
It’s all the time amusing to discover new designs which can be imaginable the use of Divi. And nowadays, we will be able to be the use of Divi to discover 3-D area! Technically, we will be able to be exploring learn how to design floating modules that appear to be they’re colliding in 3-D area. This design will paintings neatly as an artistic method to wow guests by way of appearing that you’ve an “expanse” of services and products, merchandise, or assets for your website online.
Clearly, this educational won’t examine with what I consider real-life area exploration can be like. However, confidently you Divi explorers in the market might be informed a couple of issues alongside the way in which.
Contents
- 1 Sneak Peek
- 2 Obtain the Floating Modules that Collide in 3-D Area Format for FREE
- 3 Obtain For Unfastened
- 4 You could have effectively subscribed. Please test your e-mail deal with to verify your subscription and get get entry to to loose weekly Divi format packs!
- 5 Getting Began with a Premade Format
- 6 Imposing the Floating Blurbs in 3-D Area Design in Divi
- 6.1 Growing the First Row of Blurbs
- 6.2 Including Standpoint to our Phase
- 6.3 Customizing the Row
- 6.4 Adjusting the Blurb Taste and Spacing
- 6.5 Growing the 2nd Row of blurbs
- 6.6 Building up Best and Backside Phase Padding
- 6.7 The usage of Change into Choices to Dimension and Place each and every Blurb For my part
- 7 Ultimate Design
- 8 Ultimate Ideas
Sneak Peek
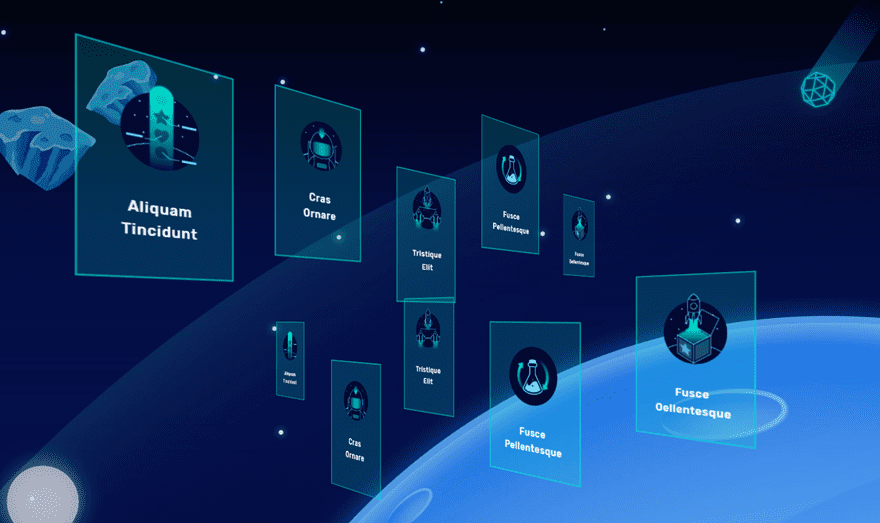
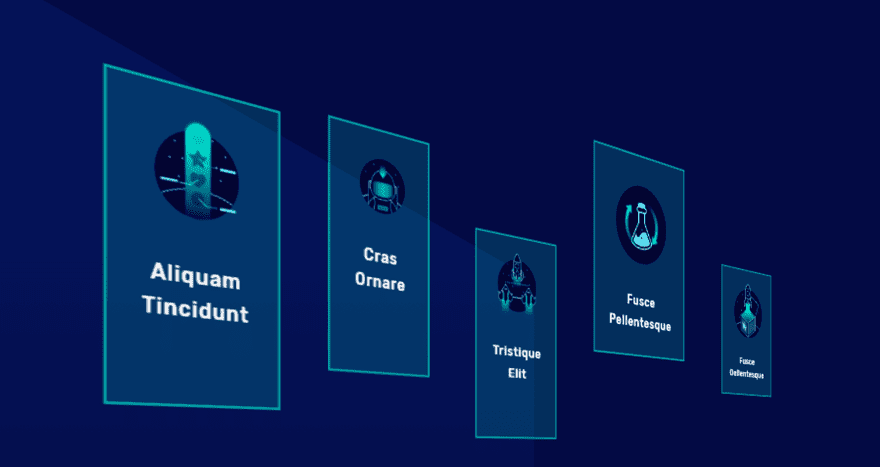
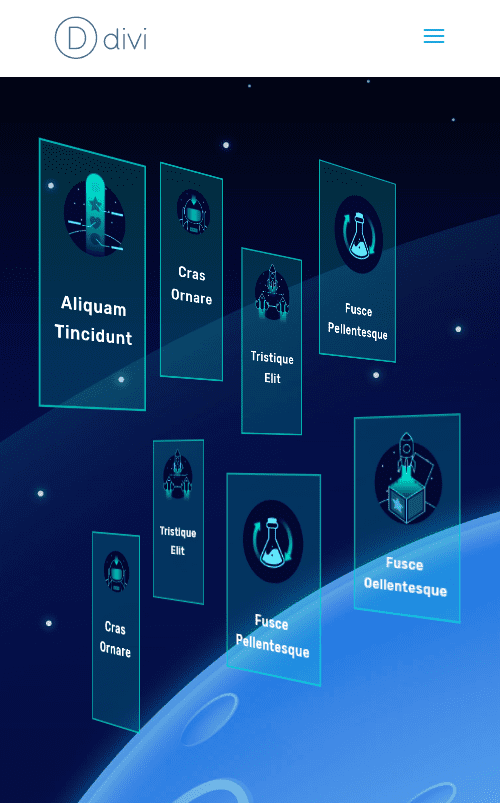
Here’s a sneak peek of the design we will be able to construct in combination.
Obtain the Floating Modules that Collide in 3-D Area Format for FREE
To put your fingers at the design constructed on this educational, you’re going to first wish to obtain it the use of the button under. To realize get entry to to the obtain it is very important subscribe to our Divi Day-to-day e-mail listing by way of the use of the shape under. As a brand new subscriber, you’re going to obtain much more Divi goodness and a loose Divi Format pack each Monday! If you happen to’re already at the listing, merely input your e-mail deal with under and click on obtain. You are going to no longer be “resubscribed” or obtain further emails.
@media best display and ( max-width: 767px ) {.et_bloom .et_bloom_optin_1 .carrot_edge.et_bloom_form_right .et_bloom_form_content:sooner than, .et_bloom .et_bloom_optin_1 .carrot_edge.et_bloom_form_left .et_bloom_form_content:sooner than { border-top-color: #ffffff !essential; border-left-color: clear !essential; }
}.et_bloom .et_bloom_optin_1 .et_bloom_form_content button { background-color: #f92c8b !essential; } .et_bloom .et_bloom_optin_1 .et_bloom_form_content .et_bloom_fields i { shade: #f92c8b !essential; } .et_bloom .et_bloom_optin_1 .et_bloom_form_content .et_bloom_custom_field_radio i:sooner than { background: #f92c8b !essential; } .et_bloom .et_bloom_optin_1 .et_bloom_border_solid { border-color: #f7f9fb !essential } .et_bloom .et_bloom_optin_1 .et_bloom_form_content button { background-color: #f92c8b !essential; } .et_bloom .et_bloom_optin_1 .et_bloom_form_container h2, .et_bloom .et_bloom_optin_1 .et_bloom_form_container h2 span, .et_bloom .et_bloom_optin_1 .et_bloom_form_container h2 sturdy { font-family: “Open Sans”, Helvetica, Arial, Lucida, sans-serif; }.et_bloom .et_bloom_optin_1 .et_bloom_form_container p, .et_bloom .et_bloom_optin_1 .et_bloom_form_container p span, .et_bloom .et_bloom_optin_1 .et_bloom_form_container p sturdy, .et_bloom .et_bloom_optin_1 .et_bloom_form_container shape enter, .et_bloom .et_bloom_optin_1 .et_bloom_form_container shape button span { font-family: “Open Sans”, Helvetica, Arial, Lucida, sans-serif; } p.et_bloom_popup_input { padding-bottom: 0 !essential;}

Obtain For Unfastened
Sign up for the Divi Newlsetter and we will be able to e-mail you a replica of without equal Divi Touchdown Web page Format Pack, plus heaps of alternative wonderful and loose Divi assets, guidelines and methods. Observe alongside and you’re going to be a Divi grasp very quickly. In case you are already subscribed merely sort to your e-mail deal with under and click on obtain to get entry to the format pack.
You could have effectively subscribed. Please test your e-mail deal with to verify your subscription and get get entry to to loose weekly Divi format packs!
To import the format for your web page, merely extract the zip document and drag the json document into the Divi Builder.
Let’s get to the academic we could?
Getting Began with a Premade Format
To get began, be sure to have the Divi theme put in and energetic. Then create a brand new web page, give the web page a name, and deploy the Divi Builder (at the entrance finish). Make a selection the choice “Make a selection a premade format”. Then make a choice the Video Recreation Touchdown Web page format and import it for your new web page.
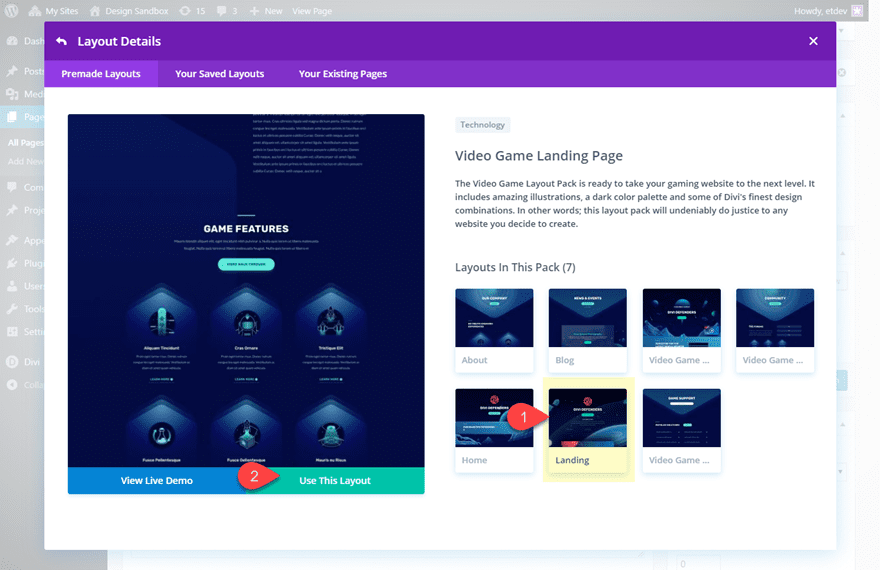
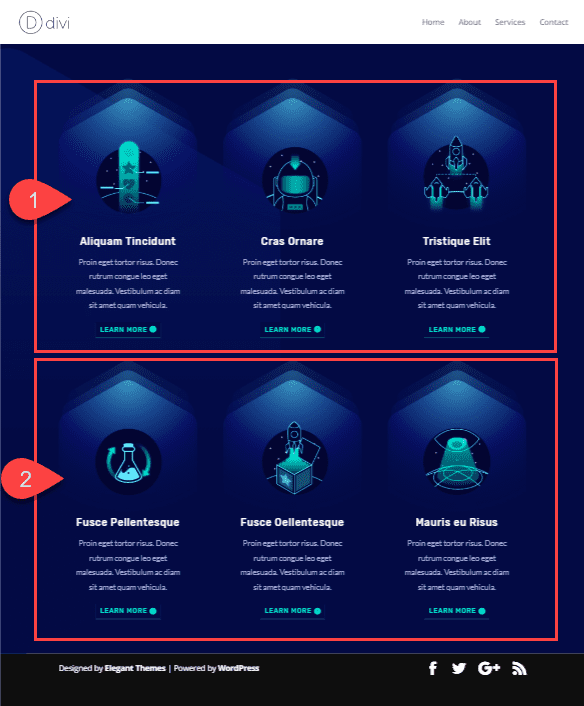
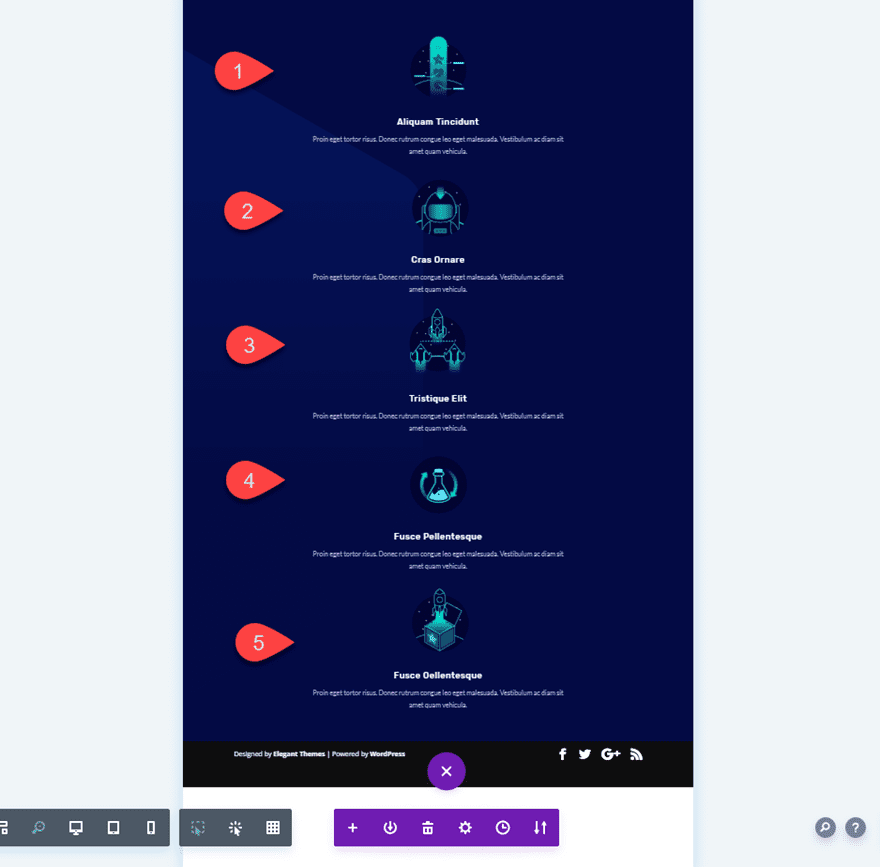
To get a head-start on our design, we’re going to be the use of the phase titled “Recreation Options” which incorporates the blurbs we’re going to use for our design. Since that is the one phase we in reality want, move forward and delete each phase and row except for the 2 rows of blurbs.
Imposing the Floating Blurbs in 3-D Area Design in Divi
Growing the First Row of Blurbs
Within the phase of the premade format containing the 2 rows of blurbs, create a brand new one-column row and drag it to the highest of the phase.

Now the use of Divi’s multiselect function (grasp ctrl/cmd whilst deciding on each and every blurb), make a choice 5 of the blurbs within the two columns under and drag them into the brand new one column row on the height of the phase.
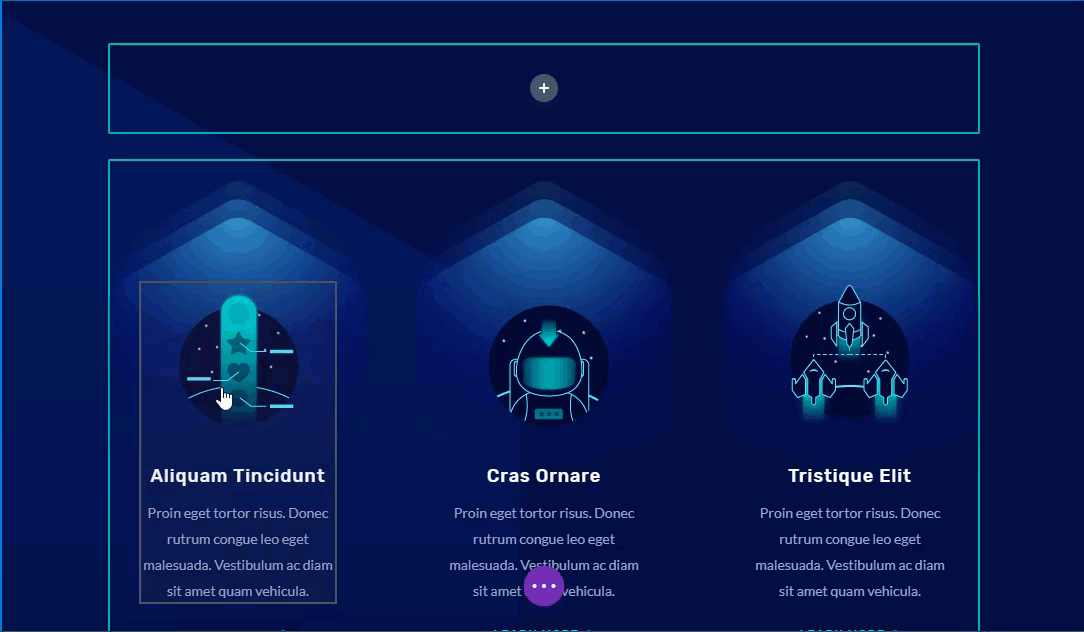
Now you’ll be able to delete the 2 rows that got here with the premade format under. After that, you’ll have just a unmarried one-column row containing 5 blurbs.
Including Standpoint to our Phase
To get the 3-D impact we’re on the lookout for on this design, we wish to upload the point of view css assets to our phase. This may increasingly upload the 3-D point of view to our row on every occasion we rotate the row the use of the develop into choices.
Open the phase settings and upload the next customized CSS to the Major Component:
point of view: 1000px;
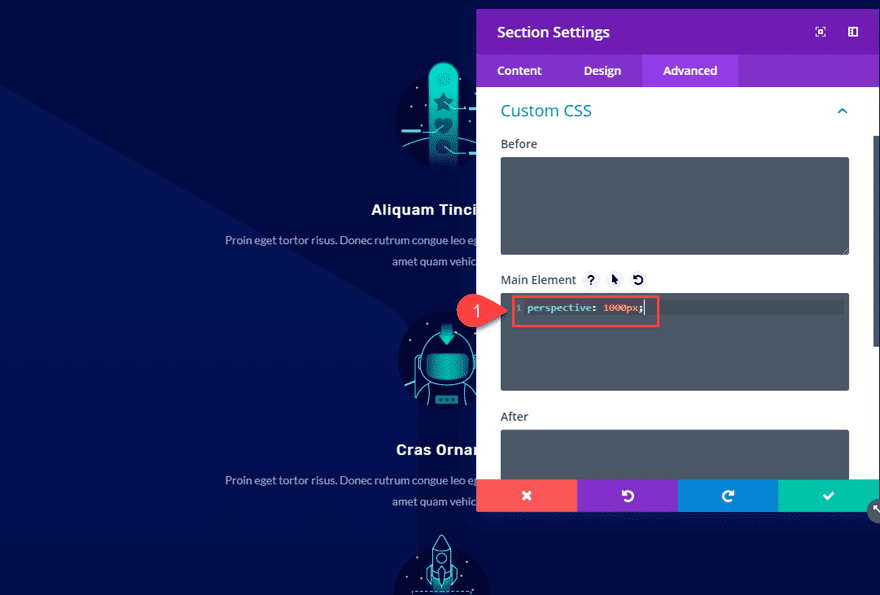
Afterward, it’s possible you’ll need to build up or lower the point of view worth to deliver the 3-D parts (on this case, the rows) nearer or farther clear of the person’s point of view when taking a look on the display.
For more information, take a look at how perspective works with transform options in Divi.
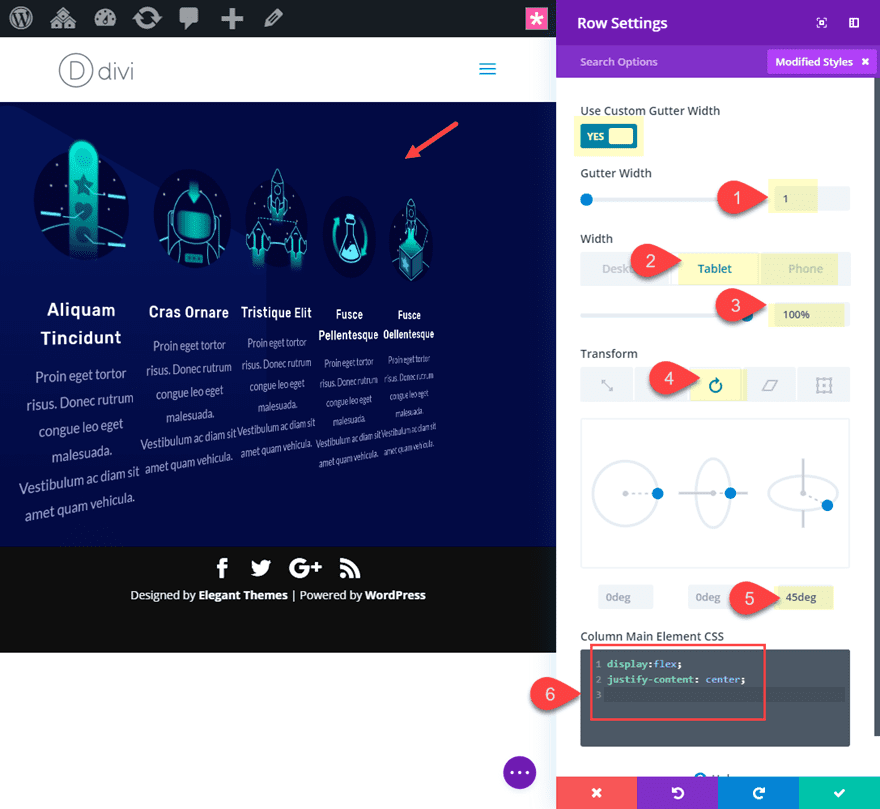
Customizing the Row
Ahead of we commence styling our blurbs, let’s first configure our row settings. There are 3 primary issues we wish to exchange on the row stage for this design:
- We wish to align our blurbs horizontally the use of “show:flex”. This may increasingly stay our design constant and responsive on all units (versus the use of a 5 column format that can ruin on pill and get in touch with).
- We wish to do away with default column margins by way of environment the gutter width to one.
- We wish to use develop into rotate to rotate the row 45 levels at the X axis. With the point of view assets added to the guardian (the phase), the row and all of its parts have the 3-D impact we’re on the lookout for.
Open the row settings and replace the next:
Gutter Width: 1
Width: 80% (desktop), 100% (pill), 100% (telephone)
Change into Rotate X axis: 45deg
Column Major Component CSS:
show: flex;
justify-content: heart;
Adjusting the Blurb Taste and Spacing
Now it’s time to regulate the content material and magnificence of our blurbs just a little.
Since we need to observe the similar customizations to all of our blurbs, use multiselect once more to choose all the blurbs and deploy the component settings modal.

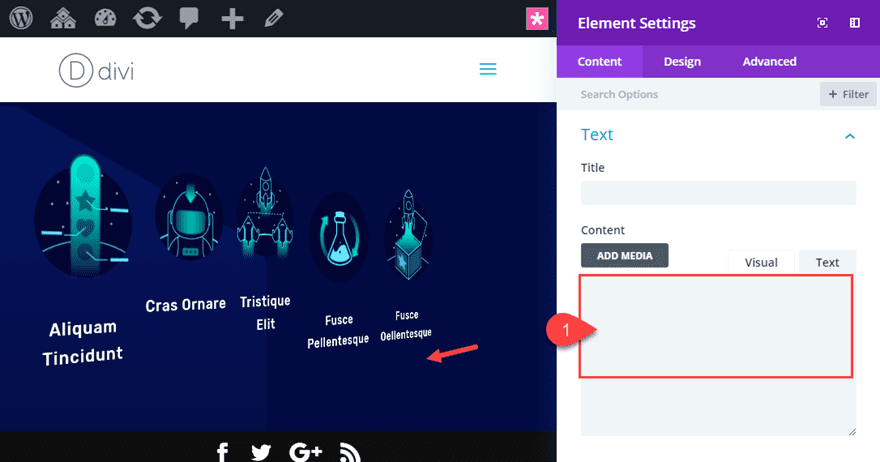
First, delete the frame content material.
Then upload a background shade:
Background Colour: rgba(20,241,217,0.16)

Then replace the next spacing:
Customized Margin (desktop): 2vw proper
Customized Margin (pill and get in touch with): 0vw proper
Customized Padding: 2% height, 2% backside, 3% left, 3% proper
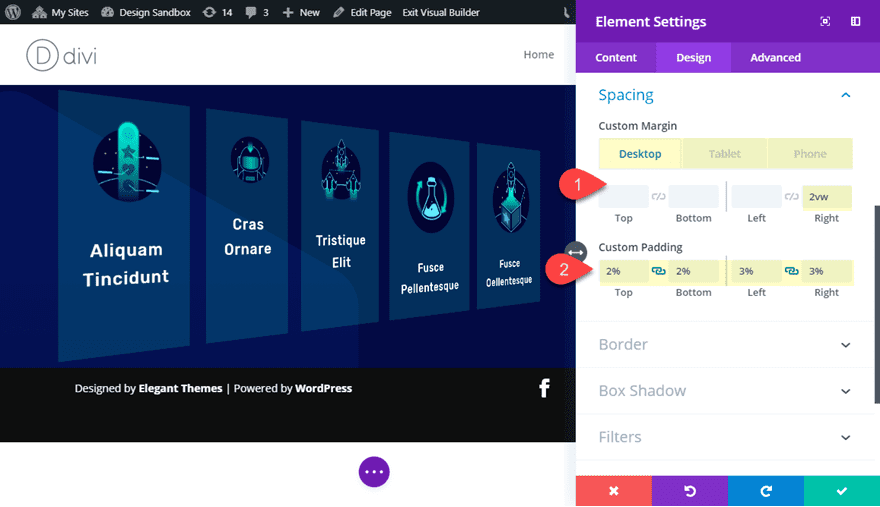
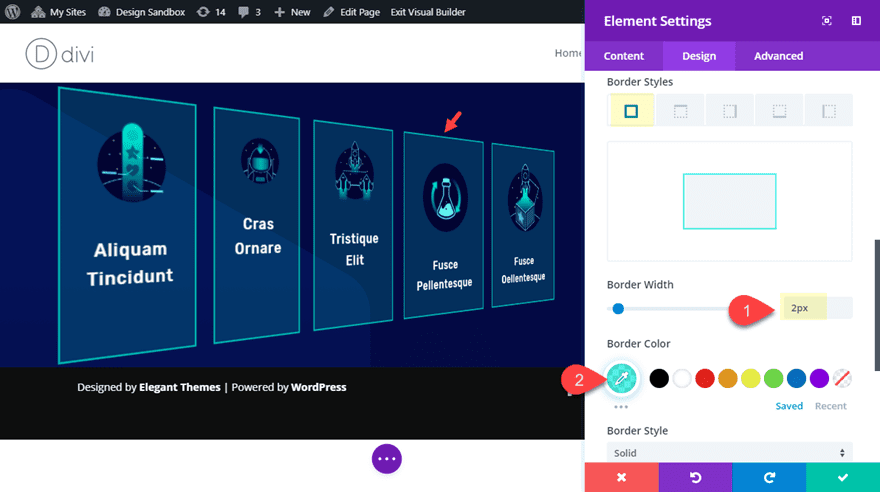
Subsequent, upload a border as follows:
Border Width: 2px
Border Colour: rgba(20,241,217,0.66)
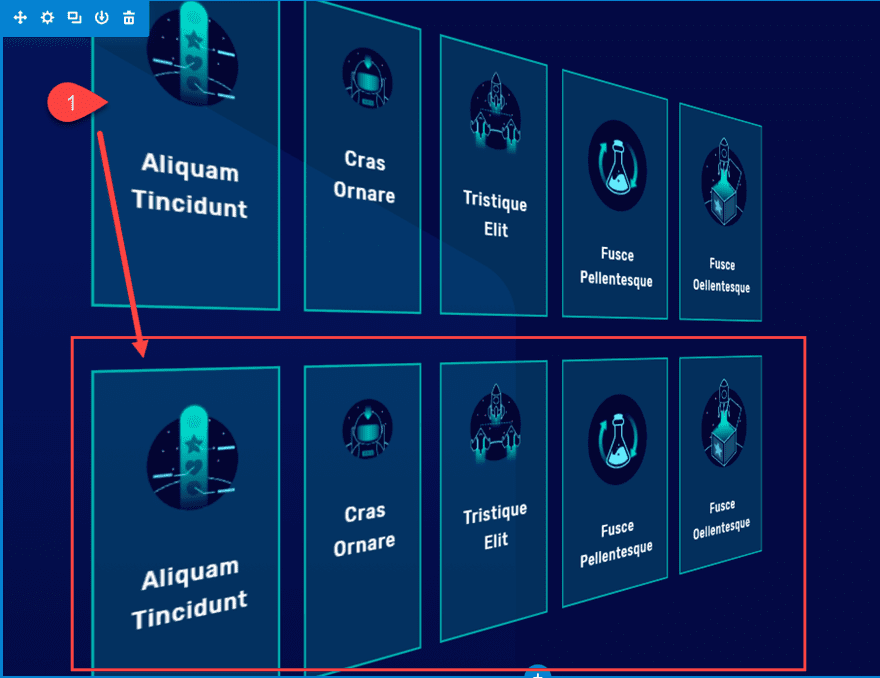
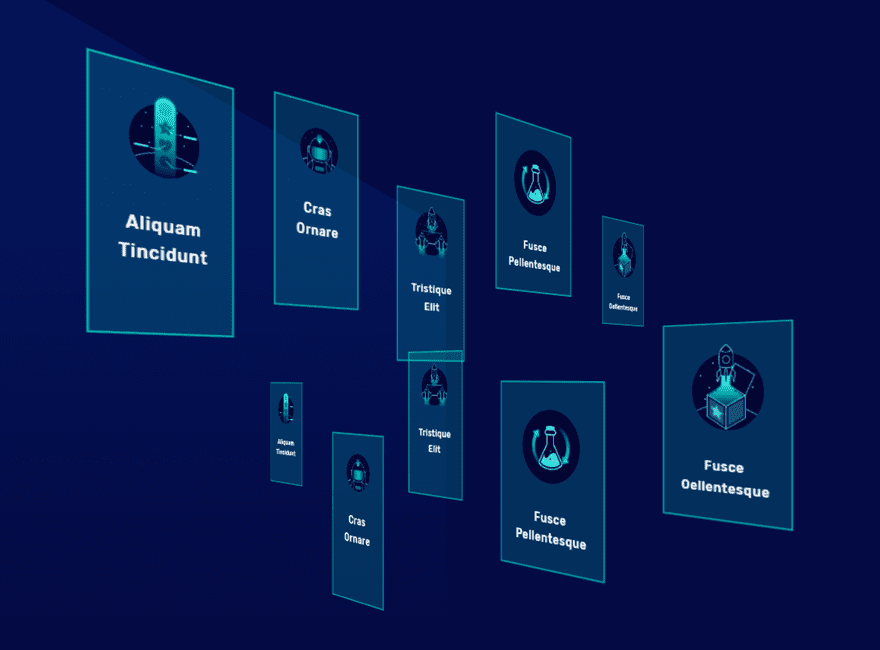
At this level, all the blurbs have the styling in position. We nonetheless wish to use the develop into choices to switch the size and place of each and every of the blurbs in my opinion which is able to upload to the 3-D floating impact of the blurbs. However sooner than we do this, let’s replica the row to create our 2nd row of blurbs.
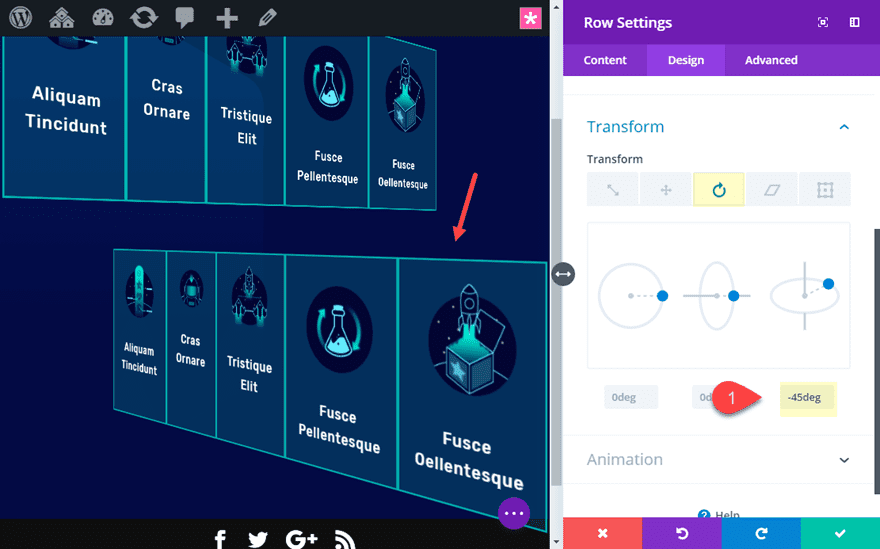
Growing the 2nd Row of blurbs
To create the second one row of blurbs, merely replica the row of five blurbs you simply custom designed.
To create a colliding impact, we will be able to rotate the duplicated row in the wrong way (-45deg).
Open the duplicated row and replace the next:
Change into Rotate X axis: -45deg
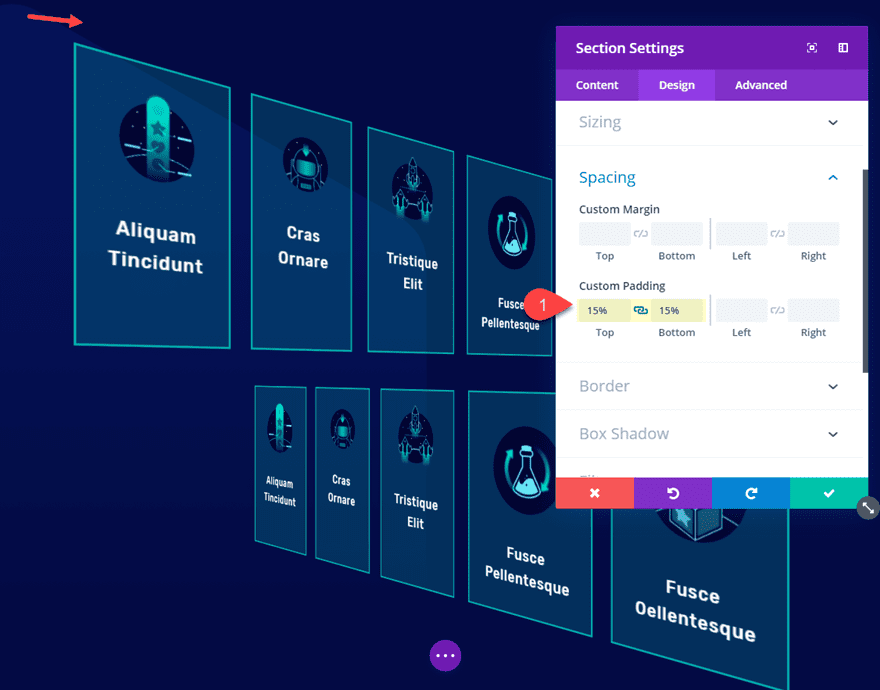
Building up Best and Backside Phase Padding
At this level, the entrance blurbs is also extending outdoor of the phase. To mend this, upload the next padding for your phase:
Customized Padding: 15% height, 15% backside
The usage of Change into Choices to Dimension and Place each and every Blurb For my part
At this level, you might be set as much as get inventive with how you wish to have each and every over your blurbs to “waft” in 3-D area. To do that, you’ll be able to use the develop into choices to measurement and place each and every blurb one at a time precisely the place you wish to have it. By way of doing this, your blurbs will seem to have other depths in 3-D area.
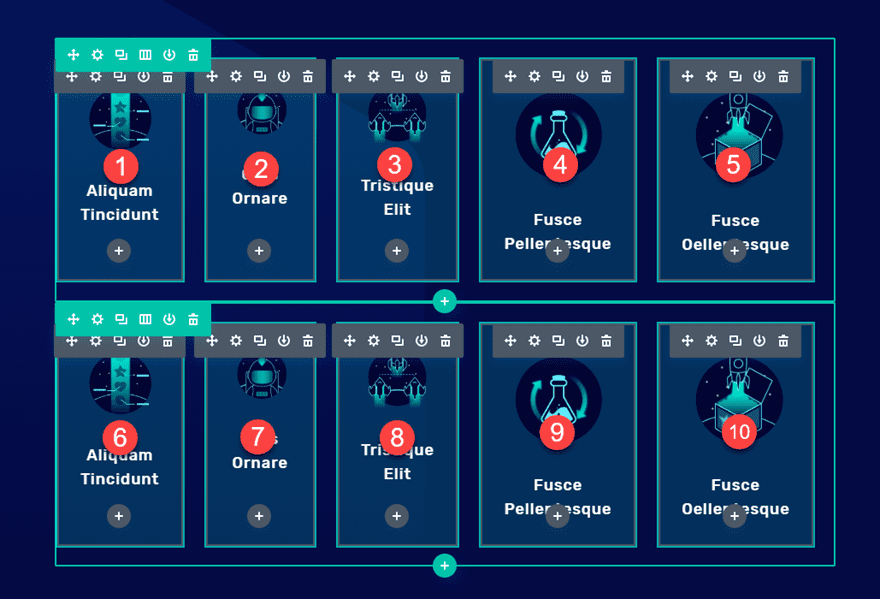
To make issues more straightforward, I’m going to quantity the blurbs from 1-10 beginning with the some distance left blurb within the height row (Blurb #1) and finishing with the some distance proper blurb in the second one row (Blurb #10).
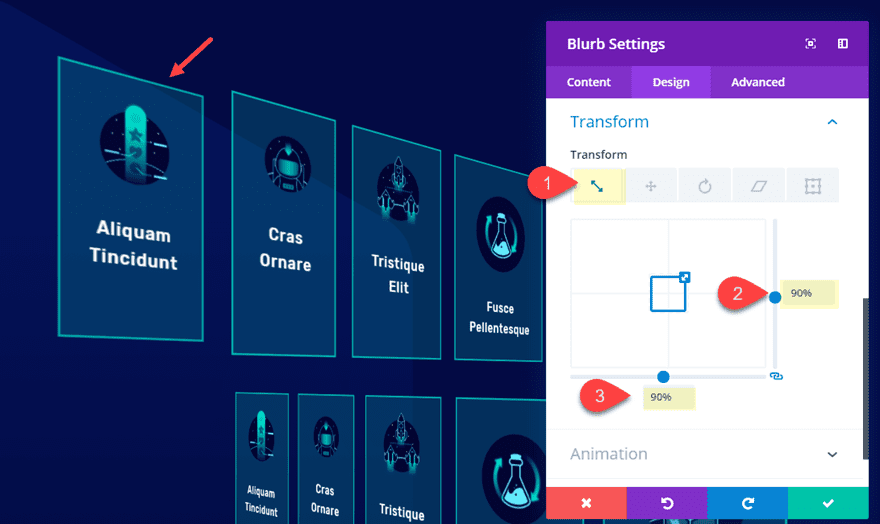
Blurb #1
Let’s delivery with our first blurb within the height row. Open the blurb settings and replace the next:
Change into Scale (x and y axis): 90%
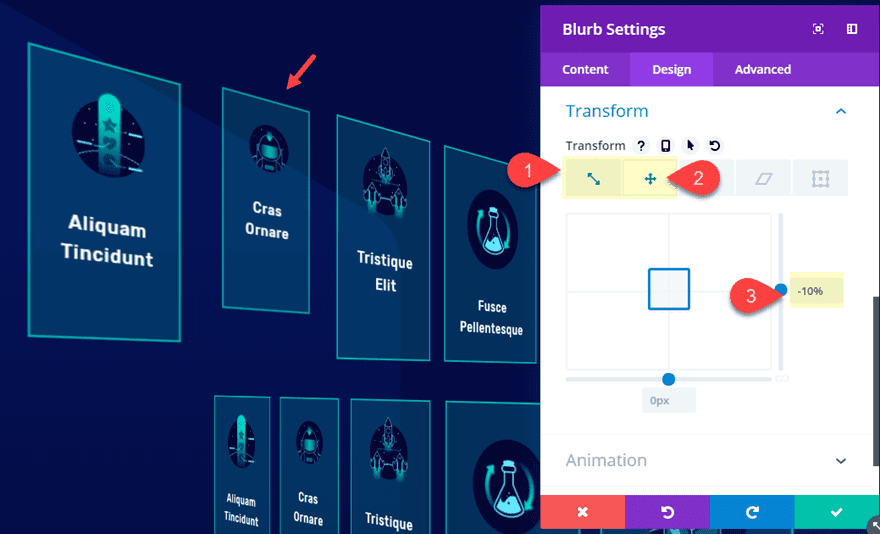
Blurb #2
Open the settings for Blurb #2 and replace the next:
Change into Scale (x and y axis): 80%
Change into Translate X axis: -10%
Blurb #3
Change into Scale (x and y axis): 80%
Change into Translate X axis: 20%
Blurb #4
Change into Scale (x and y axis): 85%
Change into Translate X axis: -30%
Blurb #5
Change into Scale (x and y axis): 60%
As soon as executed, your first row will have to glance one thing like this.
Proceed customizing the develop into choices for blurbs 6-10, beginning with blurb #6 at the some distance left of the second one row.
Blurb #6
Change into Scale (x and y axis): 60%
Change into Translate X axis: -40%
Change into Translate Y axis: -20%
Blurb #7
Change into Scale (x and y axis): 90%
Change into Translate X axis: 20%
Blurb #8
Change into Scale (x and y axis): 70%
Change into Translate X axis: -50%
Blurb #9
Change into Scale (x and y axis): 80%
Change into Translate X axis: -20%
Blurb #10
Change into Scale (x and y axis): 70%
Change into Translate X axis: -60%
Now let’s take a look at how the second one row seems because it collides with our first row in 3-D area.
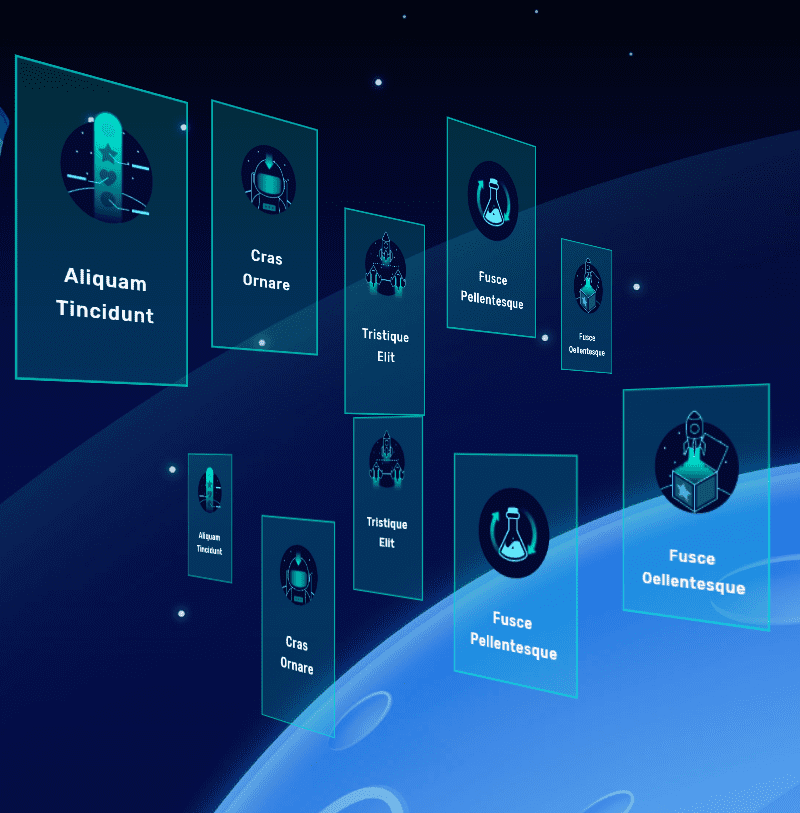
To finish the design, we will be able to upload a pleasing 3-D area background symbol to the phase. I’m the use of the highest phase background symbol that got here with the Video Recreation Touchdown Web page format we used for this educational.
Ultimate Design
Now let’s take a look at the general design of our 3-D floating modules.
Desktop

Pill
Telephone
As a result of the 5 blurbs stretching around the row, it is a bit more of a problem to suit all 5 blurbs with out it extending outdoor the viewport. To mend this you’ll be able to merely cover the some distance blurb in each and every row on telephone. Or you’ll be able to give each and every of your blurbs a smaller measurement on telephone.
Ultimate Ideas
I am hoping this educational gives you some inspiration for learn how to create your individual floating modules in 3-D Area. All it in reality takes is a couple of steps to get your whole row of modules turned around in 3-D the use of point of view and develop into choices. After that, you’ll be able to place each and every of the modules to waft them any place you wish to have.
Have amusing exploring.
I sit up for listening to from you within the feedback.
Cheers!
The put up How to Create Floating Modules that Collide in 3D Space in Divi gave the impression first on Elegant Themes Blog.
WordPress Web Design