Divi’s new background choices have unlocked an exhilarating new international of probabilities for Divi customers. The brand new gradient builder lets in makes it simple to create any form of gradient we would like with as many colours as we would like. However that is only one layer of creativity. We will mix the Gradient Builder design with background masks and patterns to create numerous distinctive and surprising background designs on your web site.
Lately we’re going to display you methods to mix Divi’s Background Gradient Builder with background mask and patterns to create a good looking background design. We’ll display you methods to upload each and every of the background design parts (background gradient, mask and patterns) to a bit. Plus, we’ll display how simple and a laugh it may be to modify the design combos with a couple of easy clicks.
Let’s have some a laugh!
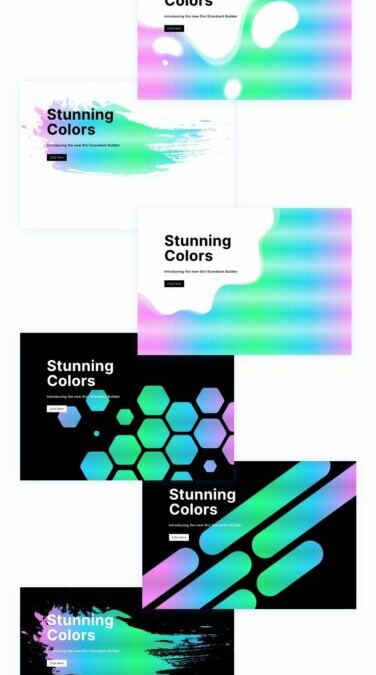
Sneak Peek
Listed here are a couple of instance designs we will construct the use of this instructional.

With this design in position, you’ll be able to simply alternate patterns and mask with a couple of clicks!
Obtain the Structure for FREE
To put your palms at the format design from this instructional, you’re going to first wish to obtain it the use of the button underneath. To achieve get admission to to the obtain it is very important subscribe to our Divi Day-to-day e mail checklist through the use of the shape underneath. As a brand new subscriber, you’re going to obtain much more Divi goodness and a unfastened Divi Structure pack each and every Monday! Should you’re already at the checklist, merely input your e mail deal with underneath and click on obtain. You’ll no longer be “resubscribed” or obtain further emails.
@media most effective display and ( max-width: 767px ) {.et_bloom .et_bloom_optin_1 .carrot_edge.et_bloom_form_right .et_bloom_form_content:sooner than { border-top-color: #ffffff !essential; border-left-color: clear !essential; }.et_bloom .et_bloom_optin_1 .carrot_edge.et_bloom_form_left .et_bloom_form_content:after { border-bottom-color: #ffffff !essential; border-left-color: clear !essential; }
}.et_bloom .et_bloom_optin_1 .et_bloom_form_content button { background-color: #f92c8b !essential; } .et_bloom .et_bloom_optin_1 .et_bloom_form_content .et_bloom_fields i { coloration: #f92c8b !essential; } .et_bloom .et_bloom_optin_1 .et_bloom_form_content .et_bloom_custom_field_radio i:sooner than { background: #f92c8b !essential; } .et_bloom .et_bloom_optin_1 .et_bloom_border_solid { border-color: #f7f9fb !essential } .et_bloom .et_bloom_optin_1 .et_bloom_form_content button { background-color: #f92c8b !essential; } .et_bloom .et_bloom_optin_1 .et_bloom_form_container h2, .et_bloom .et_bloom_optin_1 .et_bloom_form_container h2 span, .et_bloom .et_bloom_optin_1 .et_bloom_form_container h2 sturdy { font-family: “Open Sans”, Helvetica, Arial, Lucida, sans-serif; }.et_bloom .et_bloom_optin_1 .et_bloom_form_container p, .et_bloom .et_bloom_optin_1 .et_bloom_form_container p span, .et_bloom .et_bloom_optin_1 .et_bloom_form_container p sturdy, .et_bloom .et_bloom_optin_1 .et_bloom_form_container shape enter, .et_bloom .et_bloom_optin_1 .et_bloom_form_container shape button span { font-family: “Open Sans”, Helvetica, Arial, Lucida, sans-serif; } p.et_bloom_popup_input { padding-bottom: 0 !essential;}

Obtain For Loose
Sign up for the Divi E-newsletter and we will be able to e mail you a duplicate of without equal Divi Touchdown Web page Structure Pack, plus heaps of different superb and unfastened Divi sources, pointers and tips. Practice alongside and you’re going to be a Divi grasp very quickly. In case you are already subscribed merely kind for your e mail deal with underneath and click on obtain to get admission to the format pack.
You might have effectively subscribed. Please take a look at your e mail deal with to verify your subscription and get get admission to to unfastened weekly Divi format packs!
To import the phase format in your Divi Library, do the next:
- Navigate to the Divi Library.
- Click on the Import button on the height of the web page.
- Within the portability popup, make a choice the import tab
- Select the obtain record out of your pc (be sure to unzip the record first and use the JSON record).
- Then click on the import button.

As soon as completed, the phase format shall be to be had within the Divi Builder.
Let’s get to the academic, lets?
What You Wish to Get Began
To get began, it is very important do the next:
- Should you haven’t but, install and activate the Divi Theme.
- Create a brand new web page in WordPress and use the Divi Builder to edit the web page at the entrance finish (visible builder).
- Select the choice “Construct From Scratch”.
- Now have a clean canvas to begin designing in Divi!

Use Mix Background Gradients, Mask, and Patterns in Divi
1. Create the Structure Construction
For this design, we’re going to create a bit with a headline and a decision to motion at the left. Our visible design shall be created through the use of a mix of Divi’s background choices. However sooner than we get into that, we wish to create a two-column row.

2. Upload the Headline and Name to Motion
Within the left column (column 1), upload a textual content module on your major heading, a textual content module on your subheading textual content, and a button module on your button.

If you wish to know the precise design settings for those, be happy to obtain the format and test it out for your self at over again. For as of late, we’re going to be aware of the background design.
3. Upload Vertical Spacing to the Segment
To ensure that our background design to fill the browser, we wish to upload some vertical top to the phase. A very easy manner to do this is so as to add padding to the highest and backside of the phase.
Open the settings for the phase. Underneath the design tab, replace the padding as follows:
- Padding: 10vw height, 30vw backside

Remember the fact that chances are you’ll wish to regulate the padding on pill and contact show if you wish to regulate the background design as soon as the columns stack vertically.
4. Upload a Background Gradient The usage of the Gradient Builder
Subsequent, we will upload a customized background gradient to the phase. For this gradient, we’re going to upload 5 gradient stops which are spaced out beautiful flippantly. The primary and ultimate gradient stops may have the similar purple coloration. The second one and fourth gradient stops may have the similar blue coloration. And the 1/3 (heart) gradient forestall may have a inexperienced coloration. Those 5 colours will create a good looking multicolored gradient for our background design.
Gradient Prevent #1
So as to add the primary gradient forestall, be sure you have the phase settings open beneath the content material tab. Then make a choice the gradient tab and click on so as to add a brand new gradient. This may increasingly upload two default gradient colours. Click on at the first gradient at the left and replace the colour and place as follows:
- Gradient Prevent Colour: #fa8bff
- Gradient Prevent Place: 10%

Gradient Prevent #2
So as to add the second one gradient forestall, click on at the gradient coloration line so as to add a brand new gradient forestall. Then replace the colour and drag it into place as follows:
- Gradient Prevent Colour: #2bd2ff
- Gradient Prevent Place: 30%

Gradient Prevent #3
So as to add the 1/3 gradient forestall, click on at the gradient coloration line so as to add a brand new gradient forestall (across the heart of the road). Then replace the colour and drag it into place as follows:
- Gradient Prevent Colour: #2bff88
- Gradient Prevent Place: 55%

Gradient Prevent #4
So as to add the second one gradient forestall, click on at the gradient coloration line so as to add a brand new gradient forestall. Then replace the colour and drag it into place as follows:
- Gradient Prevent Colour: #2bd2ff
- Gradient Prevent Place: 80%

You will have the unique default gradient forestall left at the a long way proper of the gradient coloration line. To make the ultimate gradient forestall, click on at the gradient coloration forestall and replace the colour as follows (you’ll be able to depart it on the default place of 100%):
- Gradient Prevent Colour: #fa8bff
- Gradient Prevent Place: 100%

Replace Gradient Route
For this design, we’re maintaining the default Linear gradient kind. To modify the course of the linear coloration trend, replace the next:
- Gradient Route: 90deg
Now the gradient will float from left to proper.

5. Create a Background Trend for the Segment
Now that our background gradient is able, we will upload a background trend to go with the design. On this instance, we’re going to create a delicate trend the use of the Diamonds trend in a singular manner.
Underneath the patterns tab, replace the next:
- Background Trend: Diamonds
- Trend Colour: rgba(255,255,255,0.52)
- Trend Measurement: Customized Measurement
- Trend Width: 8px
- Trend Top: 15vw

This will have to come up with an concept of simply how inventive you’ll be able to get with the integrated trend. Right here we used a diamonds trend. However, as a result of we gave the trend a customized width and top, the diamonds are stretched vertically to offer it a singular design similar to sound waves.
However, there are lots of extra patterns to choose between that may glance nice with this design they usually’re just a click on away.
TIP: With background patterns, it’s usually higher to stay it delicate. Check out the use of customized sizes for patterns which are smaller after which drop the opacity of the colour. That mentioned, don’t be afraid to suppose out of doors the field like on this instance.
6. Create a Background Masks for the Segment
With our background trend in position, we’re in the end able so as to add a background masks to finish our background aggregate design. There are a host of choices and diversifications to choose between. For this case, we’re going to use the Paint masks (no less than initially).
Underneath the mask tab, replace the next:
- Masks: Paint
- Masks Colour: #ffffff
- Masks Grow to be: Rotate
- Masks Measurement: Quilt

This is the outcome up to now…

And, identical to with patterns, there are lots of extra mask to choose between that may glance nice with this design they usually’re just a click on away.
Extra Chances
Invert the Masks
For a distinct glance, you’ll be able to invert the masks beneath the masks turn into possibility. This may increasingly display extra of the gradient within the background and make the textual content stand out a little bit extra.

Listed here are a couple of examples of inverted mask…


Create a Darkish Model
If you wish to have a dismal model of this design, merely alternate the background masks coloration to a dismal coloration (like black). Give the trend coloration to a darker coloration. Then alternate the headline and subheader textual content to white. And you will wish to replace the button coloration as neatly.
Here’s what the darkish model looks as if the use of a couple of other mask.


And this is an instance of a dismal model with an inverted masks.

Check out Extra Gradients!

There are such a large amount of extra colours and gradient sorts you’ll be able to use to make those background designs stand out. You’ll be able to take a look at our live demos of extra background gradient design probabilities that are additionally Get More Background Mask and Pattern Designs!
If you want more designs like this one, check out these 12 background mask and pattern designs free for download. releases/advanced-gradient-builder”>to be had for obtain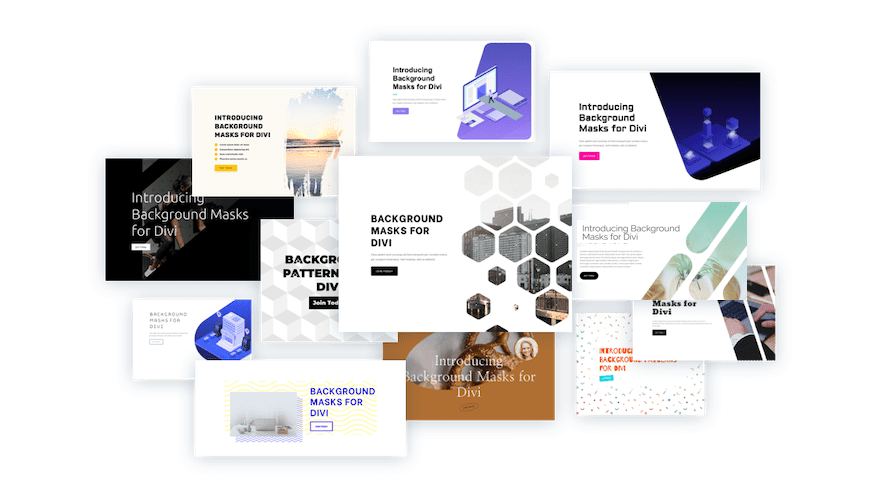
Ultimate Effects
This is every other have a look at the designs we will simply create the use of the stairs above.
And don’t omit, with this design in position, you’ll be able to simply alternate patterns and mask with a couple of clicks!
Ultimate Ideas
Combining Divi’s progressed background choices is a large number of a laugh. And, it’s superb how simple it’s to create such gorgeous background designs with out ever having to make use of third-party tool like Photoshop or Illustrator. The background choices are simple to tweak to get the design excellent. And there are such a large amount of different choices you’ll be able to use (like mix modes) to create much more distinctive background designs. Plus, you’ll be able to upload mask and patterns to any Divi part, no longer simply sections. So have a laugh experimenting!
For extra, take a look at our characteristic free up posts on the gradient builder and background masks and patterns. You might also in finding it useful to grasp how to use masks and patterns to design a hero section.
I look ahead to listening to from you within the feedback.
Cheers!
.inline-code{padding: 0px 4px; coloration: purple; font-family: Monaco,consolas,bitstream vera sans mono,courier new,Courier,monospace!essential} video.with-border {border-radius: 8px;box-shadow: 0 8px 60px 0 rgba(103,151,255,.11), 0 12px 90px 0 rgba(103,151,255,.11);show:block;margin: 0 auto;}
The put up How to Combine Divi’s Background Gradient Builder, Masks and Patterns gave the impression first on Elegant Themes Blog.
WordPress Web Design