Are you in search of a strategy to repair ‘Error 521’ with WordPress and Cloudflare?
Should you’re seeing this mistake message, then so is everybody who tries to consult with your site. That is unhealthy information for the customer revel in and your conversion charges. It should even price you your seek engine scores.
On this article, we can display you the right way to repair the 521 error with WordPress and Cloudflare.

Contents
- 1 What Reasons Error 521 with WordPress and Cloudflare?
- 2 1. Touch Your Internet hosting Supplier
- 3 2. Take a look at Whether or not Your Server Is Offline
- 4 3. Whitelist All of Cloudflare’s IP Addresses
- 5 4. Ask Your Internet hosting Supplier to Allow Port 443
- 6 5. Create and Add a Cloudflare Beginning Certificates
What Reasons Error 521 with WordPress and Cloudflare?
Should you see a 521 error when seeking to consult with your WordPress website, this implies your browser is connecting to Cloudflare effectively, however Cloudflare isn’t connecting to the server that hosts your site.
Regularly it’s because your server is offline.
There’s additionally a possibility your WordPress internet hosting server could also be on-line, however it’s blockading Cloudflare. In most cases this WordPress error occurs when a server errors Cloudflare for a safety danger. That is in most cases because of an issue with how your server or Cloudflare is about up.
However don’t fear, we’ve 5 troubleshooting steps that you’ll be able to practice to mend this mistake temporarily.
Should you’re not sure what’s inflicting your 521 error, then we advise beginning with step 1 and dealing your means throughout the each and every step. If you desire to soar immediately to a selected step, then you’ll be able to use the hyperlinks underneath.
- Contact Your Hosting Provider
- Check Whether Your Server Is Offline
- Whitelist All of Cloudflare’s IP Addresses
- Ask Your Hosting Provider to Enable Port 443
- Create and Upload a Cloudflare Origin Certificate
1. Touch Your Internet hosting Supplier
Whilst you get a 521 error, there are steps you’ll be able to take to mend the issue your self. Alternatively a few of them may also be time-consuming and technical.
With that during thoughts, the best way to mend a 521 error is by way of contacting your WordPress hosting provider. A just right internet host will have to be capable to let you know why you’re getting this mistake. They will even be capable to repair the issue for you.
Should you’re not sure the right way to touch fortify, then head over for your internet hosting supplier’s site. You’ll be able to then search for any Touch Us or Strengthen pages.

That will help you repair this downside as temporarily as conceivable, we advise opting for are living fortify choices the place to be had. As an example, live chat or business phone fortify is nearly all the time quicker than ticketing portals or electronic mail.
Should you’re not able to get fortify out of your internet hosting supplier immediately, then you’ll be able to take a look at the next steps.
2. Take a look at Whether or not Your Server Is Offline
Whilst you get a 521 error, it’s all the time price checking whether or not your server is on-line.
If it’s nonetheless on-line, then you’ll be able to take a look at different troubleshooting steps.
To do that, you’ll want to know your server’s IP address. This can be a string of numbers that identifies a work of {hardware} on a community.
You’ll be able to use this IP deal with to ‘ping’ the bodily server that hosts your WordPress site. If the server responds, you’ll know that it’s on-line.
If it doesn’t reply, then your server is offline and that is what’s inflicting your 521 error.
To get your IP deal with, you’ll want to log into your site’s regulate panel. That is in most cases provided by way of your internet hosting supplier, and is usually both cPanel or a customized panel.
When you’re logged in you’ll be able to search for any settings categorised ‘IP deal with.’
Should you’re a Bluehost buyer, you then simply want to log into your cPanel dashboard. You’ll be able to then click on on Complex within the left sidebar.

In this display, in finding the Normal Knowledge segment.
Bluehost will display your server’s IP deal with below ‘Shared IP deal with.’

Should you’re suffering to search out this IP deal with, it’s all the time price checking your internet hosting supplier’s site or on-line documentation. Many internet hosts have detailed tutorials appearing you the right way to in finding your IP deal with.
After you have this data, head over to the HTTP Header Checker software. You’ll be able to use this software to ‘ping’ your site’s server and spot whether or not it responds.
To do that take a look at, merely paste your IP deal with into the ‘URL’ box.
Then upload ‘http://’ in entrance of your IP deal with. This turns this string of numbers right into a internet deal with. As an example:
56.18.270.000
Turns into:
http://56.18.270.000

Subsequent, click on at the Take a look at button. HTTP Header Checker will now attempt to communicate for your server.
In case your server is offline, you then’ll see a message equivalent to ‘Failed to glue’ or ‘Host Now not Discovered.’
This explains why you’re getting the 521 error. On this case, you’d want to touch your internet hosting supplier to mend it.
In case your server is on-line, HTTP Header Checker will display a ‘2XX’ standing code. You might also see a ‘3XX’ standing code in case your server is on-line however is briefly redirecting to a brand new location.
In case your server is on-line, then an outage or server downtime isn’t inflicting your 521 error. If that’s the case, you’ll be able to proceed following this information to mend the mistake.
3. Whitelist All of Cloudflare’s IP Addresses
Your server could also be on-line, however blocking Cloudflare’s IP addresses. This may reason the 521 error whilst you attempt to consult with your WordPress site.
The answer is to whitelist the entire IP addresses that Cloudflare makes use of. Through whitelisting an IP deal with, you’re telling your server to permit all requests coming from that deal with.
You’ll be able to upload whitelisted IPs for your site’s .htaccess file. That is crucial configuration record that tells the server the way it will have to act.
To edit your .htaccess record, you’ll want an FTP client equivalent to FileZilla.
Should you haven’t used an FTP consumer sooner than, you could need to see our information on how to use FTP. This put up displays you ways to connect with your server the use of an FTP consumer.
When you’re hooked up for your server, you’ll want to open your site’s root folder. To achieve it, merely open the folder that displays your site’s deal with.
Subsequent, open the ‘public_html’ folder.

You will have to now see your site’s .htaccess record.
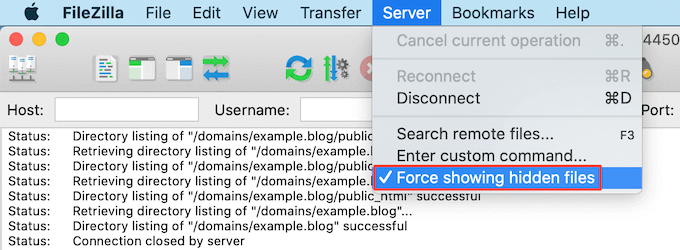
Some FTP purchasers cover delicate recordsdata by way of default. Should you don’t see an .htaccess record, you then’ll want to permit the ‘display hidden recordsdata’ possibility for your FTP consumer.
Should you’re the use of FileZilla, simply make a selection Server from the toolbar. Then click on on ‘Pressure appearing hidden recordsdata.’
Should you’re nonetheless suffering to search out .htaccess, then please see our information on how to find the .htaccess file in WordPress.
Whilst you’re able to edit this record, merely Regulate-click at the .htaccess record.
Then, make a selection View/Edit.

This may open .htaccess for your pc’s default textual content modifying program.
Inside of this record, in finding the ‘# BEGIN’ line. You’ll want to upload the entire Cloudflare IP addresses above this line.

To begin, kind the next on a brand new line:
order deny,permit

In a brand new tab, open the record of Cloudflare IP ranges.
To whitelist an IP deal with, you’ll want to kind ‘permit from’ after which both replica/paste or kind the IP deal with. Because of this:
103.21.244.0/22
Turns into:
permit from 103.21.244.0/22
You’ll additionally want to upload each and every IP deal with on a brand new line.

After including the entire Cloudflare IP addresses, save your adjustments. You’ll be able to now shut the .htaccess record.
Now you’ll be able to move forward and consult with your website, to look whether or not this has fastened ‘Error 521.’
4. Ask Your Internet hosting Supplier to Allow Port 443
Cloudflare has a couple of other encryption modes.
Did you turn to Complete or Complete (Strict) mode, proper sooner than getting the 521 error? This may increasingly have brought about the issue.
When Cloudflare is in Complete or Complete (Strict) mode, it wishes get admission to to port 443. Alternatively, some servers save you Cloudflare from getting access to this port, which can cause the ‘Error 521′ error.
The answer is to permit port 443 in your server.
This procedure will range relying in your internet hosting supplier and your server’s settings. With that during thoughts, we advise contacting your internet hosting supplier and asking them to permit port 443 for you.
5. Create and Add a Cloudflare Beginning Certificates
Even with port 443 enabled, you should still get the 521 error when the use of Cloudflare’s Complete or Complete (Strict) mode.
It is because some servers handiest permit connections on port 443 when you’ve got a legitimate Cloudflare Origin Certificate. This certificates encrypts the site visitors between Cloudflare and your internet server.
Should you don’t supply an Beginning Certificates, you will get an ‘Error 521.’
The excellent news is that Cloudflare can stroll you throughout the procedure of making this certificates, step-by-step.
To get began, log into your Cloudflare account. Then move to SSL/TLS » Beginning Server.

Subsequent click on at the Create Certificates button.
Cloudflare will now ask for a non-public key and a Certificates Signing Request (CSR).
Do you have already got a non-public key and CSR? Then merely make a selection the ‘Use my non-public key and CSR’ checkbox.

You’ll be able to now kind your CSR into the ‘Certificates Signing Request (CSR)’ field.
Should you don’t have a CSR and key, don’t panic! Cloudflare can create those two issues for you.
To get began, make a selection ‘Generate non-public key and CSR with Cloudflare.’

You’ll be able to now make a selection whether or not to create an RSA key or an ECC key.
Maximum safety mavens agree that ECC and RSA are similarly protected. Alternatively, ECC has a shorter key period. Because of this ECC keys are quicker.
Because of this, we advise you create an ECC key.
When you’ve made your choice, open the ‘Personal key kind’ dropdown. You’ll be able to then make a selection both RSA or ECC.

Subsequent, scroll to the Hostnames box. Right here you’ll be able to upload the entire hostnames that you wish to have to give protection to. This may increasingly sound difficult, however Cloudflare does a large number of the be just right for you.
You’ll see that Cloudflare has already added your root domain name.
Cloudflare additionally routinely provides a wildcard, which is your site’s area plus a * image. This can be a ‘catch-all’ that makes positive your subdomains are correctly safe. As an example, in case your root area is ‘www.instance.com’ then this wildcard will make sure that your ‘retailer.youurwebsite.com’ subdomain could also be safe. For extra main points, see our complete guide to subdomains.
Those default values will have to be sufficient to give protection to maximum web pages. Alternatively, if you want so as to add extra hostnames then you’ll be able to simply kind them into the ‘Hostnames’ box.

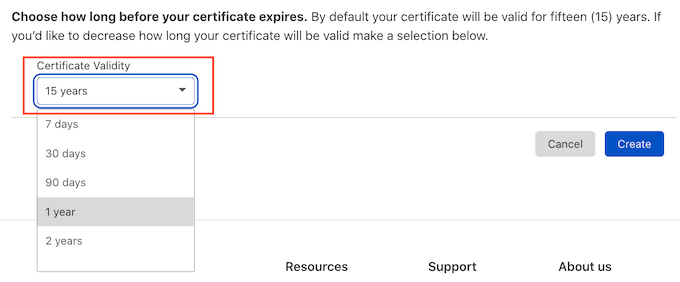
Subsequent scroll to the ‘Certificates validity’ segment.
Your certificates shall be legitimate for 15 years by way of default.
Want extra time? Then simply open the ‘Certificates validity’ dropdown and make a selection a brand new price.
Whilst you’re proud of the entire data you’ve entered, click on at the Create button.
Cloudflare will now create your certificates.

Cloudflare will then display an Beginning Certificates and Personal Key. You’ll want to replica this data into separate recordsdata.
NOTE: You received’t be capable to see the Personal Key once more after leaving this display. With that during thoughts, be sure to retailer this key someplace protected.
You’ll be able to now add your Beginning Certificates for your internet server. The stairs might range relying in your internet hosting supplier and server.
That will help you out, Cloudflare has printed instructions for the different types of web servers.
When you’ve put in the Beginning Certificates in your server, the overall step is updating your SSL/TLS encryption mode.
To your Cloudflare dashboard, move to SSL/TLS.

Now in finding the ‘SSL/TLS encryption mode’ segment.
On this segment make a selection ‘Complete (strict).’

Cloudflare is now the use of your Beginning Certificates. You’ll be able to now test your website to look whether or not this has fastened the ‘Error 521’
We are hoping this text helped you discover ways to repair ‘Error 521’ with WordPress and Cloudflare. You might also need to see our information on best managed WordPress hosting in the event you’d like your internet hosting corporate to take care of the technical main points, or see our roundup of the best business VoIP providers for small companies.
Should you appreciated this text, then please subscribe to our YouTube Channel for WordPress video tutorials. You’ll be able to additionally in finding us on Twitter and Facebook.
The put up How to Fix Error 521 with WordPress and Cloudflare first seemed on WPBeginner.
WordPress Maintenance