Believe spending hours making a Google Sheet to proportion along with your staff, simplest to seek out {that a} staff member by chance deleted a very powerful column, row, cellular, or, even worse — a whole sheet.
![→ Access Now: Google Sheets Templates [Free Kit]](https://wpfixall.com/wp-content/uploads/2022/01/e7cd3f82-cab9-4017-b019-ee3fc550e0b5.png.webp)
That may be irritating. Alternatively, it is solely preventable when you lock cells in Google Sheets.
Because it seems, with only a few clicks of a mouse, you’ll lock cells and full sheets in Google Sheets — which means, you and your staff can paintings at the similar sheet with out hindering the following particular person from finishing their assigned duties.
On this put up, we’ll pass over learn how to lock and free up cells in Google Sheets.
Desk of Contents
- The Advantages of Locking Cells in Google Sheets
- How one can Lock Particular Cells in Google Sheets
- How one can Lock Cells and Give Enhancing Permissions to Make a selection Customers
- How one can Lock an Complete Sheet
- How one can Display a Caution however Permit Enhancing of a Locked Cellular
- How one can Free up Cells
Contents
- 1 The Advantages of Locking Cells in Google Sheets
- 2 How one can Lock Particular Cells in Google Sheets
- 2.1 1. Proper-click at the cellular you wish to have to fasten.
- 2.2 2. Hover over “View extra cellular movements.”
- 2.3 3. Make a selection “Give protection to vary.”
- 2.4 4. Make a selection “Upload a sheet or vary” from the aspect panel.
- 2.5 5. Make a selection which cells to fasten.
- 2.6 6. Make a selection “Set permissions.”
- 2.7 7. Make a selection “Performed.”
- 3 How one can Lock Cells and Give Enhancing Permission to Make a selection Customers
- 3.1 1. Proper-click the chosen cells.
- 3.2 2. Hover “View extra cellular movements.”
- 3.3 3. Make a selection “Give protection to vary.”
- 3.4 4. Click on “Upload a sheet or vary” from the aspect panel.
- 3.5 5. Make a selection which cells to fasten.
- 3.6 6. Make a selection “Set permissions.”
- 3.7 7. Make a selection “Customized.”
- 3.8 8. Assign editors to cells.
- 4 How one can Lock an Complete Sheet
- 4.1 1. Proper-click on any cellular.
- 4.2 2. Hover over “View extra cellular movements.”
- 4.3 3. Make a selection “Give protection to vary.”
- 4.4 4. Make a selection “Upload a sheet or vary” from the aspect panel.
- 4.5 5. Click on on “Sheet.”
- 4.6 6. Make a selection “Set permissions.”
- 4.7 1. Proper-click at the cells you wish to have to fasten.
- 4.8 2. Hover over “View extra cellular movements.”
- 4.9 3. Make a selection “Give protection to vary.”
- 4.10 4. Make a selection “Upload a sheet or vary” from the aspect panel.
- 4.11 5. Make a selection which cells or sheet to set an modifying caution.
- 4.12 6. Make a selection “Set permissions.”
- 4.13 7. Make a selection “Display a caution when modifying this vary.”
- 5 How one can Free up Cells
- 6 Locking Cells in Google Sheets
The Advantages of Locking Cells in Google Sheets
Google Sheets lets in customers to fasten cells from modifying, because of this you’ll offer protection to your Sheet from any attainable injuries, together with modifying and deletion.
You’ll be able to additionally offer protection to necessary information and calculations, so you’ll leisure simple realizing the formulation to your Sheet are proper and correct.
The facility to fasten cells in Google Sheets comes with quite a lot of advantages.
Now not simplest are you able to lock cells from modifying, however you’ll additionally regulate which staff contributors can edit your report — correct right down to the very cells the ones staff contributors are allowed to control.
That is extraordinarily useful if a couple of staff contributors are operating at the similar Sheet immediately. You’ll be able to additionally replica permissions from different sheets, in case you have locked cells in different Sheets.
Let’s check out the stairs to fasten cells in Google Sheets.
How one can Lock Particular Cells in Google Sheets
Locking particular cells in Google Sheets is an easy job. Right here’s learn how to do it:
1. Proper-click at the cellular you wish to have to fasten.
After opening a brand new Google Sheet (or a Sheet you might have already been operating in), right-click at the cellular or cells you wish to have to fasten.
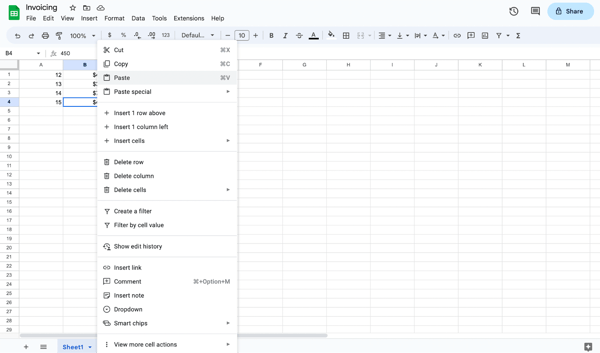
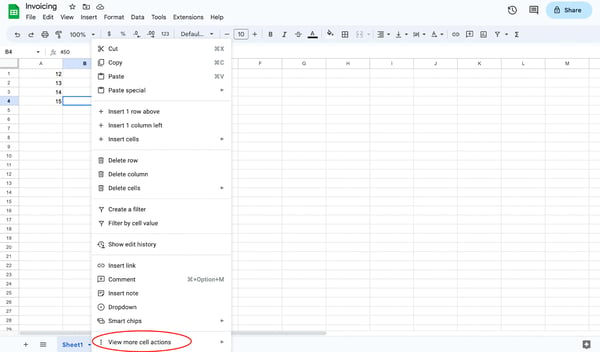
2. Hover over “View extra cellular movements.”
This selection is indexed on the backside of the dropdown menu.
Relying on the place your cells are positioned within the Sheet, you might wish to scroll down till you notice it. While you see it, hover over the “View extra cellular movements” to open up some other menu.
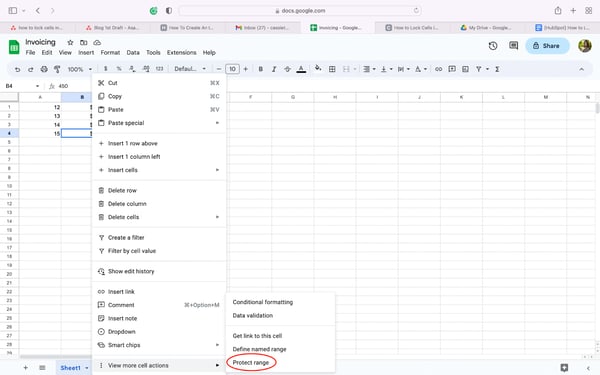
3. Make a selection “Give protection to vary.”
The following menu offers you a number of extra cellular movements. Search for the motion classified “Give protection to vary.” Make a selection “Give protection to vary” to start assigning cells to a locked standing.
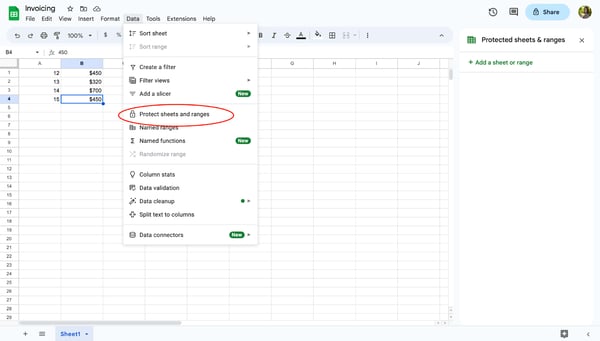
On the other hand, you’ll carry out the similar job via clicking at the Information tab and opting for “Give protection to sheets and levels.”
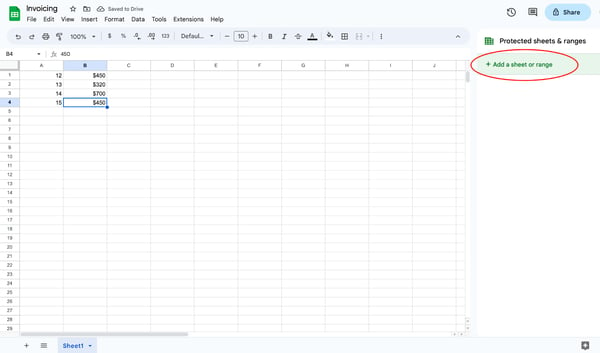
4. Make a selection “Upload a sheet or vary” from the aspect panel.
After clicking “Give protection to vary” from the dropdown menu or “Give protection to sheets and levels” from the Information tab, you’ll understand the open aspect panel at the correct of your display screen. Click on on “Upload a sheet or vary.”
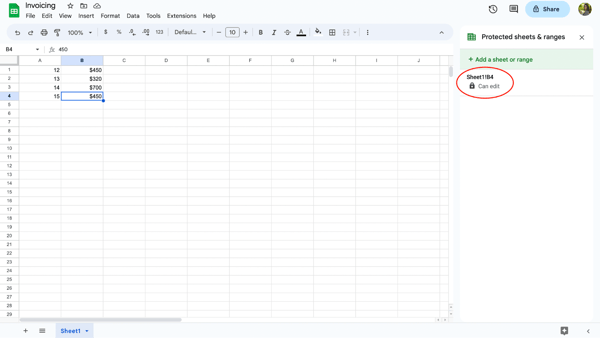
5. Make a selection which cells to fasten.
Subsequent, come to a decision which cells to fasten from modifying. When you click on the cellular you wish to have to fasten, that cellular’s knowledge might be referenced within the vary segment. If you want to fasten a spread of cells, input the variety into the sphere.

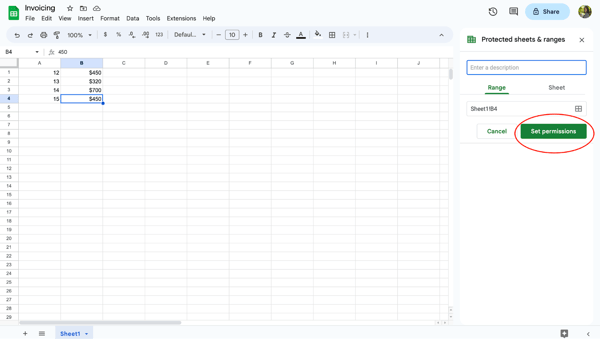
6. Make a selection “Set permissions.”
Make a selection “Set permissions” to make a choice who can edit the chosen cells. When you’re the one particular person allowed to edit the cellular, be sure you make a selection “simplest you.”
You’ll be able to additionally replica permissions from different sheets, in case you have locked cells in different Sheets.
7. Make a selection “Performed.”
While you’re completed locking cells from modifying, click on “Performed” to save lots of your personal tastes. Now, the ones cells are locked from modifying till you free up them and alter the settings.

How one can Lock Cells and Give Enhancing Permission to Make a selection Customers
When you and your staff are operating in a Google Sheet, imagine giving modifying permissions to make a choice customers. This may occasionally mean you can assign duties and higher arrange your venture and stay others from by chance deleting necessary paintings.
To fasten cells and provides modifying permission to make a choice customers, apply those steps.
1. Proper-click the chosen cells.
Make a selection the cellular or cells you wish to prohibit. Then, right-click to open up the dropdown menu.
2. Hover “View extra cellular movements.”
Scroll or glance to the ground of the dropdown menu and hover over “View extra cellular movements.” This may occasionally open some other menu for your display screen.
3. Make a selection “Give protection to vary.”
To switch a cellular’s modifying standing, make a selection “Give protection to vary.” This motion will open a facet panel menu.
4. Click on “Upload a sheet or vary” from the aspect panel.
Within the aspect panel, click on “Upload a sheet or vary.” Clicking this button will permit you to input which cells or sheets to fasten.
5. Make a selection which cells to fasten.
Decide which cells your staff member wishes to accomplish their assigned job. Then, input the variety of cells into the field.

6. Make a selection “Set permissions.”
While you’ve entered the specified cells within the field, you’ll wish to set modifying restrictions. To limit get right of entry to to the variety of cells, click on “Set permissions.”
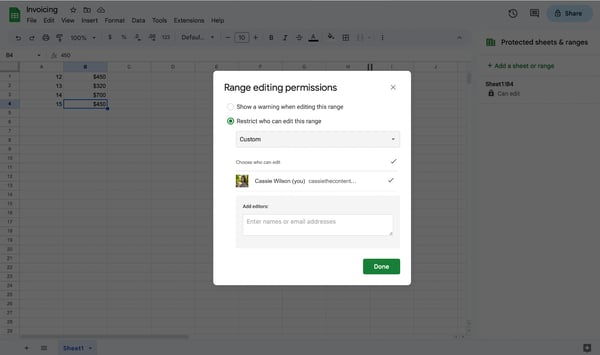
7. Make a selection “Customized.”
From this display screen, you might have the way to come to a decision who has permission to edit the variety of cells. So as to add a staff member or a couple of staff contributors, click on “Customized.”

8. Assign editors to cells.
Now, you’ll come to a decision who wishes modifying get right of entry to to the variety of cells you might have specified. Input the e-mail addresses of your staff contributors to assign them as editors of the cells. This may occasionally give them modifying get right of entry to to designated cells inside the sheet.
Remember to click on “Performed” to save lots of the variety modifying permissions.
How one can Lock an Complete Sheet
There is also occasions it is very important lock a whole sheet from modifying. Fortunately, this can be a easy procedure.
To fasten a whole sheet, you’ll right-click on any cellular inside the report to open the dropdown menu. You’ll take the similar steps to fasten a whole sheet as you probably did with locking only one cellular.
Right here’s learn how to do it:
1. Proper-click on any cellular.
Proper-click on any cellular to your Google Sheet to open a drop-down menu. To fasten a whole sheet, it does now not topic which cellular you employ to do that.
2. Hover over “View extra cellular movements.”
Make a selection the “View extra cellular movements” possibility on the backside of the dropdown menu. You don’t want to click on. Simply hover over it to open some other menu.
3. Make a selection “Give protection to vary.”
Click on “Give protection to vary” to open the permissions aspect panel. On the other hand, you’ll achieve the “Safe sheets and levels” aspect panel via clicking at the Information tab and settling on “Give protection to sheets and levels.”
4. Make a selection “Upload a sheet or vary” from the aspect panel.
Click on “Upload a sheet or vary” to start locking a whole sheet.
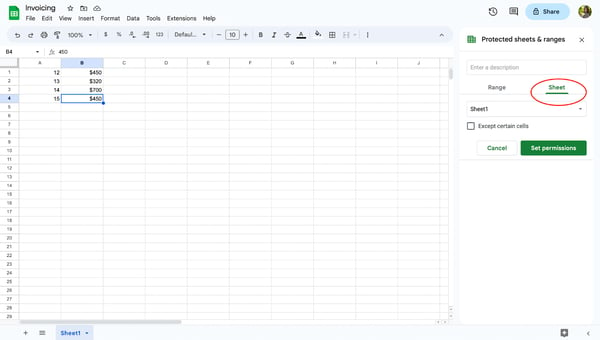
5. Click on on “Sheet.”
Click on at the “Sheet” button to fasten a whole sheet. As soon as you might be within the Sheet tab, choose which Sheet you wish to lock.
ou find a way to exclude sure cells from being locked. If you want sure cells open for modifying, click on the field for “With the exception of sure cells” and specify the variety.
6. Make a selection “Set permissions.”
Ahead of you’ll lock your Sheet, you want to set modifying permissions. Make a selection “Set permissions” to make a choice who can edit the locked Sheet. In case you are the one particular person allowed to edit the sheet, be sure you make a selection “Best you.”
While you’ve made up our minds who has modifying permissions on your Sheet, both simply you or contributors of your staff, remember to hit “Performed” to save lots of the permissions. Now your Sheet is locked and can’t be edited with out permission.

How one can Display a Caution however Permit Enhancing of Locked Cells
When you’re operating on a report concurrently with staff contributors and also you don’t need your cells to be changed, you’ll permit customers to obtain a caution sooner than accepting their edits.
To turn a caution, apply those steps:
1. Proper-click at the cells you wish to have to fasten.
For your Google Sheet, right-click at the cells you wish to have to fasten. You’ll be able to set a caution for a whole Sheet via following this procedure as smartly.
2. Hover over “View extra cellular movements.”
Scroll to the ground of the menu and hover over “View extra cellular movements.”
3. Make a selection “Give protection to vary.”
To set an modifying caution on sure cells or your Sheet, click on “Give protection to vary” to assign cells or a Sheet to a caution standing.
4. Make a selection “Upload a sheet or vary” from the aspect panel.
At the correct of your display screen, you’ll see an open aspect panel menu. Click on “Upload a sheet or vary.”
5. Make a selection which cells or sheet to set an modifying caution.
You’ll be able to set an modifying caution for a spread of cells or a whole sheet. Within the aspect panel, resolve which cells or sheets desire a caution and ensure the ideas referenced within the field suits your required cells or sheet.

6. Make a selection “Set permissions.”
After getting verified which cells or sheets must have an modifying caution, click on “Set permissions” to visit the modifying choice display screen.
7. Make a selection “Display a caution when modifying this vary.”
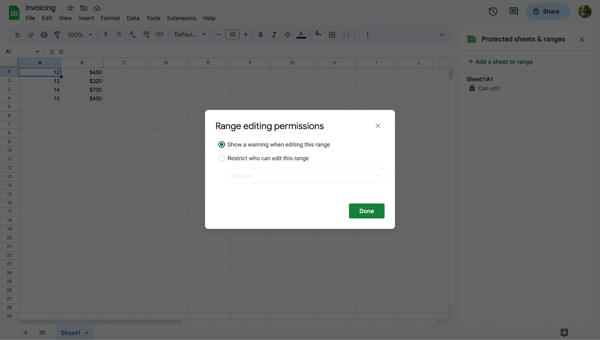
Make a selection “Display a caution when modifying this vary,” then hit “Performed” to save lots of your modifying permissions.
If a person tries to make adjustments within the semi-locked cellular or Sheet, they’re going to obtain a caution message as a heads-up. Customers should both click on “Cancel” or “Adequate” to make adjustments or revert to the unique report.

How one can Free up Cells
Locking a cellular or a Sheet is very useful in keeping up the integrity of your information. However, there might be occasions when it is very important free up a cellular to replace or alternate the ideas inside of it.
Now that you know the way to fasten cells, let’s check out learn how to free up them.
1. Proper-click at the cells you wish to have to free up.
For your Google Sheet, right-click at the cellular you want to free up. This motion opens a dropdown menu.
2. Hover over “View extra cellular movements.”
Search for the “View extra cellular movements” possibility within the drop-down menu. This selection is positioned on the backside of the dropdown menu. While you to find it, hover your mouse over the motion.
3. Make a selection “Give protection to vary.”
Like locking a cellular, you’ll nonetheless wish to click on at the “Give protection to vary” possibility. This may occasionally open a facet panel menu the place you’ll make a selection to free up the cellular.
4. Click on at the locked cellular.
Within the aspect panel menu, you’ll see an inventory of locked cells inside of your Sheet. Click on at the cellular or cellular vary that you just need to free up.
5. Click on the garbage can icon.
Subsequent, click on at the garbage can icon to the aspect of the outline field.
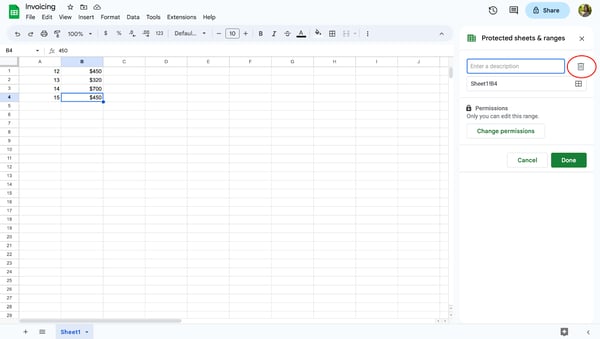
6. Make a selection “Take away.”
A caution display screen will pop up asking if you wish to take away the secure vary. In case you are certain you wish to have to free up the cellular, click on the “Take away” button.
While you click on the button, your cellular is unfastened to be edited via somebody with modifying permission for the report.

Locking Cells in Google Sheets
And there you might have it! Remember to take a little time to set modifying personal tastes and assign sure cells or sheets in your staff.
While you’ve carried out that, you and your staff can optimistically paintings at the similar Google Sheet with out being worried anyone will by chance edit or delete necessary knowledge.

![]()