In the event you’re construction a club web page, pondering during the login revel in is extremely wanted. Positive, you’ll be able to permit guests to make use of the default WordPress login web page, however you’ll be able to additionally make it more uncomplicated on them by means of together with a login variety on your header. On this case, you’ll need to cause the login variety on click on so you’ll be able to save house on your header. That’s precisely what we’ll demonstrate you in lately’s Divi educational. We’ll construct a world header from scratch and we’ll come with a dropdown login variety. You’ll be capable of obtain the JSON record without cost as smartly!
Let’s get to it.
Contents
- 1 Preview
- 2 Obtain The World Header Template for FREE
- 3 Obtain For Unfastened
- 4 You’ve got effectively subscribed. Please take a look at your e mail deal with to substantiate your subscription and get get right of entry to to unfastened weekly Divi structure packs!
- 5 1. Create New World Header Template
- 6 2. Construct Header Design
- 7 3. Upload Dropdown Login Shape & Click on Capability
- 8 4. Save Divi Theme Builder Adjustments
- 9 Preview
- 10 Ultimate Ideas
Preview
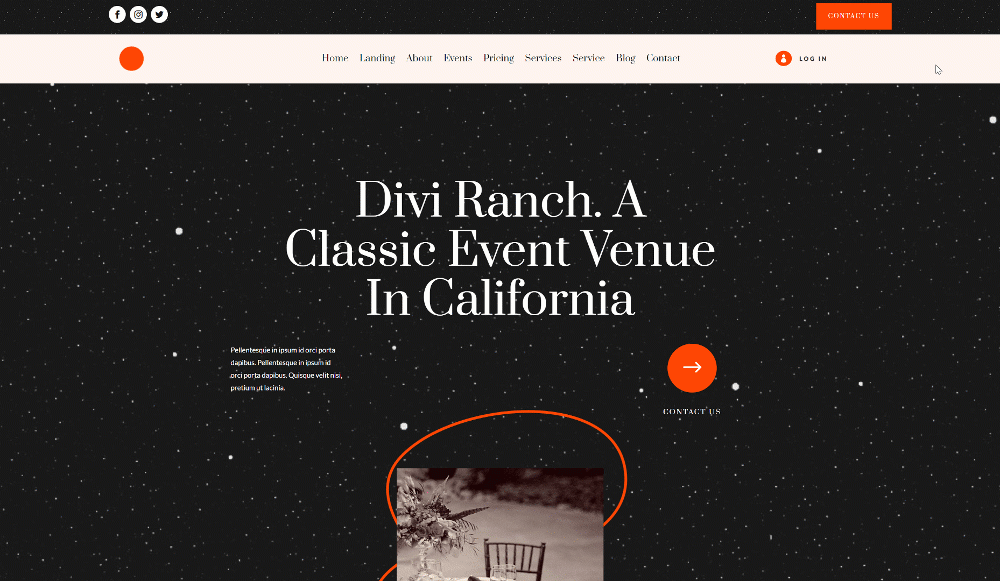
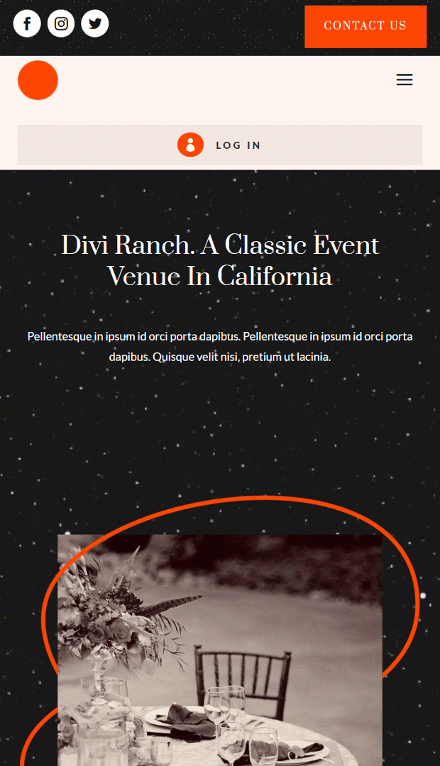
Earlier than we dive into the academic, let’s take a handy guide a rough take a look at the end result throughout other display sizes.
Desktop
Cellular
Obtain The World Header Template for FREE
To put your fingers at the unfastened world header template, you’ll first wish to obtain it the use of the button under. To realize get right of entry to to the obtain it is very important subscribe to our Divi Day-to-day e mail record by means of the use of the shape under. As a brand new subscriber, you’ll obtain much more Divi goodness and a unfastened Divi Format pack each and every Monday! In the event you’re already at the record, merely input your e mail deal with under and click on obtain. You are going to now not be “resubscribed” or obtain additional emails.
@media handiest display and ( max-width: 767px ) {.et_bloom .et_bloom_optin_1 .carrot_edge.et_bloom_form_right .et_bloom_form_content:prior to { border-top-color: #ffffff !vital; border-left-color: clear !vital; }.et_bloom .et_bloom_optin_1 .carrot_edge.et_bloom_form_left .et_bloom_form_content:after { border-bottom-color: #ffffff !vital; border-left-color: clear !vital; }
}.et_bloom .et_bloom_optin_1 .et_bloom_form_content button { background-color: #f92c8b !vital; } .et_bloom .et_bloom_optin_1 .et_bloom_form_content .et_bloom_fields i { colour: #f92c8b !vital; } .et_bloom .et_bloom_optin_1 .et_bloom_form_content .et_bloom_custom_field_radio i:prior to { background: #f92c8b !vital; } .et_bloom .et_bloom_optin_1 .et_bloom_border_solid { border-color: #f7f9fb !vital } .et_bloom .et_bloom_optin_1 .et_bloom_form_content button { background-color: #f92c8b !vital; } .et_bloom .et_bloom_optin_1 .et_bloom_form_container h2, .et_bloom .et_bloom_optin_1 .et_bloom_form_container h2 span, .et_bloom .et_bloom_optin_1 .et_bloom_form_container h2 sturdy { font-family: “Open Sans”, Helvetica, Arial, Lucida, sans-serif; }.et_bloom .et_bloom_optin_1 .et_bloom_form_container p, .et_bloom .et_bloom_optin_1 .et_bloom_form_container p span, .et_bloom .et_bloom_optin_1 .et_bloom_form_container p sturdy, .et_bloom .et_bloom_optin_1 .et_bloom_form_container variety enter, .et_bloom .et_bloom_optin_1 .et_bloom_form_container variety button span { font-family: “Open Sans”, Helvetica, Arial, Lucida, sans-serif; } p.et_bloom_popup_input { padding-bottom: 0 !vital;}

Obtain For Unfastened
Sign up for the Divi Publication and we can e mail you a duplicate of without equal Divi Touchdown Web page Format Pack, plus heaps of different wonderful and unfastened Divi assets, pointers and methods. Practice alongside and you’ll be a Divi grasp very quickly. In case you are already subscribed merely sort on your e mail deal with under and click on obtain to get right of entry to the structure pack.
You’ve got effectively subscribed. Please take a look at your e mail deal with to substantiate your subscription and get get right of entry to to unfastened weekly Divi structure packs!
1. Create New World Header Template
Move to Divi Theme Builder
Get started by means of going to the Divi Theme Builder within the backend of your WordPress web page. As soon as there, click on on “Upload World Header”.

Upload New World Header
A dropdown menu will seem. To start out construction from scratch, proceed by means of deciding on “Construct World Header”.

2. Construct Header Design
Upload Segment #1
Background Symbol
As soon as within the template editor, you’ll understand a bit there already. Open the phase settings and add a background symbol or use a background colour.

Spacing
Transfer directly to the phase’s design tab and alter the highest and backside padding subsequent.
- Most sensible Padding: 10px
- Backside Padding: 10px

Upload Row to Segment
Column Construction
Proceed by means of including a brand new row the use of the next column construction:

Sizing
With out including modules but, open the row settings and alter the sizing settings as follows:
- Use Customized Gutter Width: Sure
- Gutter Width: 1
- Equalize Column Heights: Sure
- Width:
- Desktop: 80%
- Pill & Telephone: 95%
- Max Width: 2580px

Spacing
Regulate the padding values subsequent.
- Most sensible Padding: 0px
- Backside Padding: 0px
- Left Padding: 1%
- Proper Padding: 1%

Primary Component CSS
To robotically align the columns vertically, we’ll upload the next traces of CSS code to the row’s primary component within the complex tab:
show: flex;
justify-content: heart;
align-items: heart;

Upload Social Media Practice Module to Column 1
Upload Social Networks
Time so as to add modules, beginning with a Social Media Practice Module in column 1. Upload the social networks of your selection.

Exchange Background Colour of Each and every Social Community For my part
Then, alternate every social community’s background colour in my view to white.
- Background Colour: #ffffff


Icon Settings
Return to the overall module settings and alter the icon colour within the design tab.
- Icon Colour: #141414

Border
Follow some rounded nook settings within the border settings subsequent.
- All Corners: 100px

Upload Button Module to Column 2
Upload Reproduction
In column 2, the one module we want is a Button Module. Upload some reproduction of your selection.

Button Alignment
Exchange the module’s alignment subsequent.
- Button Alignment: Proper

Button Settings
Then, taste the button.
- Use Customized Kinds For Button: Sure
- Button Textual content Dimension: 12px
- Button Textual content Colour: #ffffff
- Button Background Colour: #ff4700
- Button Border Width: 0px
- Button Border Radius: 0px
- Button Letter Spacing: 2px

- Button Font: Prata
- Button Font Taste: Uppercase

Spacing
And entire the button settings by means of making use of the next padding values to the spacing settings:
- Most sensible Padding: 16px
- Backside Padding: 16px
- Left Padding: 24px
- Proper Padding: 24px

Upload Segment #2
Background Colour
Upload some other phase proper under the former one and use the next background colour for it:
- Background Colour: #fff4ef

Spacing
Take away all default height and backside padding within the design tab subsequent.
- Most sensible Padding: 0px
- Backside Padding: 0px

Upload Row #1
Column Construction
Proceed by means of including a brand new row the use of the next column construction:

Sizing
With out including modules but, open the row settings and alter the sizing settings as follows:
- Equalize Column Heights: Sure
- Width:
- Desktop: 80%
- Pill & Telephone: 95%
- Max Width: 2580px

Spacing
Regulate the padding values within the spacing settings too.
- Most sensible Padding: 5px
- Backside Padding: 5px
- Left Padding: 2%
- Proper Padding: 2%

Column 2 Settings
Background Colour
Then, open the column 2 settings and practice a background colour on pill and contact handiest.
- Desktop: /
- Pill & Telephone: #f2e8e3


Spacing
We’re including some height and backside padding on smaller display sizes as smartly.
- Most sensible Padding:
- Pill & Telephone: 25px
- Backside Padding:
- Pill & Telephone: 25px

Upload Menu Module to Column 1
Make a selection Menu
Subsequent, we’ll upload a Menu Module to the row. Make a selection a menu of your selection.

Add Emblem
Add a symbol in your Menu Module.

Take away Background Colour
Then, take away the background colour of the menu.

Menu Textual content Settings
Transfer directly to the module’s design tab and magnificence the menu textual content as follows:
- Menu Font: Prata
- Menu Textual content Colour: #111821
- Menu Textual content Dimension: 18px
- Menu Line Top: 1.4em
- Textual content Alignment: Proper

Dropdown Menu Settings
Exchange the dropdown menu settings too.
- Dropdown Menu Background Colour: #fff4ef
- Dropdown Menu Line Colour: #191919
- Dropdown Menu Textual content Colour: #191919
- Cellular Menu Background Colour: #fff4ef
- Cellular Menu Textual content Colour: #191919

Icons Settings
Then, alternate the icon colours within the icons settings.
- Buying groceries Cart Icon Colour: #191919
- Seek Icon Colour: #191919
- Hamburger Menu Icon Colour: #191919

Sizing
And entire the module settings by means of making use of the next sizing settings:
- Emblem Max Width: 50px
- Width: 100%

3. Upload Dropdown Login Shape & Click on Capability
Upload Blurb Module to Column 2
Upload Identify
Now that the basis of our header has been constructed, we will focal point on developing the login dropdown cause and variety. The very first thing we’ll want is a Blurb Module in column 2 of our row. Right here, we’ll upload a identify.

Make a selection Icon
Subsequent, we’ll choose an icon.

Icon Settings
Transfer directly to the module’s design tab and alter the icon settings as follows:
- Icon Colour: #ffffff
- Circle Icon: Sure
- Circle Colour: #ff4700
- Symbol/Icon Placement: Left

Identify Textual content Settings
Then, taste the identify textual content.
- Identify Font: Lato
- Identify Font Weight: Heavy
- Identify Font Taste: Uppercase
- Identify Textual content Dimension: 12px
- Identify Letter Spacing: 3px

Animation
We’re additionally putting off the default animation of this module within the animation settings.
- Symbol/Icon Animation: No Animation

Blurb Identify CSS
And we’ll upload some height margin to the blurb identify within the complex tab.
margin-top: 10px;

Place
Remaining however now not least, we’ll reposition the module within the place settings.
- Place: Absolute
- Location: Heart

Upload Row #2 to Segment #2
Column Construction
So as to add the login variety, we’re going to make use of a brand new row under the former one, with the next column construction:

Sizing
With out including modules but, open the row settings and alter the sizing settings as follows:
- Equalize Column Heights: Sure
- Max Width: 2580px

Spacing
Regulate the padding values too.
- Most sensible Padding: 0px
- Backside Padding: 0px
- Left Padding: 2%
- Proper Padding: 2%

Upload Login Module to Column 2
Take away Content material
Upload a Login Module to column 2. Ensure that the content material packing containers are empty.

Background Colour
Exchange the background colour subsequent.
- Background Colour: #ff4700

Fields Settings
Transfer directly to the design tab and magnificence the fields.
- Fields Background Colour: rgba(0,0,0,0)
- Fields Textual content Colour: rgba(255,255,255,0.73)
- Fields Left Padding: 0px
- Fields Proper Padding: 0px
- Fields Font: Lato
- Fields Textual content Dimension: 16px

- Fields Line Top: 1.8em
- All Corners: 0px
- Fields Backside Border Width: 1px
- Fields Backside Border Colour: #ffffff

Button Settings
Then, alter the button settings as follows:
- Use Customized Kinds For Button: Sure
- Button Textual content Dimension: 12px
- Button Textual content Colour: #ffffff
- Button Background Colour: #141414
- Button Border Width: 0px
- Button Border Radius: 0px
- Button Letter Spacing: 2px
- Button Font: Prata

- Button Font Taste: Uppercase
- Button Most sensible Padding: 16px
- Button Backside Padding: 16px

Sizing
Ensure that the width is “100%” too.
- Width: 100%

Login Button CSS
Follow some height margin to the login button CSS field within the complex tab.
margin-top: 30px;

Place
And reposition the module accordingly:
- Place: Absolute
- Location: Most sensible Proper
- Vertical Offset: 1px

Upload CSS ID to Blurb Module in Row #1
Now that we’ve got all of the components we want, we will focal point at the click on capability. First, open the Blurb Module and upload the next CSS ID:
- CSS ID: divi-login-toggle

Upload CSS ID to Login Module in Row #2
Open the Login Module subsequent and practice the next CSS ID:
- CSS ID: divi-login-form

Upload Code Module Under Login Module
Then, upload a Code Module proper under the Login Module.

Upload Taste & Script Tags
To create the clicking capability, we’ll use some CSS and JQuery code. To arrange for that code, we’ll upload taste tags (for the CSS code) and script tags (for the JQuery code).

Insert CSS Code Between Taste Tags
Position the next traces of CSS code between the way tags:
#divi-login-toggle {
cursor: pointer;
}

#divi-login-form {
margin-top: -20px;
visibility: hidden;
opacity: 0;

-webkit-transition: all 0.2s ease !vital;
-moz-transition: all 0.2s ease !vital;
-o-transition: all 0.2s ease !vital;
transition: all 0.2s ease !vital;
}

.show-login-form {
visibility: visual !vital;
margin-top: 0px !vital;
opacity: 1 !vital;
}

Insert JQuery Between Script Tags
And the next code between the script tags:
jQuery(file).in a position(serve as($){

var loginForm =  $('#divi-login-form');

$('#divi-login-toggle').click on(serve as() {

loginForm.toggleClass('show-login-form');

});
});

4. Save Divi Theme Builder Adjustments
Now that the entirety is in position, the one factor left to do is save all Divi Theme Builder adjustments and examine the end result!


Preview
Now that we’ve long past via all of the steps, let’s take a last take a look at the end result throughout other display sizes.
Desktop
Cellular
Ultimate Ideas
On this submit, we’ve proven you the way to get inventive together with your header when construction a club web page. Extra in particular, we’ve proven you the way to come with a dropdown login variety that permits your guests to log in to their accounts with no need to visit the WordPress login web page. You had been ready to obtain the header template JSON record without cost as smartly! You probably have any questions or ideas, be at liberty to go away a remark within the remark phase under.
In the event you’re keen to be told extra about Divi and get extra Divi freebies, be sure you subscribe to our email newsletter and YouTube channel so that you’ll all the time be some of the first folks to grasp and get advantages from this unfastened content material.
The submit How to Add a Dropdown Login Form to Your Divi Header seemed first on Elegant Themes Blog.
WordPress Web Design