
Once we bring to mind the Divi Weblog module, we generally bring to mind the weblog web page. Alternatively, Divi’s Weblog module contains options that permit you to construct quite a lot of pages. Posts for Present Web page is an possibility throughout the Weblog module dynamically presentations posts. On this article, we’ll glance intently at Posts for Present Web page and spot what it does and the best way to use it.
Contents
- 1 What’s the Posts for Present Web page Choice?
- 2 The usage of the Posts for Present Web page Choice with a Weblog Template
- 3 Posts for Present Web page Effects
- 4 Every other Instance – Posts for Present Web page In response to Tags
- 5 Finishing Ideas
What’s the Posts for Present Web page Choice?
Posts for Present Web page is an possibility throughout the Content material phase of the Weblog module. It’s disabled by means of default. When enabled, among the choices inside the module alternate.

The module usually contains an possibility to select the Put up Sort. This contains Pages, Posts, Media, and Tasks. It is going to additionally come with customized put up sorts when you have any.
It additionally usually has an possibility known as Integrated Classes. This will give you an inventory of your classes so you’ll choose the ones you wish to have the module to show. This contains All Classes, which can show posts from each and every class irrespective of the class the web page is for. Another choice is Present Class. This presentations posts from the class the person decided on.
Enabling Posts for Present Web page disables the Put up Sort and Integrated Classes choices. This permits Divi to dynamically make the decisions for you. In the event you use this with dynamic content material, it’ll show posts from the class that’s decided on. That is very similar to Present Class, nevertheless it’s broader.

Posts for Present Web page works nice with Archive Templates within the Divi Theme Builder. It additionally works smartly for templates assigned to precise posts, reminiscent of a definite tag.
The usage of the Posts for Present Web page Choice with a Weblog Template
We’ll construct a easy Archive web page template that demonstrates the way it works. This template will come with a identify and two weblog modules. To create the Archive Web page template, pass to Divi > Theme Builder within the WordPress dashboard. Make a selection Upload New Template.

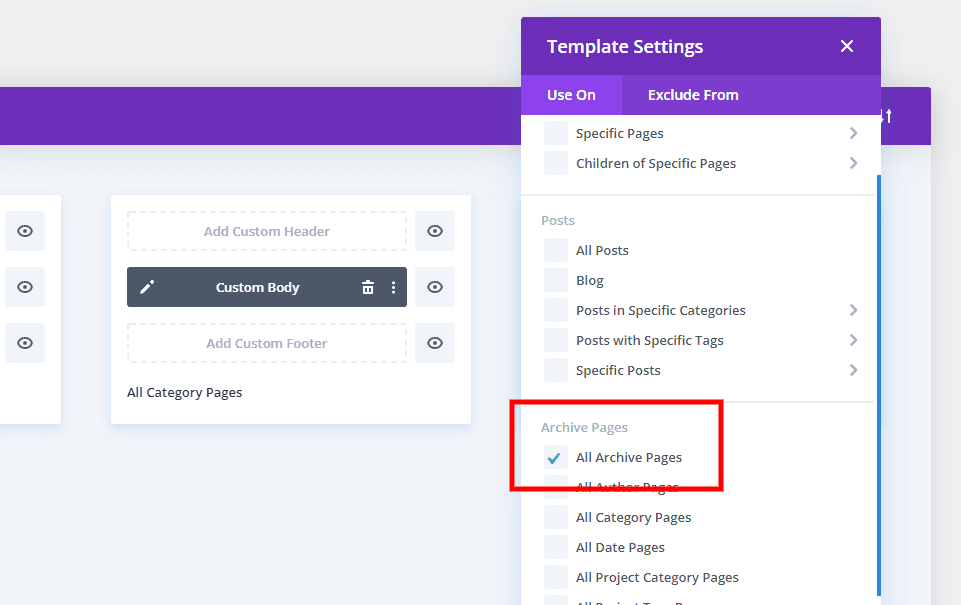
Assign to All Class Pages
A modal will open with a number of choices the place the template will probably be assigned. Below Use On, scroll all the way down to Archive Pages and choose All Class Pages. Click on Create Template on the backside of the modal. This may occasionally open the editor the place we’ll create the template.

Create the Class Template
Make a selection Construct Customized Frame. For reference, I’m the usage of the fonts and hues from the free Category Page Template for Divi’s Blogger Layout Pack and making a structure from scratch. You’ll be able to additionally use it as your template and apply along side the modules I’m including.

Taste the Segment
First, open the Segment’s settings by means of clicking at the blue equipment.

Scroll all the way down to Background and upload the colour #fbf9f4. Shut the Segment’s settings.
- Background Colour: #fbf9f4

Upload a Row
Click on at the inexperienced icon and upload a one-column Row.

Create a Dynamic Identify
Subsequent, upload a Textual content module to the Row.

For the Frame content material, choose Use Dynamic Content material.

This opens an inventory of choices the place you’ll choose the dynamic content material to show. Make a selection Put up Classes.

Shut the following set of choices. We’ll use the default settings.

Subsequent, pass to the Design tab. Trade the Textual content to Vidaloka and the Colour to #161616. Set the Desktop Font Dimension to 80px and click on at the Telephone icon to set the Telephone Font Dimension to 60px. Trade the Line Top to at least one.15em. Shut the Textual content module’s settings.
- Font: Vidaloka
- Colour: #161616
- Dimension: 80px, 60px
- Line Top: 1.15em

Upload the First Weblog Module
Subsequent, we’ll upload the primary of 2 Weblog modules. This one will display a featured put up, whilst the others will supply a weblog feed in accordance with the web page content material.

Make a selection Posts for Present Web page
First, allow Posts for Present Content material. Input 1 for the Put up Rely.
- Posts for Present Content material: Sure
- Put up Rely: 1

Taste the First Weblog Module
Components
Scroll all the way down to Components and disable Display Pagination. We’ll use this for the second one Weblog module.
- Display Pagination: No

Background
Scroll all the way down to Background and alter the colour to rgba(255,255,255,0).
- Grid Background: rgba(255,255,255,0)

Identify Textual content
Subsequent, pass to the Design tab. Trade the Format to Fullwidth. This may occasionally paintings as our featured put up within the hero house. Disable the Overlay.
- Format: Fullwidth
- Overlay: Off

Subsequent, scroll to Identify Textual content. Use Vidaloka for the Font and alter the colour to #161616. Trade the Line Top to at least one.4em.
- Font: Vidaloka
- Colour: #161616
- Line Top: 1.4em

Meta Textual content
Scroll all the way down to Meta Textual content and alter the colour to #e2c29d.
- Colour: #e2c29d

Spacing
Subsequent, pass to Spacing and alter the Best Margin to 0vw. This assists in keeping the module from overlapping the identify.
- Best Margin: 0vw

Field Shadow
Finally, pass to Field Shadow and disable it. Now, you’ll shut this module and we’ll clone it for the second one module.
- Field Shadow: None

Upload the 2d Weblog Module
Now, reproduction the primary module and open its settings. This Weblog module will show the weblog feed. We’ll get started with its settings, upload a couple of extra, and make some adjustments.

Content material
Trade the Put up Rely to six and the Put up Offset Quantity to at least one.
- Put up Rely: 6
- Put up Offset: 1

The Put up Offset environment tells Divi the choice of posts to skip. Beginning with the most recent put up, Divi counts the choice of posts and begins on the choice of the offset. We want this as a result of we’re already exhibiting a put up within the featured Weblog module.
Components
Scroll all the way down to Components and allow the Learn Extra Button and Pagination.
- Learn Extra Button: Sure
- Pagination: Sure

Taste the 2d Weblog Module
Subsequent, pass to the Design tab. Since we’ve copied the module that we already styled, we’ll simplest want to taste the weather that the module didn’t use.
Below Format, alternate it to Grid.
- Format: Grid

Learn Extra Textual content
Scroll to the Learn Extra Textual content settings. Trade the Font to Vidaloka and the Taste to Underlined.
- Font: Vidaloka
- Taste: Underlined

Trade the Textual content Colour to #161616, the Dimension to 16px, and the Line Top to at least one.8em.
- Textual content Colour: #161616
- Dimension: 16px
- Line Top: 1.8em

Pagination Textual content
Cross to the Pagination Textual content and alter the Font to Vidaloka and the Colour to #161616.
- Font: Vidaloka
- Colour: #161616

Finally, scroll to Border and alter the Rounded Corners to 0px. Shut the module and save your web page template.
- Rounded Corners: 0px

Posts for Present Web page Effects
Now, once I click on on a class, I’ll see an archive web page with posts for that web page. The Identify, featured weblog put up, and weblog feed all show the content material dynamically in accordance with the class decided on. The second one Weblog module has an offset of one.

That is my Engineering class. I’ve two posts in that class.

For demonstration, I’ve long past again to my first module and disabled Posts for Present Web page, and set it to All Classes. I’ll additionally building up the scale of the Meta Font so it’s more uncomplicated to peer.

Now, the primary Weblog module presentations the newest put up in All Classes and the second one Weblog module presentations a weblog feed dynamically in accordance with the class decided on. Realize, the second one module nonetheless begins at the second one put up within the Schooling class on account of the offset.

I’ve now reinstated Posts for Present Web page for the primary Weblog module, and the web page now simplest presentations the content material dynamically in accordance with the class decided on by means of the person.

Every other Instance – Posts for Present Web page In response to Tags
Let’s have a look at yet another instance. I’ve long past again to the template and assigned the dynamic identify to Put up Tags. When the person clicks on a tag hyperlink, the template will now show posts with that tag.
I’ve set the identify to dynamically display the tags for this tags archive web page. No classes are decided on. I’ve got rid of the featured put up to make this more uncomplicated to peer.
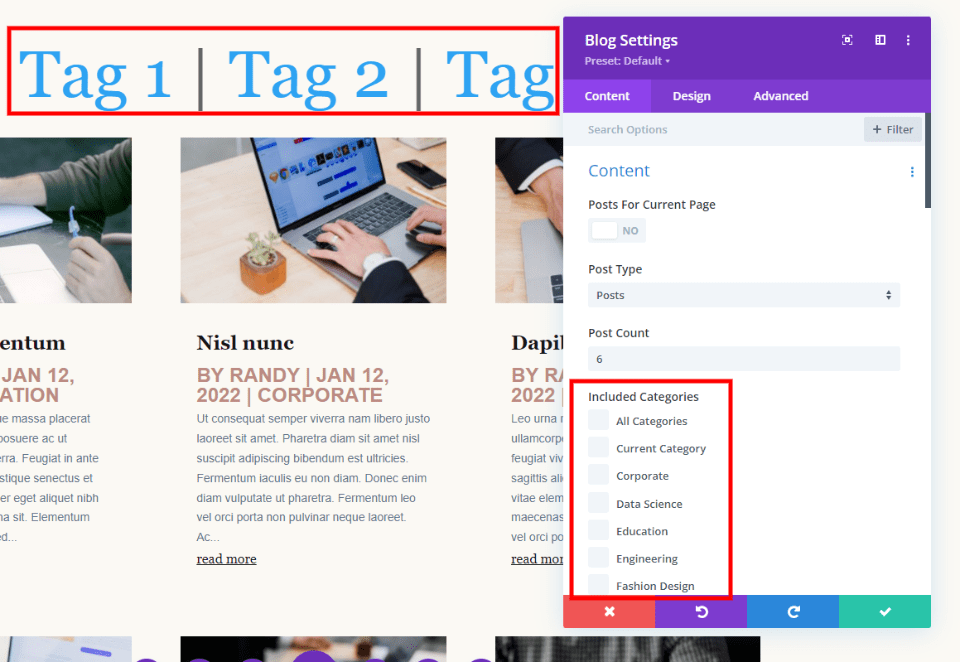
I’ve decided on the archive web page for the Device Engineering tag. This tag is implemented to the posts in my Engineering and Information Science classes. The identify presentations the tag accurately. Alternatively, the posts are from all my classes. I need it to just display posts with this tag.
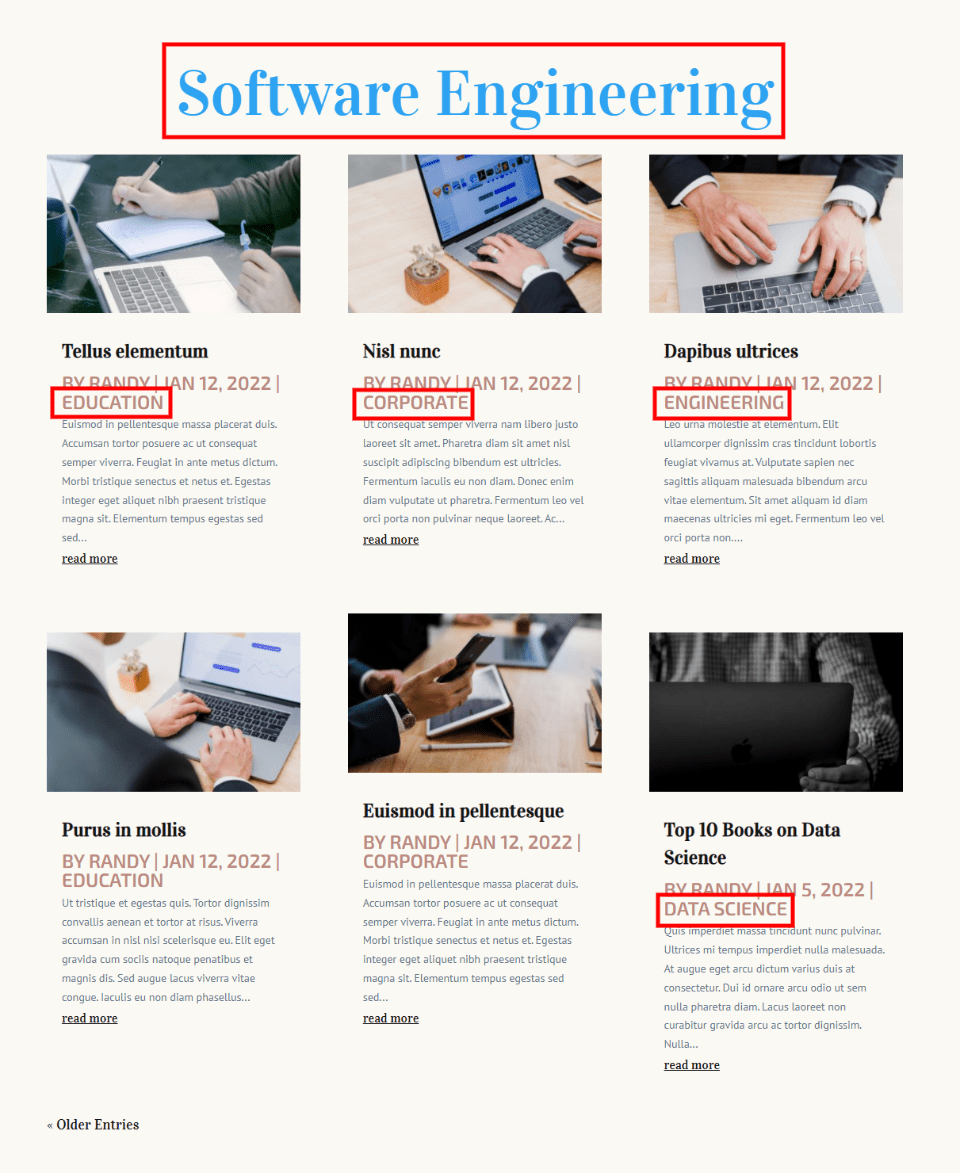
I don’t wish to display posts by means of their class. As a substitute, I wish to display posts by means of their tags. We will’t select classes and we will be able to’t select tags. Posts for Present Web page is our most suitable choice. It doesn’t care what the kinds are. It simplest cares concerning the dynamic dating between the posts. Since this can be a tags archive web page, it’ll dynamically have a look at the tags.

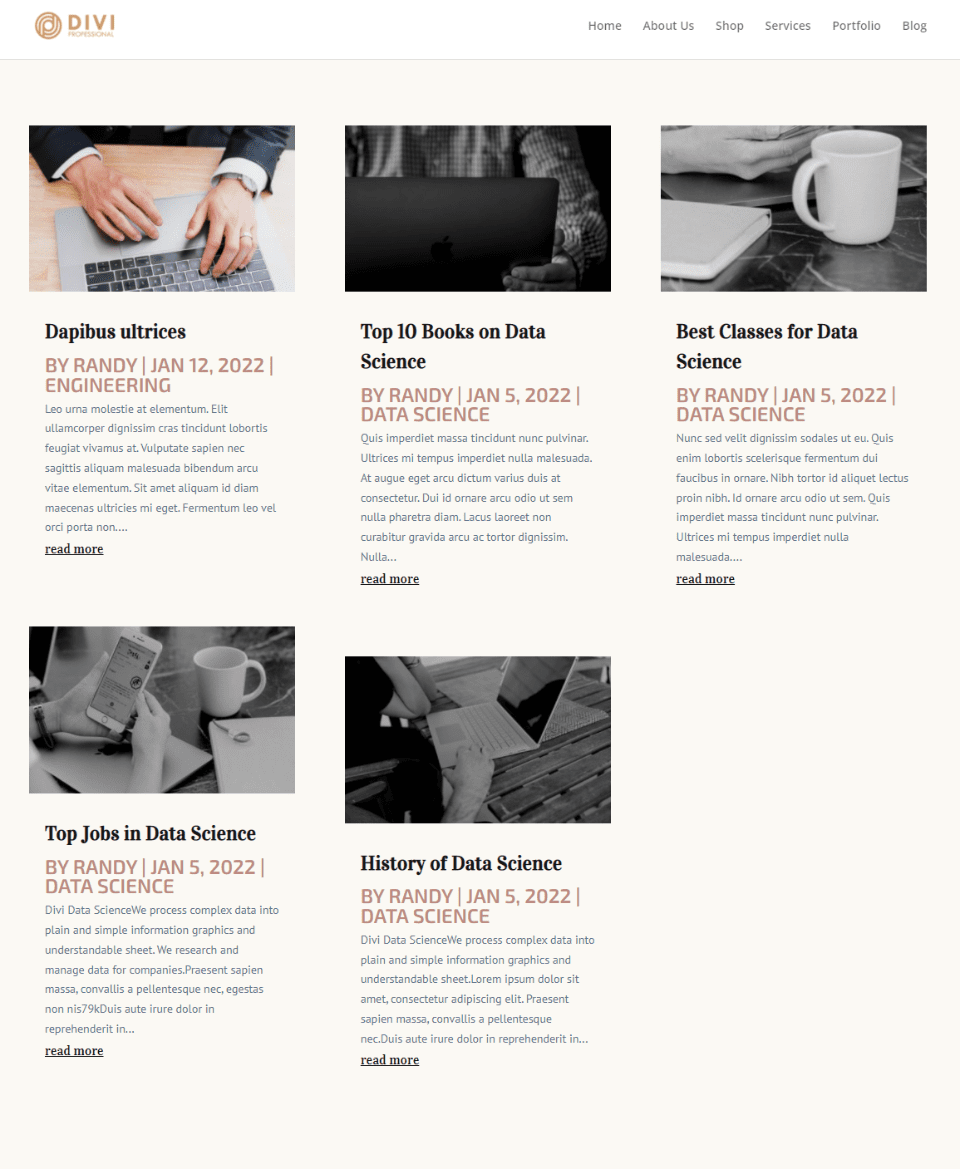
My Tags Archive web page now simplest presentations posts with the right kind tags.
And, simply to exhibit the purpose, it isn’t getting the dynamic tag from the identify. I’ve got rid of the identify within the instance beneath. Divi will get the dynamic data from the tag archive web page itself.

Finishing Ideas
That’s our have a look at figuring out the Posts for Present Web page possibility throughout the Divi Weblog module. It’s easy to make use of and will give you extra keep watch over over archive pages. Because it’s dynamic, this feature is way broader than the usage of classes.
We wish to pay attention from you. Do you employ Posts for Present Web page within your Divi Weblog module? Tell us within the feedback.
The put up Understanding the “Posts for Current Page” Option Inside the Divi Blog Module seemed first on Elegant Themes Blog.
WordPress Web Design