
It’s no longer an exaggeration to mention that Snagit has made my day-to-day regimen extra environment friendly thrice over, if no longer extra. At its base, Snagit is display screen seize instrument. However whilst you use it for a little bit, you’re going to see it’s a little bit greater than that. If you happen to’re a blogger and haven’t looked at Snagit but, I’m going to inform you why you will have to no less than give it a glance.
Contents
Display screen Seize Tool? That’s It?
No, that’s no longer it. And on account of being branded that method, a large number of other folks (myself incorporated) didn’t see what the large deal used to be. In spite of everything, MacOS has Seize, and Home windows has the Snipping Software. We will resize photographs simply in Photoshop, GIMP, Paint.NET, no matter. To not point out any more or less arrows, notes, resizing, and results may well be accomplished in any of the ones as neatly.
Why would you pay $49.95 for one thing that you must ostensibly do with the Print Display screen button?
As a result of Snagit simply more or less does it higher. And greater than that, you don’t have to dance between more than one methods. That during itself is a life-changer. Snagit additionally routinely places captures into the editor, getting rid of the additional step of discovering and loading the brand new report you created.
Plus, Techsmith provides a free trial, so you’ll be able to see for your self whether or not or no longer it’s price selecting up. (It’s what I in my view did, and I purchased the entire model sooner than my time ran out.)
For this newsletter, I wish to stroll you via a few of Snagit’s number one options, essentially those that the Content material Workforce makes use of for the Sublime Topics weblog on a day by day foundation.
Options Assessment
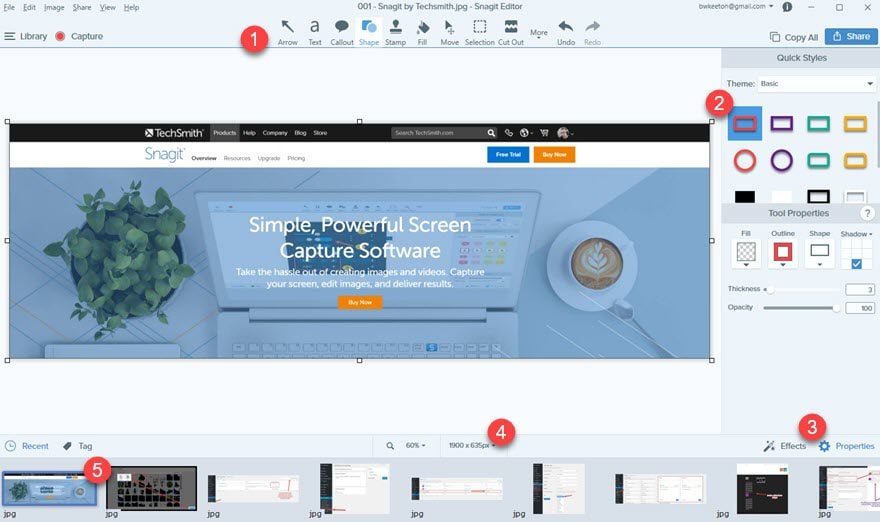
Snagit does so much, like I stated, and the Snagit Editor UI itself is intuitive. You be informed what stuff does virtually instantly. The UI has 5 primary parts, and you’re going to be interacting with more often than not.
- The Toolbar
- Fast Types and Software Homes
- Results (colour adjustment, dimming, borders, and many others.)
- Symbol Solution Adjustment
- Contemporary Captures
Moreover, Snagit has a Seize instrument. It’s screen-capture instrument, in spite of everything. You most likely received’t use this one a lot without delay as a result of you’ll be able to arrange more than one keyboard shortcuts. The principle makes use of of Snagit Seize for me are converting from recording a unmarried symbol to a video, including a time lengthen for a hover pop-up, or shooting the cursor. And putting in the ones keyboard shortcuts.
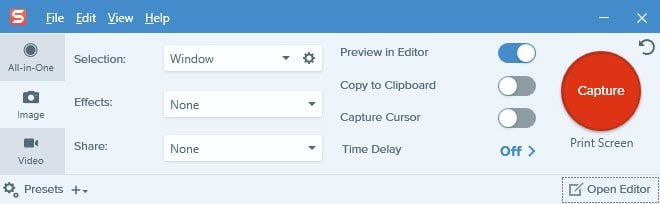
Shortcuts
If you happen to inquire from me, the most productive function of Snagit are the keyboard shortcuts. While you click on at the Presets button in Snagit Seize, you’re given the choice of which keyboard shortcuts you need to set. If you need a brand new more or less shortcut, click on the +, and you’ll be able to choose from any of the seize choices within the window above.
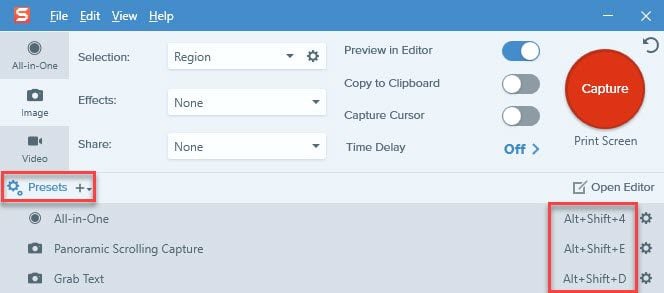
In my opinion, I take advantage of All-in-One a few hundred instances greater than any factor else within the app. I mapped mine to Alt-Shift-4 to imitate the integrated CMD-Shift-4 display screen seize on MacOS. You’ll be able to additionally set the Personal tastes on Mac to make use of the integrated Seize shortcut to place the screencap within the Snagit Editor sooner than it’s stored somewhere else. That possibility is extra helpful than you’d be expecting.
As soon as all of this is arrange, you’ll more than likely spend little or no time on this a part of this system.
The Snagit Editor
The principle a part of the app is the Editor. That’s more than likely obvious. There’s a very small studying curve with Snagit if you happen to’re coming from instrument like Photoshop or PaintShop Pro for the reason that UI is way simplified. Whenever you’re used to the structure, grabbing and annotating screenshots will change into 2d nature.
Once you seize any a part of the display screen, you’re loose to edit, annotate, stylize, crop, or no matter else you need to do sooner than you reserve it.
The Toolbar
Get used to those toolbar icons. You’re going to be clicking on them so much You’ll be able to simply change between any selection of equipment in no time so you’ll be able to edit your screencap and transfer on. Once you click on one, anywhere you click on and drag at the symbol, that instrument will do it’s factor. If the Arrow instrument is highlighted, you draw an arrow from level A to indicate B. The Textual content button means that you can make a choice the scale of your textual content field the similar method.
Usually, the equipment are all beautiful self-explanatory, however right here’s an instance symbol of the 13 maximum vital equipment in motion.
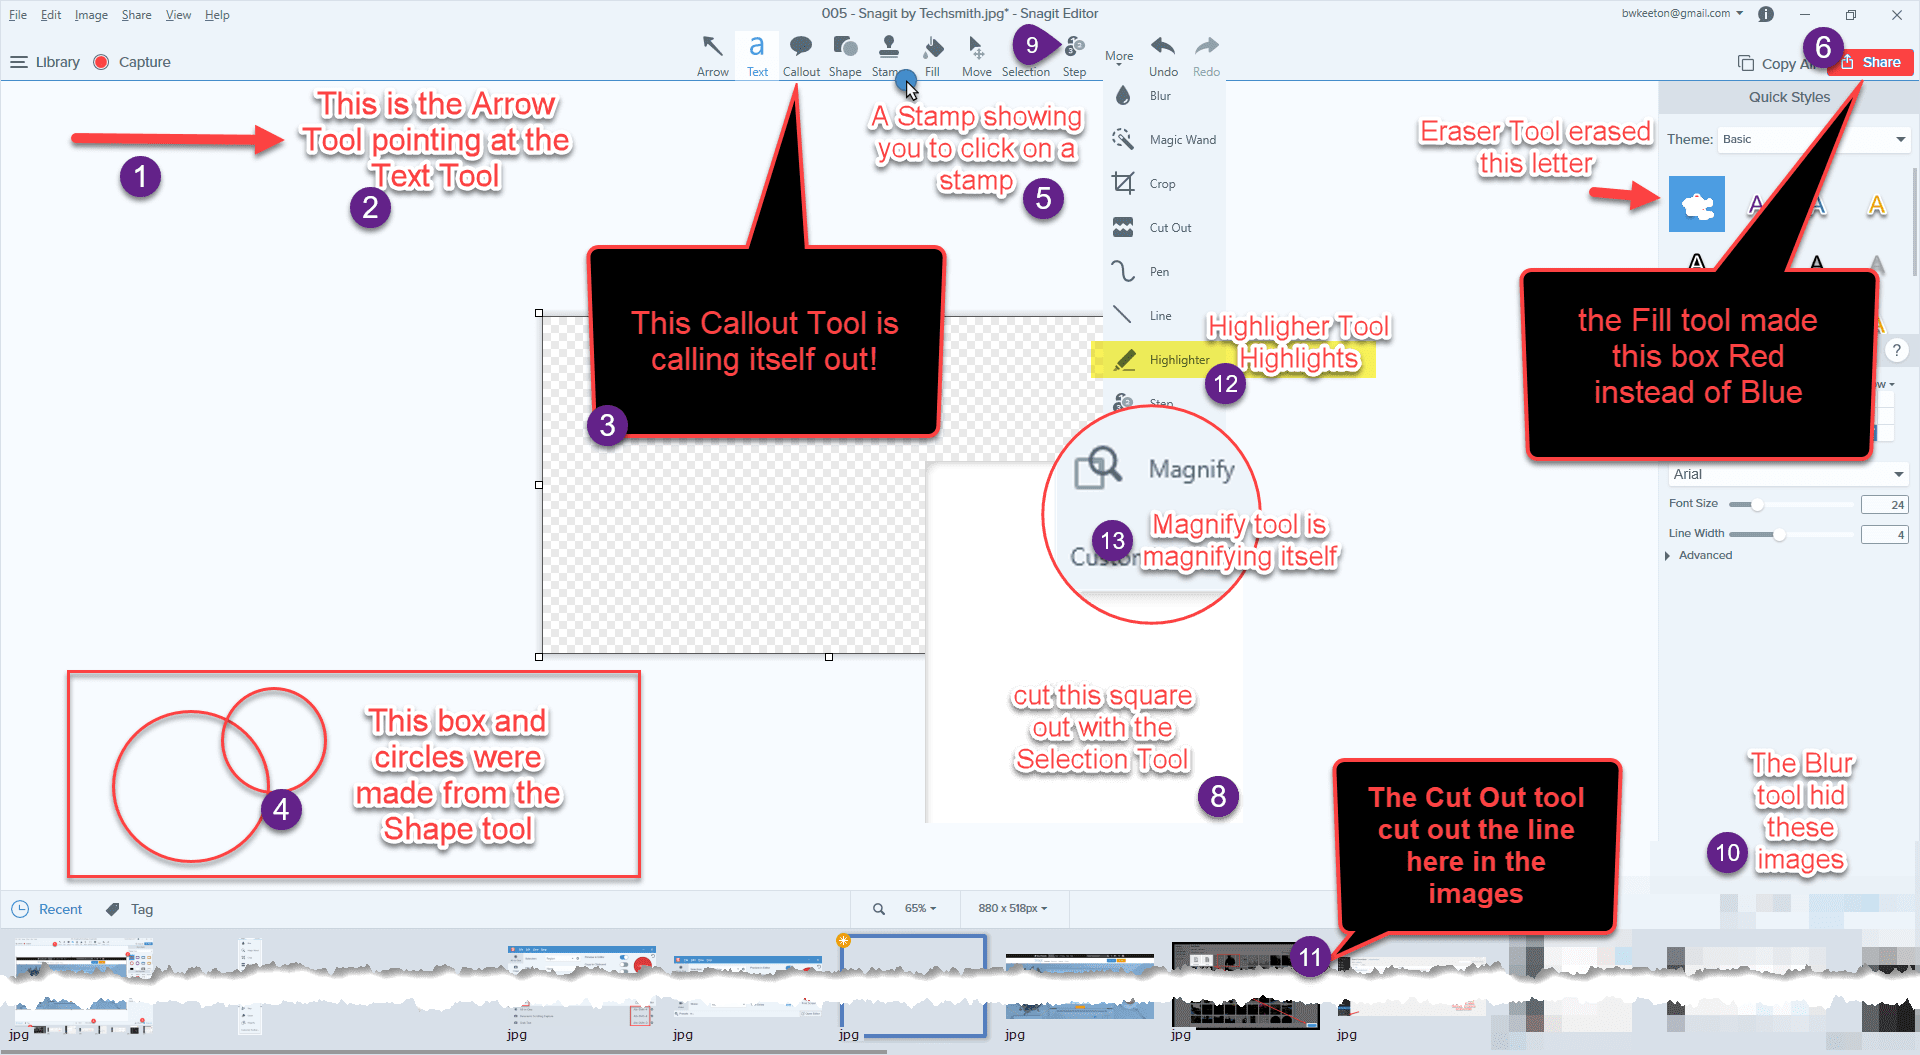
Breaking the Equipment Down
- Arrow – The number one instrument in Snagit. It issues at issues. While you’re looking to make some degree or name a reader’s consideration, temporarily with the ability to level at it’s crucial. Mix it with the Textual content instrument or the Form instrument, and you have got 90% of your Snagit edits proper there.
- Textual content – Drag your mouse to make a textual content field anywhere you need to annotate any a part of the picture. You’ll be able to modify the colours and description and textual content measurement to make it visual over any background.
- Callout – Bring to mind this one as a blended Arrow and Textual content instrument. You’ll be able to trade the bubble’s form to in point of fact name consideration to one thing. Use this when you want to make a larger observation than simply an arrow can do.
- Form – Squares and circles are the actual draw right here. When an arrow or a callout received’t reduce it, you’ll be able to’t cross incorrect with placing a field round it. This instrument is just about tied with the Arrow instrument when it comes to versatility and quantity of use. It’s simply too simple to place a field round one thing you need to discuss.
- Stamp – Most commonly used to signify the place an individual will have to click on all through an educational, Techsmith additionally provides stamps for plenty of other events. You’ll be able to use those like social media stickers to liven up your photographs and provides your edits a little bit persona and aptitude. Or simply persist with the cursors and clicks. As much as you.
- Fill – It’s everybody’s favourite Paint Bucket instrument! When you need one thing that’s one colour to be some other colour…sell off a bucket of paint on it! However in point of fact, that’s what Fill does: it fills in any area that’s one unmarried colour with some other unmarried colour.
- Transfer (unpictured) – Use this to regulate the location of another additions you’ve made, similar to a Callout or a Textual content Field, and even an Arrow that must be shifted.
- Variety – You’ll be able to reduce out, transfer, or take away any portion of the picture. You’ve two choices for what occurs to the distance in a while: a clear area left in the back of or an algorithmic autofill (which is excellent if you happen to’re making an attempt to take away a component with out indicating you’ve accomplished so).
- Step (underneath Extra) – Select a measurement and a colour, and you’ll be able to label every step of a procedure. Numbering happens routinely, and you’ll be able to modify the form and colour of every marker in my opinion. The entire numbers within the symbol above are step markers.
- Blur (underneath Extra) – If you happen to don’t wish to merely take away a side with the Variety instrument, you’ll be able to blur it out. You’ll be able to make it fuzzy or you’ll be able to use the virtual squares. You’ll be able to see the squares within the symbol above have been used to blur out some photographs. I’ve additionally blurred more than a few items in photographs right through the object.
- Lower Out (underneath Extra) – The Lower Out instrument means that you can reduce out (cross determine) vertical or horizontal spaces of the scren. You select a bit, and the instrument merely eliminates it. The picture above presentations a jagged edge, however you’ll be able to make a choice what taste you need. I essentially use this instrument to take away empty sections from screenshots that make resizing and annotating unsightly or awkward.
- Highlighter (underneath Extra) – Just like the Form instrument, however handiest sq. and in translucent colours. It merely highlights the rest in the back of it, precisely like a highlighter marker would do to your outdated biology textbooks.
- Enlarge (underneath Extra) – The Enlarge instrument makes a decided on portion of the picture greater. That is unbelievable when a high-resolution symbol must have an excessively tiny component addressed whilst nonetheless with the ability to see it in context of the entire.
That’s Now not Even All of Them!
Alternatively, the ones are the primary ones you’re going to use. Those indexed underneath the Extra tab are most often extra specialised equipment that you simply received’t be the use of over and again and again all through the process a mission. They could be one-offs (similar to offering steps or blurring a component). Whichever one you’re the use of is displayed without delay to the left of the Extra tab (the place the #9 marker is pointing within the symbol above).
As you’ll be able to see simply from the examples on this article to this point (all of which were made the use of Snagit), the app does much more than just shooting displays. That stated, there are a couple of extra issues that may make it a profitable funding in your running a blog.
Fast Types and Software Homes
To the best of the primary modifying space, you spot the Fast Types/Software Homes column. Snagit has rather a couple of preset taste in your equipment (similar to a purple arrow, yellow circle, or 24pt red textual content). You’ll be able to additionally edit any of the houses you need.
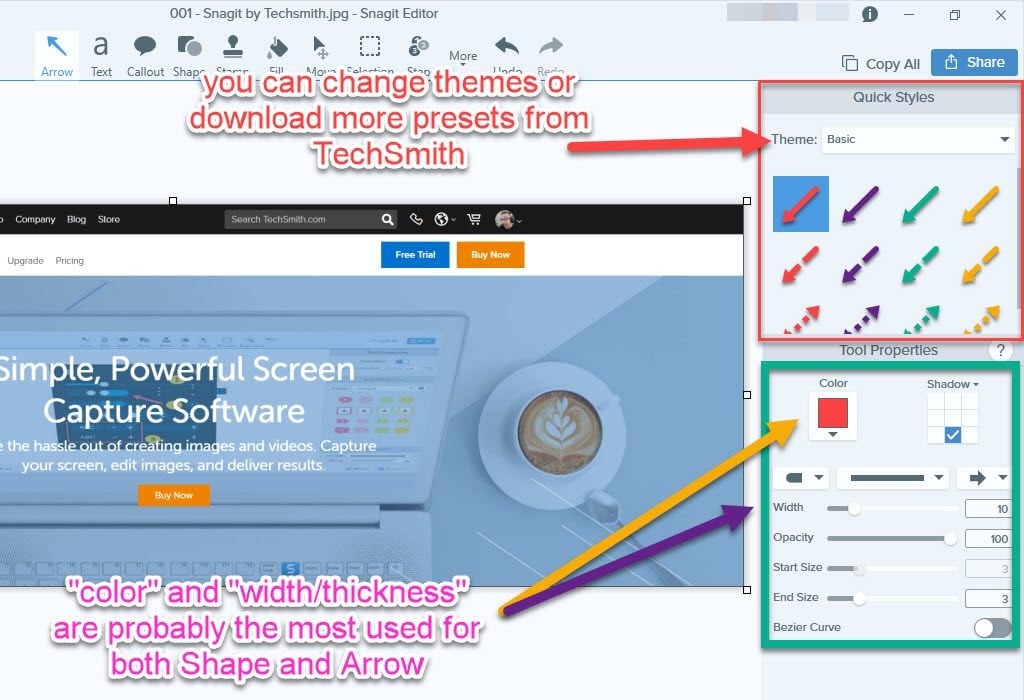
The Colour, Width, and Thickness equipment is also essentially the most used ones for each Arrow and Form. You’re going to additionally see a large number of use for the ones with the Step instrument, as neatly. Some shapes and hues don’t paintings as neatly for some tutorials as they do with others.
Results
The Results column is in point of fact powerful, too. Just like the Fast Types and Software Homes, you get Fast Results after which customizable ones beneath the ones. On this instance, the Embossed Watermark impact used to be positioned on the top-left nook of this symbol the use of the Divi emblem, and the image of the girl has been adjusted with from being naturally coloured to having a red tone.

Solution Exchange
We’ve got a collection measurement for photographs right here at the ET weblog: 880px wide. You’ll be able to simply sort in what you need the brand new measurement to be, and it’s there. In truth, that is the number one used function in Snagit for us, even over the modifying. It’s a lot much less of a ache to resize temporarily than in Photoshop, which is what I used to be in my view the use of sooner than. Basically as a result of on every occasion I take a screenshot, it opens routinely within the editor. You could be shocked at how a lot that spoils you. I used to be.
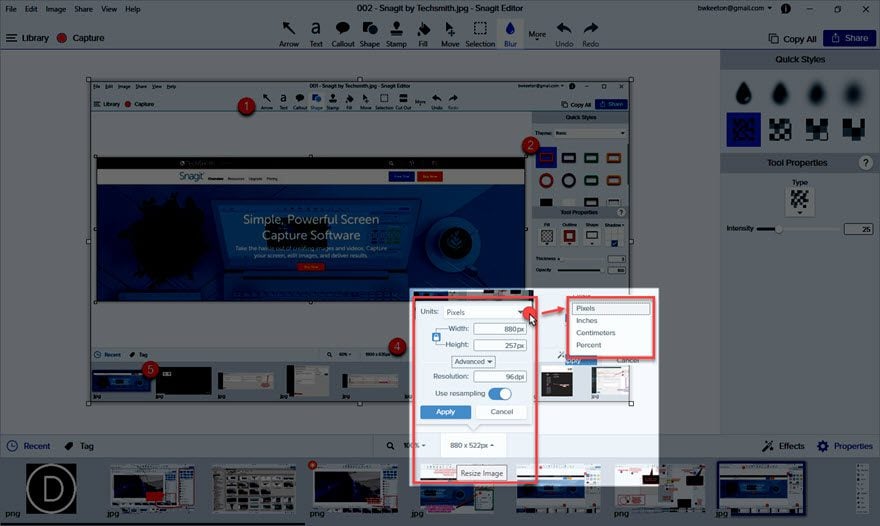
Be aware: I used the Highlight and Enlarge instrument underneath Results to dim the background right here whilst protecting the zoom to 100% (no magification).
Contemporary Captures
In spite of everything, now we have one of the crucial different featuers that may break you: a relentless flow of your fresh captures. You’ll be able to scroll via them, shut them, reproduction and paste between them. However most significantly, you stay them to your Snagit Library till you purge it. So even after you save/export the general symbol, you’ll be able to return and re-edit the picture as repeatedly as you want. Even weeks later. (Talking from revel in on that one; it’s in point of fact, in point of fact great).
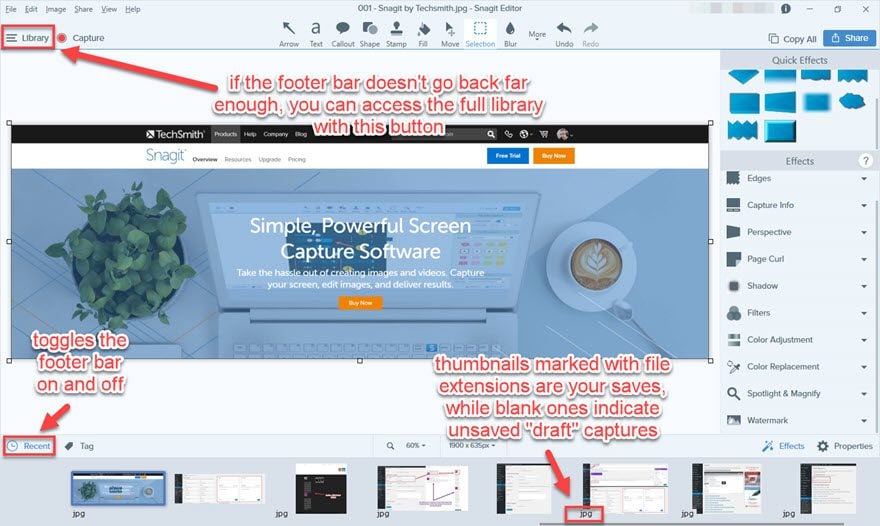
The footer bar means that you can scroll via your most up-to-date captures, and you’ll be able to see which can be your saves and which can be drafts (those with report extensions are yours, whilst clean ones are drafts). You’ll be able to press the Contemporary button within the lower-left to toggle the bar off and on, and the Library button within the top-left of the window opens the entire Snagit Library, with each and every seize you’ve taken. (Except you’ve purged the Library manually.)
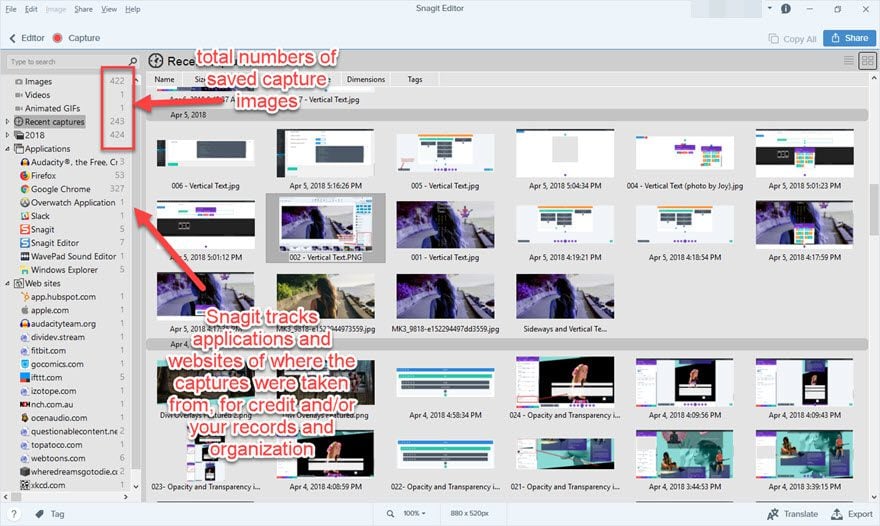
Snagit tracks the programs and internet sites from which you will have captures photographs, in addition to the dates and general selection of captures. That is nice for crediting photographs (it’s simple to omit the place you were given a screenshot if you are taking a large number of them just like the Content material Workforce does). The function provides your company a spice up, too, in case you want to temporarily return and discover a particular symbol. Snagit has a tag device, too, so you’ll be able to label and kind and report the times away.
What Do You Suppose?
The ones are the main options of Snagit that we bloggers have a tendency to make use of. As you’ll be able to see, the app does much more than simply taking an image of your display screen. When you find yourself modifying a large number of photographs in your blogs just like the Content material Workforce does for our posts, it can be price having a look into the free trial of Snagit. After a couple of days of use, chances are you’ll simply to find it price snagging your personal reproduction.
Do you employ Snagit as a blogger?
Article featured symbol via Nadia Snopek / shutterstock.com
The put up How to Use Snagit for Blogging seemed first on Elegant Themes Blog.
WordPress Web Design