
Group is vital in relation to designing internet sites. It is helping streamline your workflow, stay information so as, and hurries up the design procedure.
Now with Divi Cloud, development internet sites is even quicker.
Divi Cloud is like Dropbox on your Divi internet sites. You’ll retailer Divi Builder Components at the cloud and get admission to them on any Divi website online you’re development that’s authenticated together with your member API key. That suggests you’ll be able to save and cargo your favourite web page layouts, sections, rows, and modules with only a few clicks! And the most efficient factor? It’s to be had at the moment together with your Divi club. Be informed all about Divi Cloud here.
On this submit, we’ll move over methods to upload and delete Divi Cloud classes and tags and extra! Cloud classes and tags act very similar to local WordPress classes and tags however don’t affect search engine optimization as WP classes and tags do.
Let’s get began!
Contents
What are Divi Cloud Classes and Tags?
Cloud classes and tags paintings precisely the similar as WordPress native classes and tags. Assigning classes and tags on your Cloud pieces is helping stay issues arranged and simply searchable.
Easy methods to Prepare Divi Cloud Pieces Through Class
How To Upload Cloud Classes
Navigate to any web page and cargo the Visible Builder. Then, continue by means of doing the next:
- Load the Divi Library by means of clicking the red “+” icon at the Divi toolbar on the backside of the web page. This may increasingly deliver up the Divi layouts library.
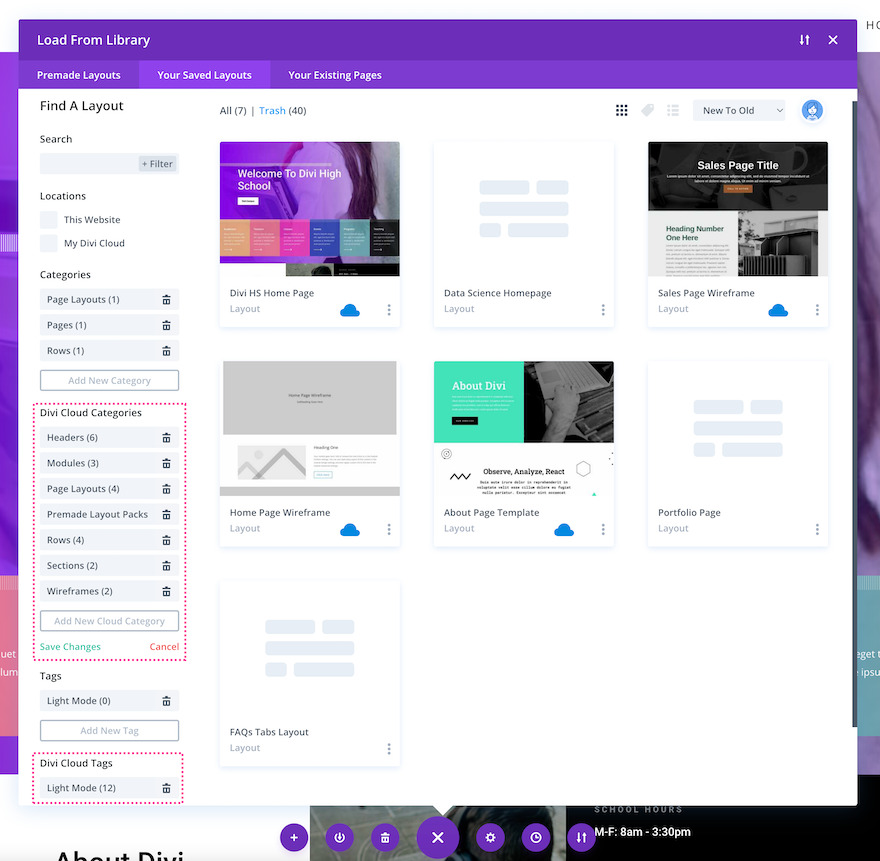
- To control and think about your Cloud Classes click on “Set up Classes” at the left sidebar. This shows your (native) Classes and Divi Cloud Classes.
- So as to add a brand new Cloud class click on “Upload New Cloud Class”. This may increasingly upload a clean enter box the place you’ll be able to kind within the identify of the brand new class.
- Click on “Save Adjustments” to save lots of your paintings.
How To Delete Cloud Classes
In the event you’d love to delete a Cloud class, then click on the trash icon subsequent to the class you’d love to delete.
Easy methods to Prepare Divi Cloud Pieces Through Tags
How To Upload Cloud Tags
Wish to use tags to prepare your cloud pieces? You’ll do this as smartly. Right here’s how:
- Navigate to any web page and cargo the Visible Builder
- Load the Divi Library by means of clicking the red “+” icon at the Divi toolbar on the backside of the web page. This may increasingly deliver up the Divi layouts library.
- To control and think about your Cloud Tags click on “Set up Tags” at the left sidebar. This shows your (native) Tags and Divi Cloud Tags.
- So as to add a brand new Tags class click on “Upload New A brand new Cloud”. This may increasingly upload a clean enter box the place you’ll be able to kind within the identify of the brand new tag. Click on “Save Adjustments” to save lots of your paintings.
How To Delete Cloud Tags
In the event you’d love to delete a Cloud tag, then click on the trash icon subsequent to the tag you’d love to delete.
How To Practice Classes And Tags Whilst Saving An Merchandise
Whilst you’re saving an merchandise to the cloud, that could be a nice time so as to add classes and tags.
Saving Web page Layouts With Classes And Tags
First, we’ll check out how you’ll be able to save whole layouts on your Divi Cloud the use of classes and tags.
- Navigate to the web page you wish to have to save lots of and allow the Visible Builder.
- Click on the red downward arrow icon at the Divi toolbar on the backside of the web page to save lots of the web page format on your library.
- This brings up the Upload To Library window with the next choices:
- Structure Title – Title the web page format.
- Save To Divi Cloud – Toggle this technique to “on” to save lots of this web page format to the Divi Cloud.
- Upload To Classes – Click on the checkbox subsequent to the class you wish to have to be assigned to this format, or create a brand new class by means of typing within the enter box.
- Upload To Tags – Click on within the tags enter box to use current tags, or create a brand new tag by means of typing in the second one enter box.
Saving Sections, Rows, and Modules With Classes And Tags
The way is the same in relation to sections, rows and, modules.
- Navigate to the phase, row, or module you wish to have to save lots of and allow the Visible Builder.
- Click on the red downward arrow icon at the phase, row, or module. This brings up the Upload To Library window with the next choices:
- Structure Title – Sort the identify of the phase, row, or module you’re saving right here.
- Save To Divi Cloud – Toggle this technique to “on” to save lots of this web page format to the Divi Cloud.
- Save As World – Toggle this technique to “on” in the event you’d like to save lots of the article as a world merchandise. Be aware: In the event you click on Save To Divi Cloud, you then received’t be capable to save this merchandise as a world merchandise. Identical factor vice versa – in the event you save this merchandise as a world merchandise, you received’t be capable to reserve it to the cloud.
- Upload To Classes – Click on the checkbox subsequent to the class you wish to have to be assigned to the article, or create a brand new class by means of typing within the enter box.
- Upload To Tags – Click on within the tags enter box to use current tags, or create a brand new tag by means of typing in the second one enter box.
How To Re-Prepare Cloud Merchandise Tags and Classes
Now, in the future, it’s possible you’ll need to trade the kinds and tags that you just’ve assigned to a selected cloud merchandise. To do this, you’ll be able to observe those steps:
- To modify the tags and classes assigned to a Divi Cloud merchandise, navigate to that merchandise and click on the three ellipses to deliver up choices. Then click on “Edit Tags and Classes”.
- This brings up the kinds and tags window the place you’ll be able to take a look at or uncheck the kinds you wish to have to be assigned to this cloud merchandise.
- If in case you have tags assigned to this merchandise you’ll see them indexed within the “Upload To Tags” phase. So as to add a brand new tag, kind the identify of the tag within the enter box.
- Click on the golf green checkmark to save lots of your adjustments.
Ultimate Ideas
Whether or not ranging from scratch or transforming your class and tag taxonomies, it’s crucial to have a plan in position. This now not most effective is helping with staying arranged, however you can save time and frustration when in search of information! Accelerate your internet design procedure with Divi and Divi Cloud these days. Nonetheless desire a club? Get one today!
The submit How to Organize Divi Cloud Items by Category and Tags gave the impression first on Elegant Themes Blog.
WordPress Web Design