
Word: This newsletter has been contributed via Eric Parker from Dynamsoft.
The Common Home windows Platform (UWP) lets in us to expand apps for quite a lot of Home windows gadgets and distribute them during the Home windows Retailer. This can be a trendy generation from Microsoft, used for development shopper apps. UWP apps can profit from the newest visible kinds and contours to be had in the latest variations of Home windows.
Dynamic Internet TWAIN (DWT) is a JavaScript library used for doc scanning. If you wish to create a doc scanning app for UWP, you’ll do so via the usage of UWP’s WebView keep an eye on.
The WebView keep an eye on allows you to embed a information superhighway view inside your UWP app, which will show information superhighway content material the usage of the Microsoft Edge Legacy rendering engine.
This way ends up in a hybrid app, combining each local UWP controls and a information superhighway web page to ship the capability you wish to have.
On this article, we will be able to supply step by step directions for developing your individual UWP document-scanning app.
Contents
- 1 Evaluation of Development a Report Scanning App in UWP
- 2 Necessities
- 3 Create a UWP Report Scanning App
- 3.1 Get started a New Common Home windows App Undertaking
- 3.2 Reproduction the Dynamic Internet TWAIN Sources Folder and Demo to the Undertaking
- 3.3 Create a WebView Keep an eye on and Load the HTML Document
- 3.4 Override the Default Conduct When Internet TWAIN is No longer Detected
- 3.5 Fortify Capability with Home windows Runtime API
- 3.6 Integrating OCR Functions
- 4 Conclusion
Evaluation of Development a Report Scanning App in UWP
To expand a doc scanning app in UWP, you’ll practice those steps:
- Get started via the usage of the Common Home windows App template to create a brand new undertaking on your app.
- Subsequent, replica the sources folder and demo information from the Dynamic Internet TWAIN library into your undertaking.
- Then, upload a WebView keep an eye on for your app’s UI and cargo the HTML document.
- Customise your app’s habits for situations the place Dynamic Internet TWAIN isn’t put in at the device.
- Make the most of the functions of the Home windows Runtime API to reinforce your app’s capability.
Necessities
The necessities for this undertaking are as follows:
- Set up of Visible Studio along side the Home windows 10 SDK.
- The Dynamic Internet TWAIN library.
Create a UWP Report Scanning App
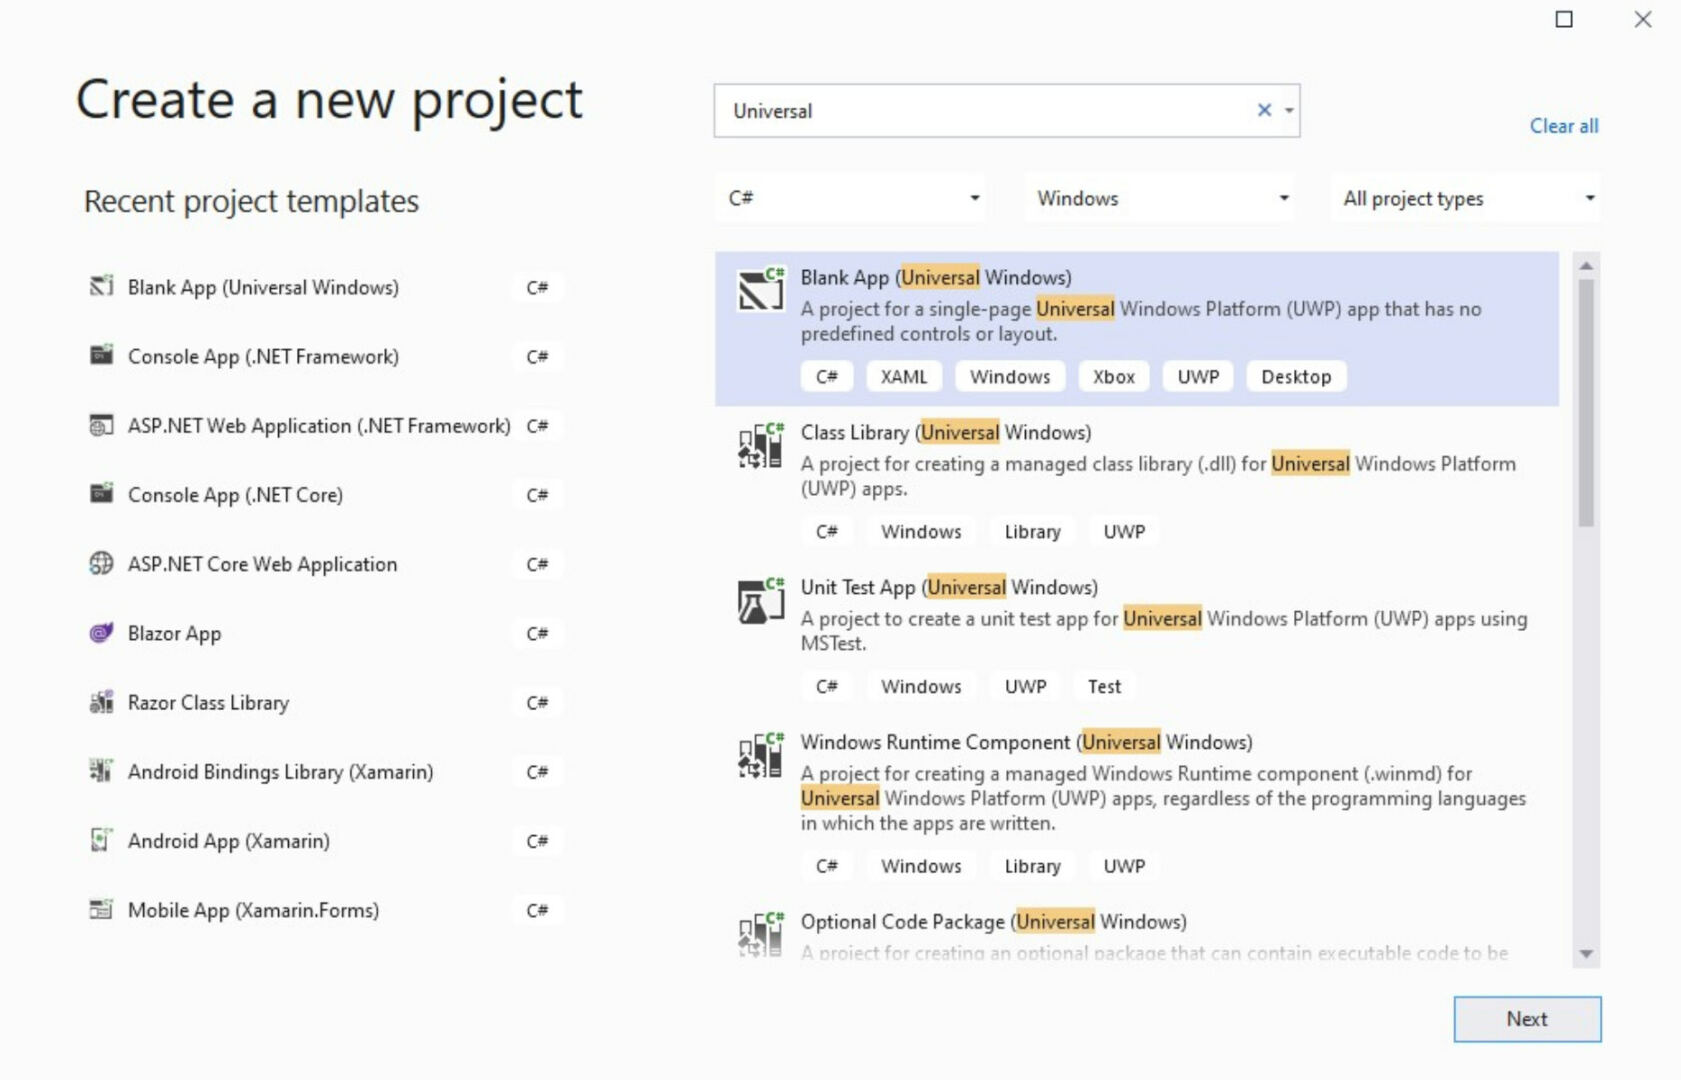
Get started a New Common Home windows App Undertaking
To start out, open Visible Studio and create a brand new undertaking for a Common Home windows app.

Reproduction the Dynamic Internet TWAIN Sources Folder and Demo to the Undertaking
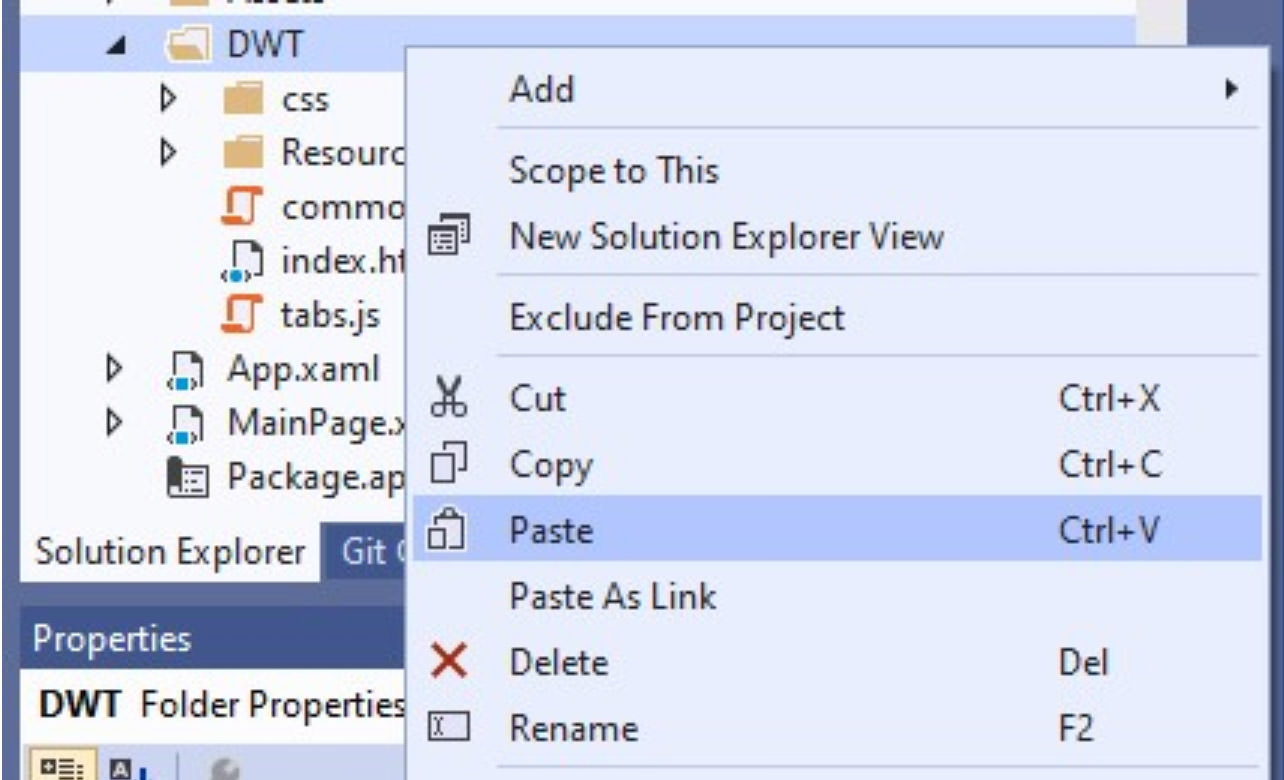
To replicate the Dynamic Internet TWAIN (DWT) sources folder and demo, please practice those steps:
- Create a brand new folder and identify it “DWT.”
- Click on this hyperlink to obtain the HTML, CSS, and JavaScript information for the pre-built demo. Position the downloaded information into the “DWT” folder you created in Step 1.
- Reproduction the Sources folder from
C:Program Recordsdata (x86)DynamsoftDynamic Internet TWAIN SDK 18.3to the DWT folder. Word that the precise trail might range relying in your pc’s setup.

Create a WebView Keep an eye on and Load the HTML Document
- Regulate the
MainPage.xamldocument the usage of the code equipped underneath:
- Upon launching the app, replace the
MainPage.xaml.csdocument to indicate the WebView to the HTML document.
public MainPage()
{
    this.InitializeComponent();
    WebView1.Navigate(new Uri("ms-appx-web:///DWT/index.html"));
}
If Dynamic Internet TWAIN is put in, the doc scanning function must be to be had inside the WebView.

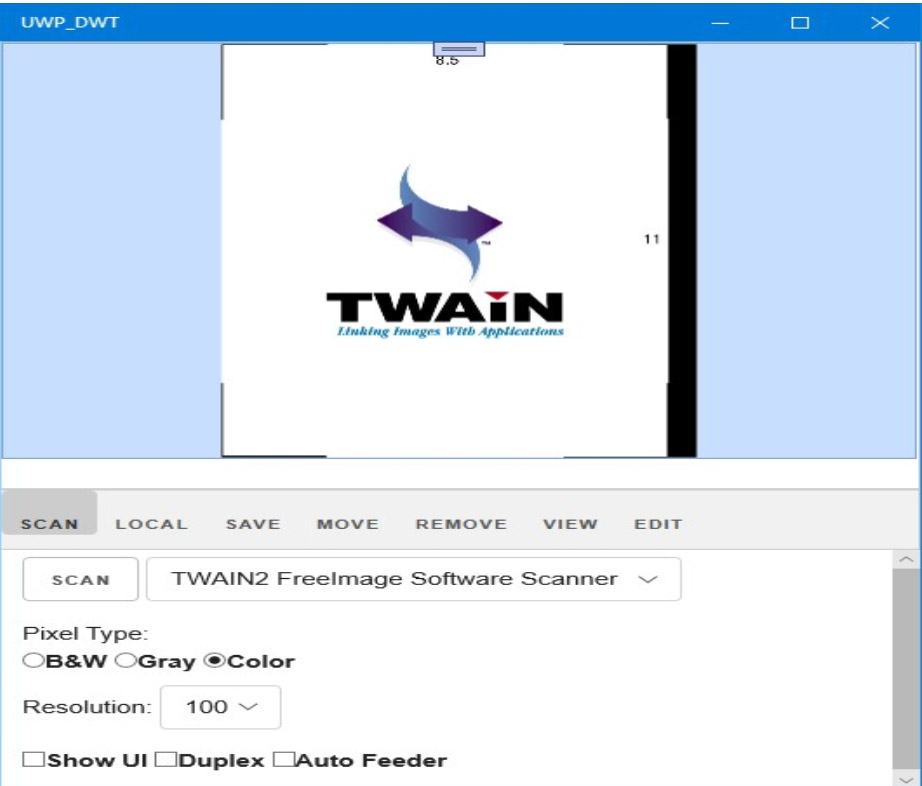
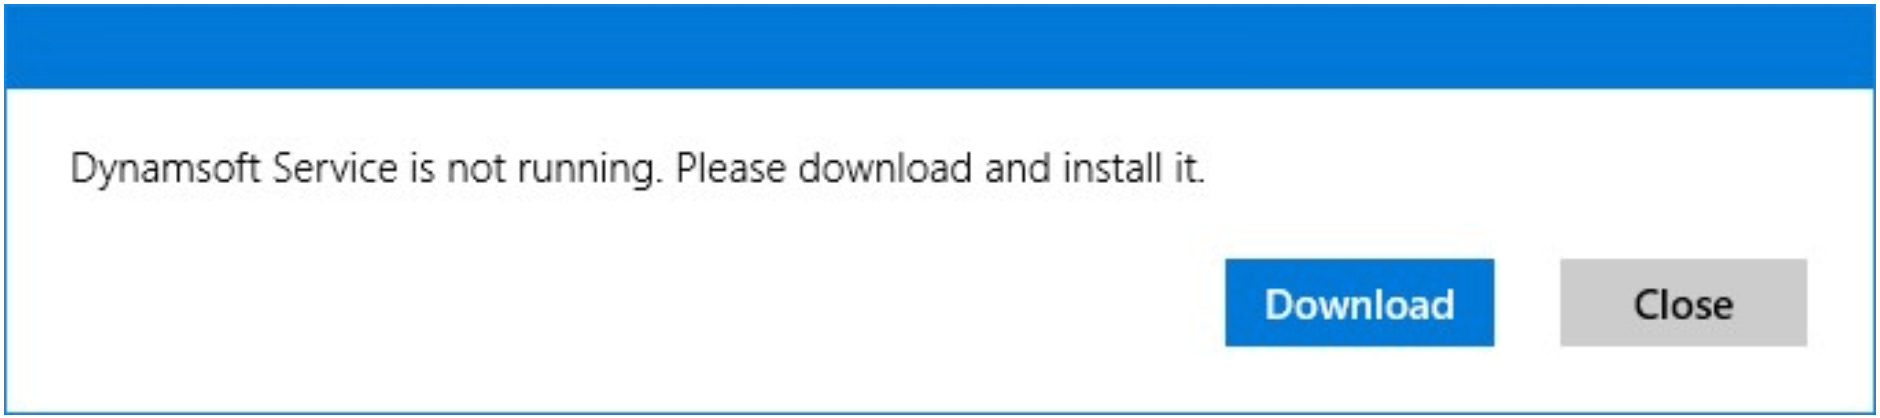
If it isn’t put in, you may even see the next discussion field:

Word: To make use of the doc scanning capability, the JavaScript library of Dynamic Internet TWAIN must keep in touch with an area provider. Customers will have to set up this provider sooner than the usage of the scanning app.
Override the Default Conduct When Internet TWAIN is No longer Detected
If Internet TWAIN isn’t detected, a obtain discussion field will seem. Alternatively, downloading the installer inside the WebView isn’t imaginable. To paintings round this, you’ll open the obtain hyperlink within the tool’s local browser.
UWP’s WebView permits information superhighway pages to ship notifications to the app:
– Make the most of window.exterior.alert within the HTML tournament handler to ship notifications by the use of WebView.ScriptNotify.
Upload the next C# code to permit the information superhighway web page to inform the app:
public MainPage()
{
    this.InitializeComponent();

    // Newly added
    Listing allowedUris = new Listing();
    allowedUris.Upload(new Uri("ms-appx-web:///DWT/index.html"));

    WebView1.ScriptNotify += WebView1_ScriptNotify;  // Newly added
    WebView1.Navigate(new Uri("ms-appx-web:///DWT/index.html"));
}

// Newly added
personal async void WebView1_ScriptNotify(object sender, NotifyEventArgs e)
{
    // Handles the message
}
First, find and open the dynamsoft.webtwain.set up.js document discovered within the “Sources” folder. Seek for the precise code phase that wishes amendment and replace it as follows:
Dynamsoft.OnWebTwainNotFoundOnWindowsCallback = serve as(
    ProductName,
    InstallerUrl,
    bHTML5,
    bIE,
    bSafari,
    bSSL,
    strIEVersion
) {
    var reaction = {};
    reaction["info"] = "dynamsoft_service_not_running";

    window.exterior.notify(JSON.stringify(reaction));
};
With this transformation, when the information superhighway web page detects that Internet TWAIN isn’t put in, it’s going to ship a JSON-formatted message to the appliance.
Within the C# document, use the next code to advised the person to obtain and set up the specified provider:
personal async void WebView1_ScriptNotify(object sender, NotifyEventArgs e)
{
    var reaction = JsonConvert.DeserializeObject>(e.Price);
    string data = reaction.GetValueOrDefault("data", "");

    // Reply to the script notification
    if (data == "dynamsoft_service_not_running")
    {
        // Create and set the content material of the message conversation
        var messageDialog = new MessageDialog("The Dynamsoft Provider isn't working. Please obtain and set up it.");

        // Upload instructions and their callbacks; each buttons use the similar callback serve as
        messageDialog.Instructions.Upload(new UICommand(
            "Obtain",
            new UICommandInvokedHandler(this.CommandInvokedHandler)
        ));
        messageDialog.Instructions.Upload(new UICommand(
            "Shut",
            new UICommandInvokedHandler(this.CommandInvokedHandler)
        ));

        // Set the default command
        messageDialog.DefaultCommandIndex = 0;

        // Set the cancel command
        messageDialog.CancelCommandIndex = 1;

        // Show the message conversation
        wait for messageDialog.ShowAsync();
    }
}

personal async void CommandInvokedHandler(IUICommand command)
{
    if (command.Label == "Obtain")
    {
        string uriToLaunch = @"https://download2.dynamsoft.com/Demo/DWT/DWTResources/dist/DynamsoftServiceSetup.msi";
        var uri = new Uri(uriToLaunch);
        var good fortune = wait for Home windows.Machine.Launcher.LaunchUriAsync(uri);
    }
}
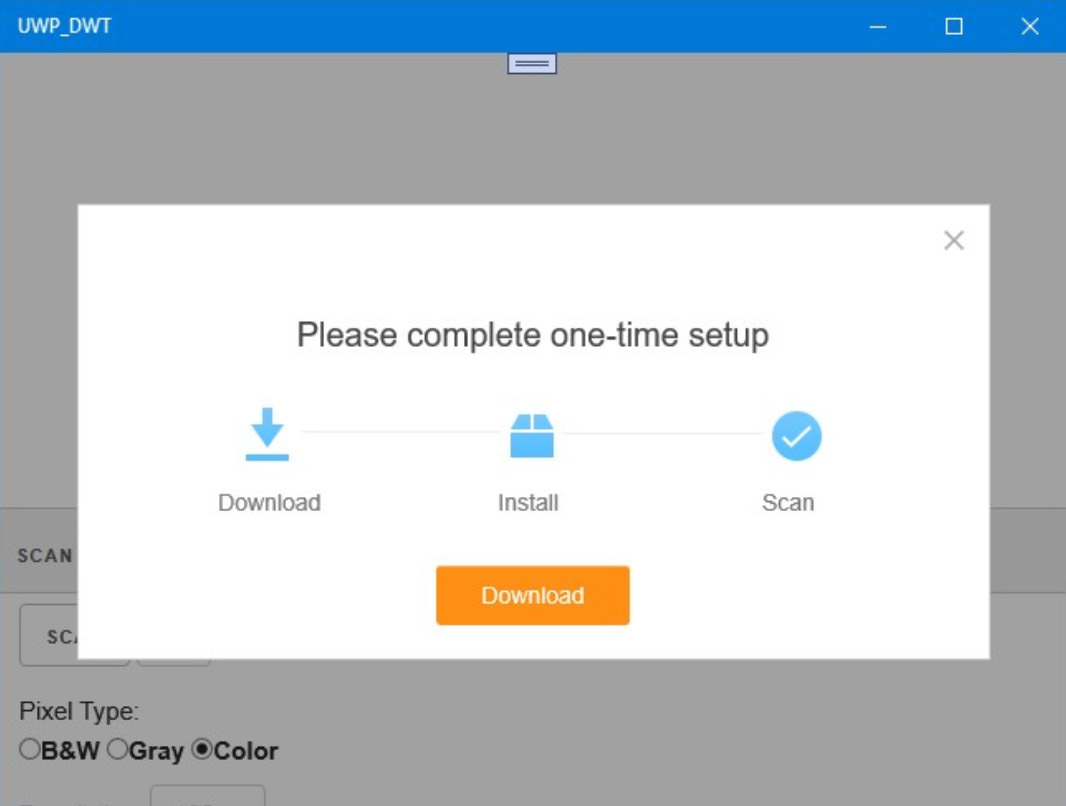
If the provider isn’t energetic, the next conversation field will seem:

Fortify Capability with Home windows Runtime API
Some options of Internet TWAIN are restricted in a WebView atmosphere. Alternatively, via leveraging the Home windows Runtime API for UWP, you’ll increase the functions of your UWP utility.
Using the Digicam API
The Home windows.Media.Seize.CameraCaptureUI API provides an intuitive digital camera interface for taking pictures photographs.
personal async void CameraButton_Click(object sender, RoutedEventArgs e)
{
    // Make the most of the Home windows.Media.Seize.CameraCaptureUI API to seize a photograph
    CameraCaptureUI conversation = new CameraCaptureUI();
    conversation.VideoSettings.AllowTrimming = true;

    StorageFile document = wait for conversation.CaptureFileAsync(CameraCaptureUIMode.Photograph);
}
As soon as induced, a integrated digital camera conversation will seem to allow symbol taking pictures. The API additionally supplies auto-trimming options helpful for doc scanning.


Integrating Captured Symbol into WebView
You’ll be able to use the WebView.InvokeScriptAsync approach to ship the captured symbol to the information superhighway web page.
personal async void CameraButton_Click(object sender, RoutedEventArgs e)
{
    // Seize a photograph the usage of the CameraCaptureUI API
    CameraCaptureUI conversation = new CameraCaptureUI();
    conversation.VideoSettings.AllowTrimming = true;

    StorageFile document = wait for conversation.CaptureFileAsync(CameraCaptureUIMode.Photograph);

    // Convert the captured document to a base64 string
    string base64 = wait for StorageFileToBase64(document);
    wait for WebView1.InvokeScriptAsync("LoadImageFromBase64", new string[] { base64 });
}

// Convert a StorageFile to a base64 string
personal async Activity StorageFileToBase64(StorageFile document)
{
    string Base64String = "";

    if (document != null)
    {
        IRandomAccessStream fileStream = wait for document.OpenAsync(FileAccessMode.Learn);
        var reader = new DataReader(fileStream.GetInputStreamAt(0));
        wait for reader.LoadAsync((uint)fileStream.Measurement);

        byte[] byteArray = new byte[fileStream.Size];
        reader.ReadBytes(byteArray);

        Base64String = Convert.ToBase64String(byteArray);
    }

    go back Base64String;
}
Exhibiting the Captured Symbol in HTML
After acquiring the base64-encoded symbol, upload it to the HTML web page the usage of the next serve as:
serve as LoadImageFromBase64(base64) {
    if (DWObject) {
        DWObject.LoadImageFromBase64Binary(
            base64,
            Dynamsoft.DWT.EnumDWT_ImageType.IT_ALL
        );
    }
}
Integrating OCR Functions
Make the most of the Home windows Media OCR API
The Home windows.Media.Ocr API provides an easy interface for Optical Personality Popularity (OCR). On this segment, we’ll define learn how to upload OCR functions for your UWP utility for a decided on symbol.
Retrieve Base64 of Decided on Symbol in HTML
First, upload a JavaScript serve as to acquire the base64-encoded string of the chosen symbol.
serve as GetSelectedImageInBase64() {
    if (DWObject) {
        DWObject.ConvertToBase64(
            [DWObject.CurrentImageIndexInBuffer],
            Dynamsoft.DWT.EnumDWT_ImageType.IT_PNG,
            serve as(end result, indices, kind) {
                var reaction = {};
                reaction["info"] = "image_base64";
                reaction["data"] = end result.getData(0, end result.getLength());

                window.exterior.notify(JSON.stringify(reaction));
            },
            serve as(errorCode, errorString) {
                console.log(errorString);
            }
        );
    }
}
Enforce OCR Capability in C#
Subsequent, invoke the aforementioned JavaScript serve as and carry out OCR at the base64-encoded symbol within the C# code.
personal async void OCRButton_Click(object sender, RoutedEventArgs e)
{
wait for WebView1.InvokeScriptAsync("GetSelectedImageInBase64", new string[] { });
}
personal async void WebView1_ScriptNotify(object sender, NotifyEventArgs e)
{
if (data == "image_base64")
{
if (reaction.ContainsKey("information"))
{
string base64 = reaction.GetValueOrDefault("information", "");
OCRImageFromBase64(base64);
}
}
}
personal async void OCRImageFromBase64(string base64)
{
// Conversion and OCR-related common sense
// ...
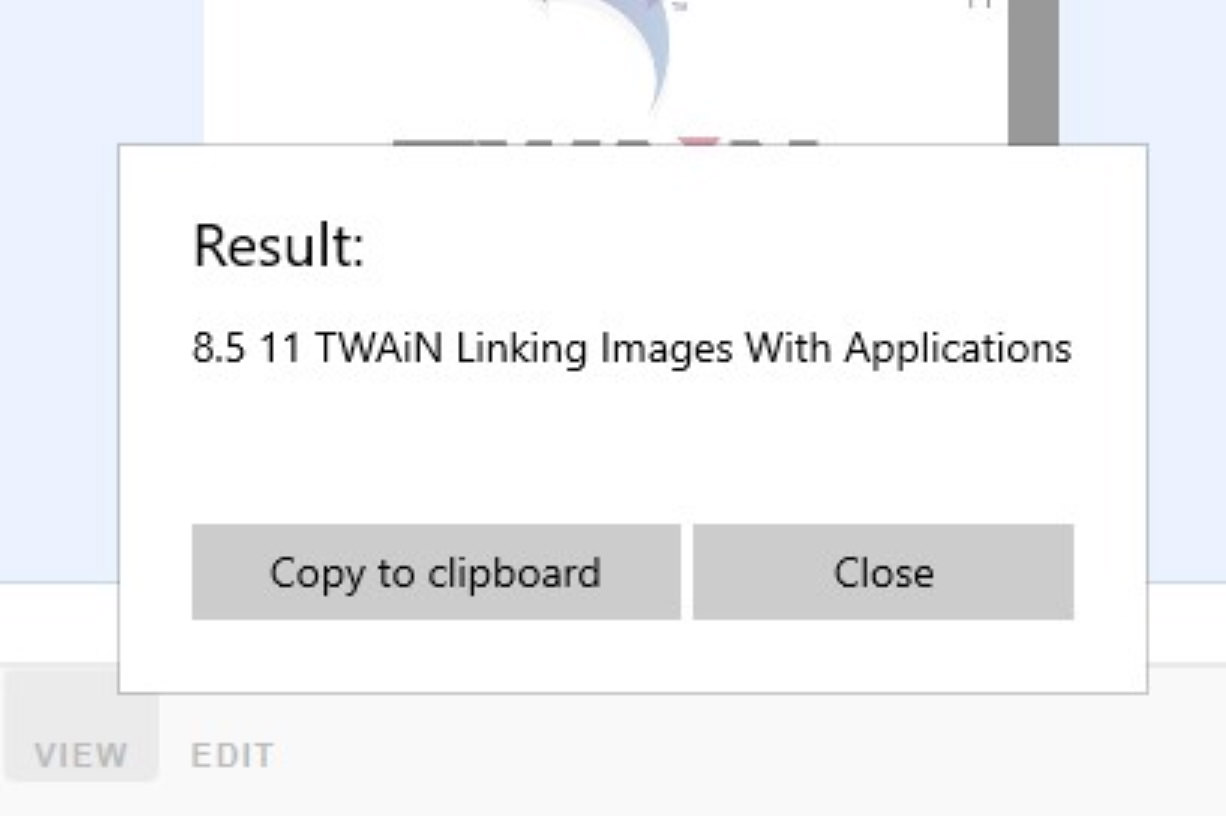
// Show OCR ends up in a content material conversation
ContentDialog contentDialog = new ContentDialog
{
Name = "Outcome:",
Content material = ocrResult.Textual content,
PrimaryButtonText = "Reproduction to clipboard",
CloseButtonText = "Shut"
};
ContentDialogResult end result = wait for contentDialog.ShowAsync();
if (end result == ContentDialogResult.Number one)
{
DataPackage dataPackage = new DataPackage();
dataPackage.SetText(ocrResult.Textual content);
Clipboard.SetContent(dataPackage);
}
}
Outcome and Person Interplay
The OCR output will likely be displayed in a content material conversation field. Customers give you the chance to duplicate the known textual content to their clipboard.

Conclusion
UWP lets in builders to construct and put up flexible packages throughout all Home windows gadgets. Following the stairs defined above, you’ll create a UWP utility with powerful doc scanning functionalities the usage of the Dynamic Internet TWAIN SDK.
The submit Development a UWP Report Scanning App seemed first on Hongkiat.
WordPress Website Development Source: https://www.hongkiat.com/blog/uwp-document-scanning-app/