
Mac’s integrated screenshot device has two primary problems:
- Screenshots save for your Desktop by means of default, developing muddle
- Filenames are in line with timestamps (e.g., “
Display screen Shot 2026-01-09 at 2.30.00 PM.png“), which aren’t descriptive
This submit will display you learn how to remedy each issues by means of mechanically saving screenshots to a customized folder with significant, descriptive filenames.
Why does this subject?
Over the years, you’ll gather heaps of screenshots with unhelpful filenames. Discovering the precise one turns into tough. It’s possible you’ll inform your self you’ll prepare and rename them later, however let’s be fair – that hardly occurs.
Ultimately, the muddle turns into overwhelming and also you delete them in bulk, continuously shedding screenshots you in fact want.

What we’re development
Right here’s what we’ll do the usage of Mac’s local options (no further apps required): Each and every time you are taking a screenshot, your Mac will mechanically reserve it to a customized folder, analyze the content material, and provides it a brief, descriptive filename.
Mainly, you’ll flip messy screenshot information like those (left) into arranged, descriptive ones like those (correct).

Getting began
This setup takes about 5-10 mins and calls for Mac’s Terminal and Shortcuts apps.
Device necessities:
- Apple silicon Mac (M1, M2, or later)
- Newest macOS model
- Apple Intelligence enabled
Now, let’s get began.
1. Specify a folder for screenshots
First, let’s configure macOS to mechanically save all screenshots to a selected folder.
Steps:
- Create a folder named “Screenshots” (or any title you like)
- Open the Terminal app
- Kind the next command adopted by means of an area (don’t press Input but):
defaults write com.apple.screencapture
- Drag and drop your folder from Finder into the Terminal window – this mechanically fills within the folder trail

- Press Input
- Observe the adjustments by means of operating:
killall SystemUIServer


That’s it! Go out the Terminal app and take a couple of check screenshots. They must now save mechanically for your designated folder.
2. Construction the automation
Right here’s what we’re development: on every occasion a screenshot is stored for your folder, it’ll be mechanically analyzed and renamed with a significant, descriptive filename.
Steps:
- Release the Shortcuts app
- Create a brand new Automation: Pass to Report > New Automation, make a choice Folder, then click on Subsequent
- Within the subsequent display:
- Click on Select Folder, navigate for your screenshot folder, and click on Make a choice
- Below “When Any Pieces Is”, test Added
- Test Run Instantly
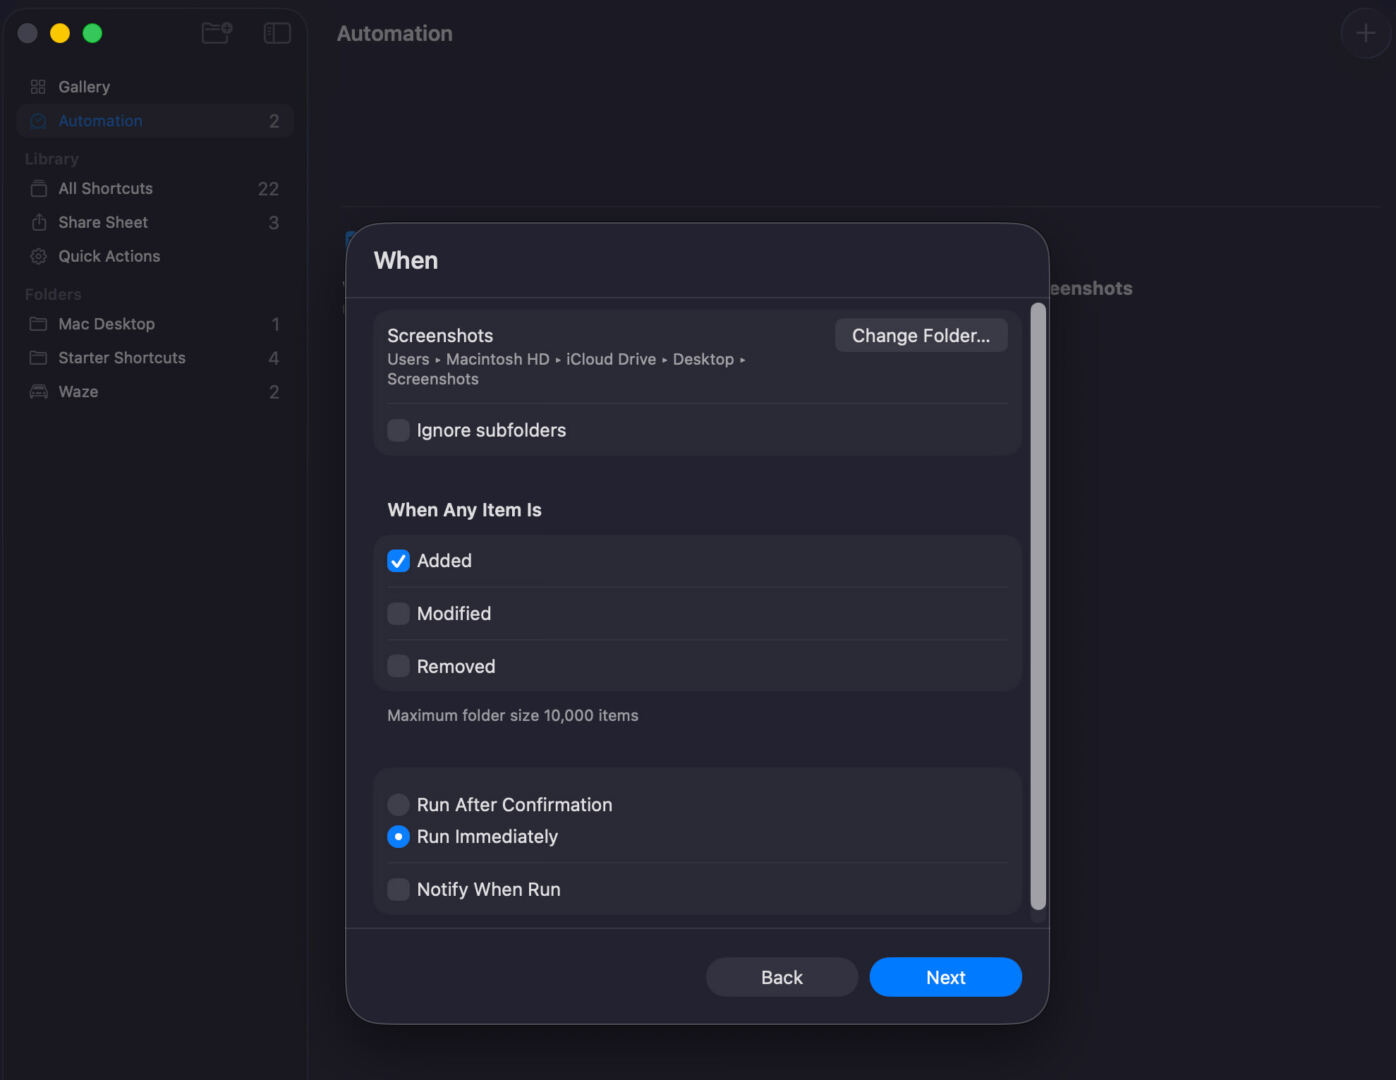
- Check the whole thing is right kind (see screenshot under), then click on Subsequent

At the subsequent display, click on “New Shortcut” to proceed, and then you definitely’ll be directed to the shortcut’s interface.

Apply those under steps in moderation to construct the shortcut:
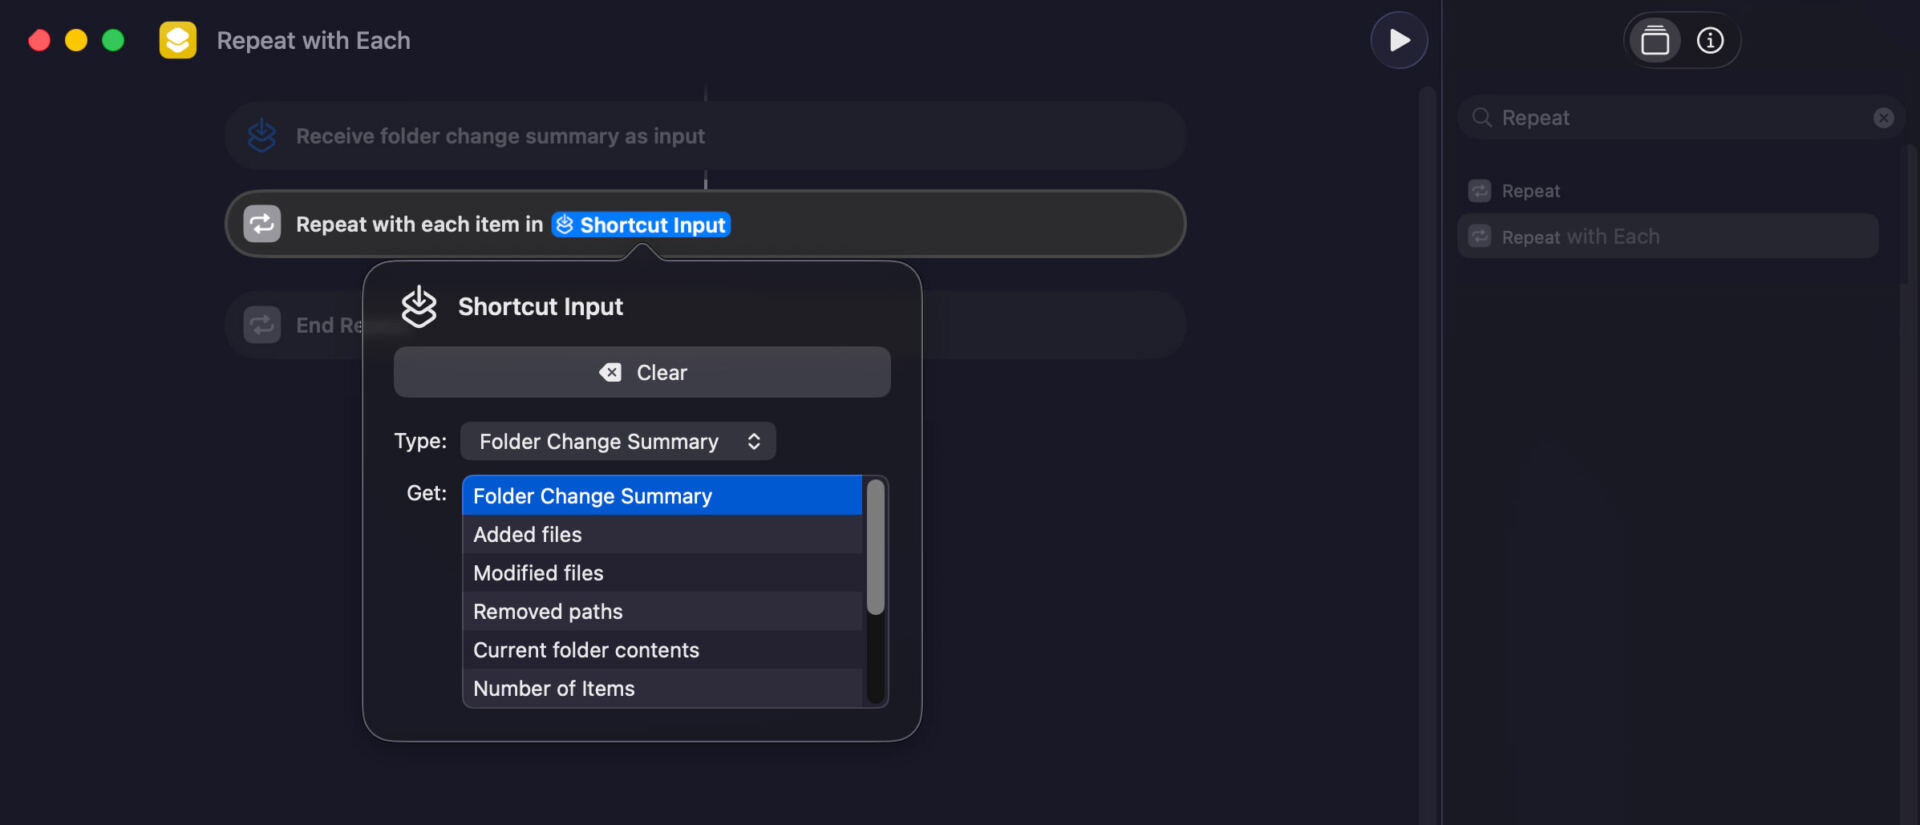
1. Upload “Repeat with Each and every” motion:
- In “Seek Movements” (most sensible correct), seek for “Repeat with Each and every” and double-click so as to add it
- Click on the blue “Pieces”, make a choice “Shortcut Enter” from the dropdown
- Click on “Shortcut Enter” once more, then make a choice “Added information”


2. Upload “Get Pictures from Enter” motion:
- Seek for “Get Pictures from Enter” and double-click so as to add it
- Drag it between “Repeat with…” and “Finish Repeat”
Test your shortcut towards the screenshot under to ensure it’s right kind.

3. Upload “Use Style” motion:
- Seek for “Use Style” and upload it to the panel
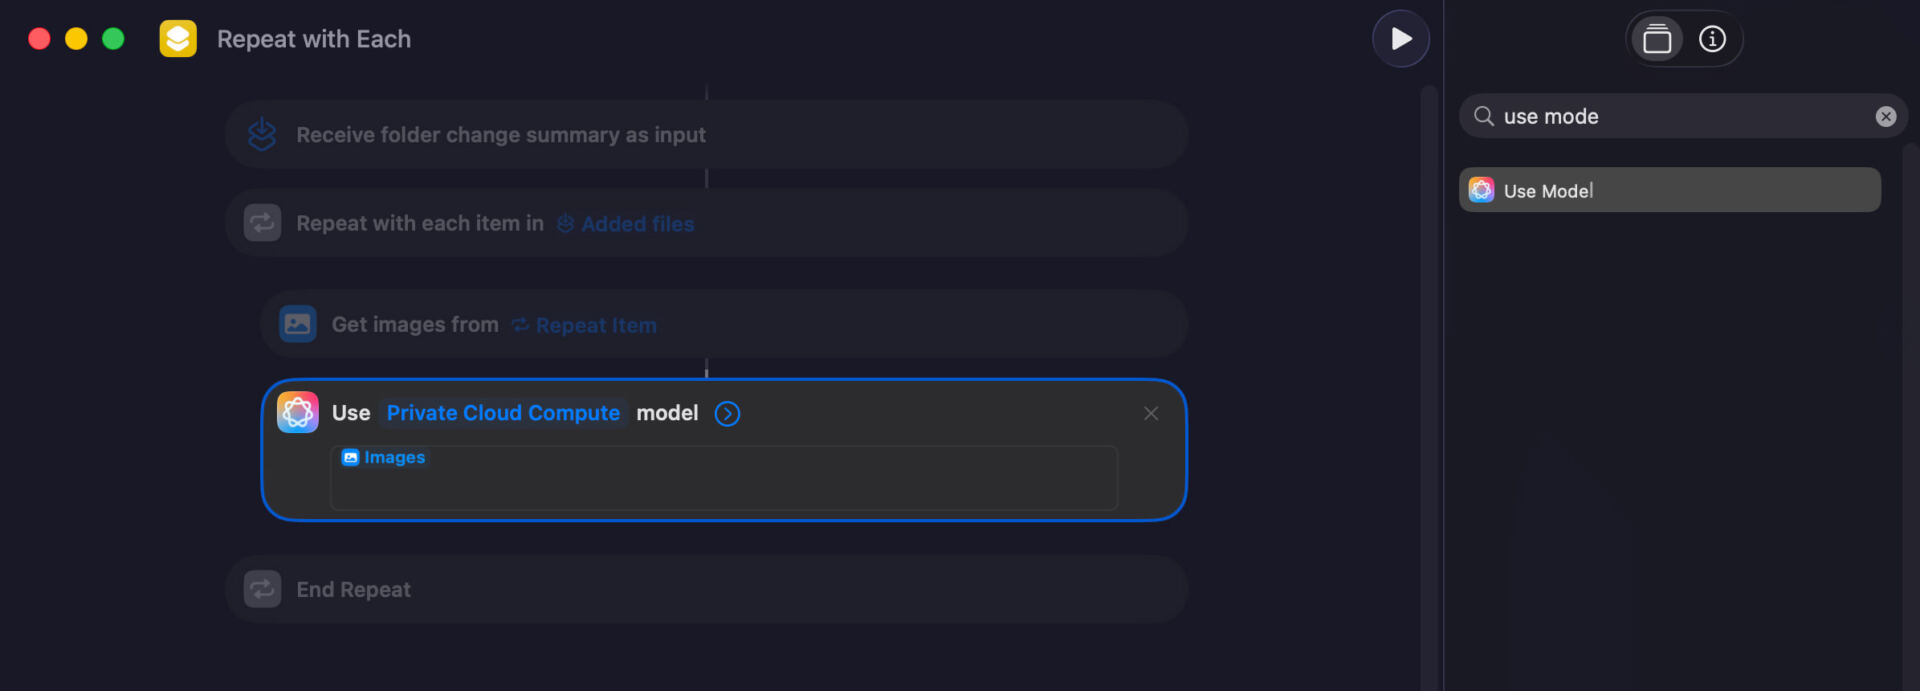
- Click on the textbox containing “Pictures”, transparent it, and paste this suggested:

Analyze the picture and supply a brief, easy descriptive title in line with those laws:
* "Duration:" Use between 3 to five phrases.
* "Layout:" Don't finish the outline with a duration (.).
* "Taste:" Stay it transparent, concise, and descriptive of the principle matter.
- On the finish of the textbox, right-click and make a choice “Insert Variable > Pictures”
4. Upload “Rename Report” motion:
- Seek for “Rename Report” and upload it above “Finish Repeat”
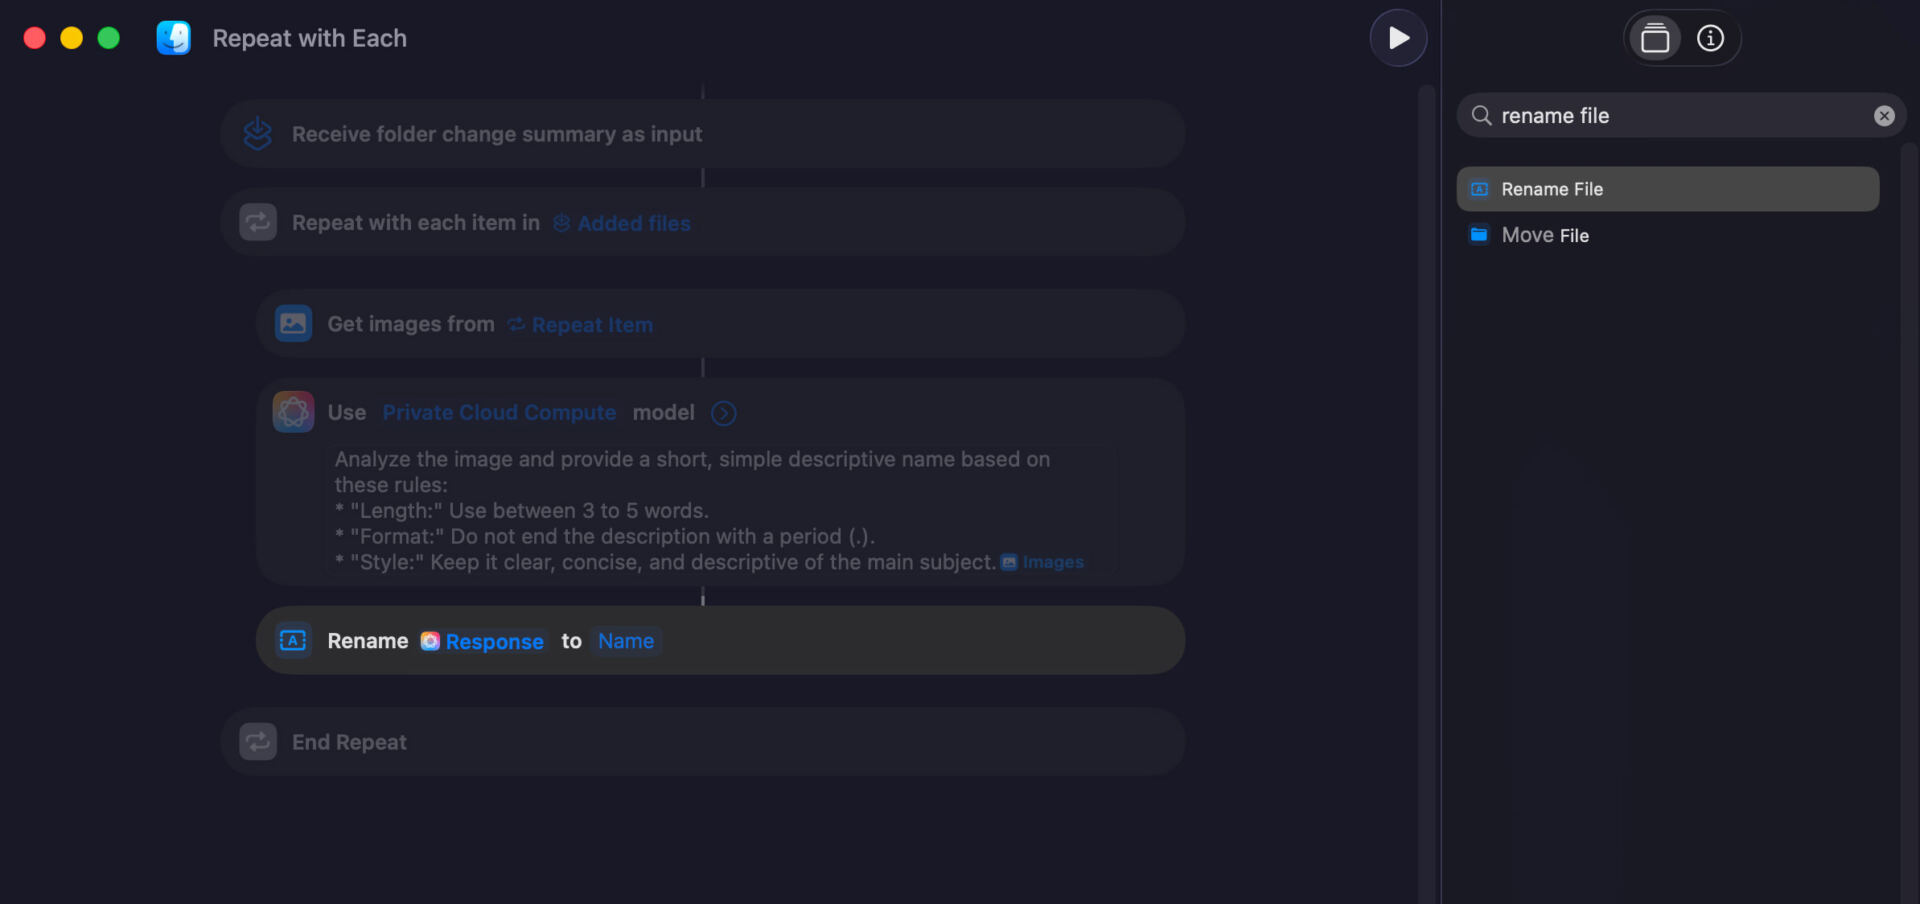
- Proper-click “Reaction” and alter it to “Repeat Merchandise”
- Proper-click “Identify” and alter it to “Reaction”

That’s it! Take a check screenshot. The primary time, you’ll see a permission suggested – click on K to permit get right of entry to for your screenshot folder.
Take a couple of extra screenshots and watch them mechanically get renamed with descriptive filenames to your designated folder.
Ultimate ideas
If the renamed screenshots aren’t precisely what you wish to have, be at liberty to edit the suggested. With this automation quietly running within the background, your screenshots will likely be higher arranged, more uncomplicated to go looking by way of Highlight, and more uncomplicated to spot at a look.
The submit Auto-Arrange Mac Screenshots into Folder and Rename with AI gave the impression first on Hongkiat.
WordPress Website Development Source: https://www.hongkiat.com/blog/organize-mac-screenshots-ai-rename/