
Have you ever ever wasted a whole day in Photoshop?So have I. It isn’t such as you get started out aimlessly. You might have a easy objective in thoughts, like cropping a photograph, making improvements to the solution, or converting the scale of the canvas. However then, you notice all of the choices. And earlier than you comprehend it, you might be making an attempt to unravel The Riddle of the Sphinx.
Would it be great if you might want to simply press a button, and magically, Photoshop would do what you sought after it to do? It turns available in the market are a wealth of Photoshop shortcuts that do just this.
Contents
- 0.1
- 0.2 Getting Set Up
- 0.2.1 1. Exchange symbol dimension
- 0.2.2 2. Exchange canvas dimension
- 0.2.3 3. Zoom in
- 0.2.4 4. Zoom out
- 0.2.5 5. Scale Proportionately
- 0.2.6 6. Scale in position (from middle of the thing)
- 0.2.7 7. Display Rulers
- 0.2.8 8. Display or conceal the grid (the automatically-generated horizontal and vertical traces that assist align gadgets to the canvas.)
- 0.3 Opting for the Proper Equipment
- 0.3.1 9. Pointer, a.ok.a. Transfer Instrument
- 0.3.2 10. Magic Wand
- 0.3.3 11. Oblong Marquee, a.ok.a. the Choose Instrument
- 0.3.4 12. Lasso
- 0.3.5 13. Eyedropper
- 0.3.6 14. Crop
- 0.3.7 15. Eraser
- 0.3.8 16. Rectangle
- 0.3.9 17. Horizontal Sort
- 0.3.10 18. Brush
- 0.3.11 19. Historical past Brush
- 0.3.12 20. Spot Therapeutic Brush
- 0.3.13 21. Gradient
- 0.3.14 22. Trail Variety
- 0.3.15 23. Hand
- 0.3.16 24. Rotate View
- 0.3.17 25. Pen
- 0.3.18 26. Clone Stamp
- 0.3.19 27. Dodge
- 0.3.20 28. Zoom Instrument
- 0.3.21 29. Default Foreground and Background Colours
- 0.3.22 30. Transfer Foreground and Background Colours
- 0.3.23 31. Edit in Fast Masks Mode
- 0.3.24 32. Exchange Display screen Mode
- 0.3.25 33. Complete Display screen
- 0.4 The usage of the Brush Instrument
- 0.5 The usage of the Marquee Instrument (for Cutting/Settling on)
- 0.6 The usage of Other Mixing Choices
- 0.7 Manipulating Layers & Gadgets
- 0.7.1
- 0.7.2 53. Choose all gadgets
- 0.7.3 54. Deselect all gadgets
- 0.7.4 55. Choose the inverse of the chosen gadgets
- 0.7.5 56. Choose all layers
- 0.7.6 57. Merge all layers
- 0.7.7 58. Choose most sensible layer
- 0.7.8 59. Choose backside layer
- 0.7.9 60. Choose subsequent layer down or up
- 0.7.10 61. Transfer goal layer down or up
- 0.7.11 62. Transfer layer to the ground or most sensible
- 0.7.12 63. Create a brand new layer
- 0.7.13 64. Team decided on layers
- 0.7.14 65. Ungroup decided on layers
- 0.7.15 66. Merge and flatten decided on layers
- 0.7.16 67. Mix all layers into a brand new layer on most sensible of the opposite layers
- 0.7.17 68. Change into your object (contains resizing and rotating)
- 0.7.18 69. More than one Undos
- 1 And After all — Save Your Paintings for Later

By means of urgent a couple of keys to your pc keyboard on the similar time, you’ll be able to choose equipment, manipulate pictures and layers, or even make changes for your mission’s canvas. We will display you the way to do all of that (and extra) on this information.
Save all of those shortcuts for your desktop by means of downloading the PDF version here.
Observe: All of those shortcuts can also be accessed on PC and Mac, however on occasion, they are other on every working device. We have integrated each sorts beneath, and within the instances the place they could be other, Mac directions seem in italicized parentheses. Additionally, in those formulation, the plus signal (+) is provide best to constitute the combo of key instructions. Sometimes, it could be a part of the command itself, like while you press the plus signal to zoom into part of a picture. Differently, do not press the plus signal between instructions.
Getting Set Up
You would assume putting in place your content material in Photoshop could be 2d nature. However on occasion, the shortcuts to modify the background dimension, or zoom into your mission don’t seem to be what you assume. Listed below are one of the vital maximum the most important basic shortcuts to grasp:
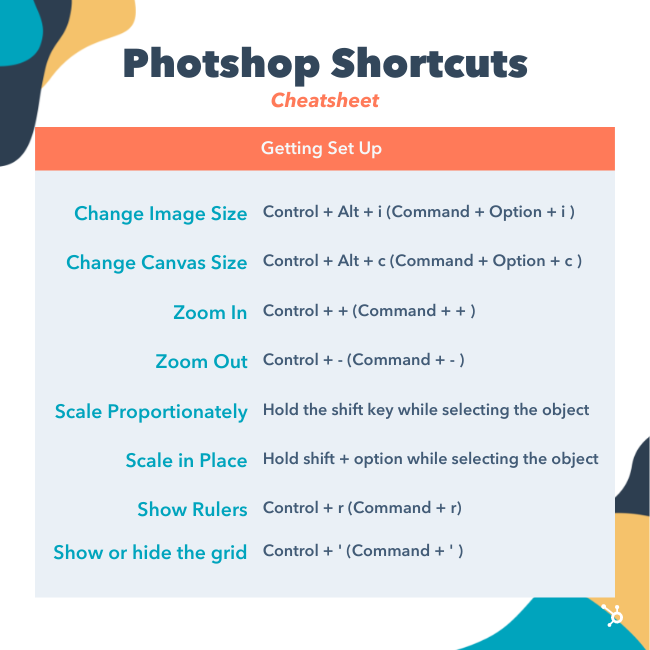
1. Exchange symbol dimension
Keep an eye on + Alt + i (Command + Possibility + i )
2. Exchange canvas dimension
Keep an eye on + Alt + c (Command + Possibility + c )
3. Zoom in
Keep an eye on + + (Command + + )
4. Zoom out
Keep an eye on + – (Command + – )
5. Scale Proportionately
Cling the shift key whilst settling on the thing
6. Scale in position (from middle of the thing)
Cling shift + possibility whilst settling on the thing
7. Display Rulers
Keep an eye on + r (Command + r)
8. Display or conceal the grid (the automatically-generated horizontal and vertical traces that assist align gadgets to the canvas.)
Keep an eye on + ‘ (Command + ‘ )
Opting for the Proper Equipment
Those shortcuts will turn on other teams of equipment, like “Lasso,” “Brush,” or “Spot Therapeutic Brush.” Inside those equipment, even though, there are other purposes. Beneath the “Magic Wand” software staff, for instance, you might have the strategy to execute a brand new variety or upload and subtract from a present one.
Each and every any such equipment has a keyboard shortcut, and we have defined a few of them beneath.
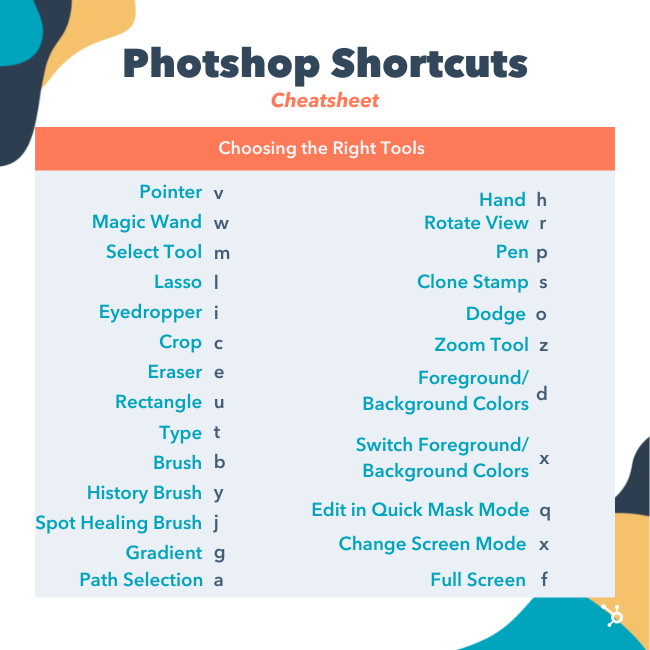
9. Pointer, a.ok.a. Transfer Instrument
v
10. Magic Wand
w
11. Oblong Marquee, a.ok.a. the Choose Instrument
m
12. Lasso
l
13. Eyedropper
i
14. Crop
c
15. Eraser
e
16. Rectangle
u
17. Horizontal Sort
t
18. Brush
b
19. Historical past Brush

y
20. Spot Therapeutic Brush
j
21. Gradient
g
22. Trail Variety
a
23. Hand
h
24. Rotate View
r
25. Pen
p
26. Clone Stamp
s
27. Dodge
o
28. Zoom Instrument
z
29. Default Foreground and Background Colours
d
30. Transfer Foreground and Background Colours
x
31. Edit in Fast Masks Mode
q
32. Exchange Display screen Mode
x
33. Complete Display screen
f
The usage of the Brush Instrument
With the comb settings, you’ll be able to trade the scale, form, and transparency of your brush strokes to reach a lot of other visible results. To make use of those keyboard shortcuts, first choose the Brush software by means of urgent b.
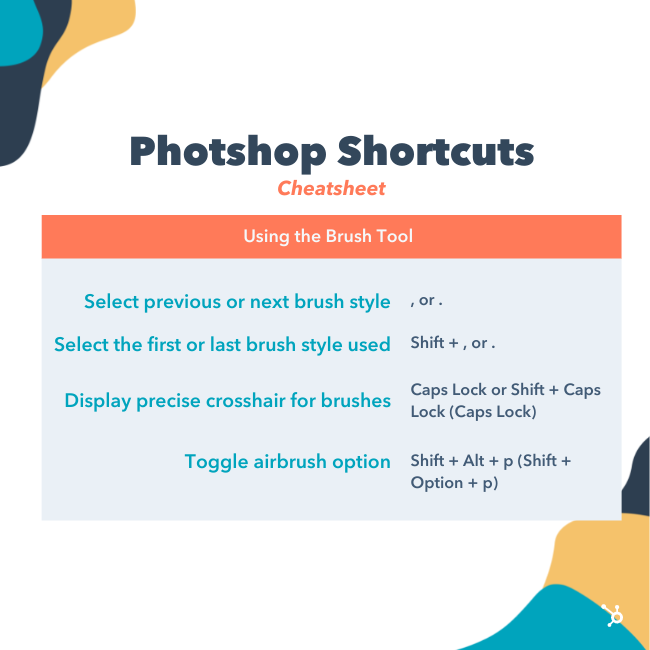
34. Choose earlier or subsequent brush taste
, or .
35. Choose the primary or final brush taste used
Shift + , or .
36. Show exact crosshair for brushes
Caps Lock or Shift + Caps Lock (Caps Lock)
37. Toggle airbrush possibility
Shift + Alt + p (Shift + Possibility + p)
The usage of the Marquee Instrument (for Cutting/Settling on)
When used as it should be, the marquee software will help you choose particular person parts, whole graphics, and resolve what’s copied, lower, and pasted into your graphics. To make use of those keyboard shortcuts, first choose the Marquee software by means of urgent m.
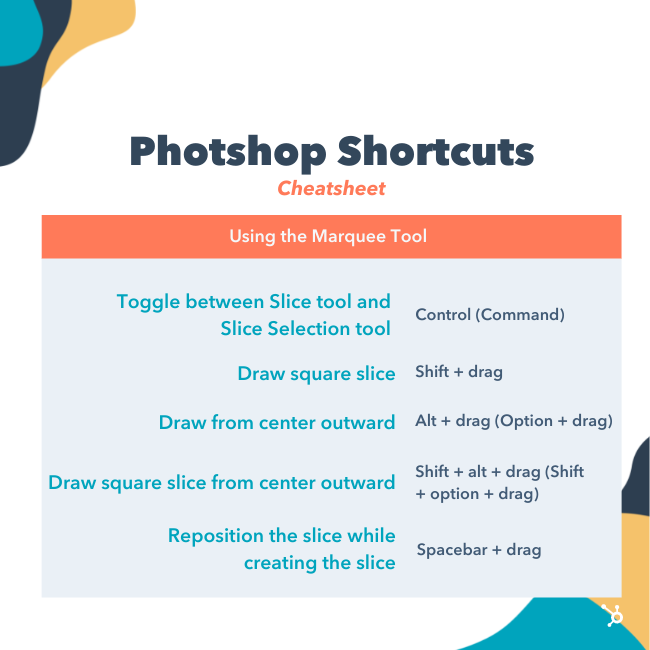
38. Toggle between Slice software and Slice Variety software
Keep an eye on (Command)
39. Draw sq. slice
Shift + drag
40. Draw from middle outward
Alt + drag (Possibility + drag)
41. Draw sq. slice from middle outward
Shift + alt + drag (Shift + possibility + drag)
42. Reposition the slice whilst developing the slice
Spacebar + drag
The usage of Other Mixing Choices
Mixing choices come with a lot of options to beef up the glance of your graphic. You’ll all the time make a selection a mixing possibility by means of going to the highest menu bar, below Layer > Layer Taste > Mixing Choices. Or, you’ll be able to double-click any layer to convey up the choices for that specific layer.
Whenever you open mixing choices, you’ll be able to use keyboard shortcuts to choose them with out shifting your mouse. To make use of the shortcuts, choose the Transfer software (“v”), after which choose the layer you would like to make use of the mixing choices on. Under are one of the vital hottest modes.
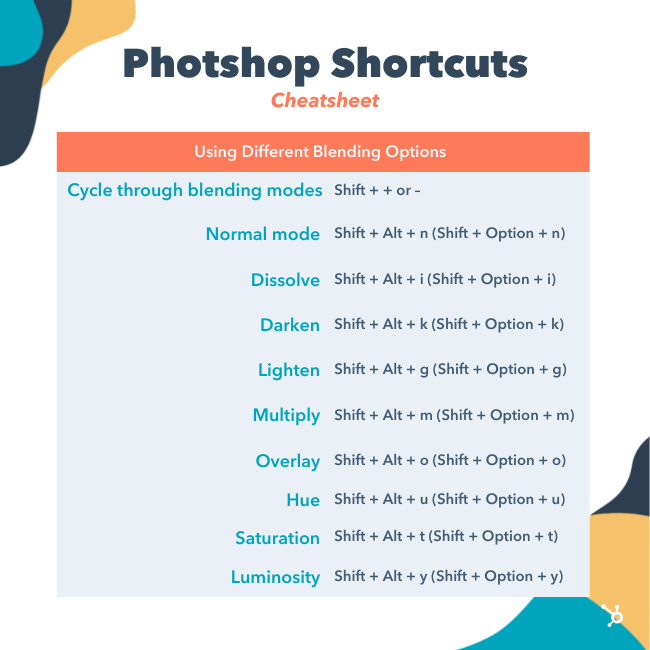
43. Cycle via mixing modes
Shift + + or –
44. Commonplace mode
Shift + Alt + n (Shift + Possibility + n)
45. Dissolve
Shift + Alt + i (Shift + Possibility + i)
46. Darken
Shift + Alt + ok (Shift + Possibility + ok)
47. Lighten
Shift + Alt + g (Shift + Possibility + g)
48. Multiply
Shift + Alt + m (Shift + Possibility + m)
49. Overlay
Shift + Alt + o (Shift + Possibility + o)
50. Hue
Shift + Alt + u (Shift + Possibility + u)
51. Saturation
Shift + Alt + t (Shift + Possibility + t)
52. Luminosity
Shift + Alt + y (Shift + Possibility + y)
For extra area of interest mixing shortcuts, take a look at these tips from Adobe.
Manipulating Layers & Gadgets
If you wish to regulate an object or get complicated with more than one layers, listed below are some shortcuts it’s possible you’ll like to grasp:
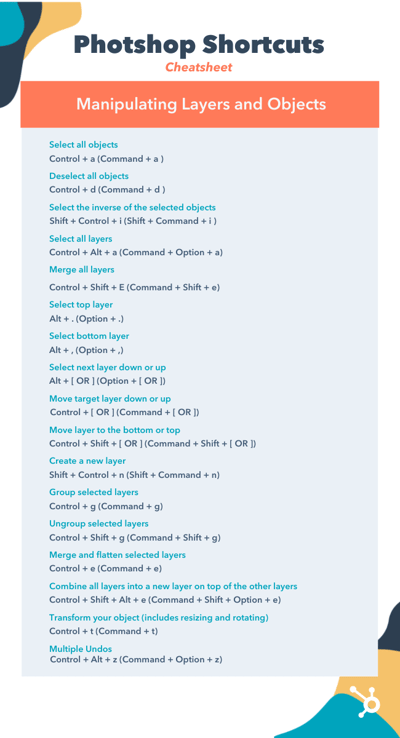
53. Choose all gadgets
Keep an eye on + a (Command + a )
54. Deselect all gadgets
Keep an eye on + d (Command + d )
55. Choose the inverse of the chosen gadgets
Shift + Keep an eye on + i (Shift + Command + i )
56. Choose all layers
Keep an eye on + Alt + a (Command + Possibility + a)
57. Merge all layers
Keep an eye on + Shift + E (Command + Shift + e)
58. Choose most sensible layer
Alt + . (Possibility + .)
59. Choose backside layer
Alt + , (Possibility + ,)
Observe: In shortcuts 55-57, the brackets ([ ]) are the keystrokes within the command, and “OR” refers back to the precise phrase — as in, press one bracket OR the opposite, now not the letters “o” and “r.”
60. Choose subsequent layer down or up
Alt + [ OR ] (Possibility + [ OR ])
61. Transfer goal layer down or up
Keep an eye on + [ OR ] (Command + [ OR ])
62. Transfer layer to the ground or most sensible
Keep an eye on + Shift + [ OR ] (Command + Shift + [ OR ])
63. Create a brand new layer
Shift + Keep an eye on + n (Shift + Command + n)
64. Team decided on layers
Keep an eye on + g (Command + g)
65. Ungroup decided on layers
Keep an eye on + Shift + g (Command + Shift + g)
66. Merge and flatten decided on layers
Keep an eye on + e (Command + e)
67. Mix all layers into a brand new layer on most sensible of the opposite layers
Keep an eye on + Shift + Alt + e (Command + Shift + Possibility + e)
Observe: This step will get you one, mixed layer, with all parts of that layer in separate layers beneath — which isn’t like a standard merge-and-flatten layers command.
68. Change into your object (contains resizing and rotating)
Keep an eye on + t (Command + t)
69. More than one Undos
Keep an eye on + Alt + z (Command + Possibility + z)
And After all — Save Your Paintings for Later
Congratulations — you have completed operating to your mission, and now, you are ready to percentage it with the arena. Save time-saving your mission by means of the use of those easy shortcuts:
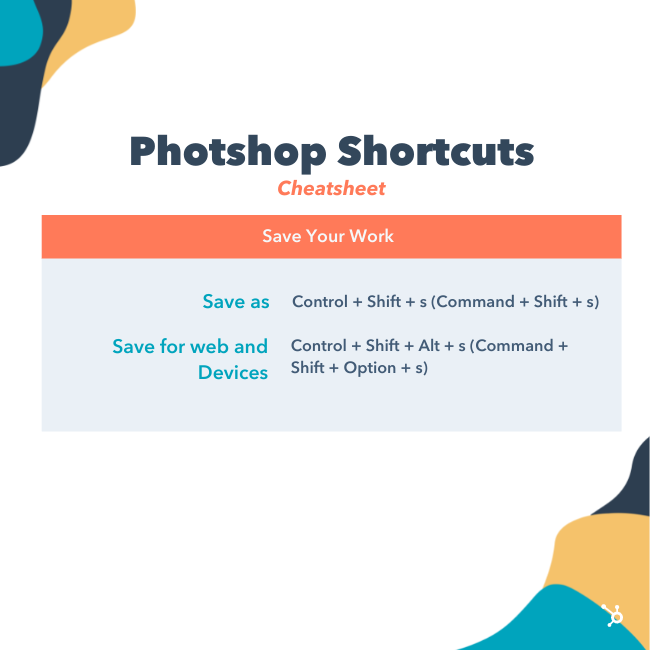
70. Save as
Keep an eye on + Shift + s (Command + Shift + s)
71. Save for internet and units
Keep an eye on + Shift + Alt + s (Command + Shift + Possibility + s)

![]()