
Managing an internet retailer is pricey, and house owners continuously need to take care of many handbook processes. The WooCommerce REST API simplifies this workflow, enabling you to keep an eye on ecommerce platforms and organize and scale WooCommerce shops programmatically.
Acting integrations, automation, and lengthening your on-line retailer functions are seamless operations with the WooCommerce REST API. You save on sources and time, which you’ll be able to use to additional streamline your processes. This additionally lets you customise the feel and appear of your retailer with versatile exterior packages.
This newsletter will provide you with a complete working out of the WooCommerce REST API, enabling you to programmatically automate and toughen your eCommerce operations. It supplies sensible insights, use circumstances, and code examples to facilitate the seamless integration and customization of WooCommerce shops.
Contents
Must haves
To get began with WooCommerce REST API, you should be the usage of:
- WooCommerce model 3.5 or upper.
- WordPress model 4.4 or upper.
- Postman or Insomnia for API checking out and interplay.
Get began with the WooCommerce REST API
To get began, you wish to have to create a WordPress web site after which generate the API credentials inside of WooCommerce.
Create a WordPress web site with Kinsta
If you happen to don’t have a WordPress web site, you’ll be able to simply create one o your MyKinsta dashboard.
- Navigate in your MyKinsta account and click on the WordPress Websites at the left sidebar.
- From the Upload web site dropdown menu, make a selection the Create new web site choice, then continue to the following web page, the place you’ll be able to make a choice the Set up WordPress choice and click on Proceed.
- Input your web site title and knowledge middle location in Website choices and click on Proceed.
- Within the subsequent tab, enter your web site identify and admin credentials. Make a choice a language and test the Set up WooCommerce checkbox to put in the WooCommerce plugin.
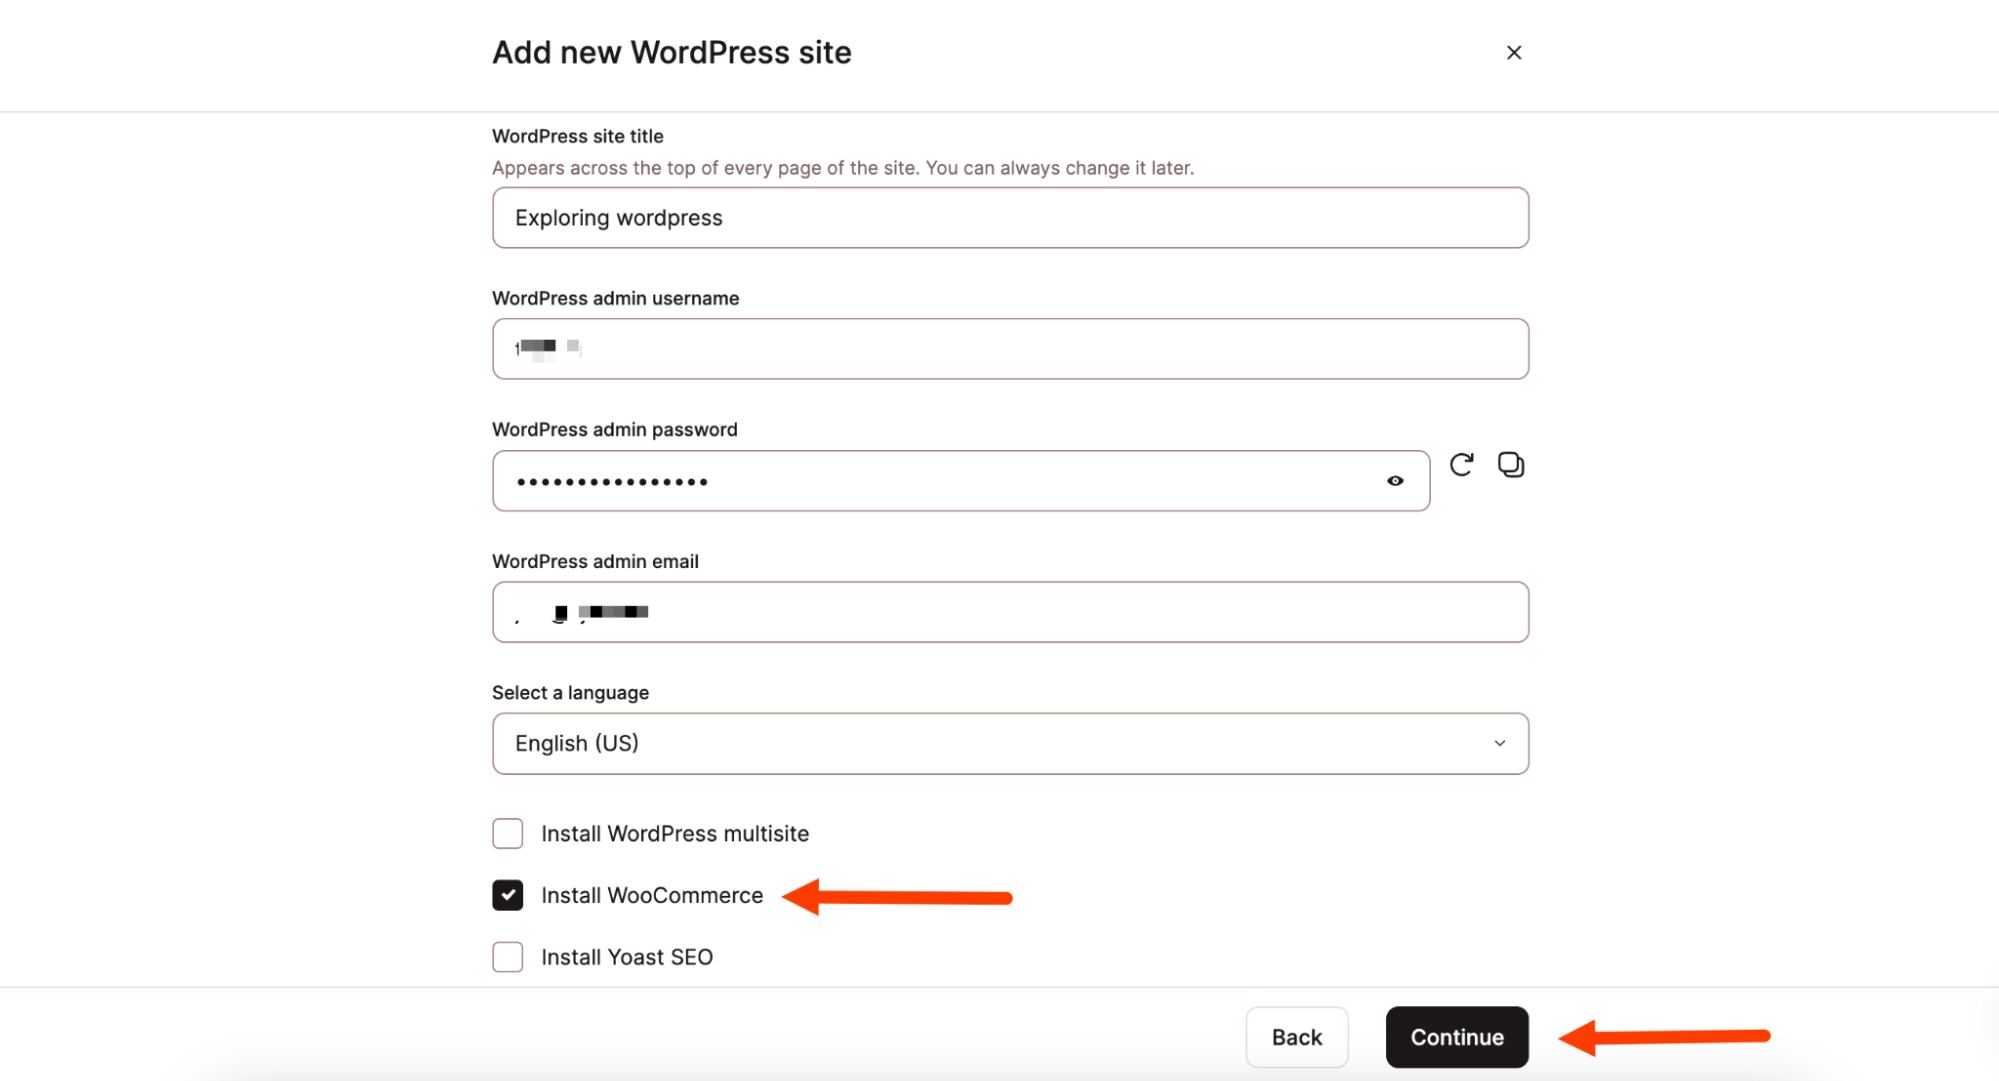
Making a WordPress web site and putting in WooCommerce. - Click on Proceed. This initiates your web site advent and sends a notification in your WordPress admin electronic mail as soon as it’s finished. Be sure you retailer your WordPress admin username and password someplace secure.

Generate API credentials in WooCommerce
To generate your WooCommerce API credentials, practice those steps:
- Log in in your WordPress dashboard, make a selection Plugins > Put in Plugins from the sidebar, and turn on the WooCommerce plugin.
- After activating the plugin, make a selection WooCommerce > Settings. Then click on the Complicated tab to get admission to the WooCommerce complicated settings web page.
- Subsequent, click on REST API.
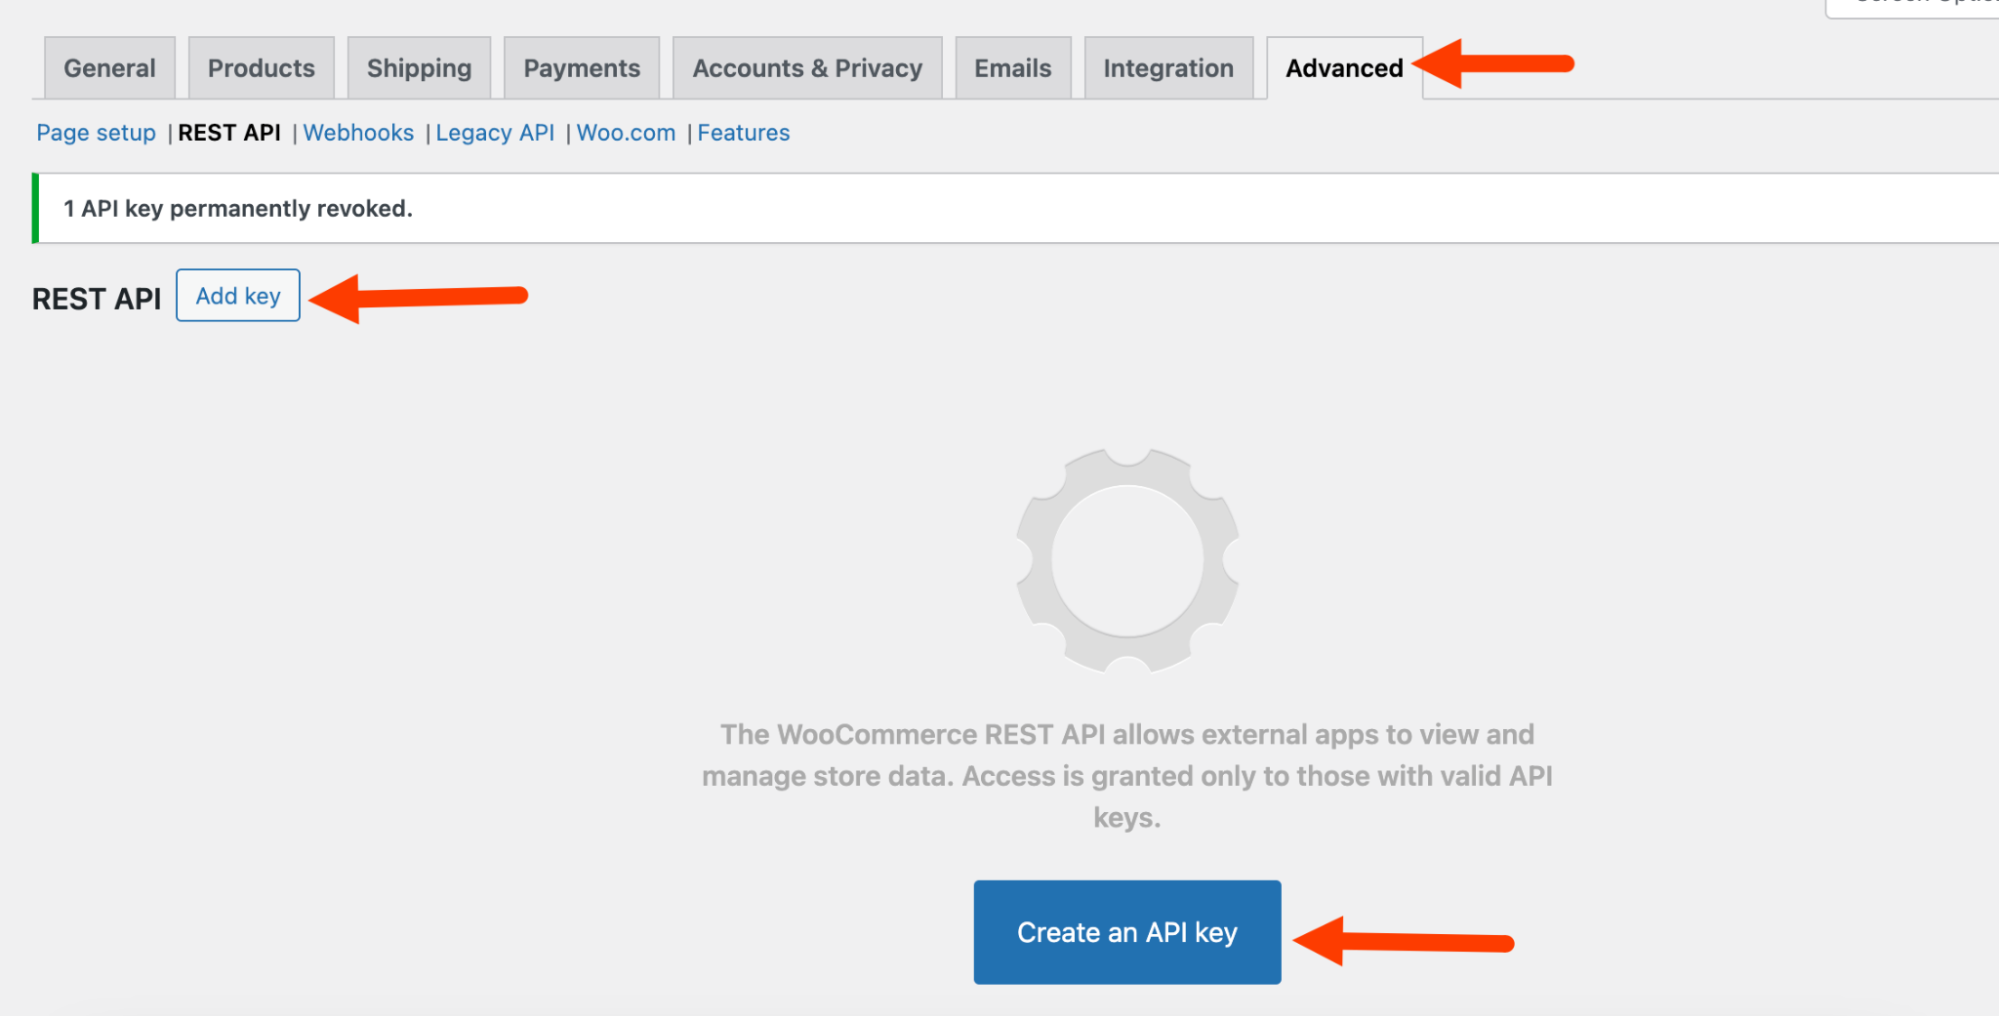
API key credentials web page. - Click on Create an API Key or Upload Key to generate an API key.
- Subsequent, you’re induced to enter the Key main points. Those are description, consumer, and permissions. Input your key description, alternate the consumer if required, and make a selection Learn/Write for permissions.
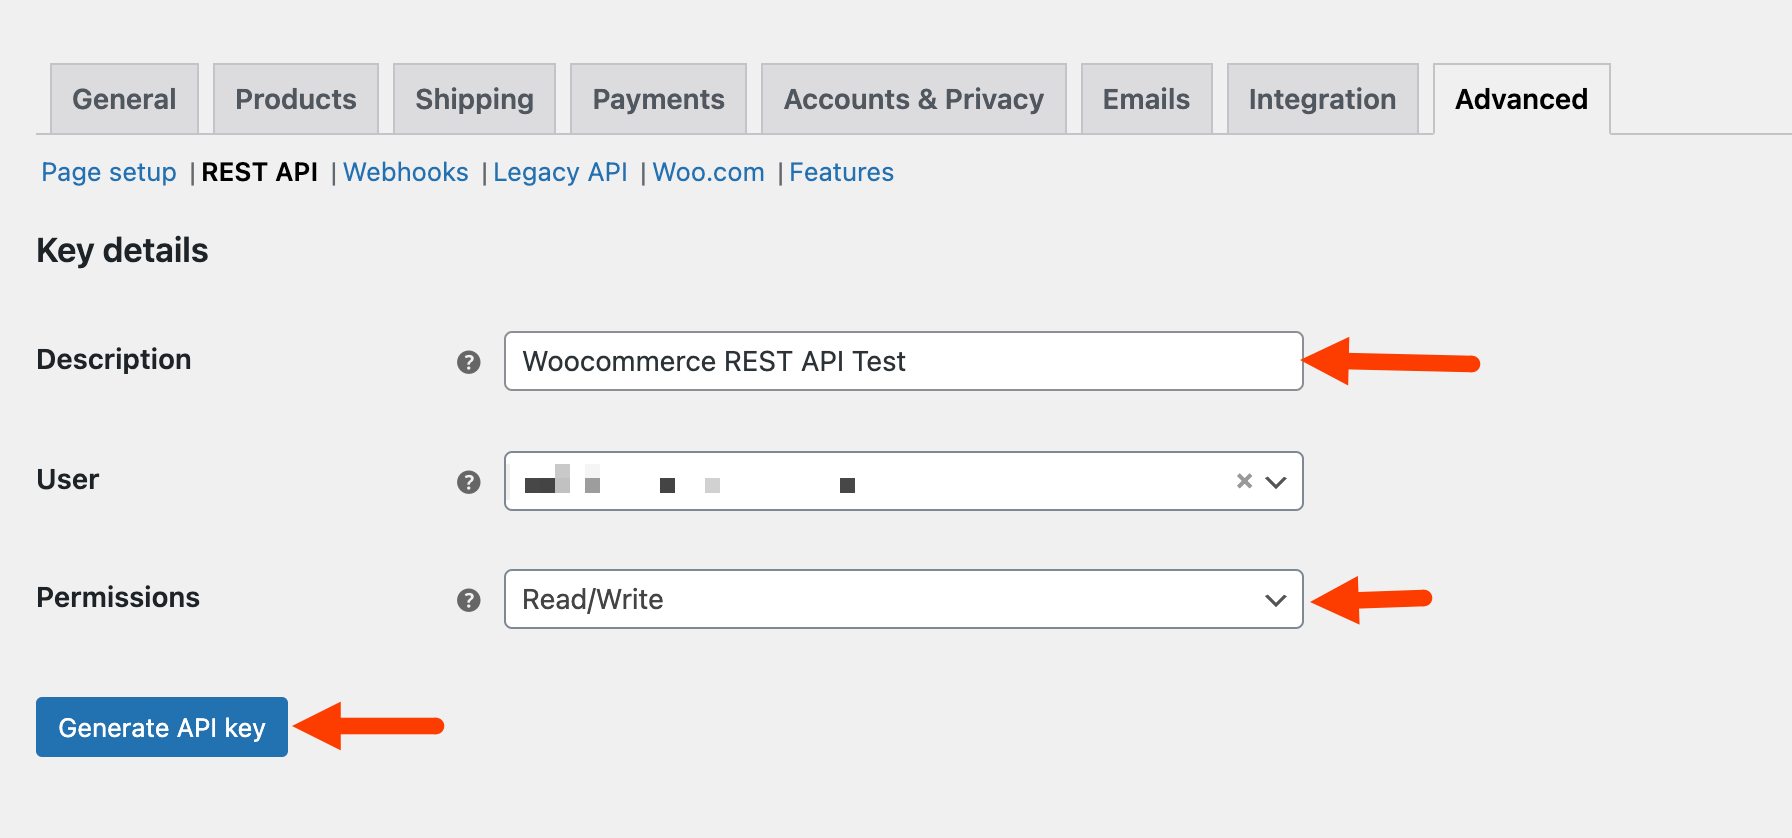
Producing API key credentials. - Click on Generate API Key. With the generated API keys, you’ll be able to get admission to and organize your retailer knowledge programmatically. Take into accout of your client key and secret, as you’ll use them within the subsequent segment to make API requests.
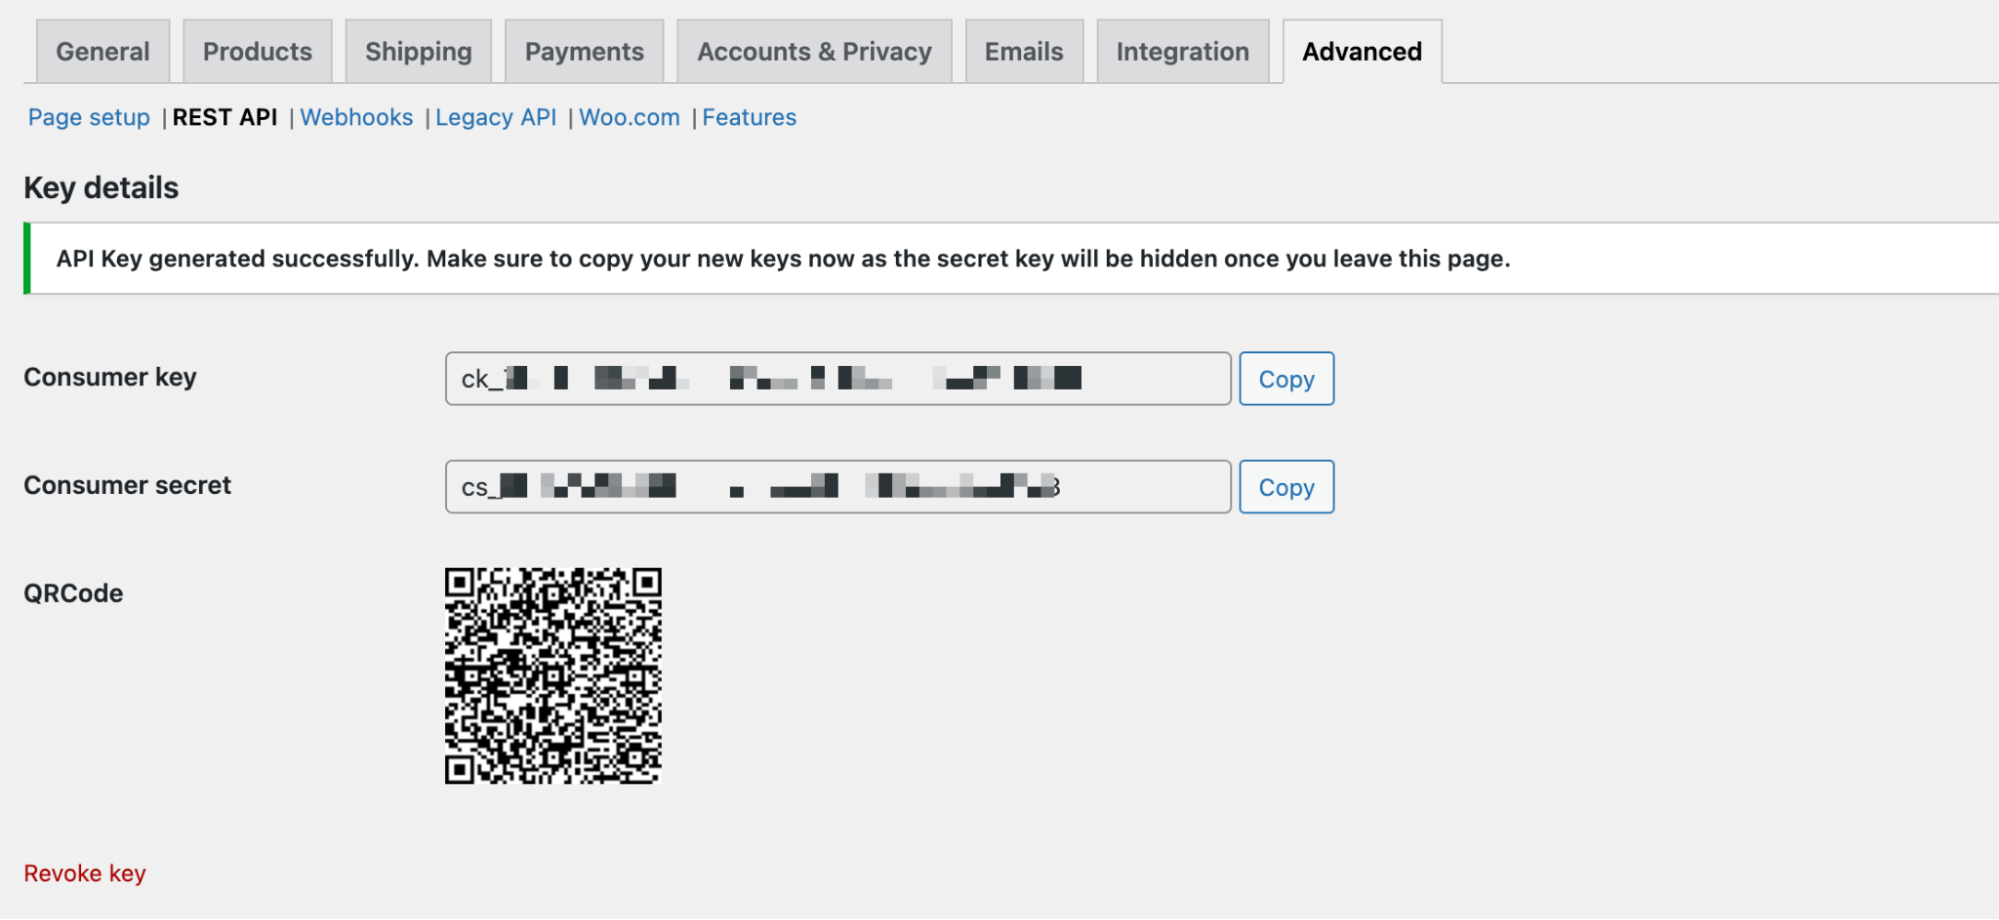
Generated API key credentials.


Working out the WooCommerce REST API structure
The WooCommerce API is constructed upon REST structure. This permits you to learn and carry out write operations on WooCommerce knowledge, similar to orders, merchandise, and consumers, via sending requests by way of the correct strategies (GET, POST, PUT, DELETE) to the endpoint.
An endpoint is composed of the request strategies in conjunction with a typical URL. With an endpoint, you’ll be able to use your selected software (Postman or Insomnia) to get admission to other saved knowledge.
Fetch a listing of goods
Sooner than you fetch the checklist of goods, make sure you’ve added a couple of in your retailer. You should alternate the permalink construction to one thing instead of Undeniable.
Click on Settings > Permalinks from the sidebar and alter the permalink construction. If you happen to don’t make this alteration, your same old URL endpoint won’t paintings because it must. Click on Save adjustments.
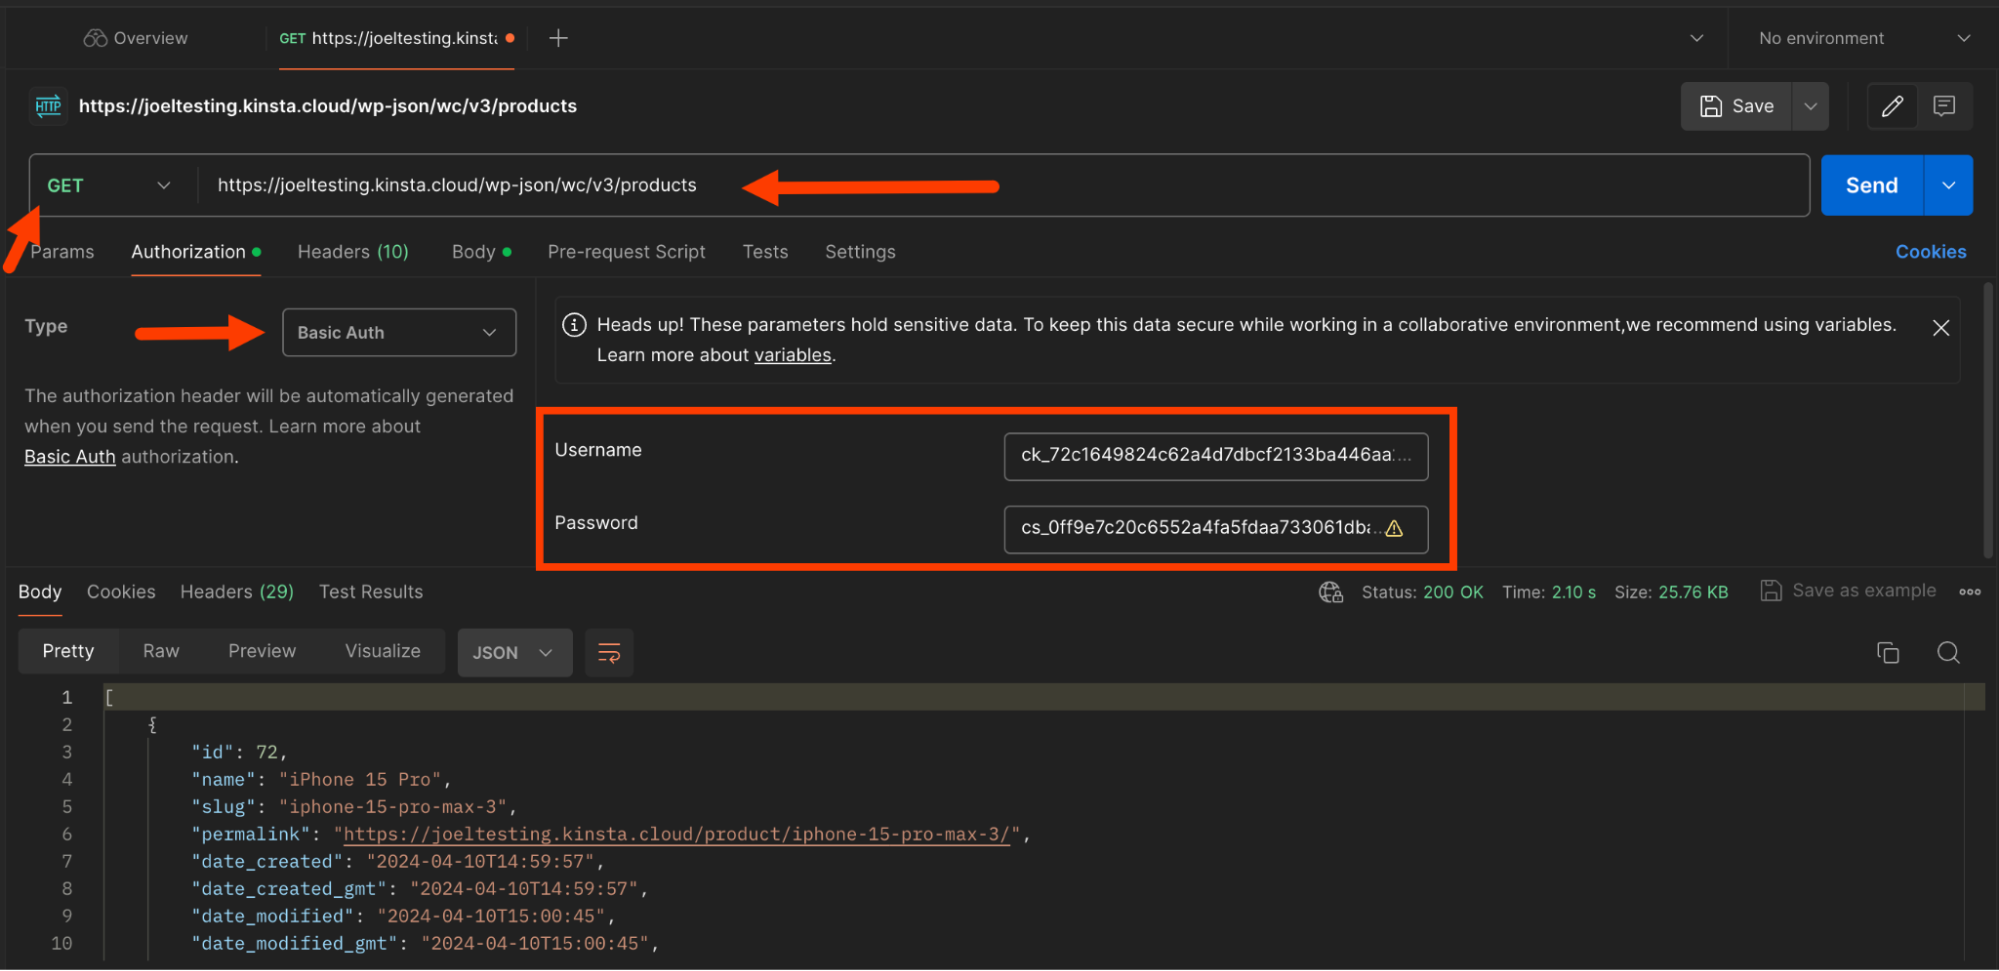
Subsequent, open Postman and upload a brand new request. Within the URL segment, use https://. Be sure you exchange
Within the authorization tab, make a selection Elementary Auth and enter your client key because the Username and client secret because the Password. You should upload this authorization to each request you are making in your WooCommerce REST API. Ship the request, and also you must obtain a listing of the entire merchandise to your retailer.

Organize merchandise by way of the REST API
The product object has a listing of attributes that make it easy to team merchandise, organize inventory, and set costs — all programmatically.
Say you wish to have so as to add a brand new product to a product team you’ve created — all you wish to have is the product team ID within the grouped_products characteristic.
To regulate inventory, use the manage_stock and stock_status attributes, that are set to both true or false and instock, onbackorder, and outofstock respectively.
Let’s take a look at how you’ll be able to upload and replace an current product element.
Upload product with the WooCommerce API
- In Postman, upload a brand new request and alter the request option to POST. Reuse the endpoint URL used within the earlier segment. Click on the Frame tab, make a selection uncooked, and make a choice JSON as your frame layout. The JSON payload has the product’s title, kind (easy, variable, or grouped), description, and quick description. It additionally has classes, tags, and photographs you’ll be able to upload as wanted.
{ "title": "iPhone 15 Professional Max", "kind": "easy", "description": "", "short_description": "", "classes": [ ], "tags": [], "photographs": [] } - Execute the request. If the product is effectively created, you must obtain a product object as a reaction. Take into accout of the product ID, as you’ll want it within the subsequent segment.
Making a product.
Edit a product with WooCommerce API
Let’s edit the document you’ve simply created.
- Within the Frame tab, upload this JSON frame:
{
  "title": "iPhone 15 Professional"
}
Because you’re handiest updating the
titlebox, you don’t want to come with different attributes. On this case, alternate it to “iPhone 15 Professional”. The endpoint URL must behttps://yourdomain/wp-json/wc/v3/merchandise/. - Exchange
identificationwith the ID of the product you created within the earlier segment. Don’t omit to modify the request option to PUT. Execute the request, and also you must obtain a product object as a reaction. You’ll test the product’s title within the reaction to substantiate its a hit replace.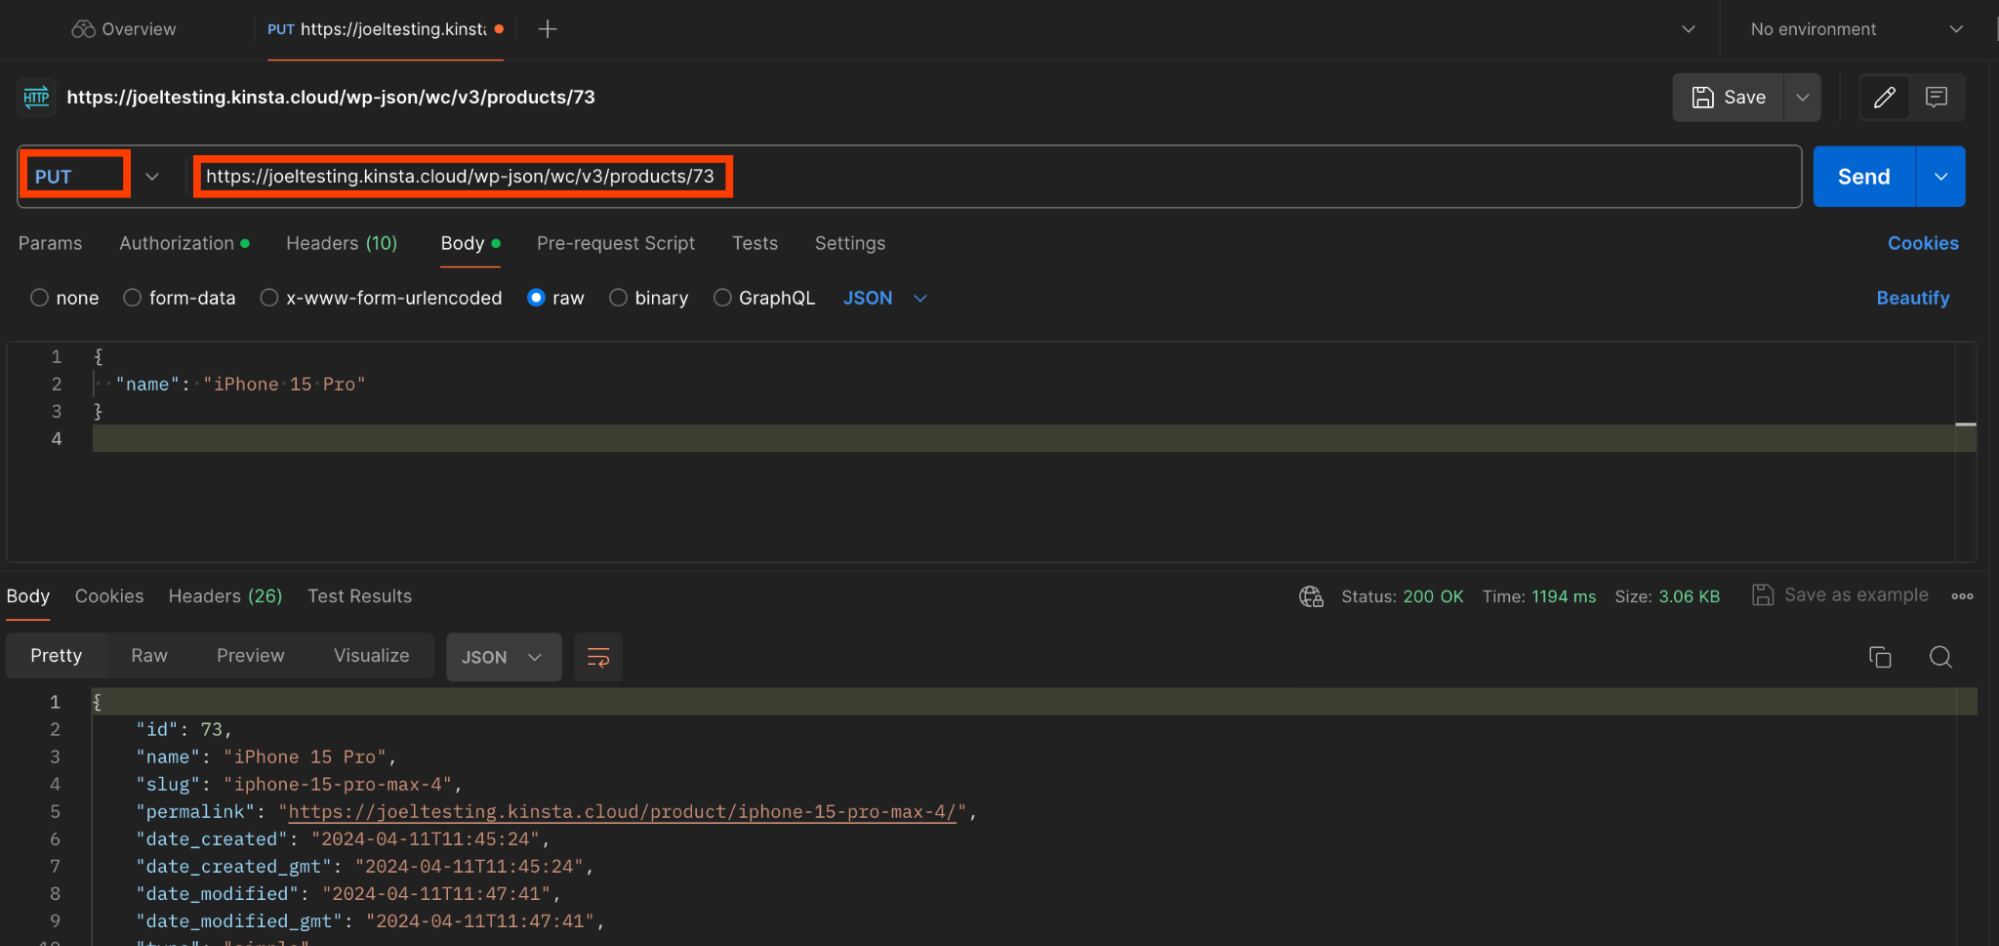
Enhancing a product.

Order control with the REST API
The WooCommerce REST API facilitates automating order processing via enabling the seamless retrieval of orders and replace of order statuses. It allows you to programmatically retrieve orders, clear out them in response to quite a lot of standards similar to date, standing, or visitor, after which successfully procedure them.
This comprises updating order statuses to replicate quite a lot of levels of success or processing. The WooCommerce REST API then guarantees correct monitoring and communique with consumers. Moreover, you’ll be able to organize refunds during the API, together with dealing with refund requests, processing refunds routinely, and updating order statuses (after refunds).
Let’s take a look at how you’ll be able to fetch fresh orders and replace the standing of an order to “finished.”
Fetch fresh orders with WooCommerce API
- In Postman, upload a brand new request for fetching orders the usage of a GET request. The endpoint URL must be as follows:
https:///wp-json/wc/v3/orders - Within the Params tab, enter the important thing to
afterand price to the date your orders have been created after. On this case, use2024-03-08T00:00:00. Be happy to switch this date as required. This permits you to clear out your orders to just the ones after a given date. Depart the opposite Postman settings as default. - Be sure you’ve made a couple of orders to your WooCommerce retailer to steer clear of returning an empty checklist. Execute the request, and also you must get a listing of the entire orders made in your retailer that fit the required standards.
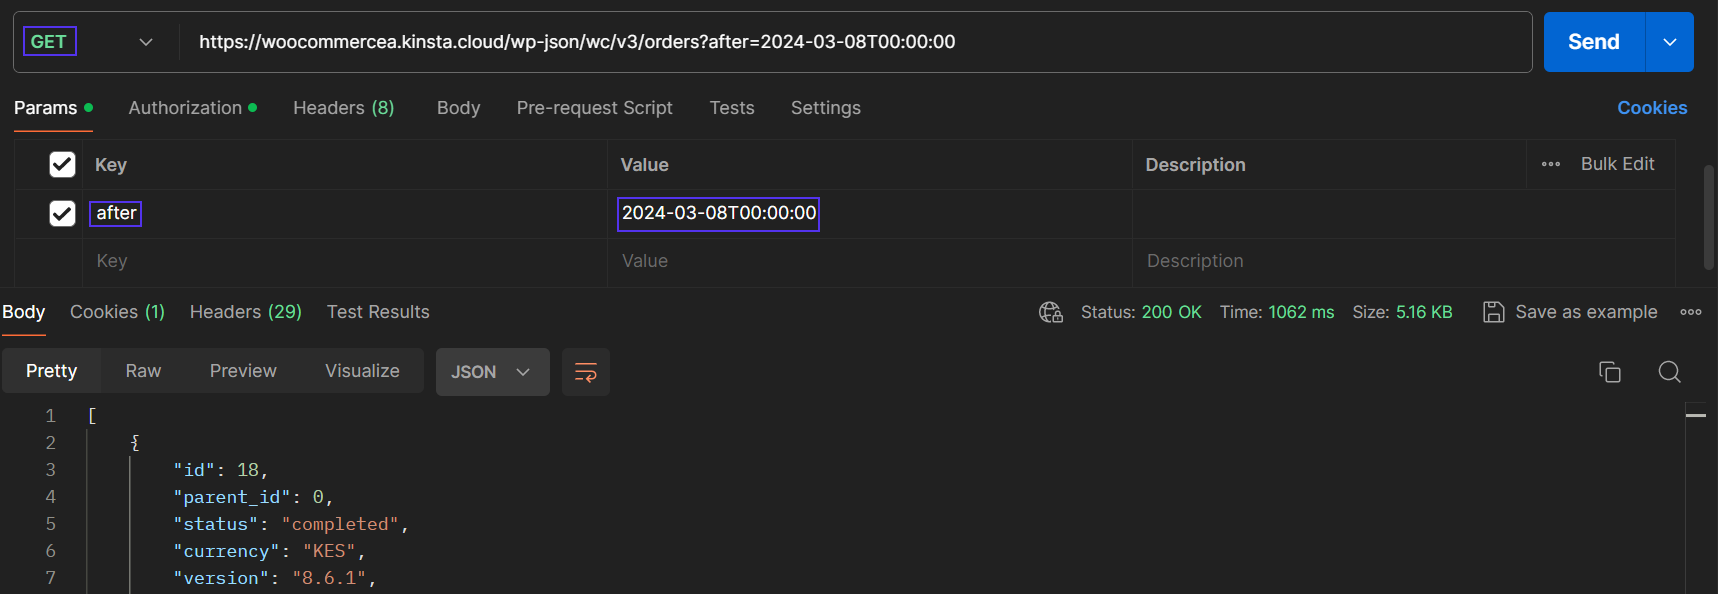
Fetching fresh orders after a given date.

Replace order standing
To replace your order standing, seize the ID of an order you’ve already made. Upload a brand new request in Postman and alter its request to PUT. Use this endpoint for an replace: https://yourdomain/wp-json/wc/v3/orders/. Within the Frame tab, upload this JSON frame:
{
  "standing": "finished"
}
Execute the request, and also you must obtain a reaction with the order marked as finished.

Buyer control and engagement
In the course of the WooCommerce REST API, companies can successfully create new visitor profiles, edit current visitor main points, and retrieve complete data similar to acquire histories and personal tastes.
By way of inspecting this information, they may be able to tailor personalised advertising and marketing methods, providing focused promotions, product suggestions, and loyalty rewards in response to particular person buying groceries behaviors.
This degree of shopper knowledge control empowers companies to construct more potent relationships with consumers, building up visitor pleasure, and force repeat purchases.
Upload a visitor with WooCommerce API
- Ship a POST request to this endpoint URL:
https://. Don’t omit to incorporate authorization as you probably did previous./wp-json/wc/v3/consumers - Within the Frame tab, use this JSON object to create a visitor:
{
  "electronic mail": "[email protected]",
  "first_name": "Brian",
  "last_name": "Abraham",
  "function": "visitor",
  "username": "briann.abraham",
  "billing": {
    "first_name": "Brian",
    "last_name": "Abraham",
    "corporate": "",
    "address_1": "969 Marketplace",
    "address_2": "",
    "town": "San Francisco",
    "state": "CA",
    "postcode": "94103",
    "nation": "US",
    "electronic mail": "[email protected]",
    "telephone": "(555) 555-5555"
  },
  "delivery": {
    "first_name": "Brian",
    "last_name": "Abraham",
    "corporate": "",
    "address_1": "969 Marketplace",
    "address_2": "",
    "town": "San Francisco",
    "state": "CA",
    "postcode": "94103",
    "nation": "US"
  }
}
The JSON object accommodates fundamental visitor main points, similar to electronic mail, title, function, and username. It additionally supplies billing and delivery data, together with the client’s deal with, location, and make contact with quantity.
- Execute the request, and also you must obtain a reaction containing the client object. Bear in mind the client ID, which you’ll use within the subsequent segment to retrieve a visitor.
Retrieve a visitor via ID with WooCommerce API
Let’s retrieve that consumer you’ve simply created by way of their ID.
- Create a brand new request with the GET request means.
- Use the similar endpoint URL,
https://and upload the ID of the client you wish to have to fetch./wp-json/wc/v3/consumers/
Complicated use circumstances of the WooCommerce REST API
Aside from managing retailer sources, you’ll be able to use WooCommerce REST API for different advanced duties, similar to integration to CRM, stock control automation, and customized analytics and reporting.
Integrating your WooCommerce retailer into your CRM of selection the usage of REST API guarantees that on every occasion a visitor is added, it’s straight away mirrored to your CRM dashboard as a lead. This makes it simple to control the synchronization of shopper data and order histories.
REST APIs additionally permit for automatic stock control. By way of integrating your exterior stock control, you’ll be able to get real-time visibility of inventory and product availability. This additionally applies to customized reviews and analytics.
With WooCommerce REST API, you’ll be able to construct reporting options that come up with a chicken’s-eye view, serving to with decision-making, figuring out tendencies, and forecasting.
Right here’s a code snippet for syncing WooCommerce visitor knowledge with a CRM platform:
 'wc/v3' // WooCommerce WP REST API model
    ]
);

// CRM API endpoint and key
$crm_api_url = 'https://your-crm-api-url/api';
$crm_api_key = 'YOUR_CRM_API_KEY';

check out {
// fetch consumers from woocommerce retailer
  $consumers = $woocommerce->get('consumers');

  // Initialize cURL
  $ch = curl_init();

  // Take a look at if cURL initialization succeeded
  if ($ch === false) {
    throw new Exception('Did not initialize cURL');
  }

  foreach ($consumers as $visitor) {
    $crm_customer_data = array(
      'first_name' => $customer->first_name,
      'last_name' => $customer->last_name,
      'electronic mail' => $customer->electronic mail,
      // Different fields
    );

    // cURL choices
    curl_setopt($ch, CURLOPT_URL, $crm_api_url . '/consumers');
    curl_setopt($ch, CURLOPT_RETURNTRANSFER, true);
    curl_setopt($ch, CURLOPT_POST, true);
    curl_setopt($ch, CURLOPT_POSTFIELDS, json_encode($crm_customer_data));
    curl_setopt($ch, CURLOPT_HTTPHEADER, array(
      'Authorization: Bearer ' . $crm_api_key,
      'Content material-Sort: software/json',
    ));

    // Execute cURL request
    $crm_response = curl_exec($ch);

    // Take a look at for cURL mistakes
    if ($crm_response === false) {
      throw new Exception('cURL error: ' . curl_error($ch));
    }

    // Take a look at HTTP standing code
    $http_code = curl_getinfo($ch, CURLINFO_HTTP_CODE);
    if ($http_code !== 200) {
      throw new Exception('Did not sync visitor knowledge with CRM: ' . $http_code);
    }

    echo 'Buyer knowledge synced with CRM effectively.';
  }

  curl_close($ch);

} catch (Exception $e) {
  echo 'Error: ' . $e->getMessage();
}
It is a PHP code snippet that first establishes a connection to the WooCommerce REST API after which retrieves consumers from the WooCommerce retailer. In any case, it sends them to the CRM the usage of cURL. The code accommodates error dealing with to control float failure. It makes use of a PHP library referred to as automattic/woocommerce, which you’ll be able to set up the usage of Composer.
The CRM used here’s for demonstration functions to turn you a common option to syncing your visitor knowledge to any CRM.
Abstract
The WooCommerce REST API lets you programmatically organize retailer knowledge, toughen the eCommerce enjoy, and lengthen the capability of your on-line retailer. This tough software transforms a fundamental WordPress setup right into a extra refined platform.
To get began, set up the WooCommerce plugin to your WordPress software and discover the REST API the usage of the examples equipped on this instructional. Those function a basis on your customized answers.
Velocity is a very powerful for eCommerce websites; quicker loading occasions give a boost to the buying groceries enjoy. The WooCommerce API permits more than one requests from the entrance finish to the WordPress backend, highlighting the significance of optimum backend efficiency.
Opting for a top quality WooCommerce Internet hosting supplier, similar to Kinsta, is important on your website online’s efficiency. Discover ways to spice up your WooCommerce retailer’s pace with our complete information.
What are your ideas at the WooCommerce API? Have you ever used it prior to? Proportion with us within the remark segment underneath.
The submit Without equal WooCommerce REST API manual: sensible examples incorporated seemed first on Kinsta®.
WP Hosting