Each and every week, we give you new and unfastened Divi structure packs which you’ll be able to use in your subsequent venture. For one of the most structure packs, we additionally proportion a use case that’ll permit you to take your website online to the following degree.
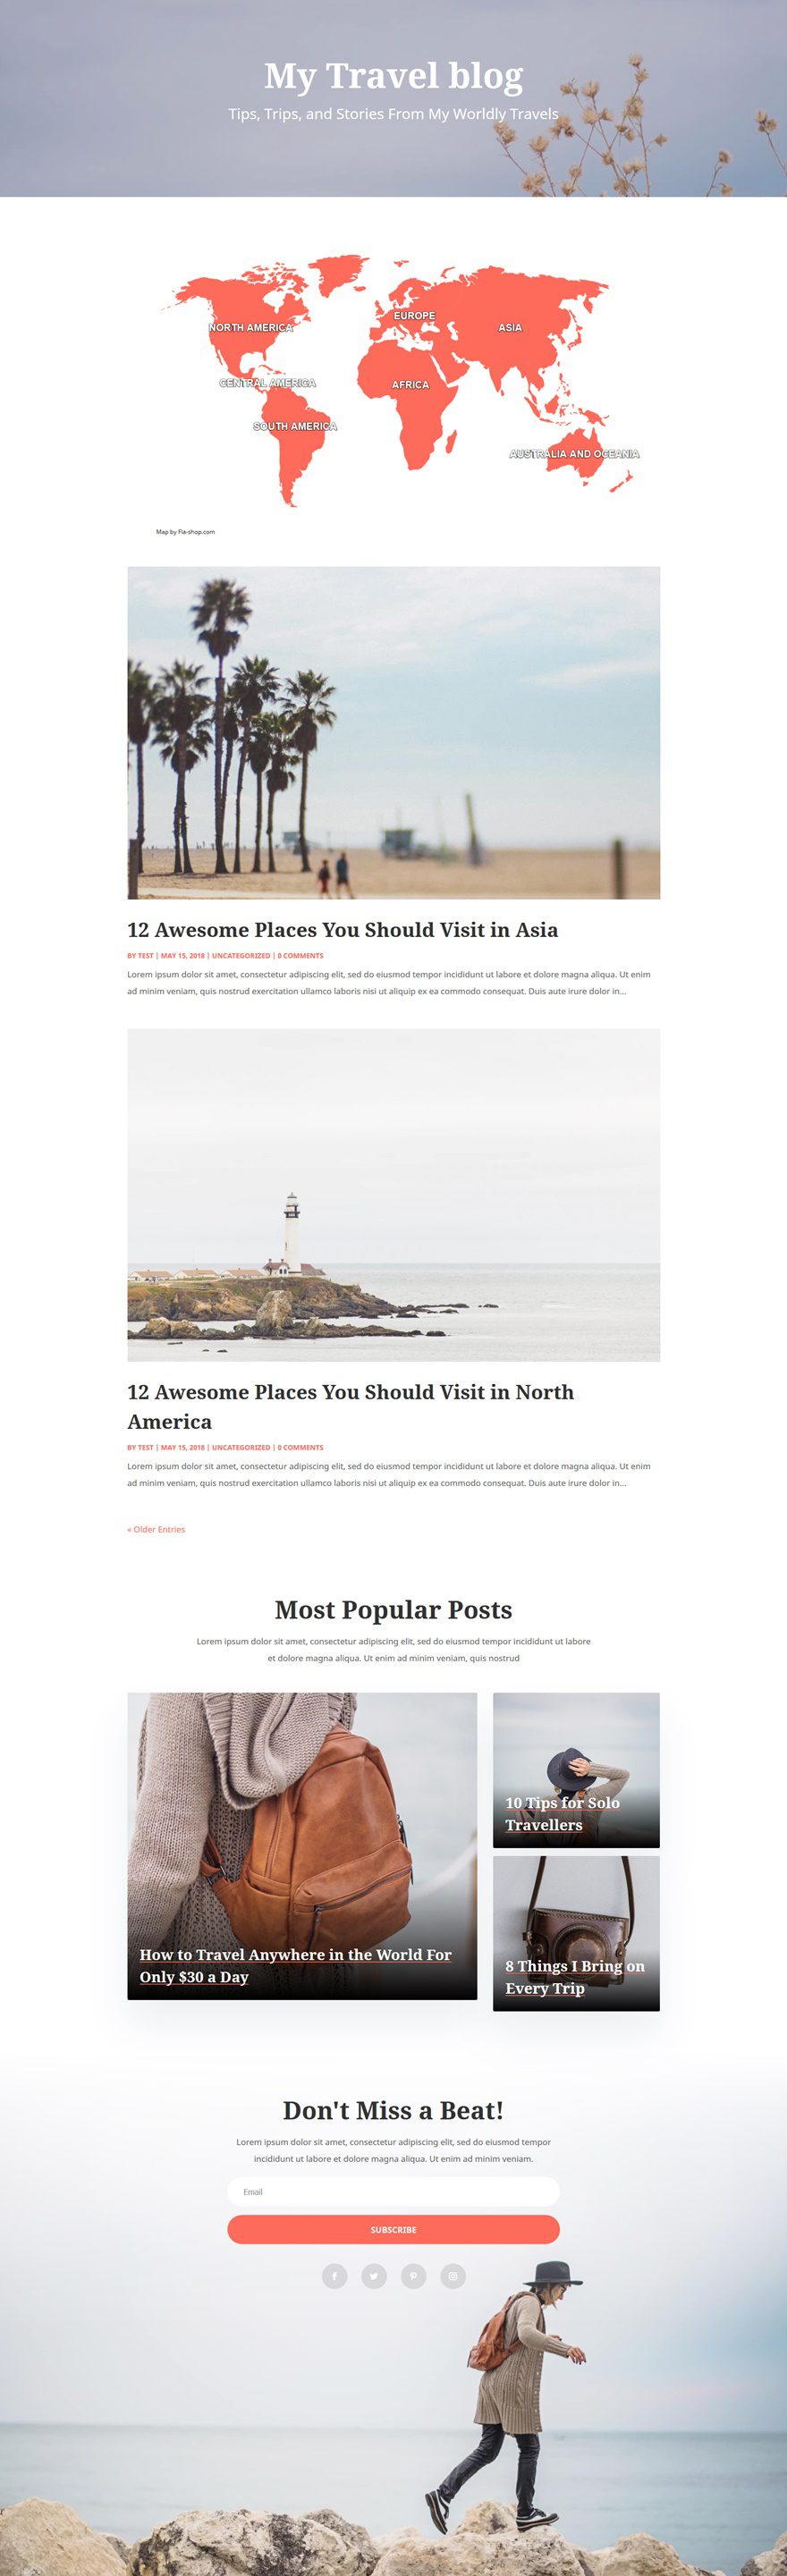
This week, as a part of our ongoing Divi design initiative, we’re going to turn you learn how to upload an interactive map to Divi’s Travel Blog Layout Pack‘s weblog structure. This interactive map will include all of the continents and on click on, the guests shall be redirected to the class web page of that individual continent.
Contents
- 1 Preview
- 2 Phase 1: Obtain & Set up the Loose HTML 5 Maps Plugin
- 3 Phase 2: Create Publish Classes & Assign Trip Posts to Classes
- 4 Phase 2: Create Global Map
- 5 Phase 3: Upload Global Map to Weblog Web page
- 5.1 Step 1: Cross to Weblog Web page & Permit the Visible Builder
- 5.2 Step 2: Upload New Segment Beneath Hero Segment
- 5.3 Step 3: Take away Backside Padding of Segment
- 5.4 Step 4: Conceal Segment on Pill & Telephone
- 5.5 Step 5: Upload One-Column Row
- 5.6 Step 6: Upload Textual content Module with Shortcode
- 5.7 Step 7: Save Web page & Go out Visible Builder
- 6 Preview
- 7 Ultimate Ideas
Preview
Prior to we dive into this use case instructional, let’s take a handy guide a rough have a look at the design that you’ll be able to be expecting when you end all of the steps.
Phase 1: Obtain & Set up the Loose HTML 5 Maps Plugin
Step 1: Obtain the Plugin
Let’s get started through downloading the unfastened model of the HTML5 Maps plugin through going to the next page and clicking at the obtain button.

Step 2: Add it to Your WordPress Website online & Turn on it
While you’ve downloaded it, move forward and add it for your plugins. Be sure to turn on the plugin as smartly.

Phase 2: Create Publish Classes & Assign Trip Posts to Classes
Step 1: Cross to Publish Classes
Within the subsequent a part of this submit, we’ll create a global map with all continents. By way of clicking on such a continents, guests shall be redirected to the class web page of the continent they’ve clicked on. There, they are going to be capable to see all of the weblog posts you’ve created which are related to that continent. However first, we’ll wish to create the types and their pages on the identical time. To do this, get started through going for your Posts > Classes.

Step 2: Create a Class for Each and every Continent
Now, create a class for every one of the most related continents as you’ll be able to see within the print display beneath.

Step 3: Assign Posts to Related Classes
You’ll wish to assign every one in all your present and long term posts to one of the most continents. This may, after all, rely at the content material of your weblog submit. A weblog submit may also be assigned to a couple of continents as smartly if the content material of your weblog submit permits it.

Phase 2: Create Global Map
Step 1: Cross to HTML Maps
Now, we’ll transfer directly to the joys phase! We’ll create an interactive map through going to our HTML5 Maps plugin > Maps.

Step 2: Upload a New Map
There each unfastened maps and top class maps to be had. The arena map containing continents is unfastened in order that’s the only we’ll move with. The arena map appearing nations is a part of the top class plugin. Give your map a reputation, make a choice the proper map and click on on ‘Upload a brand new map.’

Step 3: Cross to Map Settings
We’ve, now, created the map. We’ll wish to make some changes to it to make it fit with our structure pack. Cross to the Map Settings of the map you’ve created.

Step 4: Regulate Normal Settings
Even if you’ll be able to make a choice to make the map responsive, we’re going to make use of this map on desktop best. Navigating on cell differs from navigating on desktop and I individually don’t suppose including a map to the cell model is the easiest way to head. The map could be scaled down on account of the display measurement which might make clicking on a continent beautiful tough. Within the basic settings, practice the next adjustments:
- Borders Colour: #ff6b5b
- Responsive: Disabled
- Map Width: 1200
- Map Peak: 600

Step 5: Regulate Detailed Settings for Each and every Continent
Within the Detailed Settings tab, you alter every one of the most continents for my part. That is the place you’ll wish to upload the URL you need customers to be redirected to. The URL for every continent will wish to fit the slug of your class and can appear to be this:
- yourwebsite.com/class/continent
Open every one of the most continents for my part and practice the next settings to them:
- What to do when the world is clicked: Open a URL
- Url: yourwebsite.com/class/continent (exchange to the related continent)
- House Colour: #FF6B5B
- House Hover Colour: #d64c3d


Step 6: Replica Shortcode
Save all of the adjustments you made and replica the shortcode of the map you’ve created:

Phase 3: Upload Global Map to Weblog Web page
Step 1: Cross to Weblog Web page & Permit the Visible Builder
Within the final a part of this use case weblog submit, we’ll upload the map to our weblog web page. You’ll want to position the map on different pages as smartly however because it’ll open class pages, it makes probably the most sense to put it at the weblog web page. Get started through going for your weblog web page and enabling the Visible Builder.

Step 2: Upload New Segment Beneath Hero Segment
Then, upload a brand new phase proper beneath your hero phase.

Step 3: Take away Backside Padding of Segment
To cut back probably the most house between this phase and the following one, we’ll take away the entire default backside padding of this phase through including ‘0px.’

Step 4: Conceal Segment on Pill & Telephone
As discussed sooner than, we’ll best make this map seem on desktop for UX causes. Cross to the Visibility settings of your phase and disable all the phase on telephone and pill.

Step 5: Upload One-Column Row
While you’re completed along with your phase settings, move forward and upload a row with one column.

Step 6: Upload Textual content Module with Shortcode
The one module we’ll wish to upload is a Textual content Module containing the shortcode we’ve generated within the earlier a part of this submit.

Step 7: Save Web page & Go out Visible Builder
That’s it! The one issues left to do are saving your web page and exiting the Visible Builder. Your interactive map is in a position for use!

Preview
Now that we’ve long gone thru all of the steps, let’s take a last have a look at the outcome we’ve completed.
Ultimate Ideas
On this use case weblog submit, now we have proven you learn how to upload an interactive map to Divi’s Travel Blog Layout Pack. For this, we’ve used a global map with all of the continents. By way of clicking on one of the most continents, the guests shall be redirected to the class web page of that exact continent. If in case you have any questions, you’ll want to go away a remark within the remark phase beneath!
The submit How to Add an Interactive Map to Divi’s Travel Blog Layout Pack gave the impression first on Elegant Themes Blog.
WordPress Web Design