
Is your WooCommerce retailer running? It’s a query that assists in keeping a large number of retailer house owners up at evening—however will also be fastened with some prep and correct checking out.
Through the years, I’ve come to comprehend there are 4 faculties of concept among retailer house owners when WooCommerce updates roll round:
- The Cowboy: Those retailer house owners hit “replace” with no 2nd concept. Then their retailer comes crashing down round them.
- The Sofa Potato: Those that merely forget about updates altogether, treating them like they don’t exist.
- The Scaredy-Cat: Those retailer house owners have such a lot of old-fashioned plugins and issues as a result of they’re fearful of what’s going to occur in the event that they strive an replace.
- The Maverick: Finally, those are the shop house owners who run common backups, take a look at new releases of WooCommerce on a staging website, after which replace their reside website with out factor.
Preferably, everybody must be a Maverick. Thankfully, it’s no longer exhausting to be one! With the correct gear in position, a forged checking out tick list, and a few automation, you’ll be able to get started retaining your WooCommerce website up-to-date and all the time working easily.
On this submit, I’m going to run you thru methods to replace your WooCommerce website from begin to end, together with gear and a large checking out/updating tick list. Don’t disregard to bookmark this submit for long run reference!
Contents
Spend a Little Time Now to Save a Lot of Time (and Nervousness) Later
Earlier than we dive in, my very own private rule of thumb is that you just must by no means replace your website and particularly WooCommerce with out totally checking out any new releases first. That is going for main, minor and patch releases—it doesn’t topic.
It’s a must to be prepared to spend a little bit time now to save lots of a large number of time later.
You don’t wish to hit that replace button immediately. Give your self a while and remember to perceive what adjustments shall be made on your website whilst you replace, and the way they may have an effect on the entirety else to your website. Merely studying up at the new options to be had within the model of WooCommerce you wish to have to replace to will mean you can get your head round what you want to organize for.
It’s no longer simple being an extension/plugin or theme developer. Having to stay alongside of new releases of alternative plugins is not any small activity. In a similar fashion, writing code for WooCommerce core this is backwards appropriate is similarly tough—are you able to believe seeking to handle compatibility for the entire other plugins and issues which are constructed on WooCommerce?
When I used to be consulting, I’d all the time make time to study changelogs and the WordPress.org give a boost to boards sooner than updating WooCommerce on consumer websites. Continuously, if there used to be ever an issue with an replace, 99% of the time any individual else would come throughout the problem first, saving me a ton of time (and bother coping with the problem myself).
It’s additionally no longer unusual to must look forward to plugin/theme authors to free up their very own updates to WooCommerce-related merchandise sooner than you’ll be able to replace your website too. So being affected person and taking the time to test compatibility can actually repay.
Updating WooCommerce: Getting Began
There are 4 very important phases with regards to updating WooCommerce, and I promise if you’ve run thru the entirety as soon as it will get sooner and more uncomplicated subsequent time!
- Stage 1: Getting the right tools
- Stage 2: Prepping
- Stage 3: Updating and testing staging site
- Stage 4: Updating and testing live site
Updating WooCommerce: Equipment
Let’s face it, manually checking out WooCommerce is tedious and time-consuming. It’s for those causes that such a lot of other people merely don’t do it—or, after they do, they don’t take a look at correctly and leave out mistakes on their website.
Thankfully, there are gear that may lend a hand accelerate the checking out procedure and make it much less of an uneventful factor to do. Heck, I believe it’s in reality amusing!
After numerous occasions checking out and updating WooCommerce over time, those are the gear I like to recommend:
- Staging website. That is non-negotiable. You must by no means replace your reside website straight away after a brand new free up of WooCommerce. Staging websites supply a checking out setting the place you might be unfastened to damage issues (generally with out repercussions). There, you’ll be able to run updates, take a look at new variations, and notice how your website would possibly react sooner than updating your reside website. If you happen to haven’t were given a staging website, Kinsta will let you out—they provide one-click staging environments.
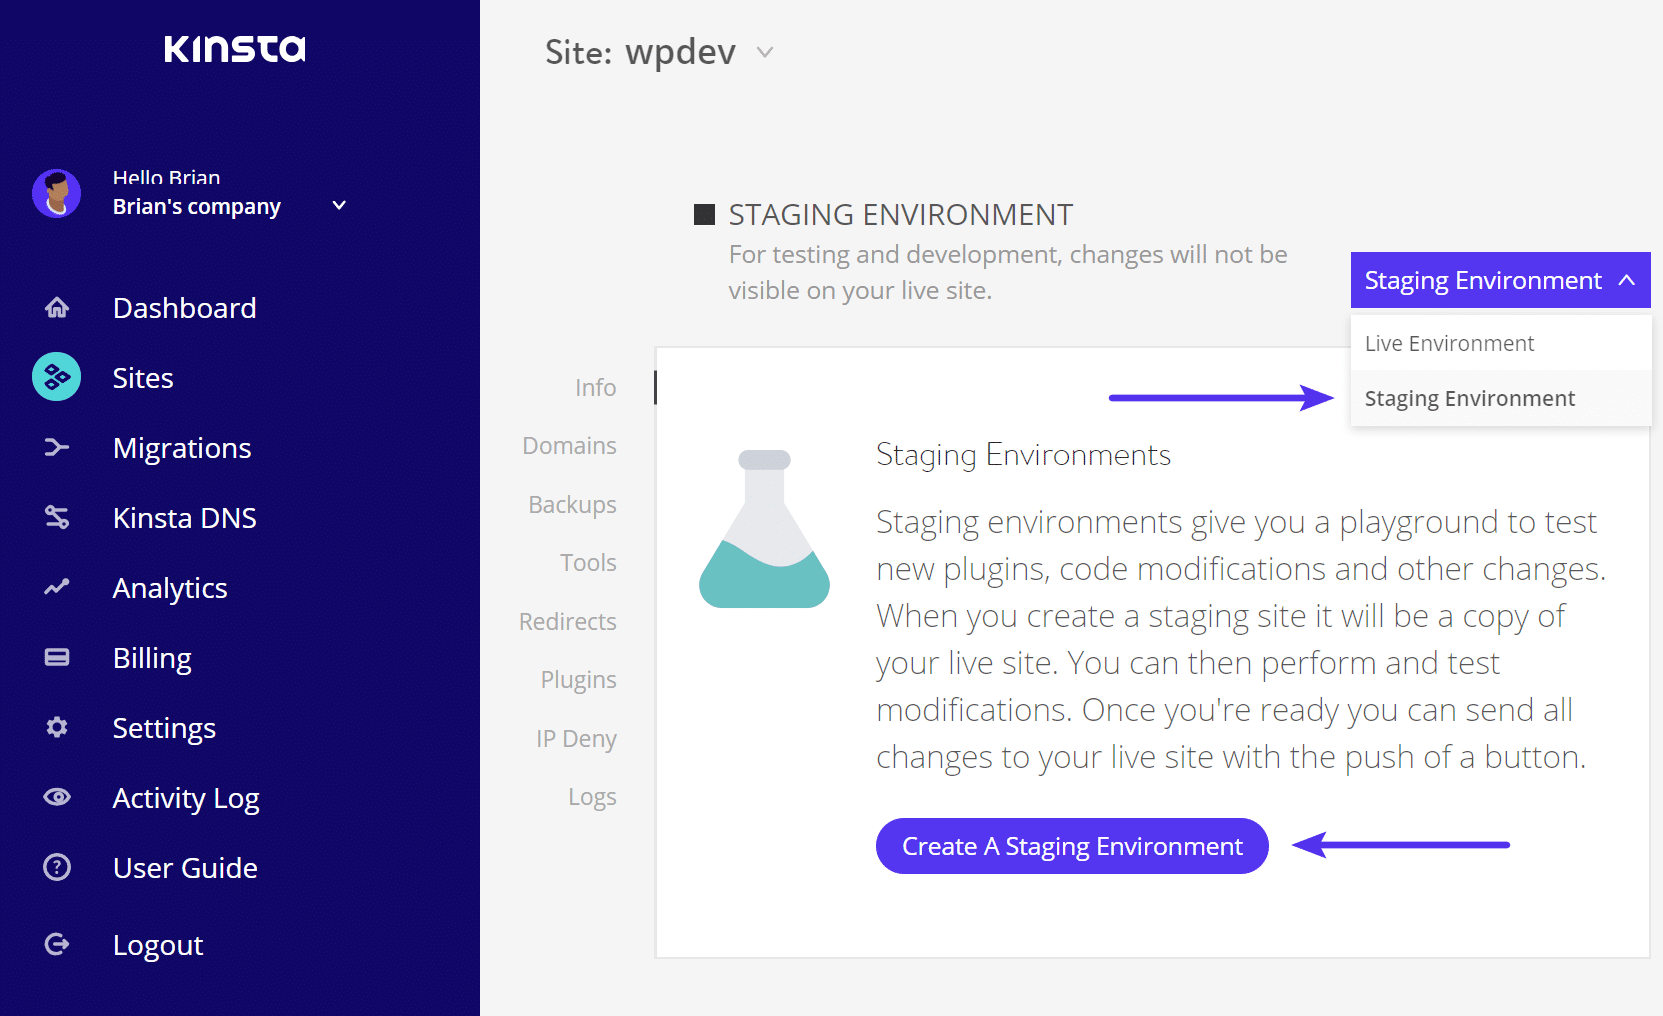
Create WordPress staging website
- Visible comparability instrument. How have you learnt in case your website has modified after an replace? If you happen to run a big website with dozens of pages, monitoring down small adjustments in formatting and even widgets that experience stopped exhibiting can take time. With a visible comparability instrument like WP Boom, which we’re going to make use of for this instructional, you’ll be able to take a snapshot of your website, hit “replace,” after which take a 2nd snapshot so you’ll be able to briefly see what’s modified. It’s essential to indicate {that a} visible alternate doesn’t essentially imply that some piece of capability has damaged to your website, simply that it might be damaged. There’s a great review of WP Boom by BobWP that’s a few years outdated, but it surely must provide you with a excellent evaluation of the way it works.
- Finish-to-end checking out gear: Whilst visible comparability gear will let you briefly spot adjustments within the formatting and design of your website, end-to-end checking out gear pass additional, checking out the real capability of your website and offering extra simple task when one thing isn’t running. Clicking round your website to finish assessments like including an merchandise to cart and trying out takes occasions and will get outdated lovely briefly whilst you’ve examined WooCommerce 100 occasions sooner than. With end-to-end checking out gear, you’ll be able to automate this so it’s executed routinely for you. For this instructional, we’re going to make use of Robot Ninja, our computerized end-to-end checking out instrument for WooCommerce on each staging and reside websites. We’ll undergo methods to arrange Robotic Ninja later on this article.
 WooCommerce additionally has some E2E tests you’ll be able to run thru if you’re extra of a developer.
 - Backups: You must be working common backups of your website. A few of my favourite backup gear come with BackUpWordPress, VaultPress, and BackupBuddy. If you happen to’re occupied with database backups, I’d suggest WP Migrate DB Pro or just the usage of WP-CLI to run quick exports. If you happen to’re with Kinsta, they supply automated day-to-day backups, guide backup issues, and backup retention for all of its plans.
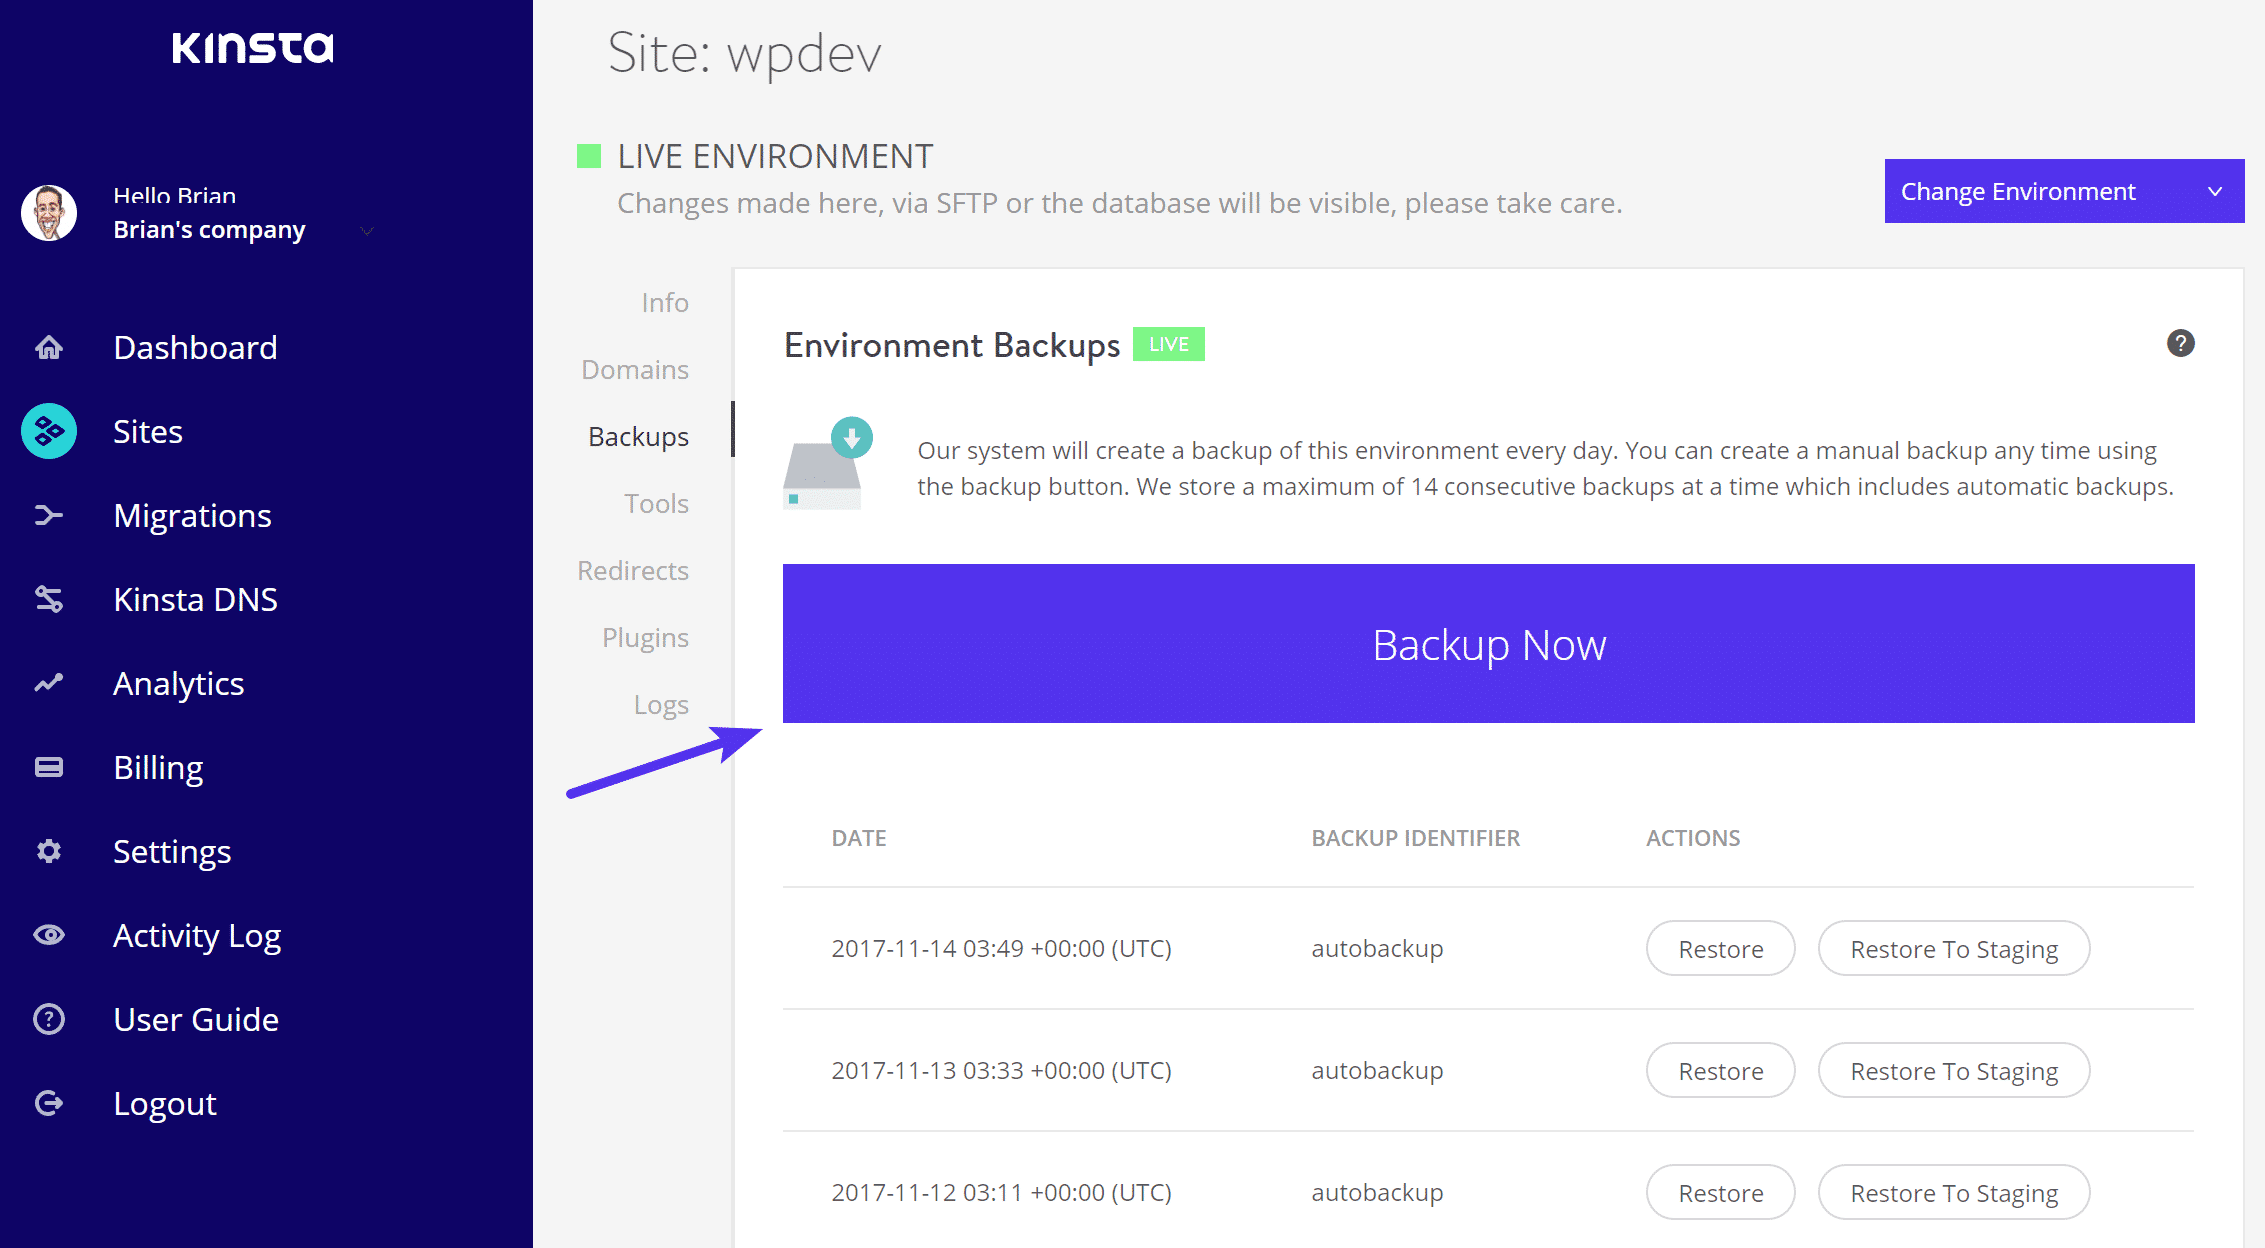
WordPress backups
Whenever you’ve were given the correct gear in position, it’s time to perform a little prepping.
Updating WooCommerce: Prepping
If you wish to have your replace to head easily, you want to perform a little prep. There’s a little prep concerned, however after you’ve prepped as soon as, it’s more uncomplicated to fill within the blanks and do it sooner subsequent time you replace.
Right here’s what I like to recommend:
- Re-familiarize your self with the website you’re updating. If you happen to’re no longer positive how your website is anticipated to serve as (i.e. if it’s a brand new consumer’s website), take some notes. This will likely lend a hand ease one of the vital anxiousness you could really feel for those who get at a loss for words about how the website works after an replace (this occurs extra steadily than you suppose).
- Make an inventory of vital URLs and capability on your website (and consumers). This must come with essential pages to your website, reminiscent of your homepage, class and product pages, my-account, cart and checkout pages.
- Test your backups are present, and if no longer, run some other backup. Re-familiarize your self along with your backup instrument. Most significantly, test they it’s running correctly and that you understand how to revert to a prior snapshot of your website.
- Arrange WP Increase. It best takes a minute to arrange. In case your reminiscence and note-taking aren’t nice (like mine) WP Increase can lend a hand fill within the gaps with screenshots of your website—recall to mind them just like the “sooner than” footage in weight reduction promotions. Take your first website snapshot so that you’ve were given a visible baseline document of your staging website, pre-update. It normally gained’t be capable to take screenshots of the checkout (you want some merchandise for your cart) and secure pages, however this is the place the following instrument can lend a hand…
- Arrange Robotic Ninja. If you happen to had been checking out WooCommerce manually, that is the phase the place you’d make an inventory of take a look at eventualities, i.e. open your website, upload a product to the cart, pass to checkout, input fee knowledge, and many others. Thankfully, Robotic Ninja can routinely do all this you.
- In response to the listing of vital URLs and capability you created previous, establish another portions of your website that you wish to have to check. This might be capability like contact forms or pop-ups or such things as slideshows or galleries. You’ll take a look at these items manually or, if you’re extra technically-minded, you must take a look at your hand at automating this too (I’ve integrated some sources about this later within the article but it surely’s extra for builders).
- Take a look at what’s new within the model of WooCommerce that you wish to have to replace to and whether or not your plugins fit. Once more, spend a while now to save lots of your self a while and anxiousness later. I like to recommend trying out: free up bulletins on WooCommerce.com, alternate logs, GitHub problems, the WordPress.org forums.
- Clone your reside website on your staging setting. If you happen to’re the usage of any plugins that characteristic a staging mode, reminiscent of WooCommerce Subscriptions, flip it on or just disable them. Likewise, disable emails. Double-check that your staging setting mimics your reside website as carefully as conceivable. I additionally love to permit debug logging in WordPress and WooCommerce at this level to lend a hand with problem-solving down the monitor.
Updating WooCommerce: Updating and Checking out Staging Web page
Now that you just’re prepped and able to head, right here comes the joys phase: updating your staging website. The superior factor about staging websites is that it doesn’t topic in case your website breaks as it’s only a reproduction.
- Take a snapshot of your website with WP Increase so that you’ve were given a visible baseline document of your staging site, pre-update.
- Run Robotic Ninja and make sure your assessments are passing.
- Replace your plugins and theme to variations which are said as being appropriate with the model of WooCommerce you wish to have to improve to.
- Replace WooCommerce to your staging website.
- Test your logs for any evident mistakes as a consequence of the updates and do a snappy test that you’ll be able to nonetheless get right of entry to the homepage and admin space. If you happen to get a white display screen of demise or are caught in another unrecoverable scenario, now is a great time to revert to a prior snapshot of your website and perform a little problem-solving your self or search lend a hand.
- If all goes neatly thus far, run WP Increase once more and get a 2nd snapshot. Examine your sooner than and after snapshots to peer what’s modified. What’s nice about WP Increase is that it’ll inform you how a lot your website has modified since your ultimate snapshot, i.e. there could be a 7% visible alternate between your two units of snapshots. While this doesn’t essentially imply your website is damaged, it will imply you want to regulate some types.
- Run Robotic Ninja once more to check that your checkout drift continues to be running correctly.
- Carry out another guide (or computerized) exams for different capability to your website reminiscent of touch bureaucracy.
- If the rest isn’t running as you’d be expecting, now’s the time to file and/or repair the rest that’s damaged. You probably have customized code working to your website (i.e. code that’s not maintained through a 3rd birthday party plugin/extension developer) it is very important repair it and ensure the fixes are implemented on your reside website sooner than or after working the replace (relying at the factor). Model keep an eye on, reminiscent of having your website in Git, will let you higher organize adjustments. The place you file insects is determined by what plugins you might be the usage of and your give a boost to preparations.
From right here you’ll both must look forward to new releases of your plugins/theme after which take a look at the method once more or paintings at the fixes your self and replace your code.
The excellent news is, your reside website has no longer damaged, your consumers are nonetheless ready to make purchases, and you’ll be able to make the effort to copy the method up to wanted till you might be relaxed the entirety goes to paintings as anticipated.
Updating WooCommerce: Updating and Checking out Are living Web page
Whenever you’ve up to date your staging website and were given it running easily, with any damaged capability fastened and all insects ironed out, you’re able to replace your reside website.
Now you’re able to replace your reside website. Right here’s what you want to do:
- Back up your reside website. Be sure you don’t leave out this step.
- Take a snapshot of your website with WP Increase so that you’ve were given a visible baseline document of your reside website, pre-update.
- Run Robotic Ninja and make sure your assessments are passing. This gives some other baseline on your website pre-update.
- Subsequent, relying on how your staging and reside environments paintings, you might merely wish to sync adjustments between staging and reside otherwise you’ll must run thru updating the plugins and code once more. If you happen to’re with a number like Kinsta, you can push changes live in one click.
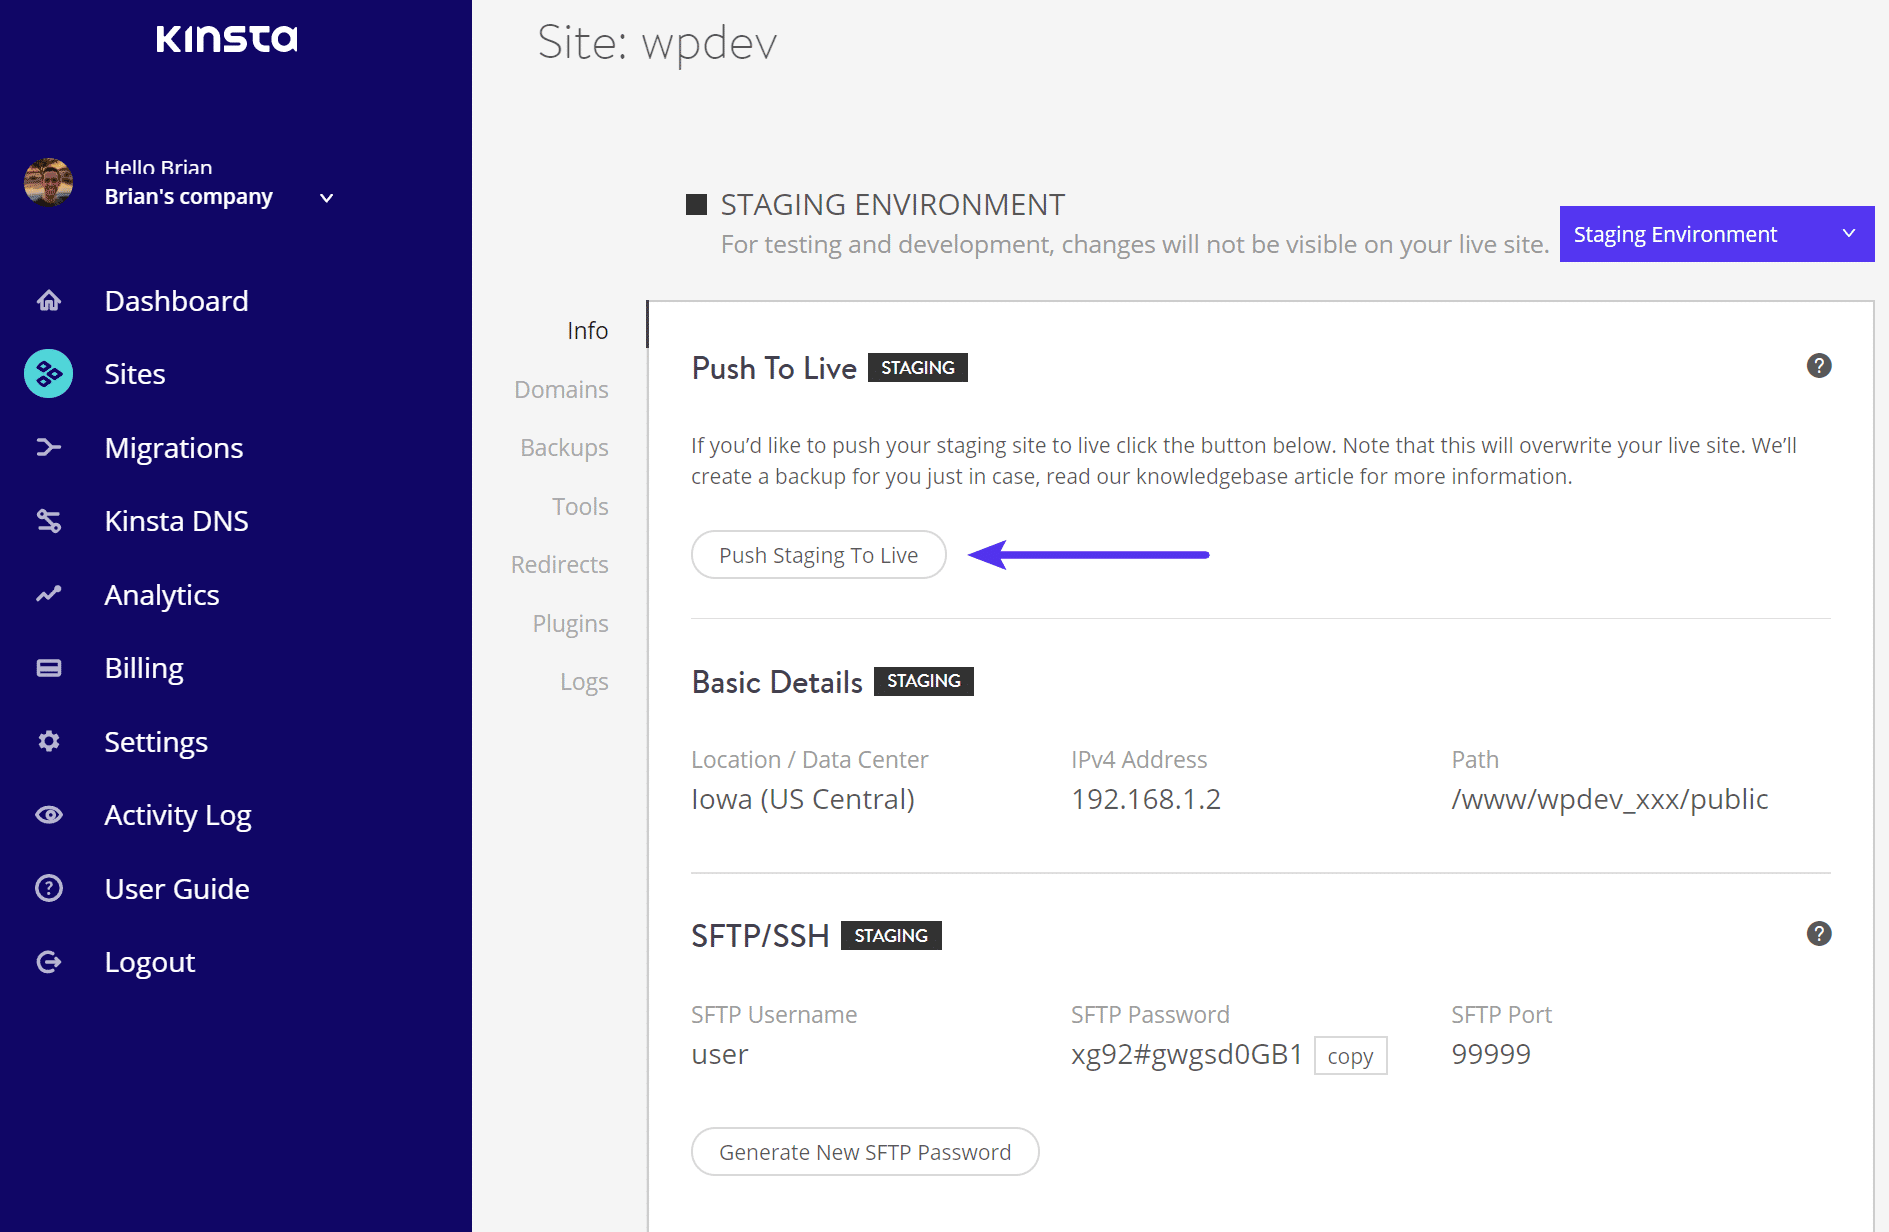
MyKinsta push staging to reside
- Test your logs for any evident mistakes as a consequence of the sync and do a snappy test that you’ll be able to nonetheless get right of entry to the homepage and admin space. If you happen to get a white display screen of demise or are caught in another unrecoverable scenario, now is a great time to revert to a prior snapshot of your website and perform a little problem-solving your self or search lend a hand.
- Run WP Increase once more so that you’ve were given a 2nd set of snapshots. Examine your sooner than and after snapshots to peer if the rest modified.
- Run Robotic Ninja once more to check that your checkout drift continues to be running correctly.
- Carry out another guide (or computerized) exams for different capability to your website reminiscent of touch bureaucracy.
- If you happen to handled and stuck any issues previous whilst updating your staging website, reminiscent of conflicting plugin code and your individual customized code, there shouldn’t be too many problems, if any, to mend at this level.
- Do a last visible test in case your website and double-check your listing of vital URLs and capability to ensure the entirety’s running.
And that’s it. Your reside website is now up-to-date!
Getting Began with WP Increase
WP Boom is a visible checking out and comparability instrument constructed for WordPress. As soon as arrange, you’ll be able to examine screenshots sooner than and after updating your website, and obtain indicators on every occasion auto-updates reason visible adjustments on your websites.
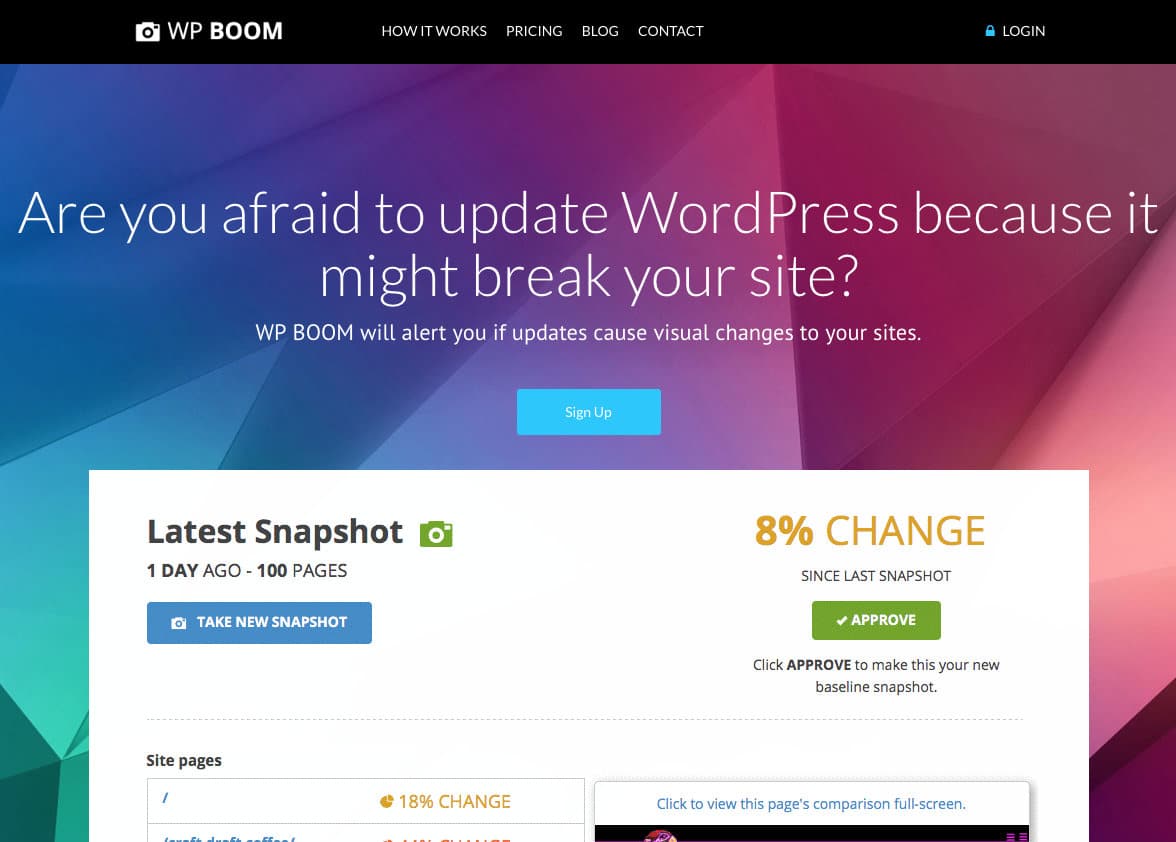
WP Increase
To get began with WP Increase, sign up for a unfastened account. After coming into your electronic mail and password, a modal will pop up asking you to attach a brand new website.
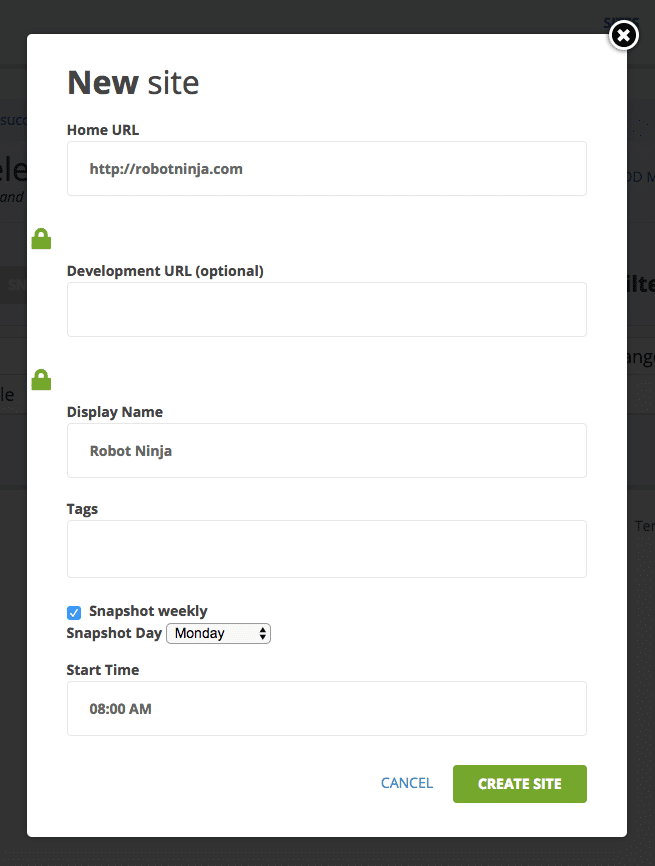
Enroll WP Increase
Whenever you click on “Create Web page,” WP Increase gets to paintings taking your website’s first snapshot. It’s going to take a minute or two, relying on what number of pages your website comprises.

WP Increase first snapshot
The web page will then refresh and whilst you click on the title of your website you’ll see an summary of your snapshot, together with the time it used to be taken, what number of pages are to your website.
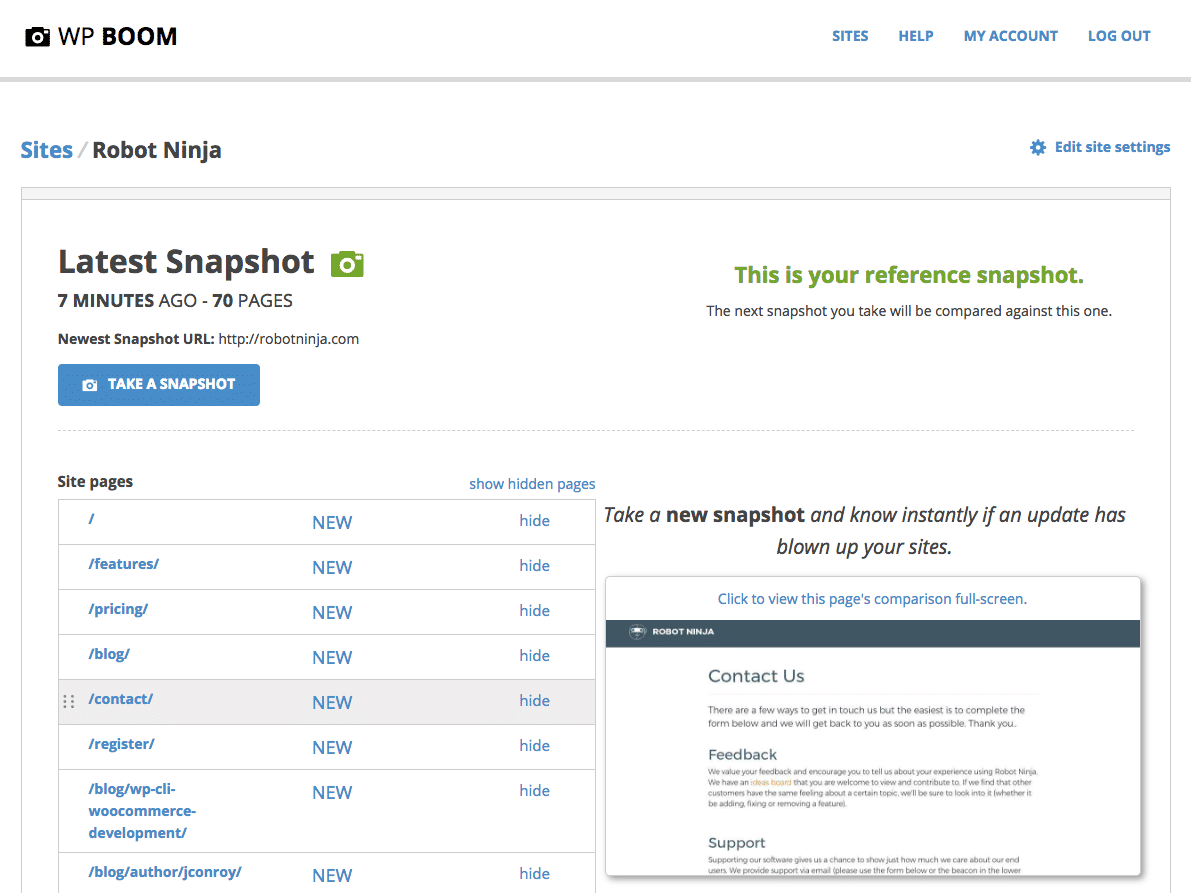
WP Increase newest snapshot
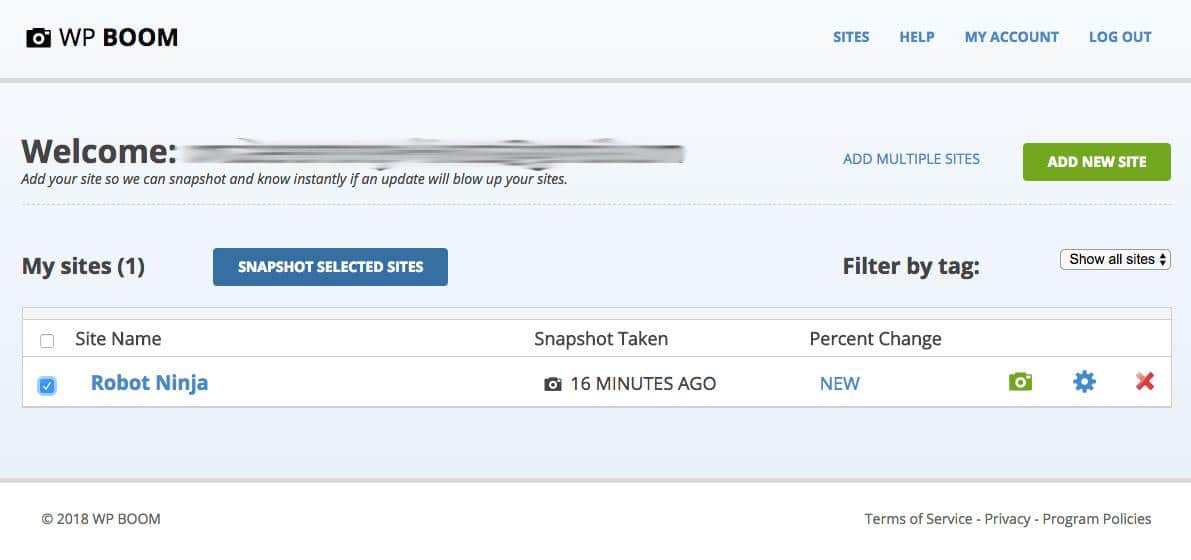
While you’re able to take a 2nd snapshot, merely go back to the WP Increase dashboard, make a choice the website you wish to have to snap, and click on “Snapshot Decided on Websites.”
WP Increase snapshot decided on websites
A few great options WP Increase comprises are the facility to agenda weekly snapshots and weekly electronic mail stories that element any visible adjustments to your website. That is actually helpful for those who organize a ton of websites and feature auto-updates in position. As I discussed, for a complete overview take a look at BobWP’s submit: WP Boom. WordPress Updates Made Easier.
Getting Began with Robotic Ninja
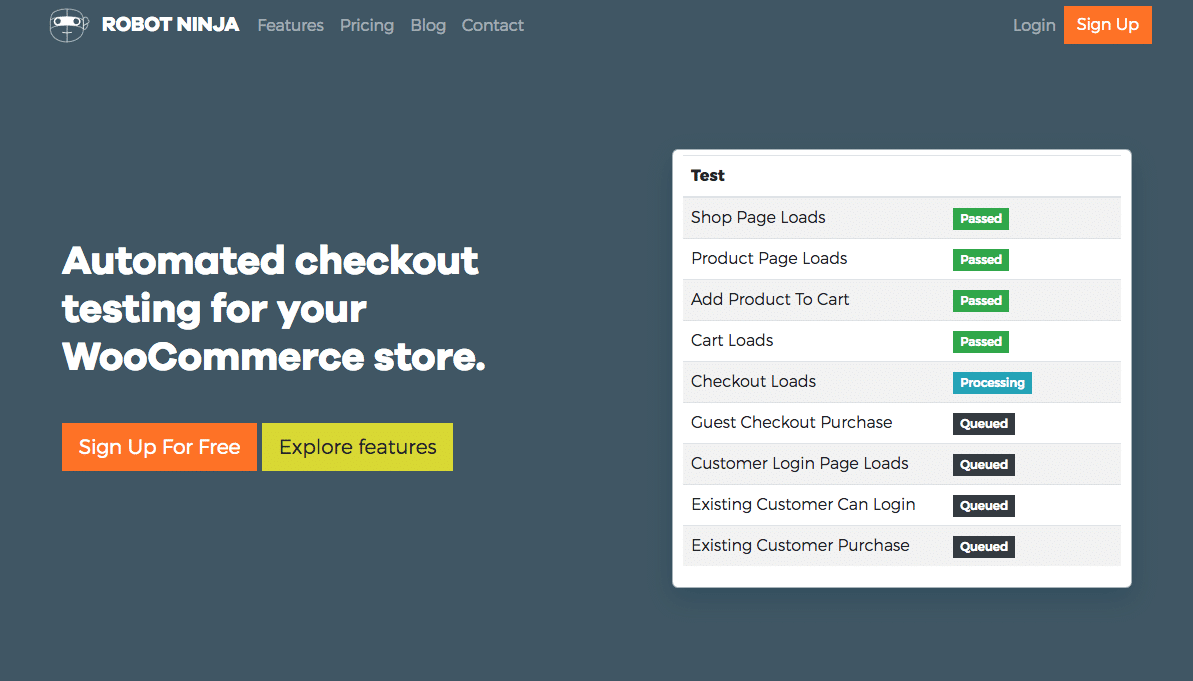
Robot Ninja is the one computerized end-to-end checkout checking out instrument designed in particular for WooCommerce. We constructed it to assist in making WooCommerce checking out extra available and no more of a headache for retailer house owners.
Robotic Ninja
While you attach your retailer to Robotic Ninja, it’ll run thru a collection of complete assessments the usage of genuine merchandise and genuine bills. To get began, sign up free of charge, log in on your account and click on the large inexperienced “Let’s Start…” button to attach your first retailer in simply 3 steps:
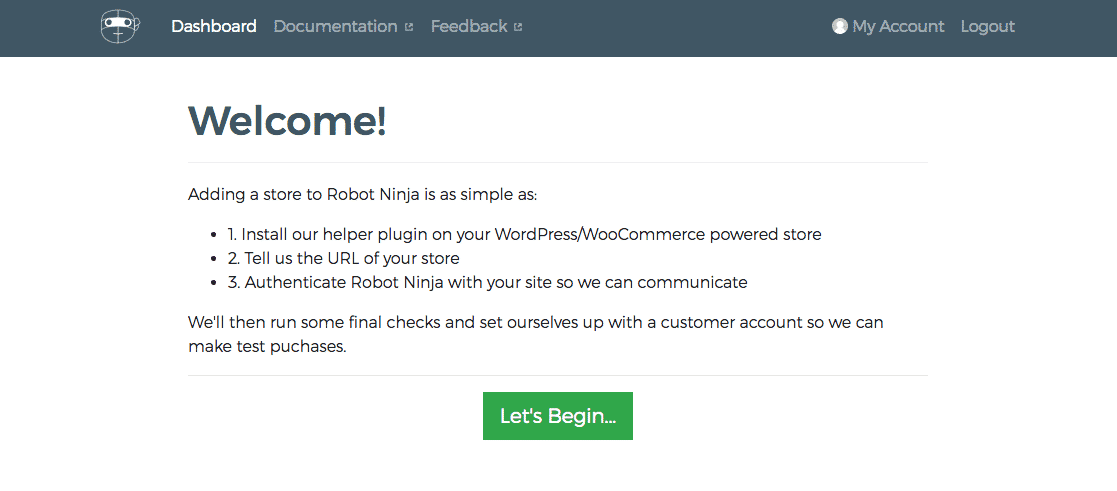
Robotic Ninja welcome
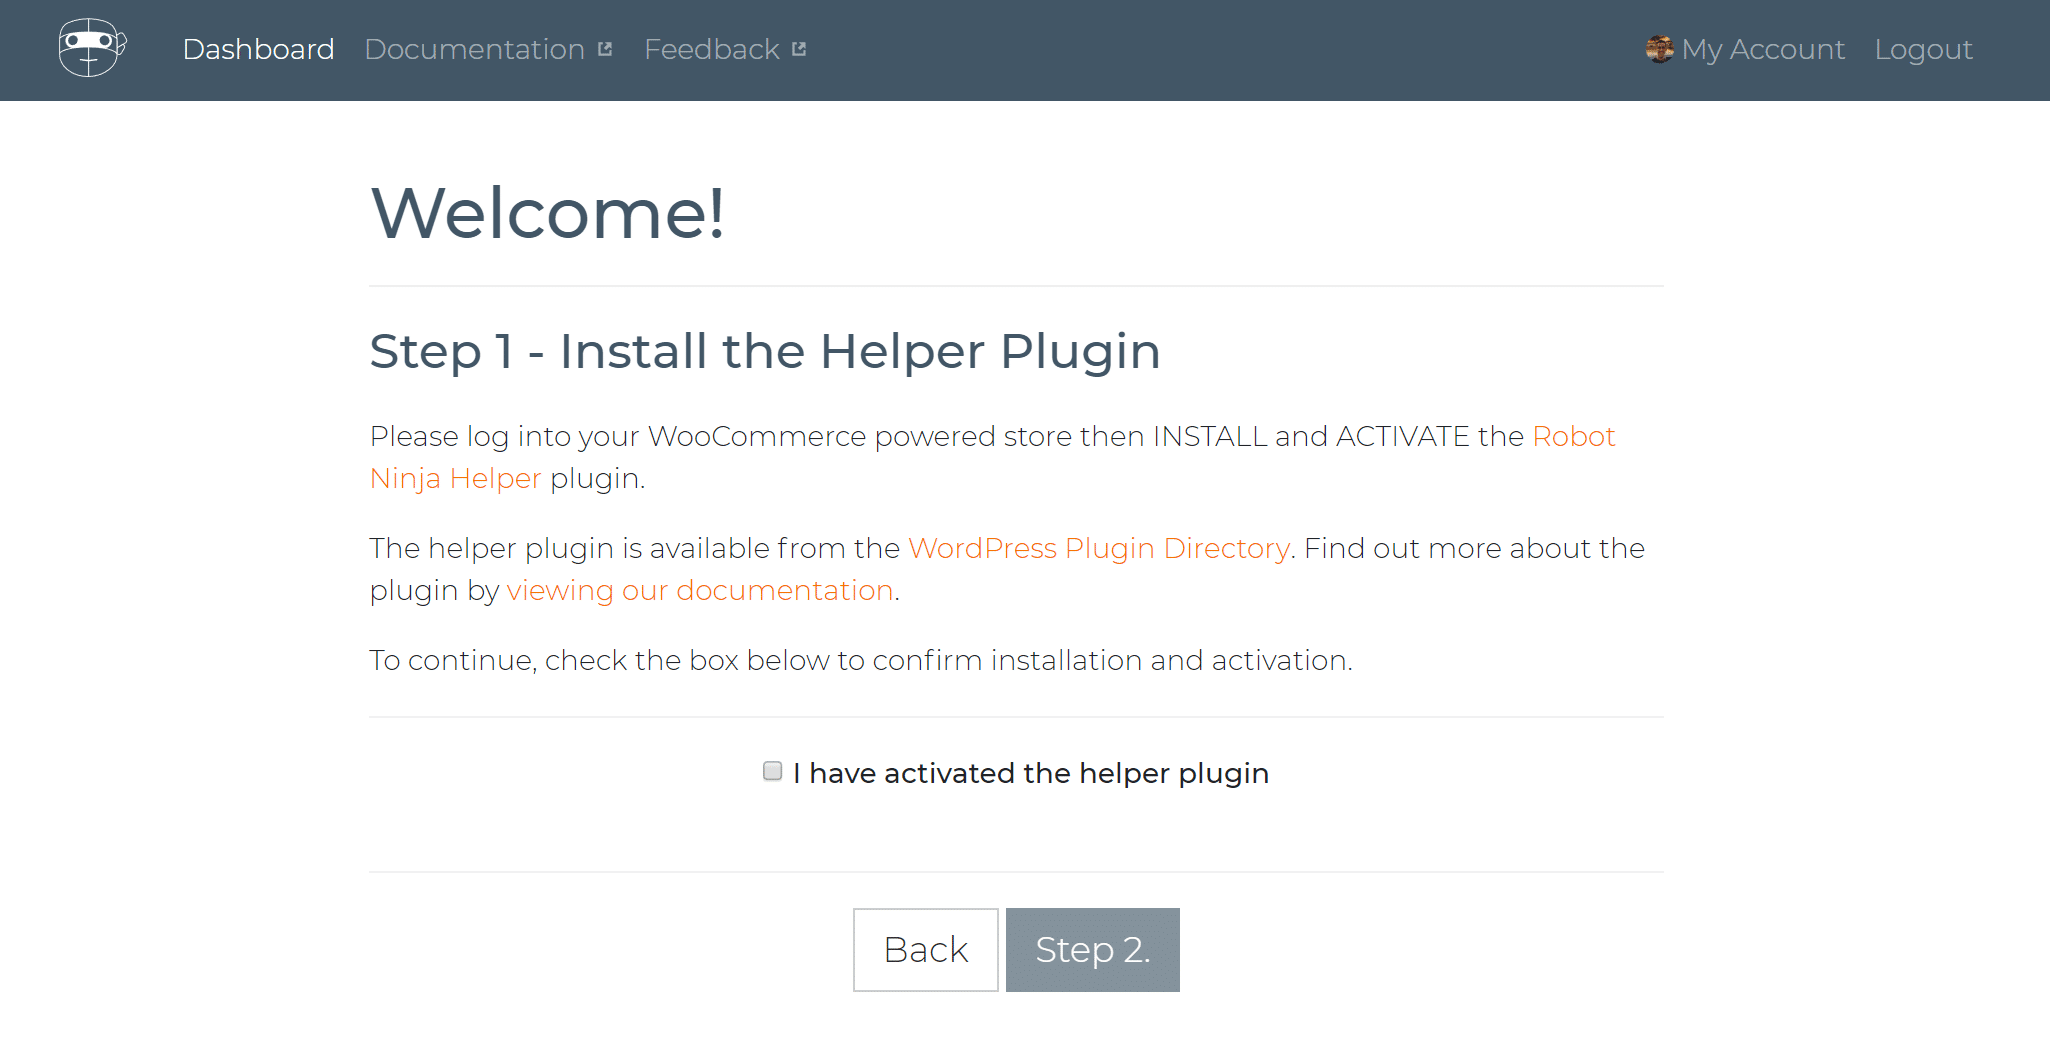
1. Set up the Robotic Ninja Helper Plugin.
You’ll obtain the Robot Ninja Helper plugin free of charge at WordPress.org, or simply set up it by means of your website’s WordPress dashboard.
Robotic Ninja WordPress plugin
Whenever you’ve put in and activated the Helper Plugin, transfer again to the browser tab with the Robotic Ninja website online open and test the sphere titled “I’ve activated the helper plugin”.
Sign up for 20,000+ others who get our weekly publication with insider WordPress guidelines!
The textual content must flip inexperienced and the “Step 2” button will turn out to be energetic and in addition inexperienced. Click on the “Step 2.” button.
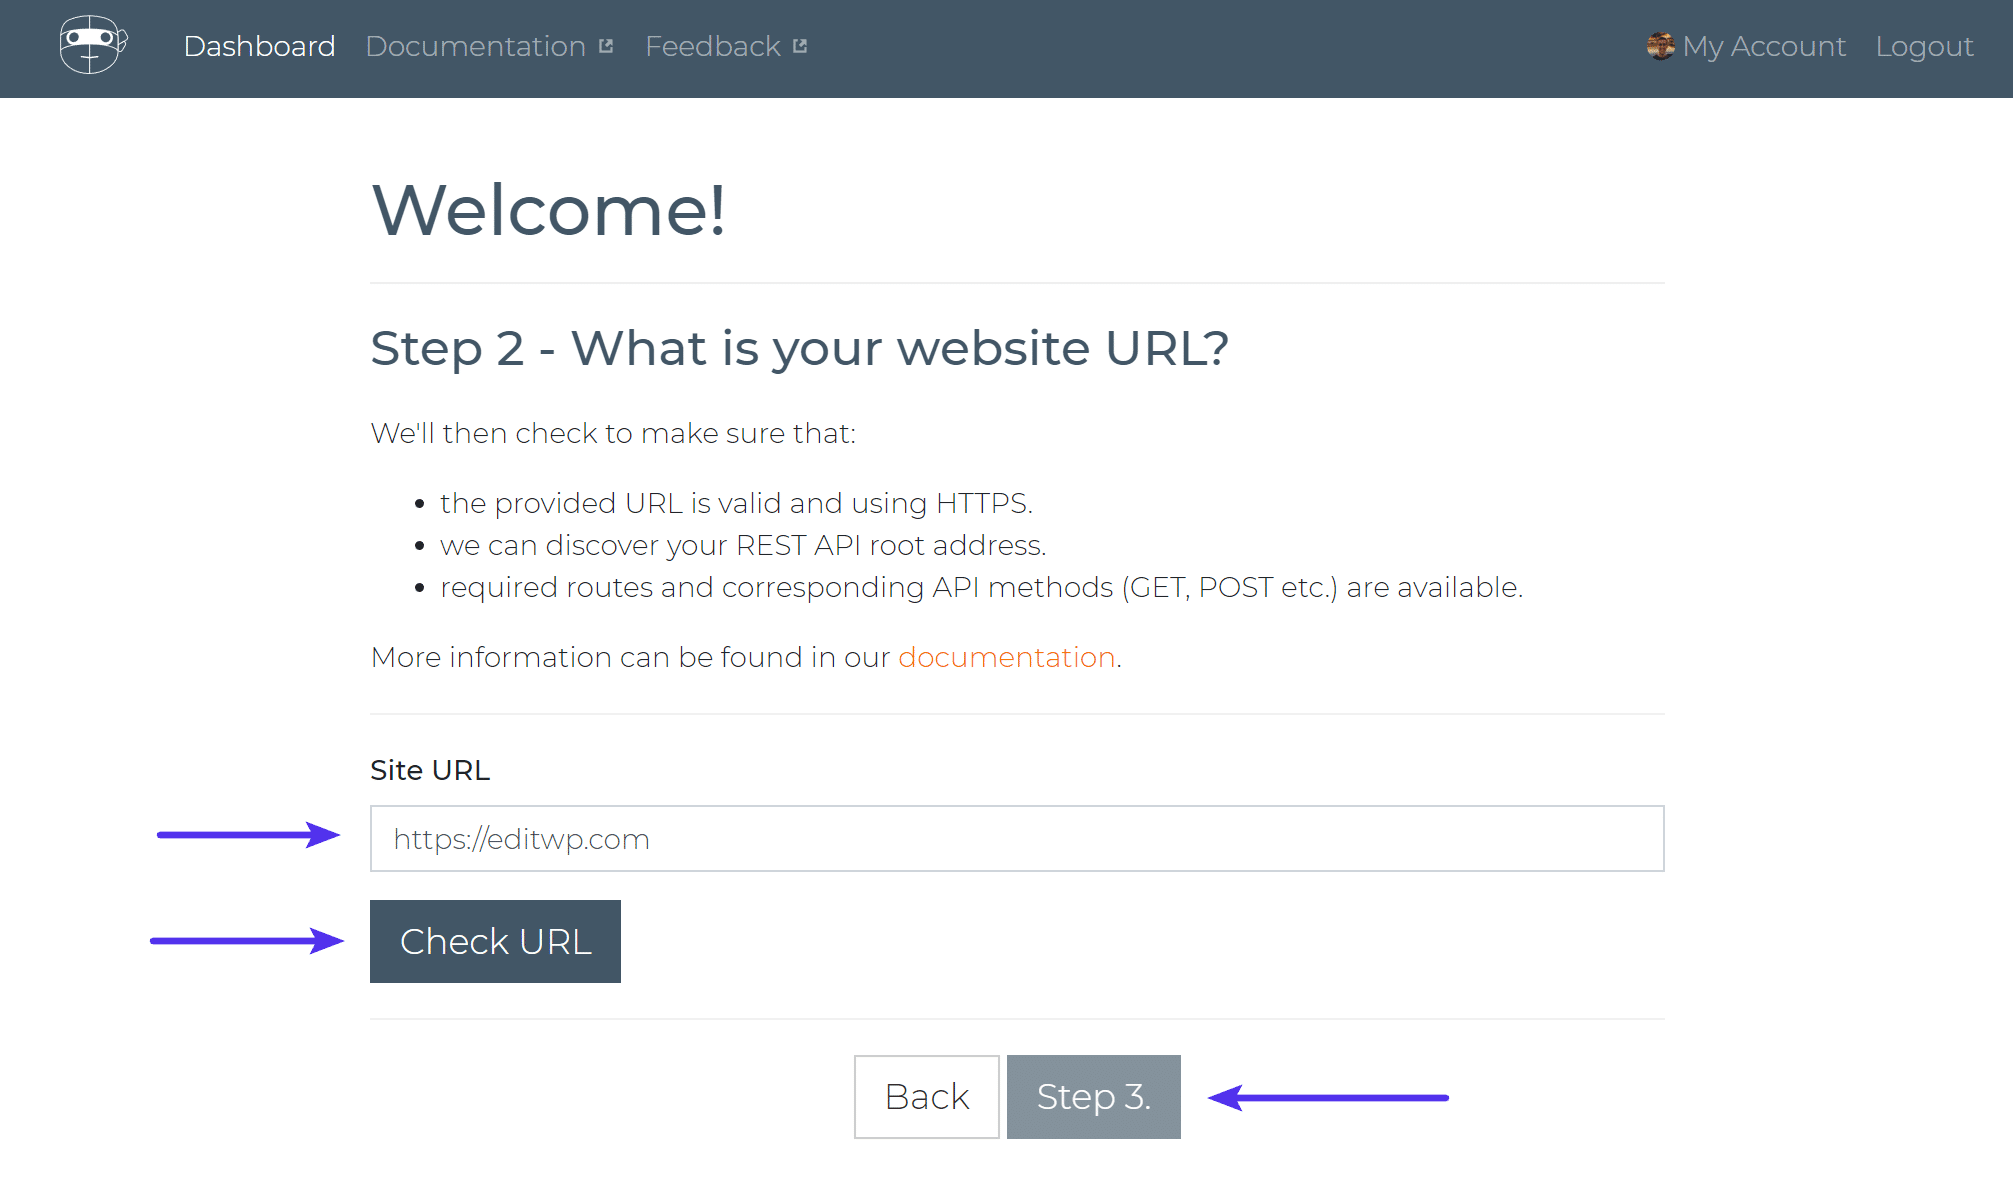
2. Input the URL on your retailer.
The next move is to go into the URL for the shop you wish to hook up with Robotic Ninja. Whenever you’ve entered a sound area, click on the “Test URL” button. Robotic Ninja will then perform a little preliminary take a look at to ensure it may attach on your website.
Upload WooCommerce retailer
You probably have any problems with it connecting remember to’ve cleared your WordPress website’s cache after putting in the plugin.
3. Authorize Robotic Ninja
The 3rd and ultimate step is to permit Robotic Ninja to get right of entry to your website. To do that securely, we use the Utility Authentication Endpoint this is already to be had inside of WooCommerce.
To start out the authentication procedure, click on the fairway “Authorize Now” button. You’ll be redirected on your website’s Authentication Endpoint. If you happen to don’t seem to be already logged into your website you’re going to be requested to log in. As soon as logged in, you’re going to be introduced with a display screen asking to “Authorize” or “Deny” get right of entry to to Robotic Ninja.
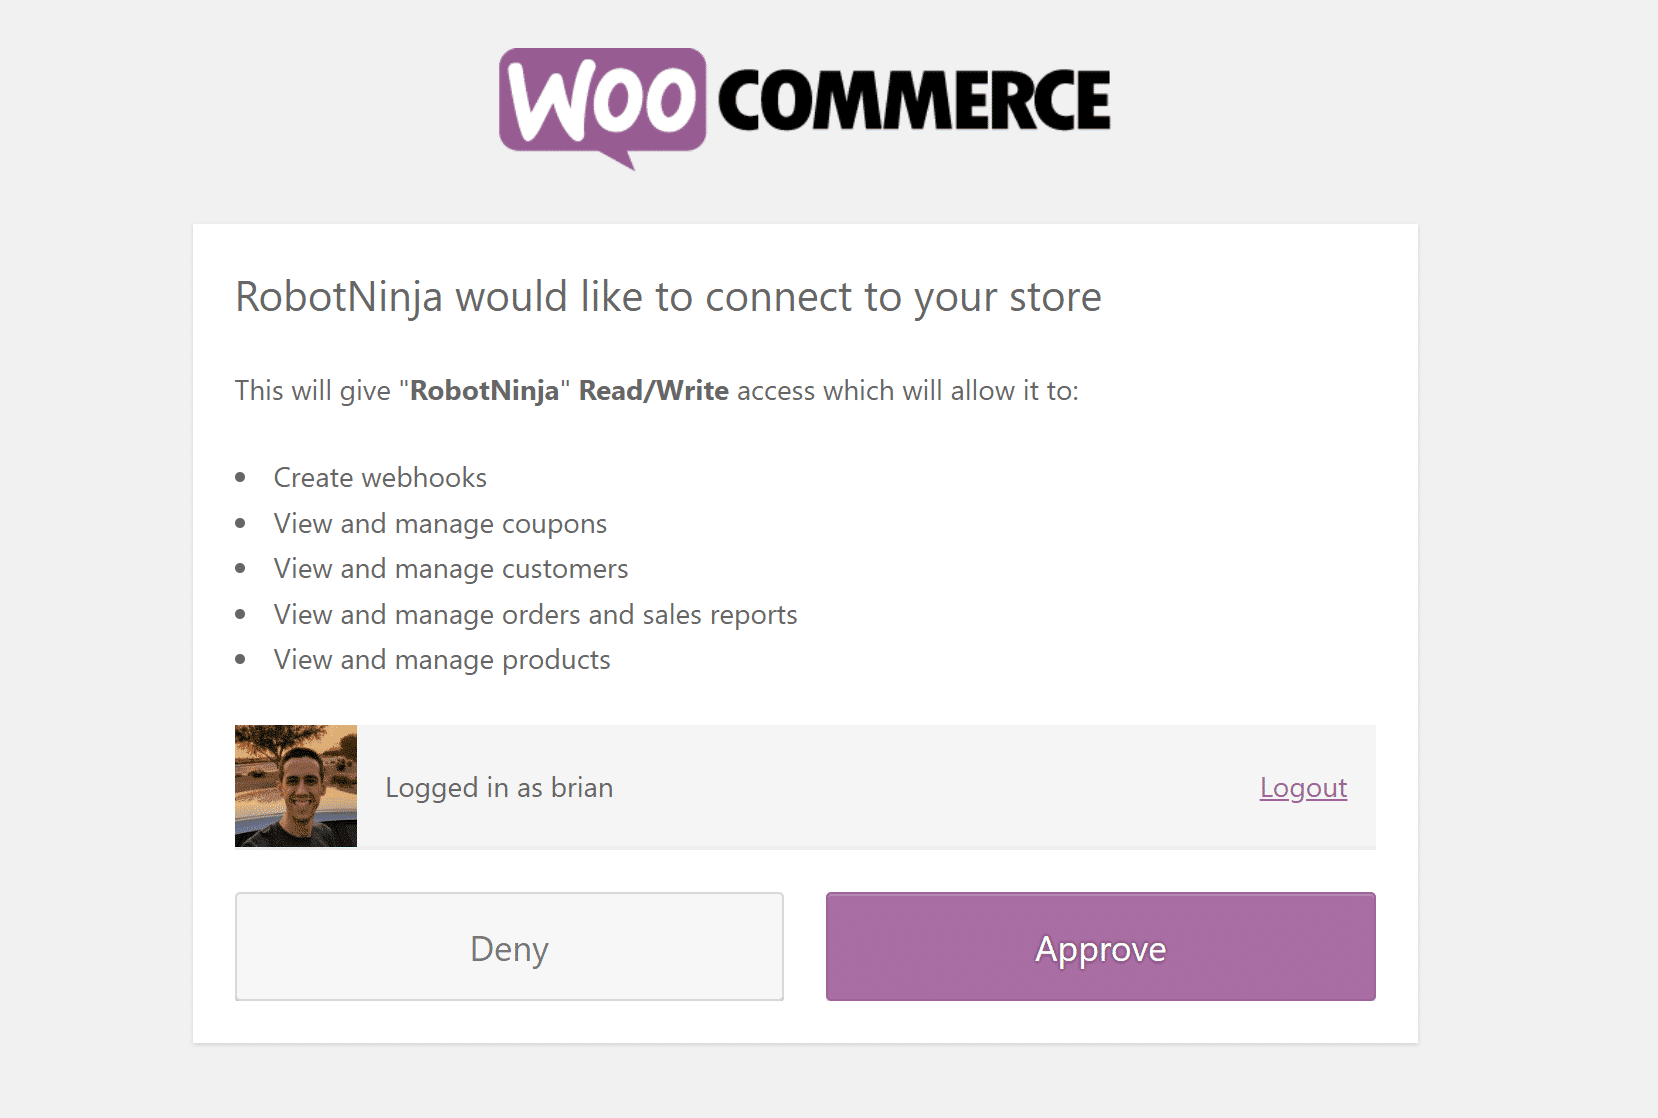
Authorize Ninja Robotic
After clicking “Approve,” you’ll be introduced with a “Congratulations!” message. Click on the fairway “Start Checking out” button to continue.
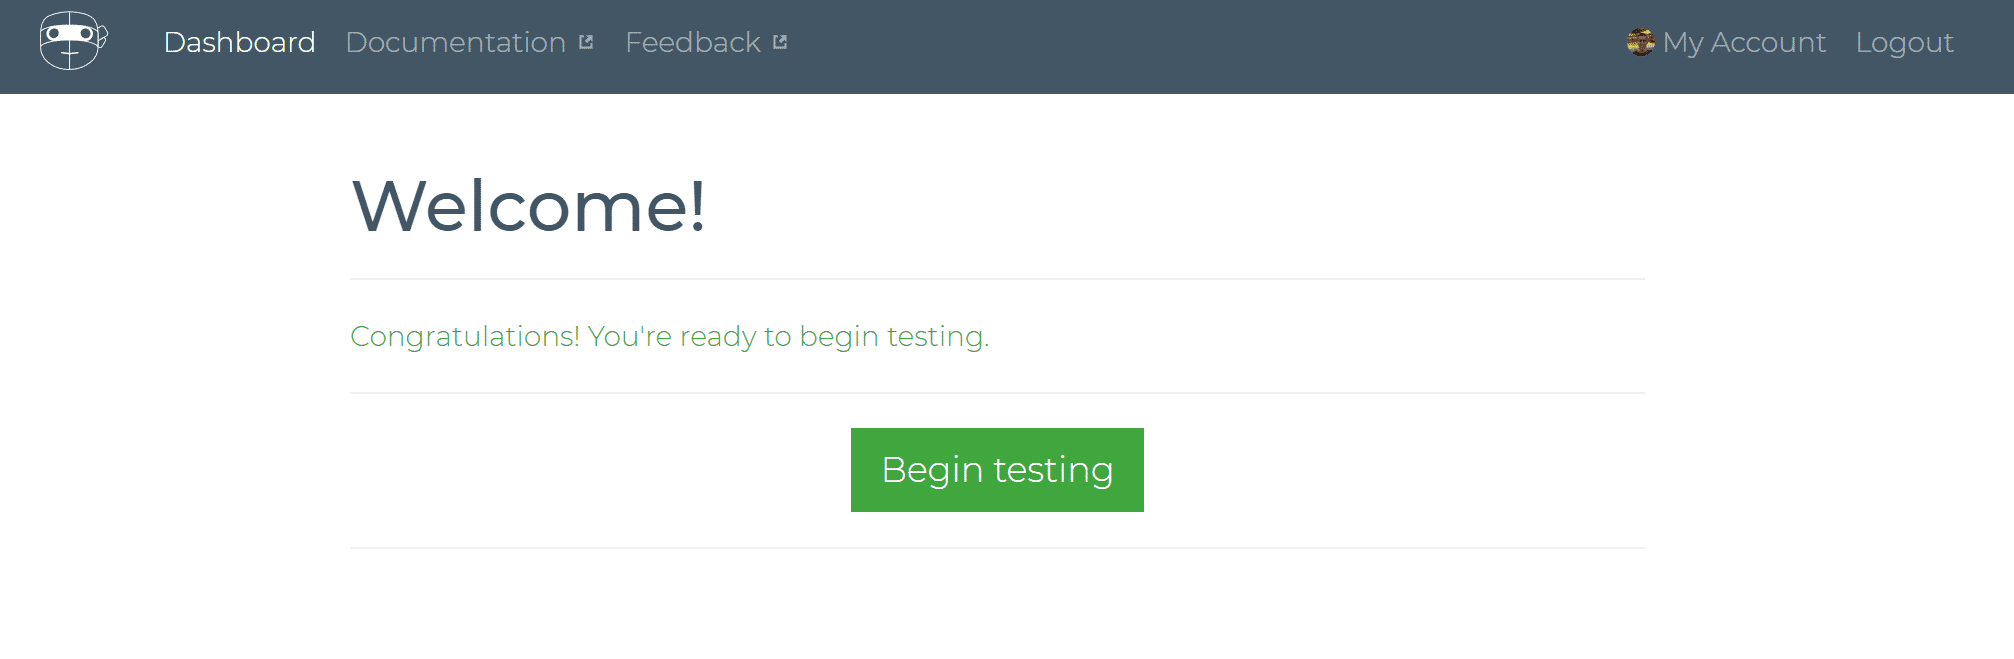
Start checking out Robotic Ninja
Now that you just’re arrange you’ll be able to:
- Get started queueing up checkout assessments and watch as they’re processed in real-time.
- Agenda computerized assessments to run when it fits you—on a daily basis, week, you place what works on your repairs agenda.
- View the consequences out of your ultimate Robotic Ninja take a look at.
- Get electronic mail notifications when a take a look at fails, together with details about the mistake, your retailer configuration, and a screenshot of what a person would see on the time of failure to lend a hand diagnose the problem.
- Check your on-line retailer the usage of genuine merchandise and genuine bills.
- Arrange and take a look at a couple of retail outlets from one account.
Computerized Checking out Equipment
It’s essential to check capability throughout your website is operating correctly after making updates, no longer simply your checkout. Finally, if a buyer fills in a touch shape or makes use of reside chat the ones items of capability are damaged, how are you going to know for those who haven’t examined them?
It’s simple to run guide assessments—merely click on thru your website, filling in bureaucracy and the usage of your reside chat window. To lend a hand automate this, put in combination an inventory of vital capability (as I discussed previous) in addition to directions for methods to manually perform assessments, i.e. open website, navigate to touch web page, fill in shape and many others). This will likely make sure you don’t leave out the rest on every occasion you do a guide take a look at.
If you happen to’d like to automate this procedure, wish to have extra keep an eye on over your computerized assessments, or have a extremely custom designed website or capability, I’d suggest trying out Ghost Inspector and UseTrace. Each are nice choices for those who aren’t accustomed to PHP and don’t wish to fiddle with scripts and code.
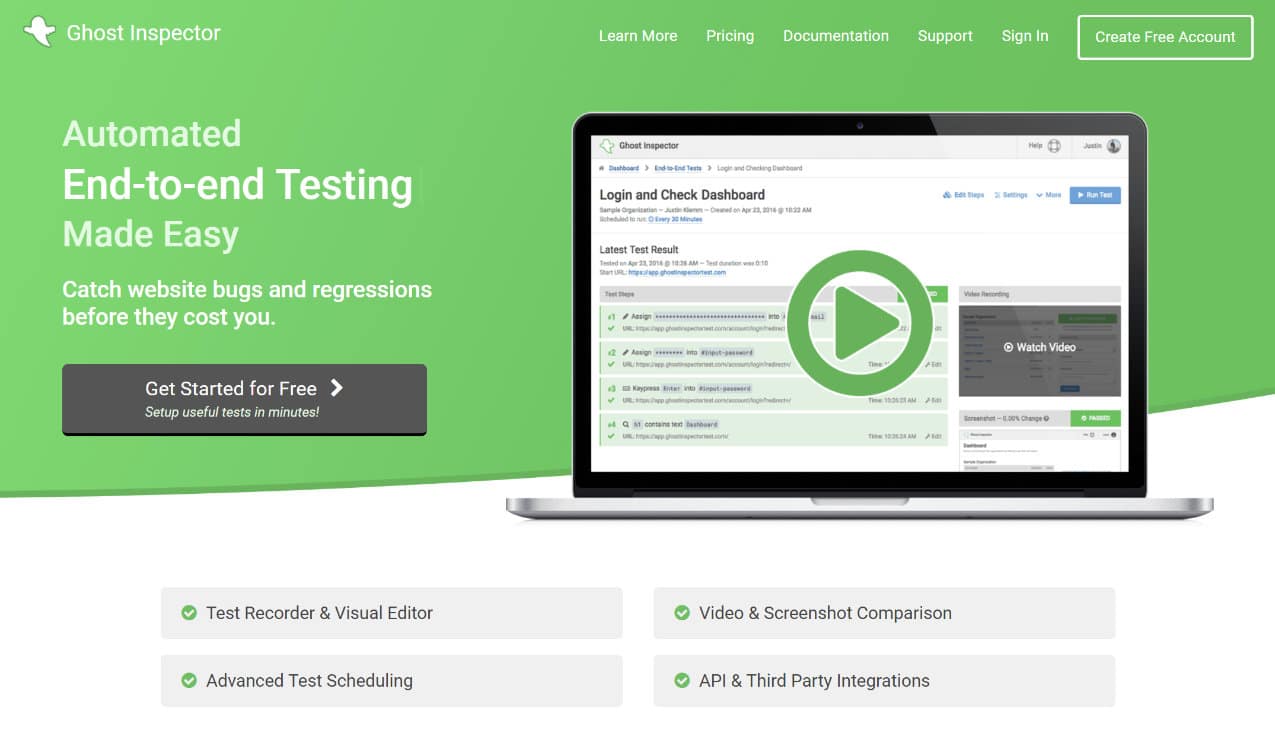
Ghost Inspector
Either one of those choices be offering an identical options for automating your checkout checking out. In the end, opting for which possibility you pass with is determined by whether or not you wish to have to make use of a Chrome extension or an internet instrument to document your assessments.
Then again, if you’re a developer and love to get your arms grimy, Codeception is a brilliant selection for builders.
Abstract
With the correct gear, some prep, and a forged tick list in position, you should not have any troubles transferring ahead with common checking out and updating WooCommerce. With a purpose to take away the anxiousness round updating WooCommerce, it’s essential to demystify the method, which we’ve executed right here. With a bit of luck, this information has supplied a forged basis for retaining your WooCommerce website up-to-date.
I must additionally spotlight that it’s essential to check your retailer’s transactional emails. Take a look at those 5 other ways to test WooCommerce transactional emails.
Do you utilize visualization/screenshot gear when updating WooCommerce and WordPress? What different gear and workflows do you utilize for updates? You probably have any questions on checking out WooCommerce, tell us within the feedback under!
The submit Updating WooCommerce: A Safe and In-Depth Guide seemed first on Kinsta Managed WordPress Hosting.
WP Hosting