
Whether or not you’re an aspiring web developer or an ecommerce entrepreneur, your web pages most probably proportion some crucial components. As an example, each and every website online wishes a transparent header to assist guests navigate between other pages. Then again, in the event you use a page builder like Elementor to chop coding, you can be questioning if it’s nonetheless imaginable to make an advanced but user-friendly Elementor sticky header.
Thankfully, the usage of an Elementor header may give your customers with a streamlined solution to discover your web site. With this popular page builder, you’ll construct all kinds of headers that don’t disappear when customers scroll down a website online. This selection is what makes them ‘sticky’.
On this submit, we’ll talk about how a sticky header works and some great benefits of the usage of one. Then we’ll display you the way to make an Elementor sticky header with each the unfastened and professional variations of the device. After all, we’ll come up with further customization choices to your sticky headers the usage of CSS. Let’s get began!
Contents
- 1 An Creation to Elementor Sticky Headers
- 2 How To Create an Elementor Sticky Header
- 3 How To Use CSS to Reinforce Your Elementor Sticky Header
- 4 Kinds of Elementor Sticky Headers
- 5 Abstract
An Creation to Elementor Sticky Headers
No two web pages are the similar. Then again, there are a couple of options that high quality web pages have in commonplace.
If you happen to’re working a multi-page website online, any such components is a header. That is the horizontal bar on the peak of any web page that comprises helpful knowledge.
Normally a header comprises your navigation menu with pages comparable to About or Touch Us:

When guests discover your web page, they’ll most probably be expecting an arranged header to assist information them round your website online. Since Consumer Enjoy (UX) is essential to the luck of a web site, you’d be sensible to create a header this is intuitive and easy. That’s the place a sticky header, designed with Elementor, could make a large distinction.
Want to make a sophisticated yet user-friendly header? 

How a Sticky Header Works
Ahead of we learn the way an Elementor sticky header works, let’s take a look at how a typical header behaves while you scroll down a web page:

As you’ll see within the above instance, this header comprises a posh navigation bar with classes comparable to Gross sales, Clothes, Sneakers, and extra. Those tabs will for sure assist consumers to find what they’re on the lookout for. Then again, while you scroll down the web page, the header disappears.
Customers would possibly to find this irritating, because it calls for them to scroll again to the highest of the web page to get right of entry to the navigation menu. Thankfully, a sticky header provides a easy answer.
By way of staying or ‘sticking’ in position on the peak of your web page, a sticky header can significantly reinforce the UX of your web site:

When your website online design features a sticky header, your customers can temporarily soar to new pages with out losing time scrolling.
Moreover, with this fastened component, you’ll come with your emblem entrance and middle always. This selection would possibly assist customers recall your logo extra simply and inspire them to stick for your website online longer.
When You Will have to Imagine The usage of a Sticky Header
Guests will likely be much less more likely to get misplaced when exploring higher websites with a sticky header. As such, chances are you’ll need to make the most of this option in case your web site has many pages. That’s why you’ll steadily see sticky headers on ecommerce sites.
A sticky header can also be specifically helpful if you wish to come with a seek function for your header. That approach, as customers are scrolling and notice they can not to find what they’re on the lookout for, they may be able to temporarily enter a question into the hunt bar.
Moreover, a sticky header is usually a game-changer in the event you run a monetized blog that displays all of your posts at the homepage. Normally, this header can ensure that your web site is maintainable and scalable.
Then again, in case your website online best has a unmarried web page, it doesn’t make a lot sense to turn out to be your header on this approach. Moreover, when you’ve got a excellent quantity of pages for your web site, however every one is moderately brief, you almost certainly don’t desire a sticky header both.
General, a sticky header reduces scrolling time and will increase website online usability and navigation. If you happen to’re no longer certain if this option would receive advantages your web site, chances are you’ll need to do a snappy audit of your web page lengths after which come to a decision.
How To Create an Elementor Sticky Header
For this instructional, we’ll stroll you throughout the steps to make an Elementor sticky header. We’ll think that you have already got the Elementor plugin put in and activated for your website online.
We’ll be overlaying how you’ll make this header with each the unfastened model and Elementor Pro. You’ll most probably be at liberty to understand that you simply received’t want to learn HTML or considerably edit code to do that!
How To Create a Sticky Header The usage of Elementor (Loose)
Elementor’s unfastened model provides some tough options for page-building. Then again, if you wish to make adjustments on your headers and footers, you’ll want some further (additionally unfastened) equipment.
With that during thoughts, let’s see how you’ll create a sticky header the usage of Elementor!
Step 1: Set up and Turn on Your Crucial Plugins
Thankfully, a couple of unswerving equipment can simply make bigger the capability of Elementor’s unfastened model.
Navigate on your WordPress dashboard to seek out your first device. Pass to Plugins > Upload New and search for ElementsKit Elementor addons the usage of the hunt serve as:

Install and activate this plugin as you typically would. Whilst you end this procedure, you’ll be taken on your major plugins web page:

Now, click on on Upload New once more to find the Sticky Header Effects for Elementor plugin with the hunt bar:

Repeat the set up and activation procedure for this device, and also you’re able for your next step!
Step 2: Create Your Menu
Ahead of you’ll make any form of header, you’ll desire a navigation menu. We’re going to make a easy menu with the commonest components. It’s going to come with a symbol, pages, and a Name To Motion (CTA).
To create your individual menu inside your WordPress dashboard, move to Look > Menus. Subsequent to the Menu Identify box, give yours a descriptive title. We’re going to name ours “Sticky Header Menu”:
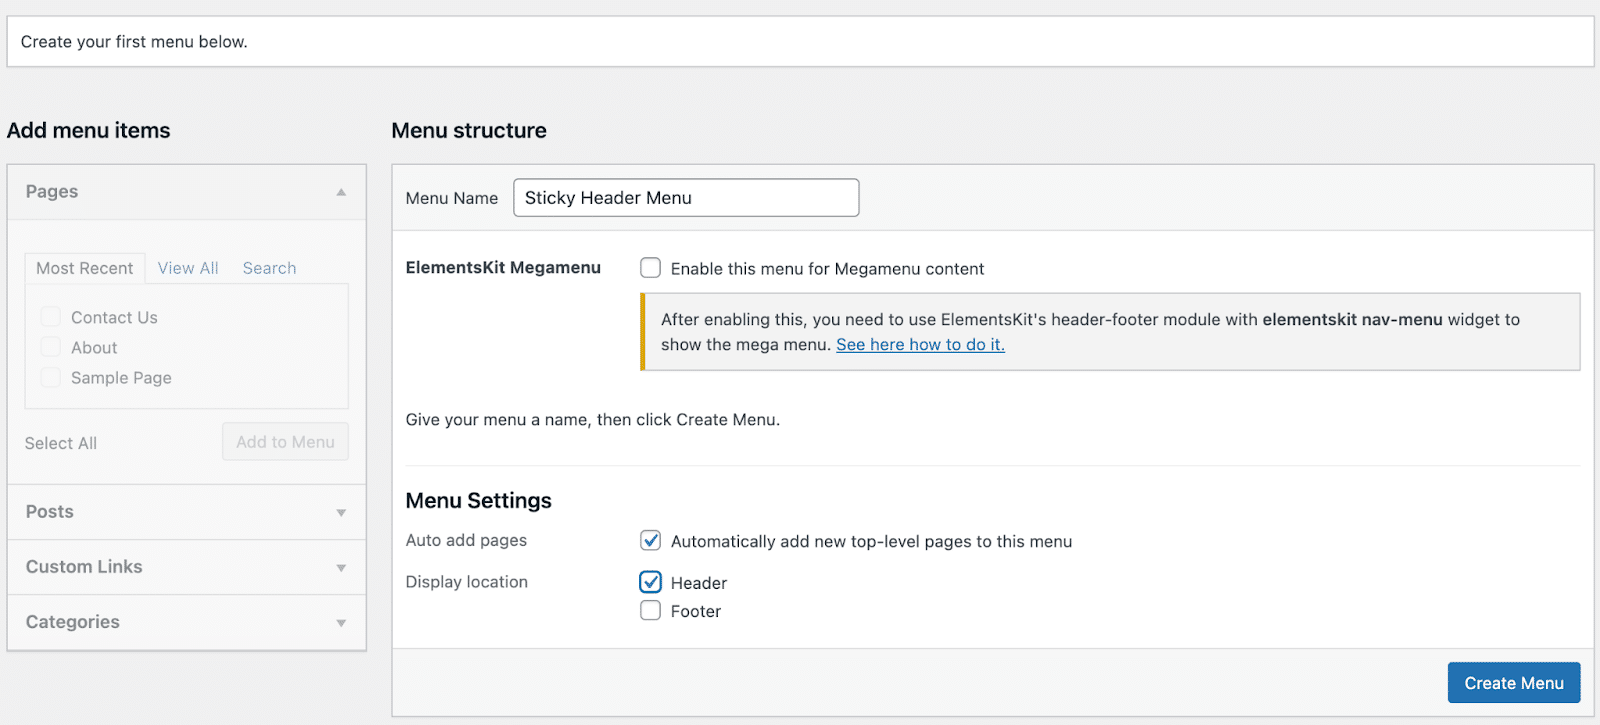
Make sure that to select Header because the Show location. You may additionally need to make a choice the field so as to add new pages on your menu mechanically.
Subsequent, you’ll want to upload some pages on your menu. Within the Pages phase at the left, tick the containers for any pages you’d like to incorporate, then click on on Upload to Menu:
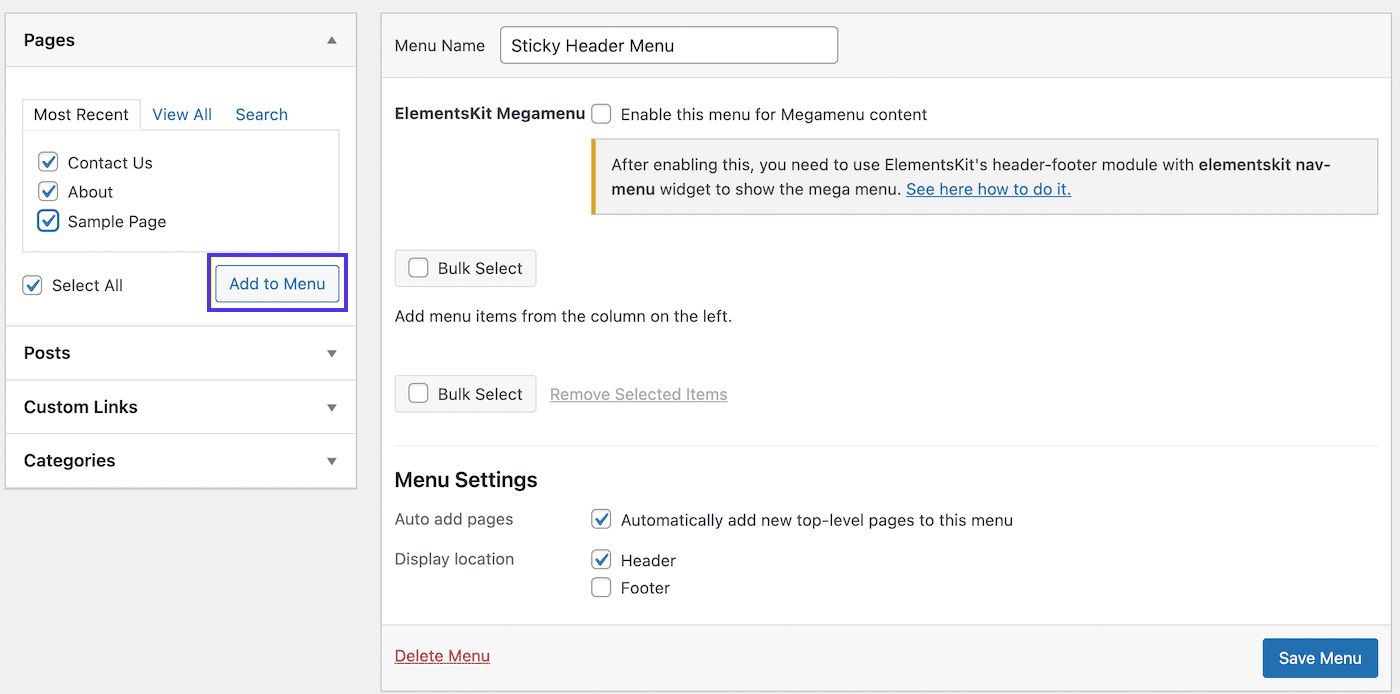
Then you definitely’ll see your pages transferred on your menu at the correct. Pass forward and click on on Save Menu on the backside correct of your display:

As you’ll see, we’ve added some fundamental pages, together with Touch Us, About, and Pattern Web page. It’s possible you’ll need to reorder your pages in order that the collection feels intuitive to guests.
Step 3: Create Your Header
Now your navigation menu exists, however you’ll’t get right of entry to it any place. That’s as a result of you wish to have to create a header for it.
To do that, move to the ElementsKit tab for your left-hand menu. If you happen to haven’t already, you’ll want to click on thru a couple of ‘getting began’ pages at this level.
Everybody will most probably have other personal tastes, so take your time deciding on which options you wish to have to turn on. Then again, be sure that the Header Footer module is toggled to ON:

Now, move to ElementsKit > Header Footer:
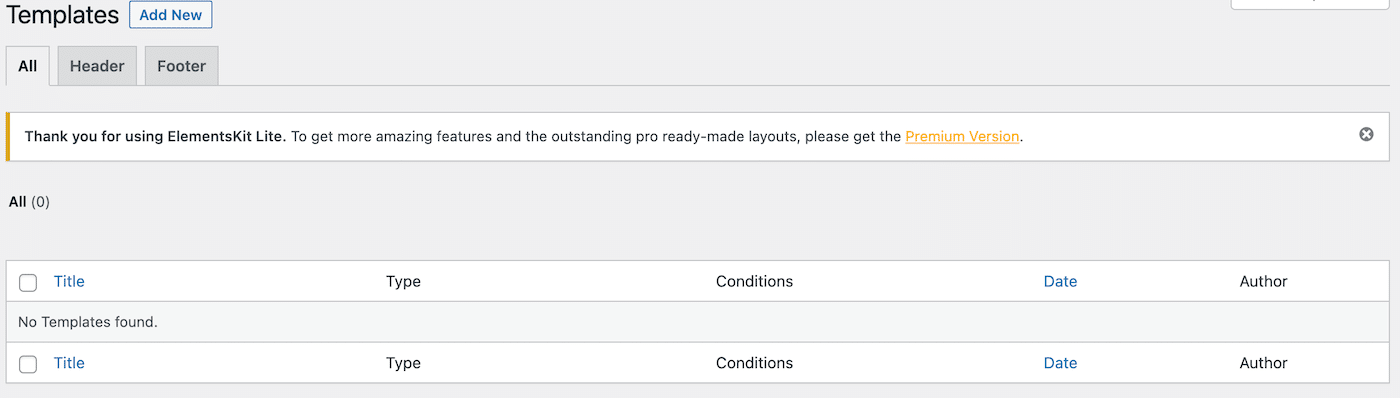
This web page will likely be empty because you don’t have any headers or footer templates but. Click on on Upload New on the peak of your display to create your first header template:
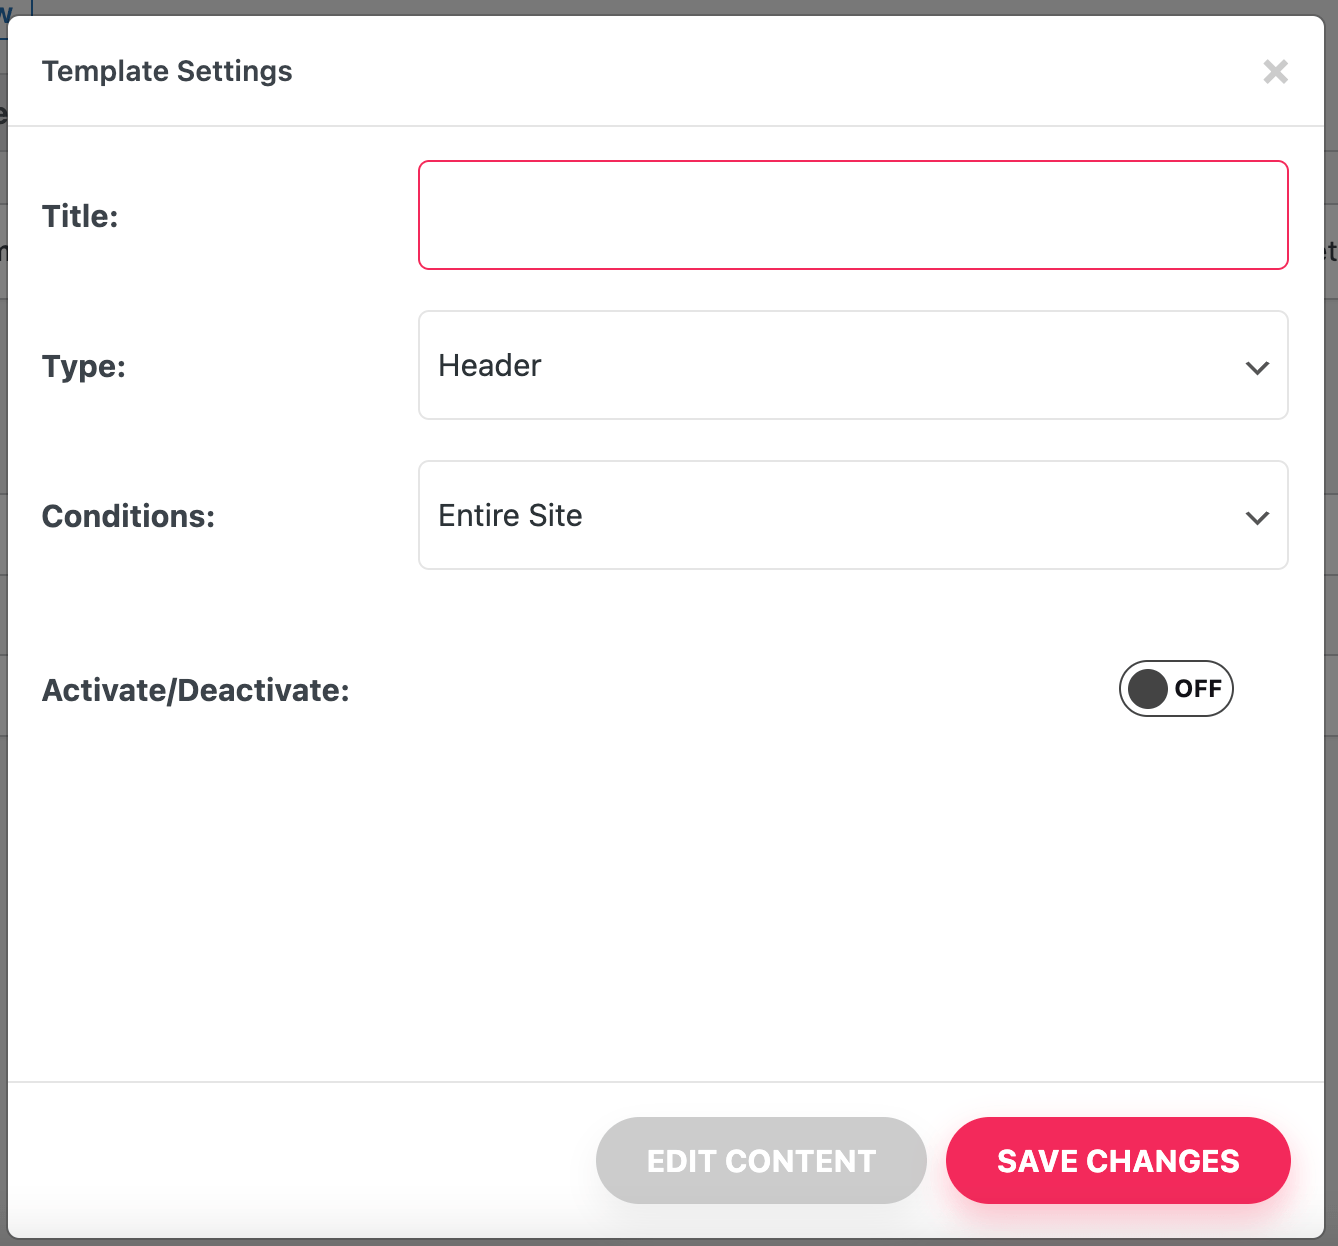
At the above display, input a descriptive title and ensure Header is chosen because the Sort. Because you’re the usage of the unfastened model, this header will seem at the Whole Website.
Be sure you toggle the Turn on/Deactivate transfer to ON and click on on SAVE CHANGES. Now you’ll be taken again on your templates web page, the place you’ll see your new header template indexed:

You may also realize a inexperienced Energetic icon subsequent to this header. Then again, it’s no longer are living but.
To finish your header, hover over it within the template listing, and click on on Edit in Elementor, slightly below its title. This may take you to the Elementor Builder display.
Right here, click on at the ElementsKit icon:

At the following display, make a selection the Sections tab:

Scroll down slightly to discover a header phase you prefer, then click on on Insert. We selected Header – Phase 5:

As you’ll most certainly see, our navigation menu isn’t visual. So let’s move forward and upload it to our header template. To do that, hover over the navigation menu phase of your header. On this case, it’s correct within the middle:

Click on in this space, and your Menu Settings must seem within the left-hand panel. Now, find the Choose Menu box. Within the dropdown, select the menu you created previous:
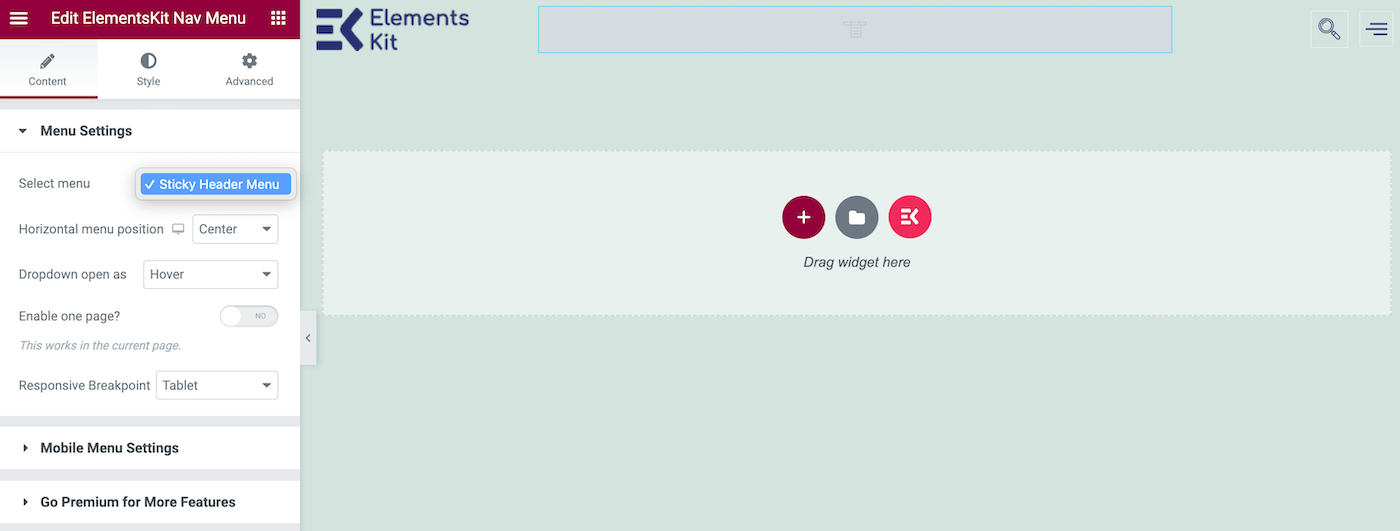
At this level, you must see the menu populate for your header template. Click on on UPDATE within the backside left nook of the display, and your same old header is completed.
Let’s take a look at the way it works in motion:
As you’ll see, our header appears nice. Then again, it disappears once we scroll down. Let’s see how we will make it stick.
Step 4: Make Your Header Sticky
For our ultimate step, navigate to ElementsKit > Header Footer > Edit with Elementor. Then make a selection your header and click on at the middle icon with six dots:

Whilst you hover over it, you are going to see this permits you to Edit Phase. If you click on on it, your edit choices will seem within the left panel.
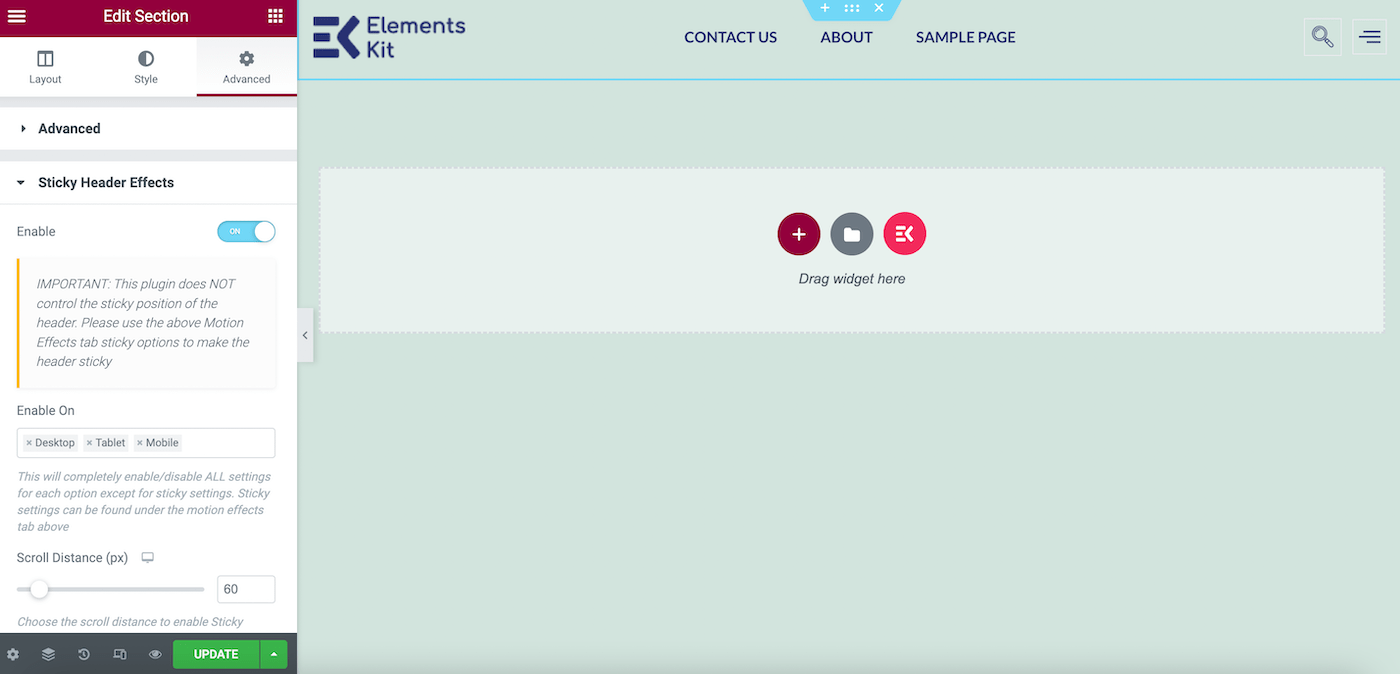
Click on at the Complex tab and scroll all the way down to Sticky Header Results. There will likely be a caution message that claims the plugin doesn’t keep watch over the sticky header, however you’ll omit that. Since we’ve additionally added the Sticky Header Results for Elementor plugin, it’s going to paintings simply fantastic.
Now permit the Elementor sticky header by means of toggling the transfer to ON:
Relying for your theme, your sticky header would possibly glance clear. If that’s the case, you could need to make one stylistic trade.
On your Edit Phase panel, beneath Taste, move to Background > Colour and you’ll want to’ve decided on a colour that may stand out in opposition to your commonplace background:

Then click on on UPDATE. Now you’ll preview your website online to try the general outcome:

That’s it! This can be a easy Elementor sticky header, however it might simply take your website online to the following degree.
How To Create a Sticky Header The usage of Elementor Professional
When the usage of Elementor Professional, making a sticky header is slightly more effective. You’ll upload this option on your website online in simply 3 simple steps.
Step 1: Create Your Menu
To make your menu, navigate to Look > Menus for your WordPress dashboard:

Give your menu a descriptive title, make a selection Number one Menu subsequent to Show location, and click on on Create Menu:

At this level, you’ll have a couple of current pages for your web site. Choose the pages you’d like to incorporate for your menu from the left-hand panel.
Then click on on Upload to Menu, adopted by means of Save Menu:

Now your pages must be populated at the right-hand facet beneath Menu Construction.
Step 2: Create Your Header
Subsequent, we’ll want to create our basis. Let’s make a vintage header.
To begin, find the Elementor tab for your left sidebar. Slightly under that, move to Templates > Theme Builder. The next web page will appear to be this:

As you’ll most probably see, with Elementor Professional, you’ll simply get started designing each and every component of your website online.
Click on at the plus icon (+) at the Header component. Now you must see a pop-up that presentations a couple of header blocks that you’ll choose between:

When you’ve got a pre-existing header template, you’ll make a selection it beneath the My Templates tab. Differently, you could need to use some of the phase blocks that comes incorporated with Elementor Professional.
Whilst you’ve made your variety, merely hover over the specified block and click on on Insert:

Right here, you’ll see that this block comes with its personal emblem, however our navigation menu has mechanically populated. Now, click on on PUBLISH:

The next display will urged you to resolve your PUBLISH SETTINGS. Right here, make a selection ADD CONDITION to come to a decision the place you wish to have to show your header:

You’ll most probably need to make a choice Whole Website subsequent to INCLUDE. You’ll additionally exclude sure website online spaces by means of clicking the arrow subsequent to INCLUDE and swapping to the other. Whilst you’re glad along with your picks, click on on SAVE & CLOSE.
At this level, a pop-up message will seem within the backside correct nook of your display. If it doesn’t disappear sooner than you’ll click on it, make a selection the solution to view your are living website online.
However, return on your WordPress dashboard and preview your website online by means of clicking at the area icon within the peak left nook after which deciding on Discuss with Website:
As you’ll see, our header is now functioning, but if we scroll down the web page, it disappears. Let’s see what we will do about that!
Step 3: Make Your Header Sticky
Now let’s see the way to create an Elementor sticky header with the professional device!
Pass to Templates > Theme Builder and make a selection the header you simply made. Then, click on on Edit subsequent to the pencil icon at the following display. This may deliver you again to the Elementor editor.
Hover over your header template, then click on at the six-dot icon within the middle. This may open your Edit Phase panel at the left:

Now, navigate to the Complex tab and find the Movement Results phase. Right here, permit Scrolling Results by means of toggling the transfer to ON:

Then, scroll down the Movement Results phase to seek out the Sticky box. Within the dropdown menu, make a selection Most sensible:

Now, click on on UPDATE. Remember the fact that relying for your theme’s shade scheme, your Elementor sticky header would possibly glance clear:

If that’s the case, and also you don’t like the way it appears, you’ll at all times trade your background shade. On your Edit Phase panel, move to Taste > Background and make a selection Vintage as your background kind.
Now, make a selection a brand new background shade to your header template. You’ll need to select a colour this is complementary to the remainder of the web page but additionally creates a pleasant distinction:

Since that is simply an instance, we’re merely opting for a grey shade to make our header much less clear.
Now, click on on UPDATE to avoid wasting your adjustments. Pass forward and preview your ultimate outcome:
That’s it! You’ll most probably need to tweak the manner and hues in line with your logo. Simply make sure you at all times save your adjustments when completed.
How To Use CSS to Reinforce Your Elementor Sticky Header
Whilst you put in force an Elementor sticky header for your web site, it might really feel like an important facelift to your website online design. Then again, you can be thinking about additional customizations or extra dynamic options.
Now that you understand how to create a fundamental sticky header, let’s see the way to take your design to the following degree. You’ll do that by means of using Cascading Style Sheets (CSS) code in WordPress.
If you happen to’re a newbie or don’t have enjoy coding, don’t fear. Bettering your designs is a breeze with Elementor.
To do that, move to Templates > Theme Builder > Header:

Underneath Edit Phase > Complex > Customized CSS, you’ll upload a small CSS snippet to make stylistic adjustments.
Kinds of Elementor Sticky Headers
Listed below are a couple of standard improvements chances are you’ll need to imagine to your Elementor sticky header!
Clear Sticky Header
Some topics would possibly mechanically set sticky headers to clear. Then again, if you wish to do that the usage of CSS, you’ll make the most of a code snippet comparable to this one:
selector.elementor-sticky--effects{ background-color: rgba(133,130,255,0.5) !necessary }

selector{ transition: background-color 4s ease !necessary; }

selector.elementor-sticky--effects >.elementor-container{ min-height: 80px; }

selector > .elementor-container{ transition: min-height 1s ease !necessary; }
Merely replica and paste this code into the Customized CSS box and modify the fields on your personal tastes. This snippet alters your header’s background shade, transparency, and peak, with an animation impact:
The chances for this sort on my own are never-ending.
Shrinking Sticky Header
Any other standard selection is a header that will get larger and smaller as guests scroll. Here’s the code you’ll want for this kind of Elementor sticky header:
header.sticky-header {
    --header-height: 90px;
    --opacity: 0.90;
    --shrink-me: 0.80;
    --sticky-background-color: #0e41e5;
    --transition: .3s ease-in-out;

    transition: background-color var(--transition),
                background-image var(--transition),
                backdrop-filter var(--transition),
                opacity var(--transition);
}
header.sticky-header.elementor-sticky--effects {
    background-color: var(--sticky-background-color) !necessary;
    background-image: none !necessary;
    opacity: var(--opacity) !necessary;
    -webkit-backdrop-filter: blur(10px);
    backdrop-filter: blur(10px);
}
header.sticky-header > .elementor-container {
    transition: min-height var(--transition);
}
header.sticky-header.elementor-sticky--effects > .elementor-container {
    min-height: calc(var(--header-height) * var(--shrink-me))!necessary;
    peak: calc(var(--header-height) * var(--shrink-me));
}
header.sticky-header .elementor-nav-menu .elementor-item {
    transition: padding var(--transition);
}
header.sticky-header.elementor-sticky--effects .elementor-nav-menu .elementor-item {
    padding-bottom: 10px !necessary;
    padding-top: 10px !necessary;
}
header.sticky-header > .elementor-container .emblem img {
    transition: max-width var(--transition);
}
header.sticky-header.elementor-sticky--effects .emblem img {
    max-width: calc(100% * var(--shrink-me));
}
If you happen to’re no longer happy with such an intensive code bite, chances are you’ll need to seek the advice of Elementor’s guide to making a shrinking sticky header.
With this design, you’ll finally end up with this impact:
Regardless that this header has a refined contact, its sophistication can provide your design a extra skilled really feel.
Fade-In / Fade-Out
Along with those stylish choices, there’s additionally the fade-in / fade-out function (additionally known as ‘expose’). It appears one thing like this:

For this impact, you received’t want to contact any code in any respect. Merely navigate on your header for your theme builder. Then move to Edit Phase > Complex > Movement Results > Scrolling Results:

Right here, click on at the pencil icon subsequent to the Transparency box and alter the Course to Fade In or Fade Out. Then, modify your design on your personal tastes.
There are lots of choices for those transparency results, so we suggest trying out Elementor’s documentation. That approach, you’ll be capable to reach the precise glance you wish to have.
With help from this guide, you’ll be making Elementor sticky headers in no time 
Abstract
Operating with a depended on web site builder is a wonderful selection to paying a veteran web developer to create your website online. When the usage of one of the vital best possible website design software, you’ll simply make the crucial components for any web site. Those come with sensible however stunning sticky headers.
A sticky header can create a extra delightful enjoy to your customers. You’ll choose between quite a lot of dynamic header types, together with clear and shrinking. Even higher, you’ll make those surprising header designs with each Elementor Pro and its unfastened model.
Designing your web site is likely one of the first steps to launching it. Then again, you’ll first want dependable webhosting. Take a look at Kinsta’s managed hosting plans to look how we will optimize your website online’s efficiency!
The submit The Ultimate Guide to Elementor Sticky Headers seemed first on Kinsta®.
WP Hosting