
Designing a 3-D photograph wall turns out like one thing most effective imaginable the usage of a photograph editor like Photoshop or Caricature. But it surely’s no longer! This present day there are a ton of apparently not possible designs you’ll be able to construct on the net the usage of simply CSS. And with a web page builder like Divi, you don’t even want to know a lot about CSS to create all these designs. That’s why as of late, I’m going to turn you the best way to design 3-D photograph partitions in Divi.
The trick is to make use of the viewpoint css assets. With only a unmarried line of CSS added to a mum or dad component, you’ll be able to use Divi’s integrated change into choices to rotate pieces into life-like 3-D designs.
Let’s get began!
Contents
- 1 Sneak Peek
- 2 Obtain the 3-D Photograph Wall design examples Structure for FREE
- 3 Obtain For Loose
- 4 You’ve gotten effectively subscribed. Please test your e mail cope with to verify your subscription and get get right of entry to to unfastened weekly Divi format packs!
- 5 Getting Began
- 6 Figuring out How Point of view Works with Turn into Choices
- 7 Designing Most sensible and Backside 3-D Photograph Partitions
- 7.1 Growing the Most sensible 3-D Photograph Wall
- 7.2 Customise the Phase to Upload Point of view and Cover Overflow
- 7.3 Replace Row Settings: Width and Gutter Width
- 7.4 Replace Row Settings: Turn into Rotate and Starting place
- 7.5 Replace Row Settings: Customized Column Widths
- 7.6 Create the Heading Phase
- 7.7 Create the Backside 3-D Photograph wall (or Flooring)
- 7.8 Ultimate Design
- 8 Growing Left and Proper 3-D Photograph Partitions
- 9 Ultimate Ideas
Sneak Peek
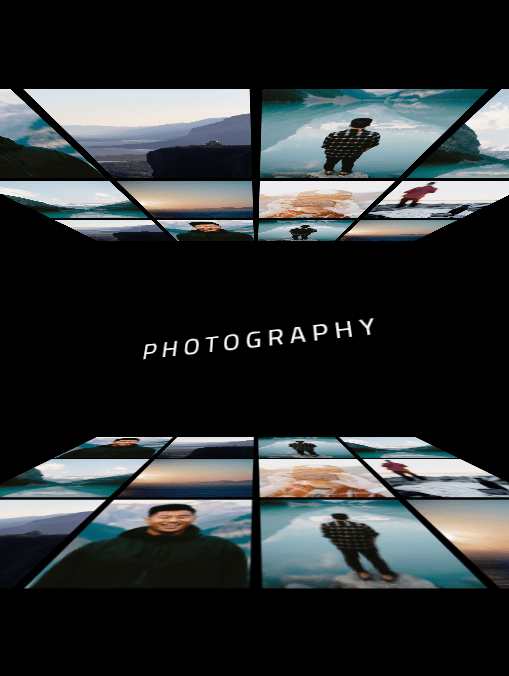
Here’s a sneak peek of the 3-D Photograph partitions we can be designing as of late.
Obtain the 3-D Photograph Wall design examples Structure for FREE
To put your fingers at the 3-D photograph wall designs from this educational, you’ll first want to obtain it the usage of the button under. To achieve get right of entry to to the obtain it is important to subscribe to our Divi Day by day e mail listing via the usage of the shape under. As a brand new subscriber, you’ll obtain much more Divi goodness and a unfastened Divi Structure pack each Monday! For those who’re already at the listing, merely input your e mail cope with under and click on obtain. You’ll no longer be “resubscribed” or obtain further emails.
@media most effective display screen and ( max-width: 767px ) {.et_bloom .et_bloom_optin_1 .carrot_edge.et_bloom_form_right .et_bloom_form_content:ahead of, .et_bloom .et_bloom_optin_1 .carrot_edge.et_bloom_form_left .et_bloom_form_content:ahead of { border-top-color: #ffffff !essential; border-left-color: clear !essential; }
}.et_bloom .et_bloom_optin_1 .et_bloom_form_content button { background-color: #f92c8b !essential; } .et_bloom .et_bloom_optin_1 .et_bloom_form_content .et_bloom_fields i { coloration: #f92c8b !essential; } .et_bloom .et_bloom_optin_1 .et_bloom_form_content .et_bloom_custom_field_radio i:ahead of { background: #f92c8b !essential; } .et_bloom .et_bloom_optin_1 .et_bloom_border_solid { border-color: #f7f9fb !essential } .et_bloom .et_bloom_optin_1 .et_bloom_form_content button { background-color: #f92c8b !essential; } .et_bloom .et_bloom_optin_1 .et_bloom_form_container h2, .et_bloom .et_bloom_optin_1 .et_bloom_form_container h2 span, .et_bloom .et_bloom_optin_1 .et_bloom_form_container h2 robust { font-family: “Open Sans”, Helvetica, Arial, Lucida, sans-serif; }.et_bloom .et_bloom_optin_1 .et_bloom_form_container p, .et_bloom .et_bloom_optin_1 .et_bloom_form_container p span, .et_bloom .et_bloom_optin_1 .et_bloom_form_container p robust, .et_bloom .et_bloom_optin_1 .et_bloom_form_container shape enter, .et_bloom .et_bloom_optin_1 .et_bloom_form_container shape button span { font-family: “Open Sans”, Helvetica, Arial, Lucida, sans-serif; } p.et_bloom_popup_input { padding-bottom: 0 !essential;}

Obtain For Loose
Sign up for the Divi Newlsetter and we can e mail you a replica of without equal Divi Touchdown Web page Structure Pack, plus heaps of different superb and unfastened Divi sources, pointers and tips. Practice alongside and you’ll be a Divi grasp very quickly. If you’re already subscribed merely kind for your e mail cope with under and click on obtain to get right of entry to the format pack.
You’ve gotten effectively subscribed. Please test your e mail cope with to verify your subscription and get get right of entry to to unfastened weekly Divi format packs!
To import the format in your web page, merely extract the zip document and drag the json document into the Divi Builder.
Let’s get to the educational lets?
Getting Began
To get began with this educational, all you wish to have is the Divi Theme put in and energetic. You’ll want some pictures to paintings with, so be happy to make use of the similar pictures I’m the usage of from the Travel Agency Layout Pack. After that, it is important to create a brand new web page, give the web page and name, and deploy the Divi Builder to construct at the entrance finish. Then choose the choice “construct from scratch”. That’s it. Your design canvas awaits!
Figuring out How Point of view Works with Turn into Choices
For those who ever took a elementary artwork magnificence, you almost certainly are conversant in viewpoint. This is a method utilized by artists to attract items that seem to be 3-D although it exists on a 2D piece of paper or canvas. In internet design, you’ll be able to place components in 3-D positions the usage of the change into assets. In Divi, those change into choices are integrated to the Divi builder. The primary change into assets that places a component in a 3-D place is change into rotate, which let you rotate pieces alongside the z, x, or y axis. Then again, in the event you rotate an merchandise the usage of change into rotate, the component gained’t seem as 3-D except the viewpoint assets is carried out.
As an example, let’s say you may have a unmarried symbol module with a picture added to a one column row.

Then you definately use the change into rotate assets to rotate the picture alongside the x axis. The picture will rotate however stay 2D so the picture merely glance find it irresistible was once squeezed from the highest and backside to grow to be shorter.
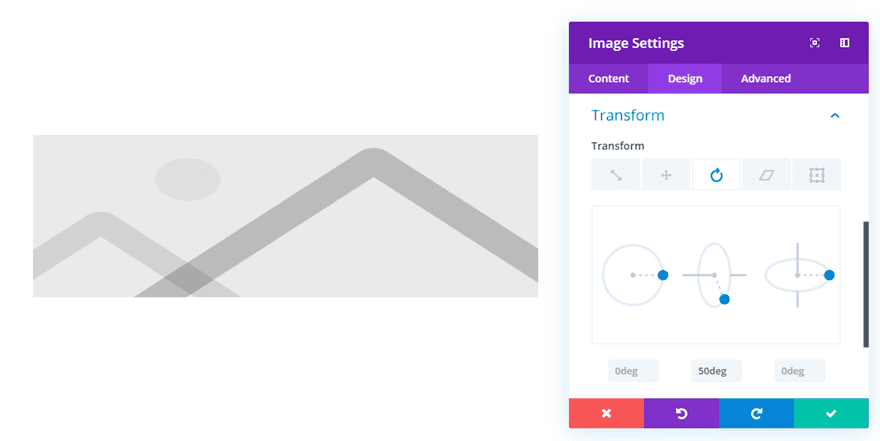
Now in the event you upload viewpoint the usage of small snippet of CSS to the Row’s major component (which is a mum or dad component of the picture), you upload viewpoint to the picture. Relying at the viewpoint worth, you’ll be able to build up or lower the space the thing seems from the person taking a look on the display screen. This is an instance of what the picture will appear to be in the event you upload “viewpoint: 600px” to the Row.
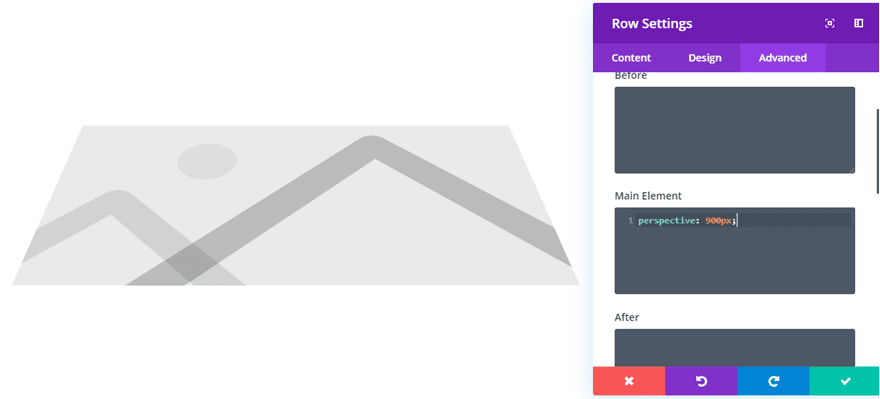
You’ll be able to see that the highest portion of the picture is smaller and the ground of the picture is bigger, growing the viewpoint 3-D impact. Mainly the picture appears 900px clear of the person viewing the web page.
On this educational, I can be the usage of this identical way to rotate a complete row of pictures after which including viewpoint to the mum or dad segment to create 3-D photograph partitions.
Designing Most sensible and Backside 3-D Photograph Partitions
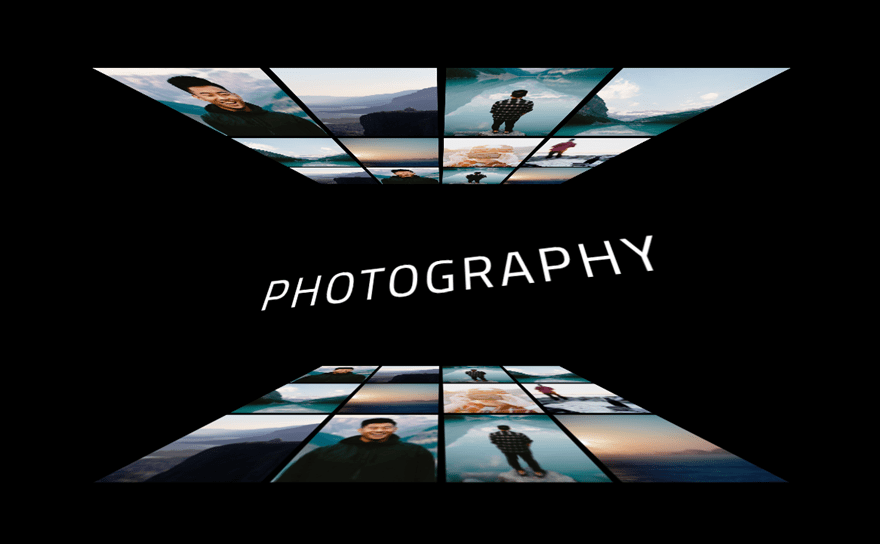
On this first design, we’re going to upload a 3-D photograph wall on the height and on the backside of a unmarried like of textual content which can be utilized as a heading. Right here’s the best way to do it.
Growing the Most sensible 3-D Photograph Wall
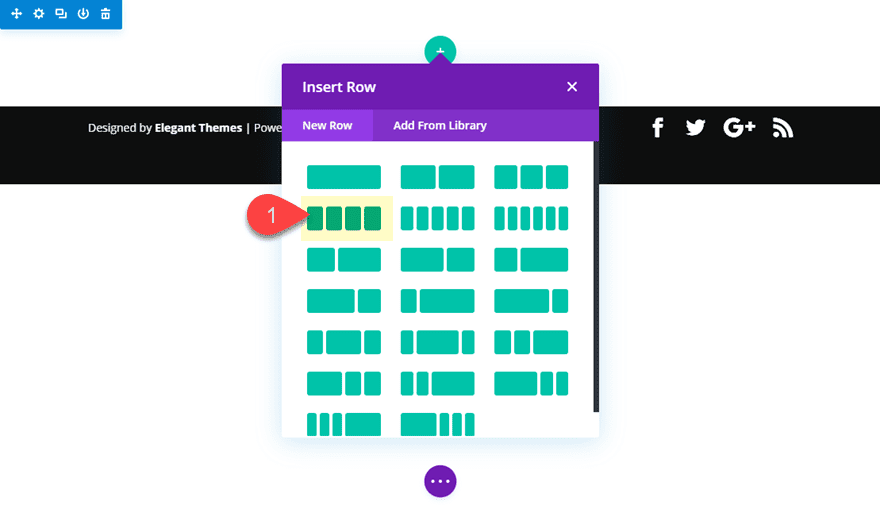
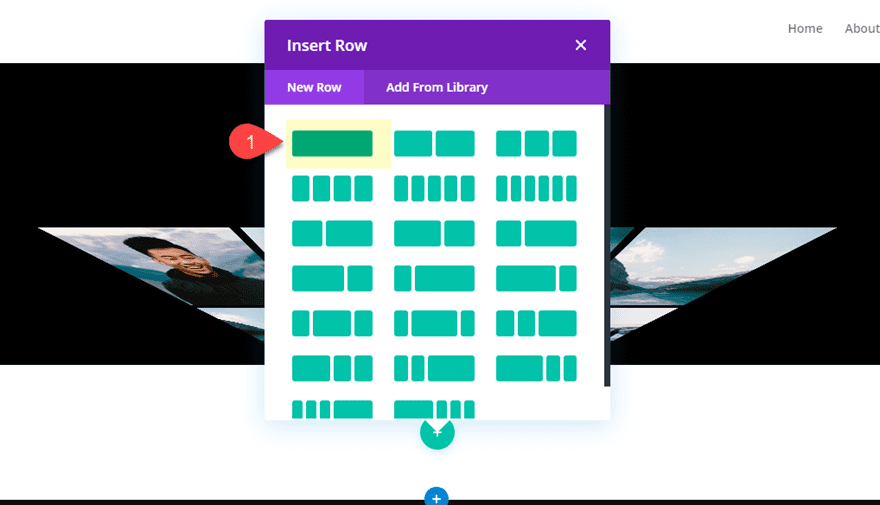
To get issues began for your new web page, create a standard segment with a four-column row.
In column 1, upload a picture module along with your first symbol. All the pictures I’m the usage of on this instance are 600px via 800px.
If you add your symbol to the picture module, replace the padding as follows:
Customized Padding: 3% height, 3% backside, 3% left, 3% proper
Reproduction (or replica and paste) the picture and upload them to every of the 4 columns so that you’ve got 3 pictures in every of the 4 columns like this.
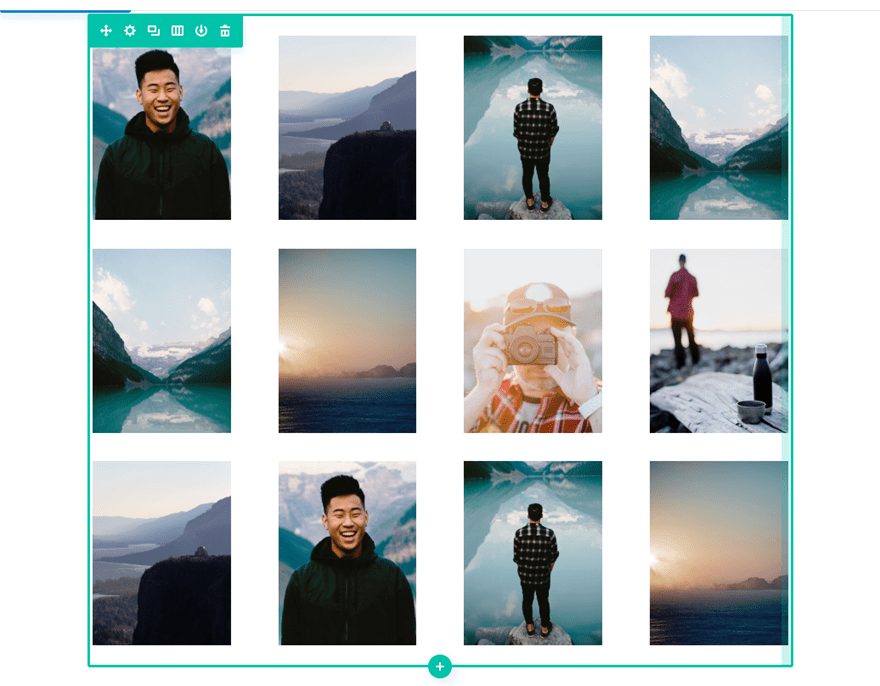
This may occasionally function the highest wall (or ceiling) that we can rotate and upload viewpoint to create the 3-D wall design.
Customise the Phase to Upload Point of view and Cover Overflow
Since we’re going to be rotating the row module (no longer particular person pictures), we want to upload the viewpoint assets to the row’s mum or dad which is the segment. And so as to stay the pictures from going out of doors of the segment container, we should upload overflow hidden to each the vertical and horizontal overflow.
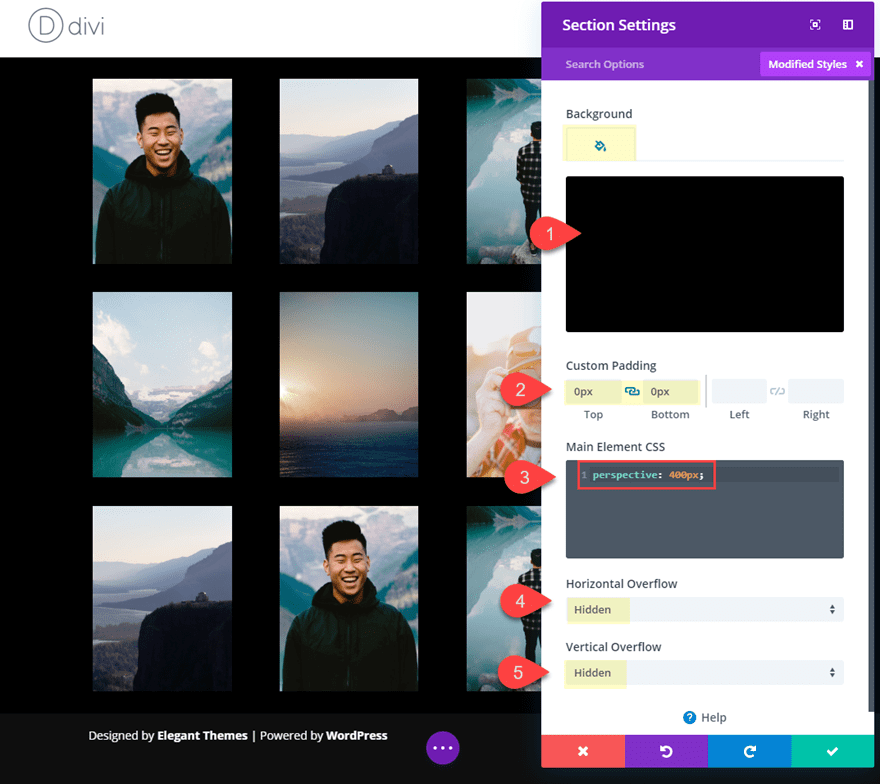
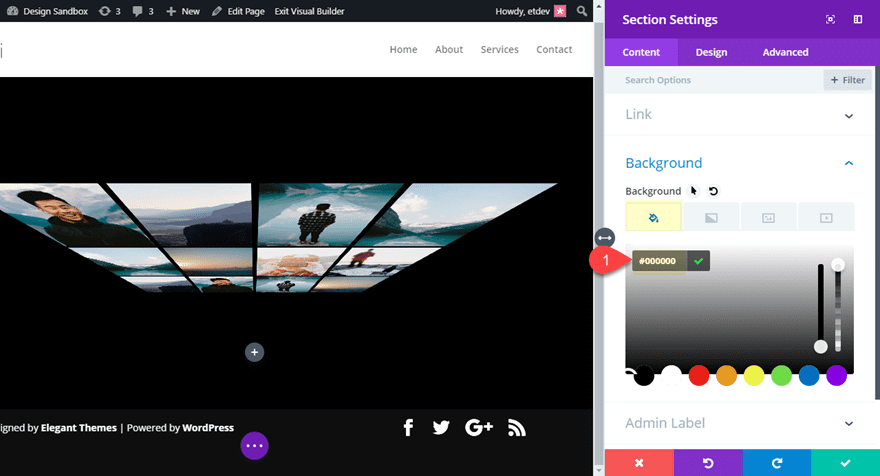
To try this open up the segment surroundings and replace the next:
Background Colour: #000000
Customized Padding: 0px height, 0px backside
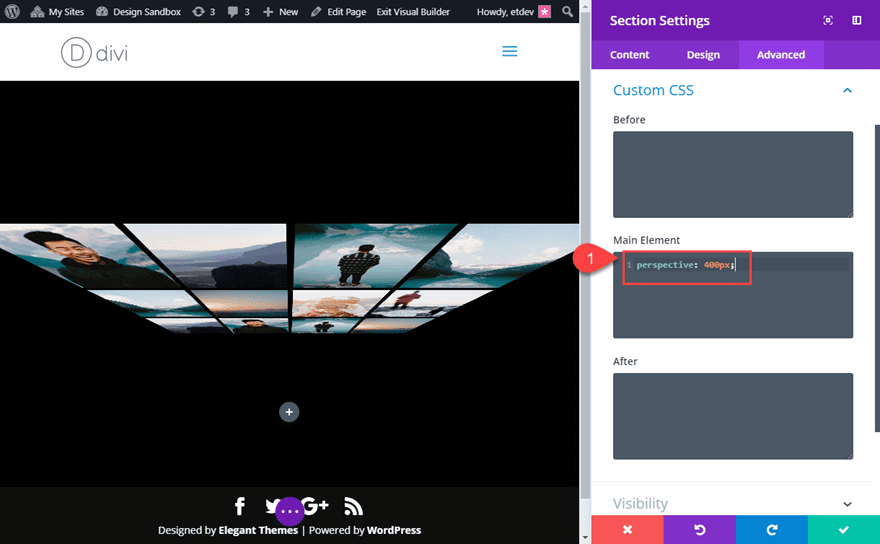
So as to add the viewpoint assets, upload the next customized CSS to the principle component:
Major Part CSS:
viewpoint: 400px;
The see the overflow houses as follows:
Horizontal Overflow: hidden
Vertical Overflow: hidden
Replace Row Settings: Width and Gutter Width
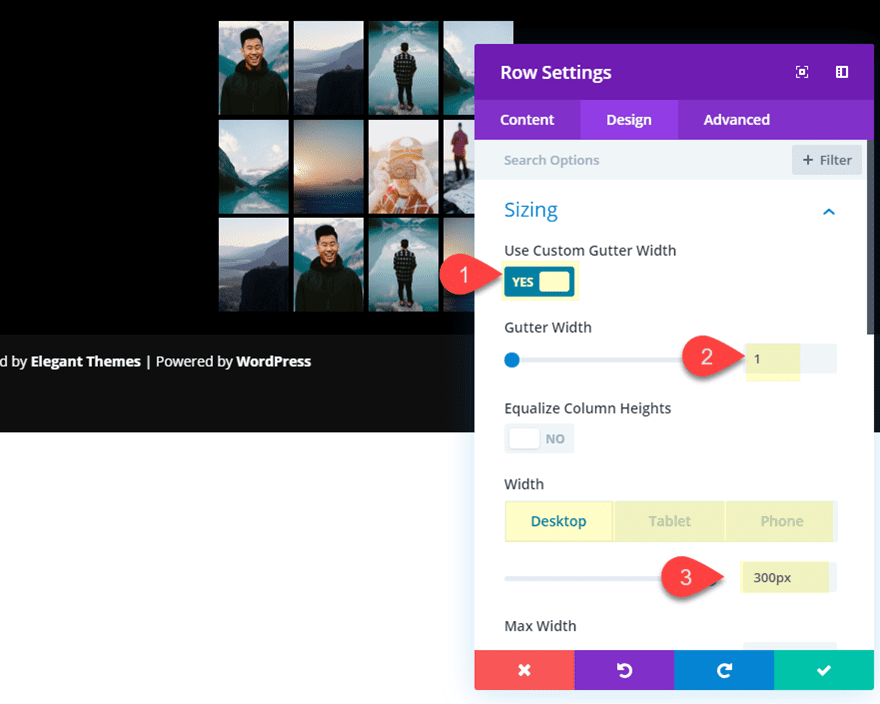
Now it’s time to customise the row to arrange it for the turned around 3-D design. To try this we’re going to shrink the width and do away with any margin between the pictures via updating the gutter width.
Open the row settings and replace the next:
Gutter Width: 1
Width: 300px (desktop, pill, and call)
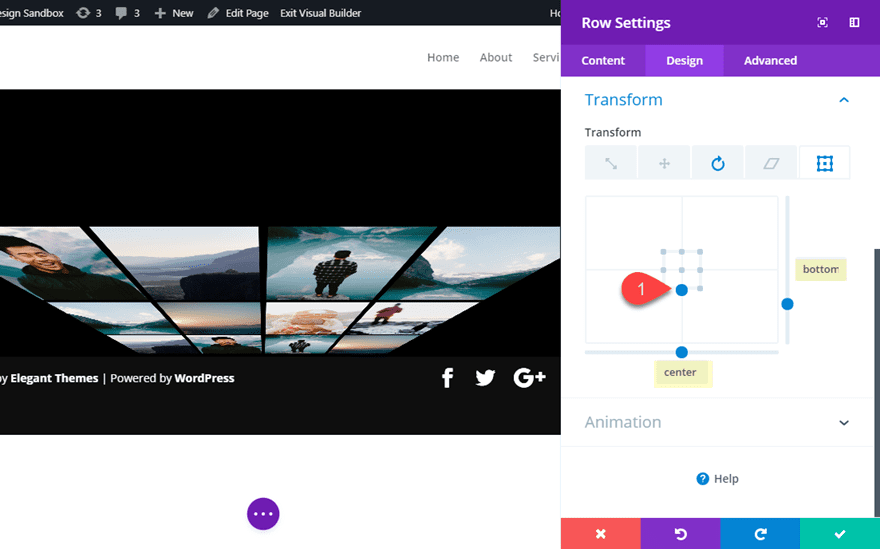
Replace Row Settings: Turn into Rotate and Starting place
Now use the change into rotate strategy to rotate the row as follows:
Turn into Rotate Y Axis: -58deg
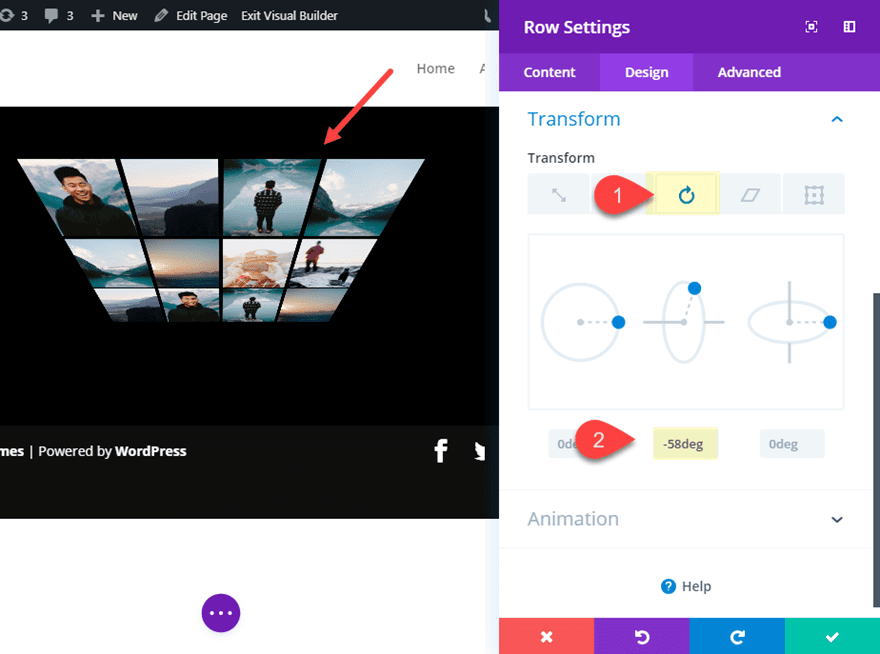
The trade the Turn into Starting place as follows:
Turn into Starting place: backside middle (or 100% 50%)
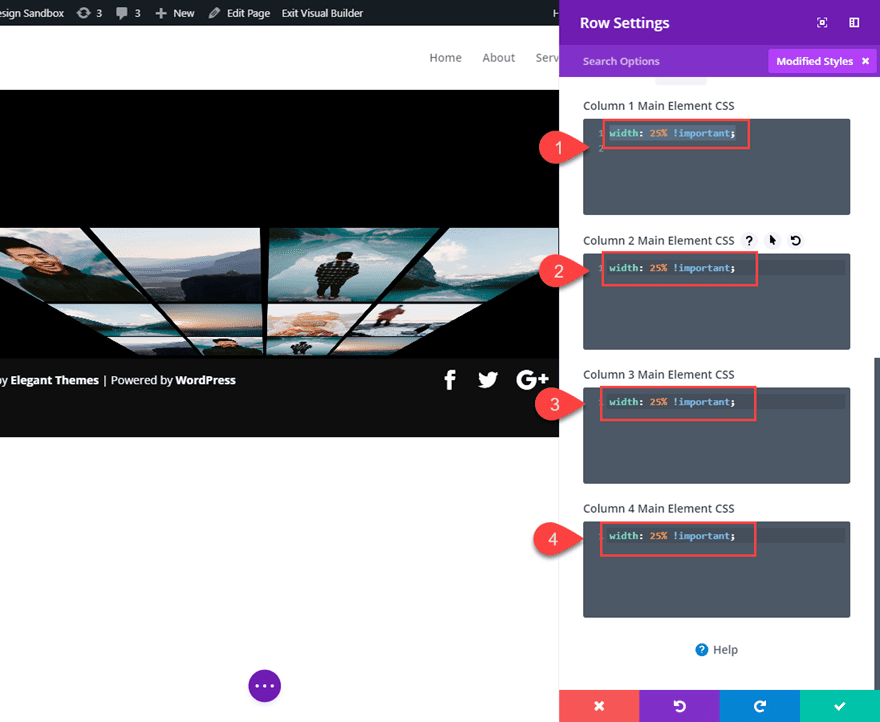
Replace Row Settings: Customized Column Widths
Since we wish the four-column format to stay on pill and call shows, we want to override the css for column width at the ones breakpoints. To try this we want to upload a width css assets to every of the columns. Below the complicated tab, upload the next customized CSS snippet to every column’s major component as follows:
(observe: make sure that the gutter width is ready to one or this is not going to paintings)
Column 1 Major Part:
width: 25% !essential;
Column 2 Major Part:
width: 25% !essential;
Column 3 Major Part:
width: 25% !essential;
Column 4 Major Part:
width: 25% !essential;
That’s it. Our first 3d photograph wall has been created.
Create the Heading Phase
To create our heading for the design, we want to create a brand new common segment with a one-column row without delay below the present segment.
Sooner than you upload a module, replace the segment with a black background:
Background Colour: #000000
Then upload the similar viewpoint assets to the segment’s major component as we did ahead of as follows:
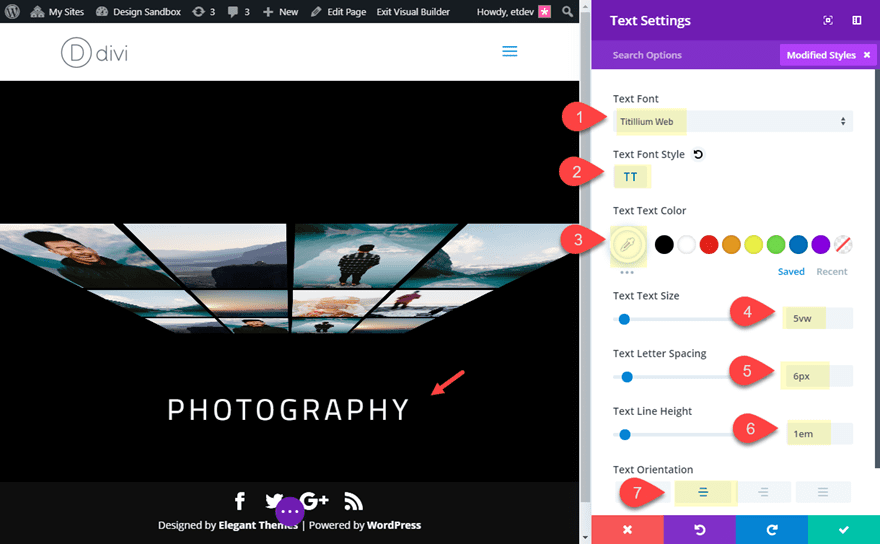
Then upload a textual content module to the row with the next:
Content material: Pictures
Textual content Font: Titillium Internet
Textual content Font Taste: TT
Textual content Textual content Colour: #ffffff
Textual content Textual content Dimension: 5vw
Textual content Letter Spacing: 6px
Textual content Line Top: 1em
Textual content Orientation: Middle
Now, we will be able to upload a change into rotation to the textual content module. With the viewpoint set on the mum or dad (or segment) the 3-D impact will happen after we rotate the textual content.
Upload the change into rotate values as follows:
Turn into Rotate X Axis: -12deg
Turn into Rotate Y Axis: 32deg

Now we’re in a position to create the ground 3-D photograph wall.
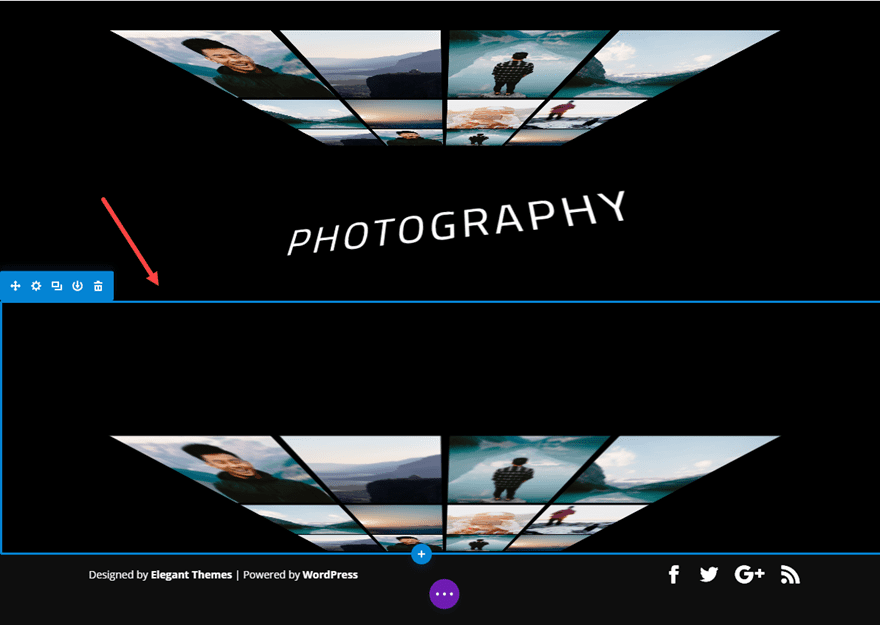
Create the Backside 3-D Photograph wall (or Flooring)
To create the ground 3-D photograph wall, we will be able to merely replica and paste the highest segment containing the highest wall and paste it without delay below the heading segment.
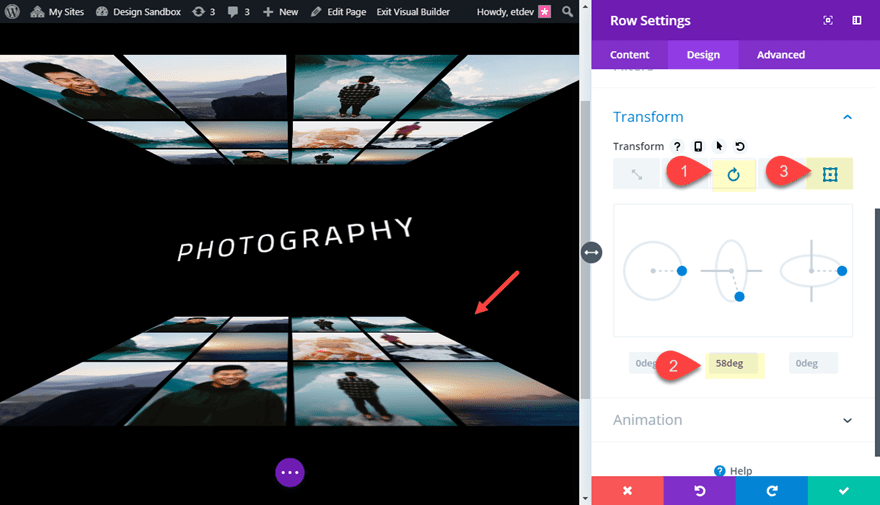
Subsequent, replace the row settings of the brand new segment as follows:
Turn into Rotate Y Axis: 58deg
Turn into Starting place: Most sensible Middle
Ultimate Design
That’s it! Let’s take a look at the overall design.
The design may even stay intact on cellular as smartly (except somewhat overflow).
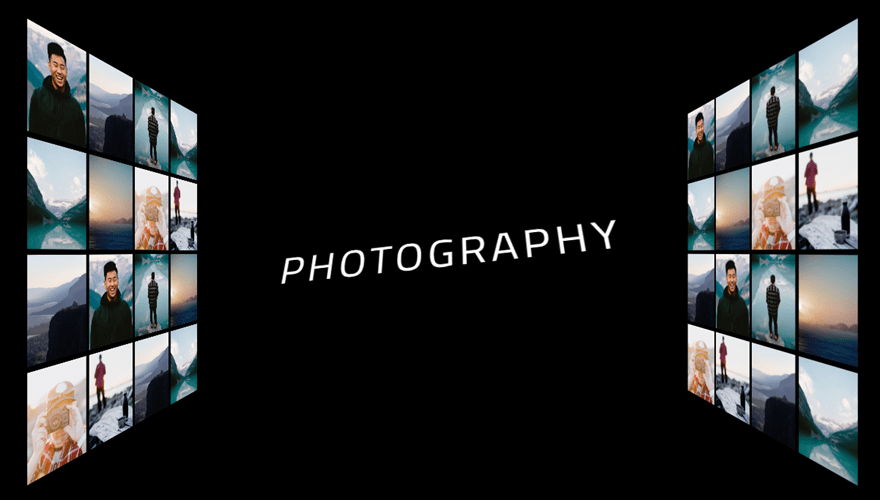
Growing Left and Proper 3-D Photograph Partitions
For this subsequent design, we’re going to create 3-D photograph partitions at the left and proper facet of our heading as a substitute of the highest and backside. To jumpstart the design procedure, we can be the usage of a few of our prebuilt designs in our first instance.
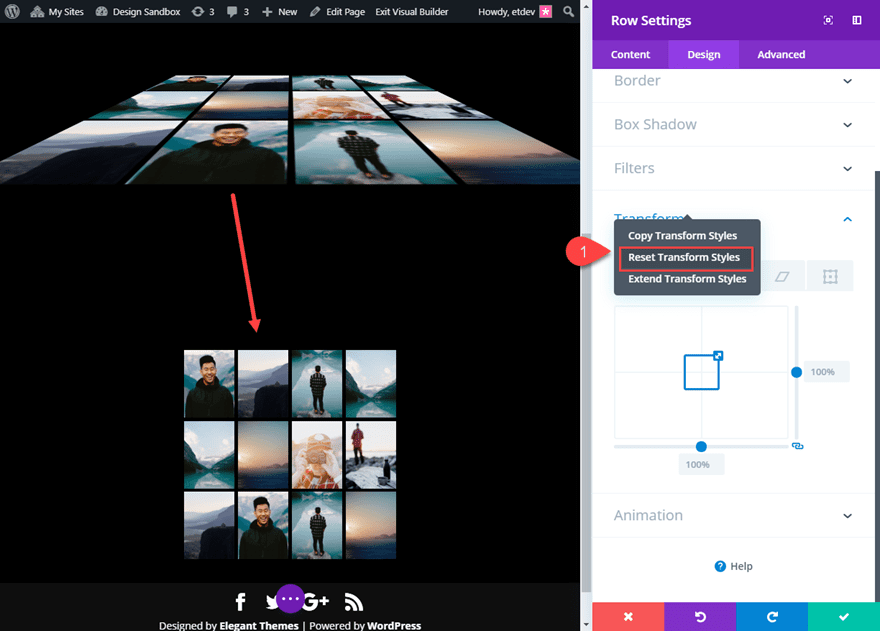
Toi get started, reproduction the ground segment of the primary design instance containing the ground symbol wall. Then open the row settings of the brand new segment and reset the change into choices again to the default state.
Subsequent reproduction the row.
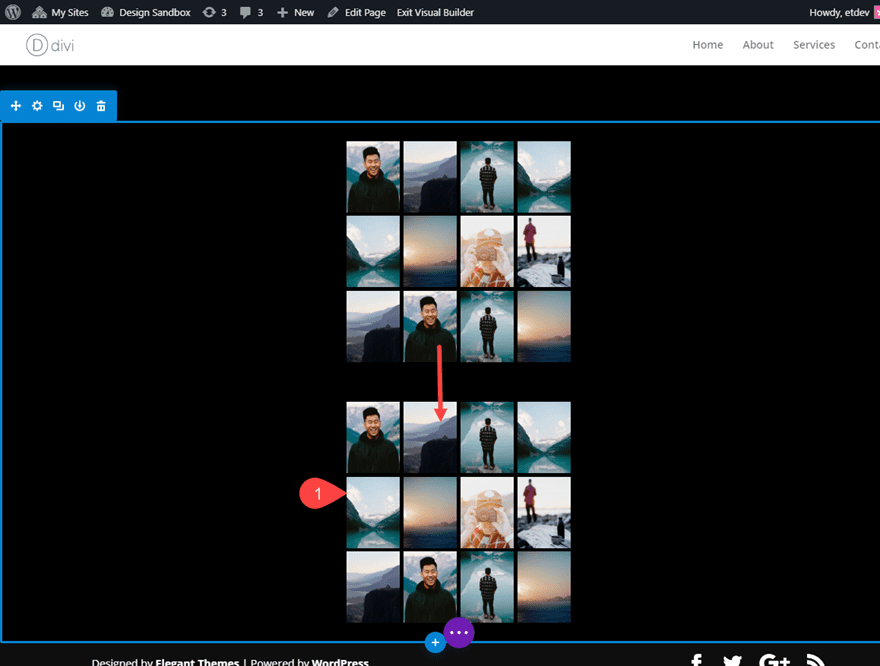
Subsequent, replica the Row (no longer the segment) containing the textual content module with the heading within the first design instance. Then paste it between the 2 rows containing the pictures.
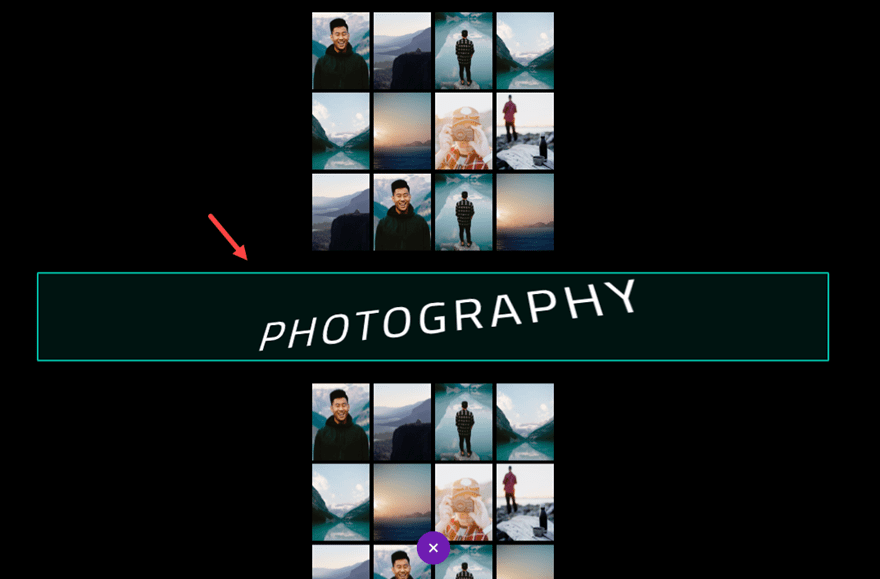
This can be a identical setup to the primary design, except for all of our rows are inside of of 1 segment. That is essential for the next move.
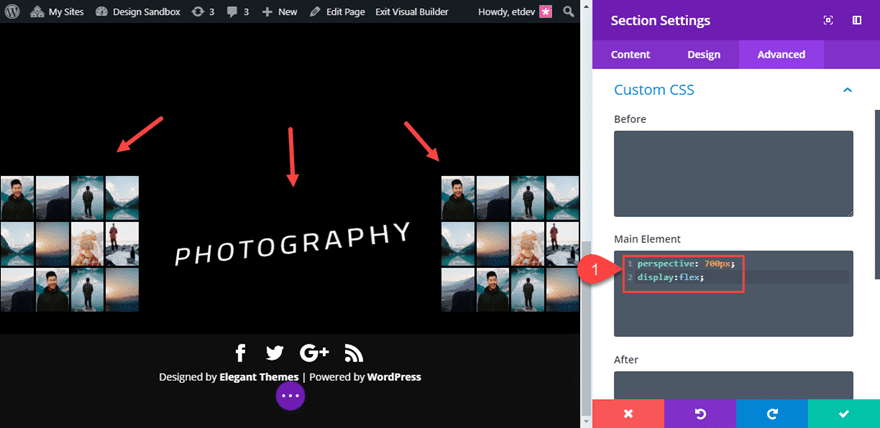
We wish our two symbol partitions to be at the left and proper of the web page with the textual content within the middle. A very easy manner to do that is to make use of show flex on our segment. This may occasionally align our rows horizontally throughout the segment.
To try this, open the segment settings and upload the next customized CSS to the Major Part:
(Realize we’re bumping up the viewpoint worth to 700px to create extra “Z area” distance of the person’s viewpoint.)
Major Part CSS:
viewpoint: 700px;
show:flex;
And voila! Our partitions are in position and in a position for rotation.
Upload Extra Photographs for the next wall
To make our 3-D photograph wall slightly upper, all we want to do is upload some other symbol to every of our 4 columns in every of the rows containing pictures. Simply make sure that they create over the three% padding just like the others.
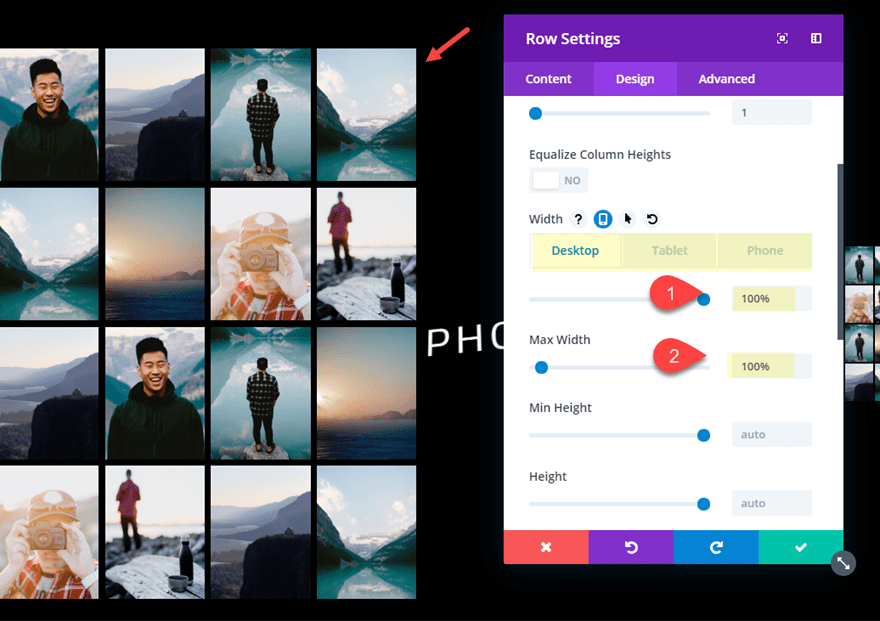
Converting the Width of the Two Facet Rows
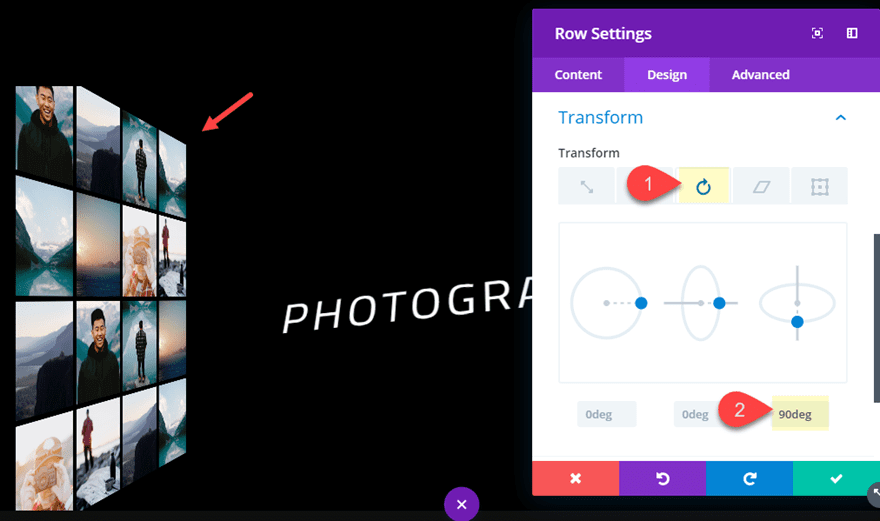
Sooner than we rotate our symbol wall, first we want to alter their width to 100%. Open the row settings for the picture wall at the left facet and replace the next:
Width: 100% (desktop, pill, telephone)
Max-width: 100%
Then do the similar for the row at the proper facet.
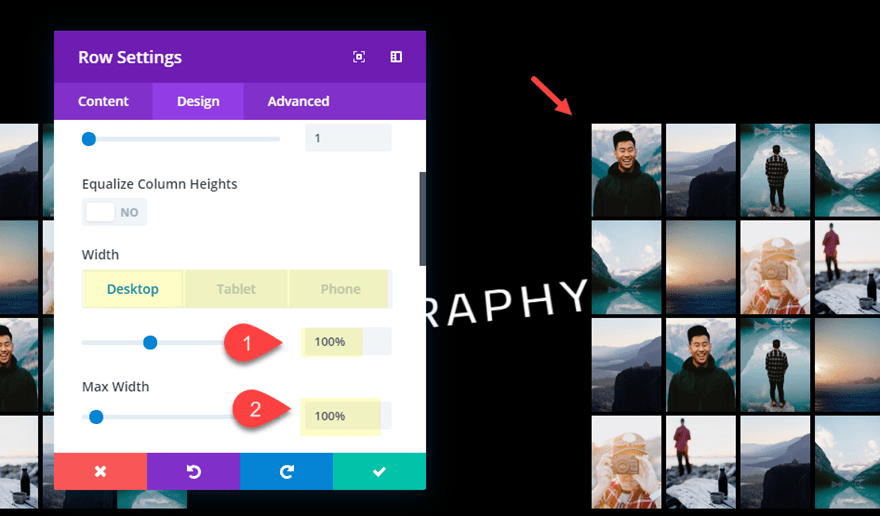
Rotating the Facet Rows for 3-D Impact
Now we’re in a position so as to add our change into rotation to every of our rows. First, open the row settings for the left row and replace the next:
Turn into Rotate X Axis: 90deg
Subsequent, open the row settings for the row at the proper facet and replace the next:
Turn into Rotate X Axis: -90deg
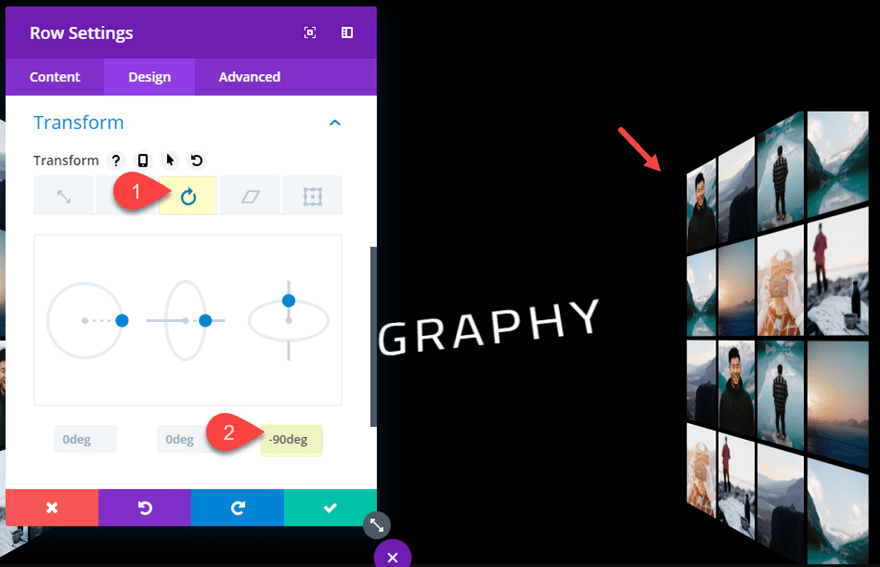
With our viewpoint in position on the segment degree, our rows will show as 3-D photograph partitions on every facet of our textual content module.
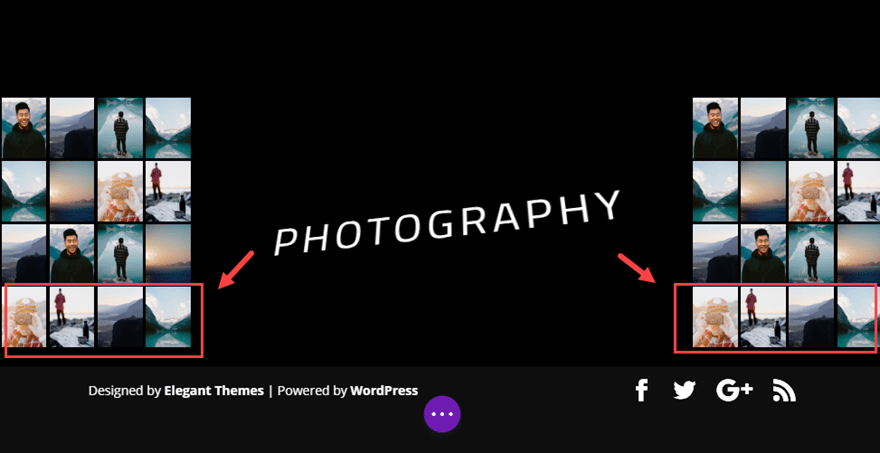
Ultimate End result
Let’s take a look at the overall end result.
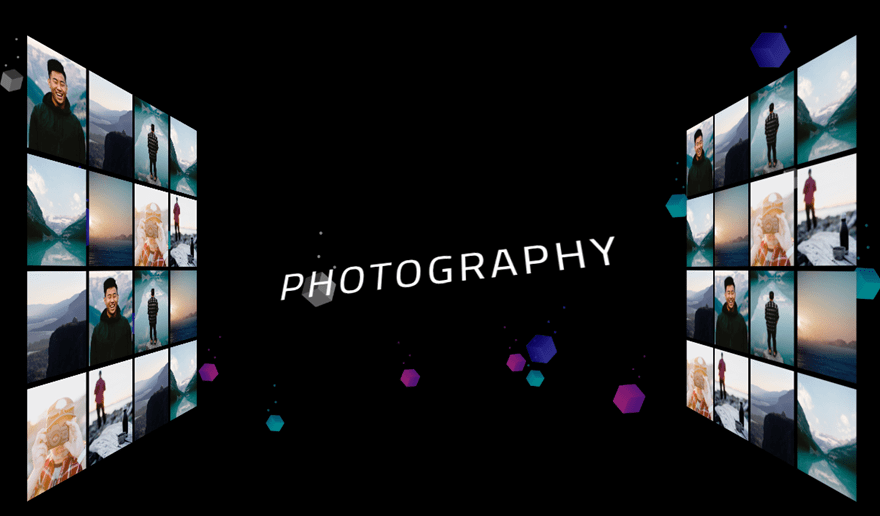
To position somewhat icing at the cake, you’ll be able to upload a background symbol with 3-D graphical components. This is an instance of the design with a background symbol taken from the Cryptocurrency Layout Pack.
Bonus Hover Impact: Swing the ones partitions into View on Hover!
You’ll be able to simply upload a change into rotate hover impact that may permit the person to view the picture wall via swinging it into view on hover. To try this open the left row settings and replace the next:
Turn into Starting place: left middle
Turn into Rotate X Axis (hover): 0deg
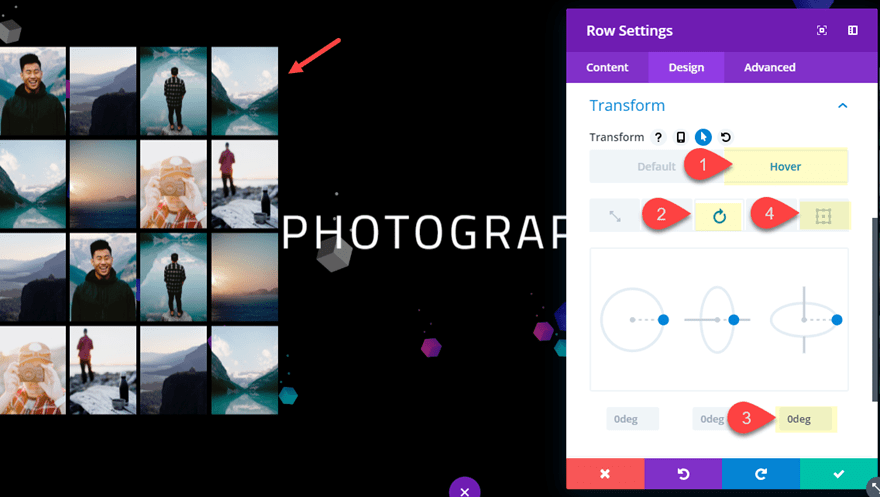
Then at the proper row settings, replace the next:
Turn into Starting place: proper middle
Turn into Rotate X Axis (hover): 0deg
Now take a look at the outcome.
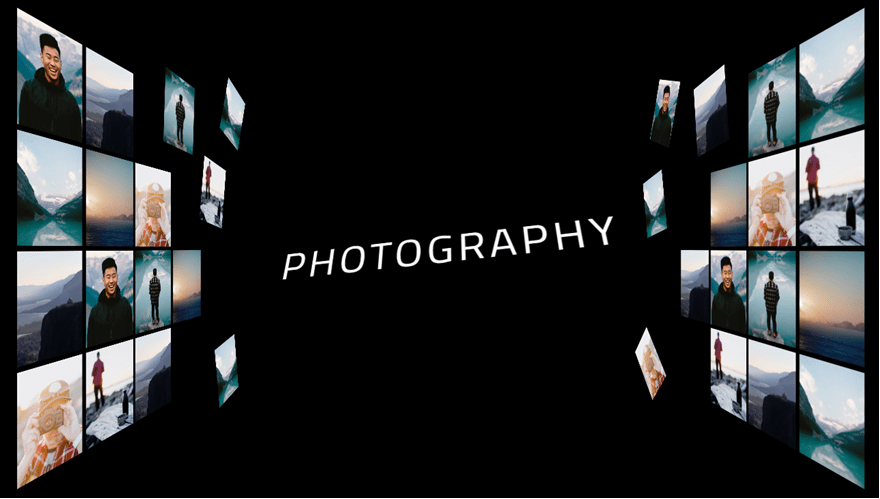
Bonus Design Impact: Make Photographs Smash Away into House
For the reason that Row of Photographs in being turned around with viewpoint in position, you’ll be able to transfer the pictures inside your row the usage of change into translate. What’s cool about that is that the motion will keep alongside the 3-D aircraft. To try this, merely open the settings of a picture and use the change into translate strategy to transfer the picture out of doors of the grid into area!
This is an instance of what that may appear to be via including a couple of change into translate values to pictures.
Ultimate Ideas
Growing 3-D Photograph Partitions in Divi in reality does make an excellent affect at the design of a web page. And I should say it’s in reality a laugh to experiment with other designs the usage of the tactics on this article. The viewpoint assets works hand in hand with the change into choices to create numerous existence like 3-D designs! And don’t omit those rows (or partitions) can also be full of any module in Divi. So be happy to take a look at out some blurbs as smartly. I am hoping this may increasingly encourage you to create one thing distinctive as of late.
I stay up for listening to from you within the feedback.
Cheers!
The publish How to use Perspective with Transform Options to Design 3D Photo Walls in Divi gave the impression first on Elegant Themes Blog.
WordPress Web Design