
Searching for an inventive means so as to add descriptions to photographs? With Divi’s integrated hover choices, it’s now more uncomplicated than ever. You’ll use this way for quite a lot of functions in your web page, from testimonials to workforce member descriptions and extra. On this instructional, we’ll pass over 4 other examples that’ll allow you to reach surprising internet design. We’re developing all 4 examples the use of Divi’s integrated choices best.
Let’s get to it!
Contents
- 1 Preview
- 2 Normal Steps
- 3 Instance #1
- 4 Instance #2
- 5 Instance #3
- 6 Instance #4
- 7 Preview
- 8 Ultimate Ideas
Preview
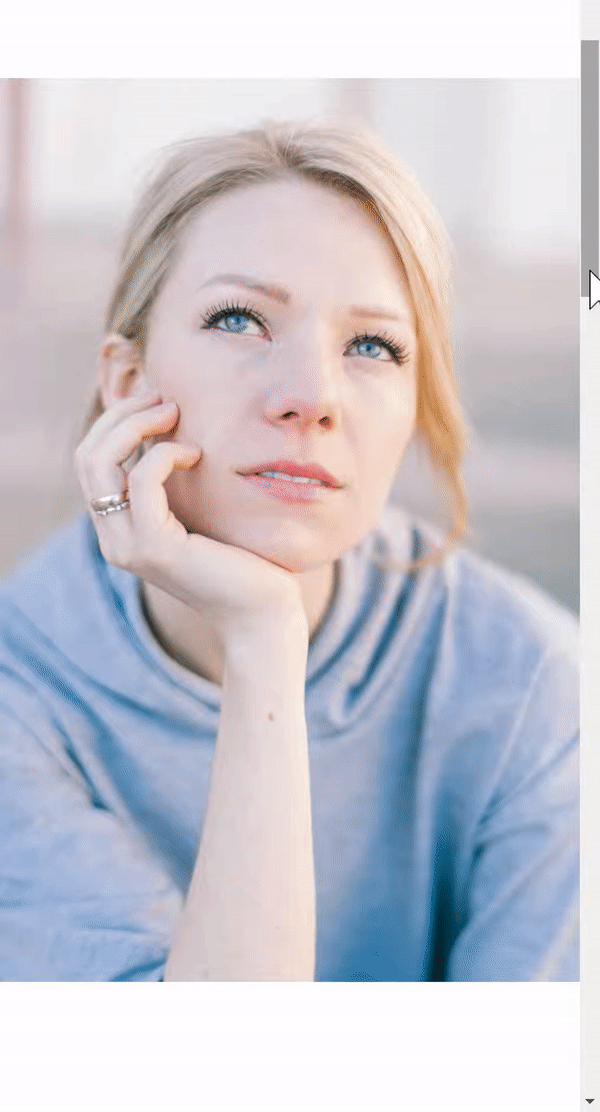
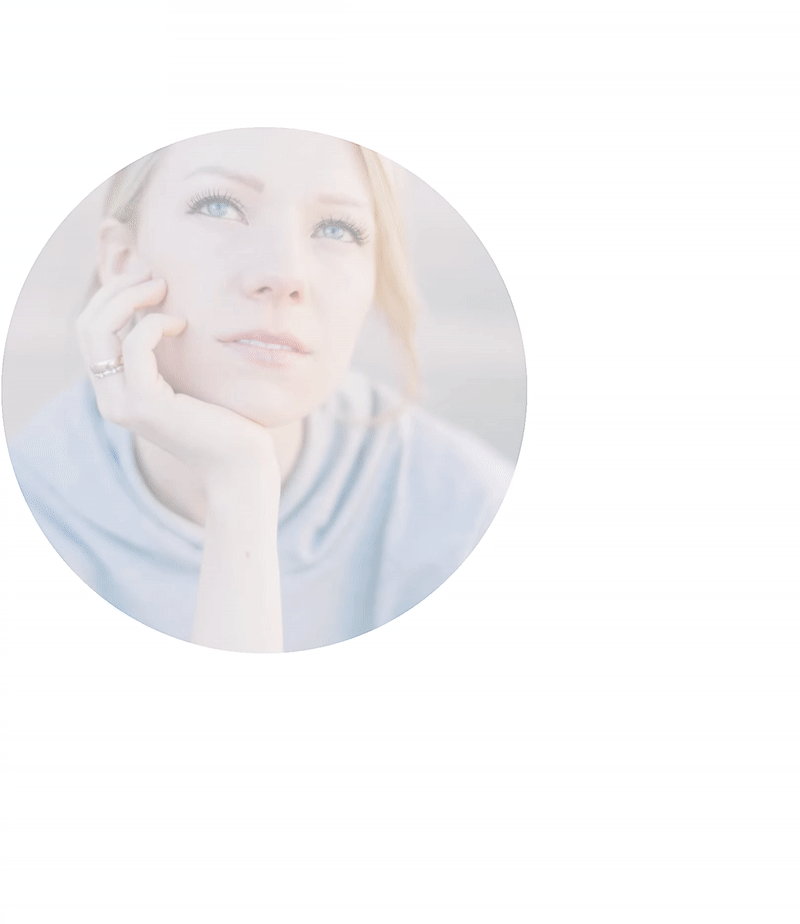
Earlier than we dive into the step by step instructional, let’s take a snappy take a look at the result on other display sizes.
Desktop

Cell
Normal Steps
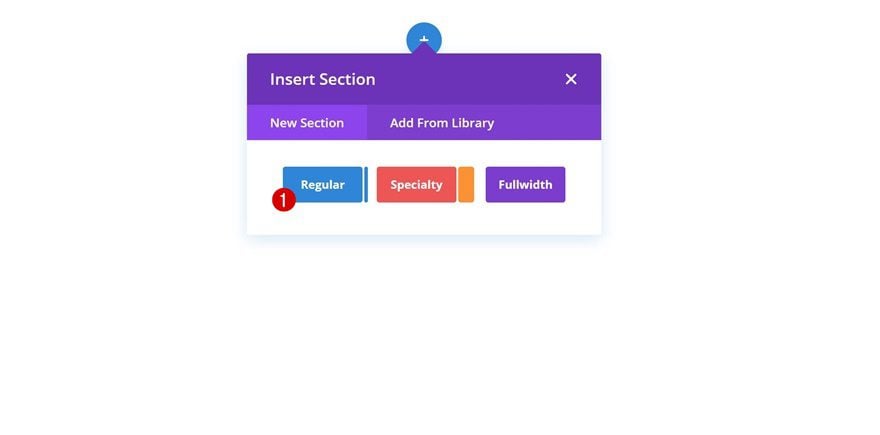
Upload New Segment
To make this instructional more uncomplicated to observe, we’ll get started with some normal steps. Afterwards, we’ll maintain the stairs which might be distinctive to every one of the most examples. Get started via including a brand new common segment to a brand new or present web page.
Upload Row
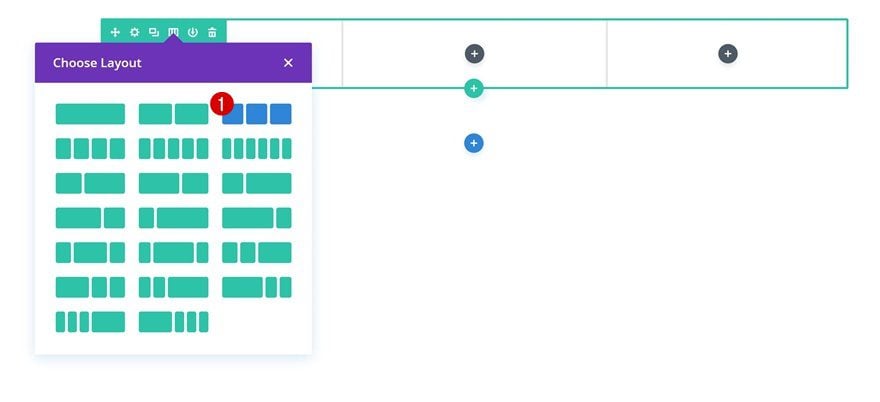
Column Construction
Pass forward and make a choice the next column construction (you’ll make this paintings with different column constructions too):
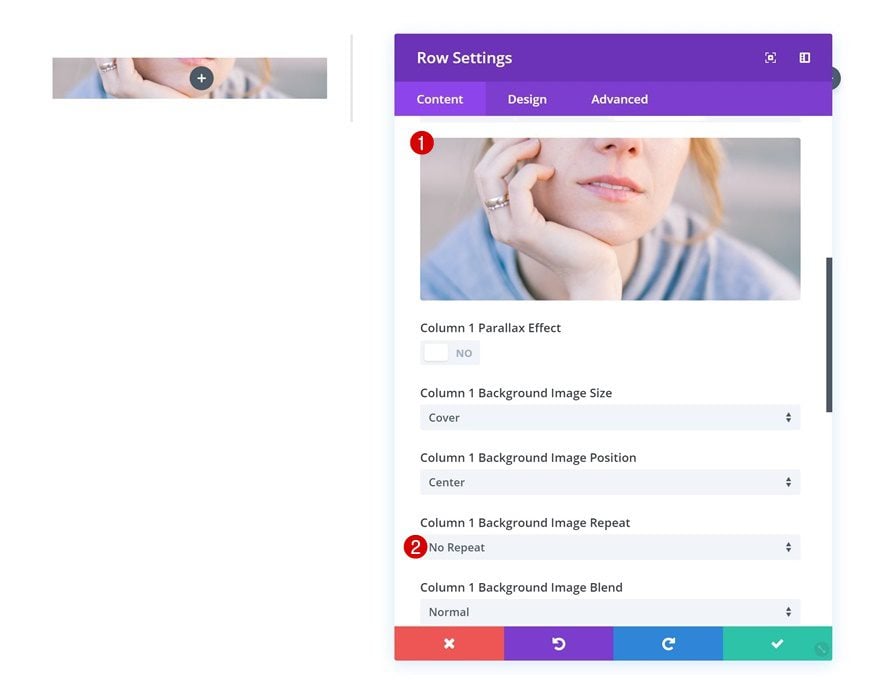
Column 1 Background Symbol
With out including any modules but, open the row settings and upload a background symbol to the primary column.
- Column 1 Background Symbol Repeat: No Repeat
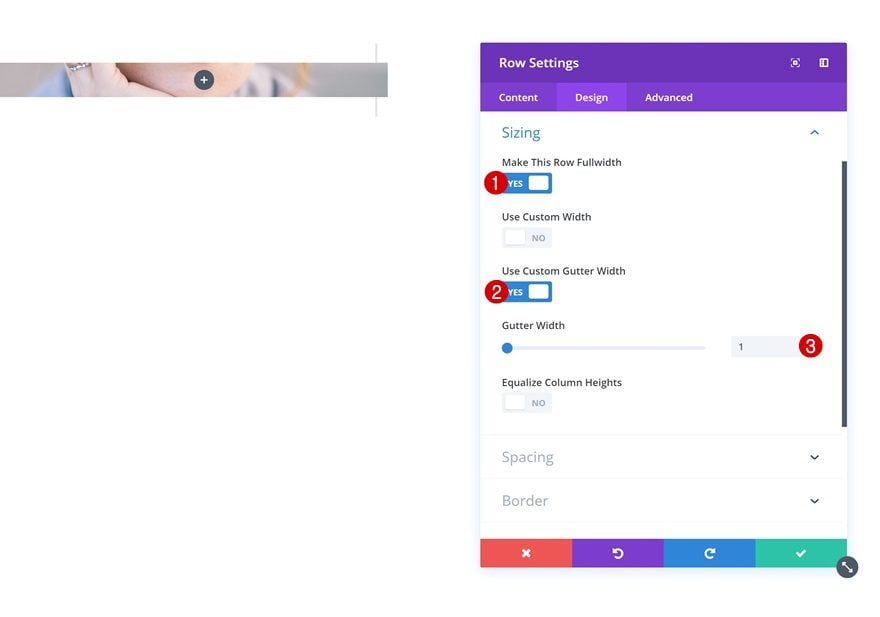
Sizing
Proceed via converting the sizing settings of the row.
- Make This Row Fullwidth: Sure
- Use Customized Gutter Width: Sure
- Gutter Width: 1
Spacing
And upload some customized padding values subsequent.
- Most sensible Padding: 150px
- Backside Padding: 150px

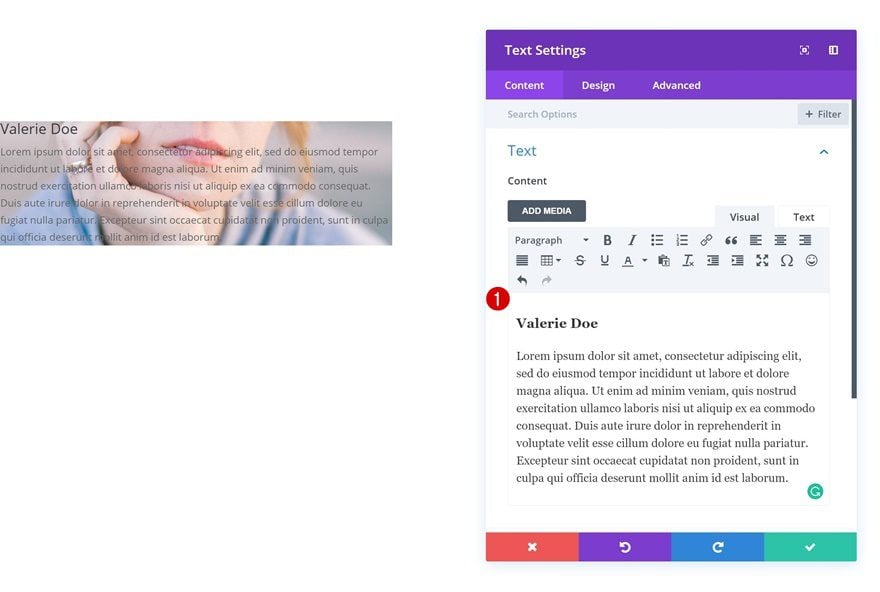
Upload Textual content Module to Column 1
Upload Content material
To turn the outline on hover, we’ll be the use of a Textual content Module for every one of the most 4 examples. Pass forward and upload this Textual content Module to the similar column you’ve added a background symbol to.
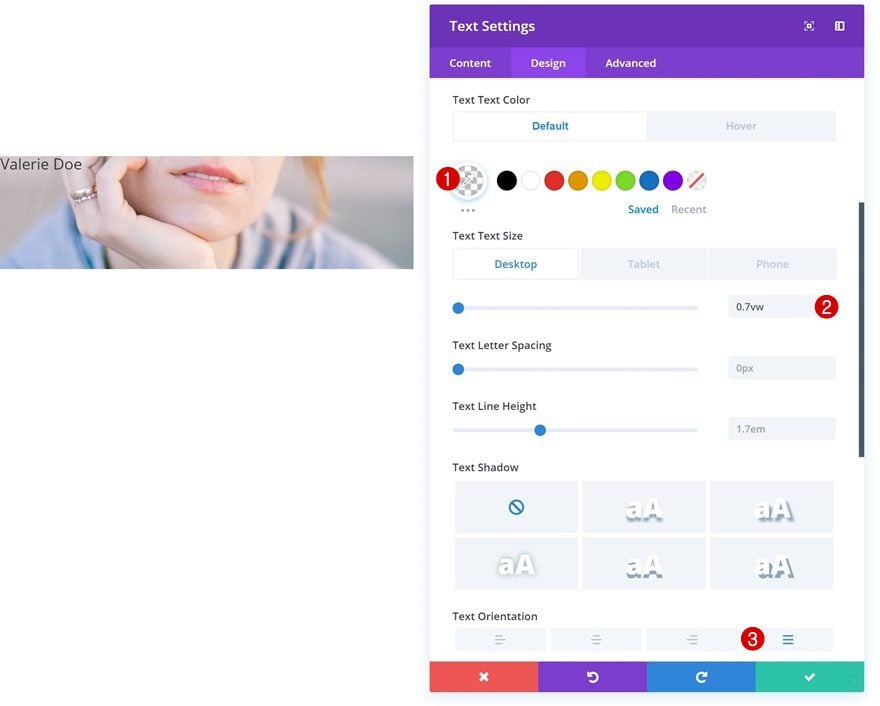
Default Textual content Settings
Then, pass to the textual content settings and make some adjustments.
- Textual content Colour: rgba(255,255,255,0)
- Textual content Measurement: 0.7vw (Desktop), 12px (Pill & Telephone)
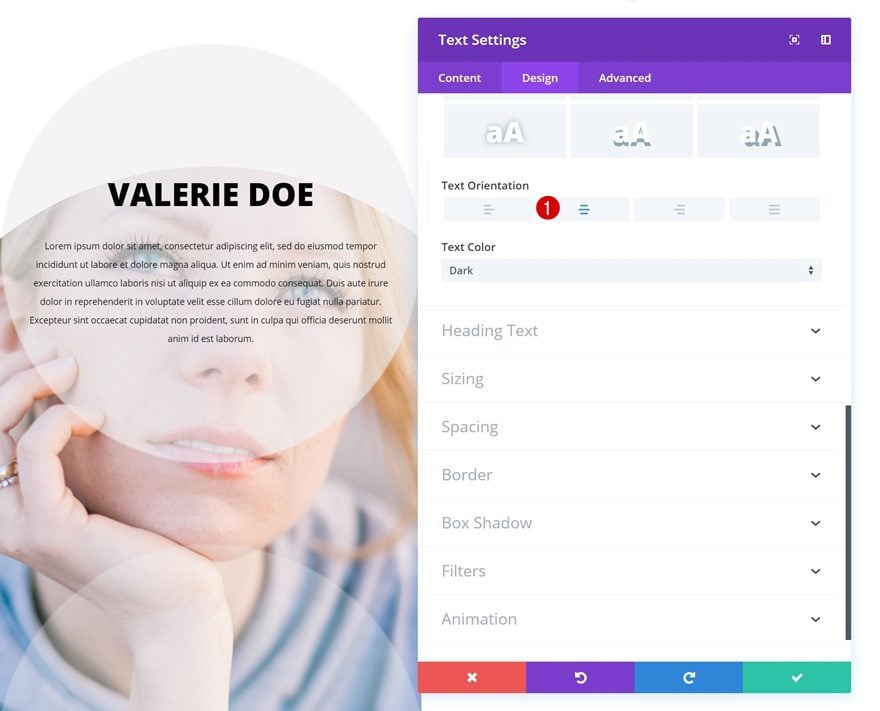
- Textual content Orientation: Justify
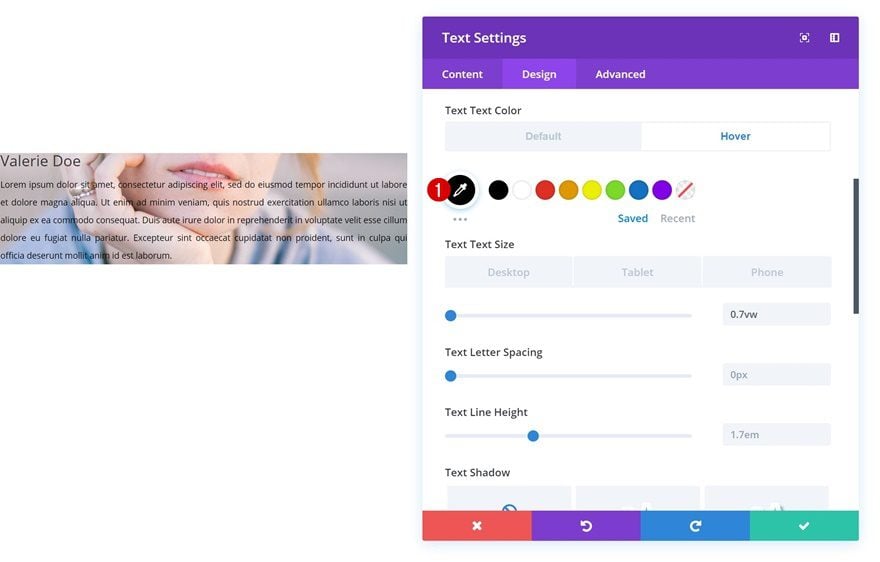
Hover Textual content Settings
Alternate the textual content colour on hover.
- Textual content Colour: #000000
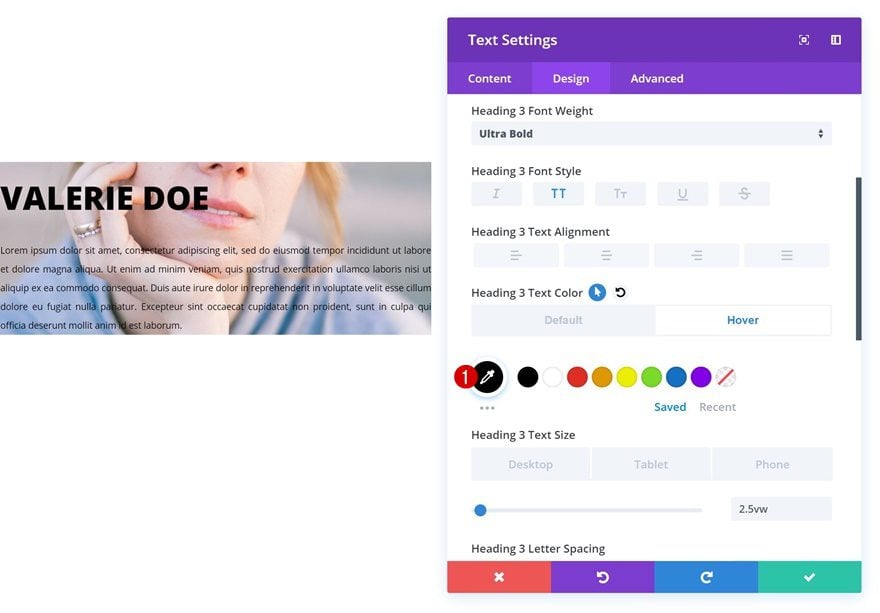
Default Heading Textual content Settings
Alternate the H3 textual content settings as smartly.
- Heading 3 Font Weight: Extremely Daring
- Heading 3 Font Taste: Uppercase
- Heading 3 Textual content Colour: rgba(255,255,255,0)
- Heading 3 Textual content Measurement: 2.5vw (Desktop), 40px (Pill), 30px (Telephone)
- Heading 3 Line Top: 2.2em
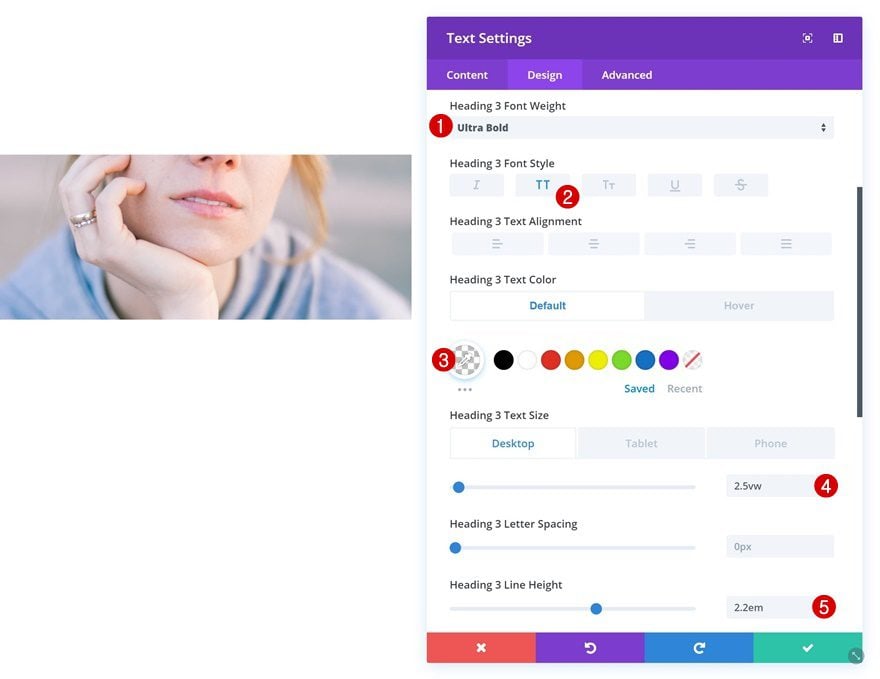
Hover Heading Textual content Settings
And follow a distinct H3 textual content colour on hover.
- Heading 3 Textual content Colour: #000000
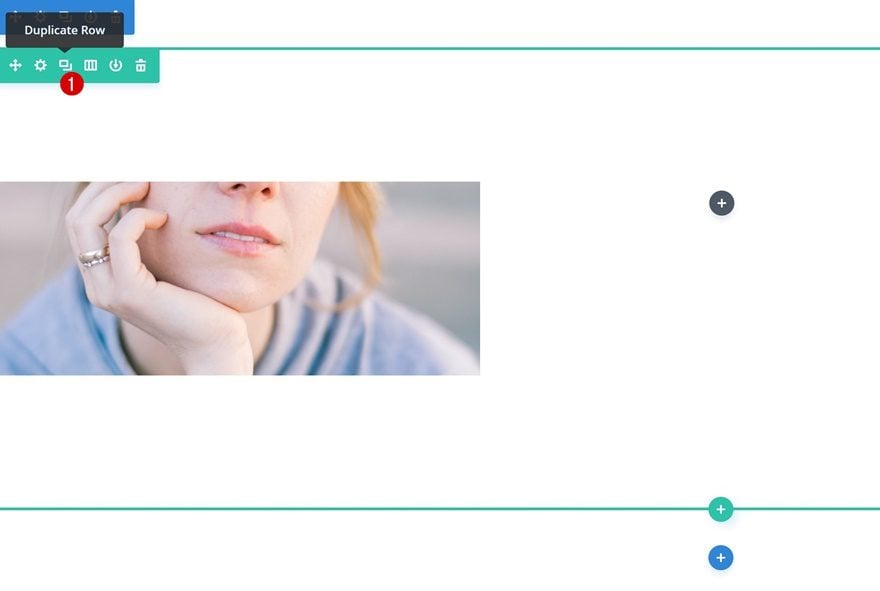
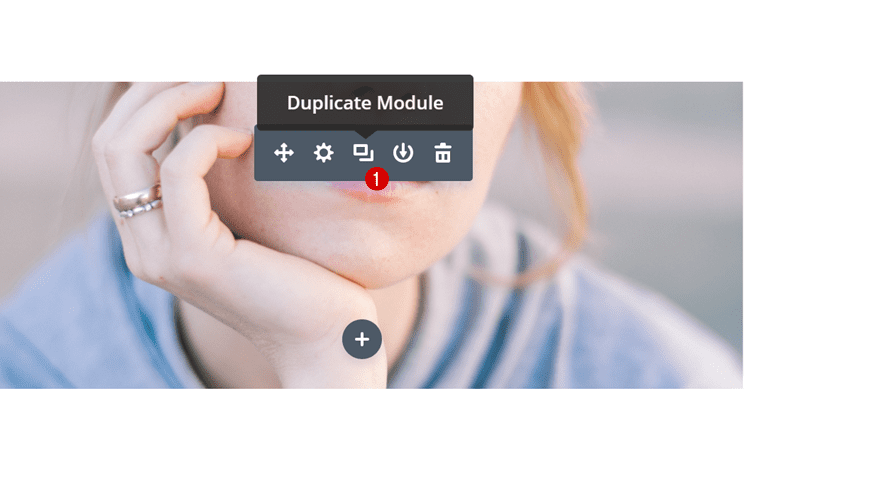
Clone Row 3 Occasions
Now that we’ve long past via the entire normal steps, we will pass forward and clone the row we’ve created 3 times which can let us have one row for every one of the most 4 examples. Be sure that originally of every instance, you progress directly to the following row.
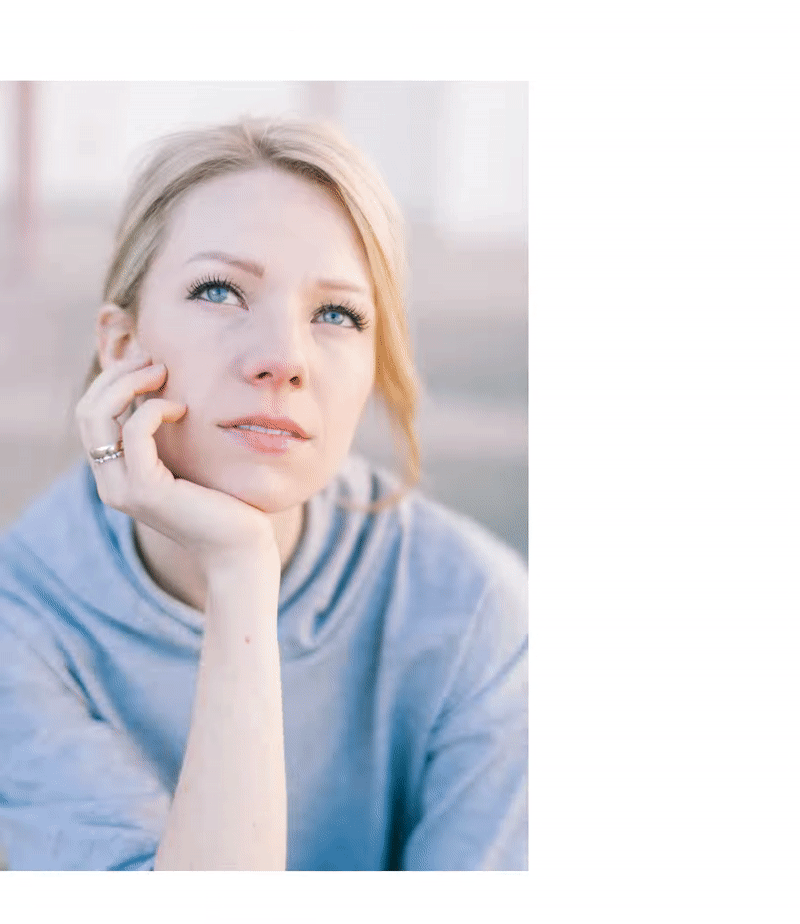
Instance #1
Alternate Textual content Module
Default Background Colour
Let’s get began with the primary instance! Open the Textual content Module within the first column and upload a background colour.
- Background Colour: rgba(255,255,255,0)
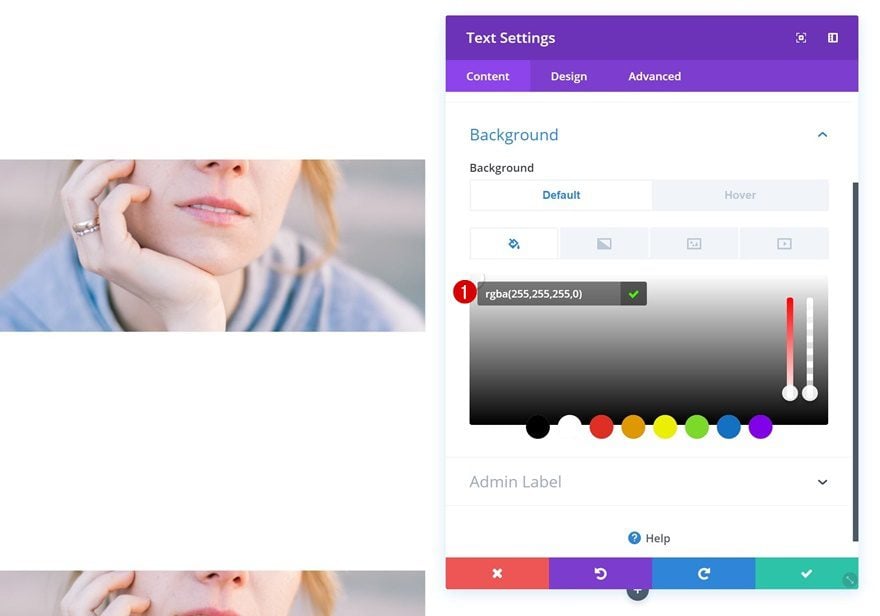
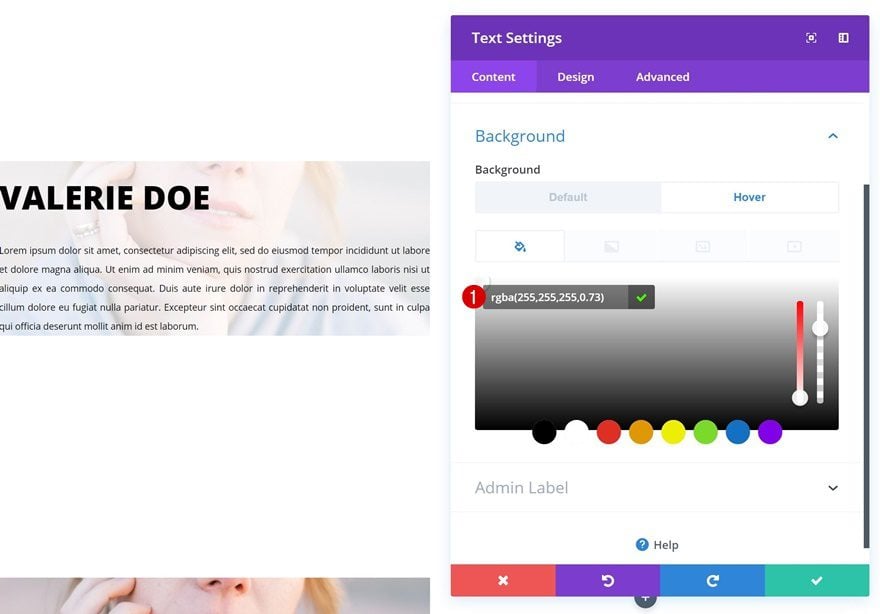
Hover Background Colour
Alternate this background colour on hover.
- Background Colour: rgba(255,255,255,0.73)
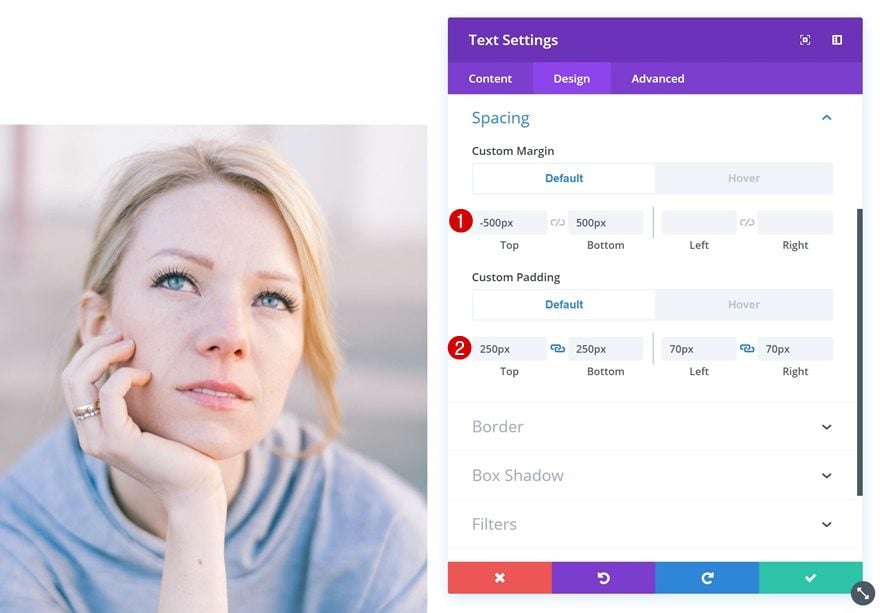
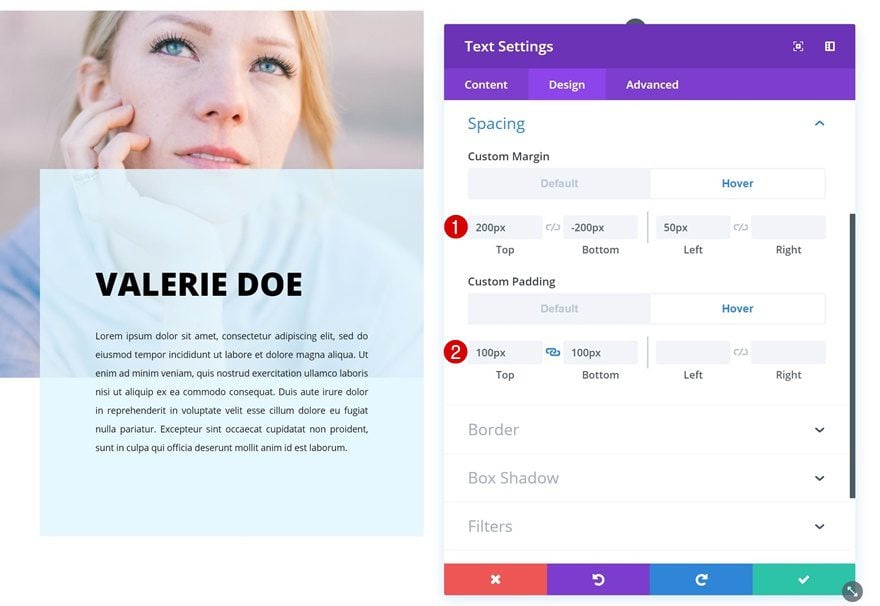
Default Spacing
Upload some customized margin and padding subsequent.
- Most sensible Margin: -500px
- Backside Margin: 500px
- Most sensible Padding: 250px
- Backside Padding: 250px
- Left Padding: 70px
- Proper Padding: 70px
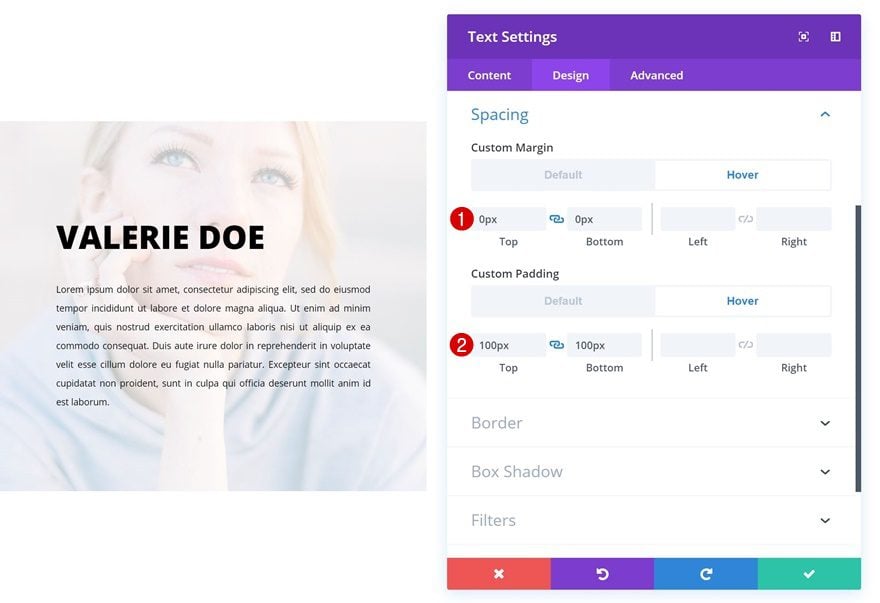
Hover Spacing
Alternate the values on hover.
- Most sensible Margin: 0px
- Backside Margin: 0px
- Most sensible Padding: 100px
- Backside Padding: 100px
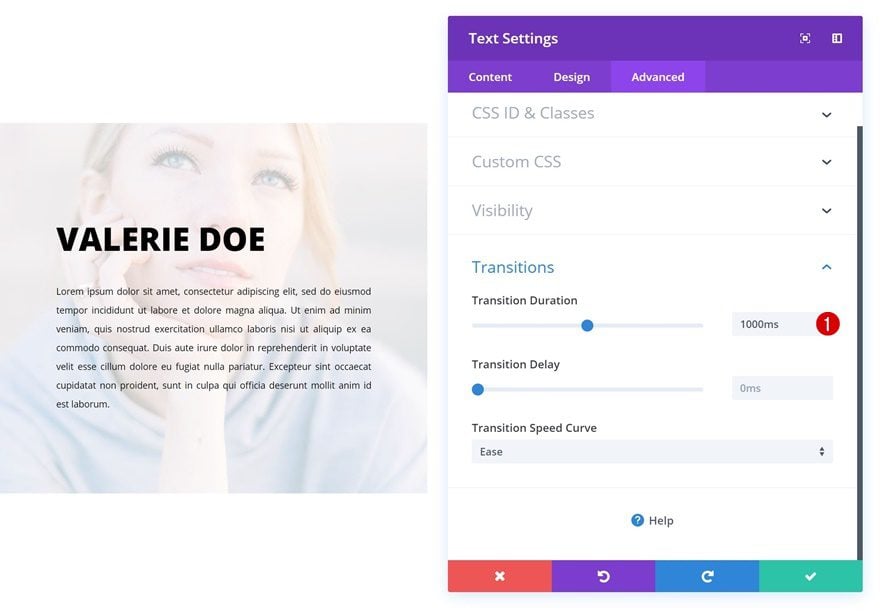
Transitions
Finally, create a clean transition via expanding the transition length within the complicated tab.
- Transition Period: 1000ms
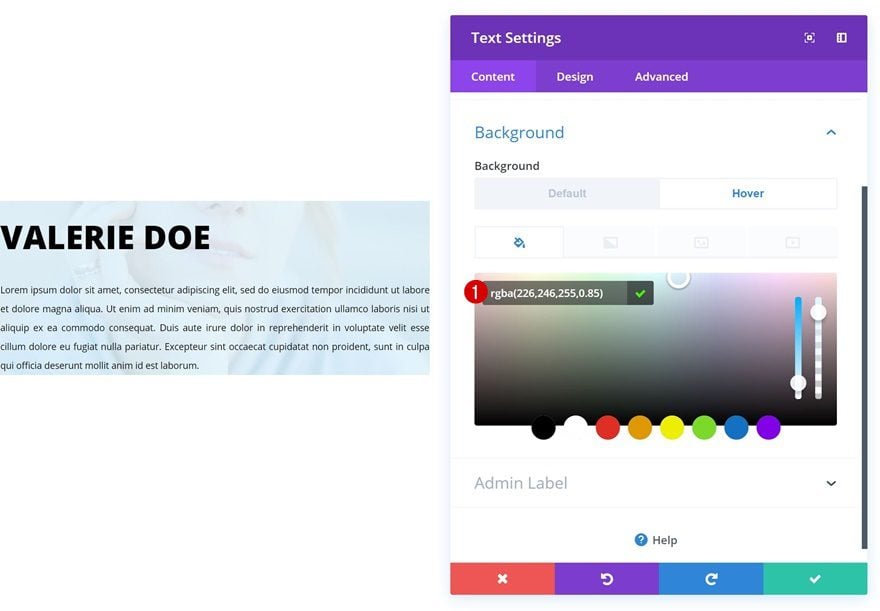
Instance #2
Alternate Textual content Module
Default Background Colour
Directly to the following instance! Open the Textual content Module within the first column and upload a background colour.
- Background Colour: rgba(255,255,255,0)

Hover Background Colour
Alternate the background colour on hover.
- Background Colour: rgba(226,246,255,0.85)
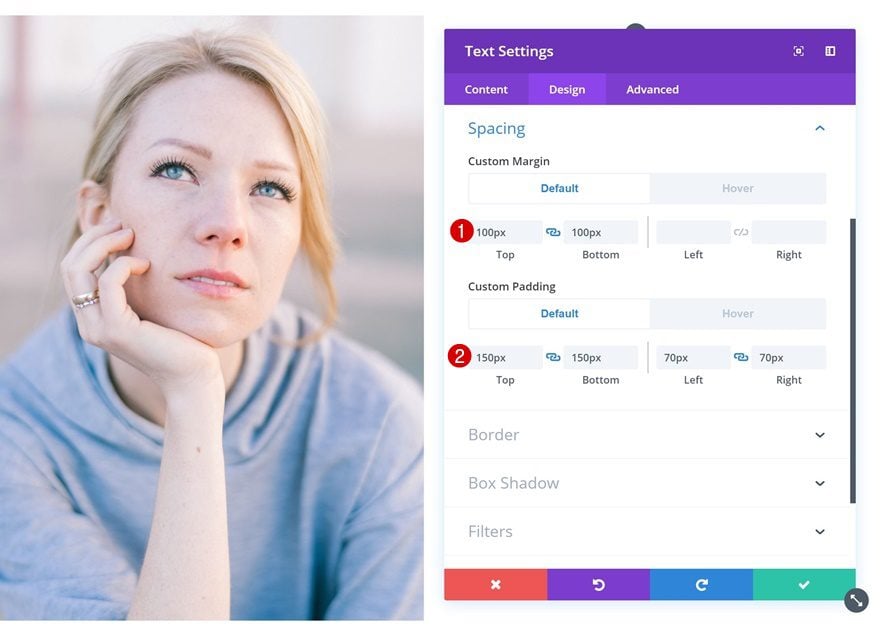
Default Spacing
Upload some customized margin and padding values subsequent.
- Most sensible Margin: 100px
- Backside Margin: 100px
- Most sensible Padding: 150px
- Backside Padding: 150px
- Left Padding: 70px
- Proper Padding: 70px
Hover Spacing
Alternate those values on hover.
- Most sensible Margin: 200px
- Backside Margin: -200px
- Left Margin: 50px
- Most sensible Padding: 100px
- Backside Padding: 100px
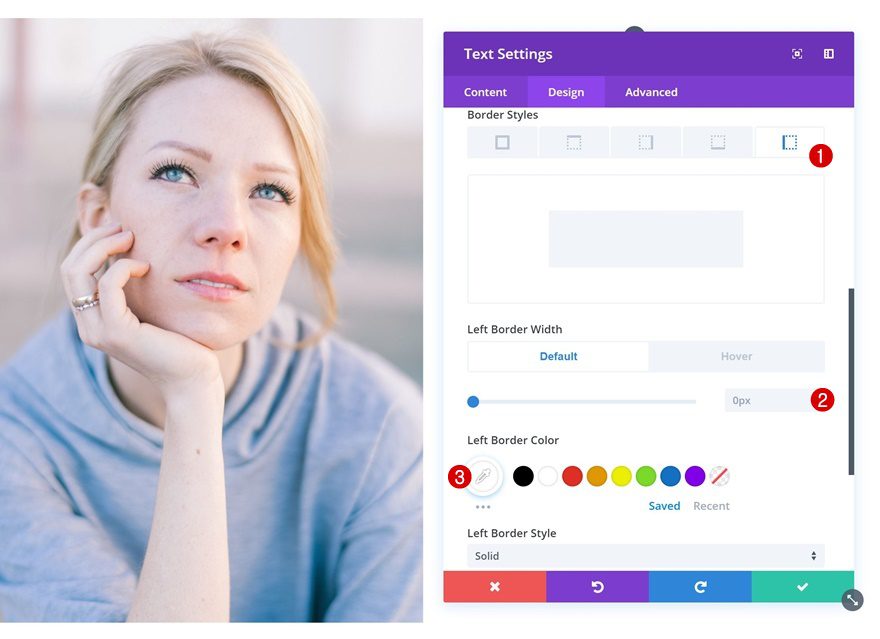
Default Border
Proceed via including a border to the Textual content Module.
- Left Border Width: 0px
- Left Border Colour: #ffffff
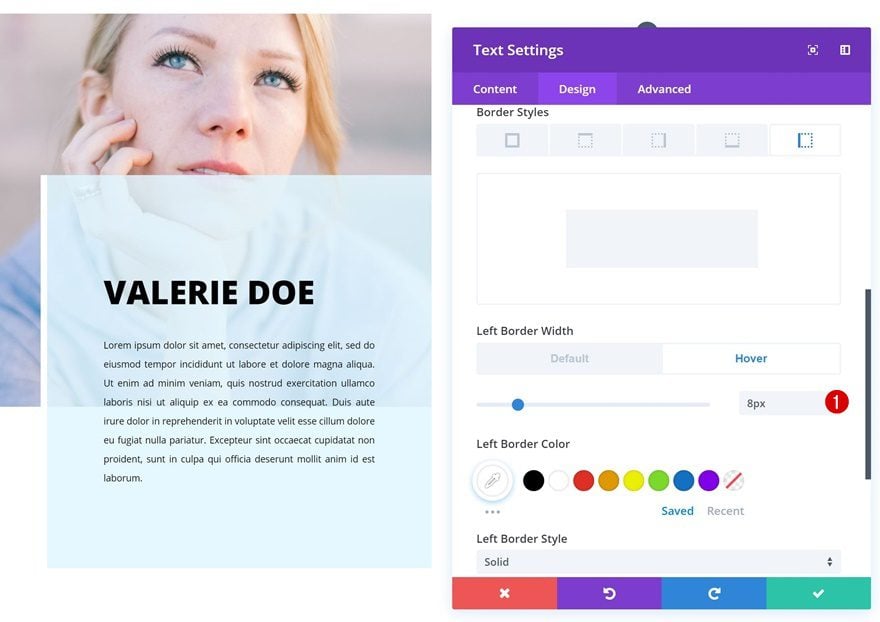
Hover Border
And alter the border width on hover.
- Left Border Width: 8px
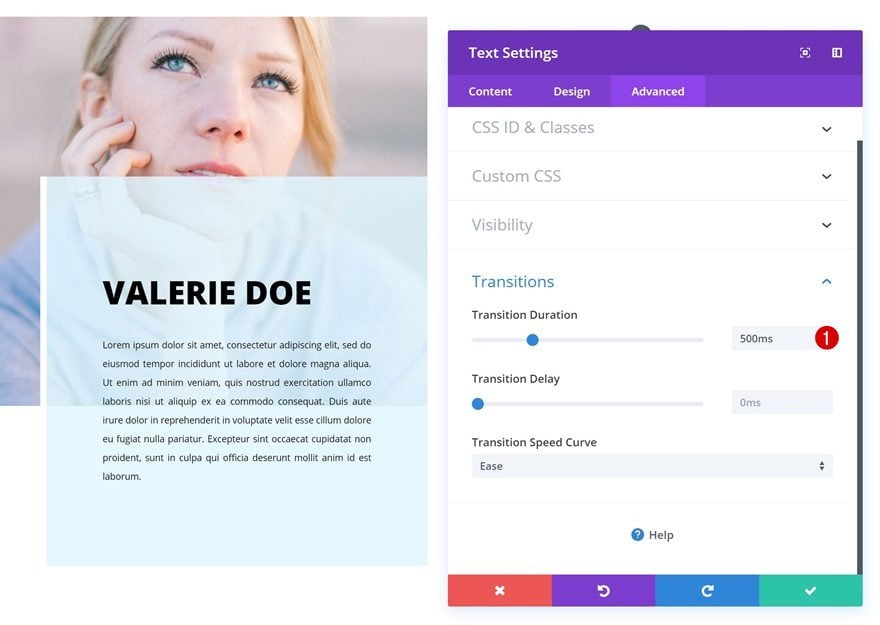
Transitions
Remaining however no longer least, building up the transition length for a clean transition.
- Transition Period: 500ms
Instance #3
Clone Textual content Module
Directly to the 3rd instance! For this situation, we’ll wish to create a separate model for smaller display sizes. Clone the Textual content Module within the first column.
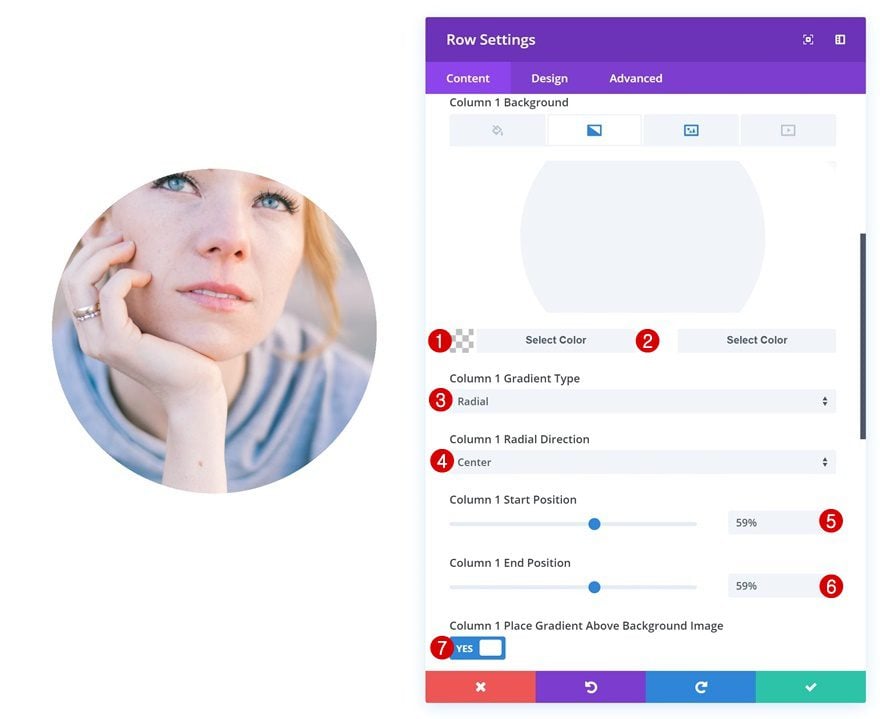
Upload Column 1 Gradient Background
Then, open the row settings and upload a gradient background to the primary column the use of the next settings:
- Colour 1: rgba(43,135,218,0)
- Colour 2: #ffffff
- Column 1 Gradient Kind: Radial
- Column 1 Radial Path: Heart
- Column 1 Get started Place: 59%
- Column 1 Finish Place: 59%
- Column 1 Position Gradient Above Background Symbol: Sure
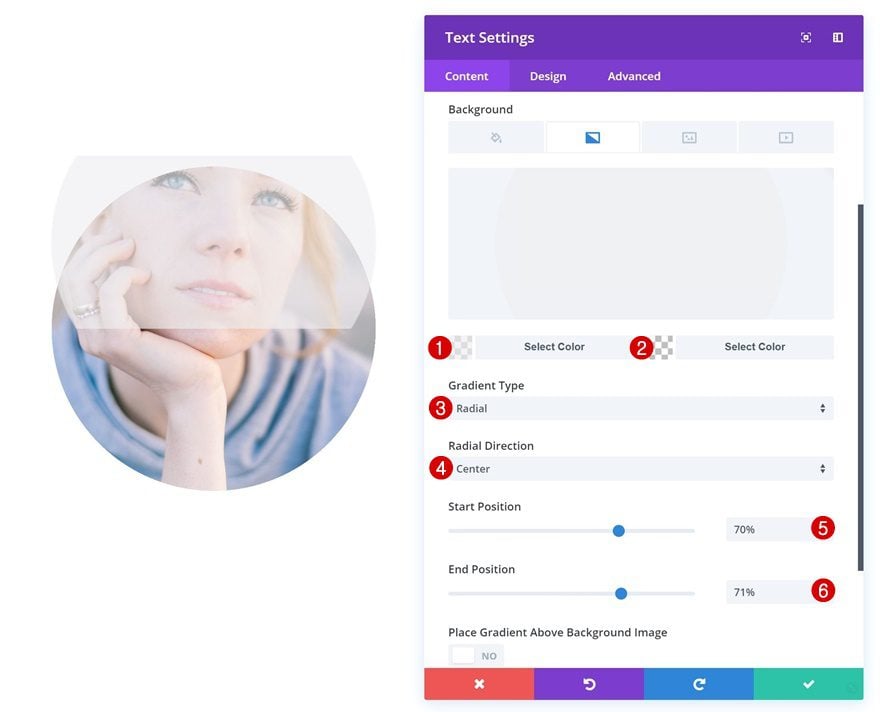
Alternate Textual content Module #1
Gradient Background
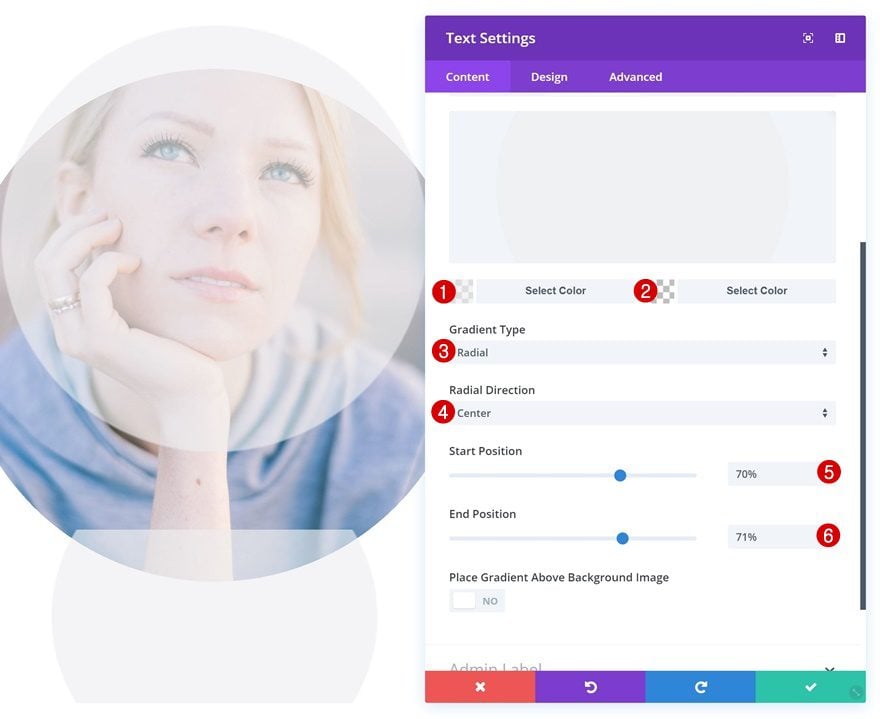
Open the primary Textual content Module in column 1. This would be the description that looks on desktop. Upload a gradient background.
- Colour 1: rgba(239,239,239,0.65)
- Colour 2: rgba(255,255,255,0)
- Gradient Kind: Radial
- Radial Path: Heart
- Get started Place: 70%
- Finish Place: 71%
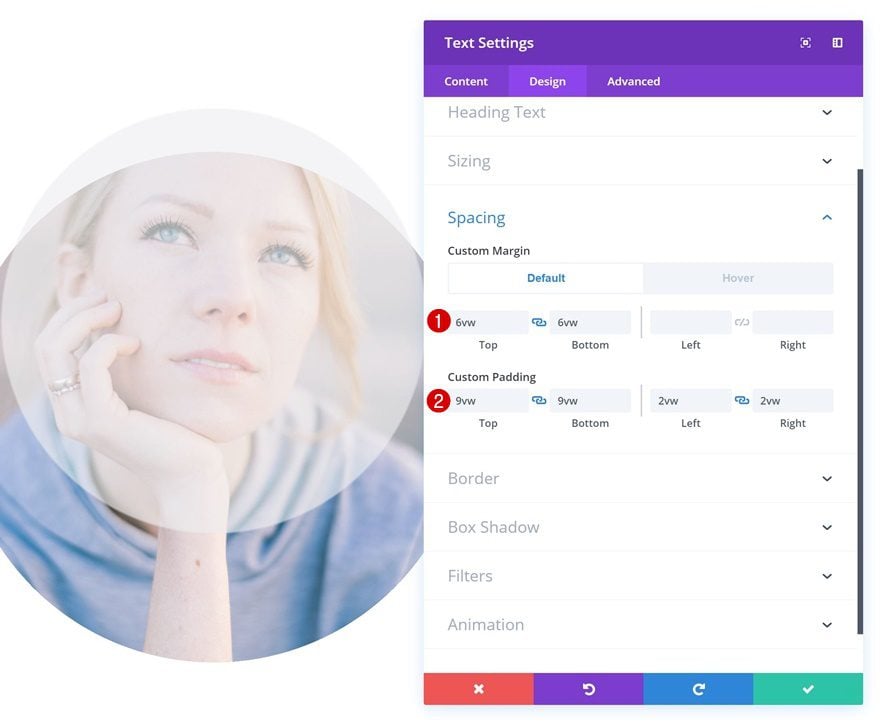
Default Spacing
Then, upload some customized margin and padding values.
- Most sensible Margin: 6vw
- Backside Margin: 6vw
- Most sensible Padding: 9vw
- Backside Padding: 9vw
- Left Padding: 2vw
- Proper Padding: 2vw
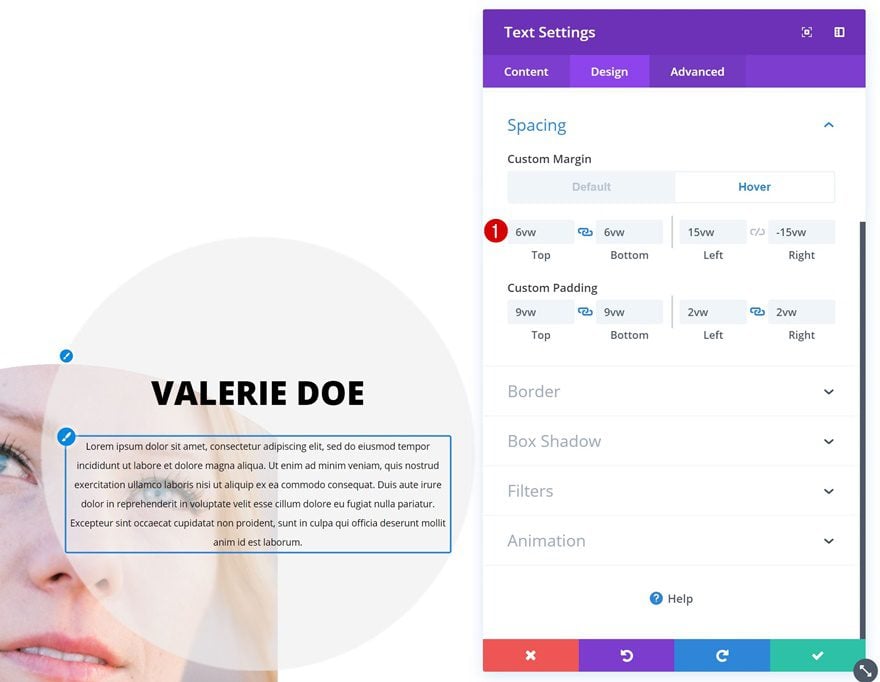
Hover Spacing
Alternate the margin values on hover.
- Left Margin: 15vw
- Proper Margin: -15vw
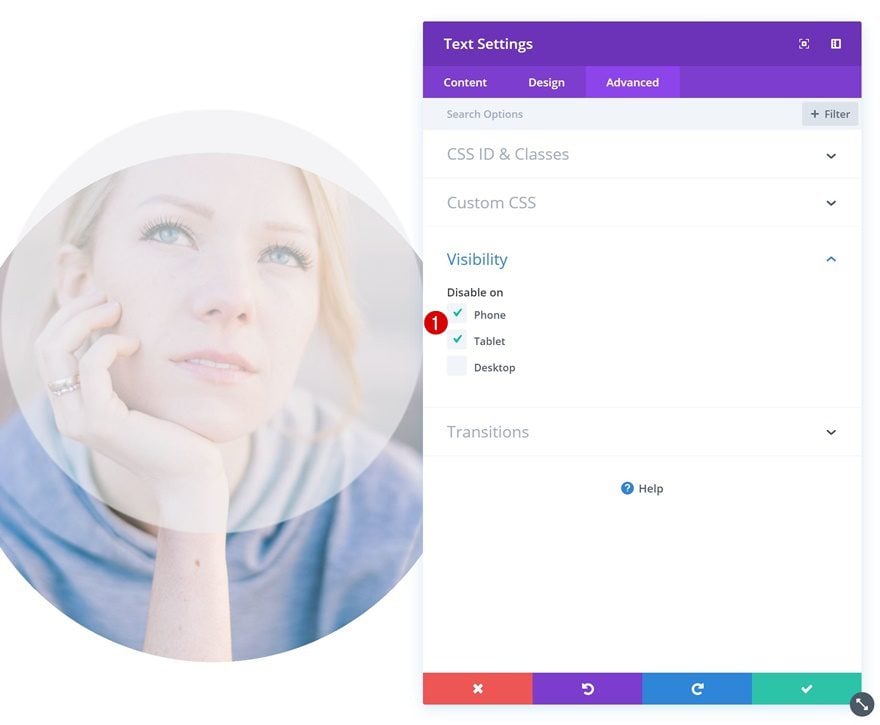
Visibility
And disable the module on pill and speak to.
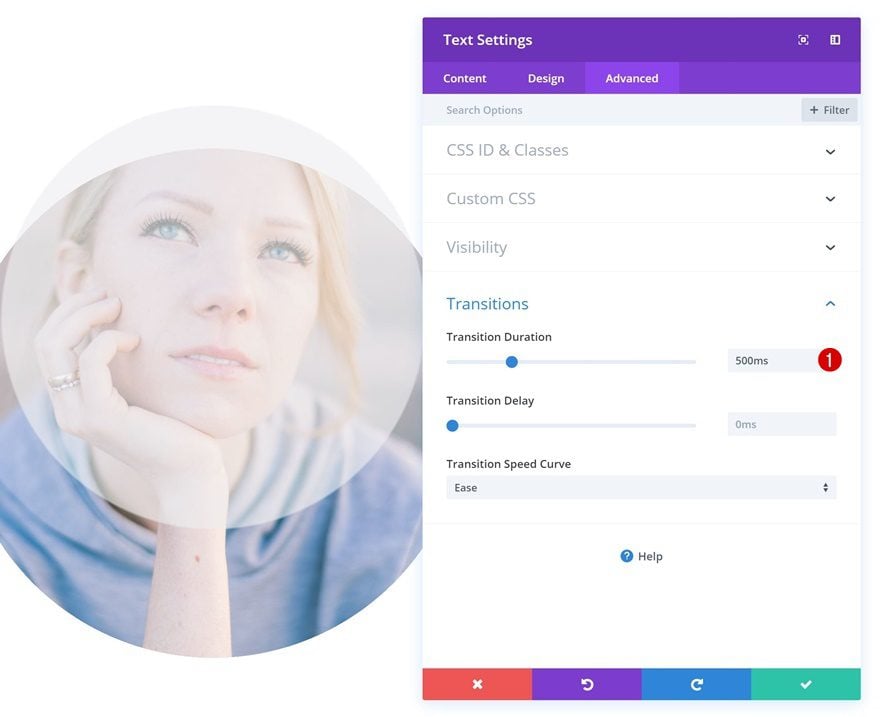
Transitions
Building up the transition length as smartly.
- Transition Period: 500ms
Alternate Textual content Module #2
Gradient Background
The second one module in column 1 is the outline that’ll seem on smaller display sizes. Get started via including a gradient background.
- Colour 1: rgba(239,239,239,0.65)
- Colour 2: rgba(255,255,255,0)
- Gradient Kind: Radial
- Radial Path: Heart
- Get started Place: 70%
- Finish Place: 71%
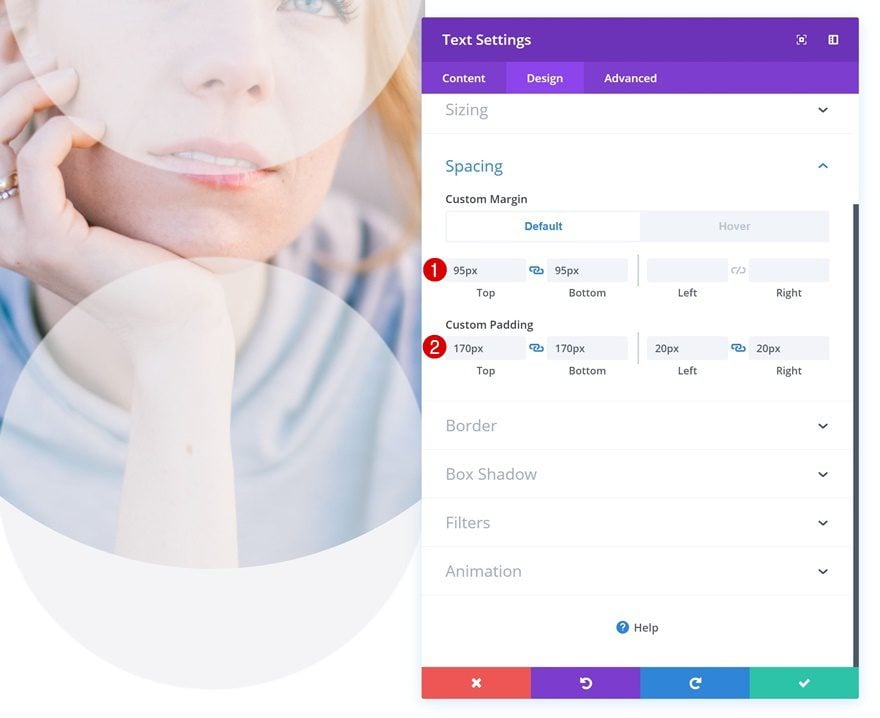
Default Spacing
Upload some customized margin and padding values subsequent.
- Most sensible Margin: 95px
- Backside Margin: 95px
- Most sensible Padding: 170px
- Backside Padding: 170px
- Left Padding: 20px
- Proper Padding: 20px
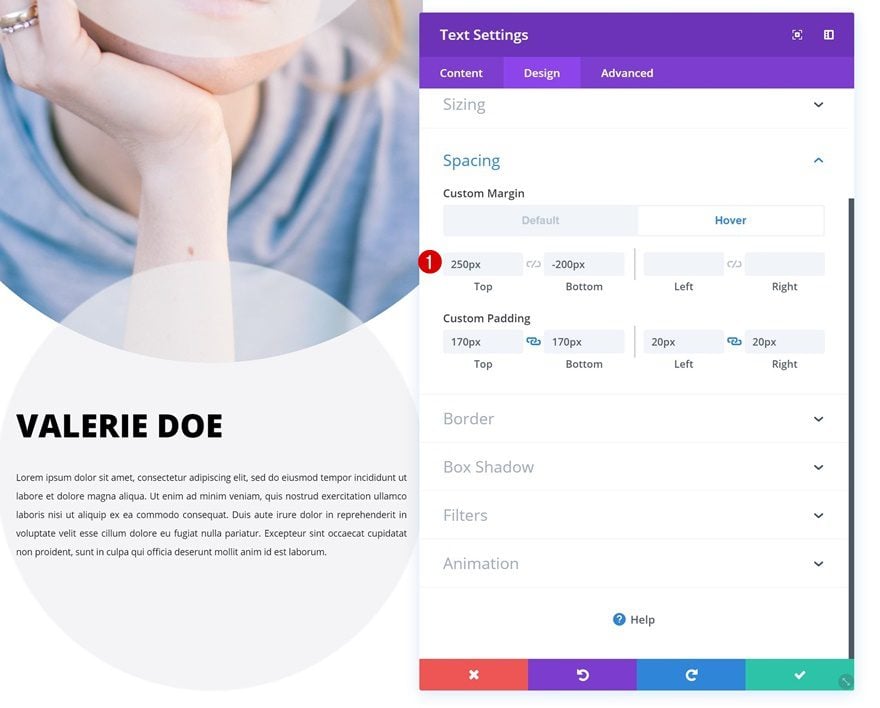
Hover Spacing
Alternate the margin values on hover.
- Most sensible Margin: 250px
- Backside Margin: -200px
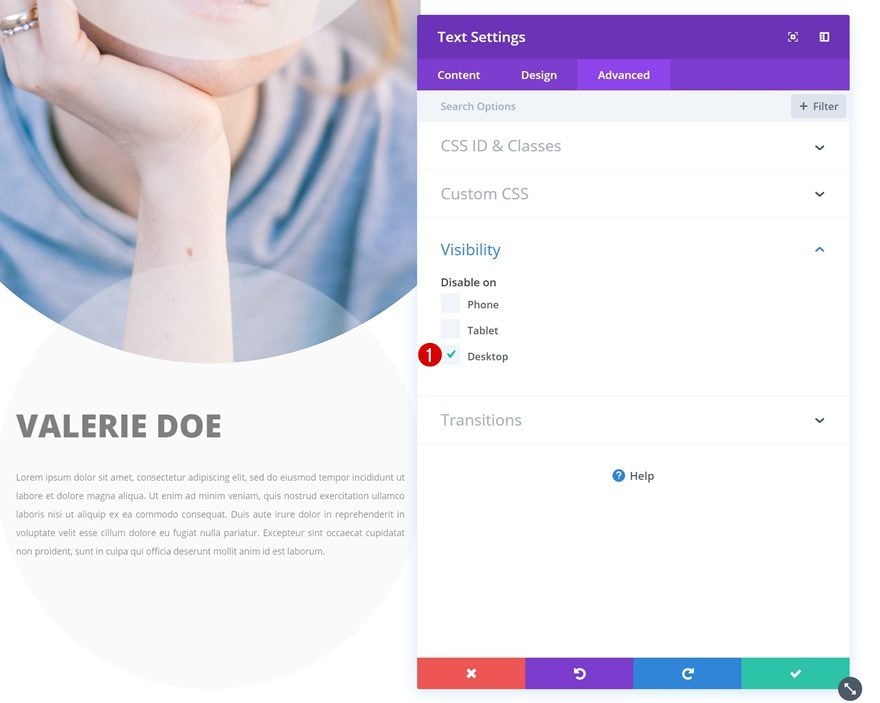
Visibility
And disable the module on desktop.
Alternate Textual content Orientation of Each Textual content Modules
Remaining however no longer least, you’ll want to alternate the textual content orientation of each modules as smartly to succeed in the specified result.
- Textual content Orientation: Heart
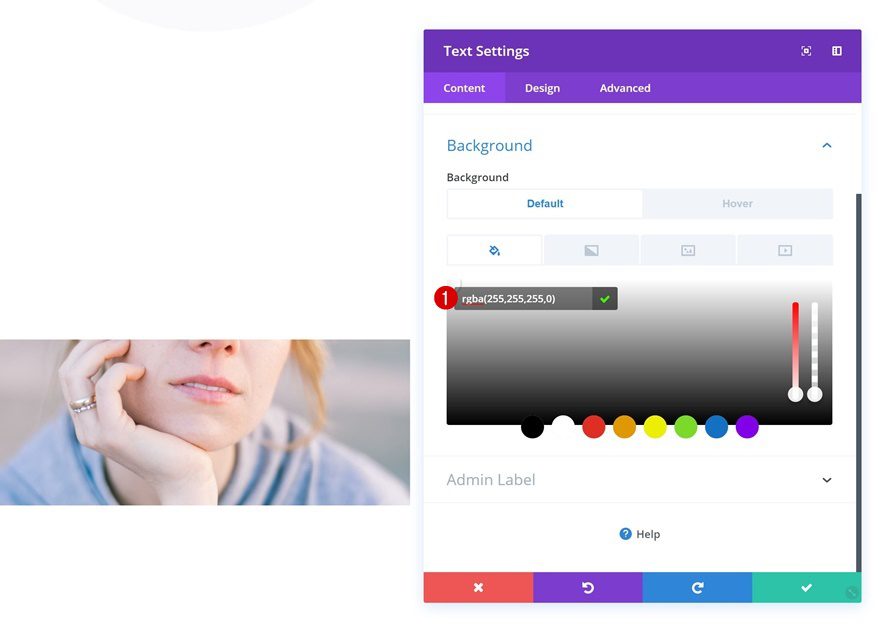
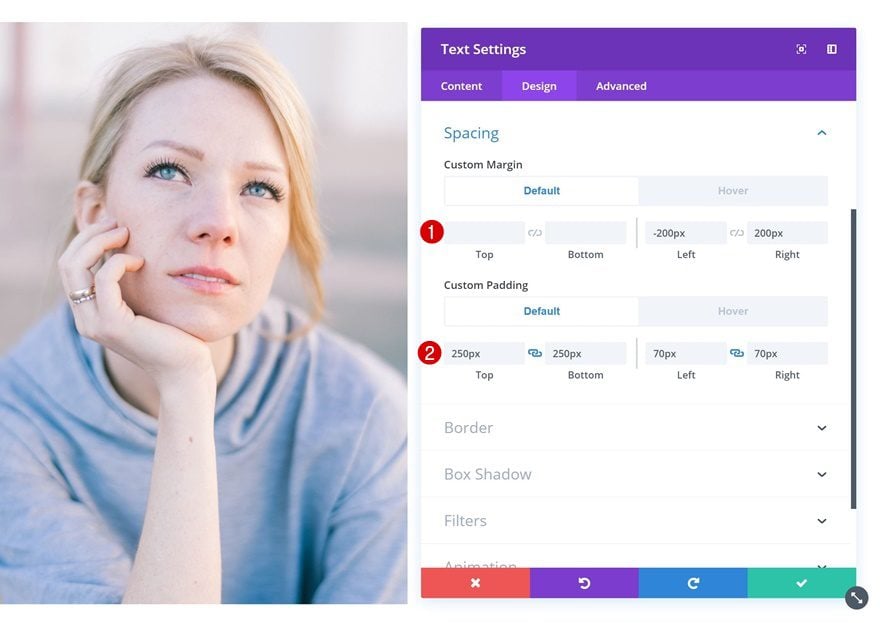
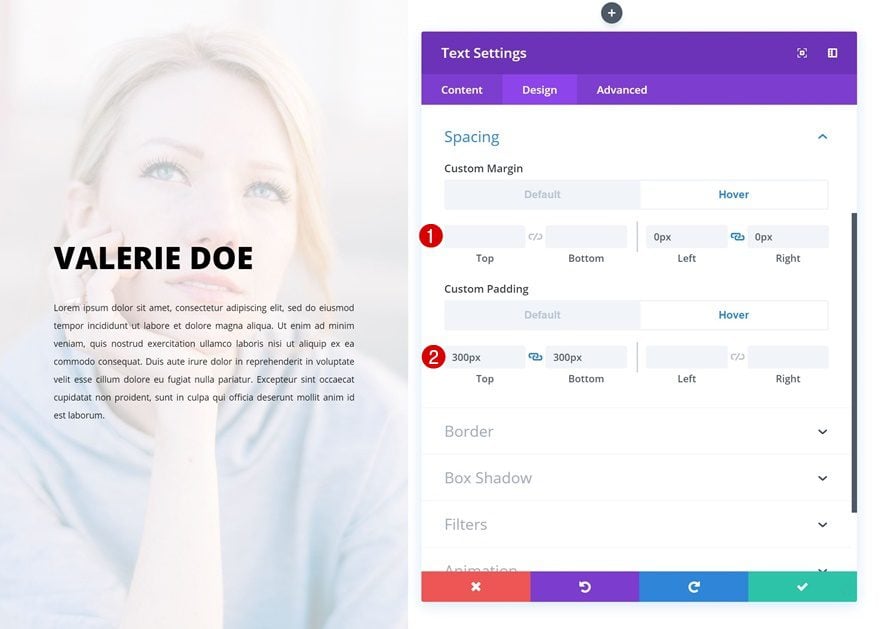
Instance #4
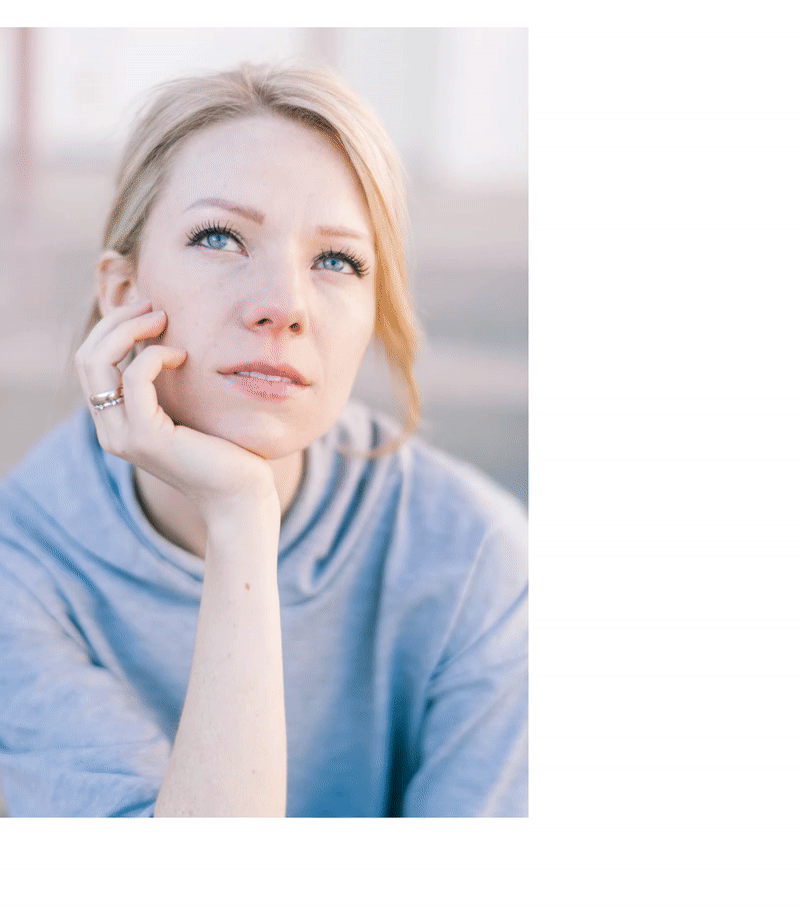
Alternate Textual content Module
Default Background Colour
Directly to the fourth and final instance! Upload the next background colour to the Textual content Module in column 1:
- Background Colour: rgba(255,255,255,0)
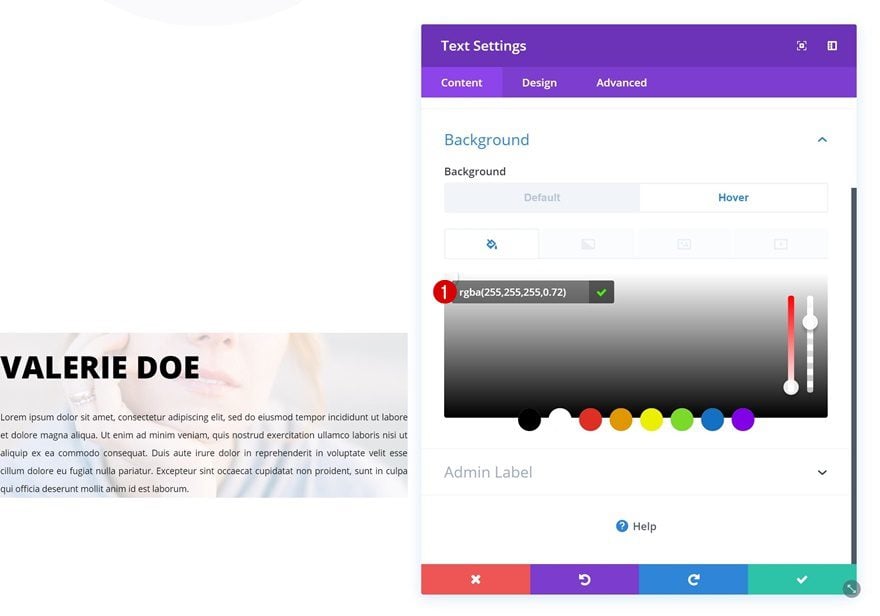
Hover Background Colour
Alternate this background colour on hover.
- Background Colour: rgba(255,255,255,0.72)
Default Spacing
Pass to the spacing settings subsequent and upload some customized margin and padding values there.
- Left Margin: -200px
- Proper Margin: 200px
- Most sensible Padding: 250px
- Backside Padding: 250px
- Left Padding: 70px
- Proper Padding: 70px
Hover Spacing
Alter those values on hover.
- Left Margin: 0px
- Proper Margin: 0px
- Most sensible Padding: 300px
- Backside Padding: 300px
Transitions
Remaining however no longer least, building up the transition length for a clean transition.
- Transition Period: 1200ms

Preview
Now that we’ve long past via the entire steps, let’s take a last take a look at the end result on other display sizes.
Desktop
Cell
Ultimate Ideas
On this put up, we’ve proven you the way you’ll creatively use Divi’s hover choices to exhibit particular person descriptions on hover. With those 4 examples, you’re ready to turn out to be any testimonial or workforce member description into an interactive design component in your web page. If in case you have any questions or tips, you’ll want to depart a remark within the remark segment under!
The put up Transforming Text Modules into Unique Person Descriptions on Hover with Divi gave the impression first on Elegant Themes Blog.
WordPress Web Design