Believe having your individual digital assistant, roughly like J.A.R.V.I.S from the Iron Guy film, however customized to your wishes. This AI assistant is designed that can assist you take on regimen duties or the rest you train it to care for.
On this article, we’ll display you an instance of what our skilled AI assistant can reach. We’re going to create an AI that can give fundamental insights into our website online’s content material, helping us in managing each the website online and its content material extra successfully.
To construct this, we’ll use 3 major stacks: OpenAI, LangChain, and Subsequent.js.
Contents
OpenAI
OpenAI, for those who don’t already know, is an AI analysis group recognized for his or her ChatGPT, which will generate human-like responses. In addition they supply an API that permits builders to get entry to those AI functions to construct their very own programs.
To get your API key, you’ll join at the OpenAI Platform. After signing up, you’ll create a key from the API keys phase of your dashboard.

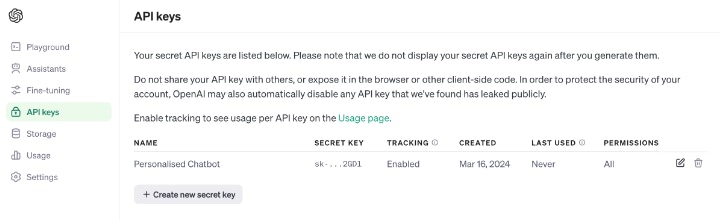
While you’ve generated an API key, you must put it to your pc as an atmosphere variable and identify it OPENAI_API_KEY. It is a usual identify that libraries like OpenAI and LangChain search for, so that you don’t want to go it manually afterward.
Do observe that Home windows, macOS, and Linux every have their very own technique to set an atmosphere variable.
Home windows
- Proper-click on “This PC” or “My Laptop” and choose “Houses“.
- Click on on “Complex machine settings” at the left sidebar.
- Within the Machine Houses window, click on at the “Atmosphere Variables” button.
- Underneath “Machine variables” or “Consumer variables“, click on “New” and input the identify,
OPENAI_API_KEY, and worth of our surroundings variable.
macOS and Linux
To set an everlasting variable, upload the next for your shell configuration record equivalent to ~/.bash_profile, ~/.bashrc, ~/.zshrc.
export OPENAI_API_KEY=worth
LangChain
LangChain is a machine that is helping computer systems perceive and paintings with human language. In our case, it supplies equipment that may assist us convert textual content paperwork into numbers.
You could marvel, why can we want to do that?
Mainly, AI, machines, or computer systems are excellent at running with numbers however now not with phrases, sentences, and their meanings. So we want to convert phrases into numbers.
This procedure is known as embedding.
It makes it more uncomplicated for computer systems to investigate and to find patterns in language knowledge, in addition to is helping to grasp the semantics of the tips they’re given from a human language.

For instance, let’s say a person sends a question about “fancy vehicles“. Somewhat than looking for the precise phrases from the tips supply, it might almost definitely remember that you are attempting to seek for Ferrari, Maserati, Aston Martin, Mercedes Benz, and so forth.
Subsequent.js
We’d like a framework to create a person interface so customers can engage with our chatbot.
In our case, Subsequent.js has the entirety we want to get our chatbot up and operating for the end-users. We can construct the interface the use of a React.js UI library, shadcn/ui. It has a direction machine for growing an API endpoint.
It additionally supplies an SDK that may make it more uncomplicated and sooner to construct chat person interfaces.

Information and Different Must haves
Preferably, we’ll additionally want to get ready some knowledge able. Those might be processed, saved in a Vector garage and despatched to OpenAI to provide extra information for the recommended.
On this instance, to make it more effective, I’ve made a JSON record with a listing of identify of a weblog put up. You’ll be able to to find them within the repository. Preferably, you’d wish to retrieve this data immediately from the database.
I suppose you’ve an excellent working out of running with JavaScript, React.js, and NPM as a result of we’ll use them to construct our chatbot.
Additionally, you should definitely have Node.js put in to your pc. You’ll be able to test if it’s put in via typing:
node -v
When you don’t have Node.js put in, you’ll practice the directions at the professional web page.
How’s The entirety Going to Paintings?
To make it simple to grasp, right here’s a high-level assessment of ways the entirety goes to paintings:
- The person will enter a query or question into the chatbot.
- LangChain will retrieve similar paperwork of the person’s question.
- Ship the recommended, the question, and the similar paperwork to the OpenAI API to get a reaction.
- Show the reaction to the person.
Now that we have got a high-level assessment of ways the entirety goes to paintings, let’s get began!
Putting in Dependencies
Let’s get started via putting in the important applications to construct the person interface for our chatbot. Kind the next command:
npx create-next-app@newest ai-assistant --typescript --tailwind --eslint
This command will set up and arrange Subsequent.js with shadcn/ui, TypeScript, Tailwind CSS, and ESLint. It is going to ask you a couple of questions; on this case, it’s very best to make a choice the default choices.
As soon as the set up is entire, navigate to the venture listing:
cd ai-assistant
Subsequent, we want to set up a couple of further dependencies, equivalent to ai, openai, and langchain, which have been now not integrated within the earlier command.
npm i ai openai langchain @langchain/openai remark-gfm
Construction the Chat Interface
To create the chat interface, we’ll use some pre-built elements from shadcn/ui just like the button, avatar, and enter. Thankfully, including those elements is simple with shadcn/ui. Simply sort:
npx shadcn-ui@newest upload scroll-area button avatar card enter
This command will robotically pull and upload the elements to the ui listing.
Subsequent, let’s make a brand new record named Chat.tsx within the src/elements listing. This record will hang our chat interface.
We’ll use the ai bundle to control duties equivalent to shooting person enter, sending queries to the API, and receiving responses from the AI.
The OpenAI’s reaction will also be simple textual content, HTML, or Markdown. To layout it into correct HTML, we’ll use the remark-gfm bundle.
We’ll additionally want to show avatars throughout the Chat interface. For this educational, I’m the use of Avatartion to generate avatars for each the AI and the person. Those avatars are saved within the public listing.
Underneath is the code we’ll upload to this record.
'use consumer';
import { Avatar, AvatarFallback, AvatarImage } from '@/ui/avatar';
import { Button } from '@/ui/button';
import {
Card,
CardContent,
CardFooter,
CardHeader,
CardTitle,
} from '@/ui/card';
import { Enter } from '@/ui/enter';
import { ScrollArea } from '@/ui/scroll-area';
import { useChat } from 'ai/react';
import { Ship } from 'lucide-react';
import { FunctionComponent, memo } from 'react';
import { ErrorBoundary } from 'react-error-boundary';
import ReactMarkdown, { Choices } from 'react-markdown';
import remarkGfm from 'remark-gfm';
/**
* Memoized ReactMarkdown element.
* The element is memoized to stop needless re-renders.
*/
const MemoizedReactMarkdown: FunctionComponent = memo(
ReactMarkdown,
(prevProps, nextProps) =>
prevProps.kids === nextProps.kids &&
prevProps.className === nextProps.className
);
/**
* Represents a talk element that permits customers to have interaction with a chatbot.
* The element presentations a talk interface with messages exchanged between the person and the chatbot.
* Customers can enter their questions and obtain responses from the chatbot.
*/
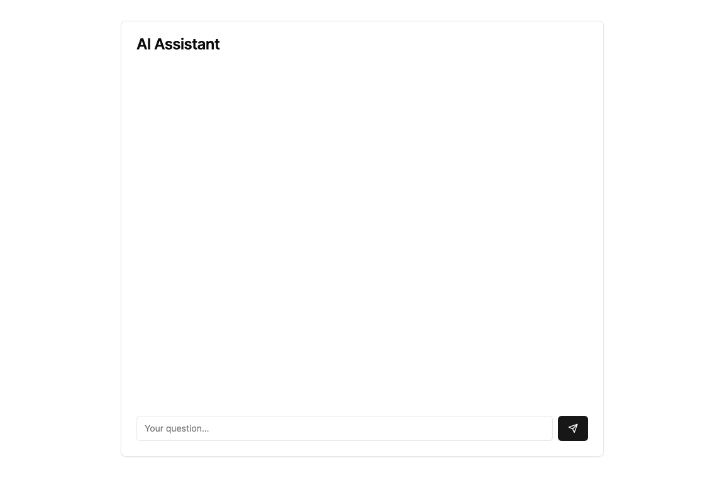
export const Chat = () => {
const { handleInputChange, handleSubmit, enter, messages } = useChat({
api: '/api/chat',
});
go back (
AI Assistant
{messages.map((message) => {
go back (
{message.function === 'person' && (
U
)}
{message.function === 'assistant' && (
)}
{message.function === 'person' ? 'Consumer' : 'AI'}
{message.content material}
}
>
{message.content material}