
Photographs are a key facet of internet design. And trendy internet design turns out to name for brand spanking new and summary techniques to show photographs in your web page. Divi’s grow to be choices make it simple to taste and place photographs in your web page with regards to anyplace you wish to have. This opens the door for developing distinctive layouts that may take your web page to the following degree.
On this instructional, I’ll be appearing you a few techniques you’ll taste and place photographs in summary puts in your web page. This may occasionally mean you can create numerous design permutations for photographs that you will have idea best imaginable in a photograph editor like Photoshop or Comic strip.
Let’s get began!
Contents
- 0.1 Sneak Peek
- 0.2 Obtain the Design Examples from This Instructional for FREE
- 0.3 Obtain For Unfastened
- 0.4 You may have effectively subscribed. Please test your e-mail cope with to verify your subscription and get get right of entry to to unfastened weekly Divi structure packs!
- 0.5 Gettings Began
- 0.6 Positioning Photographs In part Out of doors of the Viewport (to the appropriate or left)
- 0.7 About Us
- 0.8 Growing an Summary Symbol Collage Background for Your Header
- 1 Internal Design
Sneak Peek
Here’s a sneak peek of the designs we can construct on this instructional.
Obtain the Design Examples from This Instructional for FREE
To put your arms on those instance designs, you are going to first want to obtain it the use of the button beneath. To achieve get right of entry to to the obtain it is important to subscribe to our Divi Day by day e-mail checklist via the use of the shape beneath. As a brand new subscriber, you are going to obtain much more Divi goodness and a unfastened Divi Structure pack each Monday! In the event you’re already at the checklist, merely input your e-mail cope with beneath and click on obtain. You’re going to no longer be “resubscribed” or obtain additional emails.
@media best display and ( max-width: 767px ) {.et_bloom .et_bloom_optin_1 .carrot_edge.et_bloom_form_right .et_bloom_form_content:earlier than, .et_bloom .et_bloom_optin_1 .carrot_edge.et_bloom_form_left .et_bloom_form_content:earlier than { border-top-color: #ffffff !vital; border-left-color: clear !vital; }
}.et_bloom .et_bloom_optin_1 .et_bloom_form_content button { background-color: #f92c8b !vital; } .et_bloom .et_bloom_optin_1 .et_bloom_form_content .et_bloom_fields i { colour: #f92c8b !vital; } .et_bloom .et_bloom_optin_1 .et_bloom_form_content .et_bloom_custom_field_radio i:earlier than { background: #f92c8b !vital; } .et_bloom .et_bloom_optin_1 .et_bloom_border_solid { border-color: #f7f9fb !vital } .et_bloom .et_bloom_optin_1 .et_bloom_form_content button { background-color: #f92c8b !vital; } .et_bloom .et_bloom_optin_1 .et_bloom_form_container h2, .et_bloom .et_bloom_optin_1 .et_bloom_form_container h2 span, .et_bloom .et_bloom_optin_1 .et_bloom_form_container h2 sturdy { font-family: “Open Sans”, Helvetica, Arial, Lucida, sans-serif; }.et_bloom .et_bloom_optin_1 .et_bloom_form_container p, .et_bloom .et_bloom_optin_1 .et_bloom_form_container p span, .et_bloom .et_bloom_optin_1 .et_bloom_form_container p sturdy, .et_bloom .et_bloom_optin_1 .et_bloom_form_container shape enter, .et_bloom .et_bloom_optin_1 .et_bloom_form_container shape button span { font-family: “Open Sans”, Helvetica, Arial, Lucida, sans-serif; } p.et_bloom_popup_input { padding-bottom: 0 !vital;}

Obtain For Unfastened
Sign up for the Divi Newlsetter and we can e-mail you a replica of without equal Divi Touchdown Web page Structure Pack, plus lots of different wonderful and unfastened Divi sources, guidelines and methods. Apply alongside and you are going to be a Divi grasp very quickly. In case you are already subscribed merely kind on your e-mail cope with beneath and click on obtain to get right of entry to the structure pack.
You may have effectively subscribed. Please test your e-mail cope with to verify your subscription and get get right of entry to to unfastened weekly Divi structure packs!
To import the structure for your web page, merely extract the zip document and drag the json document into the Divi Builder.
Now let’s get to the educational we could?
Gettings Began
To get began, make sure to have the Divi Theme put in and lively. Then create a brand new web page and deploy the Divi Builder at the entrance finish. Make a selection the choice “Construct from Scratch”.
Now you’re ready to design!
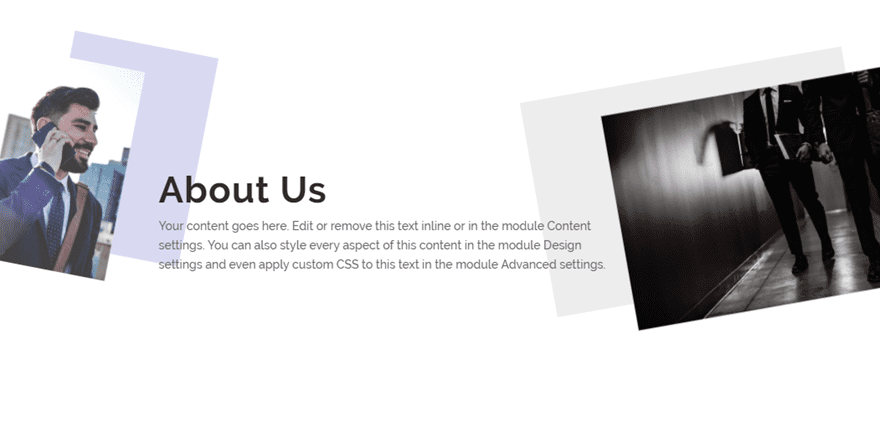
Positioning Photographs In part Out of doors of the Viewport (to the appropriate or left)
On this first instance, I’m going to turn you tips on how to place photographs partly outdoor of the viewport. This a pleasing method so as to add extra of an summary show in your photographs which can paintings just like a customized background symbol in your content material. Then you’ll taste the picture for much more distinctive designs.
Right here’s tips on how to do it.
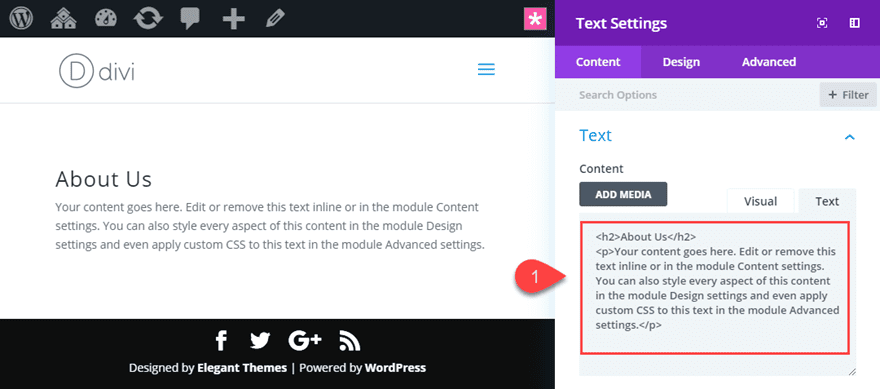
Create and Taste the Textual content Module
First we’re going to create a textual content module which can function the primary content material for our segment.
In the event you haven’t already, create a typical segment with a one-column row. Then upload the textual content module to the row.
Replace the content material to incorporate the next:
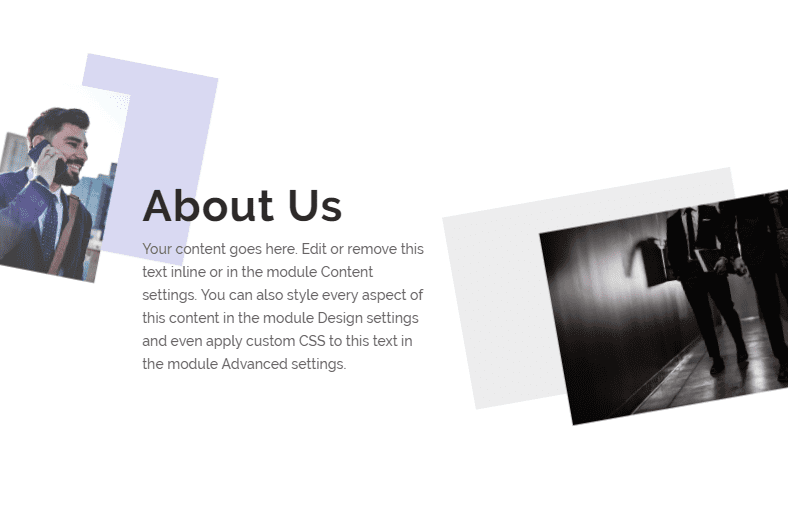
About Us
Your content material is going right here. Edit or take away this newsletter inline or within the module Content material settings. You'll be able to additionally taste each facet of this content material within the module Design settings or even practice customized CSS to this newsletter within the module Complex settings.
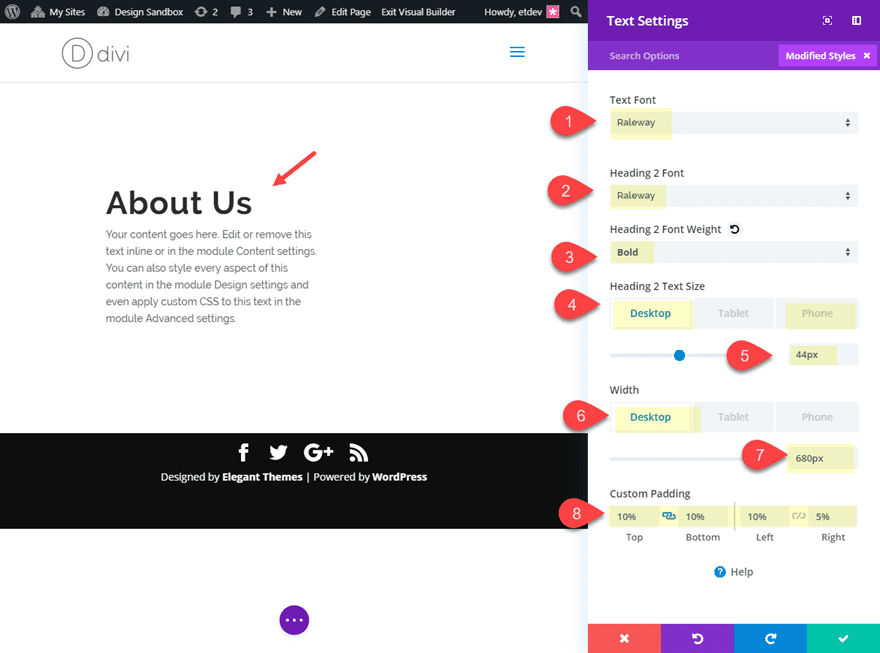
Then replace the design settings as follows:
Textual content Font: Raleway
Heading 2 Font: Raleway
heading 2 Font Weight: Daring
Heading 2 Textual content Dimension: 44px (desktop), 24px (telephone)
Width: 680px (desktop), 60% (pill), 80% (telephone)
Customized Padding: 10% height, 10% backside, 10% left, 5% proper
Upload Symbol #1
Now we’re in a position so as to add the primary symbol. Pass forward and upload a picture module without delay above the textual content module.
Then add your symbol to the picture module. Be sure that the picture is huge sufficient in order that it doesn’t lose high quality once we amplify the picture the use of the grow to be belongings. I’m the use of a picture this is 400 via 580 pixels.
Subsequent deliver the width of the picture module down and align it to the left as follows:
Width: 5%
Module Alignment: left

Shrinking the picture module like this to start with lets in us to chop down at the adverse area of the structure. This fashion we don’t have to regulate the spacing the use of adverse margins.
Now we will be able to amplify the picture the use of grow to be choices as follows:
Grow to be Scale X-axis: 416%
Grow to be Scale Y-axis: 416%

Then we will be able to place the picture the use of the grow to be translate as follows:
Grow to be Translate X-axis: -36%
Grow to be Translate Y-axis: 41%
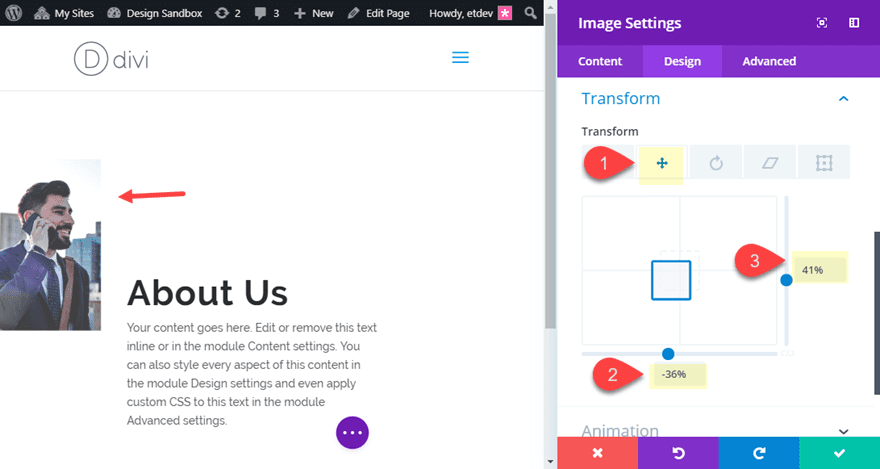
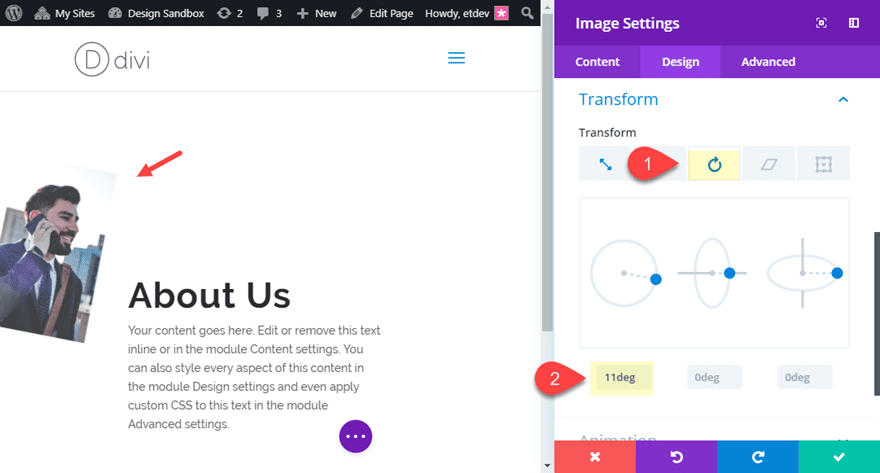
Finally, you’ll rotate the picture the use of grow to be rotate:
Grow to be Rotate Z-axis: 11deg
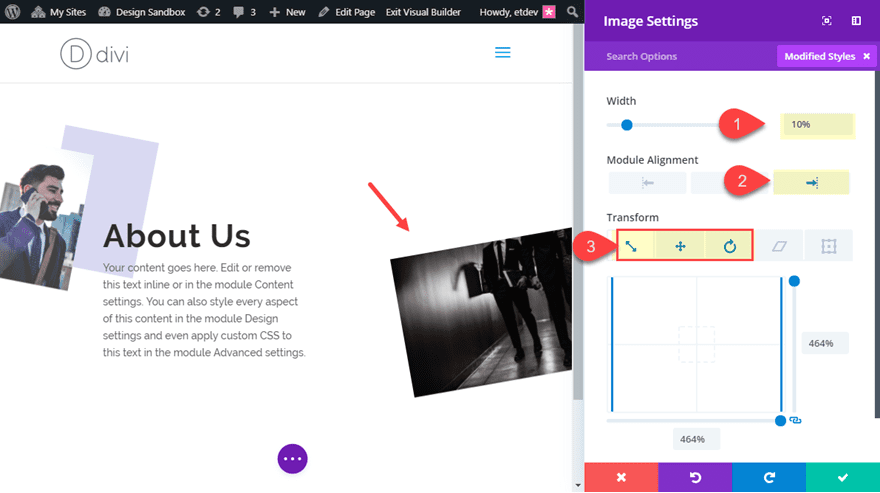
Now we’re in a position so as to add the second one symbol. Pass forward and upload a picture module without delay beneath the textual content module.
Then add a brand new symbol to the picture module.
Subsequent deliver the width of the picture module down and align it to the left as follows:
Width: 10%
Module Alignment: left
The Width doesn’t need to be precisely 10%. All you wish to have to do is shrink the module sufficient in order that it doesn’t soak up an excessive amount of vertical area at the structure.
Then replace the grow to be choices as follows:
Grow to be Scale X-axis: 464%
Grow to be Scale Y-axis: 464%
Grow to be Translate X-axis: 7%
Grow to be Translate Y-axis: -80%
Grow to be Rotate Z-axis: -10deg
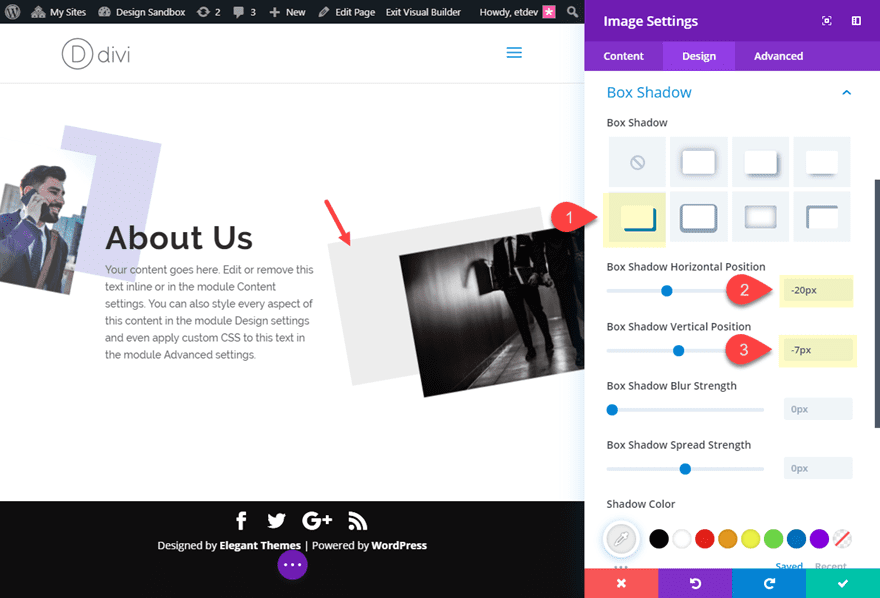
Then upload a field shadow for an extra design part.
Field Shadow: see screenshot
Field Shadow Horizontal Place: -20px
Field Shadow Vertical Place: -7px
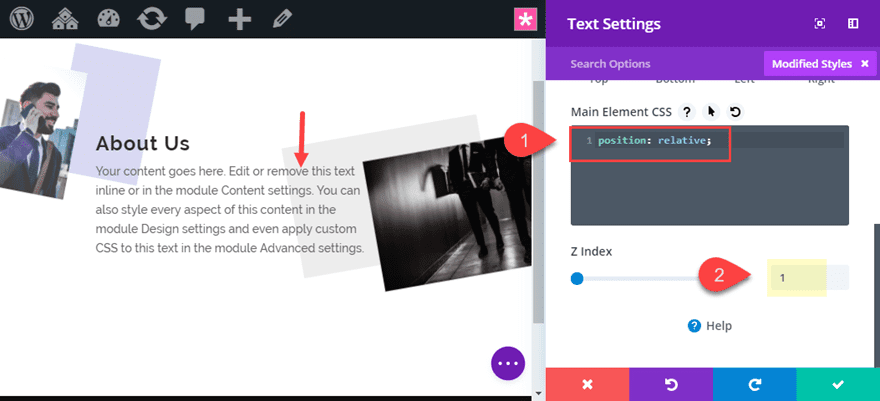
Making Certain the Textual content Module Remains on Most sensible
We need to be certain the Textual content Module remains on height of the pictures each time they begin to overlap on cell. This makes certain the pictures proceed to function background photographs within the design.
To do that, open the textual content module and upload the next Customized CSS to the Primary Part:
Primary Part CSS:
place: relative;
Then set the Z-index to at least one.
Hiding the Phase Overflow
Since we can have photographs which are extending outdoor of the segment of the web page, the browser viewport width will building up to deal with the additional area. This may occasionally interact the horizontal scroll bar on the backside of the browser. To disable this, it is important to upload a snippet of CSS to the segment.
Open the segment settings and upload the next customized CSS to the Primary Part:
overflow: hidden;

Now Take a look at the general outcome.
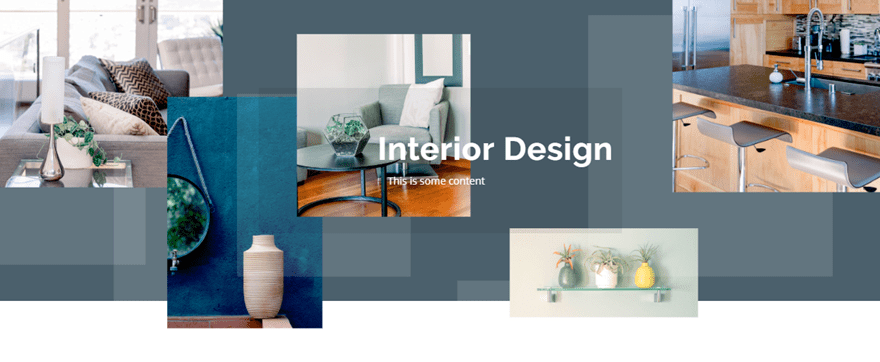
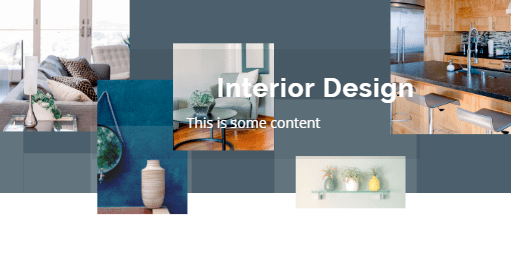
Growing an Summary Symbol Collage Background for Your Header
For this subsequent design, I’m going to turn you tips on how to construct an summary collage of pictures that may function a background for a header. To do that, we can use the show flex belongings to create a row of pictures that we will be able to scale and transfer round in inventive techniques.
Right here’s tips on how to do it.
Designing the Header Textual content Module
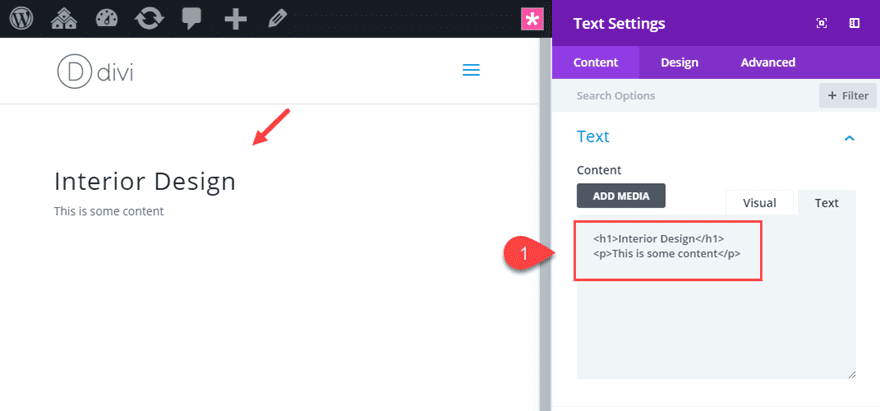
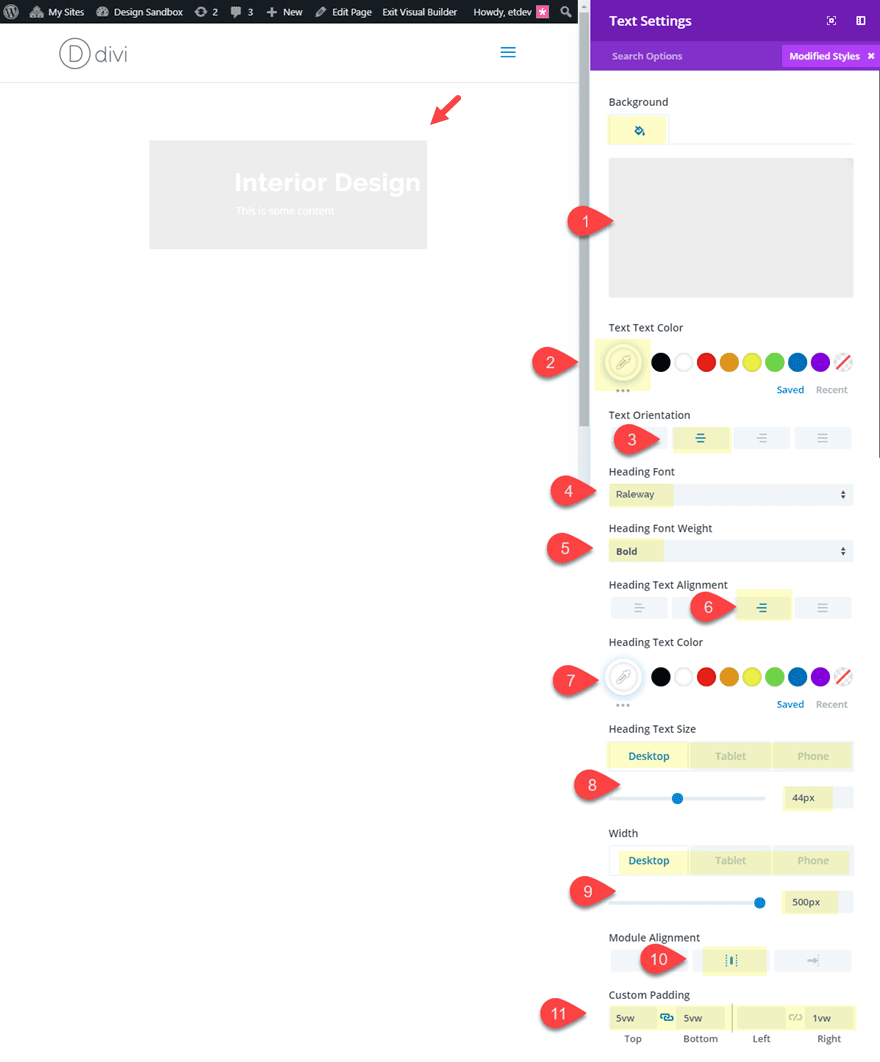
First, create a brand new common segment with a one-column row. Then upload a textual content module to the row and replace the next content material:
Internal Design
That is some content material
Then replace the design as follows:
Background Colour: rgba(0,0,0,0.07)
Textual content Textual content Colour: #ffffff
Textual content Orientation: Heart
Heading Font: Raleway
Heading Font Weight: Daring
Heading Textual content Alignment: Proper
Heading Textual content Colour: #ffffff
Heading Textual content Dimension: 44px (desktop), 34px (pill), 24px (telephone)
Width: 500px (desktop), 60% (pill), 80% (telephone)
Module Alignment: Heart
Customized Padding: 5vw height, 5vw backside, 1vw proper
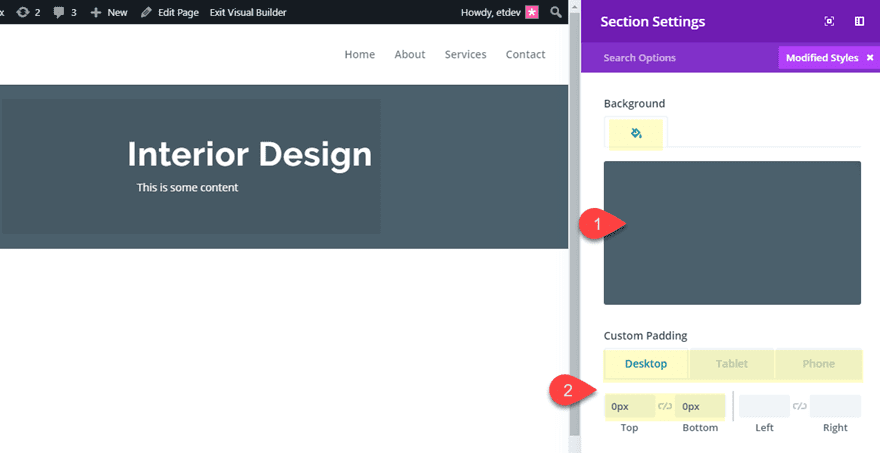
Phase Settings
Earlier than including our photographs and construction the collage background, let’s customise our segment. This may occasionally supply our canvas for finishing the remainder of the design.
Open the segment settings and replace the next:
Background Colour: #4c606d
Customized Padding (desktop): 0px height, 0px backside
Customized Padding (pill): 20px backside
Customized Padding (telephone): 40px backside
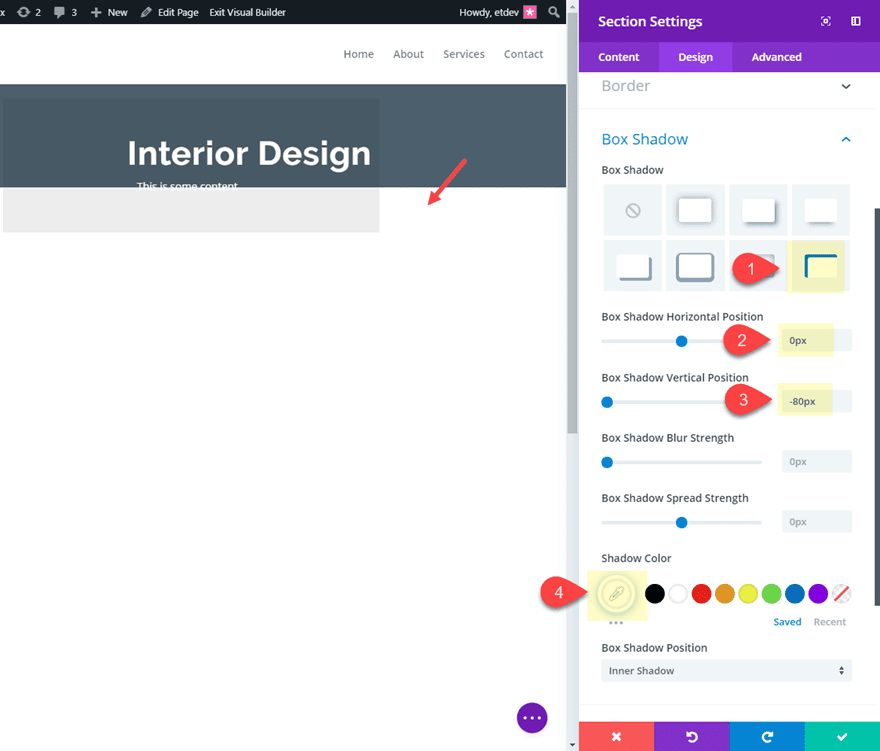
Subsequent, upload an inside field shadow to the ground of the segment with a colour that fits the background of the following segment at the web page (on this case it’s going to be white). This may occasionally let us create the impact of our photographs overlapping the ground of the header into the following segment (you’ll see what I imply afterward).
Field Shadow: see screenshot
Field Shadow Horizontal Place: 0px
Field Shadow Vertical Place: -80px
Shadow Colour: #ffffff
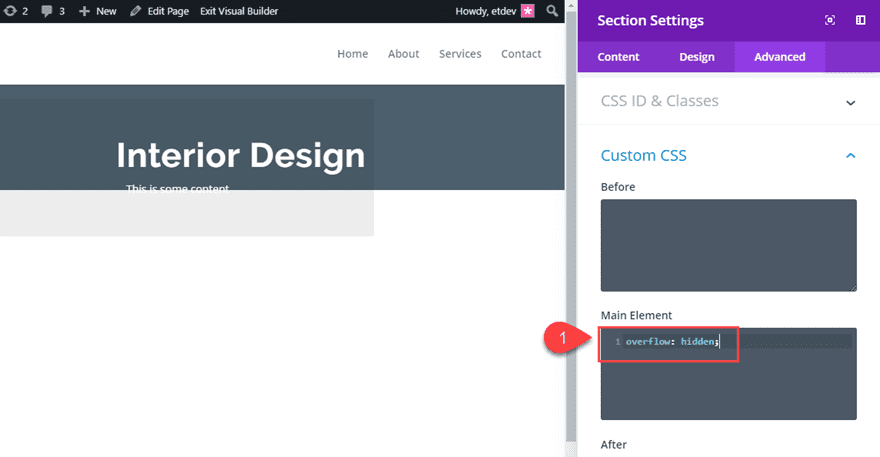
And because we can be transferring photographs outdoor of the segment viewport for our collage, we can want to upload the next CSS to the Primary Part.
overflow: hidden;
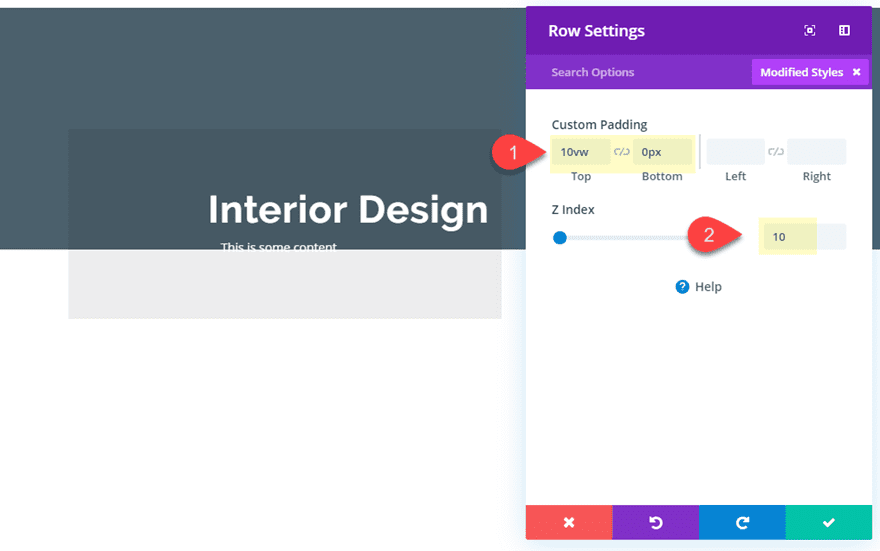
Row 1 Settings
Now we want to upload some padding to the row containing our textual content module. We additionally want to upload a z-index to stay the segment on height of the pictures we can be including to our segment. Via default, each segment has a z-index price of 9. So all we want to do is upload a z-index of 10 to the row we need to keep on height.
Open the row settings and replace the next:
Customized Padding: 10vw height
Z Index: 10
Growing the Summary Symbol Collage
At this level the segment is able to get started including our photographs.
To create the summary symbol collage we’re going to upload 5 photographs to a one column row after which use “show: flex” to align all of the ones photographs horizontally at the web page. That is vital to stay the pictures in position (horizontally) on all browser sizes. If we had been to make use of a standard 5 column structure, the pictures what spoil into other column layouts on other gadgets and spoil the design.
After that we will taste and place our photographs separately with grow to be choices.
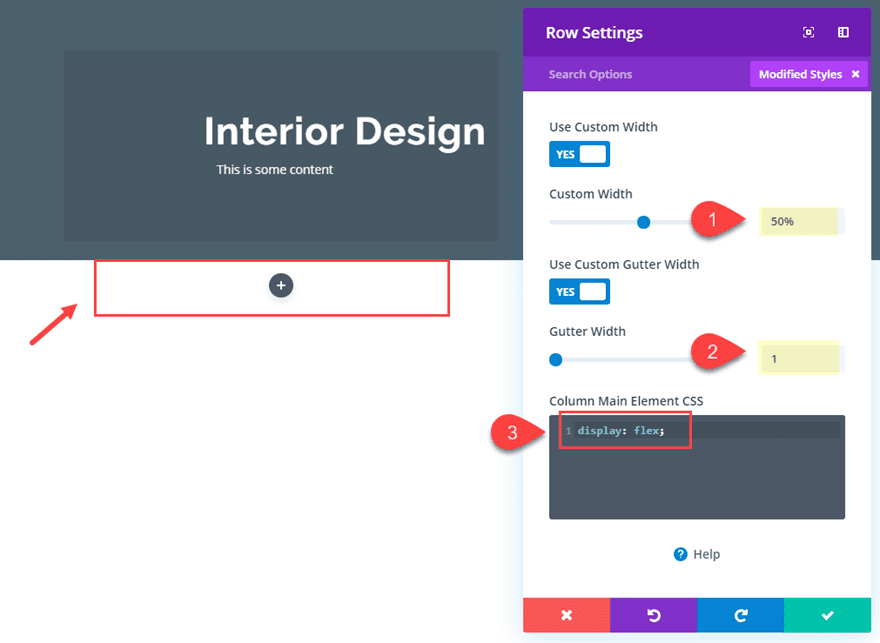
Including The Row of Photographs
Pass forward and create a brand new one-column row without delay beneath the row containing the textual content module.
Then open the row settings and replace the next:
Customized Width: 50%
Gutter Width: 1
And to align all modules on this row horizontally, upload the next CSS to the Column Primary Part:
show: flex;
Now whilst you upload symbol modules to the row, they’ll align horizontally.
Take a look at what occurs as I reproduction a picture module within the row with show:flex upload to the column.
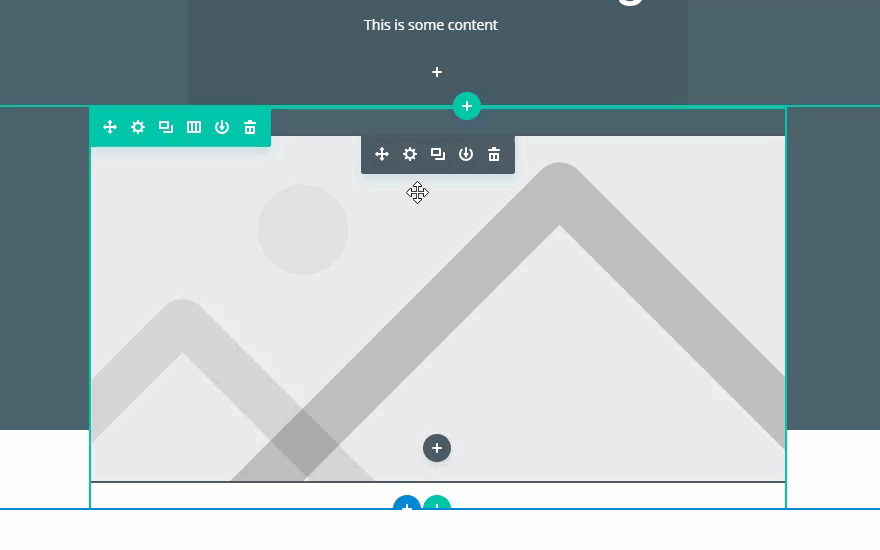
Pass forward and upload 5 photographs to the row ensuring they’re sufficiently big in dimension to deal with for the scale building up when scaling the picture for the collage. I’m the use of photographs featured in our Home Improvement Layout Pack that are all about 800px in width and range in top. Photographs with other dimensions have a tendency to make a greater taking a look summary collage.
Positioning the Photographs with Grow to be Translate
It’s time to start out positioning our photographs to create our collage.
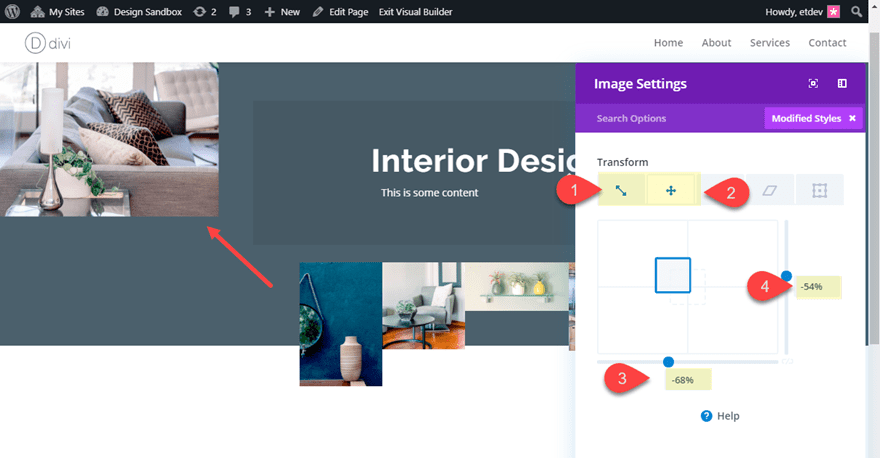
Symbol #1
Open the settings for the primary symbol module (a long way left) and replace the grow to be choices as follows:
Grow to be Scale X-axis: 266%
Grow to be Scale Y-axis: 266%
Grow to be Translate: X-axis: -68%
Grow to be Translate: Y-axis: -54%
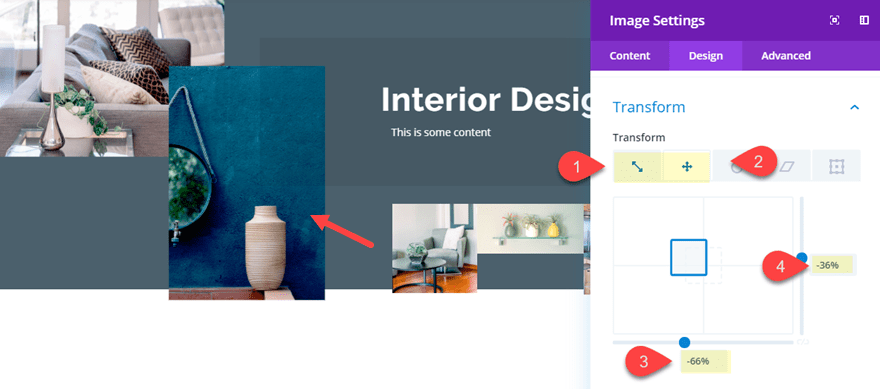
Symbol #2
Open the settings for the second one symbol module and replace the grow to be choices as follows:
Grow to be Scale X-axis: 184%
Grow to be Scale Y-axis: 184%
Grow to be Translate: X-axis: -36%
Grow to be Translate: Y-axis: -66%
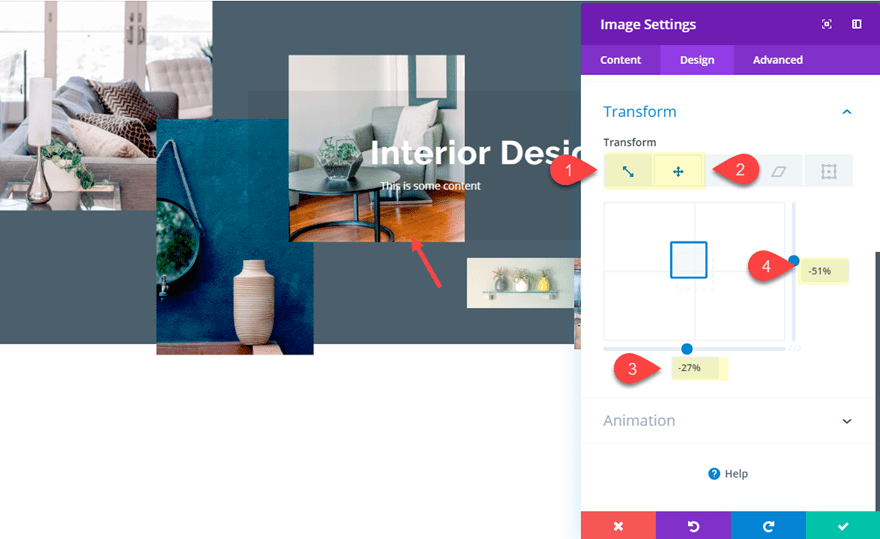
Symbol #3
Open the settings for the 3rd symbol module and replace the grow to be choices as follows:
Grow to be Scale X-axis: 206%
Grow to be Scale Y-axis: 206%
Grow to be Translate: X-axis: -51%
Grow to be Translate: Y-axis: -27%
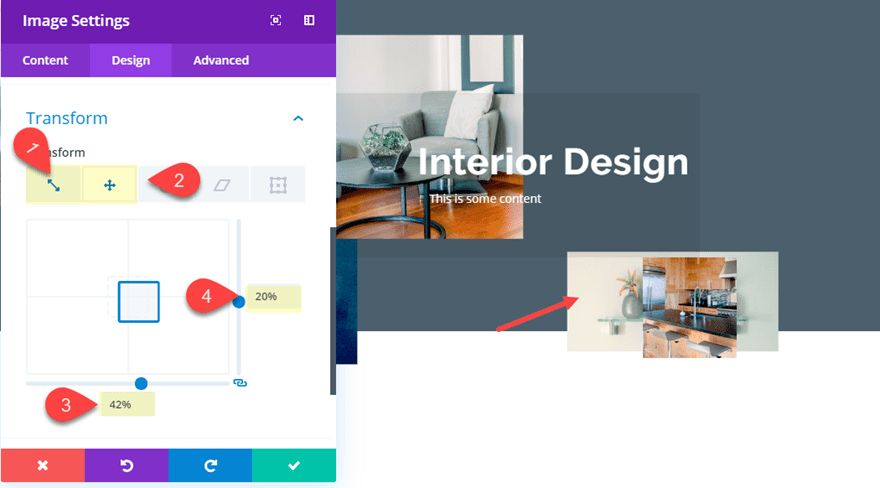
Symbol #4
Open the settings for the fourth symbol module and replace the grow to be choices as follows:
Grow to be Scale X-axis: 180%
Grow to be Scale Y-axis: 180%
Grow to be Translate: X-axis: 20%
Grow to be Translate: Y-axis: 42%
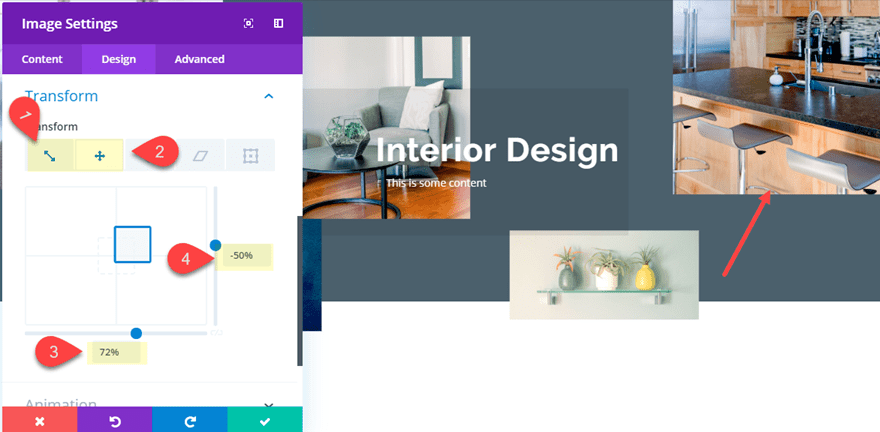
Symbol #5
Open the settings for the 5th symbol module and replace the grow to be choices as follows:
Grow to be Scale X-axis: 290%
Grow to be Scale Y-axis: 290%
Grow to be Translate: X-axis: -50%
Grow to be Translate: Y-axis: 72%
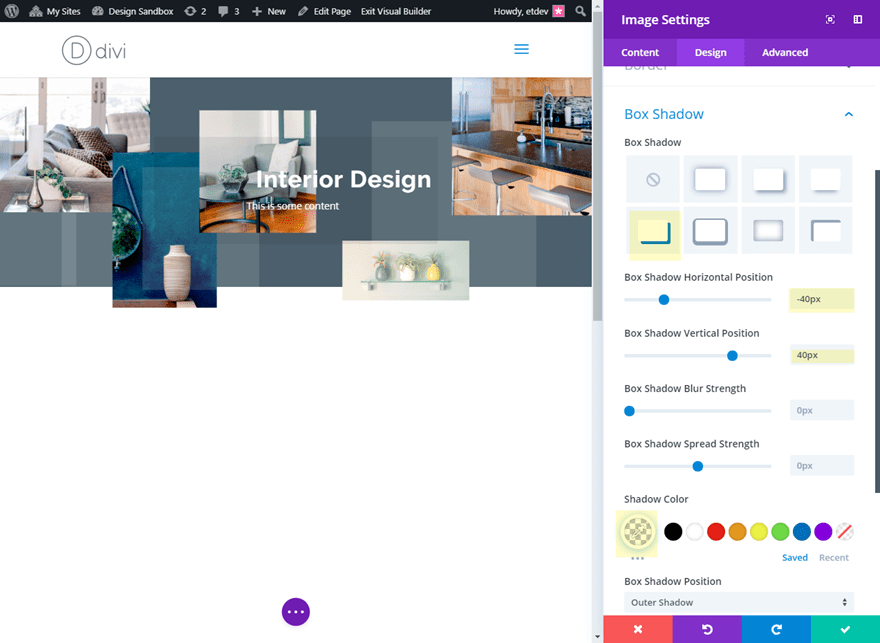
Including a Field Shadow to the Photographs
To create an extra design part, we will be able to upload a field shadow to our photographs. To do that, turn on grid mode and use the multiselect characteristic to make a choice the entire symbol modules. Then open the settings of one of the most symbol modules to deploy the part settings modal.
Then replace the next:
Field Shadow: see screenshot
Field Shadow Horizontal Place: -40px
Field Shadow Vertical Place: 40px
Shadow Colour: rgba(255,255,255,0.13)
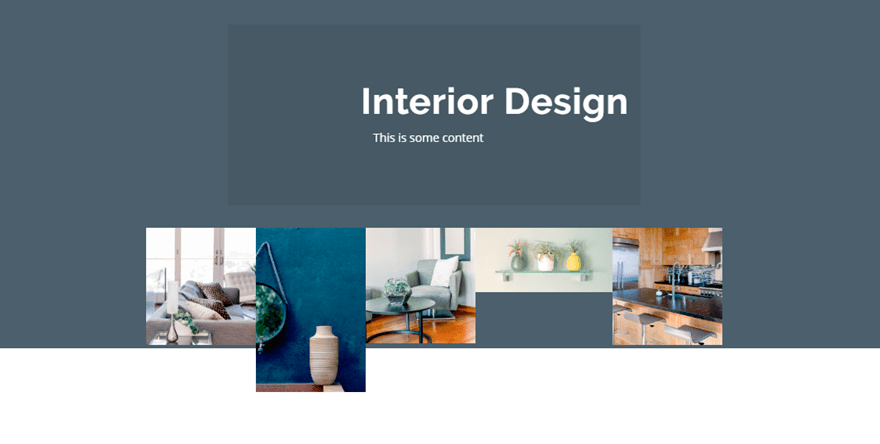
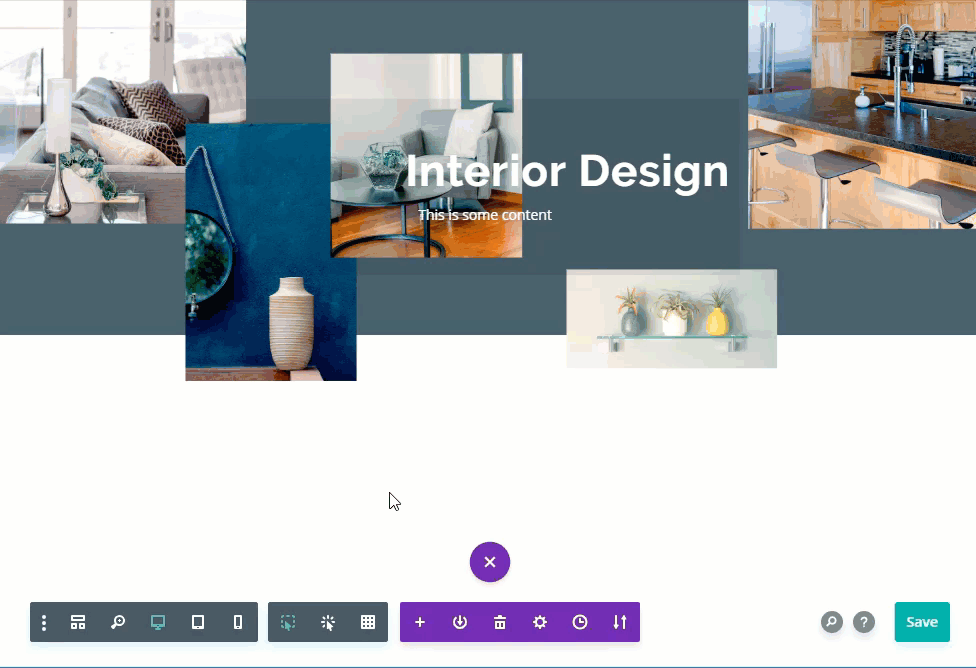
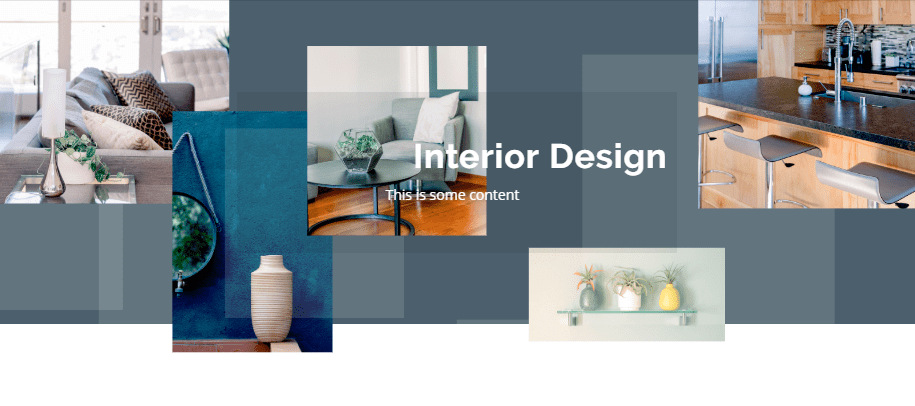
Ultimate Consequence
This is the general results of the design.
Desktop
Pill
Telephone
Ultimate Ideas
Those instance designs must supply you are going to some inspiration for tips on how to taste and place photographs in your web page in techniques you will have by no means idea imaginable outdoor of a photograph enhancing instrument. While you learn to correctly customise your structure, Divi’s grow to be choices can place photographs in distinctive and summary puts. Expectantly, this may occasionally come in useful in your subsequent venture.
I stay up for listening to from you within the feedback.
Cheers!
The submit How to Style and Position Images in Abstract Places in Divi seemed first on Elegant Themes Blog.
WordPress Web Design