
Have you ever ever clicked on a picture on a web site anticipating it to zoom in, most effective to know it doesn’t? It’s a small factor, however it may be unusually irritating to your guests.
When other people can click on to extend a picture—whether or not it’s a product picture, a weblog symbol, or a part of a portfolio—they generally tend to stick to your web site longer and have interaction extra.
I’ve arrange this selection on a number of WordPress websites, and it’s all the time a handy guide a rough win.
On this information, I’ll display you 3 easy tactics to permit customers to click on to extend pictures to your WordPress web site. You don’t want any coding abilities, and each and every approach most effective takes a couple of mins to arrange.
Contents
- 1 Why Magnify Photographs Upon Click on in WordPress?
- 2 Manner 1: The use of the Default WordPress Characteristic (Easy)
- 3 Manner 2: The use of a Lightbox Plugin (Extra Customization)
- 4 Manner 3: The use of a Gallery Plugin (Absolute best for More than one Photographs)
- 5 FAQs About Enlarging Photographs in WordPress
- 6 Bonus Sources: Organize & Toughen Your WordPress Photographs
Why Magnify Photographs Upon Click on in WordPress?
Letting guests click on to extend pictures to your WordPress web site is helping them see essential main points up shut.
It’s a easy improve that provides a elegant, skilled really feel, particularly for portfolios, actual property listings, and images galleries.
Plus, it may be to hand for on-line retail outlets the place consumers need to glance intently at your merchandise sooner than deciding to shop for them.
WordPress features a fundamental “Magnify on click on” function by means of default. It opens the picture correct at the web page, with none background dimming or visible impact.
This works high quality for easy blogs or inner pages, however it appears to be like slightly undeniable and doesn’t be offering a lot keep watch over.
If you need one thing that appears extra fashionable and polished, then a picture lightbox plugin is a better option.
As an alternative of merely increasing the picture, it opens in a swish overlay that dims the background and assists in keeping the viewer targeted. You additionally get extra keep watch over over how the picture appears to be like and purposes.
Sooner than I display you those other strategies, there’s yet another factor to remember: symbol high quality. When somebody clicks to extend a photograph, they be expecting a transparent, high-resolution model. However huge symbol information can decelerate your web page.
That’s the place symbol optimization is available in. Via compressing your pictures with out decreasing their visual high quality, you’ll be able to stay record sizes small and your web page speedy.
This implies you’ll be able to use pictures with huge dimensions (like 1500px large) that glance nice when enlarged, with out hurting efficiency.
For lend a hand with that, take a look at our information on tips on how to optimize pictures for the internet.
On this article, I’ll proportion 3 other strategies that may extend your WordPress pictures once they’re clicked, together with some lightbox choices.
You’ll be able to use the fast hyperlinks underneath to leap to the process you need to make use of:
- Manner 1: The use of the Default WordPress Characteristic (Easy)
- Manner 2: The use of a Lightbox Plugin (Extra Customization)
- Manner 3: The use of a Gallery Plugin (Absolute best for More than one Photographs)
- FAQs About Enlarging Photographs in WordPress
- Bonus Sources: Organize & Toughen Your WordPress Photographs
Manner 1: The use of the Default WordPress Characteristic (Easy)
After trying out alternative ways to extend pictures, I’ve discovered that WordPress’s integrated function is best for easy wishes.
I’ve used this technique when developing documentation or writing technical articles. It’s particularly helpful when you want readers to look small main points in screenshots or read about particular portions of a picture extra intently.
The principle problem is that it isn’t a real lightbox. It merely enlarges the picture, and you’ll be able to’t customise the glance or upload cool results.
Step 1: Upload Your Symbol within the WordPress Editor
First, you want to create or open the put up the place you need so as to add the clickable symbol.
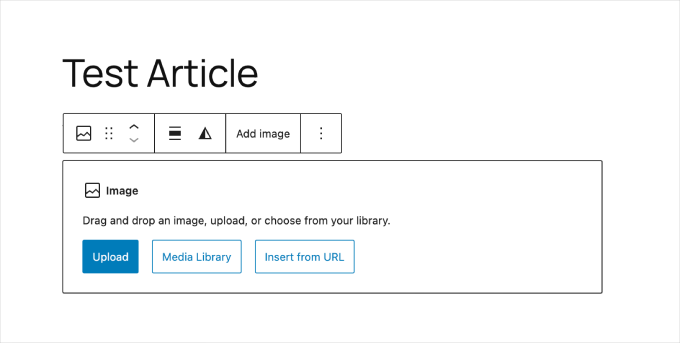
Then, within the block editor, click on the (+) icon so as to add a brand new block and make a selection ‘Symbol’ from the block choices. If you do, you’ll see buttons for including a picture in 3 alternative ways: Add, Media Library, or Insert from URL.
At WPBeginner, we all the time use the ‘Media Library’ choice. This makes certain that the name and alt textual content we upload to the picture are to be had if we reuse it in different articles.
I counsel keeping off ‘Insert from URL’. It hotlinks to a picture on every other web site, because of this the image may damage to your web page if the unique is ever got rid of.
Step 2: Set Up the ‘Magnify on Click on’ Possibility
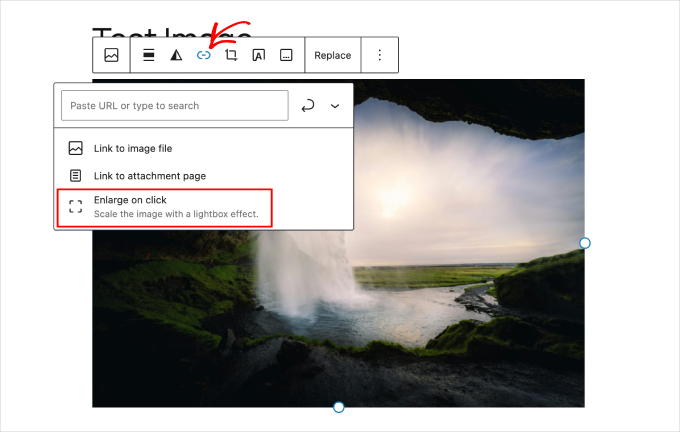
After including your symbol to the put up or web page, you’ll be able to click on on it to show the picture settings.
With the picture decided on, click on the ‘Insert hyperlink’ icon within the block toolbar. Within the settings that seem, merely toggle at the choice categorized ‘Magnify on click on’.
Step 3: Configure Symbol Settings
Now that you simply’ve enabled the click-to-enlarge function, it’s possible you’ll need to customise the unique symbol’s settings to verify the most productive show high quality inside of your put up or web page.
Make a selection your symbol after which test the block settings panel at the correct facet of your display.
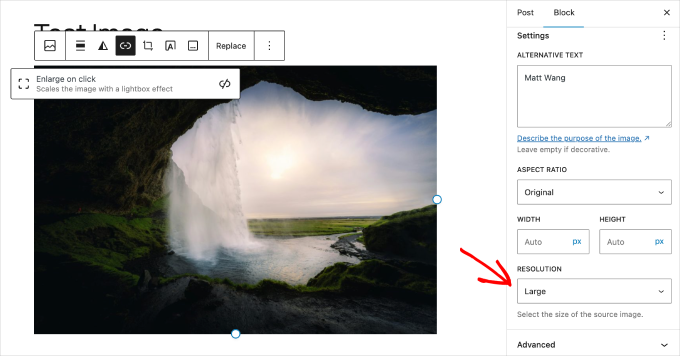
You’ll be able to keep watch over how the picture appears to be like at the web page by means of adjusting the picture’s dimensions. Alternatively, that is simply the show dimension.
When a customer clicks the picture, they’ll see the unique, full-resolution symbol you uploaded on your Media Library. So, make sure to add a high quality symbol no less than 1500 pixels large.
Step 4: Preview Your Symbol and Submit Your Content material
Sooner than you submit your put up or web page with the ‘extend on click on’ symbol choice enabled, you’ll need to preview it to verify it’s running.
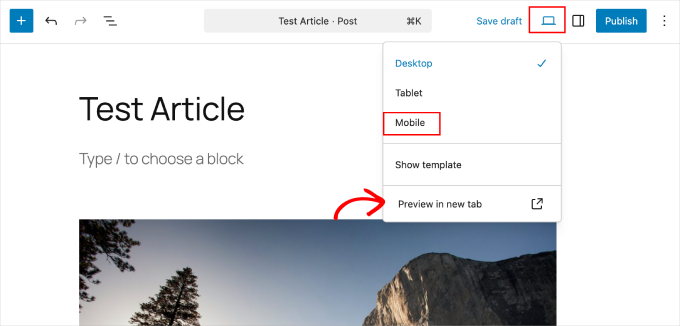
To do that, click on at the View button within the higher right-hand nook of your editor and make a selection ‘Preview in new tab.’
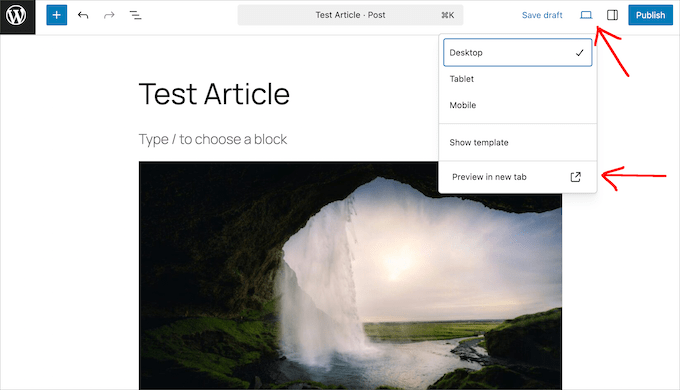
I like to recommend you take a look at it in each and every view choice, particularly ‘Cell’, since many of us use smartphones at the moment.
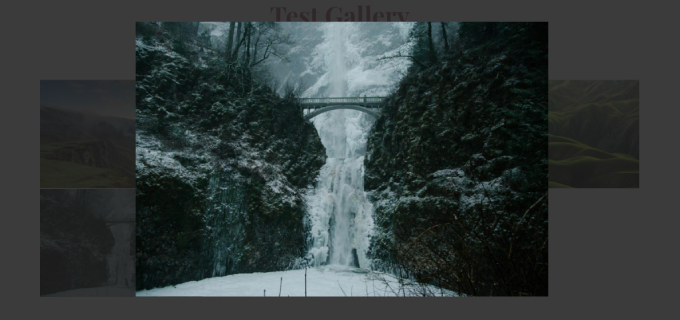
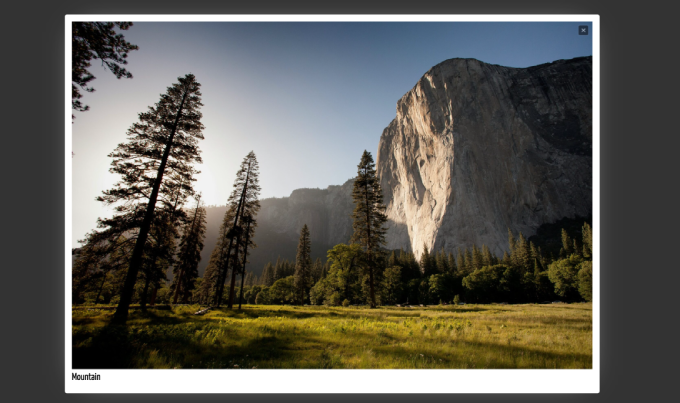
With the ‘extend on click on’ symbol impact implemented, it must amplify at the similar web page, as observed within the instance underneath. How a lot it expands relies on the scale of the unique symbol you uploaded.
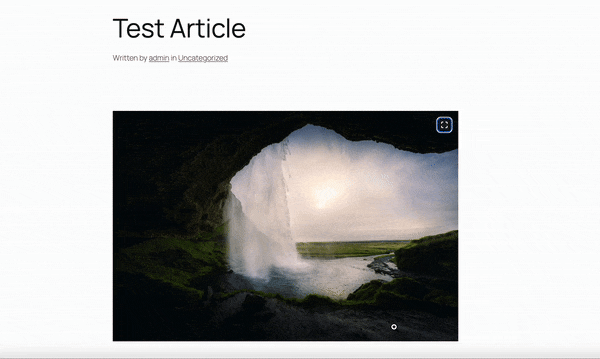
Merely click on at the symbol to go back it to standard dimension.
As soon as the entirety appears to be like just right, you’re in a position to submit or replace your content material.
Manner 2: The use of a Lightbox Plugin (Extra Customization)
In contrast to the elemental WordPress function, a lightbox plugin creates a a lot more skilled revel in. When a consumer clicks a picture, it opens in a trendy overlay that dims the remainder of the web page, making your symbol pop.
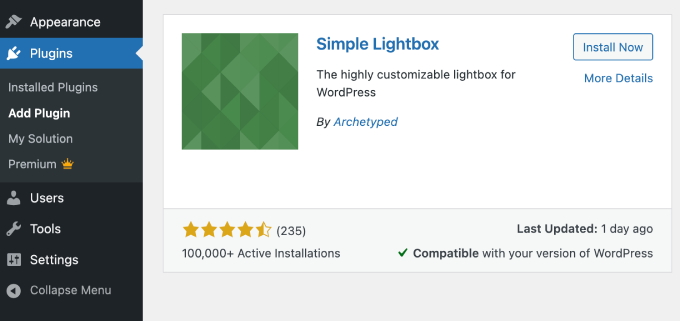
I like to recommend the loose Easy Lightbox plugin as it means that you can upload easy animations, customizable subject matters, and slideshow options that make your pictures stand out. It’s light-weight and works robotically with your entire pictures as soon as activated.
Step 1: Set up and Turn on the Easy Lightbox Plugin
To get began, you want to put in and turn on the Easy Lightbox plugin.
If you want lend a hand with this procedure, please learn our information on putting in WordPress plugins.
Step 2: Configure Easy Lightbox Settings
After activating the plugin, it’s a good suggestion to move to Look » Lightbox and assessment its settings to verify the entirety is ready up the way in which you need.
Right here, you’ll to find Lightbox settings that mean you can alter the place you need to permit lightbox capability. This may also be at the house web page, unmarried posts, pages, and extra.
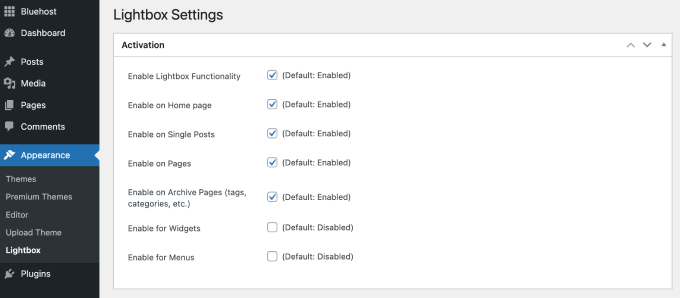
I most often stick to the default settings since they paintings nice for many web pages.
Subsequent, scroll all the way down to the ‘UI’ settings. Those keep watch over how the lightbox appears to be like and feels.
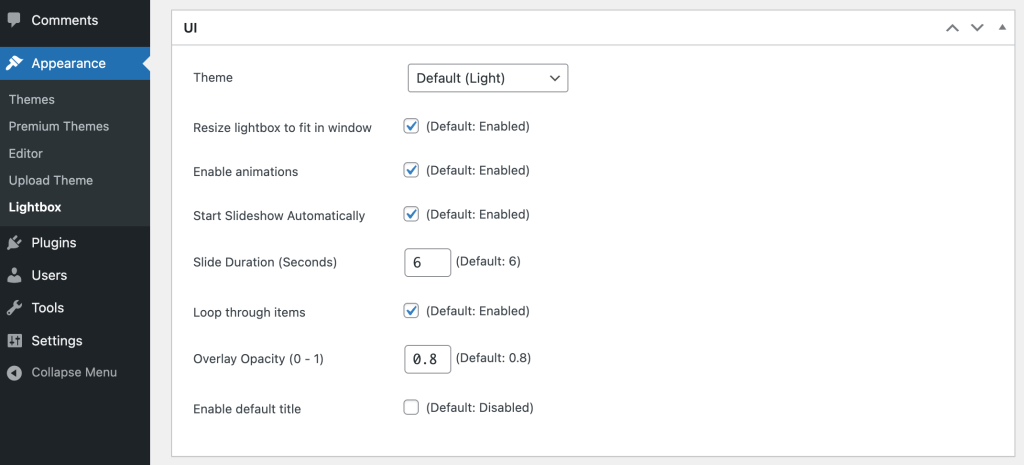
Via default, the plugin will use a mild theme, however you’ll be able to transfer to darkish mode in case you choose. You’ll be able to additionally alter the ‘Overlay Opacity,’ which controls how a lot the background web page is dimmed when a picture is open, and permit animations to modify how the picture opens.
Be happy to play with those settings, and don’t omit to click on ‘Save Adjustments’ whilst you’re executed.
Step 3: Upload Your Symbol and Permit Lightbox
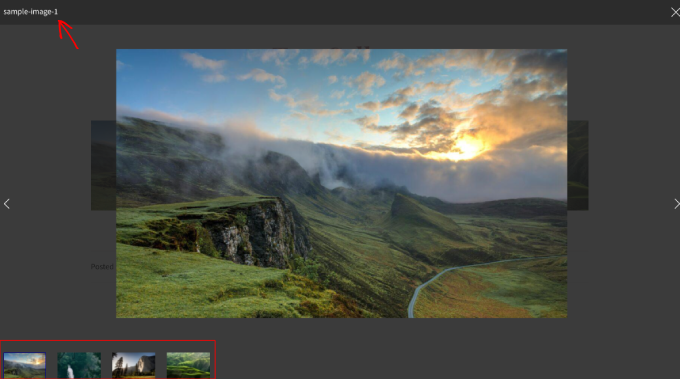
Now, let’s take a look at out the lightbox function. Merely create or open a put up and upload a picture.
As soon as your symbol is within the editor, you want so as to add a caption. The Easy Lightbox plugin will display this newsletter within the lightbox view.
Merely click on the picture and ensure the ‘Upload Caption’ icon is activated within the toolbar. This permits you to sort within the ‘Upload caption’ textual content box underneath your symbol.
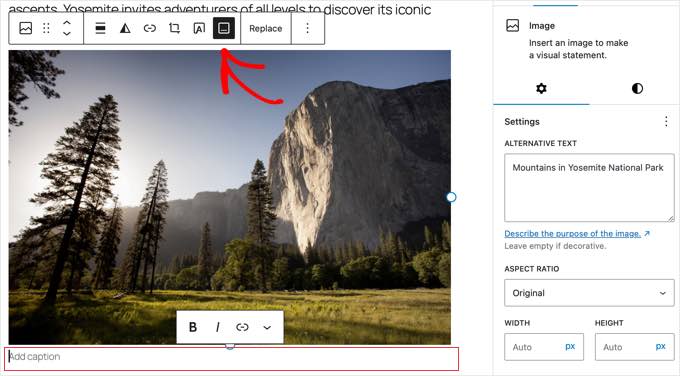
For those who don’t upload a caption, the plugin will robotically use the symbol name from the Media Library as a substitute. Alternatively, I to find that the usage of the caption box will provide you with extra direct keep watch over.
Subsequent, with the picture nonetheless decided on, you want to click on the ‘Hyperlink’ icon within the toolbar and make a selection the ‘Hyperlink to Symbol Report’ choice. It is a key step that permits the Easy Lightbox plugin to paintings.
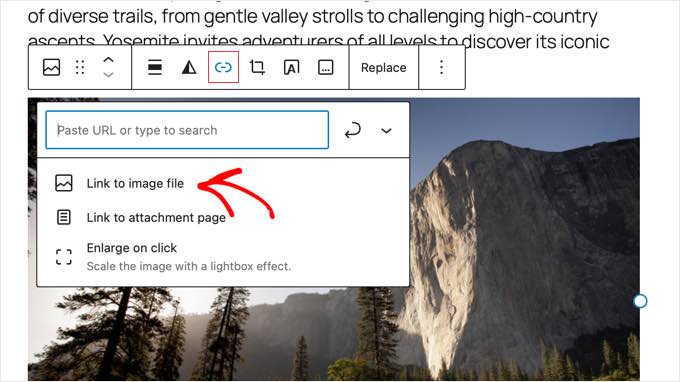
If you do that, the plugin will robotically hit upon the hyperlink and observe its lightbox impact when a customer clicks at the symbol.
💡 Word: You’ll be able to additionally use Easy Lightbox for a whole symbol gallery. Merely create a picture gallery the usage of the block editor after which observe the stairs described on this approach so as to add the lightbox function to each and every symbol.
Step 4: Take a look at Your Lightbox
Now, let’s take a look at the lightbox function by means of previewing the put up. Simply click on the View choice within the higher right-hand nook after which make a selection ‘Preview in new tab’.

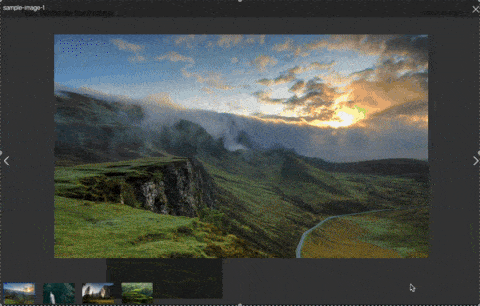
As soon as the brand new tab opens, pass forward and click on at the symbol. You must see it open easily in a lightbox overlay with a darkened background.
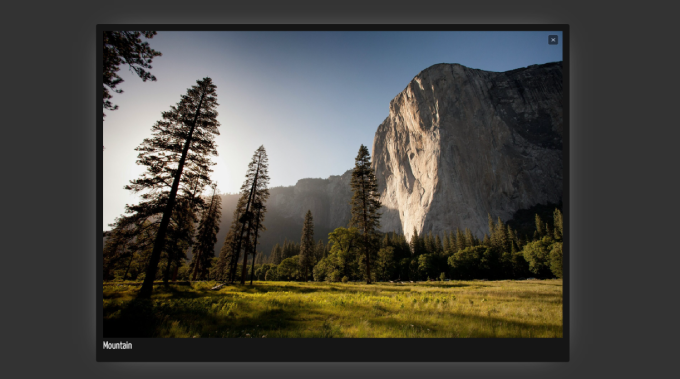
Relying to your design settings, you’re going to see the lightbox in a mild or darkish theme. Right here’s what the sunshine theme looks as if.
The sunshine theme surrounds the picture with a white body, which creates a just right distinction with the darkened background.
Now right here’s what the darkish theme looks as if.
You must additionally see your symbol caption within the backside left nook of the lightbox.
I additionally counsel previewing your lightbox on different display sizes to verify it appears to be like just right on each and every tool.
You’ll be able to do that by means of returning to the View choice and settling on the ‘Desktop’, ‘Pill’, or ‘Cell’ choice. After that, click on ‘Preview in new tab.’
Manner 3: The use of a Gallery Plugin (Absolute best for More than one Photographs)
For those who’ve ever sought after to focus on more than one pictures, then gallery plugins are palms down the most productive resolution. They lend a hand arrange and show off a sequence of pictures with symbol expansion capability with out slowing down your web page.
Those plugins can beef up consumer interplay by means of making your content material extra enticing and visually interesting, giving guests a unbroken revel in navigating via your pictures.
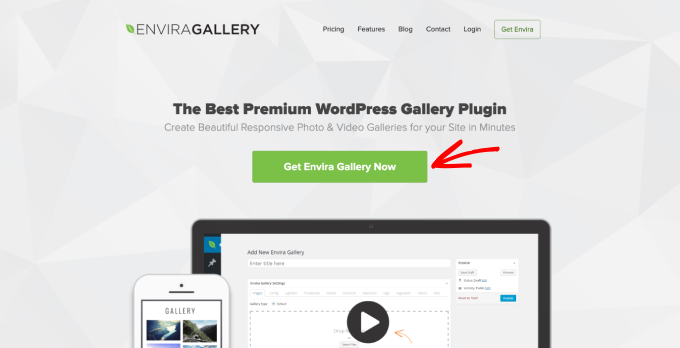
I like to recommend Envira Gallery as it lets you create gorgeous, customizable galleries that glance nice on any tool. It’s additionally tremendous beginner-friendly.
Plus, it comprises efficiency options like lazy loading to verify your galleries don’t decelerate your web page. And its AI software permit you to create customized pictures correct within WordPress.
Most significantly, the plugin provides a lightbox surroundings with a number of customization choices. This manner, you’ll be able to get all of the advantages of the click-to-enlarge symbol function, plus some cool settings for layouts, gallery transitions, and a lot more.
Wish to be informed extra about what the plugin can do? We’ve examined it broadly up to now, and you’ll be able to take a look at our complete Envira Gallery assessment for more info.
📝 Word: Whilst there’s a loose model of Envira Gallery to be had, I like to recommend the Professional model for complex options like SuperSize lightbox, Envira AI, and social sharing gear.
Now, let’s pass in the course of the steps of the usage of Envira Gallery so as to add a lightbox function.
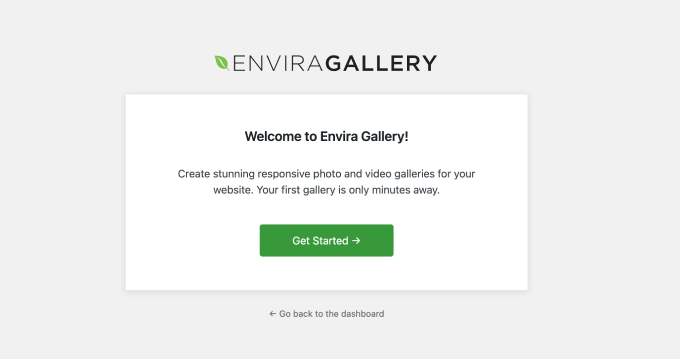
Step 1: Set up and Turn on the Envira Gallery Plugin
Let’s get started by means of putting in the plugin to your web page. On this educational, I’ll use the loose model, or you’ll be able to acquire a Professional license from the Envira Gallery web site.
Subsequent, set up and turn on it by means of following our information on tips on how to set up a WordPress plugin. If you’ve activated the plugin, Envira’s setup wizard must immediately release.
From right here, click on the ‘Get Began’ button to start out the method.
There are 5 steps on this wizard.
All through setup, you’ll be able to make a selection the class that describes your corporation or web site (like photographer or trade proprietor) and make a selection the gallery options you want to upload.
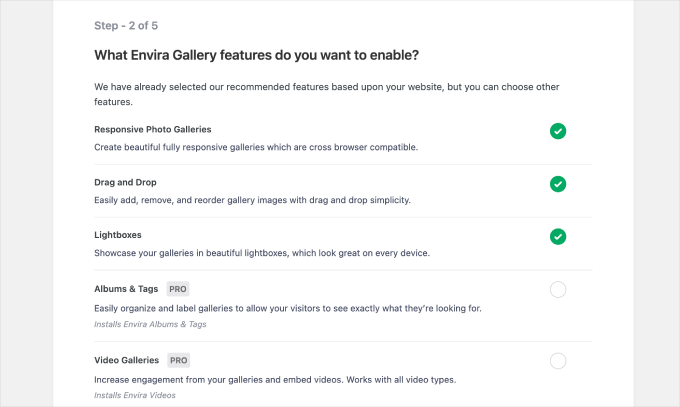
I like to recommend proceeding with the steered default settings as a result of they most often be offering the entirety you want. Alternatively, when you’ve got a Professional plan, you’ll be capable to turn on extra complex options.
Take into account that the ‘Lightboxes’ choice must already be checked, so this selection will robotically be enabled.
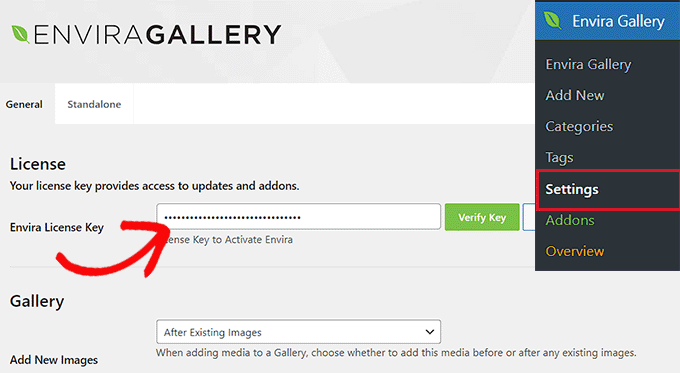
If you’ve completed the setup wizard, you’ll nonetheless wish to turn on your professional license in case you bought one. To do that, pass to Envira Gallery » Settings and paste your license key within the box. Then, hit ‘Test Key.’
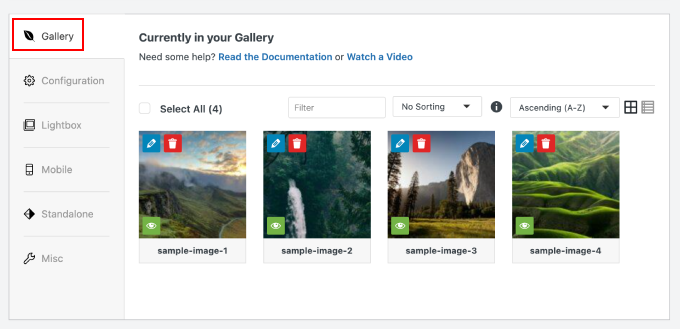
Step 2: Create a New Gallery
To create your first gallery, pass to Envira Gallery » Upload New on your dashboard.
First, upload a name on the best of the web page. I like to recommend giving it a transparent and descriptive identify in order that it’s more straightforward to stay monitor of later.
Subsequent, you’ll realize 3 choices for including pictures: Local Envira Gallery, Galleries from Different Assets, and Create with Envira AI.
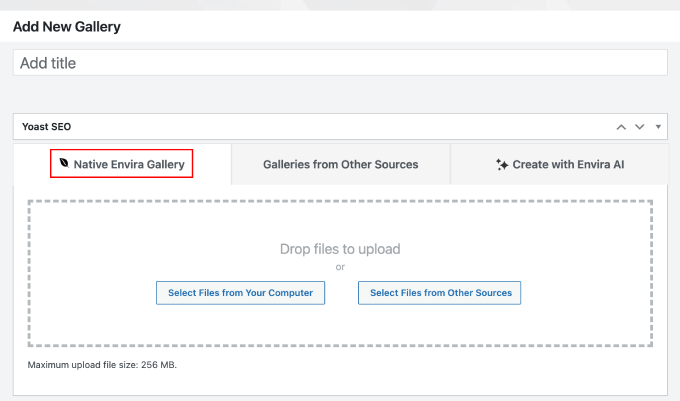
I like to recommend beginning with Local Envira Gallery. It’s the simplest method to add your individual pictures without delay.
💡 Want unique pictures speedy? You’ll be able to additionally create your individual customized pictures with Envira AI. This option makes it simple to generate distinctive pictures on call for. All you need to do is create a handy guide a rough symbol description, select from the effects, and upload it on your gallery in one click on.
Pass forward and make a selection the photographs you need to incorporate. You’ll be able to upload as many as you prefer whilst holding the utmost add record dimension underneath 256 MB.
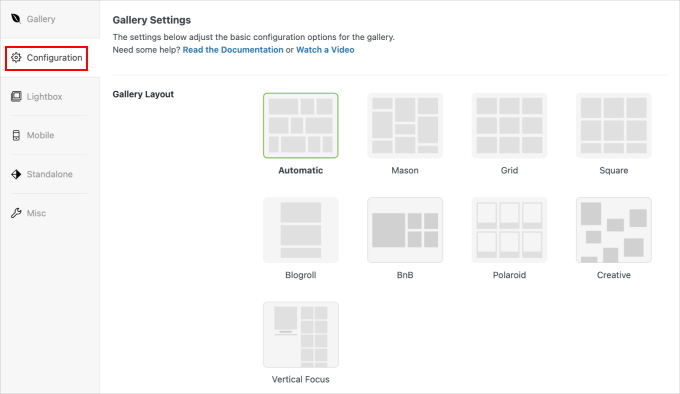
Step 3: Configure Gallery and Lightbox Choices
Within the menu to the left of your gallery pictures, you’ll to find Envira’s Gallery settings.
There are tabs for basic configuration, the lightbox function, cellular settings, and extra. Let’s undergo them one after the other.
You’ll be able to make a selection your gallery format on the best of the ‘Configuration’ segment. The grid format works nice for many galleries, however be happy to experiment with different choices.
Scrolling down, you’ll be able to to find extra gallery settings choices.
For instance, you’ll be able to permit lazy loading, set an automated format, and upload a gallery description.
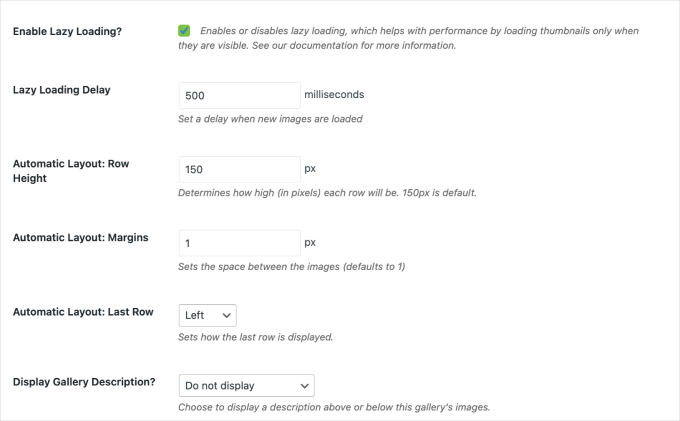
For instance, chances are you’ll need to set automated layouts to verify your gallery appears to be like neat and arranged with out further effort.
💡 Professional Tip: I like to recommend enabling the lazy loading choice. This option is helping your gallery load sooner by means of most effective loading pictures as guests scroll down the web page. It additionally is helping optimize your web page velocity.
Subsequent, transfer to the ‘Lightbox’ tab. Take into accout, this selection must be enabled by means of default, but when it isn’t, test the field subsequent to ‘Permit Lightbox?’
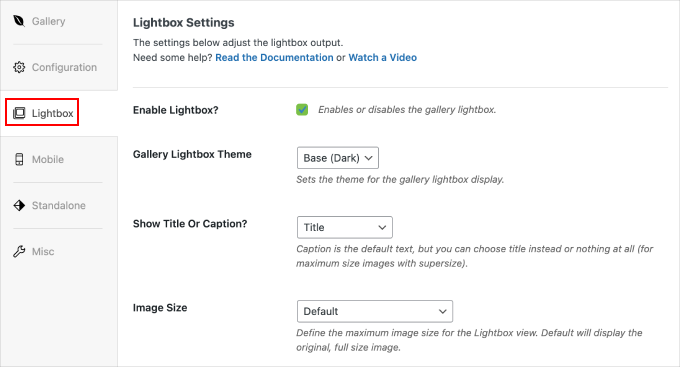
Then, you’ll need to choose a ‘Gallery Lightbox Theme.’ This will likely resolve the overall look of your lightbox.
Your choices is determined by your Envira plan and whether or not you have got the Gallery Subject matters addon. However you must be in a position to choose from a depressing, mild, or legacy theme.
Additional down within the ‘Lightbox’ tab, you’ll be able to make a selection how your enlarged pictures seem, make a selection transition results, and come to a decision whether or not to turn symbol titles.
Then, you’ll be able to to find extra lightbox settings on the second one part of the web page.
For instance, you’ll be able to permit navigation arrows, countless looping of pictures, or supersize mode. You’ll be able to even upload cool results for when other people open or shut your gallery, and once they click on via it.
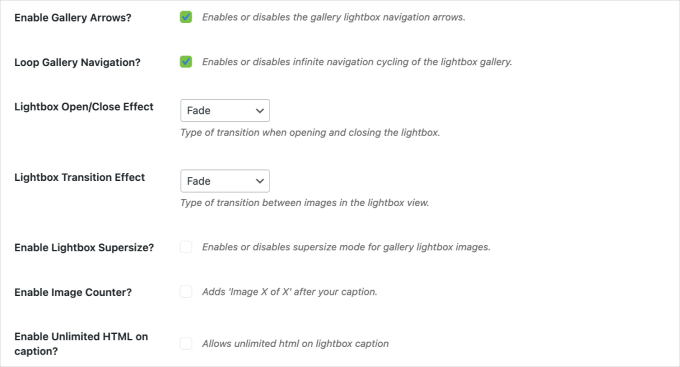
For example, for ‘Lightbox Transition Impact,’ you’ll be able to select a laugh choices like Fade, Slide, Round, Tube, Rotate, and extra.
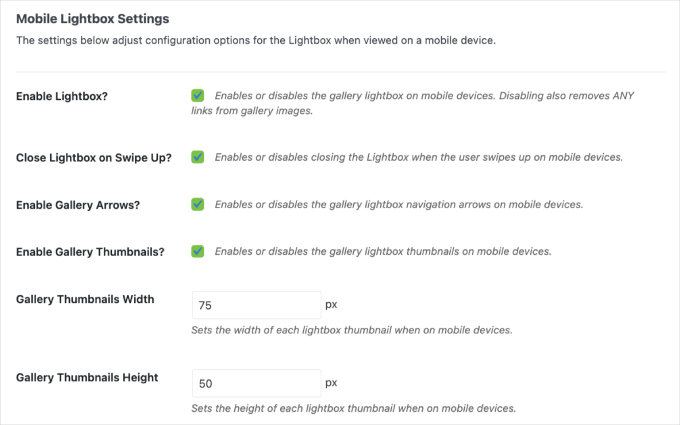
Subsequent, I like to recommend going to the ‘Cell’ tab to configure each the overall and lightbox settings.
Extra other people will almost definitely view your gallery on telephones than computer systems, so let’s be certain that it appears to be like nice on small displays too.

Along with activating the lightbox function for cellular gadgets, you’ll be able to customise mobile-specific settings akin to lightbox dimensions, row heights, and name or caption presentations.
As you scroll down, you’ll uncover extra choices, together with options like swipe-up to near, gallery navigation arrows, thumbnails, and extra.
In spite of everything, the ‘Standalone’ and ‘Misc’ tabs have a couple of further settings it’s possible you’ll to find helpful.
The ‘Standalone’ tab means that you can give your gallery its personal distinctive URL. It is a nice function if you wish to proportion an instantaneous hyperlink to a particular portfolio or picture album.
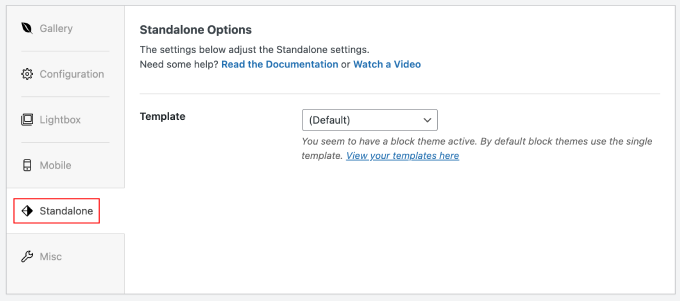
The ‘Misc’ tab comprises gear for uploading and exporting galleries, however you most likely received’t want the ones at this time.
For a deeper dive into a lot of these settings, you’ll be able to take a look at our detailed information on tips on how to create a picture gallery.
Step 4: Preview and Submit Your Gallery
To preview the gallery, click on the ‘Preview’ button at the correct facet of your gallery settings web page.
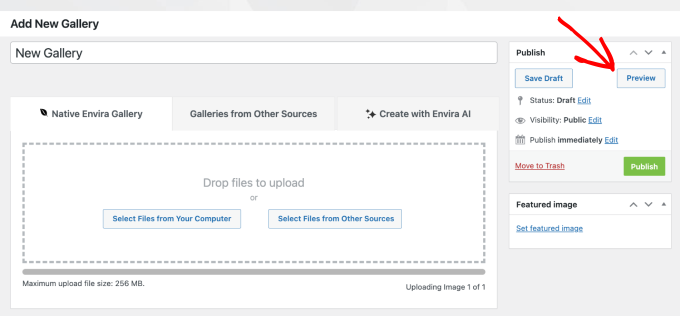
If you’re at the preview web page, click on via other pictures to check the lightbox impact.
Right here, you’ll be able to see the picture’s identify and the remainder of the gallery.
While you take a look at the gallery, the photographs must open easily. For those who selected a transition impact, it must be visual right here.
For instance, I set the Slide transition impact, and right here’s the way it appears to be like.
To navigate between pictures, click on at the navigation arrows on each side of the display or use the arrow keys to your keyboard.
At this level, it’s possible you’ll need to be certain that the navigation arrows paintings and that your symbol titles seem appropriately in case you enabled them.
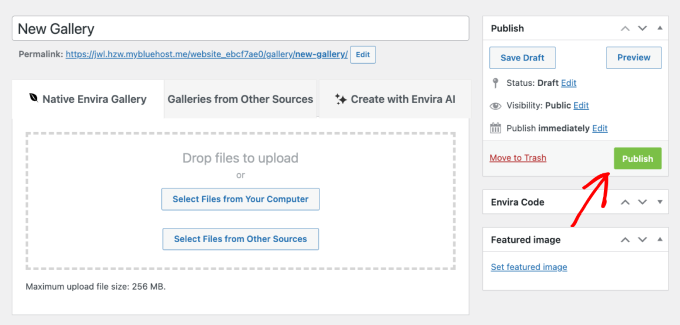
If you’re pleased with how the entirety works, you’ll be able to submit the gallery by means of clicking the ‘Submit’ button at the correct facet of your gallery settings.
After publishing the gallery, you’ll be able to transfer directly to including it on your web site.
Step 5: Upload the Gallery to Your Website online
Now that your gallery is operating completely, let’s upload it to a put up.
As soon as you might be within the WordPress editor, click on the (+) icon so as to add a brand new block and seek for ‘Envira Gallery.’ Then drag the block onto your put up.
Subsequent, whilst you click on the ‘Seek for a gallery’ drop-down, make a selection the gallery you simply created. It’ll be robotically inserted into the put up with all of the settings you simply configured.

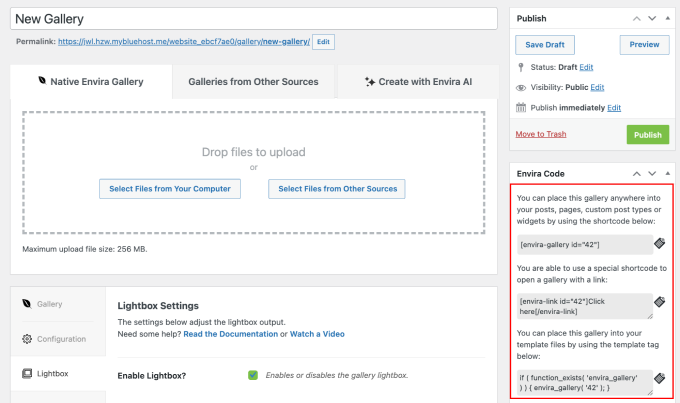
On the other hand, you’ll be able to upload your gallery to pages, widgets, or customized put up varieties by means of the usage of a shortcode.
You’ll be able to to find this shortcode at the correct sidebar of the gallery settings, just below the ‘Submit’ button.
For more info, see our information on tips on how to upload a shortcode in WordPress.
Sooner than clicking the ‘Submit’ button, make sure to preview your put up one ultimate time to verify the gallery seems precisely as you need it.
Your pictures must now be displayed in a certified grid format with a easy lightbox impact when clicked.
FAQs About Enlarging Photographs in WordPress
Listed below are some incessantly requested questions on enlarging pictures in WordPress.
How do I extend pictures in WordPress?
You’ll be able to use the default ‘Magnify on click on’ function in WordPress for fundamental capability. For extra keep watch over, you’ll be able to use plugins like Easy Lightbox or Envira Gallery.
How do I robotically resize pictures in WordPress?
WordPress robotically creates a number of smaller variations of your pictures whilst you add them. To have extra keep watch over over symbol dimensions or to optimize them for velocity, I like to recommend the usage of a picture optimization plugin like EWWW Symbol Optimizer.
Plugins like Envira Gallery additionally provide you with actual keep watch over over the show dimensions of pictures inside of your galleries.
How do I drive symbol dimension in WordPress?
You’ll be able to set customized symbol dimensions inside of your theme. For an in depth information, take a look at our educational on tips on how to create further symbol sizes in WordPress. It is a smart way to verify a constant format throughout your galleries and web page.
For those who choose the usage of a plugin, believe choices like Envira Gallery. It lets you specify precise symbol dimensions successfully, offering keep watch over over how your galleries glance. This may lend a hand take care of a elegant look throughout your web page.
Bonus Sources: Organize & Toughen Your WordPress Photographs
I am hoping this text helped you upload the ‘extend pictures upon click on’ function in WordPress. Listed below are some bonus guides in case you’re thinking about managing and making improvements to your WordPress pictures:
- How you can Optimize Photographs for Internet Efficiency With out Dropping High quality
- How you can Upload More than one Galleries in WordPress Posts and Pages
- Absolute best WordPress Symbol Compression Plugins When put next
- How you can Upload a Hero Symbol in WordPress (Works for All Subject matters)
- How you can Create Further Symbol Sizes in WordPress
- How you can Repair Commonplace Symbol Problems in WordPress (Final Information)
For those who appreciated this text, then please subscribe to our YouTube Channel for WordPress video tutorials. You’ll be able to additionally to find us on Twitter and Fb.
The put up How you can Magnify Photographs Upon Click on in WordPress (3 Simple Strategies) first seemed on WPBeginner.
WordPress Maintenance