
Should you already personal a Synology NAS, you could have more than likely puzzled whether or not it may do greater than backups, document garage, and media streaming.
It could possibly. Now not like a GPU server, and now not with large fashions, however neatly sufficient to run a small personal LLM at house.
On this information, I’m the use of the Synology DS925+ as the instance device. The stairs aren’t unique to that style, however this is a helpful reference level as it has a contemporary AMD Ryzen CPU, helps reminiscence upgrades, and sits within the vary the place native AI turns into reasonable in the event you stay your expectancies aligned with the {hardware}. In case you are utterly new to Ollama, Getting Began with Ollama is a superb significant other piece sooner than you put this up on a NAS.
The quick model is understated: sure, you’ll run Ollama on a DS925+ with Container Supervisor, and sure, this is a sensible approach to host a small personal AI style by yourself community.
Contents
- 1 Which Synology NAS Fashions and Ollama Fashions Are Appropriate?
- 2 Why Ollama?
- 3 Step 1: Set up Container Supervisor
- 4 Step 2: Obtain the Ollama Symbol
- 5 Step 3: Create the Container
- 6 Step 4: Easy methods to Communicate to the Engine
- 7 Easy methods to Inform if It Labored
- 8 Professional Tip: Including a “Face” (Internet UI)
- 9 What This Setup Is Just right For
- 10 Ultimate Ideas
Which Synology NAS Fashions and Ollama Fashions Are Appropriate?
{Hardware} is the deciding issue right here.
Ollama is most suitable to Synology NAS fashions that reinforce Container Supervisor and feature sufficient RAM for small fashions. In observe, many x86-based Plus fashions are essentially the most reasonable applicants.
- x86 CPU, now not entry-level ARM {hardware}
- 8GB RAM is a naked minimal for terribly small fashions
- 16GB or extra is a extra at ease place to begin
As for LLMs, keep reasonable. A CPU-only NAS is best for small fashions, now not 7B-and-up fashions except you’re ok with gradual responses.
Just right beginning alternatives:
llama3.2:1bfor terribly mild usellama3.2:3bas the most productive default for most of the peoplesmollm:1.7bif reminiscence is tightqwen2.5-coder:1.5borqwen2.5-coder:3bfor coding dutiesgemma3:1bif you wish to have any other compact style to check
If that is your first time working Ollama on a Synology NAS, get started with llama3.2:3b. It’s the cleanest stability between capacity and realism for this magnificence of {hardware}.
Why Ollama?
Ollama eliminates numerous the standard friction.
As a substitute of manually wiring in combination style information, runtime settings, and a serving layer, you get a more practical approach to obtain fashions and serve them thru a neighborhood endpoint.
That makes it a just right fit for a Synology field, the place the purpose is most often to get one thing helpful working with out turning the NAS right into a weekend-long infrastructure undertaking.
If you are expecting to stay a number of fashions round, this information on working LLMs from an exterior force with Ollama turns out to be useful for enthusiastic about garage sooner than your style library begins rising.
Step 1: Set up Container Supervisor
Synology does now not these days be offering Ollama as a one-click bundle in Package deal Middle, so the very best path is to run it in a container.
To put in Container Supervisor:
- Open Package deal Middle in DSM.
- Seek for Container Supervisor.
- Click on Set up.

Should you used Docker on older Synology techniques, this is similar basic thought. Container Supervisor is Synology’s more moderen interface for working containerized apps.
Step 2: Obtain the Ollama Symbol
As soon as Container Supervisor is put in:
- Open Container Supervisor.
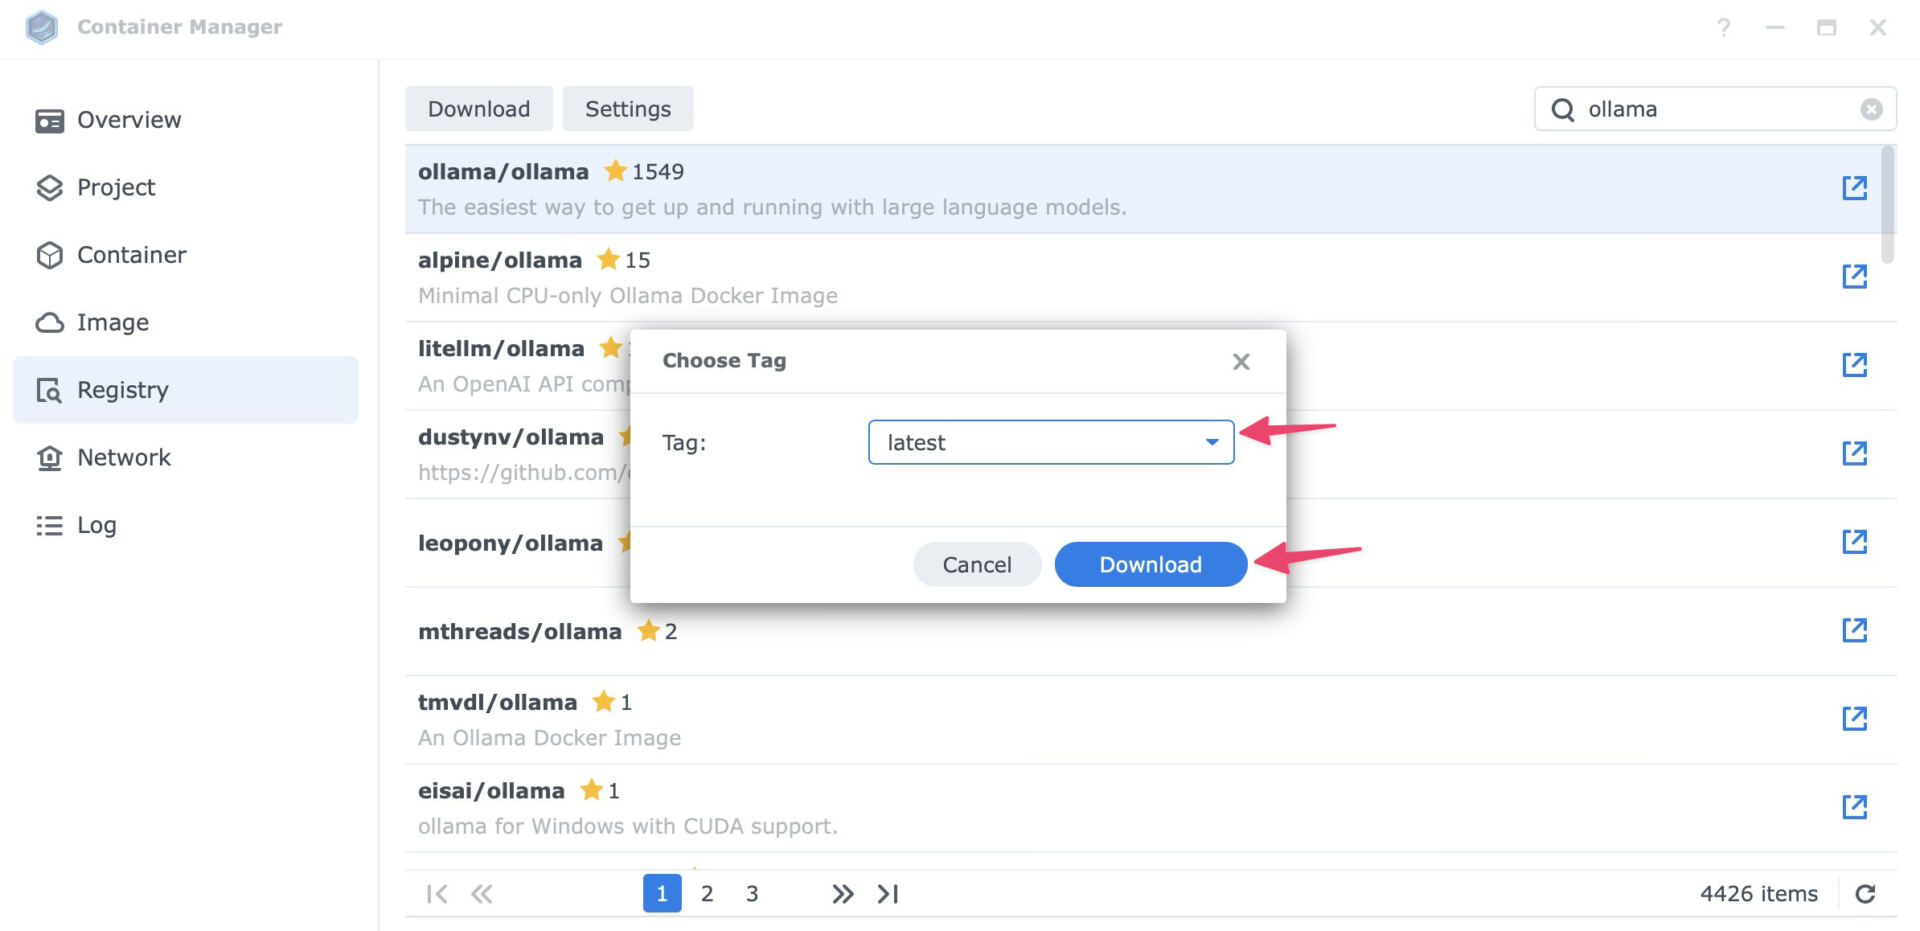
- Move to the Registry tab.
- Seek for
ollama. - Choose the legit symbol,
ollama/ollama. - Proper click on and select Obtain this symbol.

- When requested to make a choice a tag, choose newest and click on Obtain.


Step 3: Create the Container
As soon as the picture is downloaded, pass to the Symbol tab, choose ollama/ollama:newest, proper click on and choose Run.

Use those settings for the smoothest setup:
- Container identify:
ollama - Auto-restart: Permit it so the container begins once more in case your NAS reboots.
Then click on Subsequent to proceed.

Quantity Settings
Click on Upload Folder and create a folder equivalent to docker/ollama.

Then mount it to /root/.ollama.

This is essential. It helps to keep downloaded fashions in your garage quantity, so they don’t disappear whilst you replace or recreate the container.
Port Settings
Map 11434 at the NAS to 11434 within the container.

Atmosphere
Upload OLLAMA_ORIGINS with the worth *. This permits different apps, equivalent to Open WebUI, to speak to Ollama.

Take a look at to ensure the entirety is added as it should be, then click on Subsequent, then Completed.
Step 4: Easy methods to Communicate to the Engine
As soon as the container is working, Ollama is simply the engine. To obtain your first style and get started the use of it:
- Move to the Container tab in Container Supervisor.
- Choose the
ollamacontainer, proper click on and select Main points.
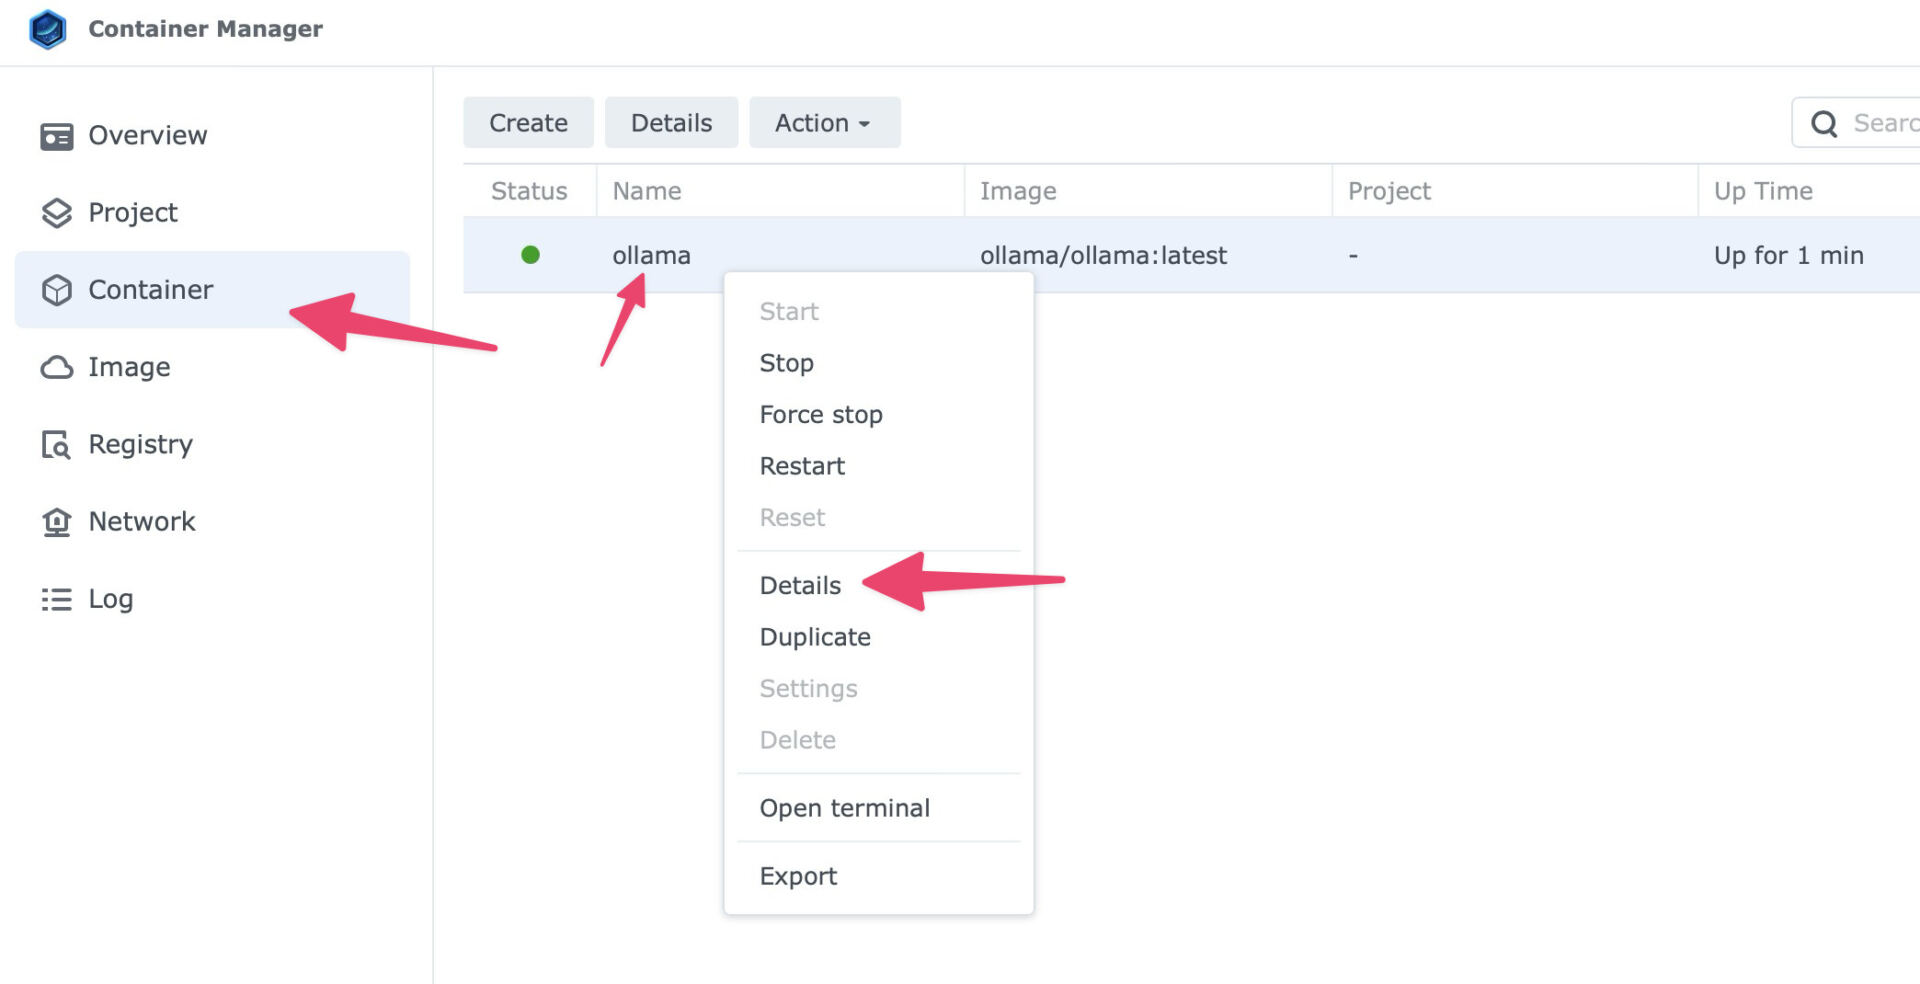
- Click on the Motion dropdown at the best proper, then choose Open terminal.

- Click on the small arrow beside Create, then select Release with command.
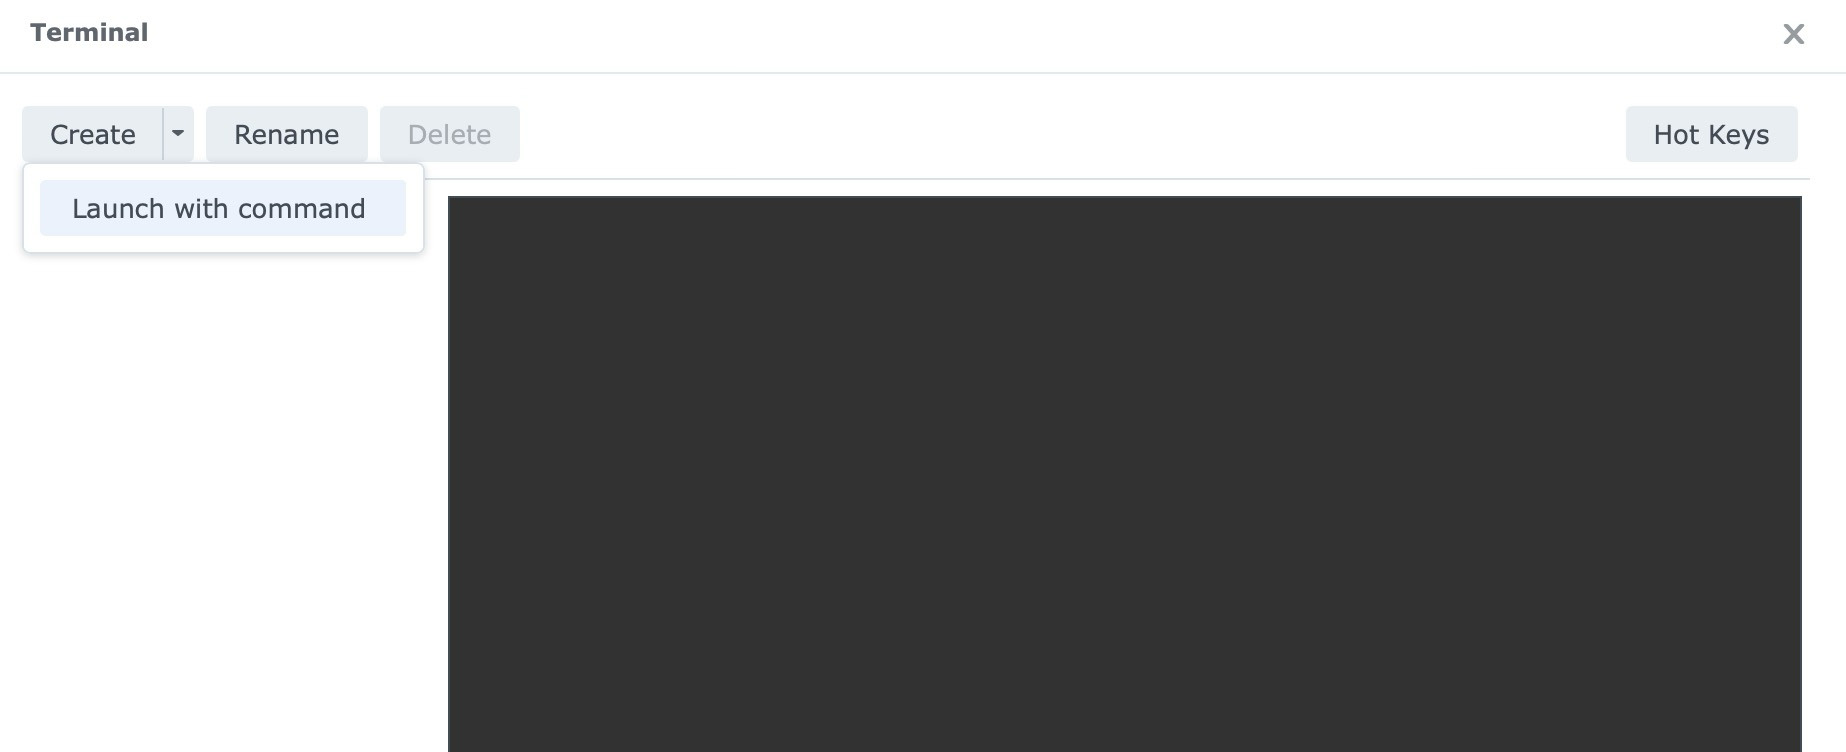
- Kind
shand press Input.
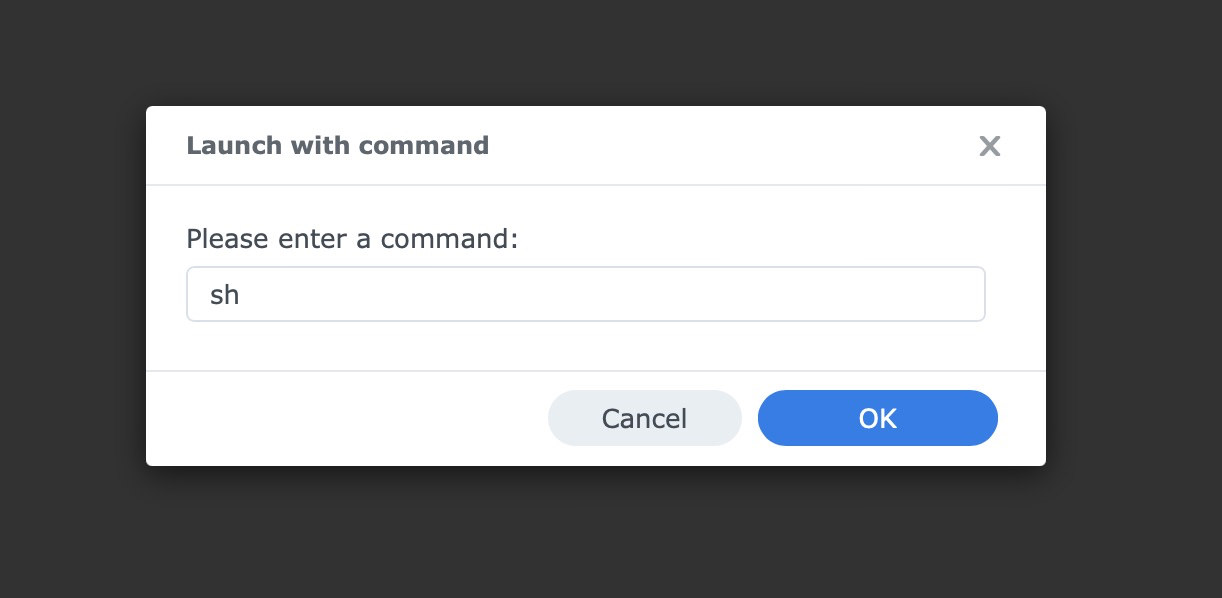


Choose sh from the left tab. Within the terminal window that opens, run:

ollama run llama3.2:3b
This downloads the 3-billion-parameter Llama 3.2 style, kind of 2GB in measurement, and allows you to get started chatting at once in that very same terminal window.
Easy methods to Inform if It Labored
If the style finishes downloading and also you get an interactive suggested, the setup is operating.
Take a look at one thing easy:
Write a brief clarification of what a NAS does.

You’ll additionally take a look at whether or not the carrier is reachable from any other instrument in your community thru port 11434, which many Ollama-compatible apps and entrance ends use. After you have the fundamentals working, those vision-enabled Ollama experiments are a pleasing subsequent step if you wish to do greater than undeniable textual content chat.
Professional Tip: Including a “Face” (Internet UI)
After you have Ollama working because the engine, maximum customers then return to the Registry and seek for openwebui/open-webui.

While you run that container and level it in your NAS IP on port 11434, you get a blank ChatGPT-like interface on your browser.
What This Setup Is Just right For
On a DS925+, this setup is sensible for:
- personal suggested checking out
- light-weight native chat
- experimenting with small fashions
- connecting self-hosted entrance ends to a neighborhood Ollama endpoint
- fundamental code or automation experiments with compact coding fashions
It’s much less fitted to:
- huge fashions
- speedy multi-user workloads
- heavy reasoning jobs that get pleasure from GPU acceleration
- any setup the place you are expecting cloud-level pace from NAS {hardware}
That’s the framing to bear in mind. The DS925+ isn’t a substitute for a devoted AI rig. This can be a sensible approach to run a small personal style on {hardware} it’s possible you’ll already personal.
Ultimate Ideas
Working Ollama on a Synology NAS is a sensible approach to experiment with native AI on {hardware} it’s possible you’ll already personal.
In case your NAS helps Container Supervisor, has an x86 CPU, and has sufficient RAM for small fashions, the setup is simple sufficient for any person already at ease the use of DSM.
Get started with llama3.2:3b or any other small style from the checklist above. As soon as that works, you’ll experiment from there with out turning your NAS right into a science undertaking.
The put up Easy methods to Set up Ollama on a Synology NAS gave the impression first on Hongkiat.
WordPress Website Development Source: https://www.hongkiat.com/blog/install-ollama-on-synology-nas/