
Designing a geometrical grid format in your web page can also be extremely gorgeous. One among my favourite geometric design part is a hexagon. Hexagons can be utilized to design well-balanced and harmonious grid layouts (suppose bee hive). However the design can include demanding situations. You’ve gotten create shapes to function backgrounds in your content material. Then it’s a must to suit your content material within the form. Then it’s a must to ensure the ones shapes are spaced accurately on other display screen sizes. However don’t concern. It’s now not as exhausting as you suppose.
As for growing the ones geometric shapes, there are methods to perform this the usage of some advance customized CSS, however I feel the most simple method is to create a picture. Then you’ll use the ability of Divi for the remaining.
On this educational, I’m going to turn you the way simple it’s to create a hexagon form symbol to design a geometrical grid format with Divi.
Let’s get began!
Contents
Sneak Peek
Here’s a peek on the geometric grid design we can construct on this educational.

What You Want
- A Picture Editor (I’ll be the usage of Comic strip) to create hexagon symbol. Or for now, you’ll simply drag this symbol on your desktop and use it.

- Divi Theme (Put in and Lively)
Developing the Hexagon Background Symbol
To construct the hexagon background symbol, I’ll be the usage of the picture editor Comic strip (for Mac simplest). On the other hand, this must be a very easy form to create on any choice of picture editors in the market (like Photoshop, Illustrator, or Gimp).
In the event you don’t wish to hassle with this a part of the academic, you’ll at all times simply drag this symbol on your desktop for now. This can be a darkish semi-transparent hexagon symbol that are meant to paintings with plenty of designs making an allowance for it’ll permit the background colours at the back of it to turn thru.
Here’s create the picture in cartoon. First, click on the insert icon on the best proper. Then hover over the form possibility and choose the hexagon form.

Now grasp down the shift key and click on (and grasp) at the canvas and drag your mouse to create the form then let pass of your mouse. Preserving down shift lets you create completely sq. dimensions in your form. Now replace the houses of your form in the fitting sidebar as follows:
Dimension: 360 width, 360 peak
Aspects: 6
Fill colour: 000000 hex, 0 R, 0 G, 0 B, 30 A (mainly this can be a black colour with 30% opacity)
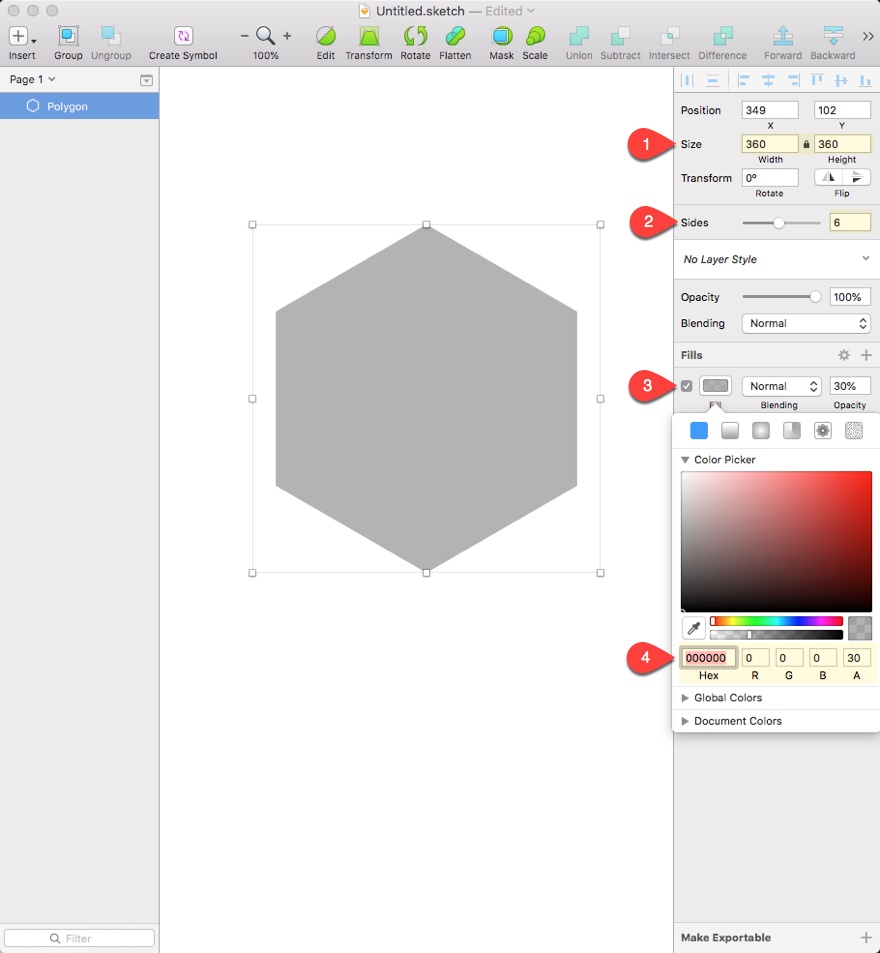
Then export your symbol as a png and import it on your WordPress Media Library for later.
Developing the First Phase with 3 Columns
This design may have 3 sections stack on best of one another, each and every with a row that holds our differing column buildings. The primary segment may have our 3 column construction, the second one segment may have two columns, and the 0.33 may have just one column.
To create the primary segment, create a brand new web page and deploy the visible builder to construct a brand new format from scratch. A brand new common segment might be created for you and the visible builder will instructed you to select your column construction in your segment. Select the 3 column construction (one-third one-third one-third).

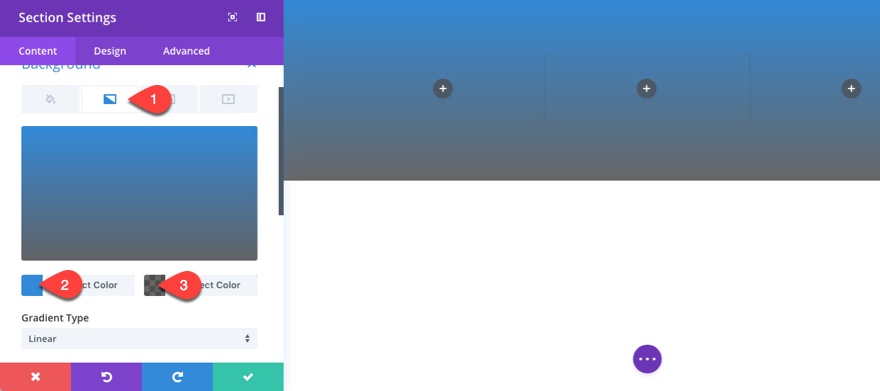
Now earlier than we commence modifying our row and including our modules, let’s give our segment a background colour gradients by means of updating the segment settings with the next:
Background Gradient Left Colour: #2b87da
Background Gradient Proper Colour: rgba(0,0,0,0.6)
Customise the Row Settings and Upload Hexagon Photographs to Your Column Backgrounds
With a view to succeed in the design we’re searching for, we want to upload our background symbol to each and every column of our 3 column row. So, for each and every column, upload the hexagon symbol (must be 360px by means of 360px) to each and every column. Then set the background symbol measurement to “exact measurement” and the background symbol repeat to “no repeat”.
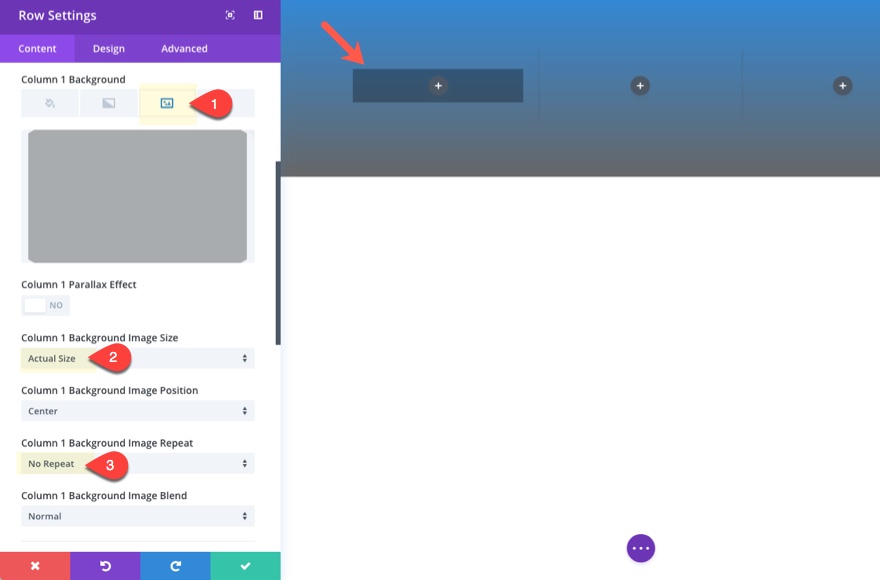
Make certain and do that for column 1, 2, and three background pictures.
Subsequent we want to customise our row settings to create the spacing we want for our hexagon background pictures to turn accurately in each and every column. This spacing will even assist to stay issues responsive and maximize horizontal area on cellular.
Replace the row settings as follows:
Use Customized Width: YES
Unit: %
Customized Width: 100%
Use Customized Gutter Width: YES
Gutter Width: 2
Equalize Column Heights: YES
Customized Padding (desktop): 0px Best, 0px Backside, 10% Left, 10% Proper
Customized Padding (pill): 0% Left, 0% Proper

Save your row settings for now.
Including Your Blurb Modules to Every Column
Upload a brand new blurb module on your first column and replace the blurb settings as follows:
Content material: “Your content material is going right here. Edit or take away this newsletter inline or within the module Content material settings.” (stay this quick since you simplest have a restricted quantity of area inside of your hexagon symbol)
Use Icon: Sure
Make a selection Icon (any individual you need clearly)
Then replace the design settings as follows:
Icon Colour: #66d1ff
Icon Font Dimension: 66px
Textual content Orientation: Middle
Textual content Colour: Gentle
Width: 360px (the similar width of your hexagon background symbol)
Module Alignment: heart
Customized Padding: 85px Best, 85px Backside, 10% Left, 10% Proper

You will need to upload the content material you need displayed in entrance of your hexagon first in order that you presently regulate the spacing of your blurb module to show the background symbol totally. Realize I added a best and backside padding of 85px. That is simply sufficient to reveal the hexagon background, even if adjusting the browser to cellular tool sizes.
After you save out your blurb module, pass forward a replica and paste it to column 2 and three so that every one 3 blurbs are provide.
Now we’ve got effectively added hexagon backgrounds to our first row of blurbs.
Developing the 2d Phase with Two Columns
To create our 2d segment, pass forward and replica the primary segment then replace the segment settings with the next background colour: rgba(0,0,0,0.6) and delete the prevailing gradient.
Then Exchange the column construction of your row to 2 columns and delete the additional module within the backside proper column.

Replace the row settings as follows:
Gutter Width: 3
Customized Margin (desktop): -145px Best
Customized Margin (pill): -70px Best
Customized Padding (desktop): 24% Left, 24% Proper

I added extra padding to the left and proper to place the hexagon backgrounds between the blurbs within the segment above (24% padding on each and every aspect will get us beautiful shut). I additionally modified the gutter width again to a few to accomodate for the lowered column area because of extra row padding. Then I used a -145px margin to tug the row up a little bit.
As you’ll see the grid format is coming in combination.
Developing the 3rd Phase with One Column
For the ultimate segment, pass forward a replica the segment segment. Then pass to the primary segment and replica the background gradient and paste it to the 0.33 segment you simply created. Then turn the gradients by means of clicking the “transfer” icon when soaring over the gradient colour preview. Then delete the background colour within the 0.33 segment.

Now replace the row column construction to at least one column and delete the additional blurb module.

With a view to get hexagon symbol background to scale with the opposite blurbs on smaller browser home windows, we want to upload extra padding to the row. This may make the hexagon symbol squish in combination a little bit to compare the others. That is only a small element to make the design extra constant.
Within the row settings, replace the customized padding as follows:
Customized Padding (desktop): 37% Left, 37% Proper

Now let’s take a look at the overall results of our geometric grid format.

Here’s what it seems like on cellular.

Here’s the way it adjusts to other display screen sizes.

Ultimate Concept
This educational presentations you create a geometrical grid by means of including a hexagon form background on your columns, however you’ll simply observe this similar methodology so as to add any background symbol you need. This opens up a large number of doorways for designing gorgeous layouts to set your web page aside.
I’m hoping you in finding it useful in your subsequent mission, and I look ahead to listening to from you within the feedback.
Cheers!
The submit How to Design a Geometric Grid Layout in Divi seemed first on Elegant Themes Blog.
WordPress Web Design