
The Divi Gallery Module lets you create gorgeous symbol gallery in a responsive grid structure. The gallery is thought of as responsive as a result of it’ll scale the scale of your photographs and regulate the choice of columns within the grid consistent with other browser widths.
Via default, the gallery module has 3 breakpoints (issues the place the manner adjustments at positive browser widths) that modify the choice of columns within the grid. It’ll show your symbol gallery in 4 columns on desktop after which destroy into 3 columns on pill, two columns on small pills (and massive telephones), and one column on telephones.
This default setup will typically paintings for many instances, however occasionally it’s possible you’ll want extra regulate over the choice of columns displayed on positive browser widths. That’s why on this instructional, I’m going to turn you easy methods to have whole over the choice of columns displayed within the Divi Gallery Module no longer just for desktop, but in addition for 3 further browser breakpoints.
Sneak Peek
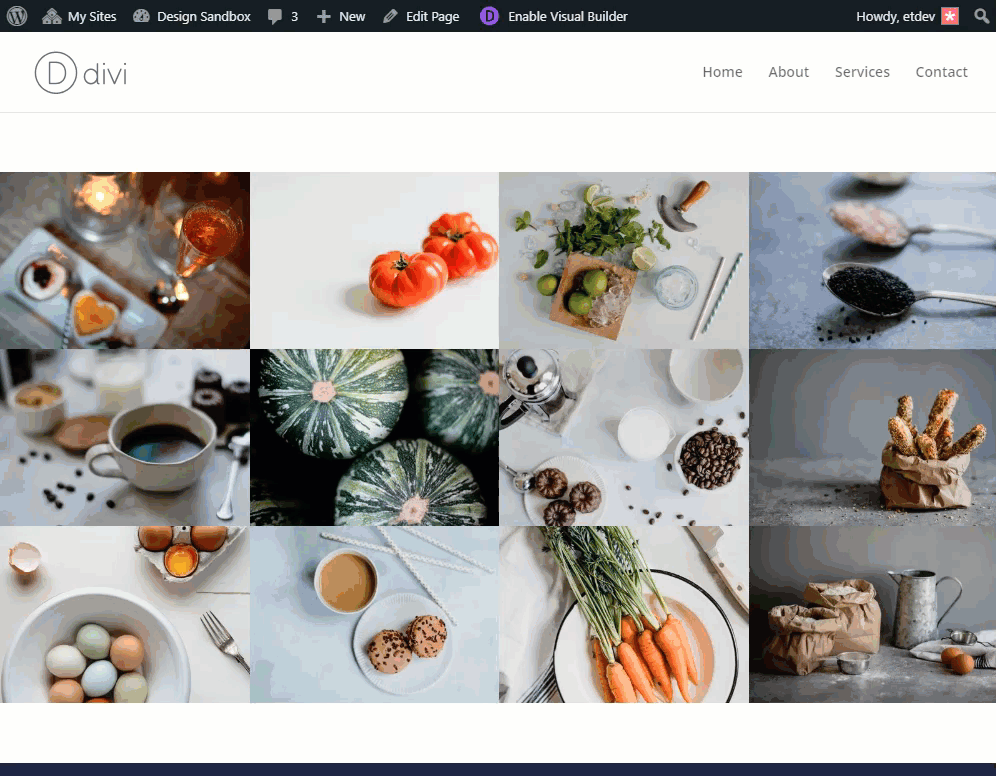
Here’s a sneak peek of what we will be able to construct on this instructional. Understand the other choice of columns for the picture gallery on other browser widths.

Making ready Your Design Parts
For this instructional, you are going to want the Divi theme put in and lively. You are going to additionally want 12 photographs added on your media library for use for the construction the picture gallery. For a Divi gallery module the usage of a grid structure, the scale of your photographs must be round 1500px by means of 800px for those who plan for your photographs opening up in lightbox show in order that it fills the display properly on maximum desktops.
Imposing the Customized Spacing for the Divi Gallery Module
Putting in place a New Web page
For starters, create a brand new web page, give your web page a name, and deploy the Divi Builder. Make a selection the choice “Construct from Scratch” after which put up your web page. Then click on to construct at the entrance finish.
Developing the Symbol Gallery
With the Divi Builder deployed, move forward and create a brand new common phase with a one-column row and upload a Divi Gallery Module to the row.

Divi will populate the gallery module with some photographs out of your media gallery in a grid show like the next:

Within the gallery module settings, click on the grey plus icon so as to add 12 photographs to the gallery.

Then replace the Divi Gallery Module settings as follows:
Photographs Quantity: 12
Display Identify and Caption: NO
Display Pagination: NO

Alter Row Settings to Make Fullwidth Gallery with out Gutter Width
To ensure that our new column construction to paintings, the principle factor we want to do is eliminate the default spacing/margin that exists between our photographs within the gallery. To do that, all we want to do is about the gutter width to one. Additionally, as an choice, you’ll be able to make the row fullwidth with a view to make the picture gallery span the entire width of the browser. To do that, open the row settings and replace the next:
Make This Row Fullwidth: YES
Gutter Width: 1

If you wish to upload spacing between the photographs within the gallery, I counsel the usage of this method since we want to stay the gutter width set to one.
How the Gallery Responds to Other Browser widths by means of Default
As discussed previous, by means of default, the Divi gallery module will show your symbol gallery in 4 columns on desktop after which destroy into 3 columns on pill, two columns on small pills (and massive telephones), and one column on telephones.
Then again, we’re going to alternate this as much as come with a customized choice of columns at positive breakpoints the usage of a couple of snippets of customized CSS.
Environment a particular choice of columns for all browser sizes
If you wish to alternate the choice of columns displayed within the gallery in order that the choice of columns remains the similar on all browser sizes, there may be easy approach to do that. This could be useful for those who best need to show your gallery in a single column, two columns, or 3 columns. That approach you’ll be able to have truly huge photographs on desktop and smaller photographs on cellular whilst holding the column quantity the similar. Having 4 or extra columns will most definitely no longer paintings because the photographs shall be too small for telephone shows.
Let’s say you wish to have to show 3 columns on all browser sizes. To do that, open your Divi gallery module settings and upload the next customized CSS to the Gallery Merchandise:
width: 33.33% !vital;
margin: 0 !vital;
transparent: none !vital;

Now your gallery will retain the 3 column construction on all browser sizes.
Should you sought after a 2 column structure for all browser sizes, all you wish to have to do is alternate the width belongings worth to 50%.
If you wish to have a 1 column structure, merely replace the width to 100%.
That’s it.
However, if you wish to acquire extra regulate of the choice of columns at positive breakpoints, learn on.
Converting the Choice of Columns for Explicit Breakpoints
If you wish to acquire whole regulate over the choice of columns displayed when the browser reaches positive breakpoints, we will be able to use a couple of snippets of CSS with media queries that concentrate on positive browser widths.
Upload the CSS Magnificence to the Divi Gallery Module
Earlier than we upload the customized CSS, first we want to give our gallery module a customized CSS Magnificence so we will be able to reference that exact magnificence in our CSS. This may increasingly make certain our css is best carried out to this particular gallery module. To do that, open the gallery module settings and upload the next CSS magnificence beneath the complex tab:
CSS Magnificence: col-width

Don’t put out of your mind to take out the customized css added to the Gallery Merchandise within the earlier phase of this newsletter for those who added it.
After that, save your settings.
Upload the Customized CSS to Web page Settings
With you CSS magnificence in position, you’re ready so as to add the Customized CSS. Open the web page settings by means of clicking the equipment icon within the web page settings bar on the backside of the web page (or you’ll be able to use the keyboard shortcut “o”).
Then upload the next Customized CSS beneath the complex tab.
/** Desktop **/
@media (min-width: 981px){
.col-width .et_pb_gallery_item {
width: 16.66% !vital; /*six columns*/
transparent: none !vital;
}
}

/** Pill **/
@media (max-width: 980px){
.col-width .et_pb_gallery_item {
width: 25% !vital; /*4 columns*/
transparent: none !vital;
}
}

/** Small Pill and Huge Telephone **/
@media (max-width: 767px){
.col-width .et_pb_gallery_item {
width: 33.33% !vital; /*3 columns*/
transparent: none !vital;
}
}

/** Telephone **/
@media (max-width: 479px){
.col-width .et_pb_gallery_item {
width: 50% !vital; /*two columns*/
transparent: none !vital;
}
}

This CSS will upload a customized choice of columns to positive breakpoints as follows:
Desktop: 6 columns
Pill: 4 columns
Small Pill and Huge Telephone: 3 columns
Telephone: 2 columns
Figuring out and Adjusting the CSS
Taking a look on the CSS, you are going to realize that it’s damaged up into 4 separate media queries. The highest media question provides styling to desktop browsers (browsers with a minimal width of 981px). The second one media question provides styling to browsers across the measurement of pill, and so forth.

Inside of each and every media question, crucial CSS to take no longer of is the width belongings. This designates the scale of each and every gallery merchandise and which additionally units the column width for the gallery.
For instance, the highest media question for desktop units the width of the gallery merchandise to 16.66%.

That is identical to one-sixth of the entire width of its container (or row). Subsequently, the gallery will show a six column structure on desktop.

To regulate the choice of columns for desktop, all you would have to do is alternate the width belongings to another worth. Here’s a checklist of width percentages that you’ll be able to check out.
12 columns: 8.33%
10 columns: 10%
8 columns: 12.5%
6 columns: 16.66%
5 columns: 20%
4 columns: 25%
3 columns: 33.33%
2 columns: 50%
1 column: 100%
Ultimate Consequence
This is the general consequence at the other browser widths.
Desktop (6 columns)

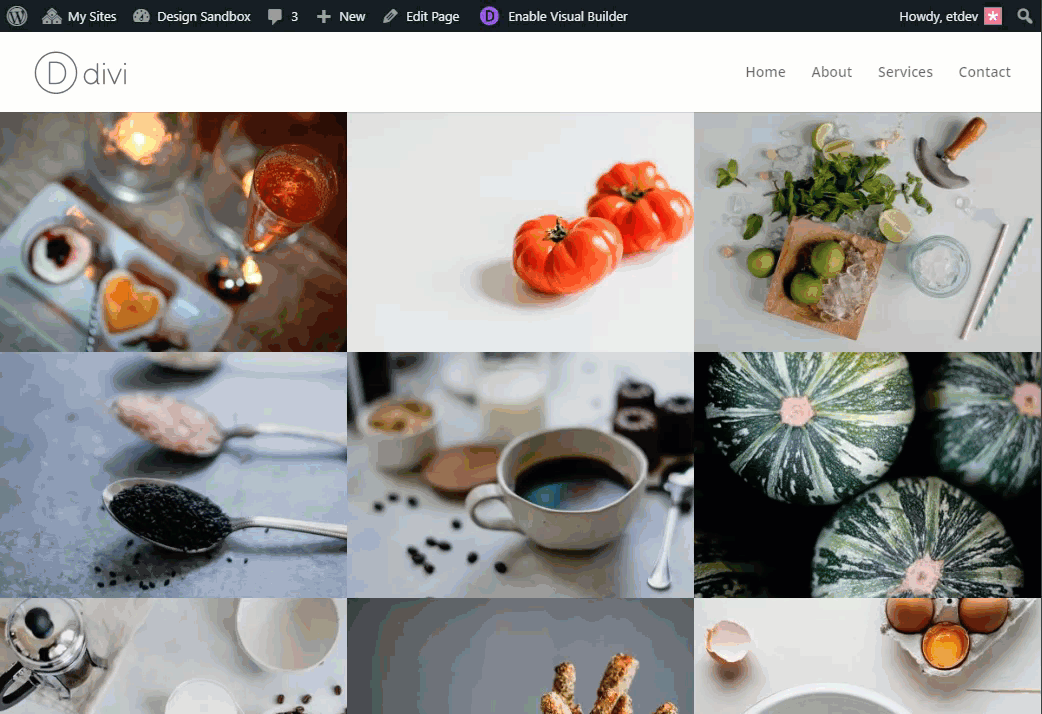
Pill (4 columns)

Small Pill and Huge Telephone (3 columns)

Telephone (2 columns)

Ultimate Ideas
I am hoping this instructional was once useful for the ones of you taking a look to realize extra regulate over the choice of columns that your gallery shows on positive gadgets or breakpoints. With this setup, you’ll be able to upload any choice of columns you need for any browser width to create gallery shows with the consumer in thoughts.
The breakpoints I used within the customized CSS are the ones breakpoints that Divi already makes use of. Be happy to take a look at our put up on easy methods to fine tune your designs with media queries for more info in this idea.
Till subsequent time, I look ahead to listening to from you within the feedback.
Cheers!
The put up Changing the Number of Columns in the Divi Gallery Module at Different Breakpoints seemed first on Elegant Themes Blog.
WordPress Web Design