
MongoDB is a NoSQL database that makes use of JSON-like paperwork with dynamic schemas. When running with databases, it’s all the time just right to have a contingency plan in case one in all your database servers fails. Sidebar, you’ll cut back the possibilities of that taking place by way of leveraging a nifty control instrument on your WordPress web site.
Because of this it’s helpful to have many copies of your records. It additionally reduces learn latencies. On the identical time, it could support the database’s scalability and availability. That is the place replication is available in. It’s outlined because the follow of synchronizing records throughout a couple of databases.
On this article, we’ll be diving into the quite a lot of salient facets of MongoDB replication, like its options, and mechanism, to call a couple of.
Contents
- 1 What Is Replication in MongoDB?
- 2 What Is a MongoDB Copy Set?
- 3 How Does Replication Paintings in MongoDB?
- 4 How To Create a MongoDB Copy Set
- 5 Dealing With Replication Lengthen
- 6 Troubleshooting MongoDB Copy Units
- 7 Making sure Safe Communications With Keyfile Authentication
- 8 Abstract
What Is Replication in MongoDB?
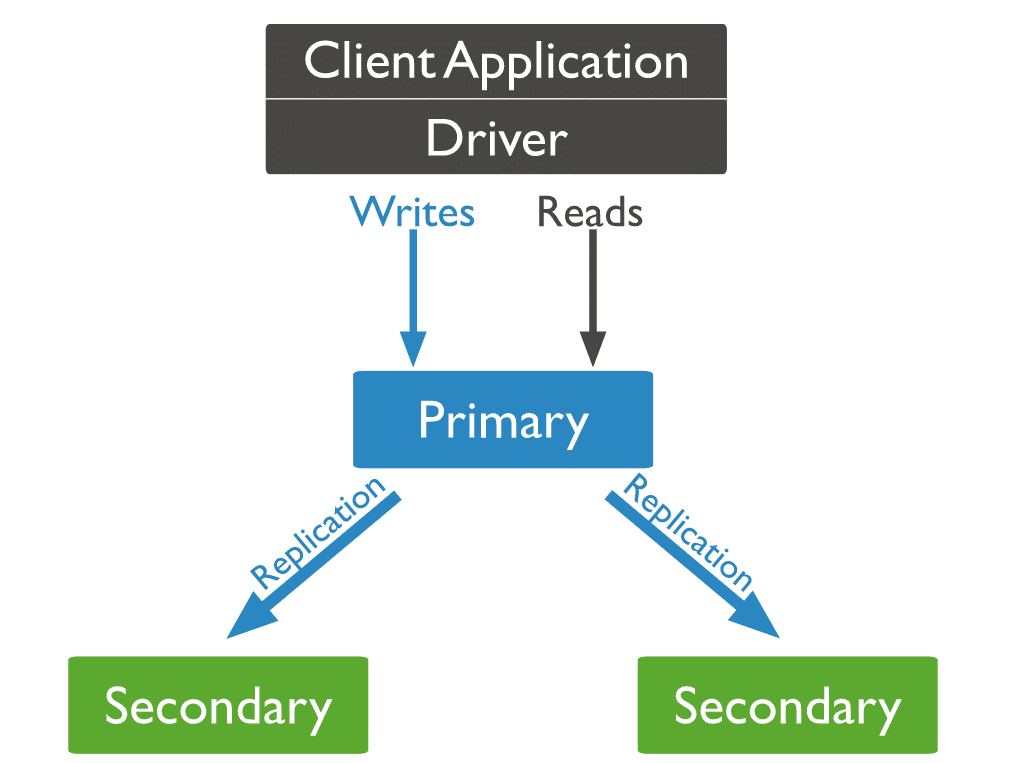
In MongoDB, reproduction units carry out replication. This can be a crew of servers keeping up the similar records set via replication. You’ll be able to even use MongoDB replication as part of load balancing. Right here, you’ll distribute the write and skim operations throughout all of the circumstances, in keeping with the use case.

What Is a MongoDB Copy Set?
Each and every example of MongoDB that’s a part of a given reproduction set is a member. Each and every reproduction set must have a number one member and a minimum of one secondary member.
The main member is the principle get right of entry to level for transactions with the reproduction set. It’s additionally the one member that may settle for write operations. Replication first copies the principle’s oplog (operations log). Subsequent, it repeats the logged adjustments at the secondaries’ respective datasets. Therefore, Each and every reproduction set can handiest have one number one member at a time. Quite a lot of primaries receiving write operations may cause records conflicts.
Most often, the programs handiest question the principle member for write and skim operations. You’ll be able to design your setup to learn from a number of of the secondary individuals. Asynchronous records switch may cause secondary nodes’ reads to serve previous records. Thus, such an association isn’t superb for each and every use case.
Copy Set Options
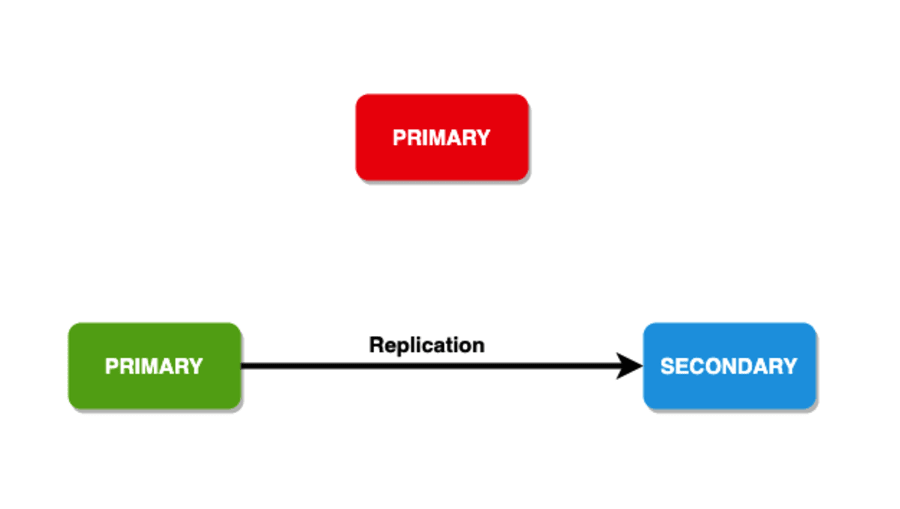
The automated failover mechanism units MongoDB’s reproduction units aside from its festival. Within the absence of a number one, an automatic election a number of the secondary nodes choices a brand new number one.
MongoDB Copy Set vs MongoDB Cluster
A MongoDB reproduction set will create quite a lot of copies of the similar records set around the reproduction set nodes. The main purpose of a reproduction set is to:
- Be offering a integrated backup resolution
- Build up records availability
A MongoDB cluster is a unique ball recreation altogether. It distributes the knowledge throughout many nodes via a shard key. This procedure will fragment the knowledge into many items referred to as shards. Subsequent, it copies every shard to another node. A cluster objectives to strengthen vast records units and high-throughput operations. It achieves it by way of horizontally scaling the workload.
Right here’s the adaptation between a reproduction set and a cluster, in layman’s phrases:
- A cluster distributes the workload. It additionally shops fragments of information(shards) throughout many servers.
- A reproduction set duplicates the knowledge set totally.
MongoDB lets you mix those functionalities by way of creating a sharded cluster. Right here, you’ll mirror each and every shard to a secondary server. This permits a shard to supply excessive redundancy and knowledge availability.
Keeping up and putting in place a reproduction set may also be technically taxing and time-consuming. And discovering the suitable web hosting provider? That’s a complete different headache. With such a lot of choices in the market, it’s simple to waste hours researching, as an alternative of establishing your corporation.
Let me provide you with a temporary a few instrument that does all of this and so a lot more so that you could return to crushing it together with your provider/product.
Kinsta’s Software Web hosting resolution, which is relied on by way of over 55,000 builders, you’ll rise up and operating with it in simply 3 easy steps. If that sounds too just right to be true, listed below are some extra advantages of the usage of Kinsta:
- Experience higher efficiency with Kinsta’s inner connections: Omit your struggles with shared databases. Transfer to devoted databases with inner connections that don’t have any question rely or row rely limits. Kinsta is quicker, extra safe, and gained’t invoice you for inner bandwidth/site visitors.
- A function set adapted for builders: Scale your utility at the powerful platform that helps Gmail, YouTube, and Google Seek. Leisure confident, you’re within the most secure palms right here.
- Experience unprecedented speeds with an information middle of your selection: Select the area that works right for you and your shoppers. With over 25 records facilities to choose between, Kinsta’s 275+ PoPs make certain most velocity and an international presence on your web site.
Check out Kinsta’s utility web hosting resolution totally free lately!
How Does Replication Paintings in MongoDB?
In MongoDB, you ship creator operations to the principle server (node). The main assigns the operations throughout secondary servers, replicating the knowledge.
3 Forms of MongoDB Nodes
Of the 3 sorts of MongoDB nodes, two have arise ahead of: number one and secondary nodes. The 3rd form of MongoDB node that turns out to be useful all over replication is an arbiter. The arbiter node doesn’t have a duplicate of the knowledge set and will’t grow to be a number one. Having stated that, the arbiter does participate in elections for the principle.
We’ve in the past discussed what occurs when the principle node is going down, however what if the secondary nodes bit the mud? In that state of affairs, the principle node turns into secondary and the database turns into unreachable.
Member Election
The elections can happen within the following situations:
- Initializing a reproduction set
- Lack of connectivity to the principle node (that may be detected by way of heartbeats)
- Upkeep of a reproduction set the usage of
rs.reconfigorstepDownstrategies - Including a brand new node to an current reproduction set
A reproduction set can possess as much as 50 individuals, however handiest 7 or fewer can vote in any election.
The common time ahead of a cluster elects a brand new number one shouldn’t transcend 12 seconds. The election set of rules will attempt to have the secondary with the very best precedence to be had. On the identical time, the individuals with a concern worth of 0 can’t grow to be primaries and don’t take part within the election.
The Write Fear
For sturdiness, write operations have a framework to duplicate the knowledge in a specified choice of nodes. You’ll be able to even be offering comments to the buyer with this. This framework is often referred to as the “write worry.” It has data-bearing individuals that want to recognize a write worry ahead of the operation returns as a hit. In most cases, the reproduction units have a worth of one as a write worry. Thus, handiest the principle must recognize the write ahead of returning the write worry acknowledgment.
You’ll be able to even building up the choice of individuals had to recognize the write operation. There’s no ceiling to the choice of individuals you’ll have. However, if the numbers are excessive, you wish to have to maintain excessive latency. It is because the buyer must stay up for acknowledgment from all of the individuals. Additionally, you’ll set the write worry of the “majority.”This calculates greater than part of the individuals after receiving their acknowledgment.
Learn Choice
For the learn operations, you’ll point out the learn choice that describes how the database directs the question to individuals of the reproduction set. In most cases, the principle node receives the learn operation however the consumer can point out a learn choice to ship the learn operations to secondary nodes. Listed below are the choices for the learn choice:
- primaryPreferred: Most often, the learn operations come from the principle node but when this isn’t to be had the knowledge is pulled from the secondary nodes.
- number one: All of the learn operations come from the principle node.
- secondary: All of the learn operations are finished by way of the secondary nodes.
- nearest: Right here, the learn requests are routed to the closest reachable node, which may also be detected by way of operating the
pingcommand. The result of studying operations can come from any member of the reproduction set, without reference to whether or not it’s the principle or the secondary. - secondaryPreferred: Right here, lots of the learn operations come from the secondary nodes, but when none of them is to be had, the knowledge is taken from the principle node.
Replication Set Information Synchronization
To handle up-to-date copies of the shared records set, secondary individuals of a reproduction set mirror or sync records from different individuals.
MongoDB leverages two types of records synchronization. Preliminary sync to populate new individuals with the total records set. Replication to execute ongoing adjustments to the entire records set.
Preliminary Sync
All through the preliminary synchronization, a secondary node runs the init sync command to synchronize all records from the principle node to some other secondary node that accommodates the newest records. Due to this fact, the secondary node persistently leverages the tailable cursor function to question the newest oplog entries inside the native.oplog.rs selection of the principle node and applies those operations inside those oplog entries.
From MongoDB 5.2, preliminary syncs may also be report reproduction founded or logical.
Logical Sync
While you execute a logical sync, MongoDB:
- Develops all assortment indexes because the paperwork are copied for every assortment.
- Duplicates all databases with the exception of for the native database.
mongodscans each and every assortment in all of the supply databases and inserts all records into its duplicates of those collections. - Executes all adjustments at the records set. Via leveraging the oplog from the supply, the
mongodupgrades its records set to depict the present state of the reproduction set. - Extracts newly added oplog data all over the knowledge reproduction. Be sure that the objective member has sufficient disk house inside the native database to tentatively retailer those oplog data at some stage in this knowledge reproduction degree.
When the preliminary sync is done, the member transitions from STARTUP2 to SECONDARY .
Report Replica-Primarily based Preliminary Sync
Proper off the bat, you’ll handiest execute this when you use MongoDB Undertaking. This procedure runs the preliminary sync by way of duplicating and shifting the recordsdata at the report machine. This sync means may well be sooner than logical preliminary sync in some circumstances. Remember, report copy-based preliminary sync would possibly result in misguided counts when you run the rely() means with no question predicate.
However, this technique has its justifiable share of boundaries as neatly:
- All through a report copy-based preliminary sync, you can’t write to the native database of the member this is being synced. You additionally can’t run a backup at the member this is being synced to or the member this is being synced from.
- When leveraging the encrypted garage engine, MongoDB makes use of the supply key to encrypt the vacation spot.
- You’ll be able to handiest run an preliminary sync from one given member at a time.
Replication
Secondary individuals mirror records persistently after the preliminary sync. Secondary individuals will reproduction the oplog from their sync from the supply and execute those operations in an asynchronous procedure.
Secondaries are in a position to robotically editing their sync from supply as wanted in keeping with the adjustments within the ping time and state of alternative individuals’ replication.
Streaming Replication
From MongoDB 4.4, sync from resources sends a continuing circulate of oplog entries to their syncing secondaries. Streaming replication reduces the replication lag in high-load and high-latency networks. It could possibly additionally:
- Diminish the danger of dropping write operations with
w:1because of number one failover. - Lower staleness for reads from secondaries.
- Cut back the latency on write operations with
w:“majority”andw:>1. In brief, any write worry that wishes looking forward to replication.
Multithreaded Replication
MongoDB used to jot down operations in batches via a couple of threads to support concurrency. MongoDB teams the batches by way of report identification whilst making use of every crew of operations with a unique thread.
MongoDB all the time executes write operations on a given report in its unique write order. This modified in MongoDB 4.0.
From MongoDB 4.0, learn operations that focused secondaries and are configured with a learn worry degree of “majority” or “native” will now learn from a WiredTiger snapshot of the knowledge if the learn happens on a secondary the place the replication batches are being carried out. Studying from a snapshot promises a constant view of the knowledge, and shall we the learn happen concurrently with the continued replication while not having a lock.
Due to this fact, secondary reads desiring those learn worry ranges now not want to stay up for replication batches to be carried out and may also be treated as they’re won.
How To Create a MongoDB Copy Set
As discussed in the past, MongoDB handles replication via reproduction units. Over the following couple of sections, we’ll spotlight a couple of strategies that you’ll use to create reproduction units on your use case.
Approach 1: Making a New MongoDB Copy Set on Ubuntu
Ahead of we get began, you’ll want to make certain that you’ve were given a minimum of 3 servers operating Ubuntu 20.04, with MongoDB put in on every server.
To arrange a reproduction set, it’s crucial to supply an deal with the place every reproduction set member may also be reached by way of others within the set. On this case, we stay 3 individuals within the set. Whilst we will use IP addresses, it’s now not really useful because the addresses may exchange impulsively. A greater choice may also be the usage of the logical DNS hostnames when configuring reproduction units.
We will do that by way of configuring the subdomain for every replication member. Whilst this may also be superb for a manufacturing setting, this segment will define easy methods to configure DNS answer by way of modifying every server’s respective hosts’ recordsdata. This report permits us to assign readable host names to numerical IP addresses. Thus, if in any tournament your IP deal with adjustments, all it’s important to do is replace the hosts’ recordsdata at the 3 servers somewhat than reconfigure the reproduction set by way of scratch!
Most commonly, hosts is saved within the /and so forth/ listing. Repeat the under instructions for every of your 3 servers:
sudo nano /and so forth/hostsWithin the above command, we’re the usage of nano as our textual content editor, then again, you’ll use any textual content editor that you simply favor. After the primary few strains which configure the localhost, upload an access for every member of the reproduction set. Those entries take the type of an IP deal with adopted by way of the human-readable call of your selection. Whilst you’ll call them no matter you’d like, you should definitely be descriptive so that you’d know to distinguish between every member. For this educational, we’ll be the usage of the under hostnames:
- mongo0.replset.member
- mongo1.replset.member
- mongo2.replset.member
The use of those hostnames, your /and so forth/hosts recordsdata would glance very similar to the next highlighted strains:
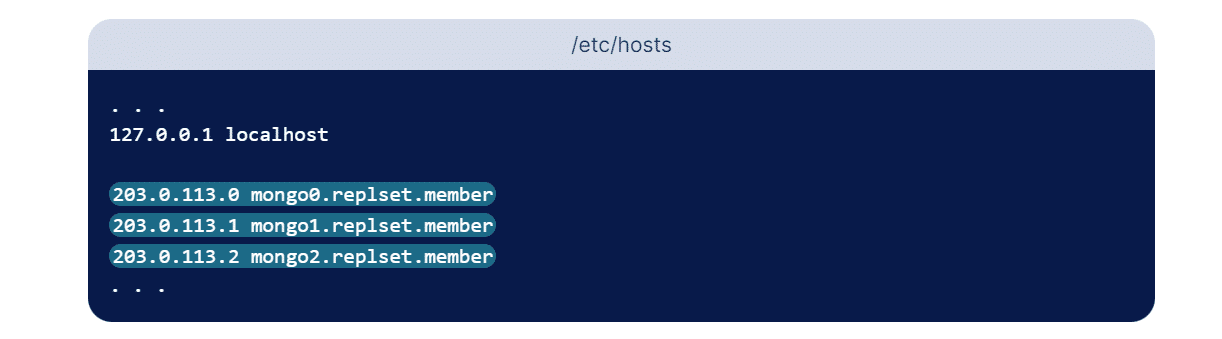
Save and shut the report.
After configuring the DNS answer for the reproduction set, we want to replace the firewall regulations so they can keep in touch with every different. Run the next ufw command on mongo0 to supply mongo1 get right of entry to to port 27017 on mongo0:
sudo ufw permit from mongo1_server_ip to any port 27017Rather than the mongo1_server_ip parameter, input your mongo1 server’s exact IP deal with. Additionally, when you’ve up to date the Mongo example in this server to make use of a non-default port, you should definitely exchange 27017 to replicate the port that your MongoDB example is the usage of.
Now upload some other firewall rule to offer mongo2 get right of entry to to the similar port:
sudo ufw permit from mongo2_server_ip to any port 27017Rather than the mongo2_server_ip parameter, input your mongo2 server’s exact IP deal with. Then, replace the firewall regulations on your different two servers. Run the next instructions at the mongo1 server, ensuring to modify the IP addresses instead of the server_ip parameter to replicate the ones of mongo0 and mongo2, respectively:
sudo ufw permit from mongo0_server_ip to any port 27017sudo ufw permit from mongo2_server_ip to any port 27017Finally, run those two instructions on mongo2. Once more, make sure that you input the proper IP addresses for every server:
sudo ufw permit from mongo0_server_ip to any port 27017sudo ufw permit from mongo1_server_ip to any port 27017The next move is to replace every MongoDB example’s configuration report to permit exterior connections. To permit this, you wish to have to switch the config report in every server to replicate the IP deal with and point out the reproduction set. Whilst you’ll use any most popular textual content editor, we’re the usage of the nano textual content editor as soon as once more. Let’s make the next adjustments in every mongod.conf report.
On mongo0:
# community interfaces
web:
port: 27017
bindIp: 127.0.0.1,mongo0.replset.member# reproduction set
replication:
replSetName: "rs0"
On mongo1:
# community interfaces
web:
port: 27017
bindIp: 127.0.0.1,mongo1.replset.member
replication:
replSetName: "rs0"
On mongo2:
# community interfaces
web:
port: 27017
bindIp: 127.0.0.1,mongo2.replset.member
replication:
replSetName: "rs0"sudo systemctl restart mongodWith this, you’ve enabled replication for every server’s MongoDB example.
You could now initialize the reproduction set by way of the usage of the rs.start up() means. This system is handiest required to be finished on a unmarried MongoDB example within the reproduction set. Be sure that the reproduction set call and member fit the configurations you made in every config report in the past.
rs.start up(
{
_id: "rs0",
individuals: [
{ _id: 0, host: "mongo0.replset.member" },
{ _id: 1, host: "mongo1.replset.member" },
{ _id: 2, host: "mongo2.replset.member" }
]
})
If the process returns “adequate”: 1 within the output, it implies that the reproduction set used to be began appropriately. Beneath is an instance of what the output must seem like:
{
"adequate": 1,
"$clusterTime": {
"clusterTime": Timestamp(1612389071, 1),
"signature": {
"hash": BinData(0, "AAAAAAAAAAAAAAAAAAAAAAAAAAA="),
"keyId": NumberLong(0)
    }
    },
"operationTime": Timestamp(1612389071, 1)
}
Close Down MongoDB Server
You’ll be able to close down a MongoDB server by way of the usage of the db.shutdownServer() means. Beneath is the syntax for a similar. Each power and timeoutsecs are non-compulsory parameters.
db.shutdownServer({
power: ,
timeoutSecs:
})
This system would possibly fail if the mongod reproduction set member runs sure operations as index builds. To break the operations and power the member to close down, you’ll enter the boolean parameter power to true.
Restart MongoDB With –replSet
To reset the configuration, ensure that each and every node for your reproduction set is stopped. Then delete the native database for each and every node. Get started it once more the usage of the –replSet flag and run rs.start up() on just one mongod example for the reproduction set.
mongod --replSet "rs0"rs.start up() can take an non-compulsory reproduction set configuration report, specifically:
- The
Replication.replSetNameor the—replSetmethod to specify the reproduction set call within the_idbox. - The individuals’ array, which accommodates one report for every reproduction set member.
The rs.start up() means triggers an election and elects one of the vital individuals to be the principle.
Upload Individuals to Copy Set
So as to add individuals to the set, get started mongod circumstances on quite a lot of machines. Subsequent, get started a mongo consumer and use rs.upload() command.
The rs.upload() command has the next fundamental syntax:
rs.upload(HOST_NAME:PORT)For instance,
Suppose mongo1 is your mongod example, and it’s listening on port 27017. Use the Mongo consumer command rs.upload() so as to add this example to the reproduction set.
rs.upload("mongo1:27017")Simplest after you’re attached to the principle node are you able to upload a mongod example to the reproduction set. To ensure when you’re attached to the principle, use the command db.isMaster().
Take away Customers
To take away a member, we will use rs.take away()
To take action, at the start, close down the mongod example you want to take away by way of the usage of the db.shutdownServer() means we mentioned above.
Subsequent, connect with the reproduction set’s present number one. To resolve the present number one, use db.hi() whilst attached to any member of the reproduction set. When you’ve made up our minds the principle, run both of the next instructions:
rs.take away("mongodb-node-04:27017")
rs.take away("mongodb-node-04")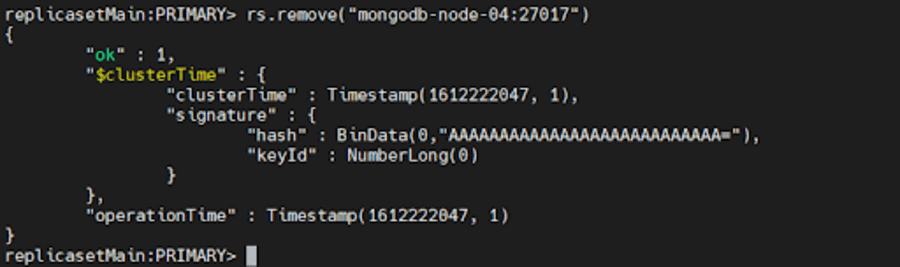
If the reproduction set must elect a brand new number one, MongoDB would possibly disconnect the shell in brief. On this state of affairs, it’ll robotically reconnect as soon as once more. Additionally, it will show a DBClientCursor::init name() failed error even if the command succeeds.
Approach 2: Configuring a MongoDB Copy Set for Deployment and Trying out
Usually, you’ll arrange reproduction units for trying out both with RBAC enabled or disabled. On this means, we’ll be putting in place reproduction units with the get right of entry to keep watch over disabled for deploying it in a trying out setting.
First, create directories for all of the circumstances which might be part of the reproduction set the usage of the next command:
mkdir -p /srv/mongodb/replicaset0-0 /srv/mongodb/replicaset0-1 /srv/mongodb/replicaset0-2This command will create directories for 3 MongoDB circumstances replicaset0-0, replicaset0-1, and replicaset0-2. Now, get started the MongoDB circumstances for every of them the usage of the next set of instructions:
For Server 1:
mongod --replSet replicaset --port 27017 --bind_ip localhost, --dbpath /srv/mongodb/replicaset0-0 --oplogSize 128 For Server 2:
mongod --replSet replicaset --port 27018 --bind_ip localhost, --dbpath /srv/mongodb/replicaset0-0 --oplogSize 128 For Server 3:
mongod --replSet replicaset --port 27019 --bind_ip localhost, --dbpath /srv/mongodb/replicaset0-0 --oplogSize 128 The –oplogSize parameter is used to forestall the system from getting overloaded all over the take a look at segment. It is helping cut back the volume of disk house every disk consumes.
Now, connect with one of the vital circumstances the usage of the Mongo shell by way of connecting the usage of the port quantity under.
mongo --port 27017We will use the rs.start up() command to begin the replication procedure. You’ll have to substitute the hostname parameter together with your machine’s call.
rs conf = {

  _id: "replicaset0",

  individuals: [

    {  _id: 0,  host: ":27017},

    {  _id: 1,  host: ":27018"},

    {  _id: 2,  host: ":27019"}

   ] }
You could now go the configuration object report because the parameter for the start up command and use it as follows:
rs.start up(rsconf)And there you may have it! You’ve effectively created a MongoDB reproduction set for building and trying out functions.
Approach 3: Reworking a Standalone Example to a MongoDB Copy Set
MongoDB permits its customers to turn into their standalone circumstances into reproduction units. Whilst standalone circumstances are most commonly used for the trying out and building segment, reproduction units are a part of the manufacturing setting.
To get began, let’s close down our mongod example the usage of the next command:
db.adminCommand({"shutdown":"1"})Restart your example by way of the usage of the –repelSet parameter for your command to specify the reproduction set you’re going to make use of:
mongod --port 27017 – dbpath /var/lib/mongodb --replSet replicaSet1 --bind_ip localhost,You should specify the call of your server at the side of the original deal with within the command.
Attach the shell together with your MongoDB example and use the start up command to begin the replication procedure and effectively convert the example to a reproduction set. You’ll be able to carry out all of the fundamental operations like including or doing away with an example the usage of the next instructions:
rs.upload(“”) rs.take away(“host-name”)Moreover, you’ll test the standing of your MongoDB reproduction set the usage of the rs.standing() and rs.conf() instructions.
Approach 4: MongoDB Atlas — A More practical Selection
Replication and sharding can paintings in combination to shape one thing referred to as a sharded cluster. Whilst setup and configuration may also be slightly time-consuming albeit easy, MongoDB Atlas is a greater choice than the strategies discussed ahead of.
It automates your reproduction units, making the method simple to put into effect. It could possibly deploy globally sharded reproduction units with a couple of clicks, enabling crisis restoration, more uncomplicated control, records locality, and multi-region deployments.
In MongoDB Atlas, we want to create clusters – they may be able to both be a reproduction set, or a sharded cluster. For a selected challenge, the choice of nodes in a cluster in different areas is proscribed to a complete of 40.
This excludes the loose or shared clusters and the Google cloud areas speaking with every different. The entire choice of nodes between any two areas should meet this constraint. For instance, if there’s a challenge through which:
- Area A has 15 nodes.
- Area B has 25 nodes
- Area C has 10 nodes
We will handiest allocate 5 extra nodes to area C as,
- Area A+ Area B = 40; meets the constraint of 40 being the utmost choice of nodes allowed.
- Area B+ Area C = 25+10+5 (Further nodes allotted to C) = 40; meets the constraint of 40 being the utmost choice of nodes allowed.
- Area A+ Area C =15+10+5 (Further nodes allotted to C) = 30; meets the constraint of 40 being the utmost choice of nodes allowed.
If we allotted 10 extra nodes to area C, making area C have 20 nodes, then Area B + Area C = 45 nodes. This is able to exceed the given constraint, so that you won’t be capable to create a multi-region cluster.
While you create a cluster, Atlas creates a community container within the challenge for the cloud supplier if it wasn’t there in the past. To create a reproduction set cluster in MongoDB Atlas, run the next command in Atlas CLI:
atlas clusters create [name] [options]Just be sure you give a descriptive cluster call, because it can’t be modified after the cluster is created. The argument can include ASCII letters, numbers, and hyphens.
There are a number of choices to be had for cluster introduction in MongoDB in keeping with your necessities. For instance, if you need steady cloud backup on your cluster, set --backup to true.
Dealing With Replication Lengthen
Replication extend could also be slightly off-putting. It’s a extend between an operation at the number one and the applying of that operation from the oplog to the secondary. If your corporation offers with vast records units, a extend is predicted inside a undeniable threshold. Then again, from time to time exterior elements may additionally give a contribution and building up the extend. To get pleasure from an up-to-date replication, ensure that:
- You direction your community site visitors in a solid and enough bandwidth. Community latency performs an enormous function in affecting your replication, and if the community is inadequate to cater to the wishes of the replication procedure, there might be delays in replicating records all through the reproduction set.
- You’ve gotten a enough disk throughput. If the report machine and disk tool at the secondary are not able to flush records to disk as temporarily as the principle, then the secondary can have problem maintaining. Therefore, the secondary nodes procedure the write queries slower than the principle node. This can be a not unusual factor in maximum multi-tenant methods, together with virtualized circumstances and large-scale deployments.
- You request a write acknowledgment write worry after an period to give you the alternative for secondaries to meet up with the principle, particularly when you need to accomplish a bulk load operation or records ingestion that calls for numerous writes to the principle. The secondaries gained’t be capable to learn the oplog rapid sufficient to stay alongside of adjustments; specifically with unacknowledged write issues.
- You determine the operating background duties. Sure duties like cron jobs, server updates, and safety check-ups would possibly have sudden results at the community or disk utilization, inflicting delays within the replication procedure.
If you happen to’re not sure if there’s a replication lag for your utility, agonize now not – the following segment discusses troubleshooting methods!
Troubleshooting MongoDB Copy Units
You’ve effectively arrange your reproduction units, however you understand your records is inconsistent throughout servers. That is closely alarming for large-scale companies, then again, with fast troubleshooting strategies, chances are you’ll in finding the reason and even right kind the problem! Given under are some not unusual methods for troubleshooting reproduction set deployments that would come in useful:
Test Copy Standing
We will test the present standing of the reproduction set and the standing of every member by way of operating the next command in a mongosh consultation that is hooked up to a reproduction set’s number one.
rs.standing()Test the Replication Lag
As mentioned previous, replication lag is usually a significant issue because it makes “lagged” individuals ineligible to temporarily grow to be number one and will increase the chance that disbursed learn operations might be inconsistent. We will test the present period of the replication log by way of the usage of the next command:
rs.printSecondaryReplicationInfo()This returns the syncedTo worth which is the time when the closing oplog access used to be written to the secondary for every member. Right here’s an instance to exhibit the similar:
supply: m1.instance.web:27017
    syncedTo: Mon Oct 10 2022 10:19:35 GMT-0400 (EDT)
    0 secs (0 hrs) in the back of the principle
supply: m2.instance.web:27017
    syncedTo: Mon Oct 10 2022 10:19:35 GMT-0400 (EDT)
    0 secs (0 hrs) in the back of the principle
A behind schedule member would possibly display as 0 seconds in the back of the principle when the inaction duration at the number one is bigger than the individuals[n].secondaryDelaySecs worth.
Take a look at Connections Between All Individuals
Each and every member of a reproduction set should be capable to hook up with each and every different member. At all times make sure you examine the connections in each instructions. Most commonly, firewall configurations or community topologies save you standard and required connectivity which is able to block replication.
For instance, let’s suppose that the mongod example binds to each localhost and hostname ‘ExampleHostname’ which is related to the IP Cope with 198.41.110.1:
mongod --bind_ip localhost, ExampleHostnameTo connect with this example, far off shoppers should specify the hostname or the IP Cope with:
mongosh --host ExampleHostname
mongosh --host 198.41.110.1
If a reproduction set is composed of 3 individuals, m1, m2, and m3, the usage of the default port 27017, you must take a look at the relationship as under:
On m1:
mongosh --host m2 --port 27017
mongosh --host m3 --port 27017
On m2:
mongosh --host m1 --port 27017
mongosh --host m3 --port 27017
On m3:
mongosh --host m1 --port 27017
mongosh --host m2 --port 27017
If any connection in any course fails, you’d have to test your firewall configuration and reconfigure it to permit the connections.
Making sure Safe Communications With Keyfile Authentication
Via default, keyfile authentication in MongoDB is determined by the salted problem reaction authentication mechanism (SCRAM). So as to do that, MongoDB should learn and validate the consumer’s supplied credentials that come with a mixture of the username, password, and authentication database that the particular MongoDB example is conscious about. That is the precise mechanism used to authenticate customers who provide a password when connecting to the database.
While you allow authentication in MongoDB, Position-Primarily based Get admission to Keep watch over (RBAC) is robotically enabled for the reproduction set, and the consumer is granted a number of roles that resolve their get right of entry to to database assets. When RBAC is enabled, it way handiest the legitimate authenticated Mongo consumer with the right privileges would be capable to get right of entry to the assets at the machine.
The keyfile acts like a shared password for every member within the cluster. This permits every mongod example within the reproduction set to make use of the contents of the keyfile because the shared password for authenticating different individuals within the deployment.
Simplest the ones mongod circumstances with the proper keyfile can sign up for the reproduction set. A key’s period should be between 6 and 1024 characters and would possibly handiest include characters within the base64 set. Please notice that MongoDB strips the whitespace characters when studying keys.
You’ll be able to generate a keyfile by way of the usage of quite a lot of strategies. On this educational, we use openssl to generate a fancy 1024-random-character string to make use of as a shared password. It then makes use of chmod to modify report permissions to supply learn permissions for the report proprietor handiest. Steer clear of storing the keyfile on garage mediums that may be simply disconnected from the {hardware} web hosting the mongod circumstances, equivalent to a USB pressure or a network-attached garage tool. Beneath is the command to generate a keyfile:
openssl rand -base64 756 >
chmod 400
Subsequent, reproduction the keyfile to every reproduction set member. Be sure that the consumer operating the mongod circumstances is the landlord of the report and will get right of entry to the keyfile. After you’ve accomplished the above, close down all individuals of the reproduction set beginning with the secondaries. As soon as all of the secondaries are offline, chances are you’ll pass forward and close down the principle. It’s crucial to practice this order as a way to save you possible rollbacks. Now close down the mongod example by way of operating the next command:
use admin
db.shutdownServer()
After the command is administered, all individuals of the reproduction set might be offline. Now, restart every member of the reproduction set with get right of entry to keep watch over enabled.
For every member of the reproduction set, get started the mongod example with both the safety.keyFile configuration report environment or the --keyFile command-line choice.
If you happen to’re the usage of a configuration report, set
- safety.keyFile to the keyfile’s trail, and
- replication.replSetName to the reproduction set call.
safety:
  keyFile:
replication:
  replSetName:
web:
   bindIp: localhost,
Get started the mongod example the usage of the configuration report:
mongod --config If you happen to’re the usage of the command line choices, get started the mongod example with the next choices:
- –keyFile set to the keyfile’s trail, and
- –replSet set to the reproduction set call.
mongod --keyFile --replSet --bind_ip localhost, You’ll be able to come with further choices as required on your configuration. For example, if you want far off shoppers to hook up with your deployment or your deployment individuals are run on other hosts, specify the –bind_ip. For more info, see Localhost Binding Compatibility Adjustments.
Subsequent, connect with a member of the reproduction set over the localhost interface. You should run mongosh at the identical bodily system because the mongod example. This interface is handiest to be had when no customers had been created for the deployment and robotically closes after the introduction of the primary consumer.
We then start up the reproduction set. From mongosh, run the rs.start up() means:
rs.start up(
  {
    _id: "myReplSet",
    individuals: [
      { _id: 0, host: "mongo1:27017" },
      { _id: 1, host: "mongo2:27017" },
      { _id: 2, host: "mongo3:27017" }
    ]
  }
)
As mentioned ahead of, this technique elects one of the vital individuals to be the principle member of the reproduction set. To find the principle member, use rs.standing(). Connect with the principle ahead of proceeding.
Now, create the consumer administrator. You’ll be able to upload a consumer the usage of the db.createUser() means. Be sure that the consumer must have a minimum of the userAdminAnyDatabase function at the admin database.
The next instance creates the consumer ‘batman’ with the userAdminAnyDatabase function at the admin database:
admin = db.getSiblingDB("admin")
admin.createUser(
  {
    consumer: "batman",
    pwd: passwordPrompt(), // or cleartext password
    roles: [ { role: "userAdminAnyDatabase", db: "admin" } ]
  }
)
Input the password that used to be created previous when caused.
Subsequent, you should authenticate because the consumer administrator. To take action, use db.auth() to authenticate. For instance:
db.getSiblingDB(“admin”).auth(“batman”, passwordPrompt()) // or cleartext password
On the other hand, you’ll attach a brand new mongosh example to the principle reproduction set member the usage of the -u , -p , and the --authenticationDatabase parameters.
mongosh -u "batman" -p --authenticationDatabase "admin"Even though you don’t specify the password within the -p command-line box, mongosh activates for the password.
Finally, create the cluster administrator. The clusterAdmin function grants get right of entry to to replication operations, equivalent to configuring the reproduction set.
Let’s create a cluster administrator consumer and assign the clusterAdmin function within the admin database:
db.getSiblingDB("admin").createUser(
  {
    "consumer": "robin",
    "pwd": passwordPrompt(),     // or cleartext password
    roles: [ { "role" : "clusterAdmin", "db" : "admin" } ]
  }
)
Input the password when caused.
If you want to, chances are you’ll create further customers to permit shoppers and engage with the reproduction set.
And voila! You’ve gotten effectively enabled keyfile authentication!


Abstract
Replication has been an crucial requirement in terms of databases, particularly as extra companies scale up. It broadly improves the efficiency, records safety, and availability of the machine. Talking of efficiency, it’s pivotal on your WordPress database to watch efficiency problems and rectify them within the nick of time, as an example, with Kinsta APM, Jetpack, and Freshping to call a couple of.
Replication is helping make certain records coverage throughout a couple of servers and stops your servers from affected by heavy downtime(and even worse – dropping your records completely). On this article, we lined the introduction of a reproduction set and a few troubleshooting pointers at the side of the significance of replication. Do you utilize MongoDB replication for your corporation and has it confirmed to be helpful to you? Tell us within the remark segment under!
The submit Construct a Tough MongoDB Copy Set in Document Time (4 Strategies) seemed first on Kinsta®.
WP Hosting