
Divi’s integrated remodel choices have confirmed to be a particularly helpful design device, permitting you to scale, rotate, skew, or place any part on a web page conveniently. And, you’ll be able to even select to remodel parts within the hover state for wonderful hover results. However as of late, I’m going to introduce one way for deploying those remodel houses on click on. This technique does require a bit customized jQuery (don’t fear, it’s not anything too frightening). Then again, the cool factor about this method is that you’ll be able to in fact use Divi’s inbuilt design settings to taste the remodel houses after which turn on (or toggle) the ones remodel houses with a click on of the mouse. This may increasingly open up a ton of distinctive probabilities to show hidden content material via shifting parts on click on as a substitute of hover. And it additionally is helping cut back the wish to know a large number of CSS as neatly.
Let’s get began.
Contents
- 1 Sneak Peek
- 2 Obtain the Become on Click on Examples Format for FREE
- 3 Obtain For Loose
- 4 You will have effectively subscribed. Please test your e mail cope with to substantiate your subscription and get get entry to to unfastened weekly Divi format packs!
- 5 What You Want to Get Began
- 6 The Elementary Thought Defined
- 7 How you can Toggle Become Houses on Click on to Expose Content material in Divi
- 8 Go Browser Beef up
- 9 Ultimate Ideas
Sneak Peek
Here’s a sneak peek of the “on click on” capability we can construct on this instructional.
Obtain the Become on Click on Examples Format for FREE
To put your palms at the designs from this instructional, you’re going to first wish to obtain it the use of the button underneath. To achieve get entry to to the obtain it is very important subscribe to our Divi Day-to-day e mail record via the use of the shape underneath. As a brand new subscriber, you’re going to obtain much more Divi goodness and a unfastened Divi Format pack each Monday! In case you’re already at the record, merely input your e mail cope with underneath and click on obtain. You’ll now not be “resubscribed” or obtain additional emails.
@media best display screen and ( max-width: 767px ) {.et_bloom .et_bloom_optin_1 .carrot_edge.et_bloom_form_right .et_bloom_form_content:ahead of, .et_bloom .et_bloom_optin_1 .carrot_edge.et_bloom_form_left .et_bloom_form_content:ahead of { border-top-color: #ffffff !necessary; border-left-color: clear !necessary; }
}.et_bloom .et_bloom_optin_1 .et_bloom_form_content button { background-color: #f92c8b !necessary; } .et_bloom .et_bloom_optin_1 .et_bloom_form_content .et_bloom_fields i { coloration: #f92c8b !necessary; } .et_bloom .et_bloom_optin_1 .et_bloom_form_content .et_bloom_custom_field_radio i:ahead of { background: #f92c8b !necessary; } .et_bloom .et_bloom_optin_1 .et_bloom_border_solid { border-color: #f7f9fb !necessary } .et_bloom .et_bloom_optin_1 .et_bloom_form_content button { background-color: #f92c8b !necessary; } .et_bloom .et_bloom_optin_1 .et_bloom_form_container h2, .et_bloom .et_bloom_optin_1 .et_bloom_form_container h2 span, .et_bloom .et_bloom_optin_1 .et_bloom_form_container h2 sturdy { font-family: “Open Sans”, Helvetica, Arial, Lucida, sans-serif; }.et_bloom .et_bloom_optin_1 .et_bloom_form_container p, .et_bloom .et_bloom_optin_1 .et_bloom_form_container p span, .et_bloom .et_bloom_optin_1 .et_bloom_form_container p sturdy, .et_bloom .et_bloom_optin_1 .et_bloom_form_container shape enter, .et_bloom .et_bloom_optin_1 .et_bloom_form_container shape button span { font-family: “Open Sans”, Helvetica, Arial, Lucida, sans-serif; } p.et_bloom_popup_input { padding-bottom: 0 !necessary;}

Obtain For Loose
Sign up for the Divi Newlsetter and we can e mail you a duplicate of without equal Divi Touchdown Web page Format Pack, plus lots of different wonderful and unfastened Divi assets, guidelines and methods. Practice alongside and you’re going to be a Divi grasp very quickly. In case you are already subscribed merely kind to your e mail cope with underneath and click on obtain to get entry to the format pack.
You will have effectively subscribed. Please test your e mail cope with to substantiate your subscription and get get entry to to unfastened weekly Divi format packs!
To import the format for your web page, merely extract the zip report and drag the json report into the Divi Builder.
NOTE: As soon as the format has been loaded to the web page, you’ll be able to to find the CSS and jQuery code from the educational has been added inside of a code module on the backside of the web page.
Now let’s get to the educational lets?
What You Want to Get Began
For this instructional, all you truly want is Divi. To get began, pass for your WordPress dashboard. Create a brand new web page, give your web page a identify, and deploy the Divi builder at the entrance finish. Choose the solution to “Construct from Scratch”. Now you’re ready to move!
The Elementary Thought Defined
Sooner than we get too a ways into the main points of this instructional, I assumed I’d give an explanation for the elemental thought in the back of toggling remodel choices on click on in Divi.
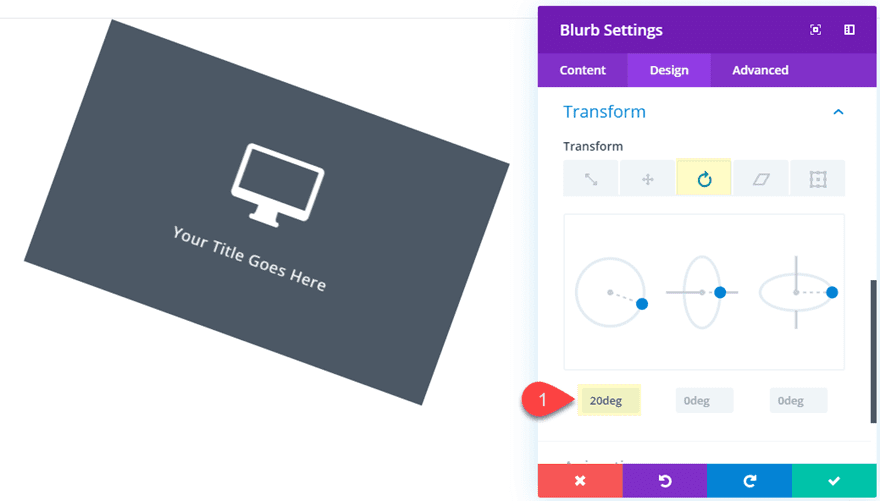
Each and every time you customise a component (phase, row, or module) in Divi, you might be including customized CSS to that part in the back of the scenes. As an example, the use of Divi’s integrated settings, you’ll be able to upload a remodel rotate belongings to a blurb module in order that it rotates the module alongside the Z axis 20 levels.
However in the back of the scenes, you might be developing customized CSS this is added to that textual content module that can glance one thing like this:
.et_pb_text_0 {
remodel: rotateZ(20deg);
}
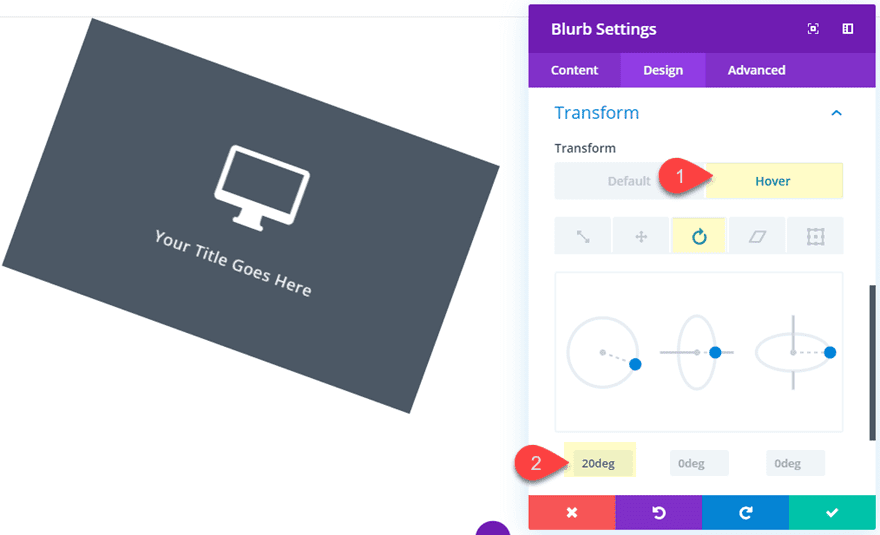
Easy sufficient. And let’s say you sought after so as to add that very same remodel possibility on hover. All you would have to do is practice the remodel belongings for the hover state within the Divi Builder settings.
And the code will glance one thing like this in the back of the scenes:
.et_pb_text_0:hover {
remodel: rotateZ(20deg);
}
Then again, should you sought after to deploy the remodel belongings on click on, issues will wish to paintings a bit in a different way. It is important to introduce a bit jQuery to cause a click on tournament at the part (or textual content module).
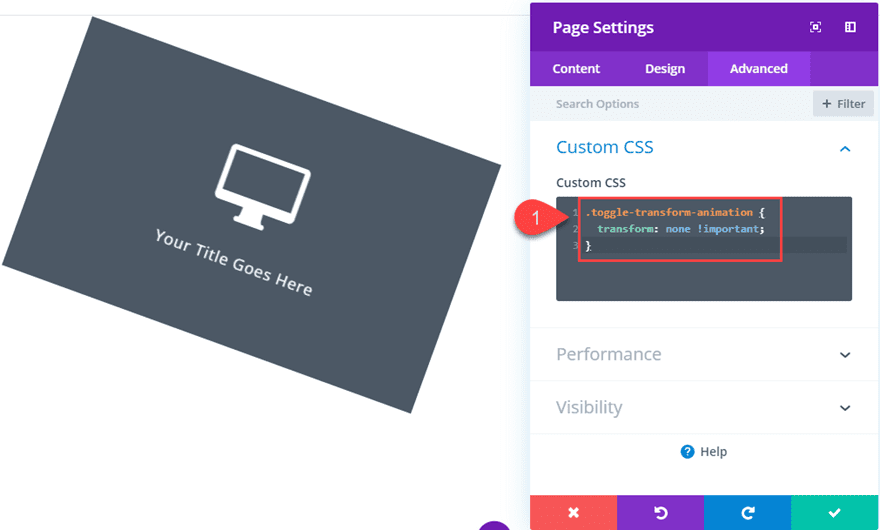
With our present instance, our primary purpose is basically to turn on and deactivate the remodel belongings “remodel: rotateZ(20deg)” on click on. A easy method to pass about that is to create a customized CSS elegance with the valuables “remodel: none !necessary” to our web page settings (or exterior taste sheet). It will glance one thing like this.
.toggle-transform-animation {
remodel: none !necessary;
}
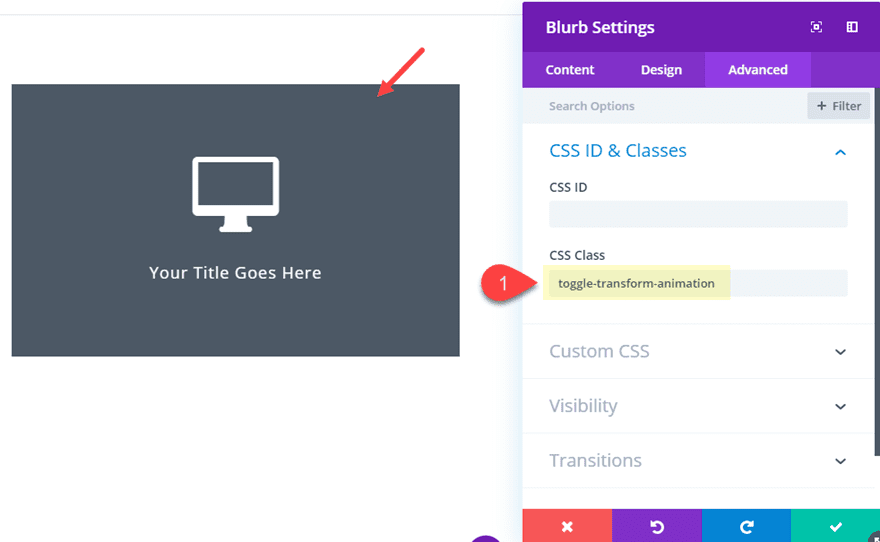
With that CSS in position. We will be able to upload the CSS Elegance “toggle-transform-animation” to the blurb module part that has our remodel belongings.
This may increasingly disable (override) the remodel belongings and stay it from activating to start with despite the fact that it has remodel belongings styling added to it already.
Now all we wish to do is toggle (upload and take away) that Customized CSS Elegance when clicking the part. That means every time we click on at the part, the category shall be got rid of and the remodel houses (those you added with Divi) will deploy.
Right here is a straightforward instance of ways to do that. First, upload any other CSS Elegance to the blurb module named “transform_target”.

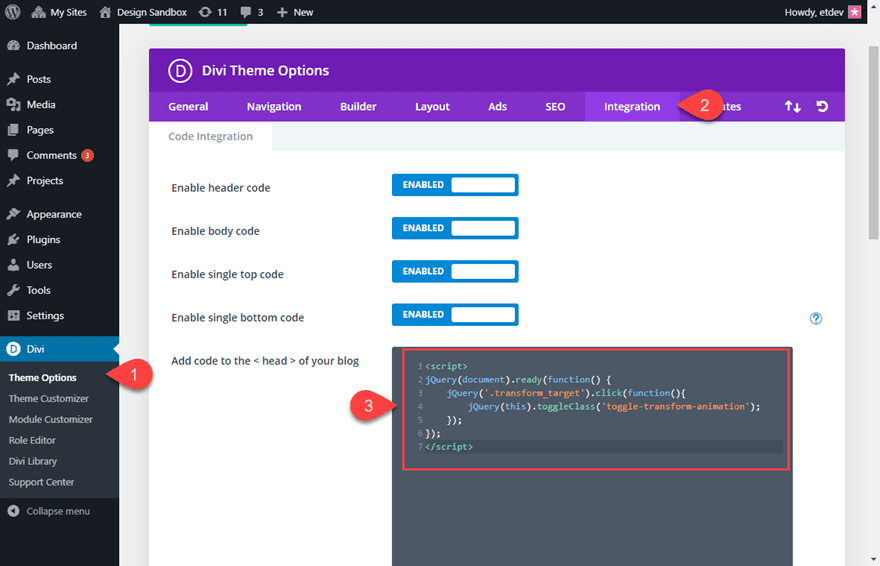
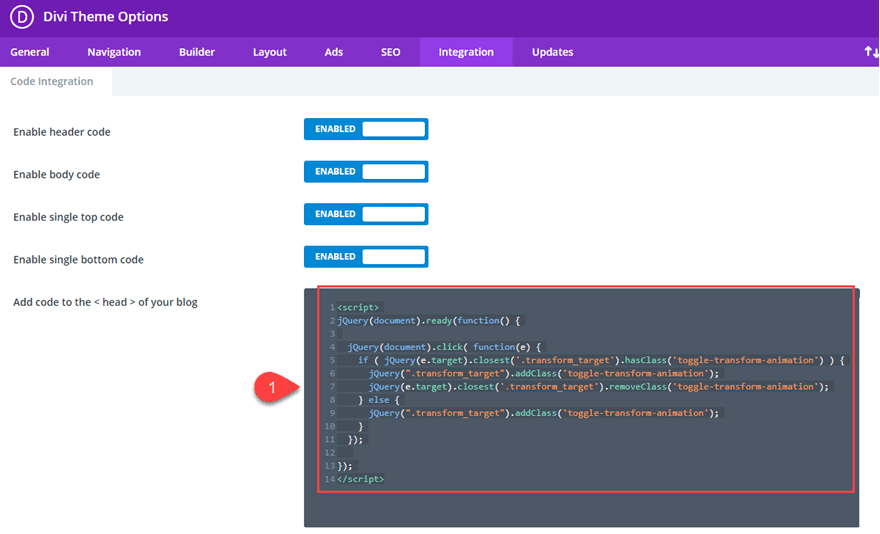
Then navigate to Divi > Theme Choices > Integration and upload the next jQuery script to the top of your weblog:
That’s it! Now every time you click on at the blurb module, the remodel belongings you added to the blurb in Divi will toggle off and on.
Now let’s construct a couple of extra actual existence examples from scratch so you’ll be able to see how this may turn out to be useful on your personal tasks.
How you can Toggle Become Houses on Click on to Expose Content material in Divi
For this case, we’re going to stick to a easy blurb instance used above. Then we’re going to upload an extra blurb in the back of it in order that every time the highest blurb is clicked, it’s going to transfer out of how to divulge the extra content material of the blurb sitting in the back of it.
Developing the entrance and Again Blurb Modules
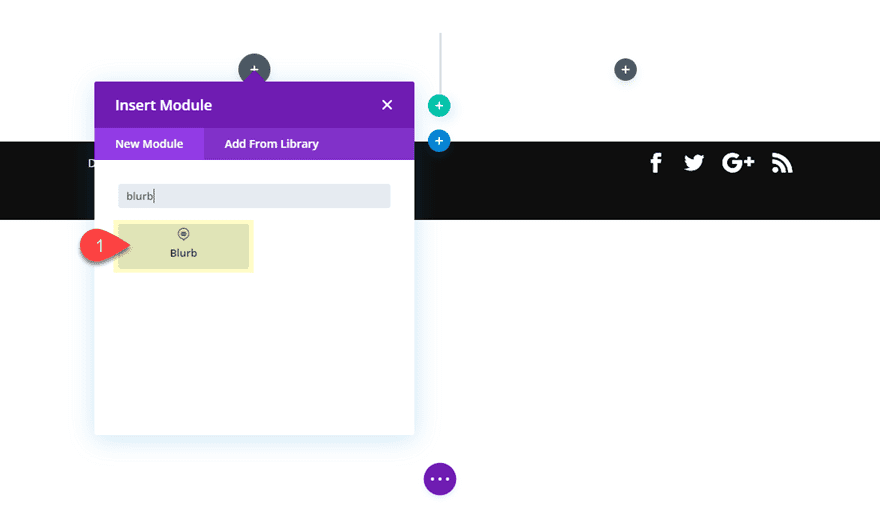
Then upload a blurb module to column 1.
Replace the content material of the blurb to incorporate just a Identify (take out the default frame content material) after which upload a Blurb icon.
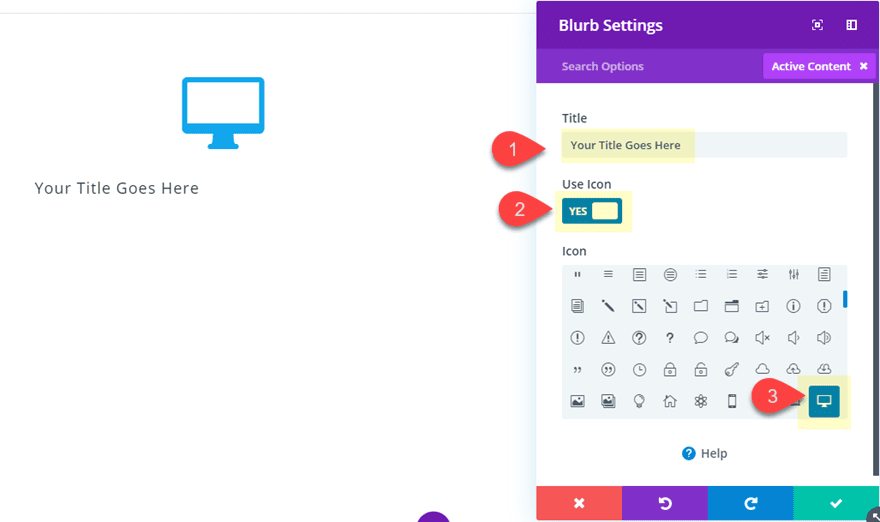
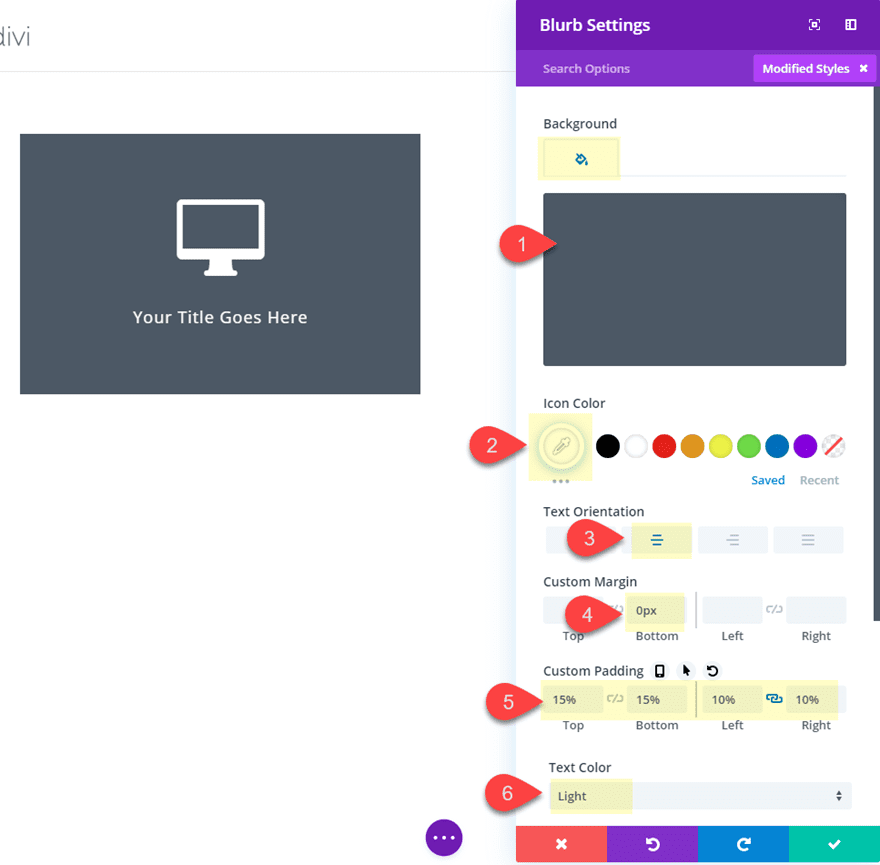
Then replace the design settings as follows:
Background Colour: #4c5866
Icon Colour: #ffffff
Textual content Orientation: middle
Textual content Colour: mild
Customized Margin: 0px backside
Customized Padding: 15% peak, 15% backside, 10% left, 10% proper
We will be able to come again to this module later, however for now we wish to create our 2d blurb module that can function our “again” module with addition content material.
To try this, replica the blurb module you simply created.
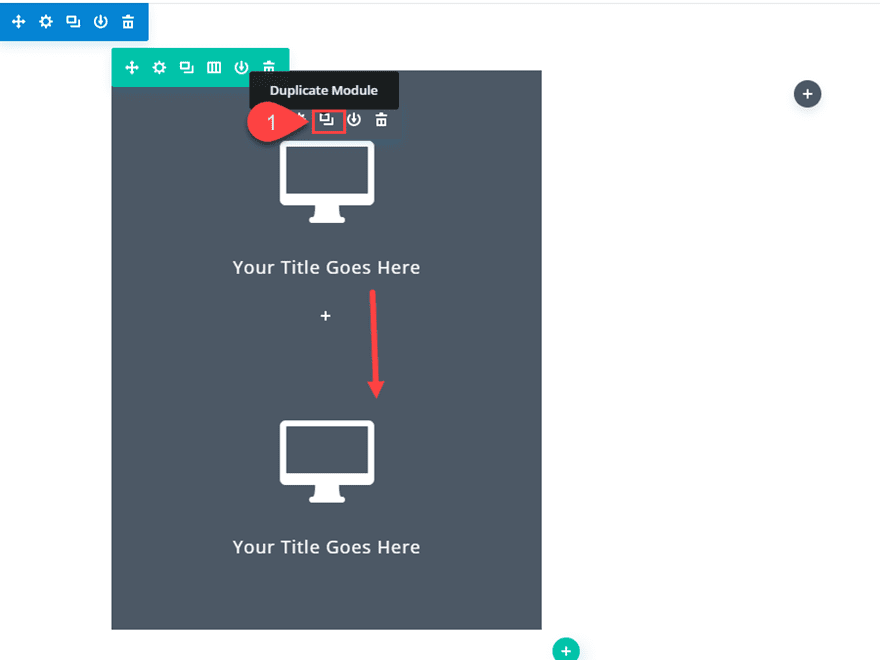
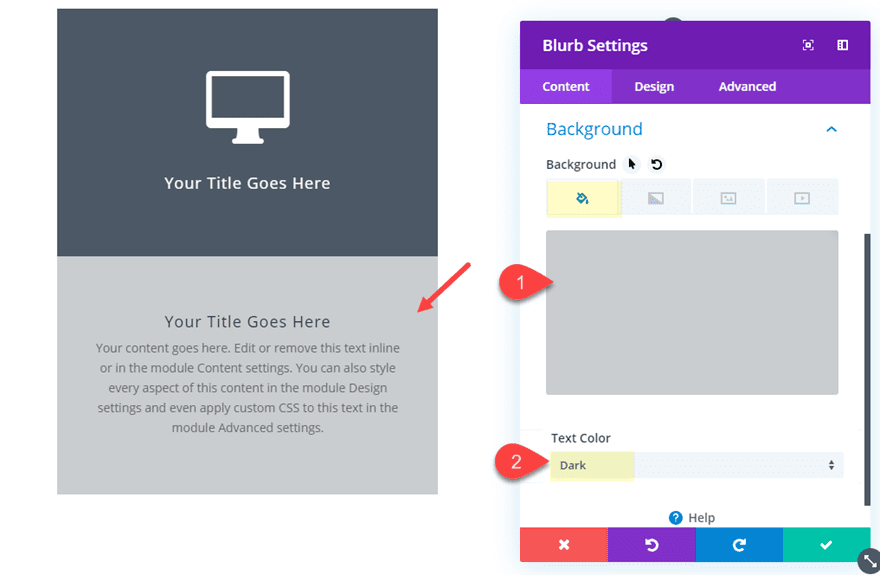
Then take out the blurb Icon (and default symbol) and upload some frame content material again to the module.
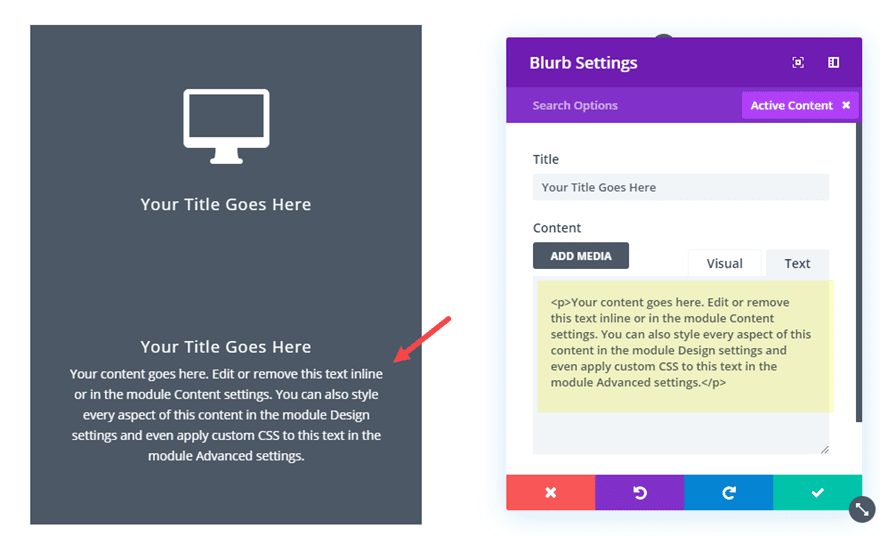
Then replace the design settings as follows:
Background Colour: rgba(76,88,102,0.3)
Textual content Colour: Darkish
Customized Padding: 20% peak
Positioning the Entrance Blurb Module
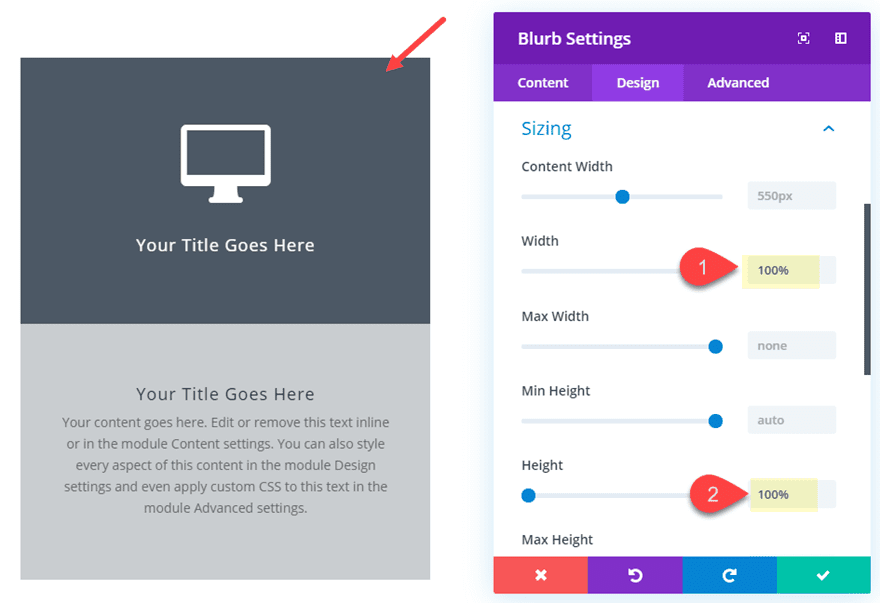
Now that either one of our blurbs are styled, we wish to return to our entrance (peak) blurb module and place it above the again (backside) blurb module. To try this we’re going to give it an absolute place with a 100% top and a 100% width.
First, open the highest/entrance blurb module settings and replace the next:
top: 100%;
width: 100%;
Then upload the next customized CSS to the Major Part:
place: absolute !necessary;
transition: all .5s;
Then replace the z index as follows:
Z index: 4
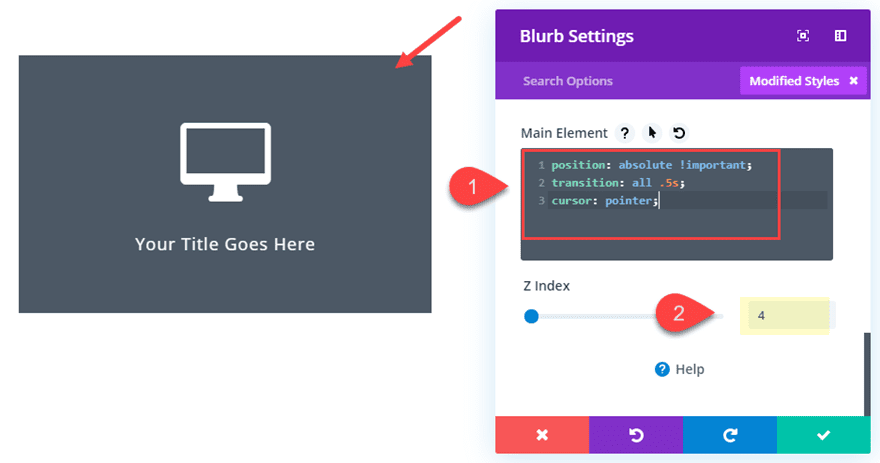
Absolutely the place mixed with the 100% top and width and the z index will ensure the blurb module remains above the blurb module sitting in the back of it. The transition belongings is in fact for the transition period of the remodel choices we can be deploying on click on in our subsequent step. And the “cursor:pointer” is to switch the cursor in order that the part seems clickable to the person.
Including the Become Choices and Customized Categories to the Entrance Blurb
Now it’s time to upload our remodel houses to the entrance blurb. Then we can upload the customized CSS Categories essential for our jQuery to toggle the ones houses on click on.
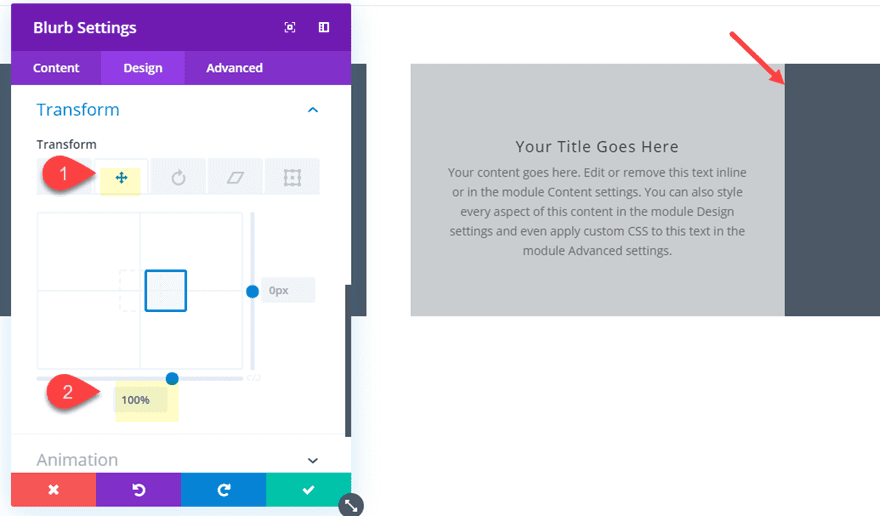
Beneath the design settings of the entrance blurb, upload the next remodel houses:
Become Scale x and y: 20%
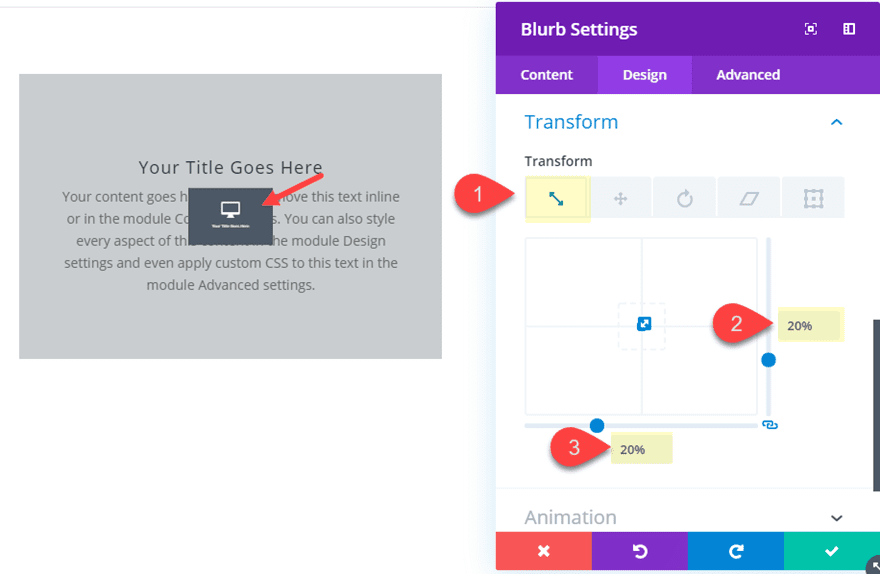
Become Beginning: peak middle
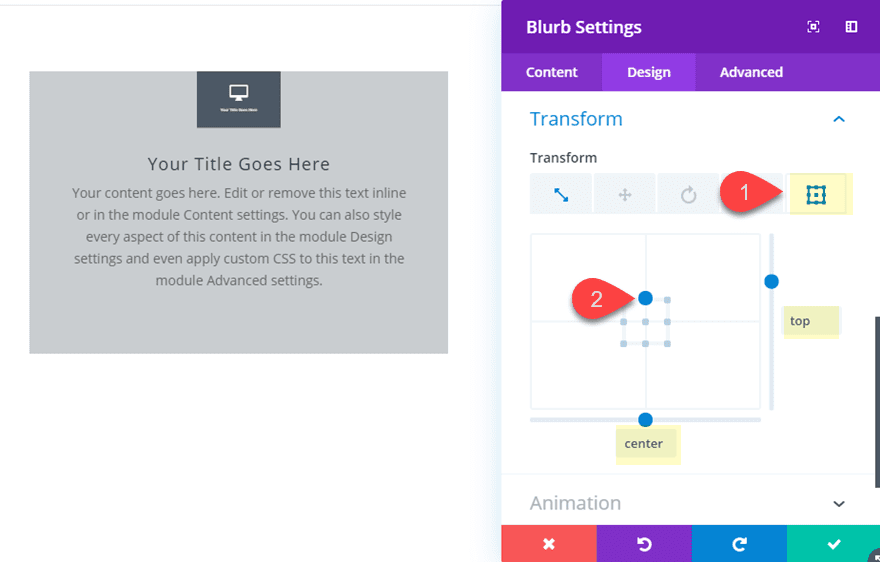
Take into account, the remodel design you spot at this level shall be what’s induced on click on. We’re merely profiting from the Divi builder to get the design we would like. On this case, the entrance blurb will shrink and change into targeted on the peak of the blurb like a clickable icon.
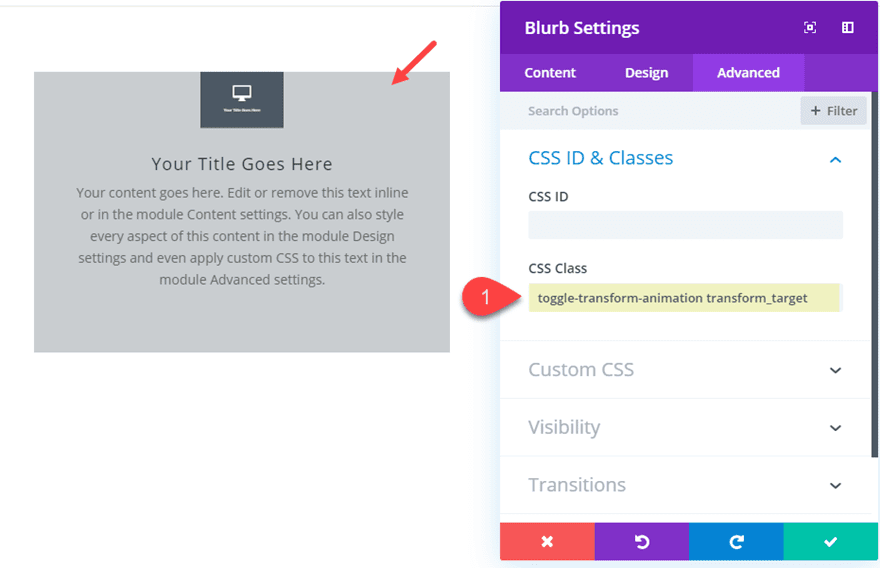
As soon as you might be carried out, upload the 2 CSS Categories had to goal the entrance blurb with jQuery as follows:
CSS Elegance: toggle-transform-animation transform_target
(be sure to separate each and every elegance identify with an area)
Subsequent, upload the next customized CSS snippet that shall be used to toggle the remodel houses off and on with jQuery.
.toggle-transform-animation {
  remodel: none !necessary;
}
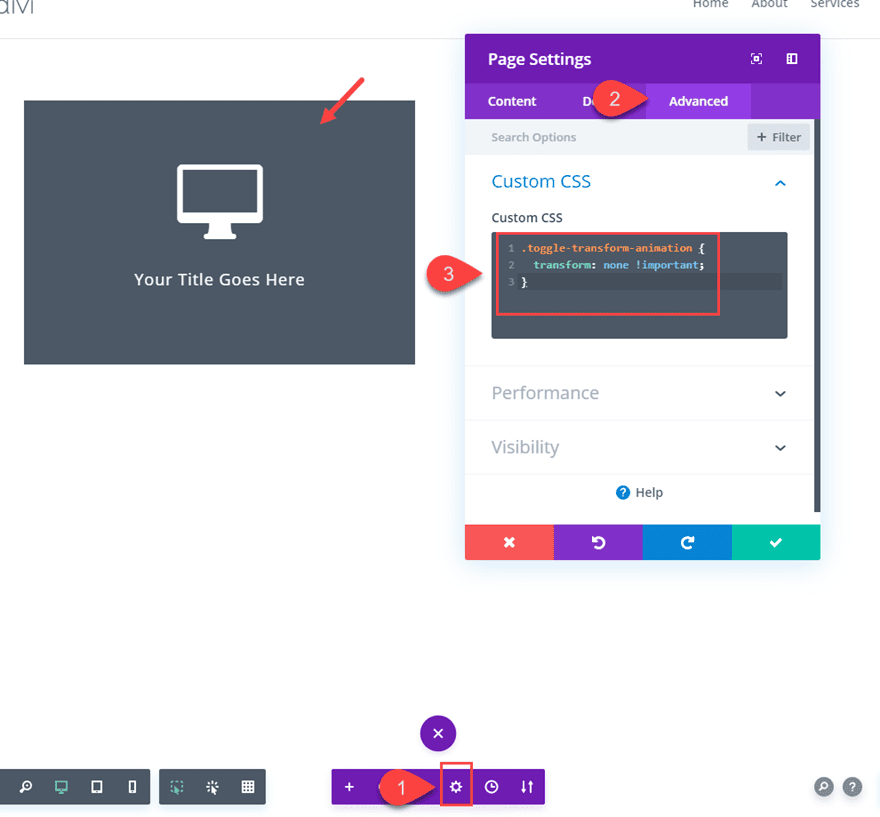
You’ll realize the entrance blurb remodel houses that added previous have change into disabled as a result of we this elegance has been carried out to it.
Now navigate to Divi > Theme Choices > Integration and upload the next jQuery script to the top of the weblog:
Let’s take a look at the general outcome.
Extra Examples
Now that we’ve got a case in point of divulge content material on click on, we will experiment with numerous different remodel houses. Listed below are a couple of…
TIP: When checking out out new remodel houses, you’ll want to briefly take away the category that to start with disables the remodel impact from appearing. To try this, you’ll be able to merely remove a letter from the category “toggle-transform-animation” or take it out altogether. Then you’ll be able to set the remodel choices you need with the Divi builder to look how it’s going to glance ahead of including the category again.
Slide Open on Click on
For this design, merely replica the 2 blurb modules within the left column and upload them to the correct column. Then replace the remodel choices as follows:
Become Translate X axis: 100%
This may increasingly slide the entrance blurb over to the correct so as to divulge the again blurb content material on click on.
This is the outcome.
TIP: Since this impact reasons the module to increase past the row and phase, it is very important trade the Horizontal Overflow atmosphere of your phase to hidden.
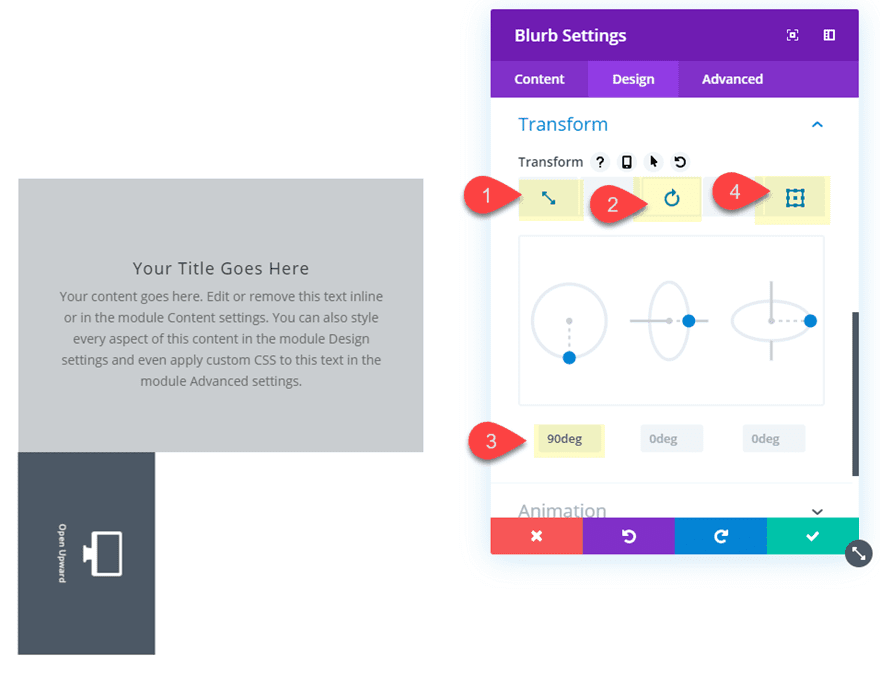
Open Upward on Click on
For this design, pass forward and create a brand new two-column row after which replica the 2 blurbs and paste them into column 1. Then open the row settings and upload the next snippet of customized CSS to the Column 1 Major Part:
Column 1 Major Part:
point of view: 1200px;

That is essential to get the 3-D impact when rotating the blurb module in our design.
Then open the Entrance (peak) blurb settings and replace the remodel choices as follows:
Become Rotate Y: 90deg
Become Beginning: peak middle
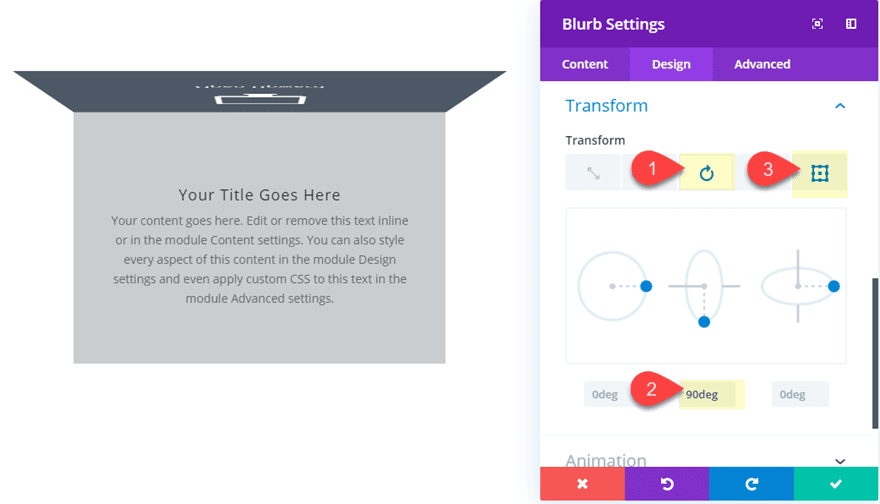
This is the outcome.
Open to the Proper on Click on
This subsequent design is very similar to the former remodel impact. Pass forward and replica the 2 blurbs in column 1 and paste them in column 2. We wish the similar 3-D impact for this one so open the row settings and upload the next customized CSS snippet to the column 1 primary part:
Column 2 Major Part:
point of view: 1200px;
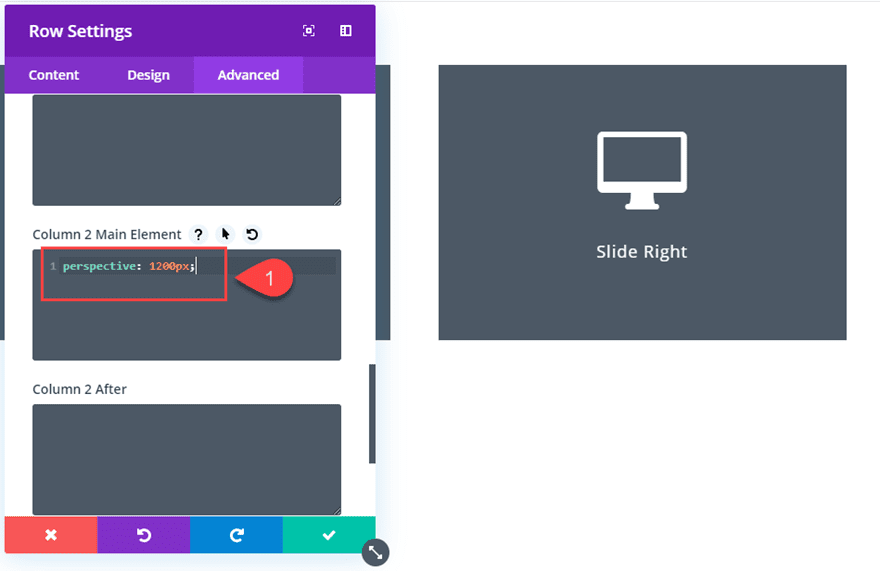
Then replace the remodel choices:
Become Rotate X: 85deg
Become Beginning: peak left
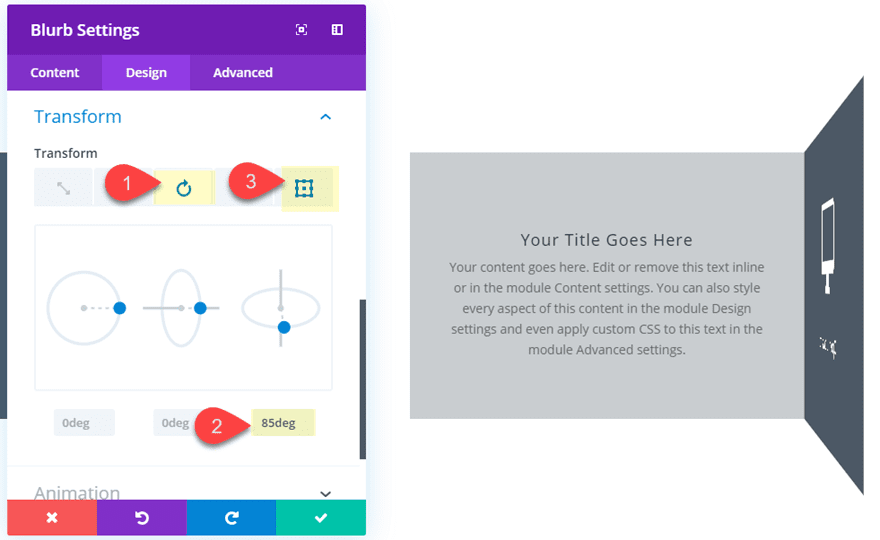
This is the outcome.
Shrinking Hinge Impact on Click on
For this design, replica and paste the blurbs into a brand new column and replace the next remodel choices:
Become Scale: 50%
Become Rotate Z: 90deg
Become Beginning: backside left
This is the outcome.
Turn Round on Click on
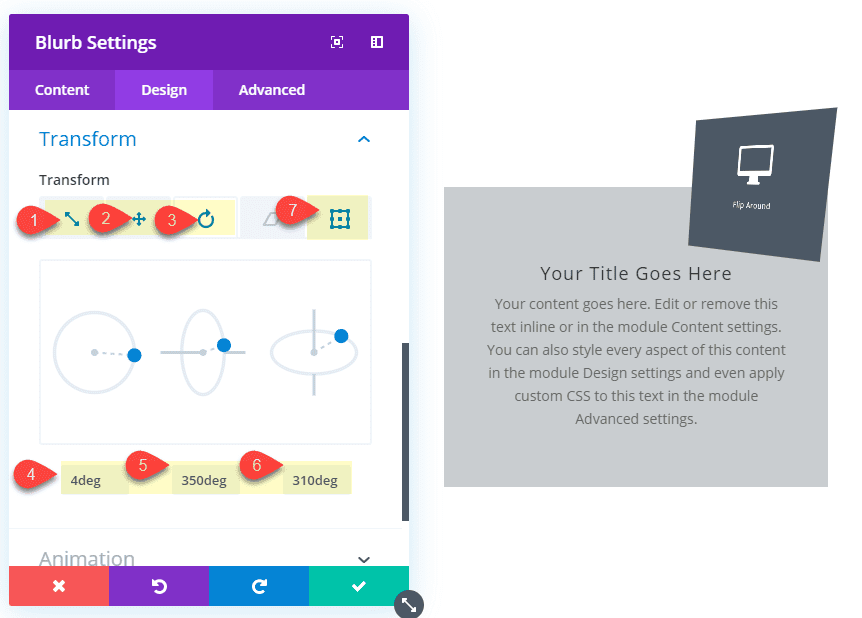
This ultimate design instance combines more than one remodel choices to turn the entrance blurb round, shrink it, and show it on the peak proper of the content material blurb.
To create this impact, replica and paste the blurbs into a brand new column and replace the next:
Become Scale: 50%
Become Translate Y: -100%
Become Rotate Z: 4deg
Become Rotate Y: 350deg
Become Rotate X: 310deg
Become Beginning: proper middle
Be sure to give the column the customized CSS snippet “point of view: 1200px” for this design as neatly.
This is the outcome.

Ultimate Effects
Listed below are the general result of all six remodel results on click on.
Non-compulsory jQuery for Clicking More than one Components on a Web page
At this time the press capability will toggle the remodel impact when clicking the Blurb with the customized CSS Elegance “transform_target”. Then again, if you’re feeling that you need a extra complex capability, this jQuery would possibly assist. As soon as this jQuery is added, the remodel houses will toggle open and closed when clicking both the entrance blurb or the again blurb. It is going to additionally shut any open parts when clicking any other part our out of doors the weather.
To get this capability, merely substitute the customized jQuery underneath your theme choices with the next:
This is the general results of this capability.
Go Browser Beef up
The design and click on capability represented on this instructional is supported via all main browsers (together with IE) so there shouldn’t be a wish to upload any fallbacks to the code. Then again, there could also be some inconsistencies when combining hover results with those remodel animations.
Ultimate Ideas
For many folks Divi customers, including remodel results on click on would possibly appear a little bit too a ways out of our convenience zone. However as soon as you know the way Divi shops the CSS generated when construction at the visible builder, you’ll be able to simply permit and disable that CSS via including and disposing of a customized CSS elegance with jQuery. Like an on/off transfer you’ll be able to toggle any remodel choices you upload with Divi’s inbuilt choices with a easy click on. In fact, there are likely extra complex jQuery answers and setups available in the market, however I’m hoping this instructional a minimum of get’s your foot within the door for exploring some truly cool click on interactions.
I sit up for listening to from you within the feedback underneath.
Cheers!
The submit How to Toggle Divi Transform Properties on Click (with jQuery) gave the impression first on Elegant Themes Blog.
WordPress Web Design