Each and every week, we come up with new and unfastened Divi format packs which you’ll use to your subsequent mission. For probably the most format packs, we additionally proportion a use case that’ll allow you to take your web page to the following stage.
This week, as a part of our ongoing Divi design initiative, we’re going to turn you the right way to create a swipe menu bar to your web page the use of the Mortgage Broker Layout Pack. This can be a good way so as to add interplay on your web page. You’ll have the similar person enjoy throughout all display sizes and you’ll use this system for any roughly web page you’re construction.
Let’s get to it!
Contents
- 1 Preview
- 2 Disable Mounted Navigation in Divi Theme Choices
- 3 Disguise Number one Menu Bar on Web page
- 4 Create Customized Menu Design with Divi
- 4.1 Make Certain There’s Sufficient Best Padding in Hero Segment Throughout All Display Sizes
- 4.2 Upload New Common Segment to Backside of Web page
- 4.3 Upload Row
- 4.4 Upload Symbol Module
- 4.5 Upload Button Module
- 4.6 Upload Textual content Module #1
- 4.7 Clone Textual content Module x5 Occasions
- 4.8 Upload Customized CSS to Row
- 4.9 Take away Scrollbar
- 5 Save as Segment as International Merchandise
- 6 Preview
- 7 Ultimate Ideas
Preview
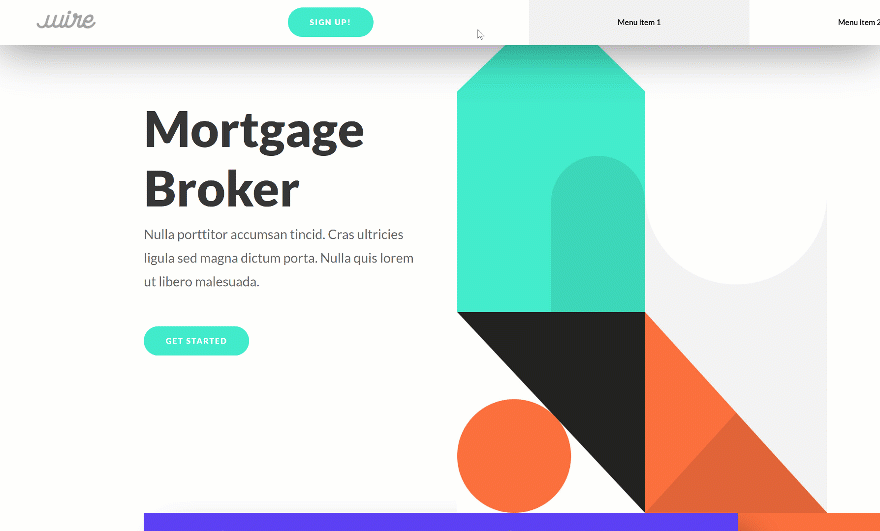
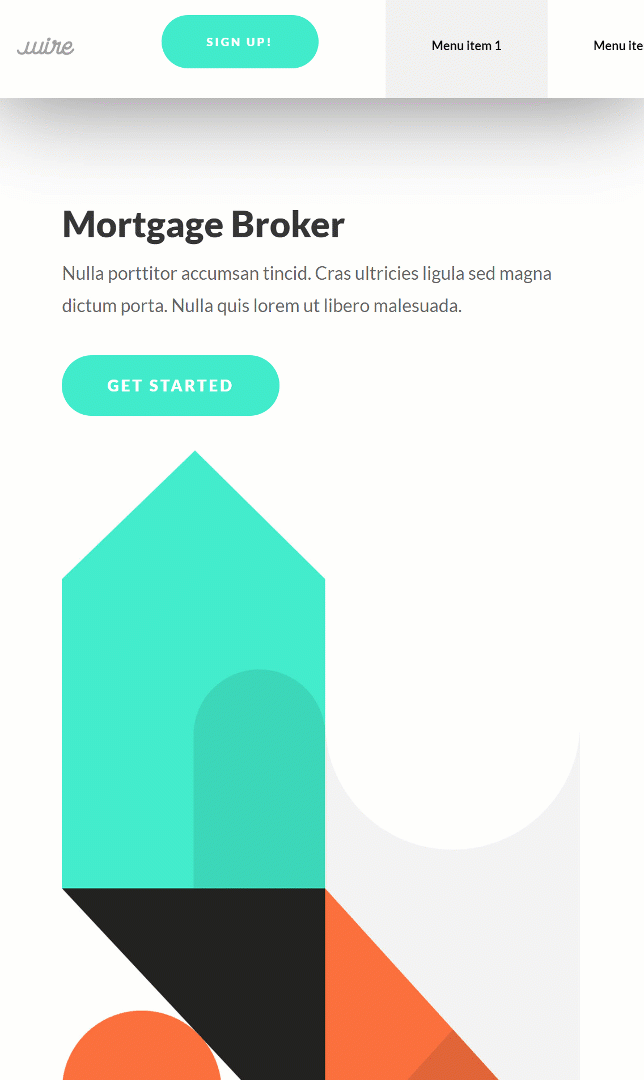
Earlier than we dive into the educational, let’s take a handy guide a rough have a look at the end result throughout other display sizes.
Desktop
Cellular
Cross to Divi Theme Choices
Let’s get began! The very first thing you’ll wish to do is cross to the Divi theme choices to your WordPress web page.

Right here, we’re going to disable the fastened navigation bar. We wish to disable this selection with a view to utterly do away with the principle menu bar on our web page later in this educational.
- Mounted Navigation Bar: Disabled

Disguise Number one Menu Bar on Web page
Allow Visible Builder on Loan Dealer Structure Pack Touchdown Web page
Proceed by means of going to the web page you’ve created the use of the Mortgage Broker Layout Pack‘s touchdown web page and permit the Visible Builder.

Open Web page Settings
We’re going to cover the principle menu bar on our web page by means of including some CSS code. So as to add this code, open the web page settings.

Upload Customized CSS Code to Disguise Number one Menu Bar
Then, cross to the complex tab and position the next strains of CSS code within the Customized CSS field:
#main-header {
show: none;
}
Including this code will lend a hand save you the principle menu bar from appearing up at the web page.

Create Customized Menu Design with Divi
Make Certain There’s Sufficient Best Padding in Hero Segment Throughout All Display Sizes
Now that we’ve gotten rid of the principle menu bar on our web page, we will get started including the swipe menu bar as a substitute! The very first thing you’ll wish to do is ensure that there’s sufficient padding on the best of your web page so the swipe menu bar gained’t overlap any current content material. For the Loan Dealer Structure Pack’s touchdown web page particularly, that suggests ensuring the column 1 customized padding stays ‘180px’ throughout all display sizes.
- Best Padding: 180px

Upload New Common Segment to Backside of Web page
Time to begin growing the customized swipe menu bar! Upload a standard phase to the ground of your web page.

Spacing
Open the phase settings and take away the entire default best and backside padding.
- Best Padding: 0px
- Backside Padding: 0px

Upload Row
Column Construction
Proceed by means of including a brand new row the use of the next column construction:

Background Colour
Open the row settings and alter the row background colour into white.
- Background Colour: #ffffff

Sizing
Then, open the row settings and alter the sizing settings to permit the row to soak up all of the width of the display:
- Use Customized Gutter Width: Sure
- Gutter Width: 1
- Width: 100%
- Max Width: 100%

Spacing
Take away all best and backside padding subsequent.
- Best Padding: 0px
- Backside Padding: 0px

Field Shadow
And to verify there’s sufficient intensity between the swipe menu bar and the web page itself, we’re going so as to add a field shadow.
- Field Shadow Blur Energy: 80px
- Shadow Colour: rgba(0,0,0,0.55)

Upload Symbol Module
Add Corporate Brand
Time to begin including the entire modules we need to display up within the swipe menu bar, beginning with an Symbol Module. Add your emblem the use of a picture document with 226px width and 100px peak.

Alignment
Then, cross to the design tab of the Symbol Module and alter the picture alignment.
- Symbol Alignment: Middle

Sizing
Alternate the sizing settings of the picture subsequent.
- Max Width: 75% (Desktop), 100% (Pill & Telephone)

Spacing
And upload some customized best and backside padding to the picture as neatly.
- Best Padding: 15px (Pill), 25px (Telephone)
- Backside Padding: 15px (Pill), 25px (Telephone)

Upload Button Module
Upload Reproduction
The second one module we’d like is a Button Module. Upload some reproduction of your selection.

Alignment
Then, cross to the design tab and alter the button alignment.
- Button Alignment: Middle

Button Settings
Adjust the illusion of the button subsequent.
- Use Customized Types for Button: Sure
- Button Textual content Measurement: 0.8vw (Desktop), 1.4vw (Pill), 2.1vw (Telephone)
- Button Textual content Colour: #ffffff
- Button Background Colour: #40eccc
- Button Border Width: 0px
- Button Border Radius: 50px
- Button Letter Spacing: 2px
- Button Font: Lato
- Font Weight: Heavy
- Font Taste: Uppercase


Spacing
And create the form you wish to have the use of customized margin and padding values.
- Best Margin: 15px
- Backside Margin: 15px
- Best Padding: 15px
- Backside Padding: 15px
- Left Padding: 40px
- Proper Padding: 40px

Upload Textual content Module #1
Upload Menu Merchandise to Content material Field
The following module we’d like in our swipe menu bar is a Textual content Module. Right here, we’re going so as to add the web page identify to the content material field.

Upload Hyperlink
Transfer directly to the hyperlink settings and upload the right kind hyperlink to the Textual content Module.

Background Colour
Adjust the background colour subsequent.
- Background Colour: #f2f2f2

Textual content Settings
Then, exchange the textual content settings.
- Textual content Font: Lato
- Textual content Font Weight: Daring
- Textual content Colour: #000000
- Textual content Measurement: 0.9vw (Desktop), 1.9vw (Pill), 2.4vw (Telephone)
- Textual content Orientation: Middle

Spacing
And upload some customized best and backside padding to the module as neatly.
- Best Padding: 30px
- Backside Padding: 30px

Clone Textual content Module x5 Occasions
When you’re carried out enhancing the Textual content Module, you’ll cross forward and clone it 5 instances.

Alternate Reproduction
You’ll want to exchange the web page identify in every any such duplicates.

Alternate Hyperlinks
Together with the hyperlinks.

Alternate Background Colours
Adjust the background colours of the second one, fourth and 6th menu merchandise subsequent.
- Background Colour: #ffffff

Upload Customized CSS to Row
Primary Component
Now, to verify the swipe menu bar sticks to the highest of the web page, we’ll wish to upload a couple of strains of CSS code to the primary component of the row.
place:fastened;
best: 0px;
z-index: 99;

Column Primary Component
We’re additionally turning the column right into a grid that permits us to scroll. The odds that you’ll see within the CSS code beneath point out how a lot area every probably the most modules takes up within the grid. You’ll alter those values if you wish to have your grid to appear otherwise.
overflow-x: scroll;
show: grid;
grid-template-columns: 15% 45% 25% 25% 25% 25% 25% 25%;

Column CSS Elegance
And to do away with the scrollbar, we’re going so as to add a CSS magnificence to the row as neatly.

Take away Scrollbar
At the Web page
You’ll take away the scrollbar at the web page itself by means of opening the web page settings and including the next strains of CSS code to the Customized CSS field:
.swipe-menu::-webkit-scrollbar {
show: none;
}


On Complete Website online
When you don’t need to repeat the similar step of hiding the scrollbar on every web page personally, you’ll additionally cross to the Divi theme choices and make the CSS code practice to all of the web page by means of scrolling down the overall tab and including the next strains of CSS code to the Customized CSS field:
.swipe-menu::-webkit-scrollbar { show: none; }


Save as Segment as International Merchandise
As soon as your swipe menu bar is functioning correctly, you’ll reserve it on your Divi library as a world merchandise and apply it to different pages as neatly!

Preview
Now that we’ve long gone thru the entire steps, let’s take a last have a look at the end result throughout other display sizes.
Desktop
Cellular
Ultimate Ideas
On this submit, we’ve proven you the right way to create a swipe menu bar for any web page you growing the use of Divi. This can be a nice method for including some other size on your web page. This educational is a part of our ongoing Divi design initiative, the place we attempt to put one thing additional into your design toolbox every week. In case you have any questions or tips, you’ll want to go away a remark within the remark phase beneath!
The submit How to Create a Swipe Menu Bar for Your Website with Divi gave the impression first on Elegant Themes Blog.
WordPress Web Design