
One of the crucial major causes folks create web sites is to discover a new solution to method their audience. As soon as you are taking that first step and get started development a web site, you get started questioning how precisely you’ll have the ability to get in contact along with your attainable purchasers. One of the crucial issues that experience confirmed to assist a large number of web site house owners is record development. It’s all about accumulating electronic mail addresses from guests, turning them into leads (and ultimately consumers) with electronic mail advertising.
And with record development comes developing sexy subscribe sections to your web site. You wish to have your subscribe segment to be attention-grabbing and extra importantly, you need your subscribe segment to transform. For this instructional, we’ve created a shocking subscribe segment that may undeniably catch your customer’s consideration. We’re combining a slick design with arguments on why to enroll in an electronic mail record. On most sensible of that, we’ll additionally proportion 3 colour palettes that you’ll choose between whilst developing the design.
Let’s get to it!
Contents
- 1 Preview
- 2 Colour Palette #1
- 3 Colour Palette #2
- 4 Colour Palette #3
- 5 Means
- 6 Recreate Subscribe Phase
- 6.1 Upload a New Phase
- 6.2 Upload a New Row
- 6.3 Upload Blurb Module #1 to Column 1
- 6.4 Clone Blurb Module Two times & Adjust Featured Blurb Module
- 6.5 Upload Textual content Module #1 to Colum 2
- 6.6 Upload Textual content Module #2 to Column 2
- 6.7 Upload Electronic mail Optin Module to Column 2
- 6.8 Upload Social Media Practice Module to Colum 2
- 7 Preview
- 8 Ultimate Ideas
Preview
Earlier than we dive into the educational, let’s check out the outcome on other display screen sizes.

Colour Palette #1

- Colour #1: rgba(79,35,255,0.88)
- Colour #2: #e09900
- Colour #3: #4f23ff
Colour Palette #2

- Colour #1: rgba(255,35,97,0.75)
- Colour #2: #e09900
- Colour #3: #d80e00
Colour Palette #3

- Colour #1: rgba(41,17,147,0.75)
- Colour #2: #00ffd8
- Colour #3: #291193
Means
Make a selection probably the most colour palettes above (or create your individual one) and use those colours all over the educational. We’ll refer to paint #1, #2 or #3 after we’re the usage of a colour in our settings. We’re additionally making the Subscribe Module overlap two columns and we’re emphasizing some great benefits of signing up for an electronic mail record.
Recreate Subscribe Phase
Upload a New Phase
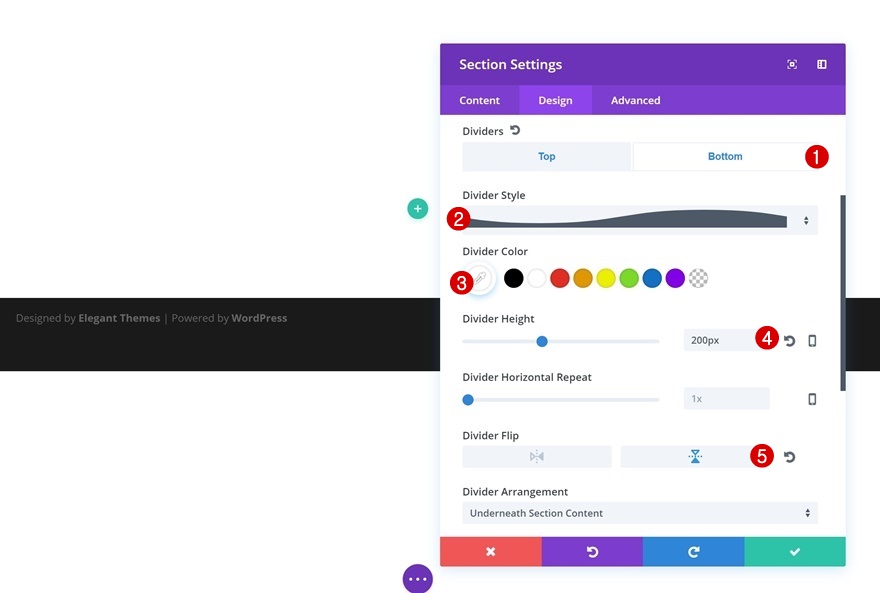
Most sensible Divider
Open the web page you need so as to add your subscribe segment to and upload a brand new usual segment. Open the settings of your segment immediately and upload the next most sensible divider:
- Divider Taste: To find in Listing
- Divider Colour: #FFFFFF
- Divider Peak: 200px
- Divider Turn: Vertical

Backside Divider
Upload the similar more or less divider to the ground of your segment:
- Divider Taste: To find in Listing
- Divider Colour: #FFFFFF
- Divider Peak: 200px
- Divider Turn: Vertical
Spacing
Open the Spacing settings subsequent and take away the entire default padding of your segment by means of including ‘0px’ to the highest and backside padding.

Upload a New Row
Column Construction
Now that we’re performed with all segment settings, we will upload a brand new row. Make a selection the next column construction for it
Gradient Background
Open your row settings and proceed by means of including the next gradient background:
- First Gradient Colour: Colour #1
- 2nd Gradient Colour: Colour #2
- Gradient Course: 123deg
- Position Gradient Above Background Symbol: Sure

Background Symbol
Proceed by means of including a background symbol of selection. This background symbol will handiest display via just a little. Make a selection ‘Duvet’ because the Background Symbol Dimension as smartly.

Colum 2 Background Colour
Subsequent, upload ‘rgba(255,255,255,0.87)’ because the Column 2 Background Colour.

Sizing
We’re additionally going to cut back the gap between each columns and make the row absorb all of the width of the display screen by means of making use of the next Sizing settings:
- Make This Row Fullwidth: Sure
- Use Customized Gutter Width: Sure
- Gutter Width: 1
- Equalize Column Heights: Sure

Spacing
The very last thing you’ll wish to do inside the row settings is upload some customized padding:
- Most sensible & Backside Padding: 0px
- Column 1 Most sensible Padding: 200px
- Column 1 Backside Padding: 100px
- Column 2 Most sensible Padding: 300px (Desktop) 50px (Pill & Telephone)
- Column 2 Backside Padding: 100px (Pill & Telephone)
- Column 2 Left & Proper Padding: 50px

Upload Blurb Module #1 to Column 1
Upload Blurb Identify
Now let’s get started including our modules! We’ll get started with the primary column by means of including a Blurb Module. When we’re performed editing that Blurb Module, we’ll reuse its settings for the opposite two as smartly. After you upload a Blurb Module, give it a identify.

Upload Blurb Icon
Upload an icon on your Blurb Module subsequent. We’ve used the next icon for the primary module:

Icon Settings
Trade the illusion of the icon by means of including the next settings:
- Icon Colour: #FFFFFF
- Icon Placement: Most sensible
- Use Icon Font Dimension: Sure
- Icon Font Dimension: 43px

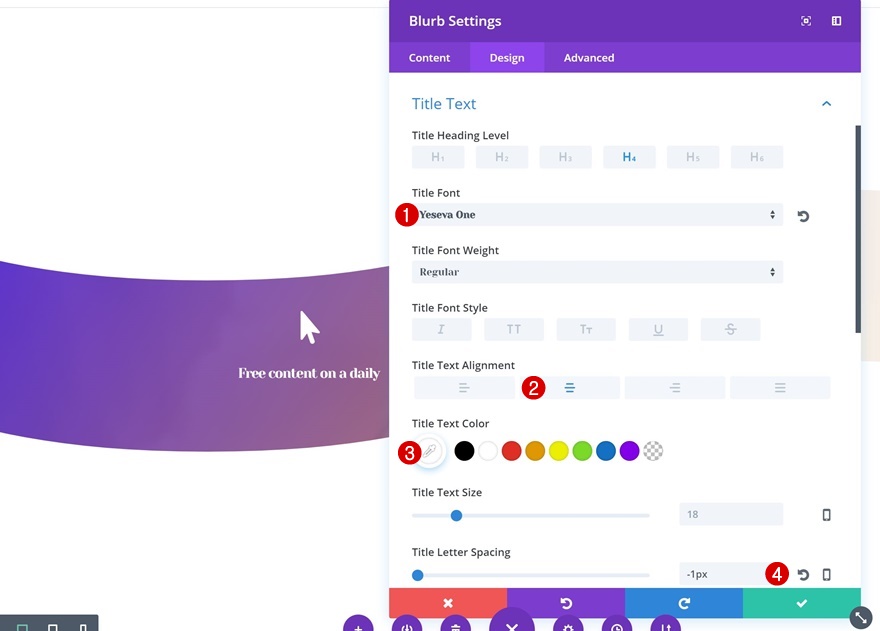
Identify Textual content Settings
We’re handiest the usage of a blurb identify. That’s why we’ll wish to alter the textual content settings of the H4 handiest:
- Identify Font: Yeseva One
- Identify Textual content Alignment: Heart
- Identify Textual content Colour: #FFFFFF
- Identify Letter Spacing: -1px
Sizing
We’ll additionally alter the width of our Blurb Module consistent with the other display screen sizes:
- Content material Width: 150px
- Width: 33% (Desktop), 40% (Pill), 60% (Telephone)
- Module Alignment: Heart

Spacing
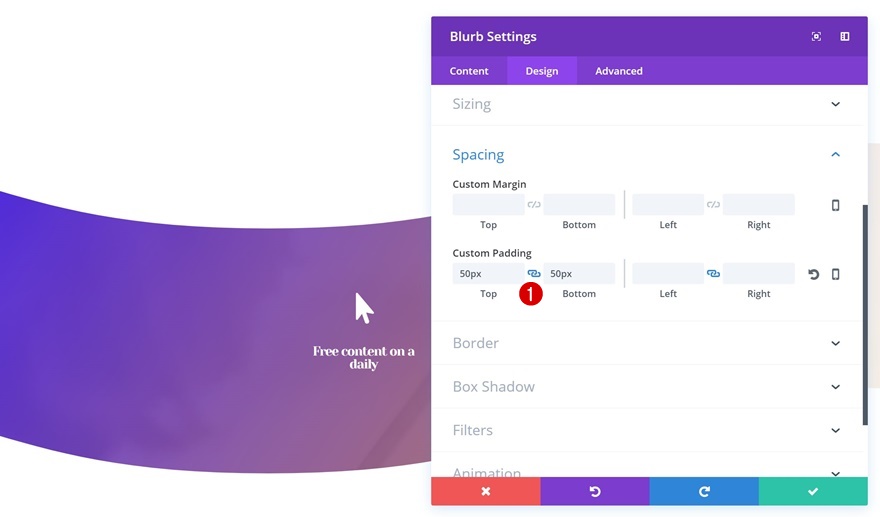
Finally, upload the next customized padding on your Blurb Module as smartly:
- Most sensible & Backside Padding: 50px
Clone Blurb Module Two times & Adjust Featured Blurb Module
Trade Icon & Content material
You’ll be able to now move forward and clone the Blurb Module two times. Stay they all within the first column. For each and every probably the most new Blurb Modules, move forward and alter the icon and identify to make it fit with the message you need to ship out.


Upload Background Colour
We’re going to spotlight the center Blurb Module. To try this, we’ll get started by means of including a white background colour to it.

Trade Icon & Identify Textual content Colour
We’ll additionally trade the colour of the icon and the H4 identify to ‘#000000.’

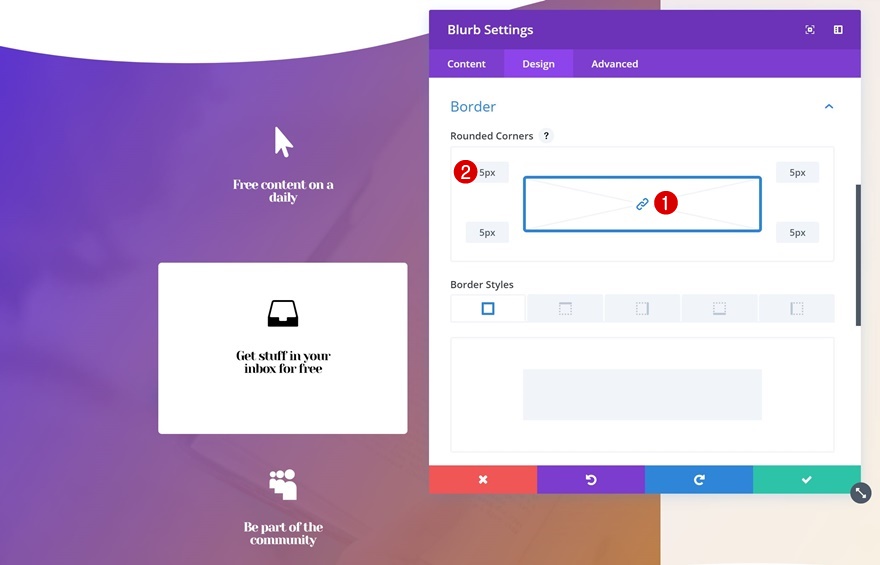
Upload Rounded Corners
Subsequent, we’ll upload ‘5px’ to each and every probably the most corners within the Border settings.
Field Shadow
Ultimate however now not least, we’ll upload just a little of intensity by means of the usage of the primary field shadow possibility.

Upload Textual content Module #1 to Colum 2
Textual content Settings
Let’s transfer directly to the second one column! The primary module we’ll want there’s a Textual content Module. After you’ve added your content material, practice the next textual content settings to it:
- Textual content Font: Yeseva One
- Textual content Colour: #000000
- Textual content Dimension: 54px
- Textual content Line Peak: 1em

Upload Textual content Module #2 to Column 2
Spacing
Proper under that Textual content Module, we’re going so as to add some other Textual content Module for the outline. After you’ve added your content material, upload ’20px’ to the highest margin.

Upload Electronic mail Optin Module to Column 2
Background Colour
The following module we’ll wish to upload is an Electronic mail Optin Module. Whenever you upload it, move forward and alter the background colour to ‘rgba(255,255,255,0).’

Electronic mail Account
Upload your Electronic mail Account subsequent opting for your carrier supplier of selection.

Fields
Proceed by means of opening the Box settings and disable the First Title and Ultimate Title fields.

Box Settings
We’ll additionally alter the Box settings. Take away the rounded corners by means of including ‘0px’ to each and every probably the most corners. Upload the primary field shadow possibility as smartly.


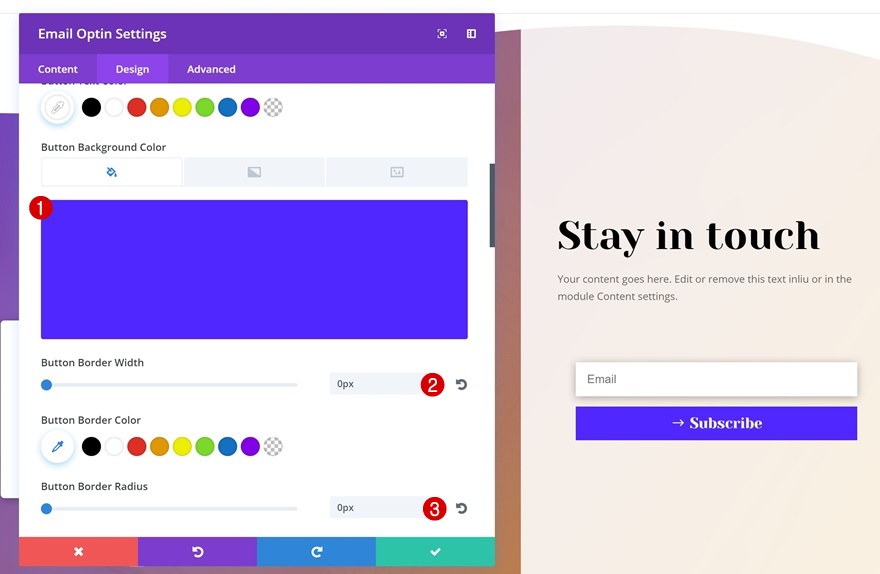
Button Settings
Subsequent, trade the illusion of your button:
- Button Textual content Colour: #FFFFFF
- Button Background Colour: Colour #3
- Button Border Width: 0px
- Button Border Radius: 0px
- Button Font: Yeseva One
- Display Button Icon: Sure
- Button Icon Colour: #FFFFFF
- Button Icon Placement: Left
- Simplest Display Icon on Hover for Button: No
- Field Shadow: Make a selection the primary possibility


Spacing
Finally, make the Subscribe Module overlap each columns the usage of the next Spacing settings:
- Most sensible Margin: 20px (Desktop), 0px (Pill & Telephone)
- Left Margin: -60% (Desktop & Pill), 0px (Telephone)
- Proper Margin: 60% (Desktop), 50% (Pill), 0px (Telephone)

Upload Social Media Practice Module to Colum 2
Upload as Many Social Networks as Sought after
Ultimate however now not least, we’ll upload a Social Media Practice Module. Cross forward and upload the social networks you’d need to seem.

Rounded Corners
Whenever you’ve added the entire social networks, upload ’50px’ to each and every probably the most corners within the Border settings.

Spacing
We’ll additionally push down the module by means of including ’50px’ to the highest margin.
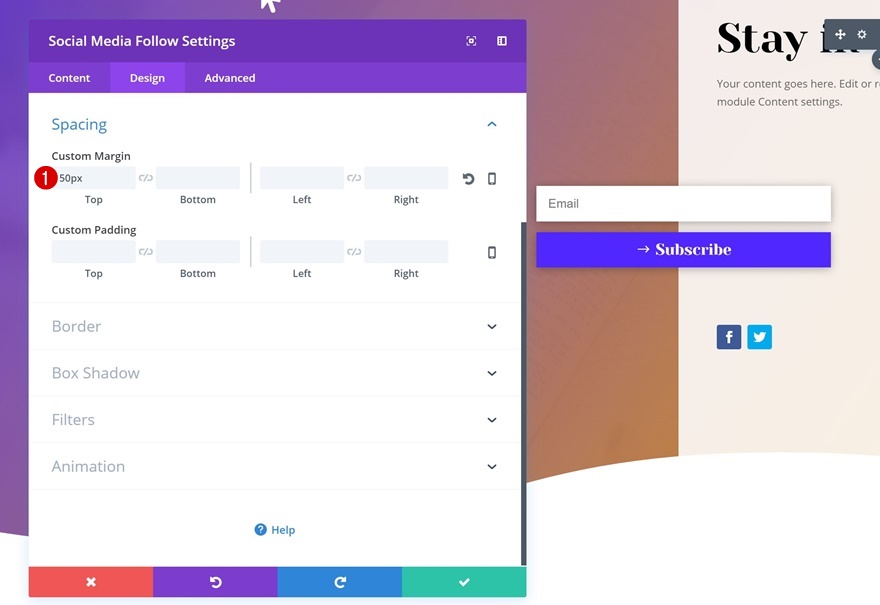
Trade Background Colour of Each and every Social Community In my opinion
Ultimate however now not least, trade the background colour of each and every probably the most social networks in my opinion to ‘#000000.’

Preview
Now that we’ve long past via the entire steps, let’s take a last have a look at the outcome on other display screen sizes.
Ultimate Ideas
Subscribe sections are a very powerful a part of your web site. They can help you construct electronic mail lists, allow electronic mail advertising and switch leads into guests in only a subject of time. On this publish, we’ve proven you easy methods to create a shocking subscribe segment that’ll fit any form of web site available in the market. We’ve blended the usage of an attractive design with placing the signup benefits available in the market. In case you have any questions or tips, remember to go away a remark within the remark segment under!
The publish How to Design an Attractive Subscribe Section for Any Kind of Website With Divi gave the impression first on Elegant Themes Blog.
WordPress Web Design