Do you want to show a map in your web page’s touch shape?
You’ll be able to use geolocation to pre-fill a consumer’s cope with and point out their location by way of striking a pin on a map. This makes filling within the shape more straightforward and quicker thus main to higher of completion price.
On this article, we’ll display you the way to embed a Google Map in touch bureaucracy with a map pin.

Contents
Why Embed a Google Map in Your Touch Shape?
While you created your WordPress website, likelihood is that that you just added a touch shape in order that guests can simply get in contact with you about your services.
And if your online business has a bodily location, then you most likely additionally added a Google Map of your personal location to inspire other people to discuss with your retailer.
What many trade house owners don’t know is that you’ll use geolocation to robotically fill within the cope with box in your touch shape and show the consumer’s location on a map. This improves the whole consumer enjoy and is helping reduces shape abandonment.
Realizing your customers’ places additionally permits you to use geolocation targeting to turn customized content material and spice up conversion charges.
With that being stated, let’s check out the way to embed a Google Map in touch bureaucracy.
The right way to Embed a Google Map in a Touch Shape
For this instructional, we’ll be the usage of WPForms, the best contact form plugin for WordPress. It permits you to simply create any form of shape with a easy drag and drop shape builder.
There’s a free version of WPForms to be had with the entire options you want to create a fundamental touch shape. For this instructional, on the other hand, we’ll use WPForms Pro because it come with the Google Map addon.
The very first thing you want to do is set up and turn on the WPForms plugin. For extra main points, see our step-by-step information on how to install a WordPress plugin.
Upon activation, you want to discuss with the WPForms » Settings web page to go into your license key. You’ll be able to to find this knowledge to your WPForms account house. Make sure to click on the ‘Test Key’ button to turn on your license.

Subsequent, you want to navigate to WPForms » Addons and to find the Geolocation Addon. You’ll be able to use the quest possibility on the most sensible of the display, or just scroll throughout the to be had addons.
If you’ve discovered it, you must set up the add-on by way of clicking the ‘Set up Addon’ button.

Now that the Geolocation addon is activated, it is very important configure its settings. To do this, navigate to WPForms » Settings and click on at the Geolocation tab.
In this web page, you want to choose a geolocation supplier. For this newsletter, we’ll select the Google Puts API.

You must additionally click on the ‘Present Location’ checkbox. This will likely come across and autocomplete the address when customers fill within the touch shape, saving time and bettering accuracy.
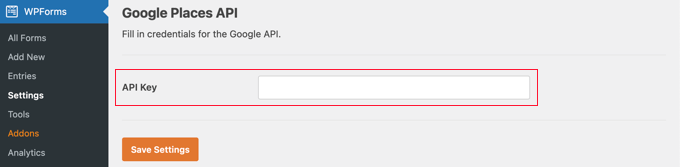
Subsequent, you want to scroll all the way down to the Google Puts API settings. You’ll be requested to fill to your Google API key. You’ll be able to get your key from Google after which paste it into the sector. We’ll display you ways to try this within the subsequent segment.
Producing a Google Puts API Key
You’ll be able to download an API key for Google Puts by way of going to the Google Cloud Console web page.
You’ll be requested to choose your nation from a drop down menu and conform to the phrases of provider. In some nations, you might also be presented the risk to join a mailing checklist.

While you’re in a position to transport to your next step, click on on ‘Agree and Proceed’.
Subsequent, you’ll want to choose a challenge for the API key. Merely click on on ‘Make a choice a challenge’ and click on at the challenge you wish to have to make use of from the checklist.

When you haven’t created a challenge prior to, or it is a new web page you haven’t but added to Google, you then must click on ‘New Venture’ to set one up.
Word: Google would require you to permit billing for that challenge in an effort to use the Google Puts API. They provide the primary $300 at no cost, which is lots to hide a easy map embed like we’re developing on this instructional. Smaller visitors websites gained’t wish to pay anything else, they usually’ll ask your permission to improve prior to charging any charges.
You must now be at the ‘APIs & Products and services’ web page the place you’ll permit the APIs wanted for showing Google Maps in your website. You’ll wish to click on the ‘+ Allow APIs and Products and services’ button on the most sensible of the web page.

This will likely take you to Google’s API Library the place it is very important permit 3 other mapping APIs.
You’ll be able to to find them by way of the usage of the quest serve as on the most sensible of the web page or by way of clicking the ‘View All’ hyperlink subsequent to the Maps segment.

First you want to seek out and permit the Puts API. If you find it, it is very important click on it. At the subsequent web page, you must to click on the ‘Allow’ button.
After that, you must do the similar factor for the Maps JavaScript API and Geocoding API.

Now that you’ve enabled the 3 APIs, you’ll create an API key.
Within the menu at the left, you want to navigate to APIs & Products and services » Credentials.
From right here it is possible for you to to click on the ‘+ Create Credentials’ button on the most sensible of the display after which choose the ‘API key’ possibility.

Your API key can be created and displayed on a popup window.
Later on this instructional, you’ll wish to reproduction that key into WPForm’s settings. For now, let’s check out the way to position some restrictions on using the API key.

Proscribing Your Google Puts API Key
Overuse of the API key might transfer you out of the loose plan and price greater than you are expecting. We propose that you just prohibit the important thing to forestall unauthorized or sudden use.
To do this, you want to click on the ‘Limit Key’ hyperlink on the backside of the ‘API key created’ popup within the screenshot above.
At the subsequent web page, you’ll arrange quite a few other restrictions. The primary of those is ‘Software restrictions’. On this segment, you must click on at the ‘HTTP referrers (internet websites) possibility. Then the important thing will handiest be used on web sites.

Subsequent, you must ensure it’s only used by yourself web page. To do this, you must scroll all the way down to the ‘Site restrictions’ segment after which click on the ‘Upload an Merchandise’ button.
Now you must kind your website domain name into the ‘New merchandise’ box the usage of the development *instance.com/*.

If you’re going to be the usage of Google Maps on a couple of web page, then you’ll click on the ‘Upload an Merchandise’ button and upload as many domain names as you want.
Now that you just’ve limited the API key to simply your personal web sites, you’ll additionally prohibit it to paintings with handiest the Google APIs that you just added above.
You want to scroll all the way down to the ‘API restrictions’ segment of the web page and choose the ‘Limit key’ possibility. This will likely divulge a drop down the place you must take a look at the ‘Geocaching API’, ‘Maps JavaScript API’ and ‘Puts API’ bins.

If you’ve achieved that, you must click on the ‘OK’ hyperlink to retailer your settings. In the end, be sure to click on the ‘Save’ button on the backside of the web page to turn on all the restrictions you could have selected.

Word that it is going to take as much as 5 mins for the settings to take impact.
Including the Google API Key to WPForms Settings
You’ll now see the API key indexed with any others you could have to be had. You must click on the Replica icon so you’ll upload the important thing to the WPForms Geolocation settings web page.

Word that should you ever wish to exchange any of the API’s settings or restrictions, then you’ll click on the Edit icon at the proper
Now you want to go back on your web page which must nonetheless be at the WPForms » Settings » Geolocation web page.
As soon as there, paste the important thing into the Google Puts API box within the WPForms settings. If you’ve achieved that, be sure to click on the ‘Save Settings’ button.
Word: Google Puts calls for you to have an SSL certificates to your website. To learn to get one, take a look at our newbie’s information on how to get a free SSL certificate.
Making a Touch Shape With Embedded Google Map in WordPress
Now that you’ve configured WPForms and Google Puts, you’re ready to create a touch shape in WordPress. You’ll be able to get began by way of following our information on how to create a contact form in WordPress.
If you’ve made a fundamental shape, you want so as to add an cope with box. You’ll be able to use both an Cope with block or Unmarried Line Textual content box. For this instructional, we’ll use a Unmarried Line Textual content box.
Merely drag the Unmarried Line Textual content block onto the shape.

Subsequent, we’ll customise the sector’s settings. To do this, you want to click on at the box to show the Unmarried Line Textual content settings.
First, you must exchange the sector’s label to ‘Cope with’. This will likely make it transparent on your customers what they must kind within the box.

After that, you want to switch the sector’s settings in order that it shows a map at the shape. To do this, you’ll wish to click on at the Complex tab.
As soon as there, you must search for the ‘Allow Cope with Autocomplete’ possibility on the backside of the settings and toggle it to the ‘On’ place. You’ll then see an alternative choice, ‘Show Map’, which you must additionally permit. You’ll be able to select to show the map above or underneath the sector.

Including the Touch Shape to Your Site
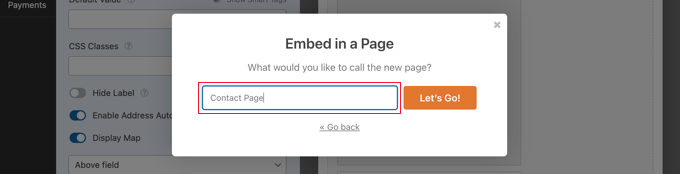
The most simple method so as to add the touch shape on your web page is to click on the ‘Embed’ button. You’ll to find it subsequent to the ‘Save’ button on the most sensible of the shape editor display.
You’ll be requested whether or not so as to add the shape to an present shape or create a brand new web page.

For this instructional, we’ll click on the ‘Create New Web page’ button.
Subsequent, you must give the web page a reputation after which click on the ‘Let’s Move!’ button.
A brand new web page with that title can be created, and your touch shape can be added robotically.
All you want to do is click on the ‘Submit’ button to push the shape are living.

Viewing the Google Map in Touch Shape
When a consumer visits your touch shape, they are going to be requested whether or not they want to permit your web page to get entry to your location.

In the event that they click on the ‘Permit’ button, then their present location can be entered into the cope with box, and a pin of that location can be added to the map.
This autocomplete function will save your guests time by way of making it quicker and more straightforward to kind their addresses.

In the event that they wish to exchange the cope with, then they may be able to merely kind a brand new one or drag the pin to another location at the map.
The right way to View Person Location Information on a Shape
If you permit geolocation, WPForms will even report each and every consumer’s location after they fill to your shape. Realizing the positioning of your customers might assist you to find better leads.
You’ll wish to navigate to WPForms » Entries after which click on in your touch shape.

You’ll now see an inventory of entries stuffed in by way of your customers for that shape.
To view a specific access, merely click on the ‘View’ hyperlink at the proper.

You’ll now see the shape information stuffed in by way of the consumer corresponding to their title, business email, business phone number, along side some location information.
This features a pin on Google Maps, the consumer’s location, zip code, and nation, in addition to their approximate latitude and longitude.

After all, if the consumer didn’t grant permission for the shape to grasp their location, then no location information can be displayed.
That’s all, you could have effectively added a Google Map to your touch shape. You’ll be able to additionally use WPForms to build surveys in WordPress, create a cost shape to accept online payments, and extra.
We are hoping this instructional helped you learn to embed a Google Map in touch bureaucracy. You may additionally need to be told how to run a giveaway or contest, or take a look at our knowledgeable select of the best WordPress plugins for all trade web sites.
When you appreciated this newsletter, then please subscribe to our YouTube Channel for WordPress video tutorials. You’ll be able to additionally to find us on Twitter and Facebook.
The submit How to Embed a Google Map in Contact Forms (With Map Pin) first gave the impression on WPBeginner.
WordPress Maintenance