
This week, as a part of our ongoing Divi design initiative, we’re going to turn you how one can switch a brand new design taste to every other web page the usage of Divi’s Furniture Store Layout Pack. With all of the new structure packs which are popping out, you may have sought after to switch the way of an current web page the usage of the brand new structure pack’s taste. As a substitute of changing all the web page, you’ll be able to additionally switch the design taste the usage of Divi’s potency options. One of the vital latest choices that’s integrated within the Visible Builder is the cross-page reproduction and paste characteristic. This may mean you can make many adjustments all over the structure with out touching a design component’s settings.
However in fact, every structure is exclusive, this means that you’ll have to use some guide adjustments as smartly. The excellent news is that you’ll be able to lengthen the ones guide settings to identical components at the web page in a single click on. This submit is confidently going that can assist you apply a definite construction when moving a design taste.
Let’s get to it!
Contents
- 1 Preview
- 2 Manner
- 3 Section 1: Opening Two Pages Subsequent to Every Different
- 4 Section 2: Resetting Sure Phase Settings
- 5 Section 3: The use of Divi’s Go-Web page Reproduction-Paste & Lengthen Types Options for Hero Phase
- 6 Section 4: Make Handbook Adjustments (In line with Format) & Use Potency Options
- 6.1 Format Particular Adjustments
- 6.1.1 In finding & Exchange Identify Font
- 6.1.2 In finding & Exchange Identify Font Weight
- 6.1.3 In finding & Exchange Rounded Corners
- 6.1.4 Reset CTA Background Settings & Lengthen Taste in Phase
- 6.1.5 In finding & Exchange CTA Background Colour in Phase
- 6.1.6 In finding & Exchange CTA Textual content Colour in Phase
- 6.1.7 Alternate Pricing Desk Button Settings
- 6.1.8 Lengthen Types for Pricing Tables & CTA Modules
- 6.1 Format Particular Adjustments
- 7 Section 5: Upload Design Traits
- 8 Preview
- 9 Ultimate Ideas
Preview
Earlier than we dive into the educational, let’s take a snappy take a look at the end result.

Manner
Web page constructions vary from every different, that’s why it’s laborious to totally switch a design taste in a single click on. However with Divi, you’ll be able to use the potency options to hurry up the method. We’ll mix the cross-page copy-paste characteristic, the lengthen types characteristic and the to find and exchange characteristic to save lots of time moving a design taste to an current web page, with no need to switch the web page construction.
Section 1: Opening Two Pages Subsequent to Every Different
We’ll get started off through opening two pages subsequent to one another. The present web page and the brand new web page containing the design taste we need to follow. We’re going to take the Furnishings Retailer Format Pack’s touchdown web page (the design taste we need to follow to the present web page) and the Internet hosting Corporate Format Pack’s touchdown web page (the web page we need to trade round).
Section 2: Resetting Sure Phase Settings
The second one section will probably be about resetting sure phase settings. The settings you want to reset range from structure to structure however generally come with the background settings and divider settings.
Section 3: The use of Divi’s Go-Web page Reproduction-Paste & Lengthen Types Options for Hero Phase
Then, we will be able to get started the usage of Divi’s cross-page copy-paste characteristic to begin converting issues. The herbal factor to do is beginning with the hero sections. We’ll trade every design component within the hero phase to the brand new design taste through copying the settings of the brand new design taste and pasting them at the current web page. After doing that, we’ll lengthen those types to identical components at the web page.
Section 4: Make Handbook Adjustments (In line with Format) & Use Potency Options
As discussed sooner than, every structure is exclusive. That’s why making guide adjustments to the present web page is essential as smartly. As soon as the few adjustments are made, you’ll be able to lengthen the way or use to find and exchange to make it follow to identical components at the web page.
Section 5: Upload Design Traits
Ultimate however now not least, you’ll be able to upload sure design traits to the present web page as smartly.
Section 1: Opening Two Pages Subsequent to Every Different
Create New Web page The use of Format The use of the Furnishings Retailer Format Pack’s Touchdown Web page
Now that we’ve long past during the means a part of this submit, let’s get started the usage of Divi! Upload a brand new web page the usage of the Furnishings Retailer Format Pack’s touchdown web page.

Create New Web page The use of the Internet hosting Corporate Format Pack’s Touchdown Web page
Create every other web page the usage of the Internet hosting Corporate Format Pack’s touchdown web page as smartly. We’re going to switch the design taste of this structure with the Furnishings Retailer Format Pack’s touchdown web page design.

Section 2: Resetting Sure Phase Settings
Reset Phase Particular Settings of Internet hosting Corporate Touchdown Web page
Open Hero Phase
After getting each layouts closeby, proceed through opening the hero phase settings of the webhosting corporate touchdown web page.

Reset Phase Background & Lengthen to All Sections
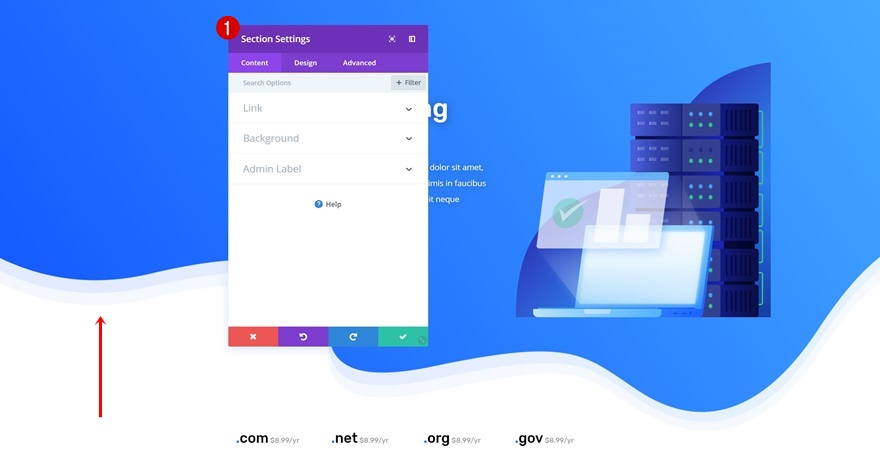
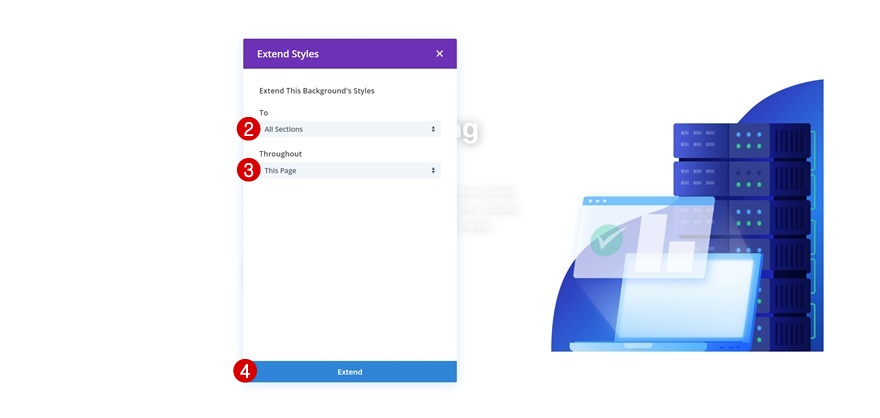
Move to the background settings and reset the choices through right-clicking and clicking on Reset Background. As soon as that’s executed, you’ll be able to lengthen those background types to all sections at the web page to verify no phase to your web page comprises background components.


Reset Dividers & Lengthen to All Sections
Do the similar issues for the phase dividers to verify all phase dividers at the web page are long past.


Section 3: The use of Divi’s Go-Web page Reproduction-Paste & Lengthen Types Options for Hero Phase
Go-Web page Reproduction-Paste Hero Phase Parts
Phase Settings
Time to begin the usage of the cross-page copy-paste choice! We’ll regulate each and every design component within the hero phase. Get started through copying the hero phase types at the furnishings retailer touchdown web page. Then, return to the webhosting corporate touchdown web page and paste the copied phase types.


Row Settings
Do the similar factor for the row.


Identify Textual content Module
Reproduction the module types of the identify Textual content Module as smartly and cause them to follow to the identify of the webhosting corporate touchdown web page.


Frame Textual content Module
Open the outline Textual content Module subsequent and duplicate the textual content types. While you do, cause them to follow to the Textual content Module at the webhosting corporate web page.


Lengthen Types
While you’ve carried out the brand new textual content types, pass forward and lengthen those types to all modules all over the web page.


Alternate Again Textual content Orientations to Middle The place Wanted
You’ll understand that the left textual content orientation will probably be carried out to all design components all over the web page. You’ll stay it that manner or trade again the textual content orientation manually.

Button Settings
The remaining module within the hero phase you’ll want to follow new module types to is the Button Module.


Lengthen Types for Button Settings
As a substitute of extending all the Button Module types, we’ll lengthen the precise button settings.


Lengthen Types for Spacing
At the side of the spacing settings.


Lengthen Types for Field Shadow
And the field shadow settings as smartly.


Reproduction-Paste Last Parts As soon as + Lengthen Taste
Divider
We’ll additionally want to reproduction and paste the Divider Module types and cause them to follow to the dividers at the webhosting corporate touchdown web page.


Lengthen Types
Once more, lengthen the types of this module all over all the web page.


Section 4: Make Handbook Adjustments (In line with Format) & Use Potency Options
Format Particular Adjustments
In finding & Exchange Identify Font
Time to begin making some guide adjustments! The very first thing we’ll do is fit the font. Open a Textual content Module at the web page and to find the Rubik font this is used all over the web page. Then, click on on In finding & Exchange and exchange the font with Montserrat.


In finding & Exchange Identify Font Weight
Do the similar factor for the font weight. As a substitute of the usage of Medium, make a selection Gentle.


In finding & Exchange Rounded Corners
We’re additionally casting off the rounded corners borders all over the web page through the usage of In finding & Exchange and making use of ‘0px’ to every one of the most corners all over the web page.


Reset CTA Background Settings & Lengthen Taste in Phase
Proceed through discovering the Name to Motion Modules at the web page and reset the background settings of the primary module. Then, lengthen those types to all Calls to Motion within the phase.


In finding & Exchange CTA Background Colour in Phase
While you do, the default background colour will seem. In finding & Exchange this colour and alter it into ‘#1a2545’ all over the phase.


In finding & Exchange CTA Textual content Colour in Phase
Exchange the Textual content Colour with ‘Gentle’ all over the phase as smartly.


Alternate Pricing Desk Button Settings
Then, pass to the pricing tables at the web page and alter the button settings:
- Button Background Colour: #ef6f49
- Button Border Width: 8px
- Button Border Colour: #ef6f49
- Button Border Radius: 0px
- Button Letter Spacing: 2px (Default), 1px (Hover)
- Button Font: Montserrat
- Font Weight: Semi Daring
- Font Taste: Uppercase
- Button Alignment: Left


Lengthen Types for Pricing Tables & CTA Modules
Lengthen the brand new button atmosphere to all pricing tables and Name to Motion Modules all over the web page.


Section 5: Upload Design Traits
Phase Background Colour #1
Within the remaining a part of this educational, we’re going to manually upload some design traits. This comprises, however isn’t restricted to, background settings. Open the phase marked within the print display underneath and alter the background colour.
- Background Colour: #f7f3ec

Phase Background Colour #2
Do the similar factor for the phase underneath.
- Background Colour: #f7f3ec

Phase Gradient Background #1
Then, to find the phase within the print display underneath and upload a gradient background.
- Colour 1: #ffffff
- Colour 2: #1a2545
- Gradient Course: 90deg
- Get started Place: 55%
- Finish Place: 55%

Phase Gradient Background #2
Use every other gradient background for the phase underneath:
- Colour 1: rgba(210,218,228,0.38)
- Colour 2: #ffffff
- Gradient Course: 90deg
- Get started Place: 45%
- Finish Place: 45%

Phase Gradient Background #3
Ultimate however now not least, upload a linear gradient background to the remaining phase at the web page as smartly.
- Colour 1: #ffffff
- Colour 2: #f7f3ec
- Get started Place: 40%
- Finish Place: 40%

Preview
Now that we’ve long past via all of the steps, let’s take a last take a look at the end result.
Ultimate Ideas
On this submit, we’ve proven you ways you’ll be able to switch a structure’s design taste the usage of Divi’s potency options. This educational takes benefit of the brand new cross-page copy-paste characteristic that is a part of the brand new Visible Builder. This educational is a part of our ongoing Divi design initiative the place we attempt to put one thing further into your design toolbox each week. When you’ve got any questions or tips, be sure to go away a remark phase underneath!
The submit How to Transfer a New Design Style to Another Page Using Divi’s Efficiency Features seemed first on Elegant Themes Blog.
WordPress Web Design