One of the most cool options of the brand new website online design of elegantthemes.com is the premade structure pack previews at the Divi product page. What makes this design distinctive is how each and every structure pack is featured with 3 separate photos that fan-out on hover.
Nowadays, we’re going to turn you the best way to recreate the design of our structure pack previews with that very same spectacular fan-out hover impact in Divi. Since the design is a little more complex, we can be the usage of some customized CSS together with Divi’s integrated design choices. However don’t concern, it received’t take lengthy to construct and the result’s for sure value it.
Let’s get began.
Contents
- 1 Sneak Peek
- 2 Obtain the Format Pack Preview Fan-Out Hover Results Format for FREE
- 3 Obtain For Unfastened
- 4 You’ve got effectively subscribed. Please test your electronic mail deal with to substantiate your subscription and get get entry to to unfastened weekly Divi structure packs!
- 5 What You Wish to Get Began
- 6 Recreating ET’s Format Pack Previews with Fan-Out Hover Results in Divi
- 7 Non-compulsory Hover Impact: Rotating Symbol 1 and a pair of One at a time on Hover
- 8 Including Hyperlinks to Photographs
- 9 Including new Format Pack Previews to the Different Columns
- 10 Ultimate Design
- 11 Ultimate Ideas
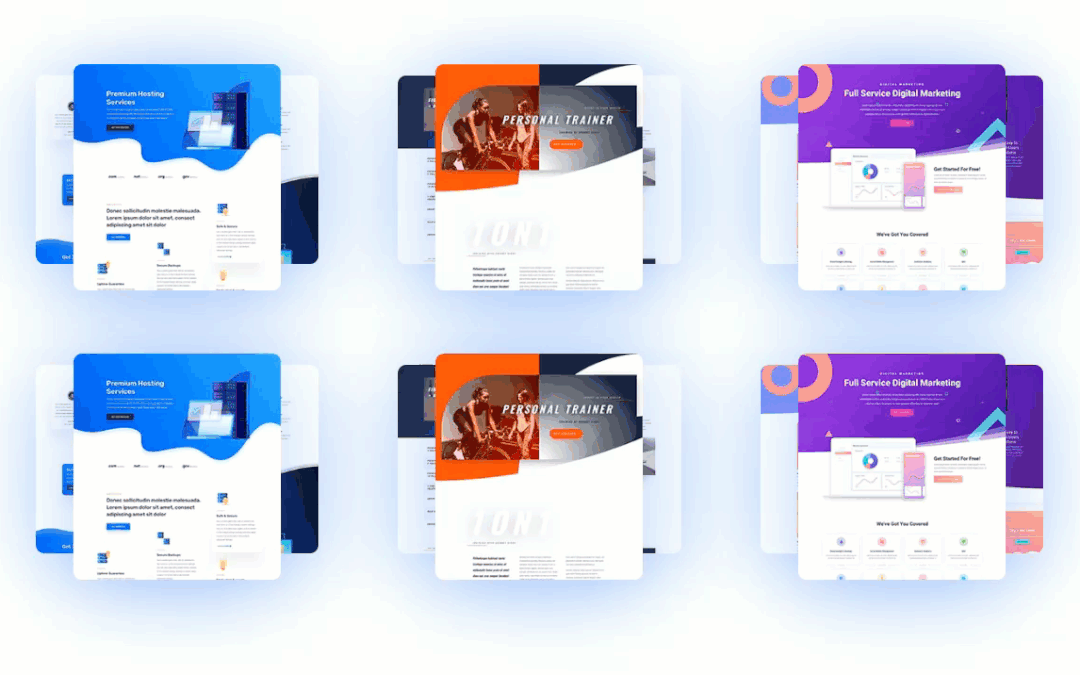
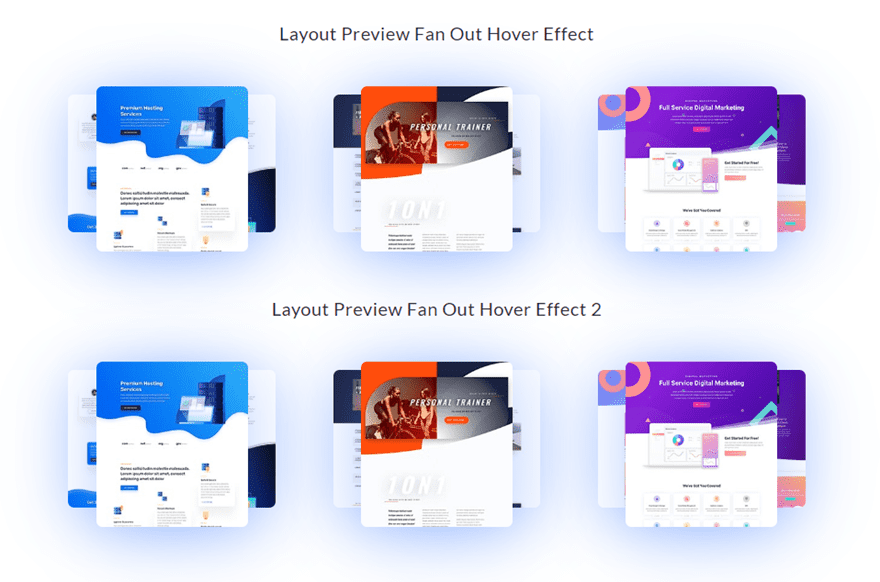
Sneak Peek
Here’s a peek on the structure pack previews with a fan-out hover impact. Understand the ground row has a secondary hover impact that rotates the pictures one by one on hover.
The 3 column structure on desktop will modify to at least one column on pill and make contact with.

Obtain the Format Pack Preview Fan-Out Hover Results Format for FREE
To put your fingers on designs from this educational, you are going to first wish to obtain it the usage of the button under. To achieve get entry to to the obtain it is important to subscribe to our Divi Day by day electronic mail checklist by way of the usage of the shape under. As a brand new subscriber, you are going to obtain much more Divi goodness and a unfastened Divi Format pack each Monday! When you’re already at the checklist, merely input your electronic mail deal with under and click on obtain. You’ll no longer be “resubscribed” or obtain additional emails.
@media best display screen and ( max-width: 767px ) {.et_bloom .et_bloom_optin_1 .carrot_edge.et_bloom_form_right .et_bloom_form_content:ahead of, .et_bloom .et_bloom_optin_1 .carrot_edge.et_bloom_form_left .et_bloom_form_content:ahead of { border-top-color: #ffffff !essential; border-left-color: clear !essential; }
}.et_bloom .et_bloom_optin_1 .et_bloom_form_content button { background-color: #f92c8b !essential; } .et_bloom .et_bloom_optin_1 .et_bloom_form_content .et_bloom_fields i { colour: #f92c8b !essential; } .et_bloom .et_bloom_optin_1 .et_bloom_form_content .et_bloom_custom_field_radio i:ahead of { background: #f92c8b !essential; } .et_bloom .et_bloom_optin_1 .et_bloom_border_solid { border-color: #f7f9fb !essential } .et_bloom .et_bloom_optin_1 .et_bloom_form_content button { background-color: #f92c8b !essential; } .et_bloom .et_bloom_optin_1 .et_bloom_form_container h2, .et_bloom .et_bloom_optin_1 .et_bloom_form_container h2 span, .et_bloom .et_bloom_optin_1 .et_bloom_form_container h2 sturdy { font-family: “Open Sans”, Helvetica, Arial, Lucida, sans-serif; }.et_bloom .et_bloom_optin_1 .et_bloom_form_container p, .et_bloom .et_bloom_optin_1 .et_bloom_form_container p span, .et_bloom .et_bloom_optin_1 .et_bloom_form_container p sturdy, .et_bloom .et_bloom_optin_1 .et_bloom_form_container shape enter, .et_bloom .et_bloom_optin_1 .et_bloom_form_container shape button span { font-family: “Open Sans”, Helvetica, Arial, Lucida, sans-serif; } p.et_bloom_popup_input { padding-bottom: 0 !essential;}

Obtain For Unfastened
Sign up for the Divi Newlsetter and we can electronic mail you a replica of without equal Divi Touchdown Web page Format Pack, plus lots of alternative superb and unfastened Divi sources, guidelines and tips. Apply alongside and you are going to be a Divi grasp very quickly. In case you are already subscribed merely sort on your electronic mail deal with under and click on obtain to get entry to the structure pack.
You’ve got effectively subscribed. Please test your electronic mail deal with to substantiate your subscription and get get entry to to unfastened weekly Divi structure packs!
To import the structure in your web page, merely extract the zip document and drag the json document into the Divi Builder.
Let’s get to the educational lets?
What You Wish to Get Began
To get began, it is important to have the next setup:
- The Divi Theme put in and energetic
- A brand new web page created to construct from scratch on Divi’s entrance finish (visible) builder.
- 3 photos for use for mock content material. The photographs will have to be round 250px by way of 375px for easiest effects. Since those are previews of webpages, you’ll create your individual screenshots of any web page design and then crop/resize each and every symbol accordingly.
After that, you are going to have a clean canvas to start out development some hover tabs in Divi.
Recreating ET’s Format Pack Previews with Fan-Out Hover Results in Divi
Development the Phase and Row
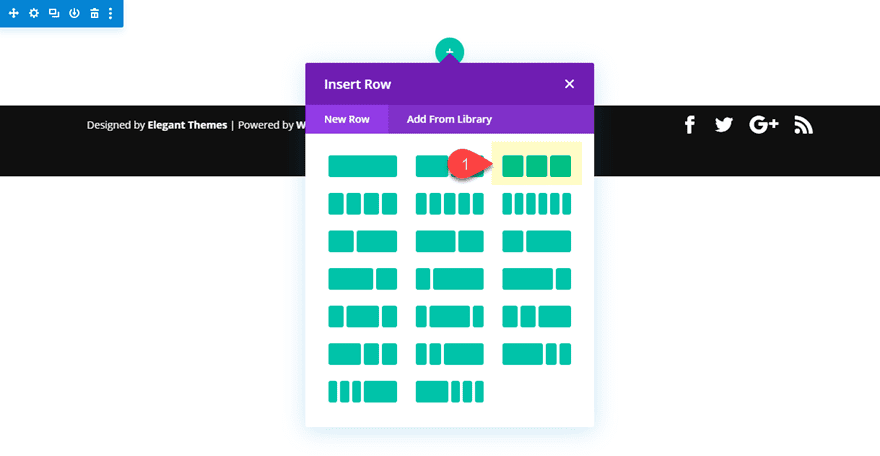
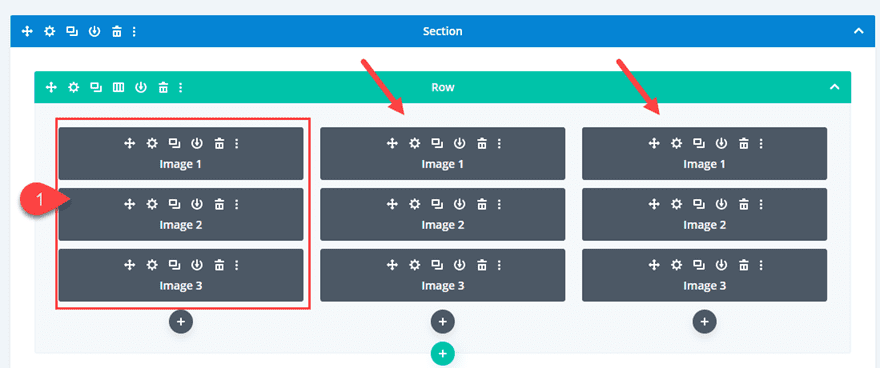
Create a brand new common segment with a three-column row.
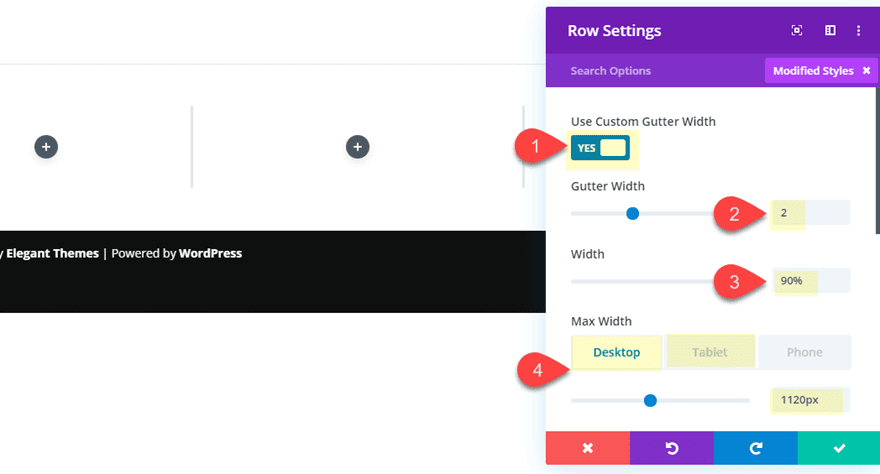
Earlier than including any modules, open the row settings and replace the scale and spacing as follows:
- Gutter Width: 2
- Width: 90%
- Max Width: 1120px (desktop), 400px (pill)
Then upload some padding to the row on pill for extra spacing on cellular.
- Column 1 Padding: 20% backside
- Column 2 Padding: 20% backside
- Column 3 Padding: 20% backside

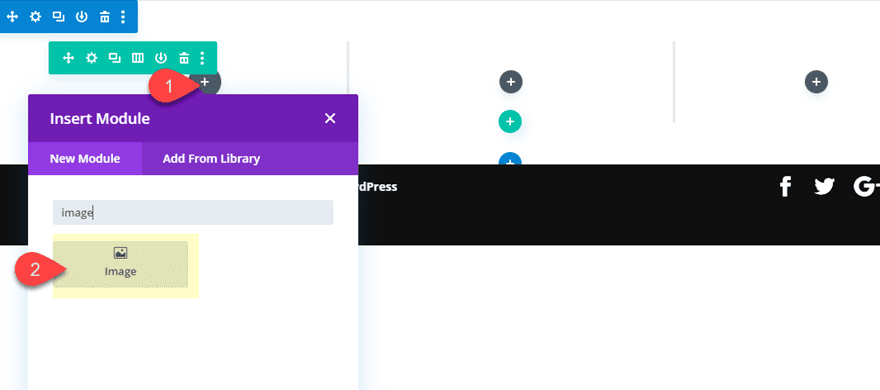
Including Symbol 1
Now we’re able so as to add our first of 3 photos that may make up our structure pack preview design. Pass forward and upload a picture module to column 1.
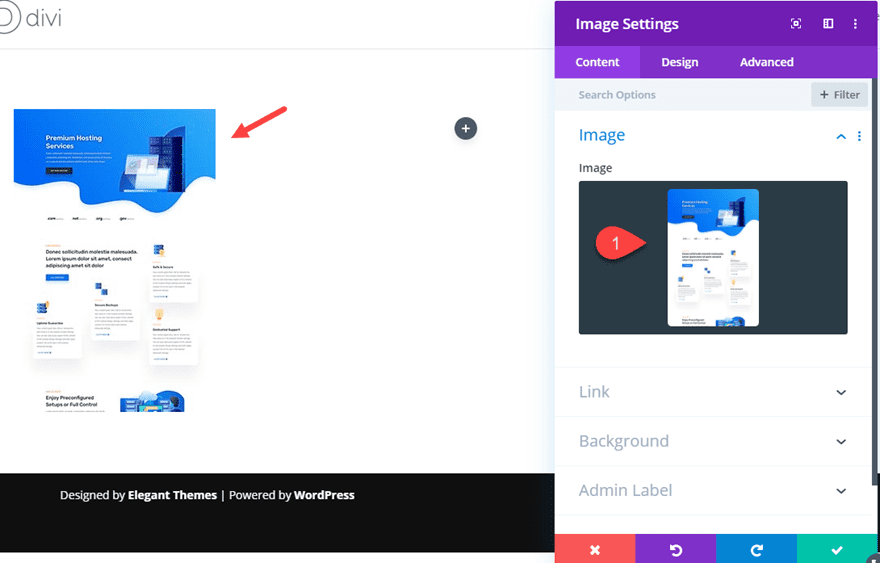
Then add the picture to the picture module (it will have to be round 250px by way of 375px in dimension).
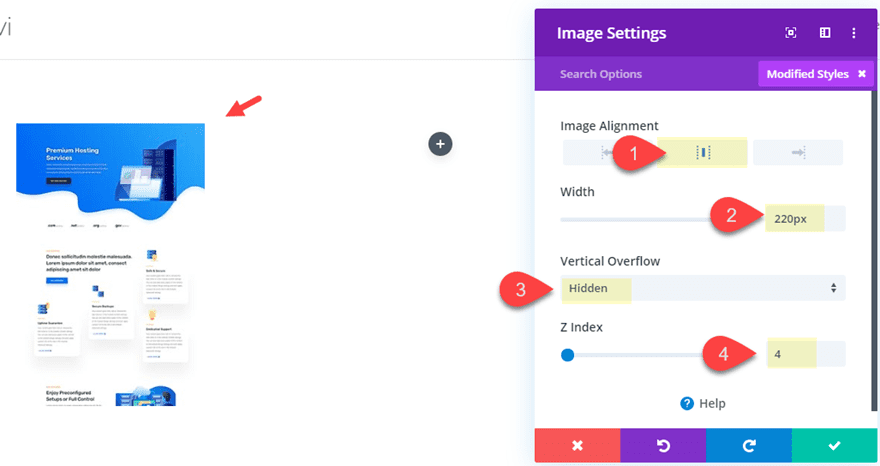
Then replace the design settings as follows:
- Symbol Alignment: middle
- Width: 220px
- Vertical Overflow: hidden
- Z index: 4
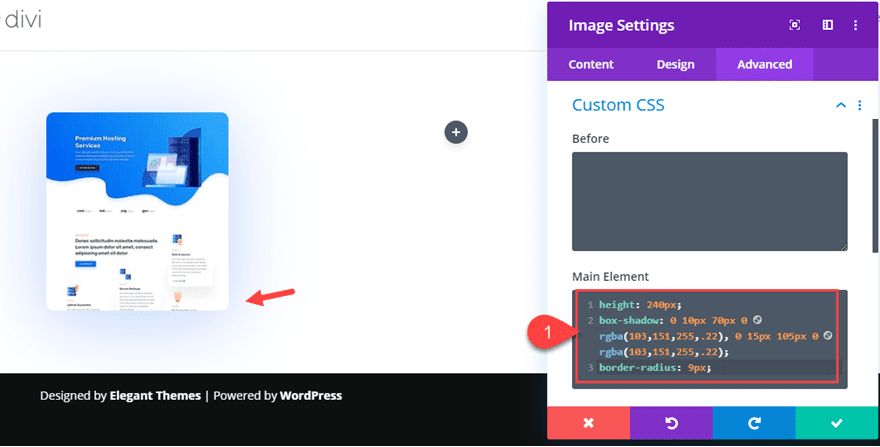
Since we’re wanting to focus on the picture container (no longer the picture itself), we wish to upload a customized peak, field shadow, and border radius the usage of customized CSS. Upload the next CSS to the Primary Part:
peak: 240px;
box-shadow: 0 10px 70px 0 rgba(103,151,255,.22), 0 15px 105px 0 rgba(103,151,255,.22);
border-radius: 9px;
This may permit the picture to regulate with the with of the picture container once we upload the hover impact in a while. As you’ll see now, the picture has been relatively bring to an end on the backside as a result of we’ve a customized peak of 240px and the overflow set to “hidden”.
Including Symbol 2
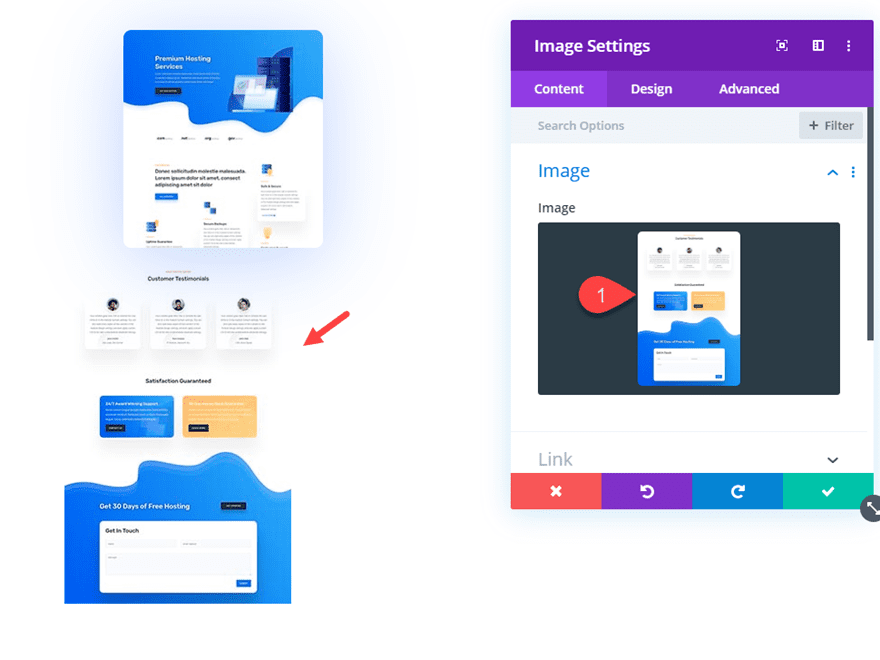
To create the second one symbol, upload a brand new symbol module under the primary symbol module in column 1. Then add a brand new symbol (250X350) to the module.
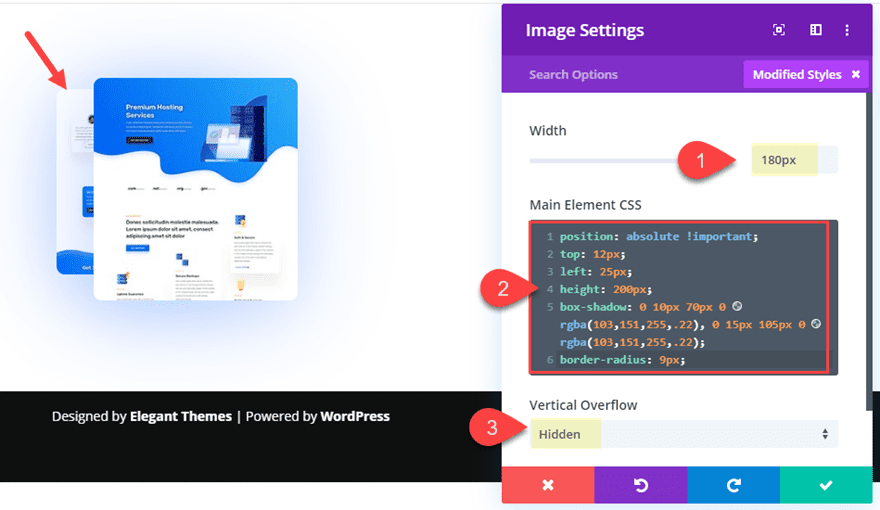
Then we wish to place the picture at the back of and relatively to the left of symbol 1. To do that we can wish to upload a customized width and peak with the vertical overflow hidden (just like we did with symbol 1). The principle distinction this is that we wish to give the picture an absolute place in order that shows on the peak left of the column at the back of symbol 1.
To do that, replace the next:
- Width: 180px
- Vertical Overflow: hidden
Then upload the next customized CSS to the Primary Part:
place: absolute !essential;
peak: 12px;
left: 25px;
peak: 200px;
box-shadow: 0 10px 70px 0 rgba(103,151,255,.22), 0 15px 105px 0 rgba(103,151,255,.22);
border-radius: 9px;
Including Symbol 3
Now we’re able so as to add the 3rd symbol to finish the structure pack preview. At this level it is smart to make use of the wireframe view mode since we’ve some overlapping that makes the usage of the visible builder tougher. Deploy the wireframe mode and replica symbol 2.
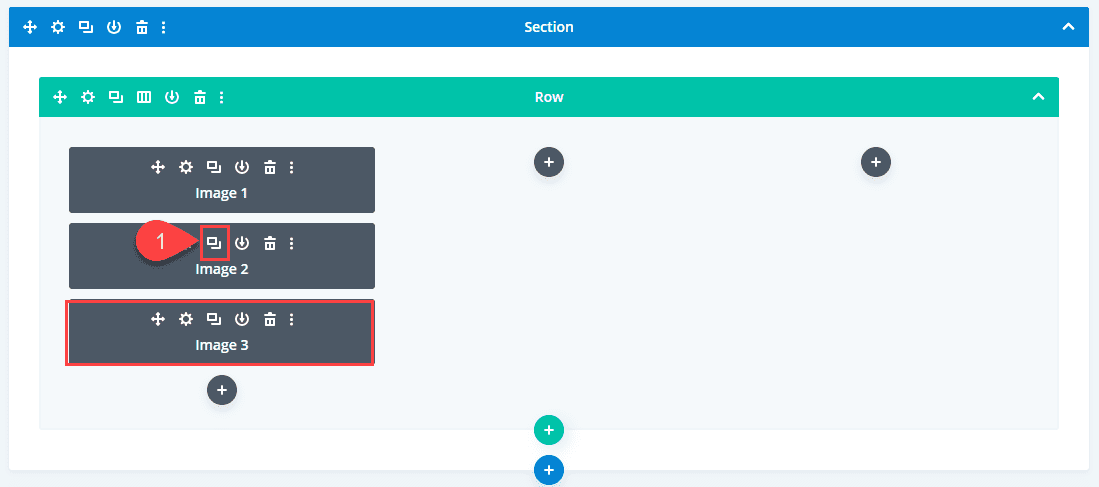
We duplicated the picture as a result of we need to raise over lots of the settings that we used for symbol 2. The one distinction (but even so a brand new symbol) is we wish to place the picture to the fitting as a substitute of the left.
Open the duplicated symbol (symbol 3) and replace symbol module with a brand new symbol (250×375).
Then replace the customized CSS by way of converting the left place belongings to a proper place belongings. No different adjustments to the CSS are wanted.
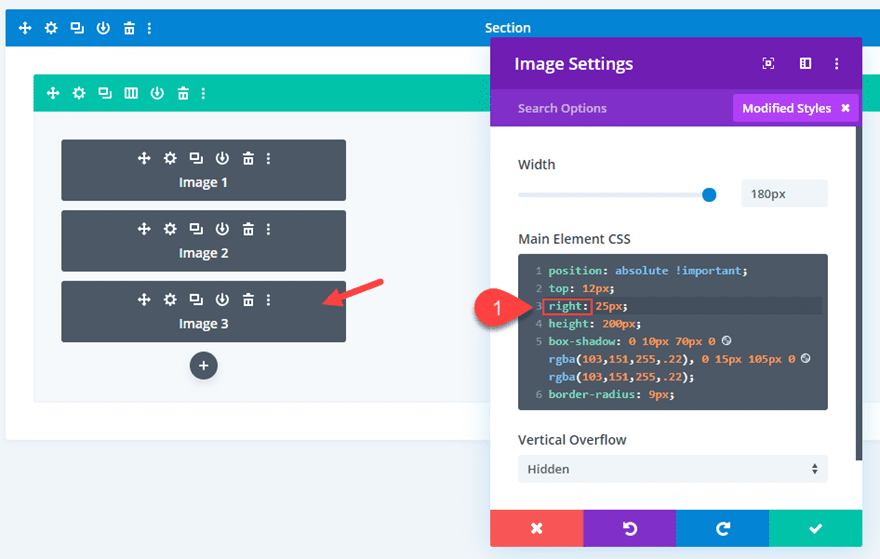
When you choose, you’ll reproduction and paste the next CSS within the Primary Part to interchange the present CSS.
place: absolute !essential;
peak: 12px;
proper: 25px;
peak: 200px;
box-shadow: 0 10px 70px 0 rgba(103,151,255,.22), 0 15px 105px 0 rgba(103,151,255,.22);
border-radius: 9px;
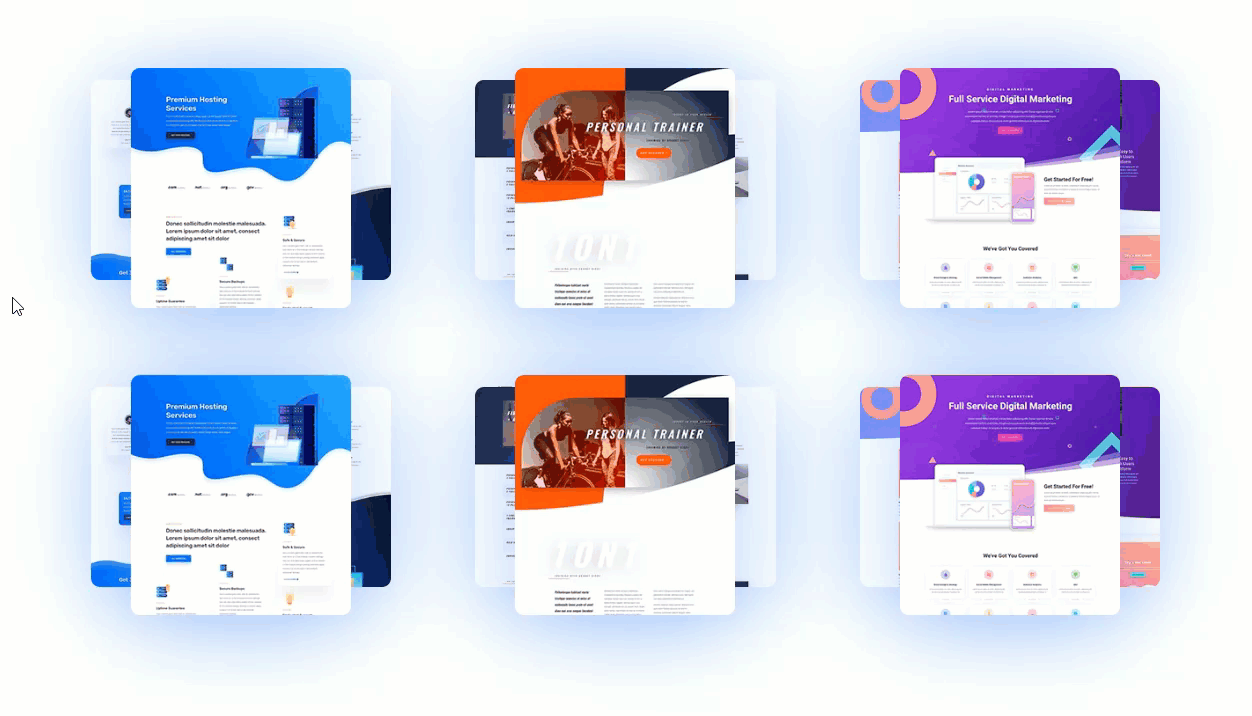
So A ways So Just right
This is the general end result thus far.

The design is in reality truly stunning as is, however let’s kick it up a notch with a fan-out hover impact.
Including the Fan-Out Hover Impact CSS
Typically, if we had been coping with only one symbol, lets simply upload hover results the usage of integrated Divi choices. However this fan-out hover impact calls for that we have interaction the hover state of more than one youngster components (photos) directly when soaring over the mother or father column. When soaring over the column, we would like the next to perform the next changes to the pictures.
- Upload a transition length to each and every symbol for a easy transition on hover.
- Modify Symbol 1 to have a width of 180px and a peak of 240px. This may motive the picture container to develop taller and narrower to turn extra of the picture.
- Modify Symbol 2 and three to have a width of 160px and a peak of 220px. This may additionally motive the pictures to develop taller and narrower to turn extra of the picture.
- Modify Symbol 2 to rotate 5 levels counterclockwise and transfer relatively to the left. We will do that by way of including -5 stage price the
rework:rotatebelongings and adjusting the price of theleftplace belongings to 0. - Modify Symbol 3 to rotate 5 levels clockwise and transfer relatively to the fitting. We will do that by way of including a 5 stage price to the
rework:rotatebelongings and adjusting the price of theproperplace belongings to 0.
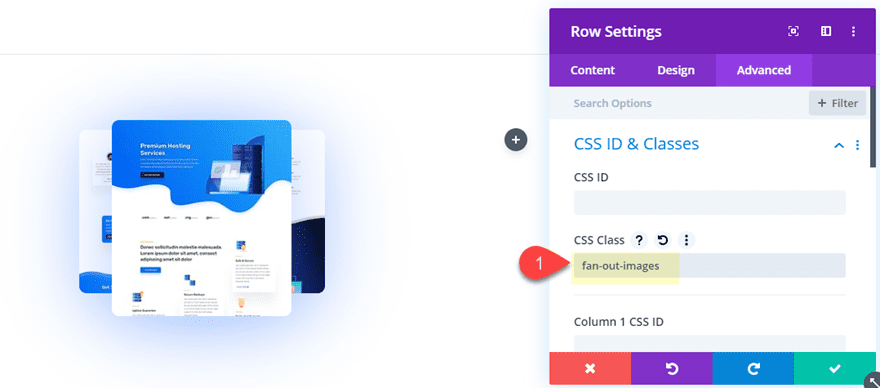
So as to add the customized CSS wanted for those hover results, we wish to upload a customized CSS magnificence to the row containing the pictures. This may permit us to use the customized CSS best to the pictures in a specific row.
Open the row settings and upload the next CSS Magnificence.
- CSS Magnificence: fan-out-images
So as to add the customized CSS to the web page, open the web page settings and upload the next Customized CSS below the Complicated tab.
/**transition length and velocity curve**/
.fan-out-images .et_pb_image {
  -webkit-transition: 300ms all cubic-bezier(.4,0,.2,1);
  transition: 300ms all cubic-bezier(.4,0,.2,1);
}
/**Trade width and peak of symbol 1 on hover**/
.fan-out-images .et_pb_column:hover .et_pb_image:first-child {
  width: 160px;
  peak: 240px;
}
/**Trade width and peak of symbol 2 and three on hover**/
.fan-out-images .et_pb_column:hover .et_pb_image:nth-child(2), .fan-cards .et_pb_column:hover .et_pb_image:nth-child(3) {
  width: 160px;
  peak: 220px;
}
/**Rotate symbol 2 counterclockwise and transfer to the left on hover**/
.fan-out-images .et_pb_column:hover .et_pb_image:nth-child(2) {
  left: 0;
  -webkit-transform: rotate(-5deg);
  rework: rotate(-5deg);
}
/**Rotate symbol 3 clockwise and transfer to the fitting on hover**/
.fan-out-images .et_pb_column:hover .et_pb_image:nth-child(3) {
  proper: 0;
  -webkit-transform: rotate(5deg);
  rework: rotate(5deg);
}
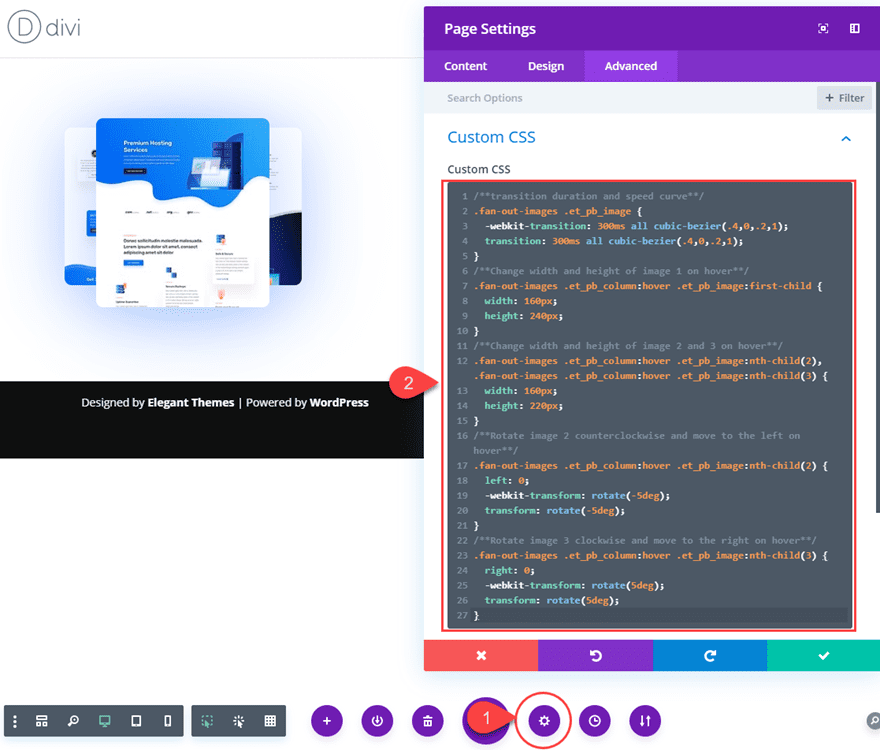
I’ve upload a remark above each and every snippet of css to remind you what each and every is doing.
As soon as you might be accomplished. Take a look at the general end result.
Ultimate Consequence

Non-compulsory Hover Impact: Rotating Symbol 1 and a pair of One at a time on Hover
So as to add any other stage of engagement to the structure pack preview photos, we will have the rotation of symbol 1 and symbol 2 occur become independent from the preliminary hover impact. This may permit the consumer to engage with the pictures in a singular approach. You’ll even upload separate hyperlinks or lightbox previews to these photos if you need.
Right here’s the way you do it.
Removing the Turn out to be Houses from Web page Settings Customized CSS
First, you wish to have to take out the 2 strains of customized CSS that rotate the picture when soaring over the column. Open the web page settings customized CSS and take out the next:
  -webkit-transform: rotate(-5deg);
  rework: rotate(-5deg);
  -webkit-transform: rotate(5deg);
  rework: rotate(5deg);
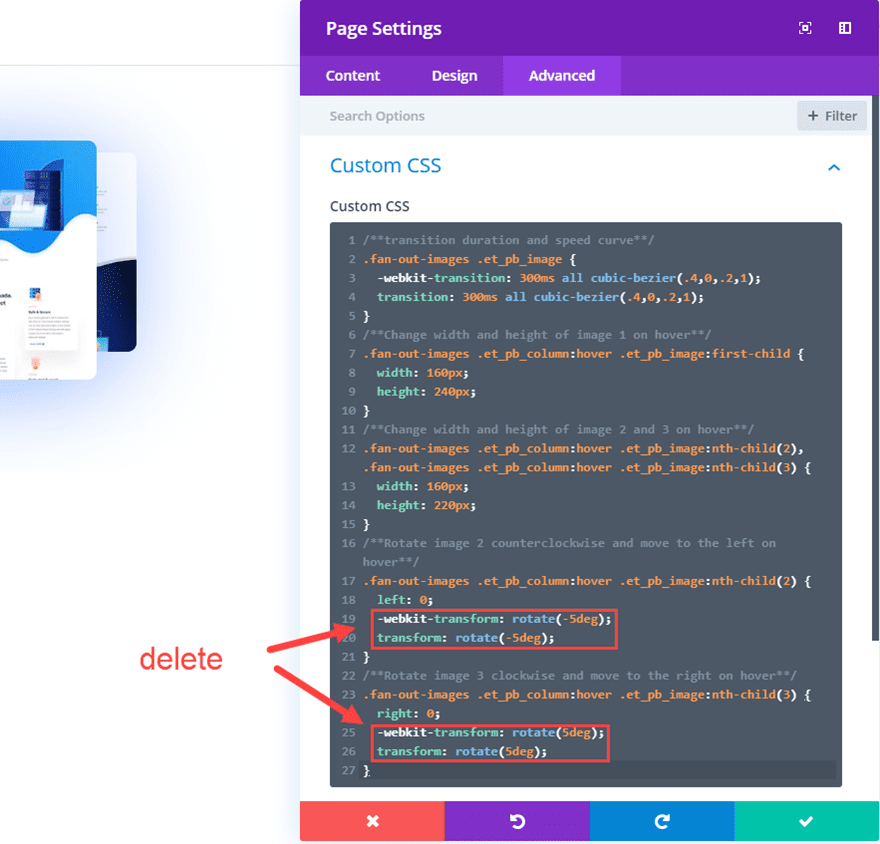
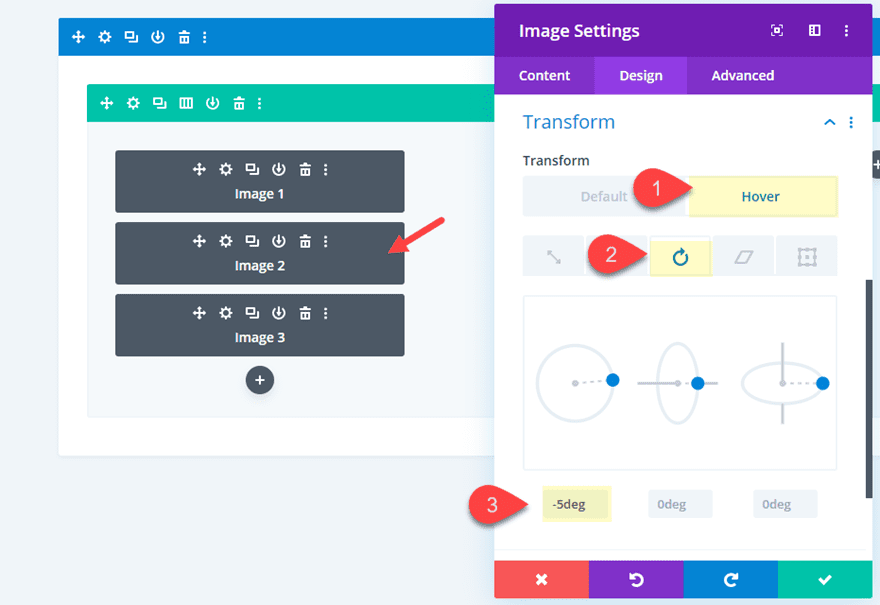
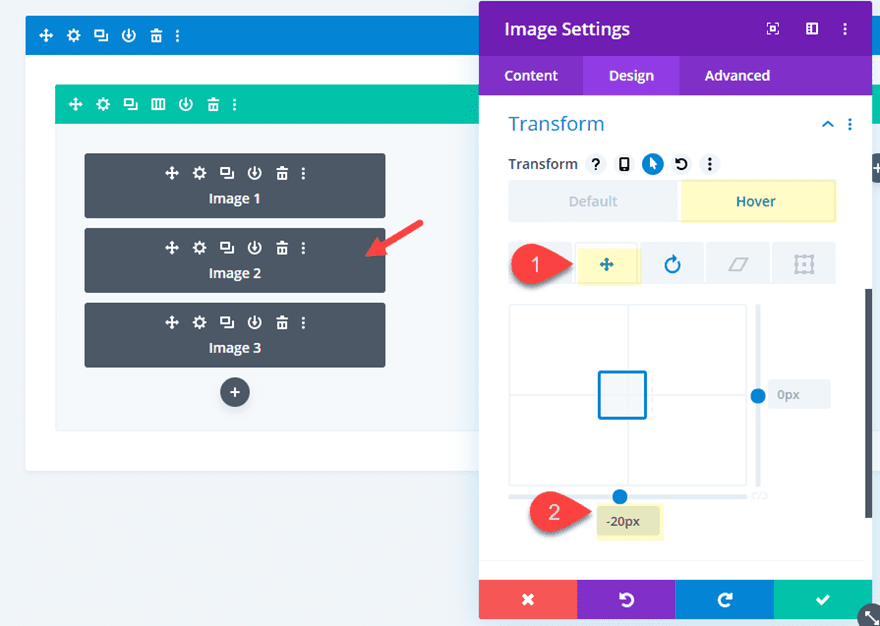
Including Turn out to be Houses on Hover for Symbol 2
Then open the picture module settings for symbol 2 and use Divi’s integrated rework choices so as to add the similar rework rotate price we deleted prior to now for the hover state.
- Turn out to be Rotate Z Axis (hover): -5deg
- Turn out to be Translate X axis (hover): -20px
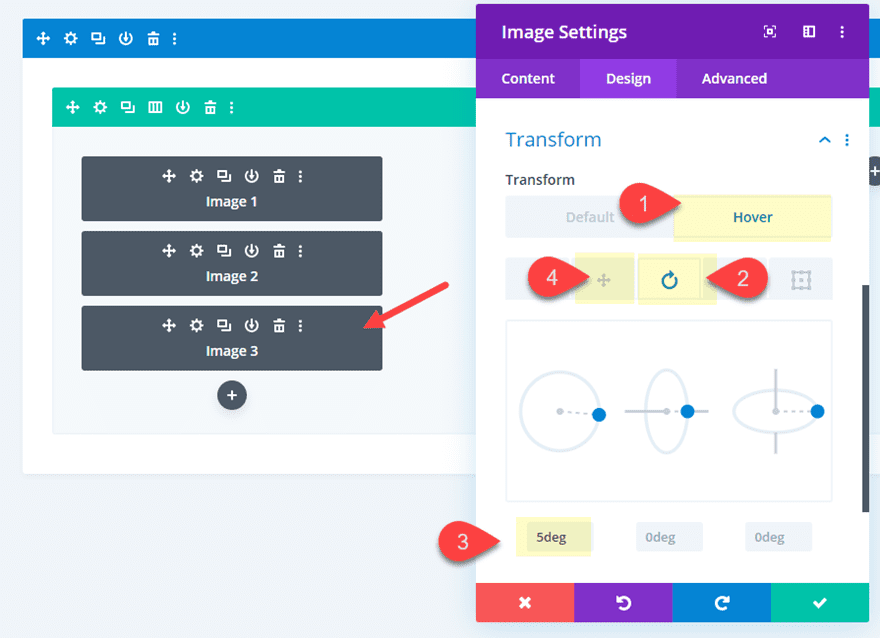
Including Turn out to be Houses on Hover for Symbol 3
Then replace the picture module settings for symbol 3 so as to add the rework rotate belongings.
- Turn out to be Rotate Z Axis (hover): 5deg
- Turn out to be Translate X axis (hover): 20px
Now take a look at the general end result.
Ultimate Consequence

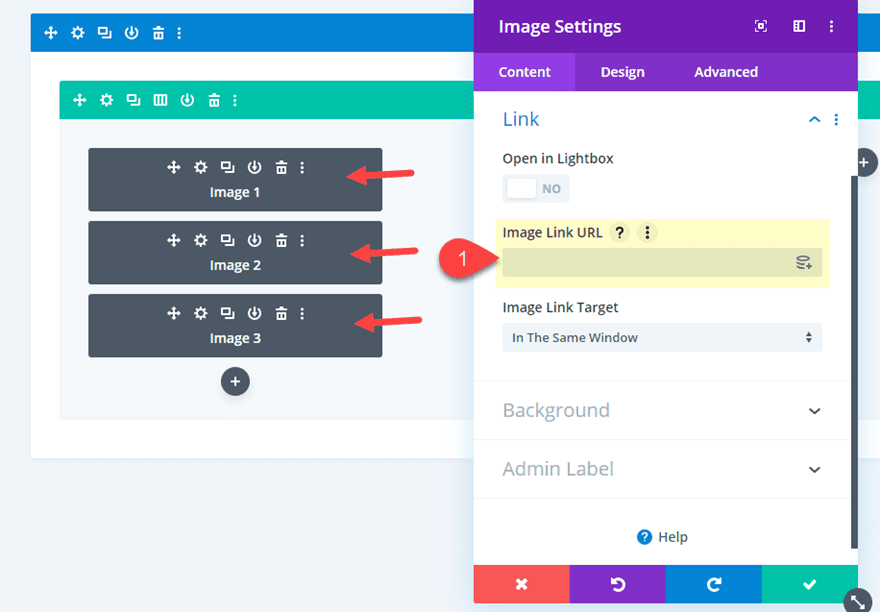
Including Hyperlinks to Photographs
If you wish to create redirect hyperlinks to show off a specific structure pack or web page design on a separate web page, you’ll want to upload the similar Hyperlink URL to all 3 photos within the pack. To do that, open each and every of the picture modules and upload the hyperlink URL.
Including new Format Pack Previews to the Different Columns
To complete off the design, we will reproduction the 3 photos in column 1 and pasted them into column 2 and column 3.
After that, all you wish to have to do is replace each and every of the pictures in column 2 and three with new ones.
That’s it!
Ultimate Design
This is the general design. The highest row presentations the hover fan-out hover impact when soaring over the column. The second one row presentations the secondary fan-out hover impact added to symbol 2 and three one by one.
The 3 column structure on desktop will modify to at least one column on pill and make contact with.
Ultimate Ideas
The fan-out hover impact is a gorgeous and attractive design part that you’ll use to function web page layouts for your very personal website online. The combo of customized CSS and integrated Divi settings we coated on this educational will paintings magically. And this setup will function a super place to begin for exploring extra design the usage of the Divi builder. Optimistically, this will give you some inspiration to take your portfolio to the following stage.
I stay up for listening to from you within the feedback.
Cheers!
.inline-code{padding: 0px 4px; colour: red; font-family: Monaco,consolas,bitstream vera sans mono,courier new,Courier,monospace!essential}
The publish How to Recreate ET’s Layout Pack Previews with Fan-Out Hover Effects in Divi gave the impression first on Elegant Themes Blog.
WordPress Web Design