Including tooltips to label a background symbol is an inventive technique to interact guests with treasured details about your services or products. The elemental concept is to place icons (or textual content) explicit places at the symbol (like a google map with pinpoints). And when you make the most of Divi’s hover results, you’ll be able to disclose further textual content when soaring over an icon to create enticing tooltips.
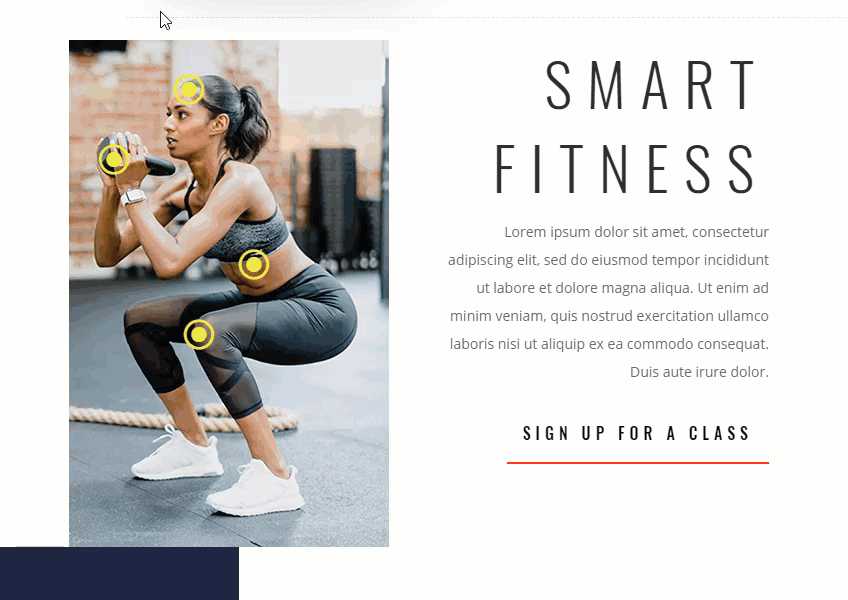
On this instructional, I’m going to turn you the best way to label a background symbol with blurbs that can function informative tooltips about your product. To try this I’ll be the use of the Health Gymnasium Touchdown web page to label a background symbol with details about high quality health.
Let’s get began.
Contents
A Sneak Peek
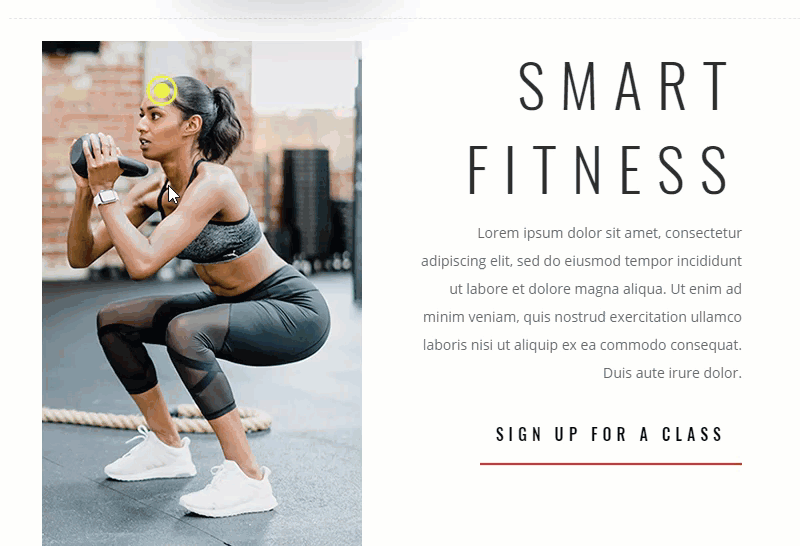
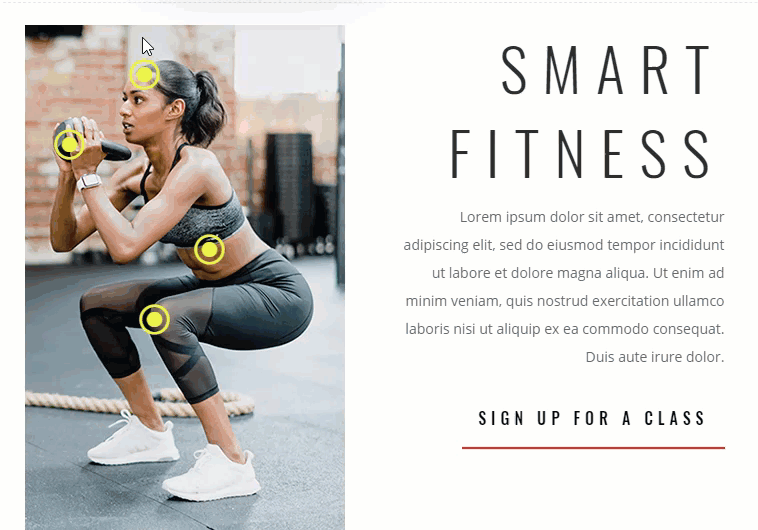
Here’s a sneak top of the design we can construct on this instructional.
What You Want
For this instructional, you are going to want the next:
- The Divi Theme
- The Health Gymnasium Touchdown Web page from the Health Gymnasium Structure Pack (to be had from the Divi Builder)
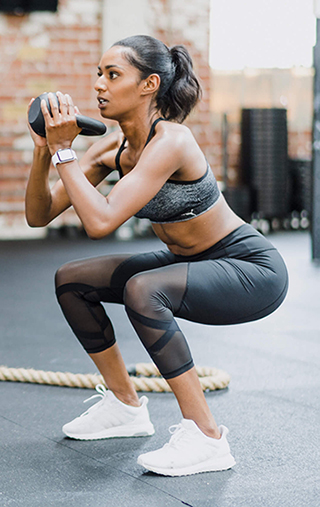
- A picture to make use of in your background symbol this is precisely 320px via 507px. Be happy to pull this one onto your desktop and use it for this instructional.

Getting ready the Premade Structure
To get began, create a brand new web page, upload a name, after which deploy the Visible Builder. Then make a choice “Select a Premade Structure”. From the weight from library popup, make a choice the Health Gymnasium Touchdown Web page structure and click on “Use This Structure”.

As soon as the structure is loaded to the web page, scroll all the way down to the fourth segment with the 2 column row that has the name “Featured Methods” in the correct column. We’re going to upload our background symbol with tooltips within the left column of this row.

Use the inline editor to modify the name textual content in the correct column to “Sensible Health”.
Including the Background Symbol and Customizing the Row Settings
With this design, sizing and spacing are a very powerful and can wish to be exact. And, all of it begins with the scale of our background symbol. As discussed sooner than the picture we use for the background must be 320px via 507px. Since a 320px width is a great start line for cellular, this may occasionally let us make the design cellular pleasant with no need to modify the scale of our symbol.
Open up the row settings and upload the background symbol to column 1. Then replace the next:
Column 1 Background Symbol Dimension: Exact Dimension
Column 1 Background Symbol Place: Heart Left
Column 1 Background Symbol Repeat: No Repeat

Subsequent we wish to upload a customized width to the row and take out the highest and backside spacing.
Customized Width: 700px
Customized Padding: 0px most sensible, 0px backside
Surroundings the width to 700px will make sure that the row doesn’t get smaller on smaller display sizes sooner than the pill breakpoint.

At this level, I believe this can be a just right concept to move forward and set a particular peak for column 1 equivalent to the peak of the background symbol. This fashion we all know that the picture will stay visual if the content material of the column doesn’t disclose all of the symbol. To try this, cross to the complex tab and upload the next customized CSS within the Column 1 Major Component:
peak: 507px;
Now the peak of the column is the same as the peak of your symbol and won’t rely at the content material (or modules) we upload to the row.
Including the Tooltip Labels over the Background Symbol The usage of Blurbs
With our background symbol in position, we will get started including our blurbs which will probably be located and styled to serve as as tooltips. Move forward and upload a blurb module to column 1 and replace the next blurb settings:
Identify: “Center of attention”
Content material: “The important thing to good fortune!”
Use Icon: Sure
Icon: see screenshot
You will need to stay the Identify and content material to only some phrases as a result of we would like so that you could are compatible all of the blurb within the background symbol.

Subsequent, you’ll replace the design settings. This can be a extra complex design of a blurb so there are numerous choices to modify at the side of a couple of hover results that can disclose the content material of the blurb on hover. Replace the next blurb design settings:
Icon Colour: #edf000
Circle Icon: YES
Circle Colour: rgba(0,0,0,0)
Display Circle Border: YES
Circle Border Colour (default): rgba(0,0,0,0)
Circle Border Colour (hover): #edf000
Symbol/Icon Placement: Left
Use Icon Font Dimension: YES
Icon Font Dimension: 40px

Proceed to regulate the design settings as follows:
Identify Font Weight: Daring
Identify Textual content Colour (default): rgba(0,0,0,0)
Identify Textual content Colour (default): #edf000
Frame Textual content Colour (default): rgba(0,0,0,0)
Frame Textual content Colour (default): #ffffff
(Understand that the default textual content colours are totally clear with a view to cover them till you hover over the blurb.)
Customized Margin: 15px most sensible, 0px backside, 90px left
Customized Padding: 5px most sensible, 5px backside, 5px proper
(The customized margin is the way you place the blurb icon in a particular location over the picture.)
Field Shadow: see screenshot
Field Shadow Horizontal Place: -154px
Field Shadow Vertical Place: 0px
Shadow Colour (default): rgba(0,0,0,0)
Shadow Colour (hover): #1e2441
(The field shadow is an inventive manner so as to add a background colour in the back of the content material of the blurb. By means of default, the field shadow is totally clear however will display a pleasing blue colour on hover.)

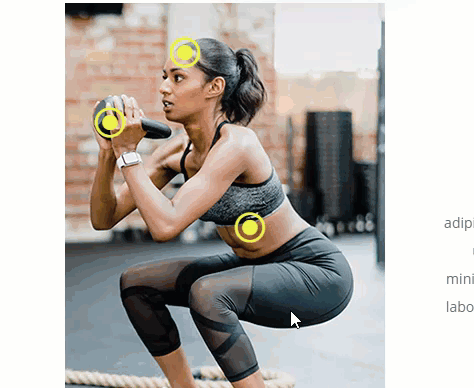
Now cross and try the overall results of your first blurb to ensure the hover impact and design is proper.
Subsequent, we will reproduction the blurb module to create our 2d tooltip label. After you reproduction the blurb, You’ll be able to replace the content material to no matter textual content you need (stay it quick). Then all you want to do is place the tooltip the use of a unique customized margin as follows:
Customized margin: 0px most sensible, 0px backside, 15px left

To create the 3rd blurb, you’ll be able to reproduction the second one blurb.
For this 3rd blurb, we can run out of room at the proper aspect of our symbol so we actually gained’t have a lot room for content material. Shall we use destructive margin to increase the blurb outdoor of the picture, however this is able to additionally lengthen past the 320px display measurement on cellular. So, we’re going to introduce a couple of small snippets of code to turn our blurb content material round in order that the icon is at the proper and the textual content is at the left. To try this open the blurb settings and, beneath the Complex tab, upload the next customized CSS.
Major Component CSS:
course: rtl;
Blurb Symbol CSS:
padding-left: 15px;

When you haven’t spotted, the icon is now at the proper. Now all you want to do is place the blurb the use of the next customized margin:
Customized Margin: 35px most sensible, 0px backside, 0px left

We additionally wish to modify the field shadow in order that it comes from the left as an alternative of the correct as follows:
Field Shadow Horizontal Place: 150px

Now take a look at the reversed tooltip at the are living website.
For the final blurb, reproduction the primary blurb on the most sensible of the column and paste it beneath the 3rd blurb.
Then replace the margin as follows:
Customized Margin: 0px most sensible, 100px left

Now take a look at the overall results of the design!

And take a look at the ones tooltip hover results!
Is it Responsive?
This design used to be constructed used to be constructed with cellular in thoughts from the start. The picture has a width of 320px which is the width of maximum small smartphones. And since we sized and located the whole lot the use of a pixel period devices, the design (together with the tooltips) don’t transfer round once we modify the browser measurement.

On the other hand there’s yet another factor chances are you’ll wish to do with a view to make sure that and maximize the width of the picture on small telephone displays. By means of default, your row can have a 80% width on cellular, so with a view to make this 100%, you’ll be able to upload it as customized CSS for your Row’s primary part like so:
width: 100%;

Your customized width of 700px will nonetheless function a max width on desktop, however will now be 100% on cellular.
Ultimate Ideas
Labeling a background symbol with tooltips and hover results like this one can upload a component {of professional} design that engages your target audience with helpful knowledge. And I’m positive there are a couple of tactics to make use of this idea for different use circumstances. However it does include demanding situations when you plan on maintaining the design on cellular as smartly. The trick is to suppose mobile-first and plan forward. I am hoping this serves as inspiration for long term initiatives down the street. If the rest, a minimum of you know the way to create a blurb with an icon or the correct :).
I stay up for listening to from you within the feedback beneath.
Cheers!
The submit How to Label a Background Image with Engaging Tooltips in Divi seemed first on Elegant Themes Blog.
WordPress Web Design