
Wish to migrate from WordPress.com to WordPress.org (AKA self-hosted WordPress)? Typically, this implies you’re able to take your weblog or industry to the following point! Going with a self-hosted resolution opens up an entire new realm of customization choices and chances in your site.
On this article, we’ll display you step by step how you’ll migrate your current WordPress.com web site to a self-hosted WordPress web site at Kinsta.
Kinsta does be offering free migrations, however this doesn’t come with migrations from different platforms similar to WordPress.com. Those are two very other answers. Perplexed? Learn extra concerning the variations in our article on WordPress.com vs WordPress.org.
Contents
- 1 What You Wish to Get Began
- 2 Steps to Migrate WordPress.com to WordPress.org
- 2.1 Step 1: Create a New WordPress Website at Kinsta
- 2.2 Step 2: Export Content material from WordPress.com
- 2.3 Step 3: Import Content material to New WordPress.org Website
- 2.4 Solving Lacking Photographs After WordPress.com Migration
- 2.5 Step 4: Redirect WordPress.com Website online to WordPress.org (Or Make Personal)
- 2.6 Use Jetpack to Get right of entry to WordPress.com Capability
- 3 Abstract
Nonetheless in search of that best WordPress host?
-

Totally controlled -
 Safe like Fortress Knox
 -
 Unfastened migrations
 -
 Final pace
 -
 Day by day backups
 -
 Google Cloud Platform
You’ll wish to make the most of the WordPress.org self-hosted resolution to make use of Kinsta’s webhosting.
What You Wish to Get Began
With the intention to apply this educational, we’ll suppose that you simply’ve already signed up for webhosting with Kinsta. If no longer, you’ll head right here to learn more about Kinsta’s plans.
Past webhosting in your new WordPress.org web site, you’ll additionally desire a area identify.
In the event you bought a customized area from WordPress.com (e.g. yoursite.com as a substitute of yoursite.wordpress.com), you’ll additionally wish to level that area to Kinsta.
To try this, you’ll both edit your DNS knowledge at WordPress.com and level it to Kinsta:
- Right here’s find out how to edit DNS information at WordPress.com
- Right here’s find out how to point that DNS information to Kinsta
Or, you’ll decide to transfer your domain to another registrar after which level it to Kinsta.
In the event you don’t have a customized area identify but, you’ll wish to acquire one from a third-party provider – we advise a supplier like Google Domains or Namecheap. Having hassle bobbing up with a just right area identify? Take a look at a couple of tips about how to choose a domain name.
While you’ve signed up for Kinsta webhosting and feature your area arrange, right here’s find out how to migrate WordPress.com to WordPress.org.
Steps to Migrate WordPress.com to WordPress.org
To come up with an concept of what it takes emigrate WordPress.com to WordPress.org, right here’s a high-level have a look at the stairs that you simply’ll wish to take:
- Create a contemporary WordPress set up at Kinsta and carry out some elementary home tasks
- Export your content material from WordPress.com
- Import your content material to WordPress.org with the WordPress Importer device
- If the use of
yoursite.wordpress.comURL, redirect guests on your new area (non-compulsory)
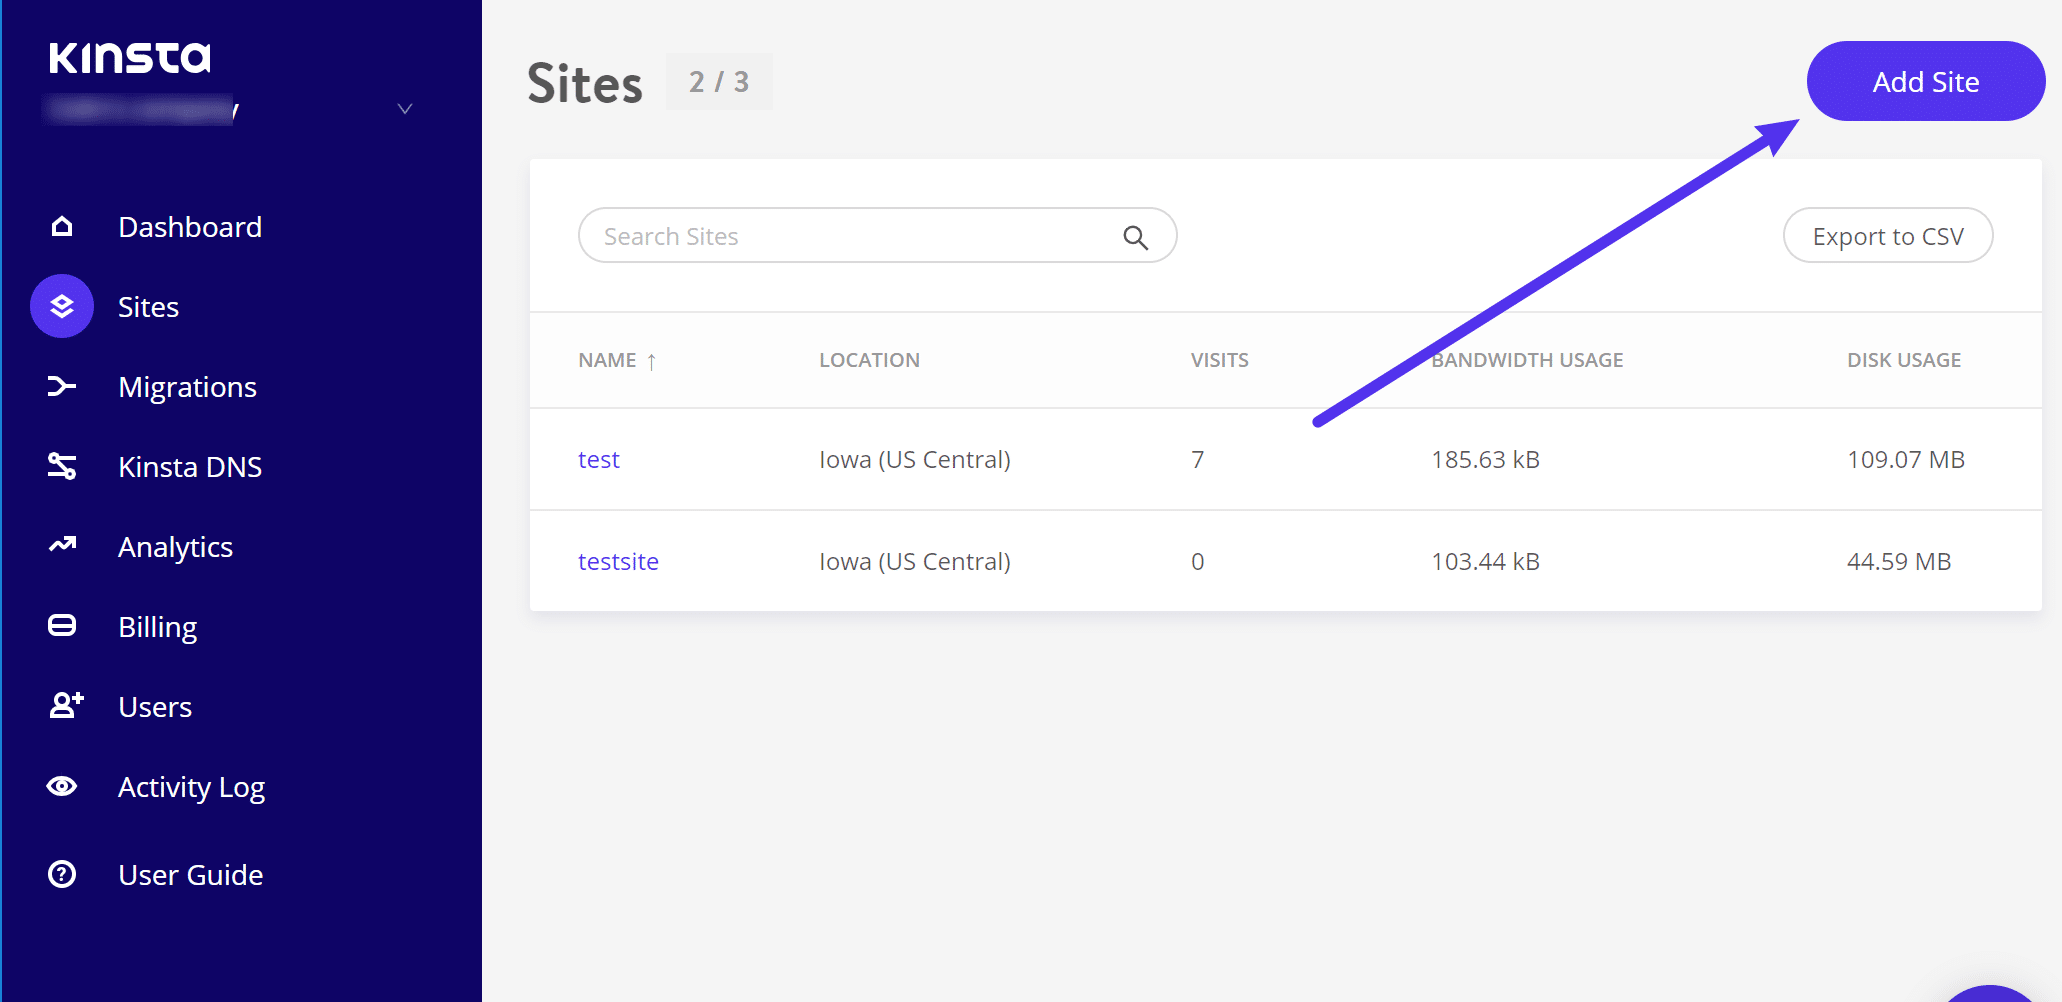
Step 1: Create a New WordPress Website at Kinsta
To get began, you’ll wish to create a contemporary WordPress.org set up.
At Kinsta, you’ll do this through going to the Websites tab on your MyKinsta dashboard after which clicking the Upload Website button:
create a brand new WordPress set up
Then, apply the stairs within the popup to put in your web site:

Fill in knowledge in your WordPress set up
You’ll view a more detailed tutorial here.
While you’ve created your new WordPress.org set up, you’ll wish to do some home tasks ahead of you import your WordPress.com content material.
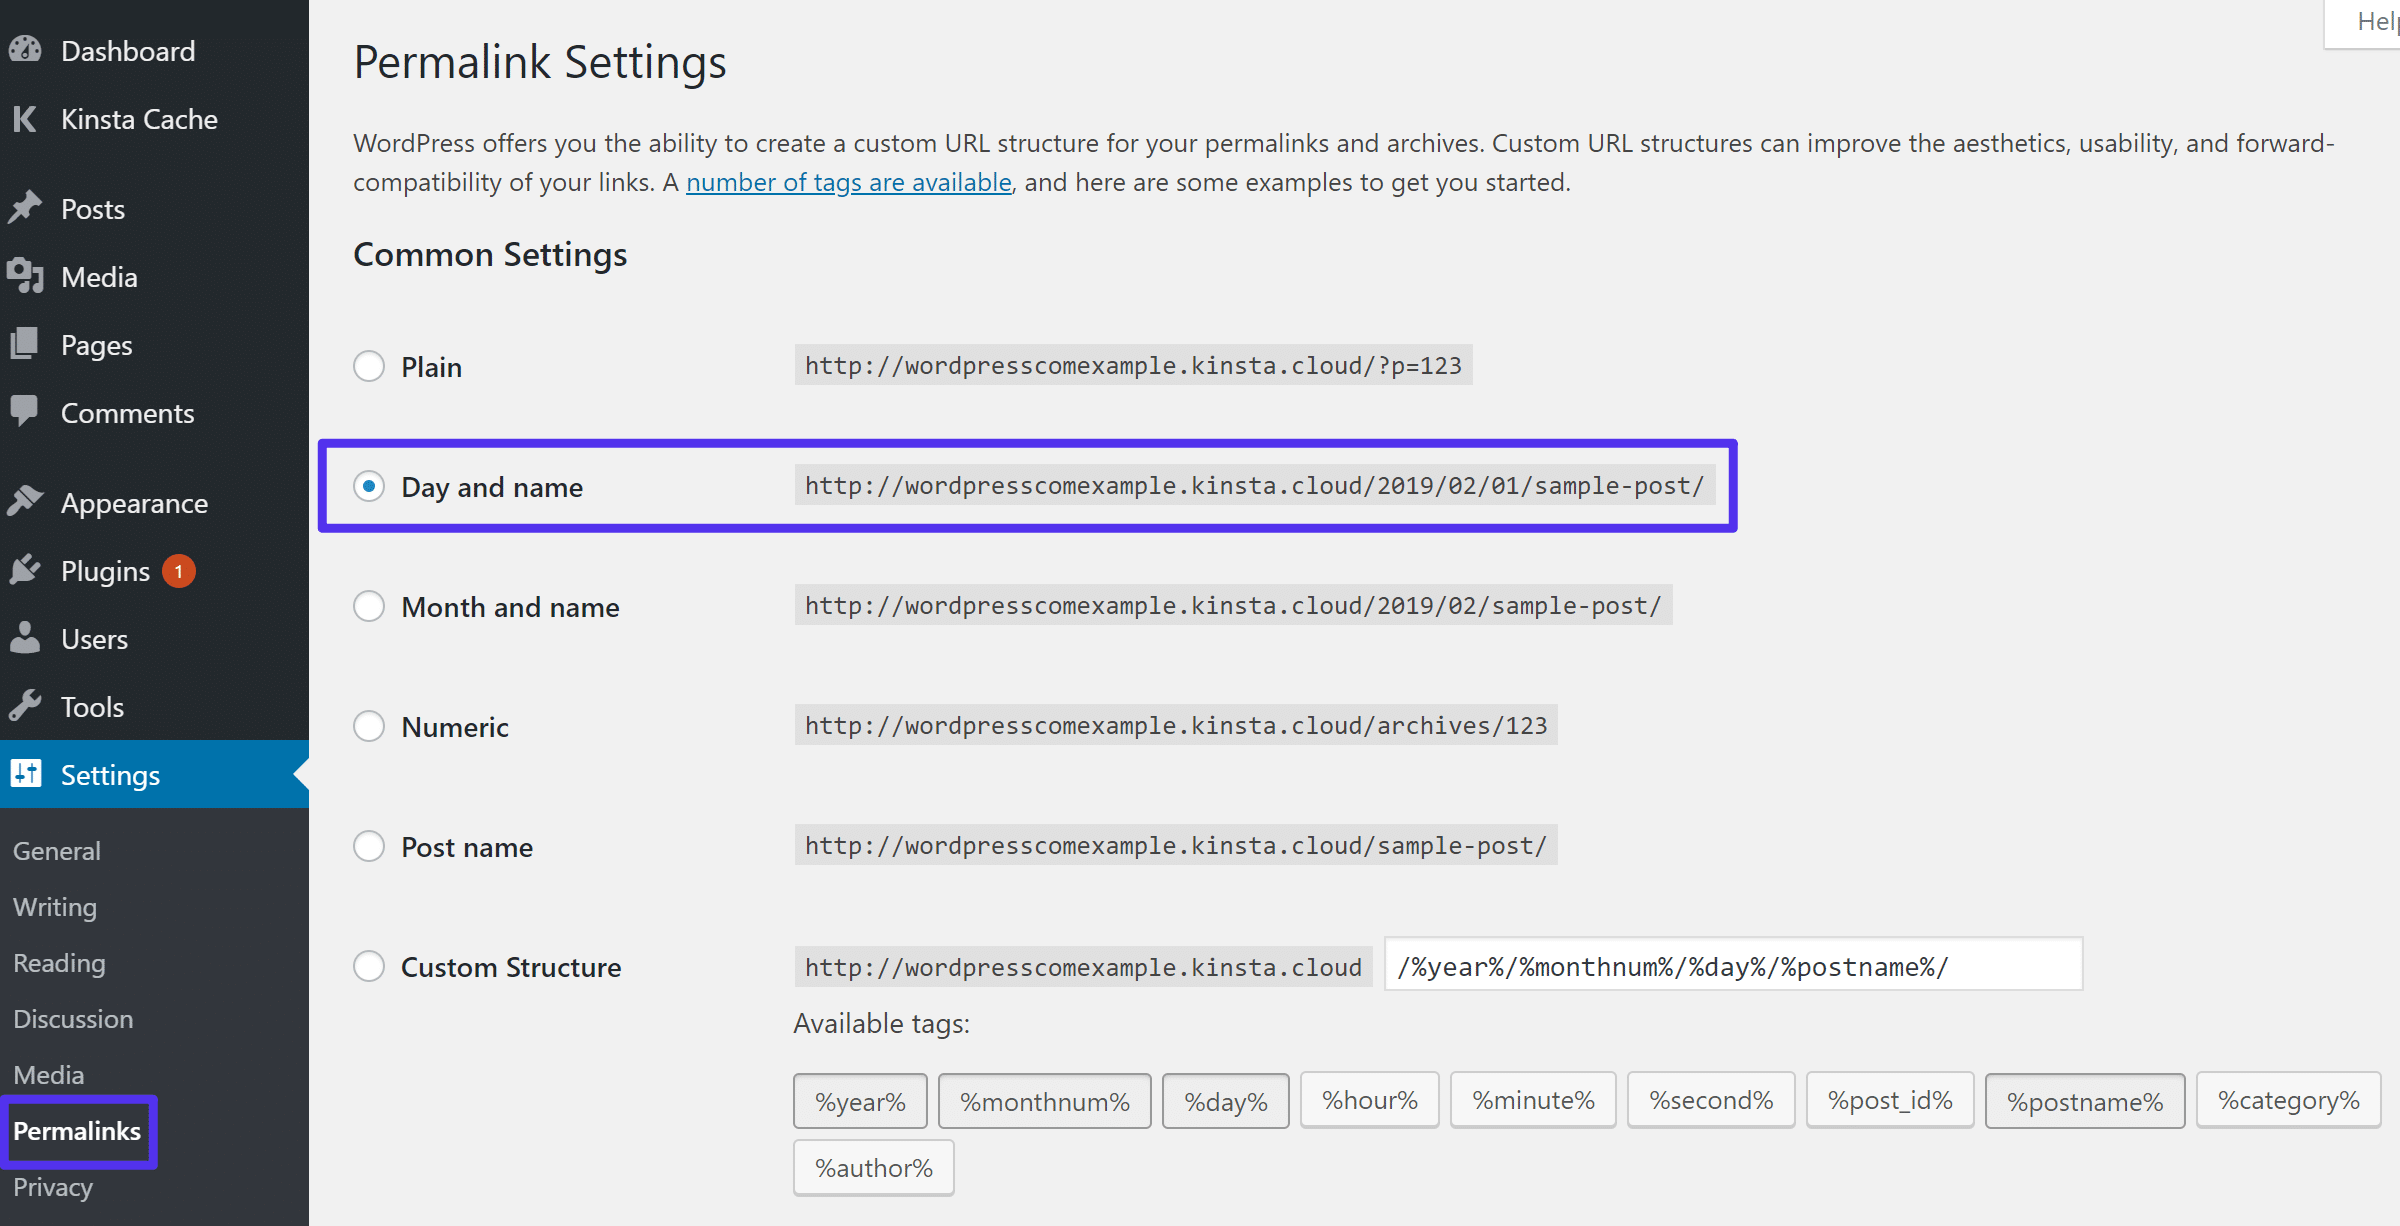
Set Permalinks
Your WordPress site’s permalinks impact the structure of your site’s URLs.
With the intention to make certain a unbroken transition, you’ll wish to be sure that your new self-hosted WordPress.org set up makes use of the similar permalink construction as your WordPress.com site.
By means of default, WordPress.com internet sites use the Day and identify permalink construction.
To mimic this permalink structure for your WordPress.org web site, log in on your self-hosted WordPress dashboard and cross to Settings → Permalinks.
Then, make a selection the choice for Day and identify and save your adjustments:
Set your permalink construction to check WordPress.com
If you wish to exchange your permalink construction at some point, you’ll all the time set up a 301 redirect in a while. If wanted, Kinsta reinforce workforce will let you arrange a 301 redirect to soundly exchange your permalink construction.
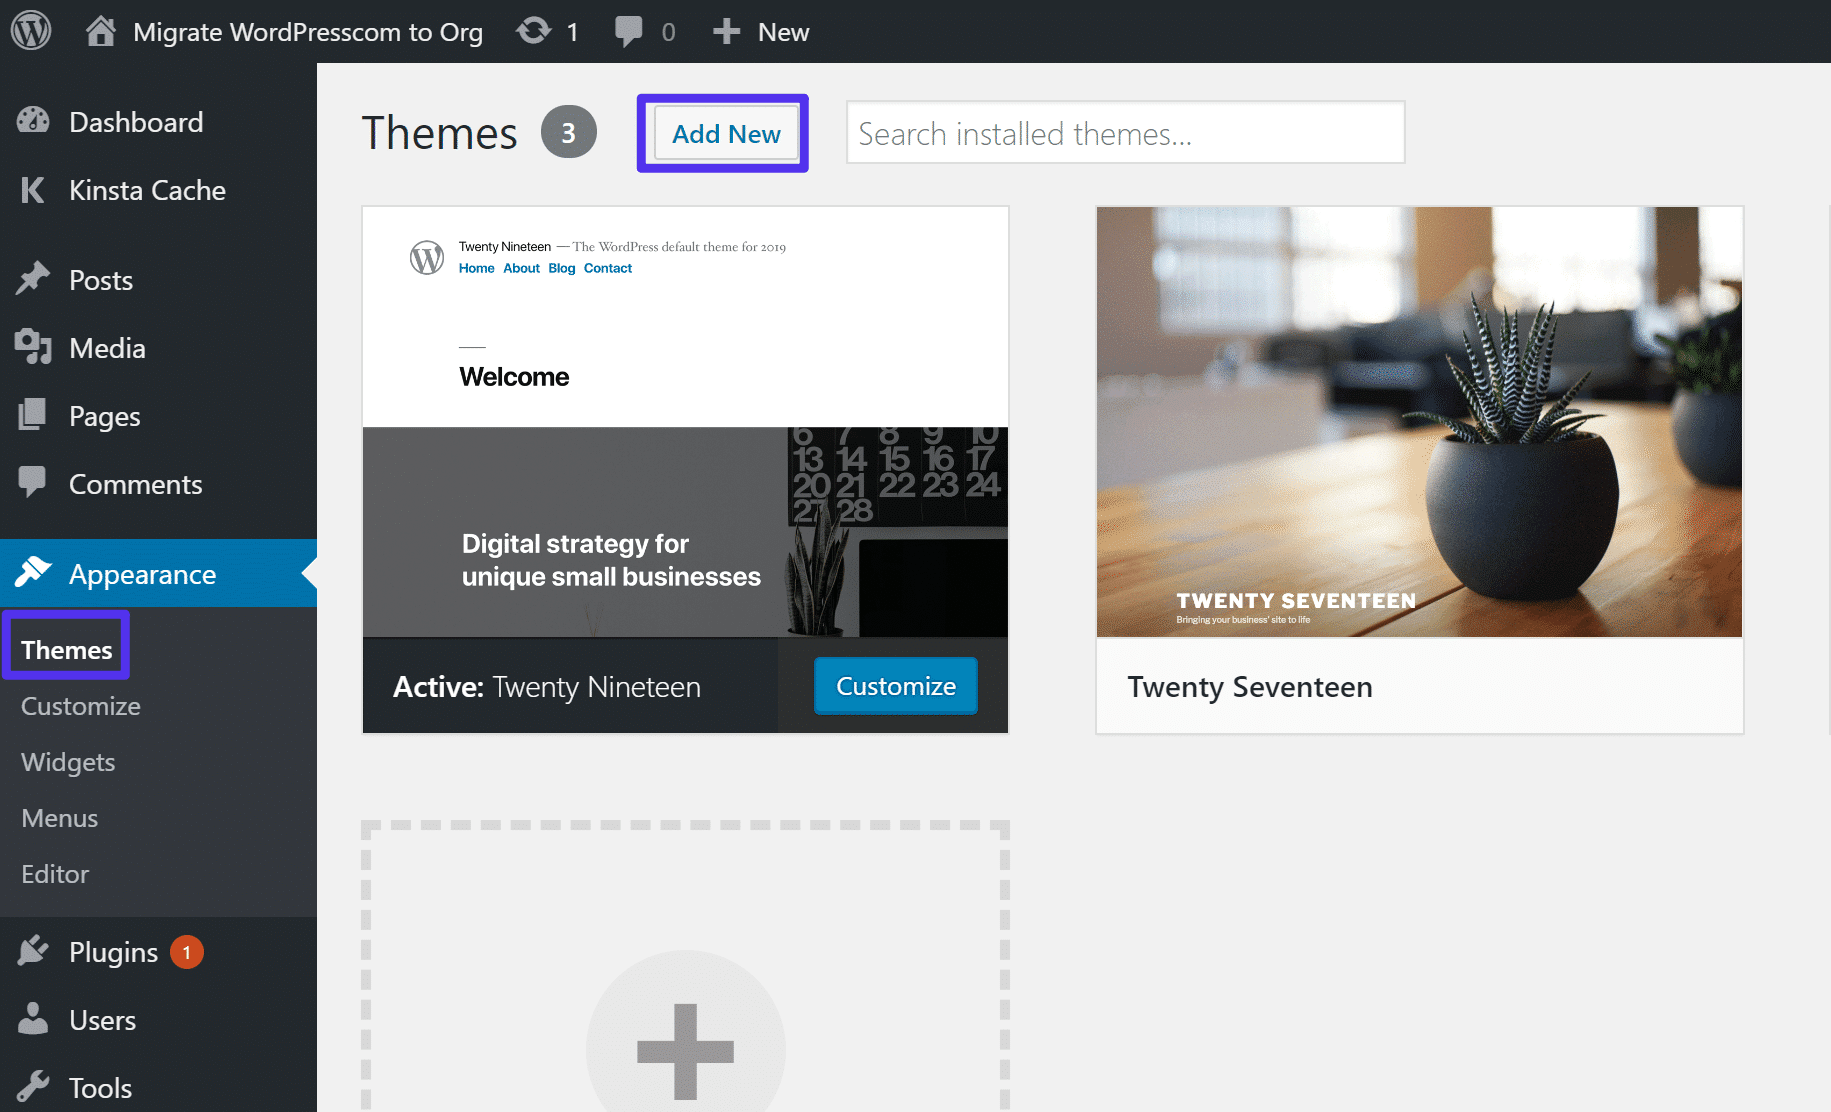
Set up Your WordPress Theme
Sadly, there’s no method to export your WordPress.com theme immediately on your WordPress.org web site.
Alternatively, many (although no longer all) of the topics that you simply’ll in finding at WordPress.com also are to be had to self-hosted WordPress websites.
As an example, the AltoFocus theme is to be had at each WordPress.com and WordPress.org.
That implies that, in case your WordPress.com theme could also be to be had on the WordPress.org theme directory, you’ll merely set up a contemporary replica of the theme for your new WordPress.org web site.
To try this, cross to Look → Topics on your WordPress.org web site. Then, click on Upload New:
set up a brand new WordPress theme
From there, you’ll seek for your theme through identify and set up it:
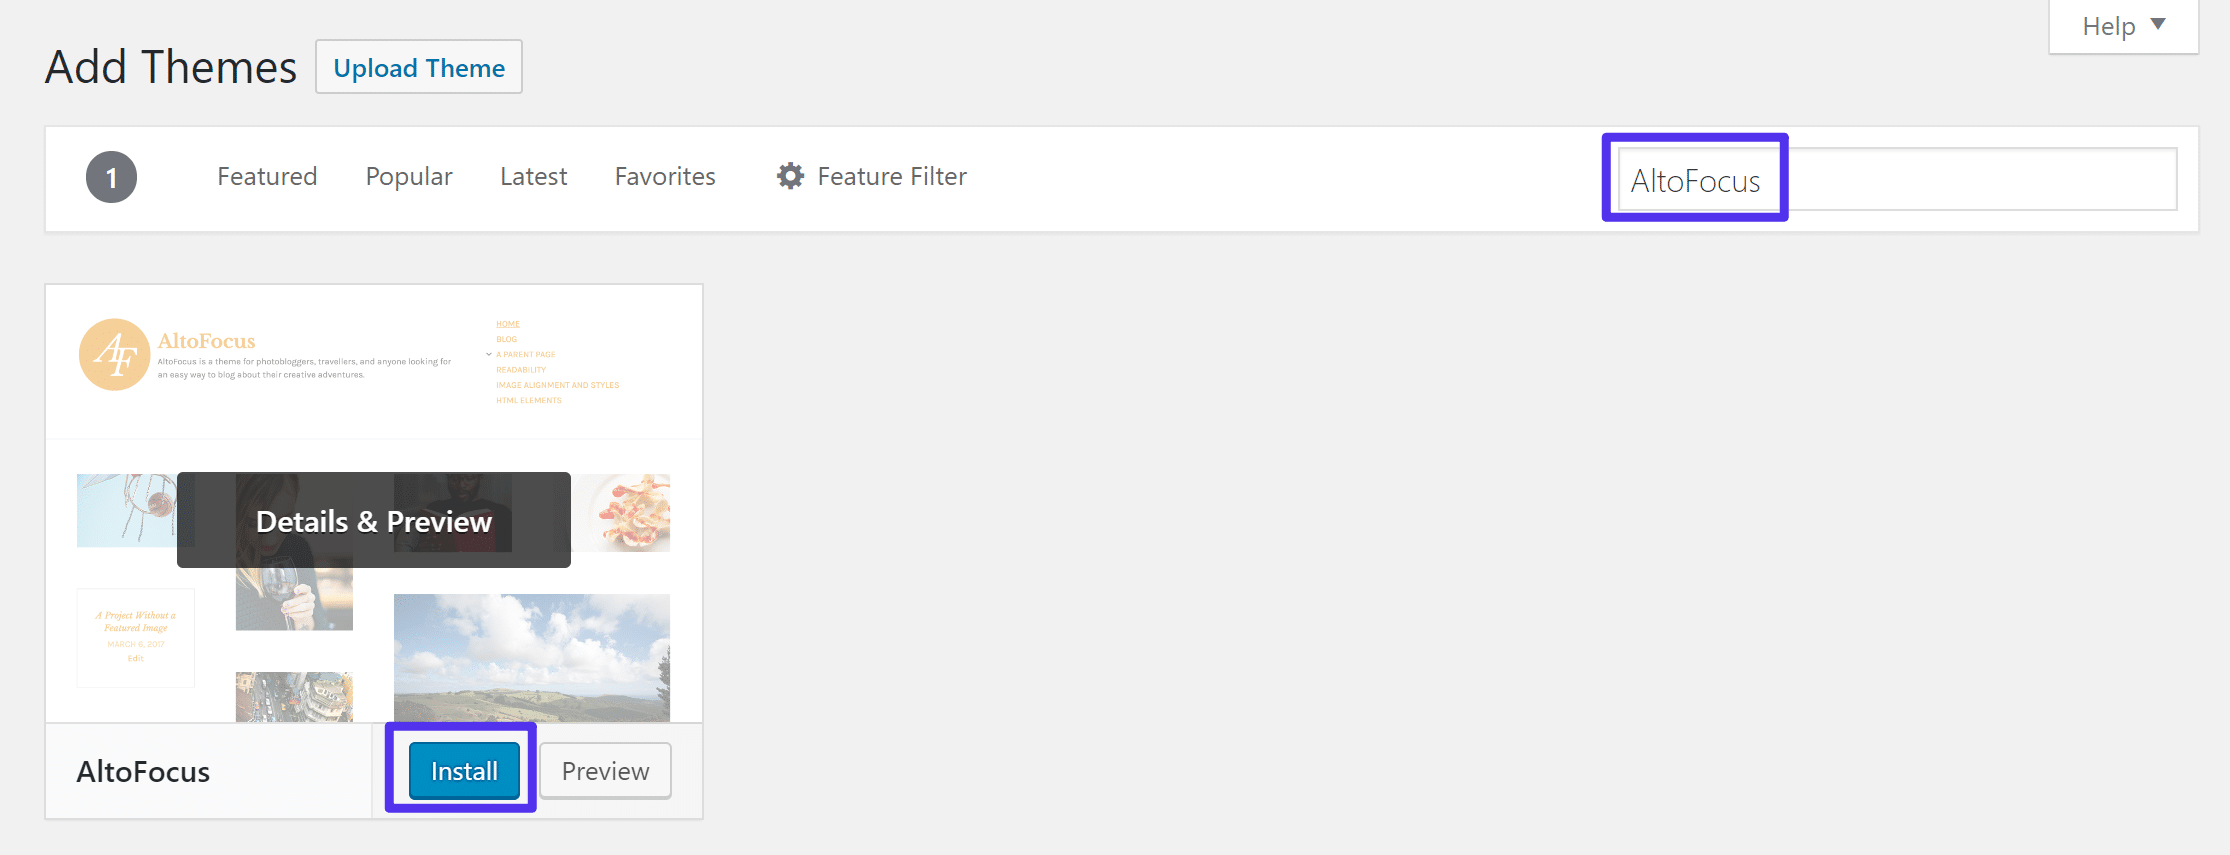
Instance of putting in a WordPress theme
Step 2: Export Content material from WordPress.com
Subsequent, you wish to have to export your WordPress.com web site’s content material. Then, in the next move, you’ll import that content material into your new WordPress.org web site at Kinsta.
To export your web site’s content material, cross to the WordPress.com dashboard in your web site. Click on the Settings possibility within the sidebar. Then, scroll right down to the ground and in finding the Export possibility beneath Website Equipment:
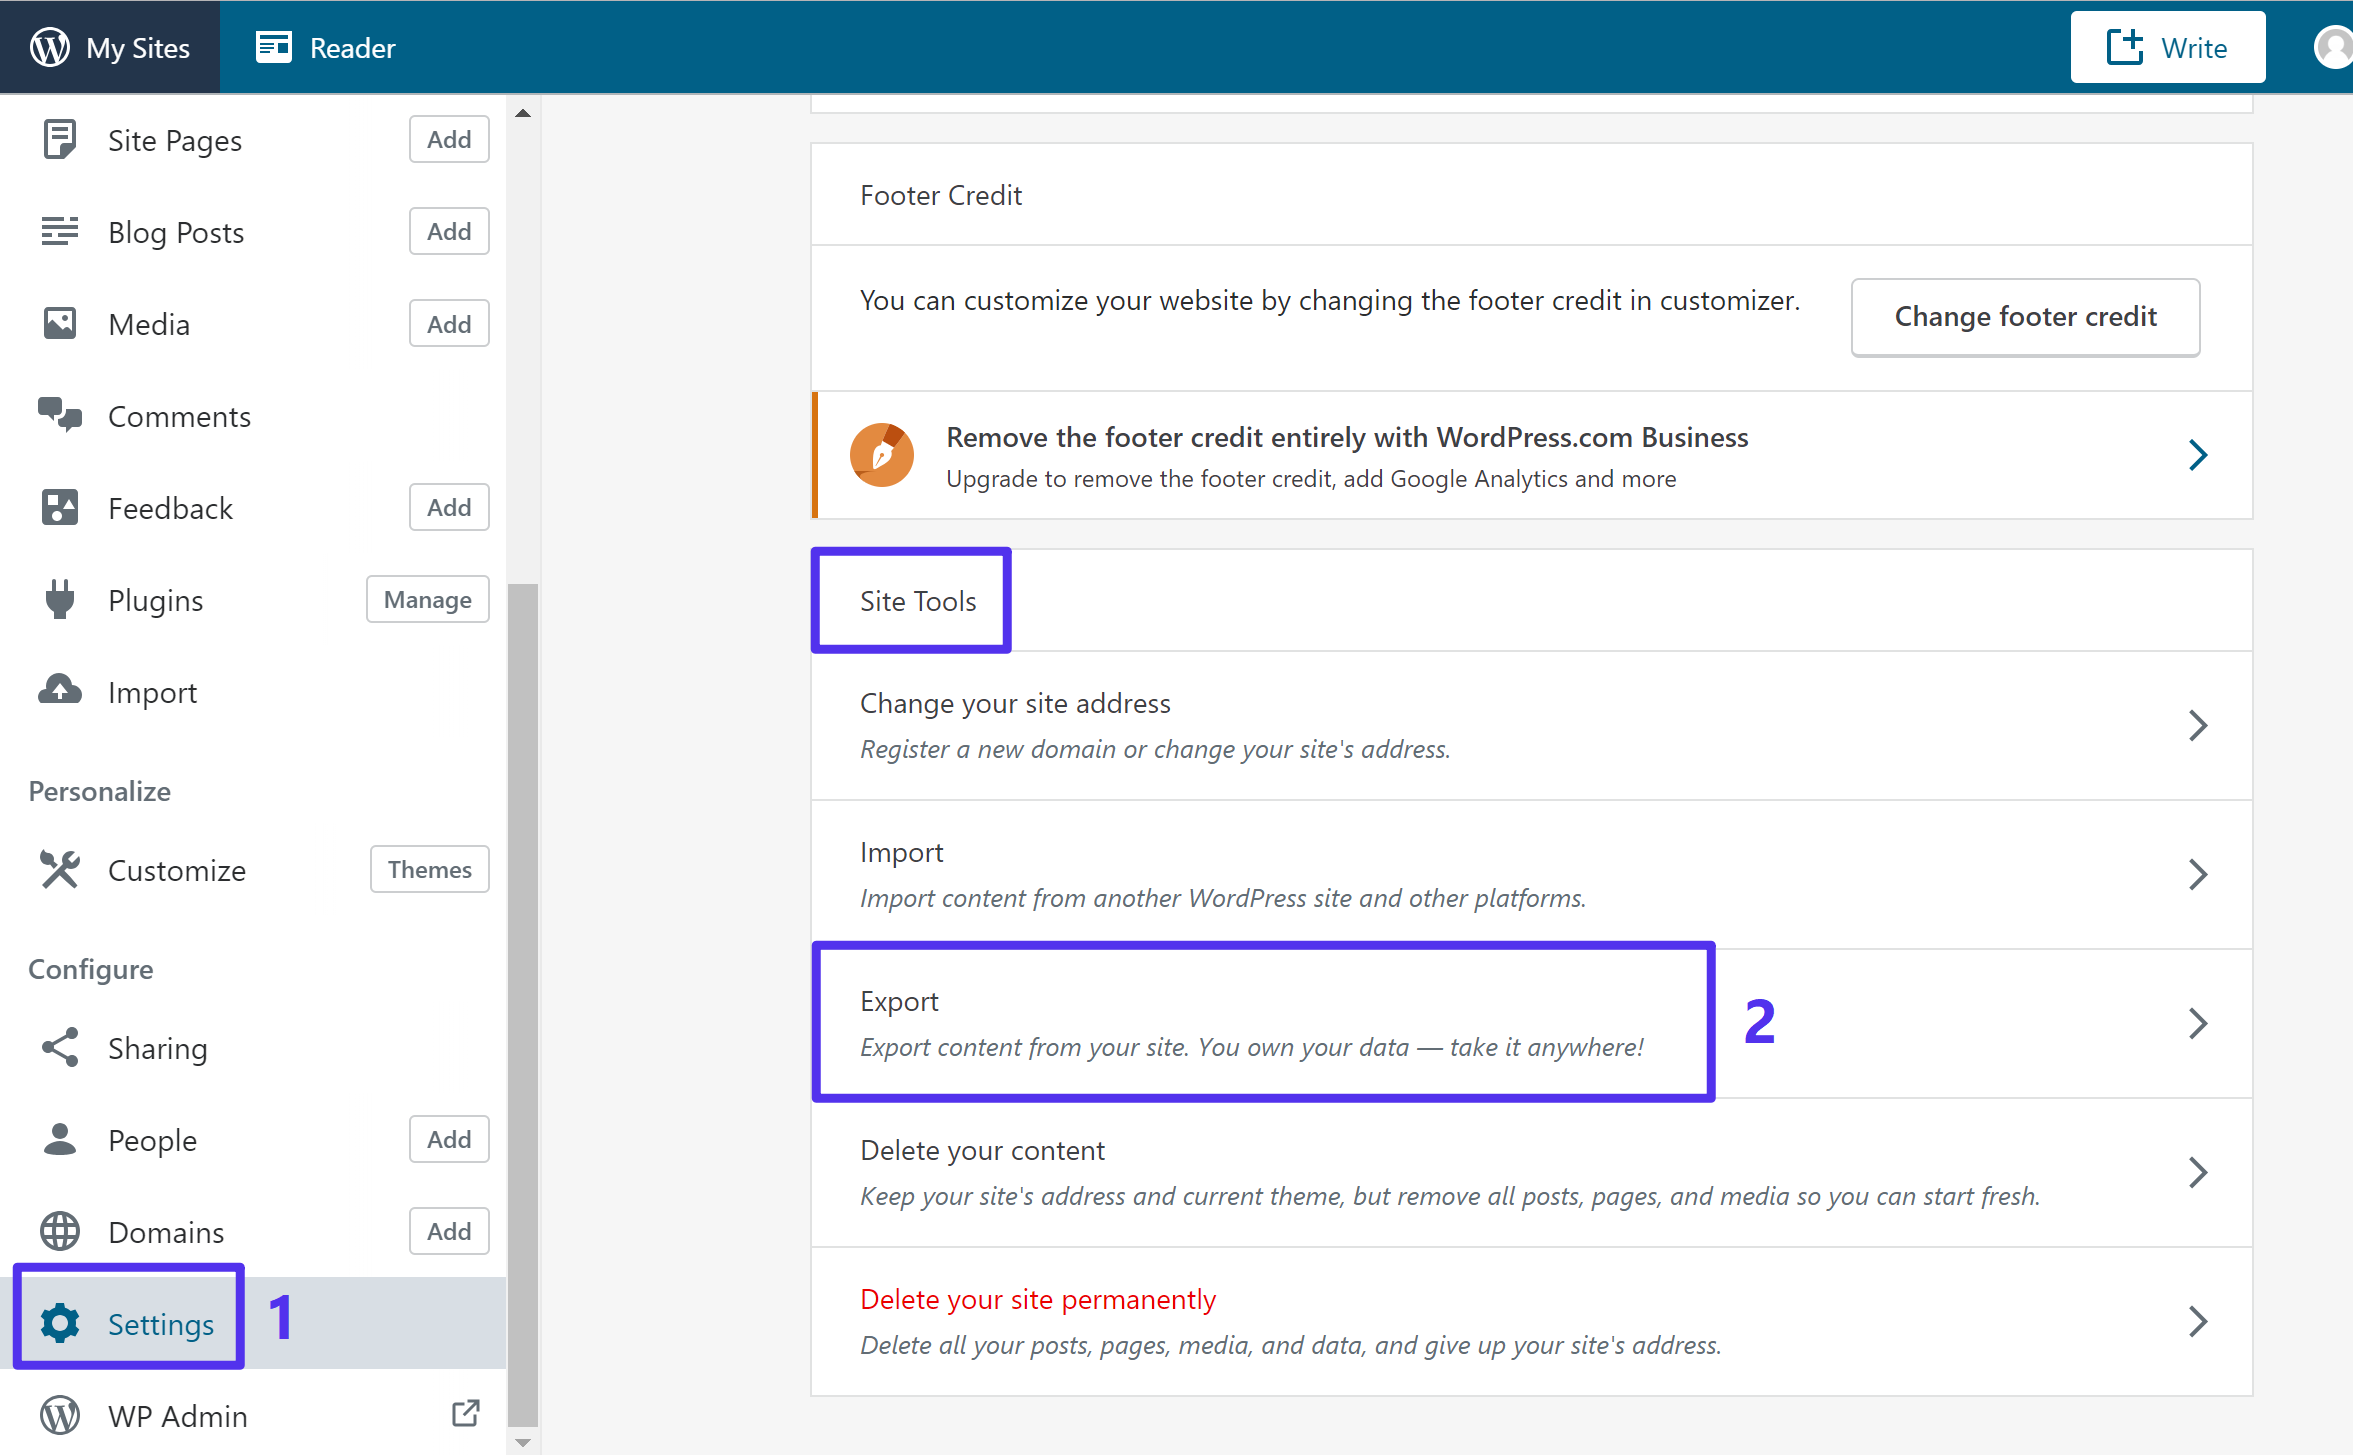
Get right of entry to the WordPress.com Export settings
At the subsequent display, click on the Export All button subsequent to Export your content material:
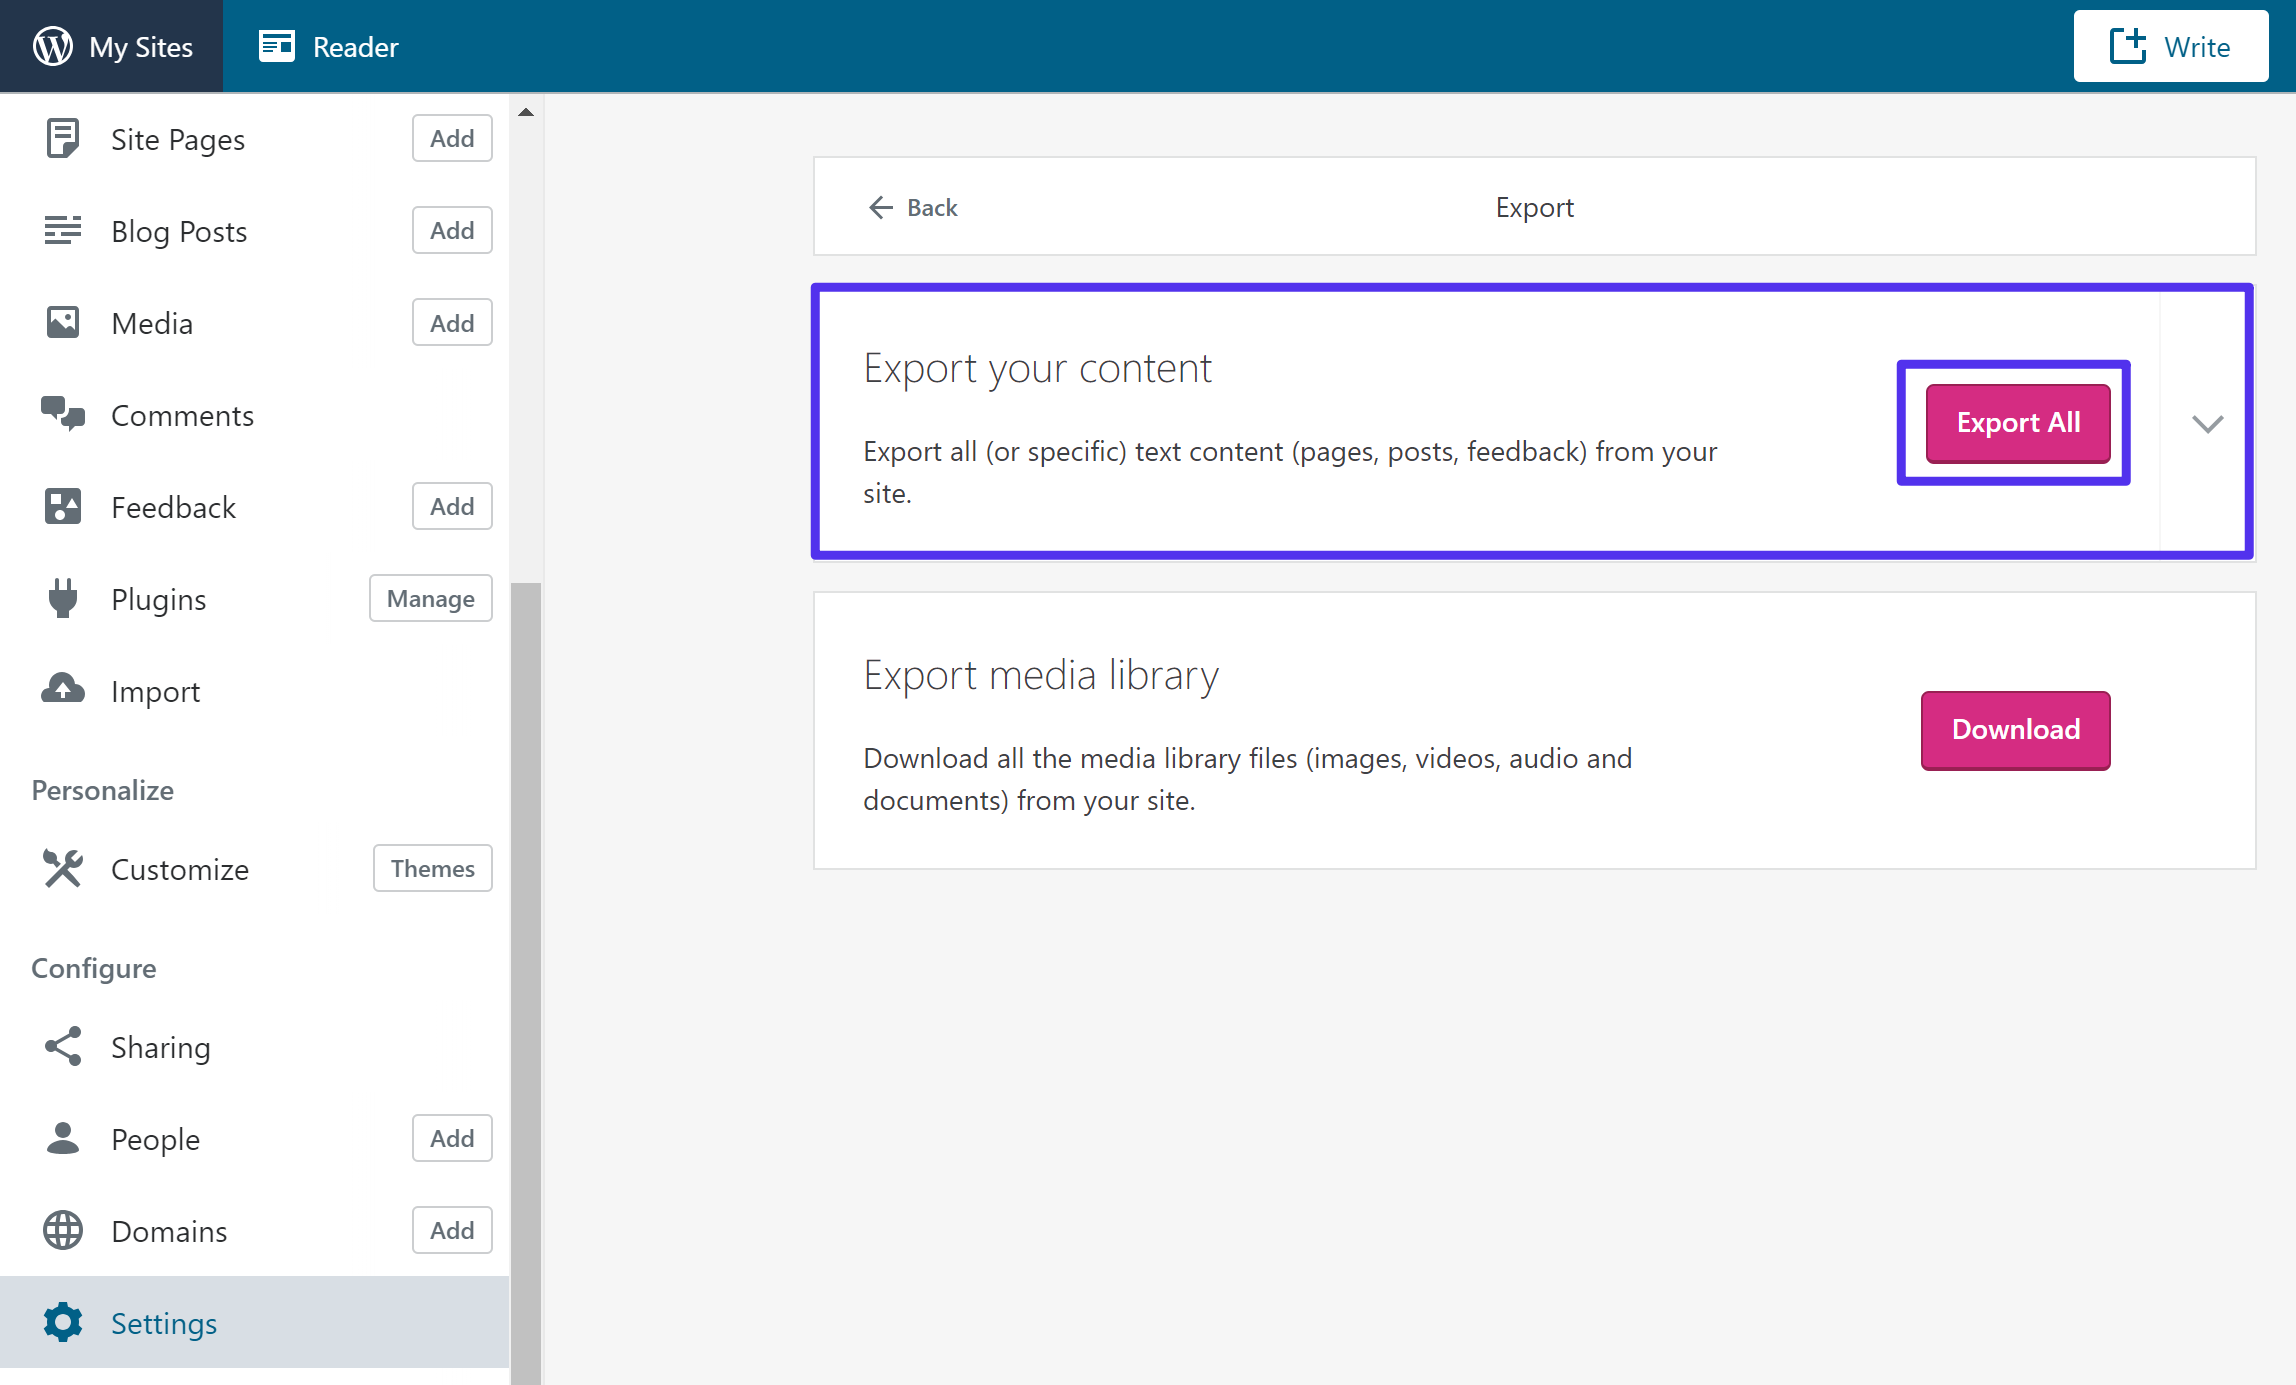
Export your content material from WordPress.com
You must then obtain a obtain hyperlink on your electronic mail. Or, you’ll click on the Obtain hyperlink within the interface:

Obtain the document together with your content material
This may obtain a ZIP document on your desktop. As soon as the obtain finishes, you wish to have to extract the ZIP document. In the event you’re the use of Home windows, you’ll do this through right-clicking and opting for Extract All:
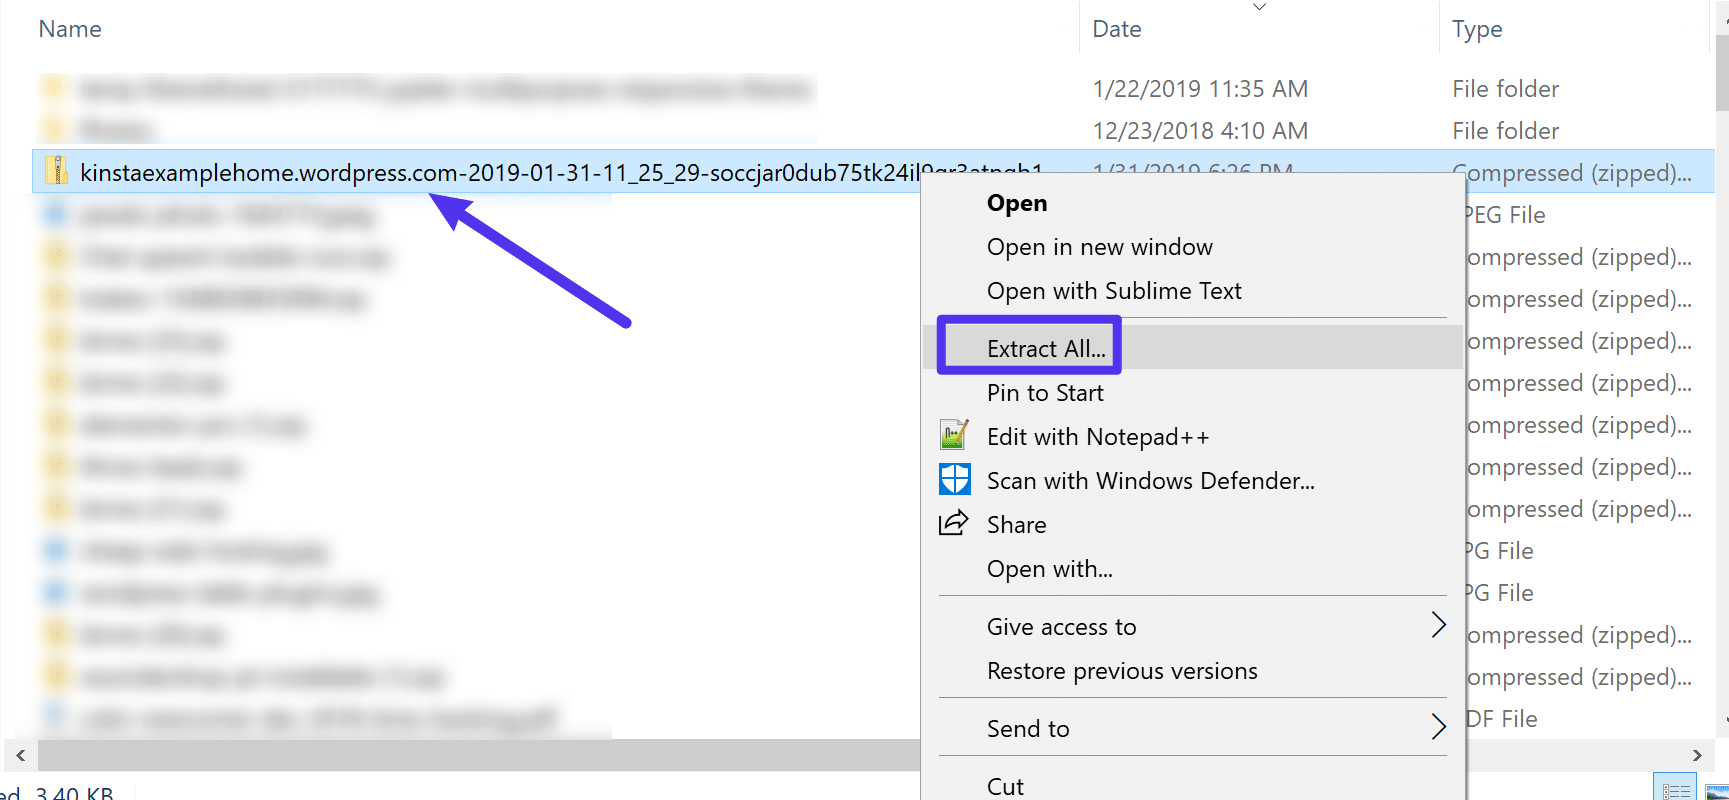
Extract the ZIP document that you simply downloaded
While you’ve extracted the ZIP document’s contents, you must be capable of open a folder that comprises an .xml document. Stay this document to hand since you’ll want it in the next move.
Step 3: Import Content material to New WordPress.org Website
Subsequent, cross to the WordPress admin dashboard for the WordPress.org web site you created in Step 1.
Then, cross to Equipment → Import. In finding the WordPress device and click on Set up Now:
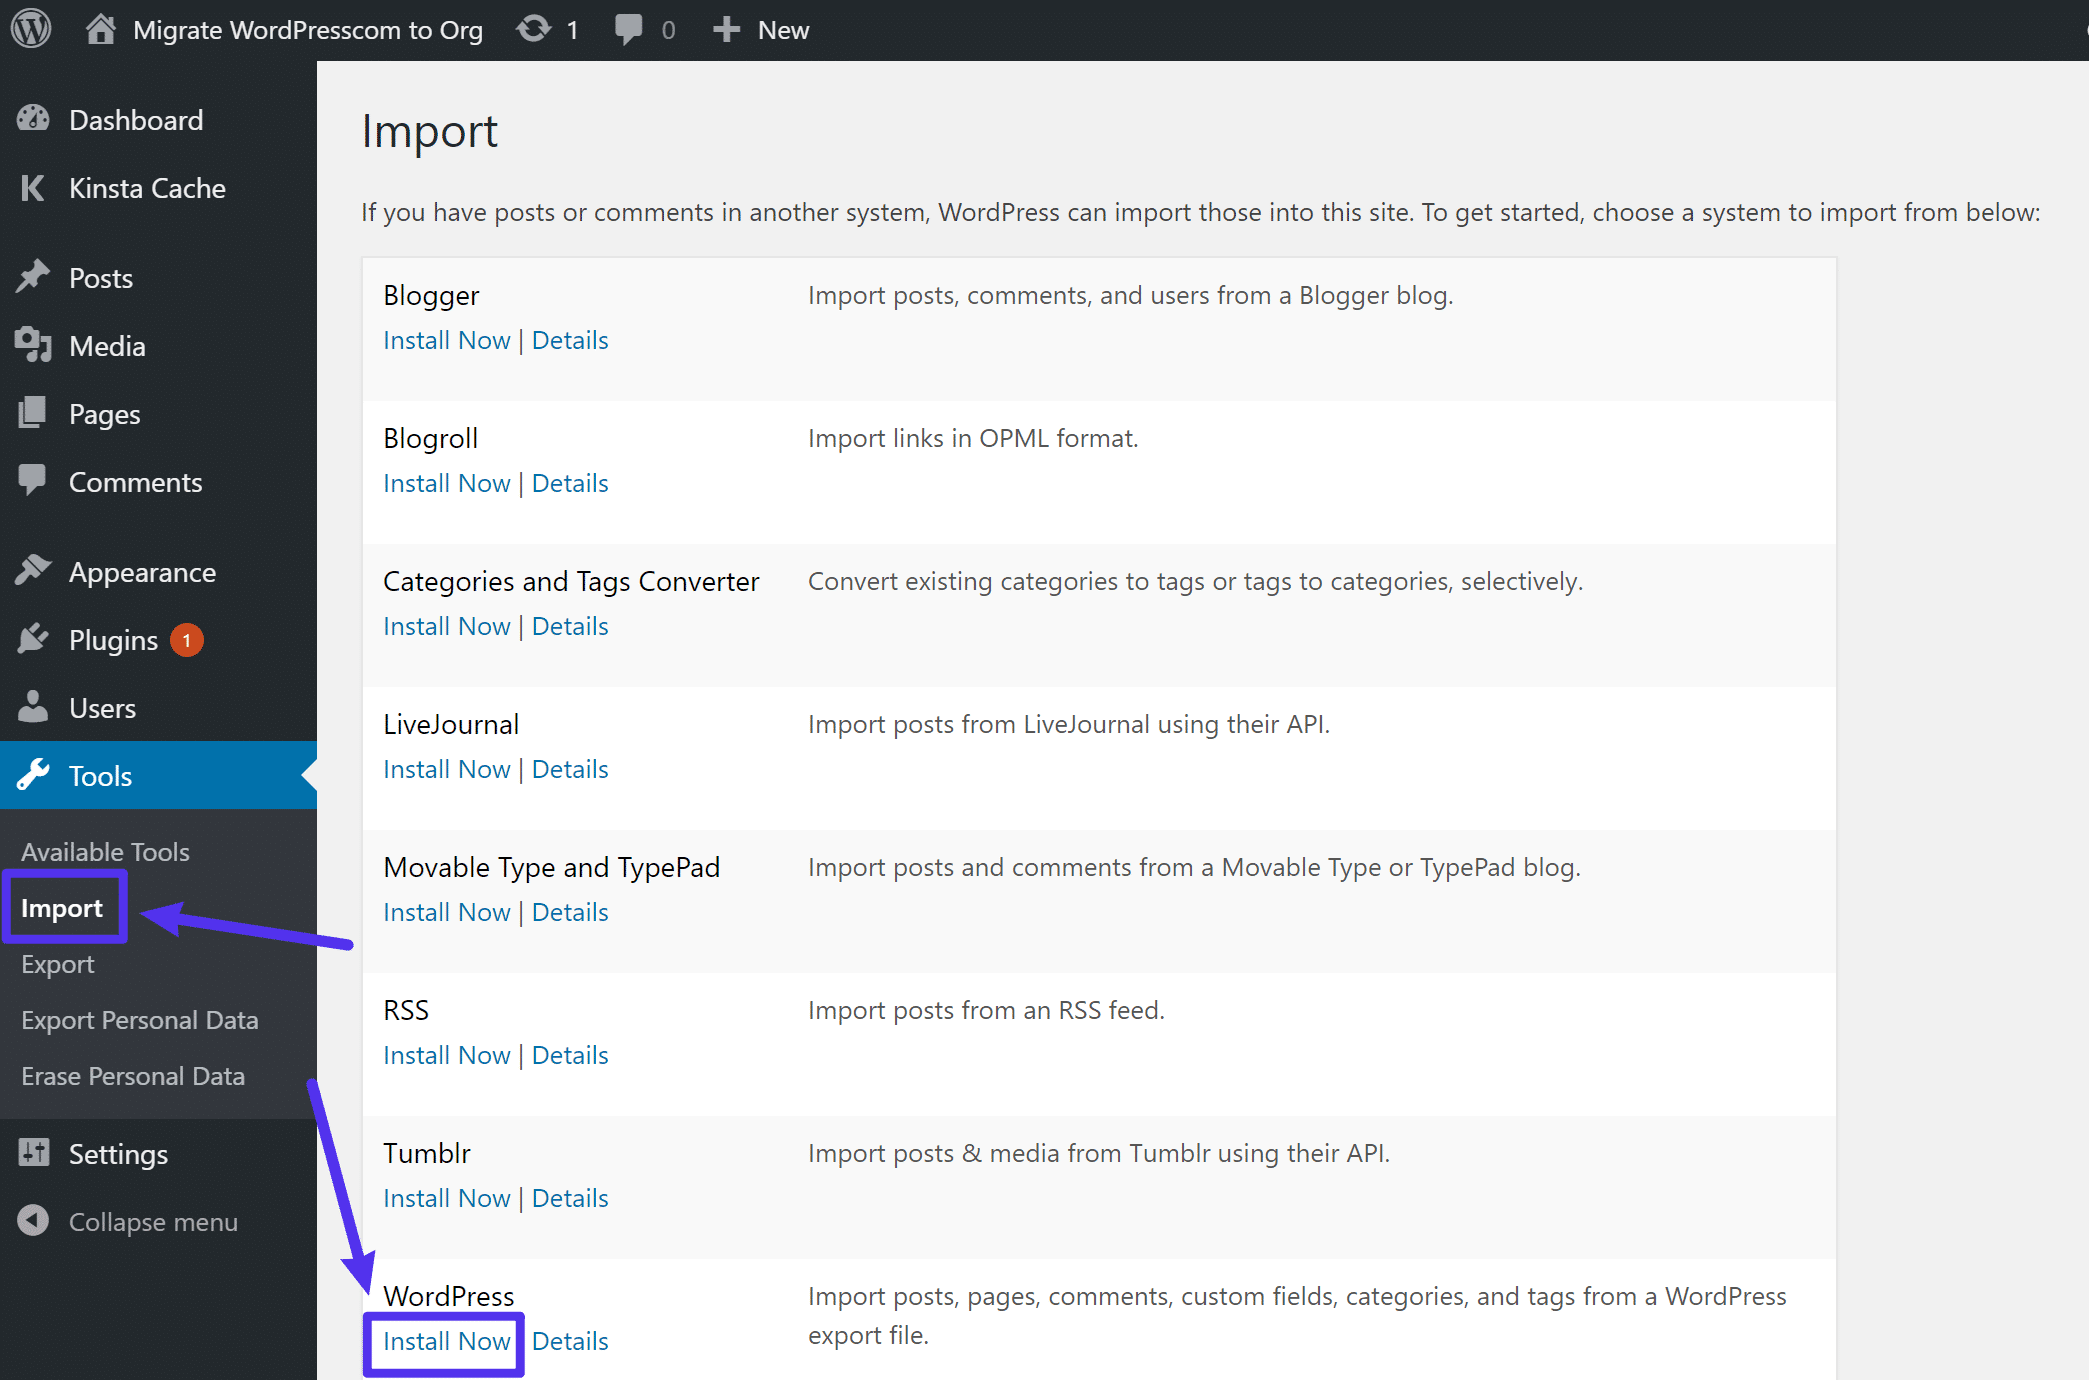
Set up the WordPress Importer device
After a short lived wait, you must see a brand new hyperlink to Run Importer. Click on that hyperlink to proceed the method:

Run the WordPress Importer device
At the subsequent web page, you’ll be precipitated to add the .xml document that you simply downloaded from WordPress.com within the earlier step:
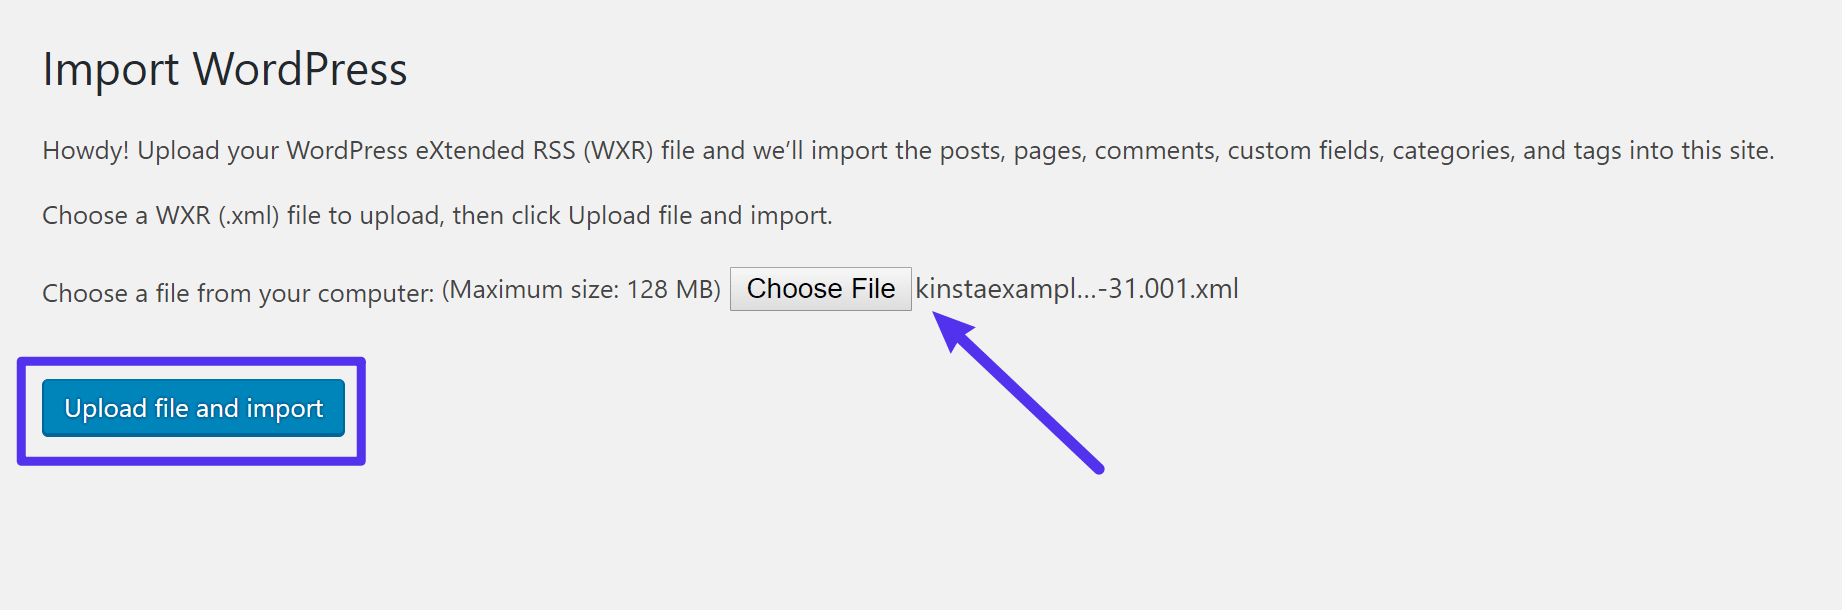
Add the .xml document from WordPress.com
While you’ve decided on the .xml document, click on Add document and import.
You probably have numerous content material, you may wish to wait a short while. Then, you’ll see two choices to:
- Assign Authors
- Import Attachments
For the Assign Authors segment, we advise opting for the technique to assign posts to an current person and settling on your username from the drop-down.
Then, take a look at the field to Obtain and import document attachments. This may make certain that your WordPress.org web site imports the entire photographs out of your WordPress.com web site.
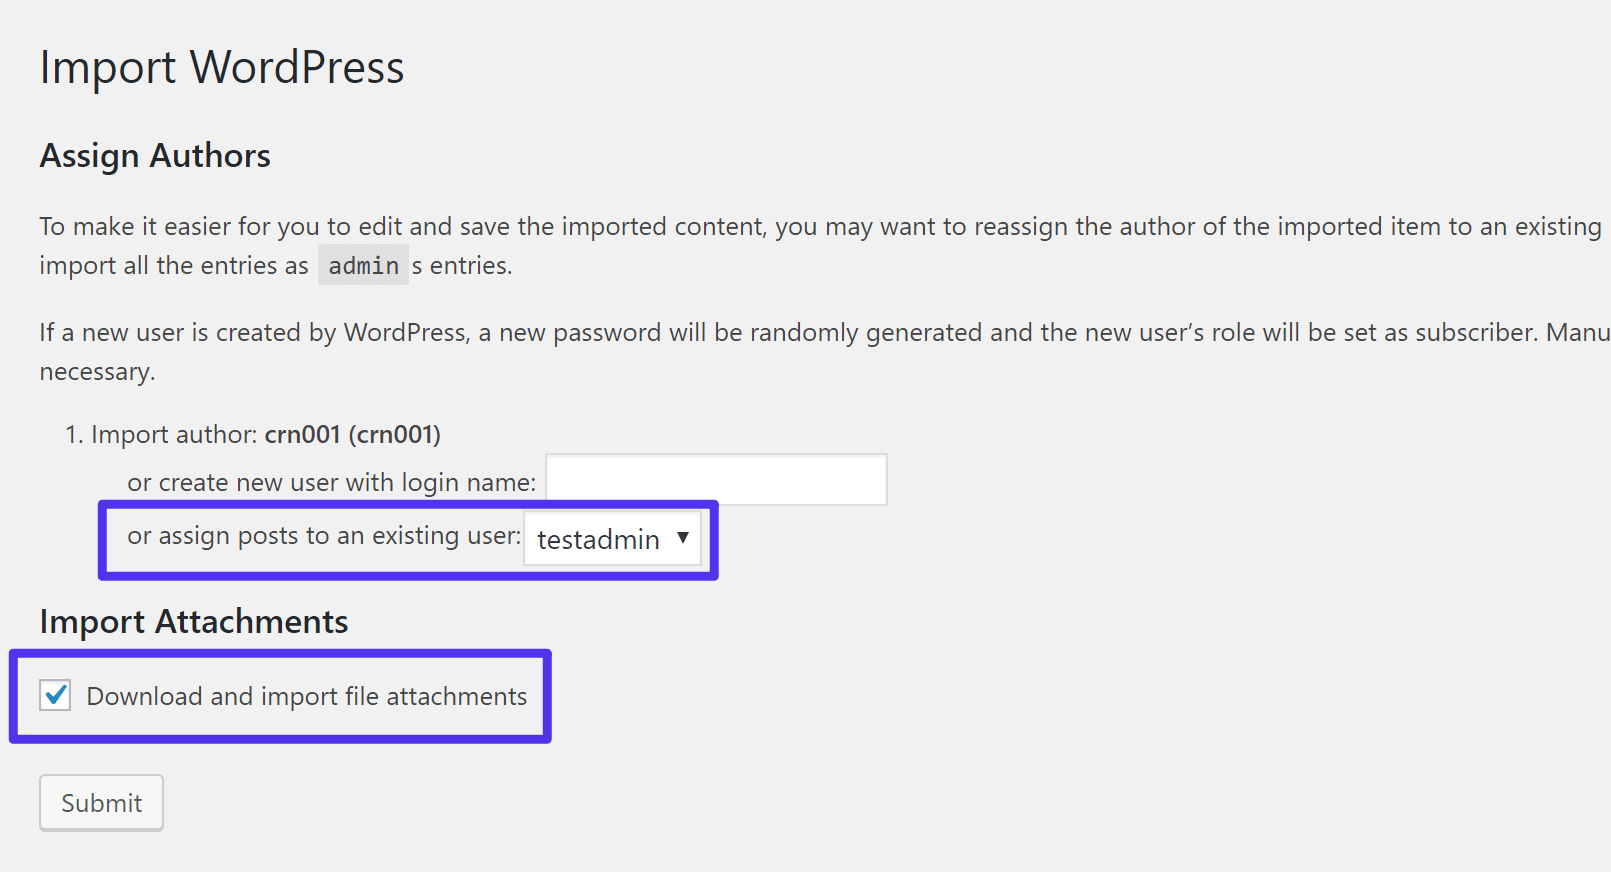
Configure the import settings
Then, click on Post.
As soon as the method finishes, you must see a luck message:
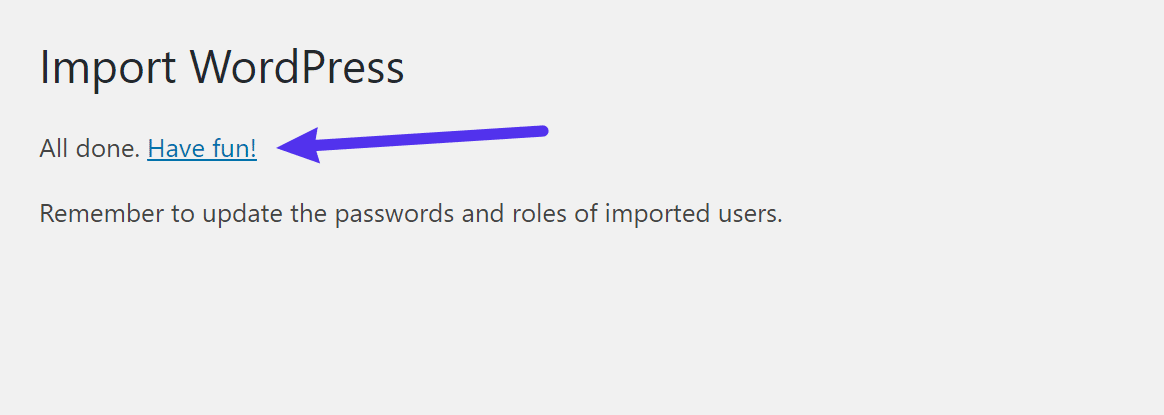
The import luck message
Now, cross on your web site and poke round. If all went neatly, your content material must glance and serve as simply find it irresistible did at WordPress.com.
If one thing turns out mistaken – like damaged URLs or lacking photographs – right here’s find out how to repair it:
Solving Damaged URLs After WordPress.com Migration
In the event you modified URLs as a part of your migration (like shifting from yoursite.wordpress.com to yoursite.com), you may finally end up with “damaged” URLs on your content material.
As an example, should you wrote a weblog publish that incorporated a hyperlink to another weblog publish for your web site, that hyperlink may nonetheless take folks to yoursite.wordpress.com/instance when in reality it must cross to that very same weblog publish for your WordPress.org web site – yoursite.com/instance.
To mend this, you’ll use Kinsta’s Search and Replace tool (to be had from the Equipment tab on your MyKinsta dashboard):
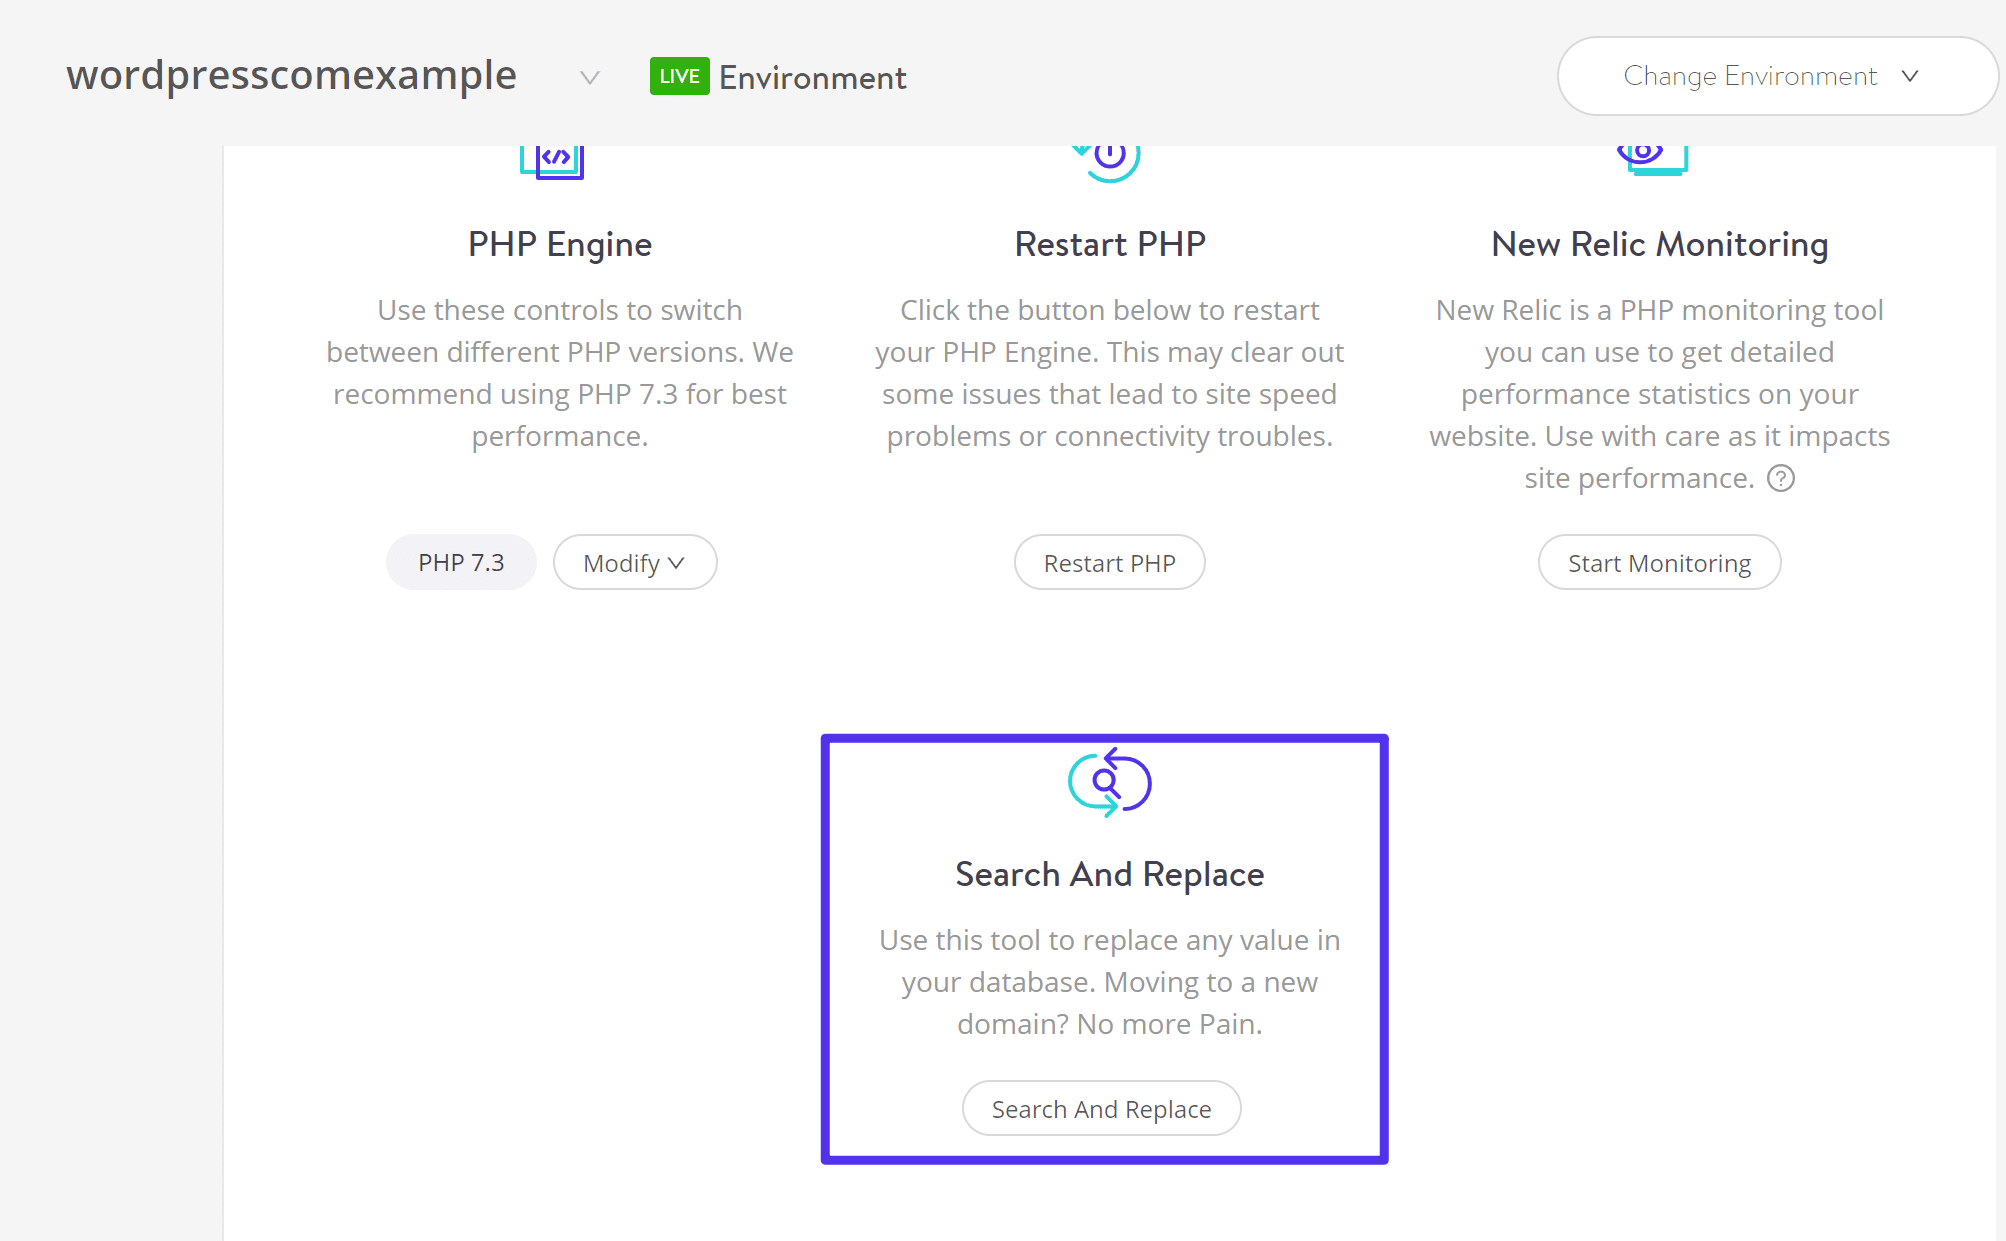
Kinsta Seek And Exchange device
Input your previous WordPress.com URL within the Seek field and your new WordPress.org URL within the Exchange field. On this instance we’re the use of your transient Kinsta URL. If you have already got a site identify, it would be best to use that as a substitute. Go away the Dry Run field checked after which click on Exchange:
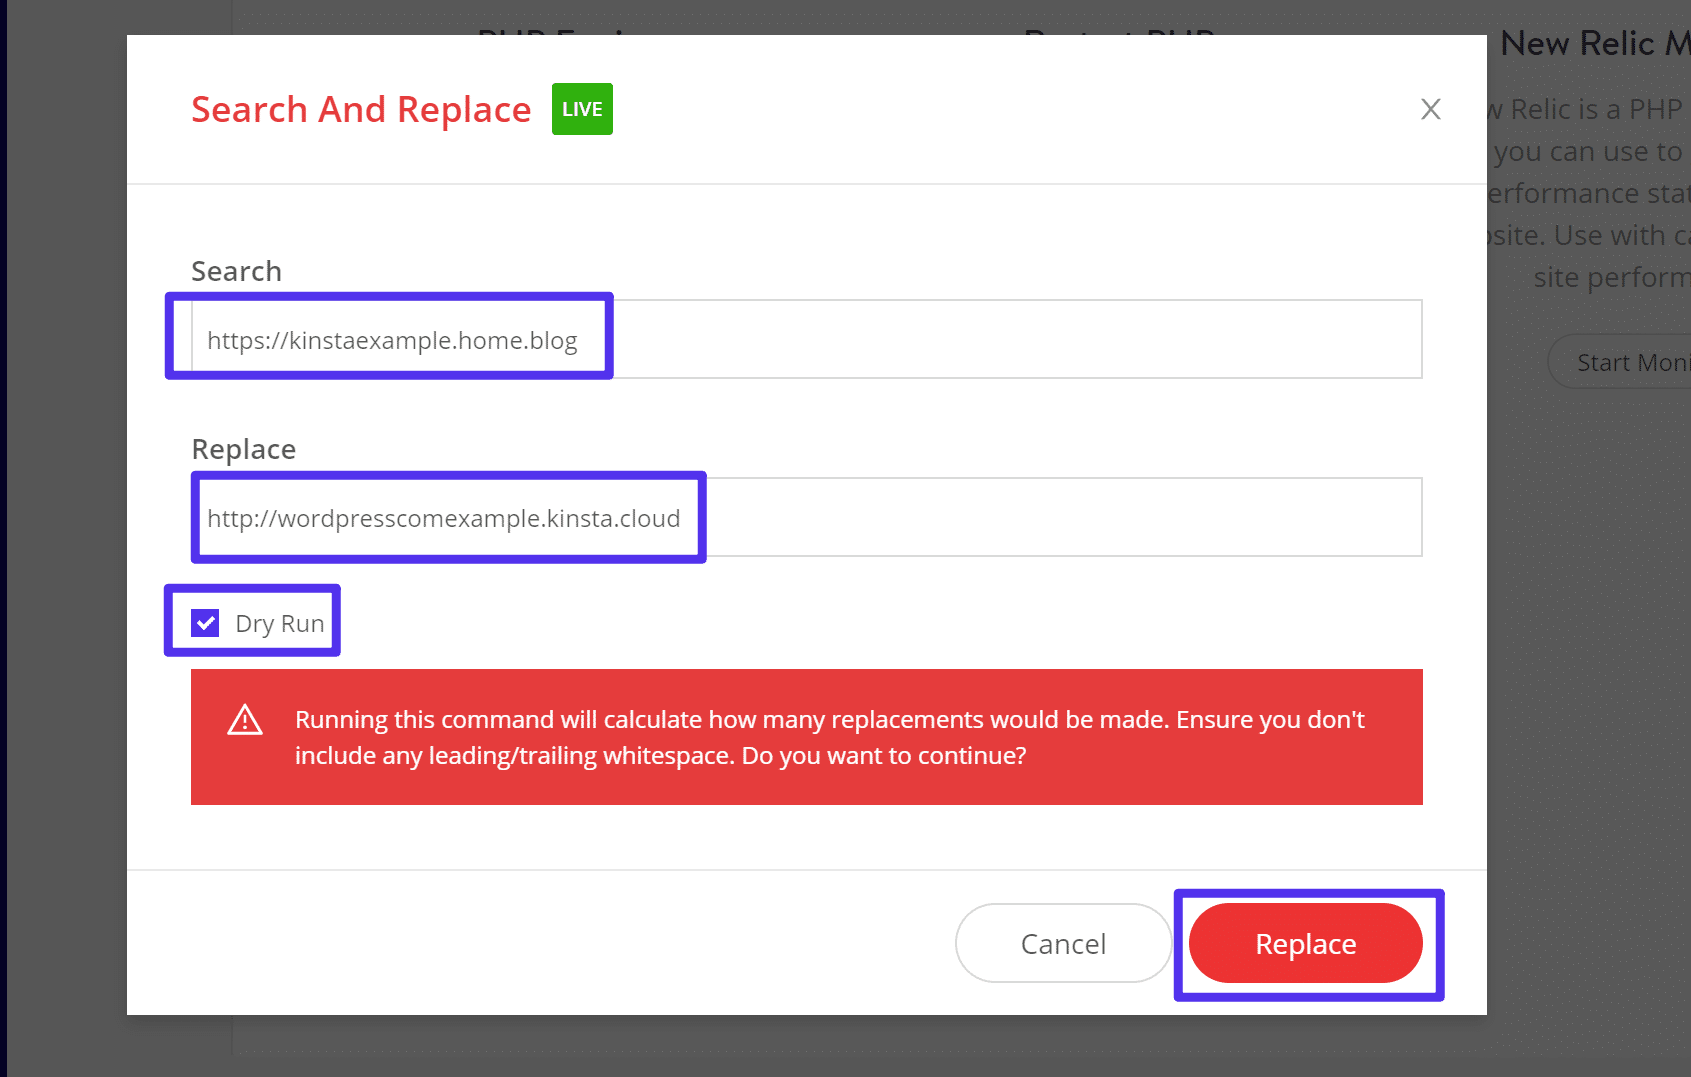
configure the Kinsta Seek And Exchange device
You must see a abstract of what number of doable replacements the device discovered. Preferably, it must be a favorable quantity:
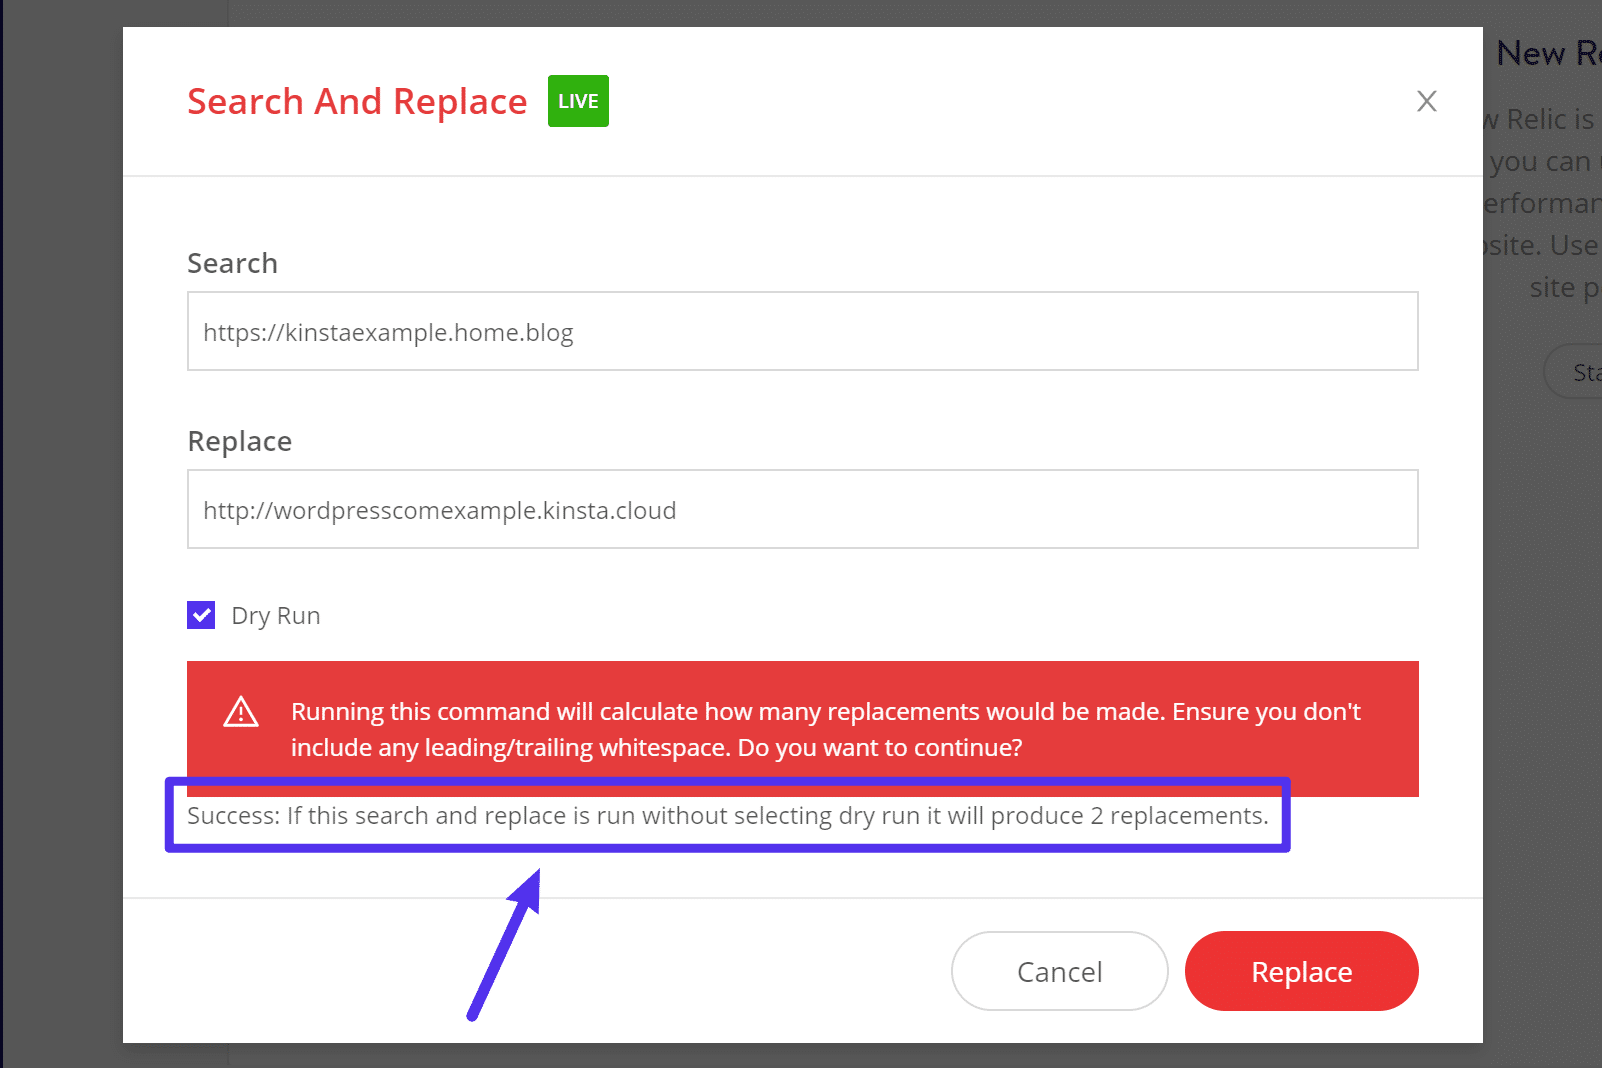
Search for the luck message ahead of unchecking the “Dry Run” field
While you check that you simply correctly entered the guidelines, uncheck the Dry Run field and click on Exchange once more:
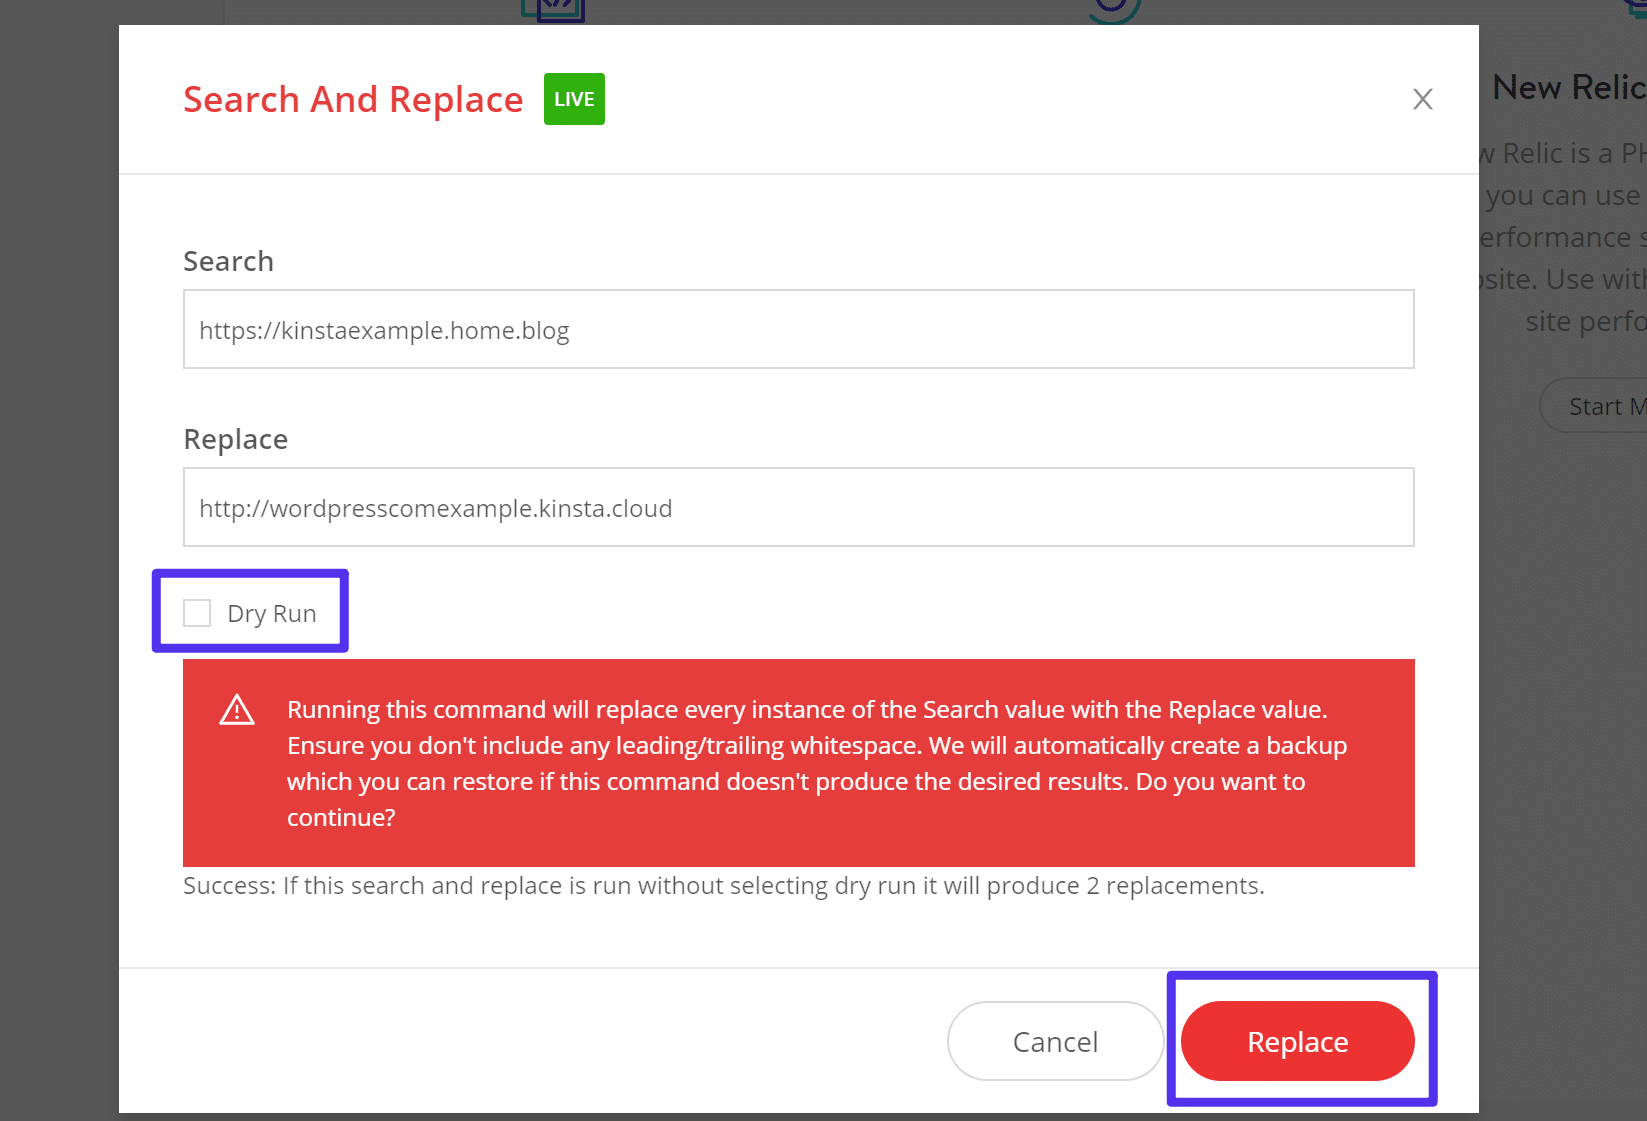
Uncheck the “Dry Run” field
Solving Lacking Photographs After WordPress.com Migration
If the whole thing went neatly, you must see your entire photographs in an instant. Alternatively…infrequently issues cross mistaken, and it’s imaginable that you simply could be lacking some photographs.
If that’s the case, you’ll use the free Auto Upload Images plugin to import the lacking photographs for you.
While you set up and turn on the plugin, cross to the Posts space on your WordPress dashboard. Use the checkbox to make a choice your entire posts after which choose Edit from the drop-down. Then, click on Practice:
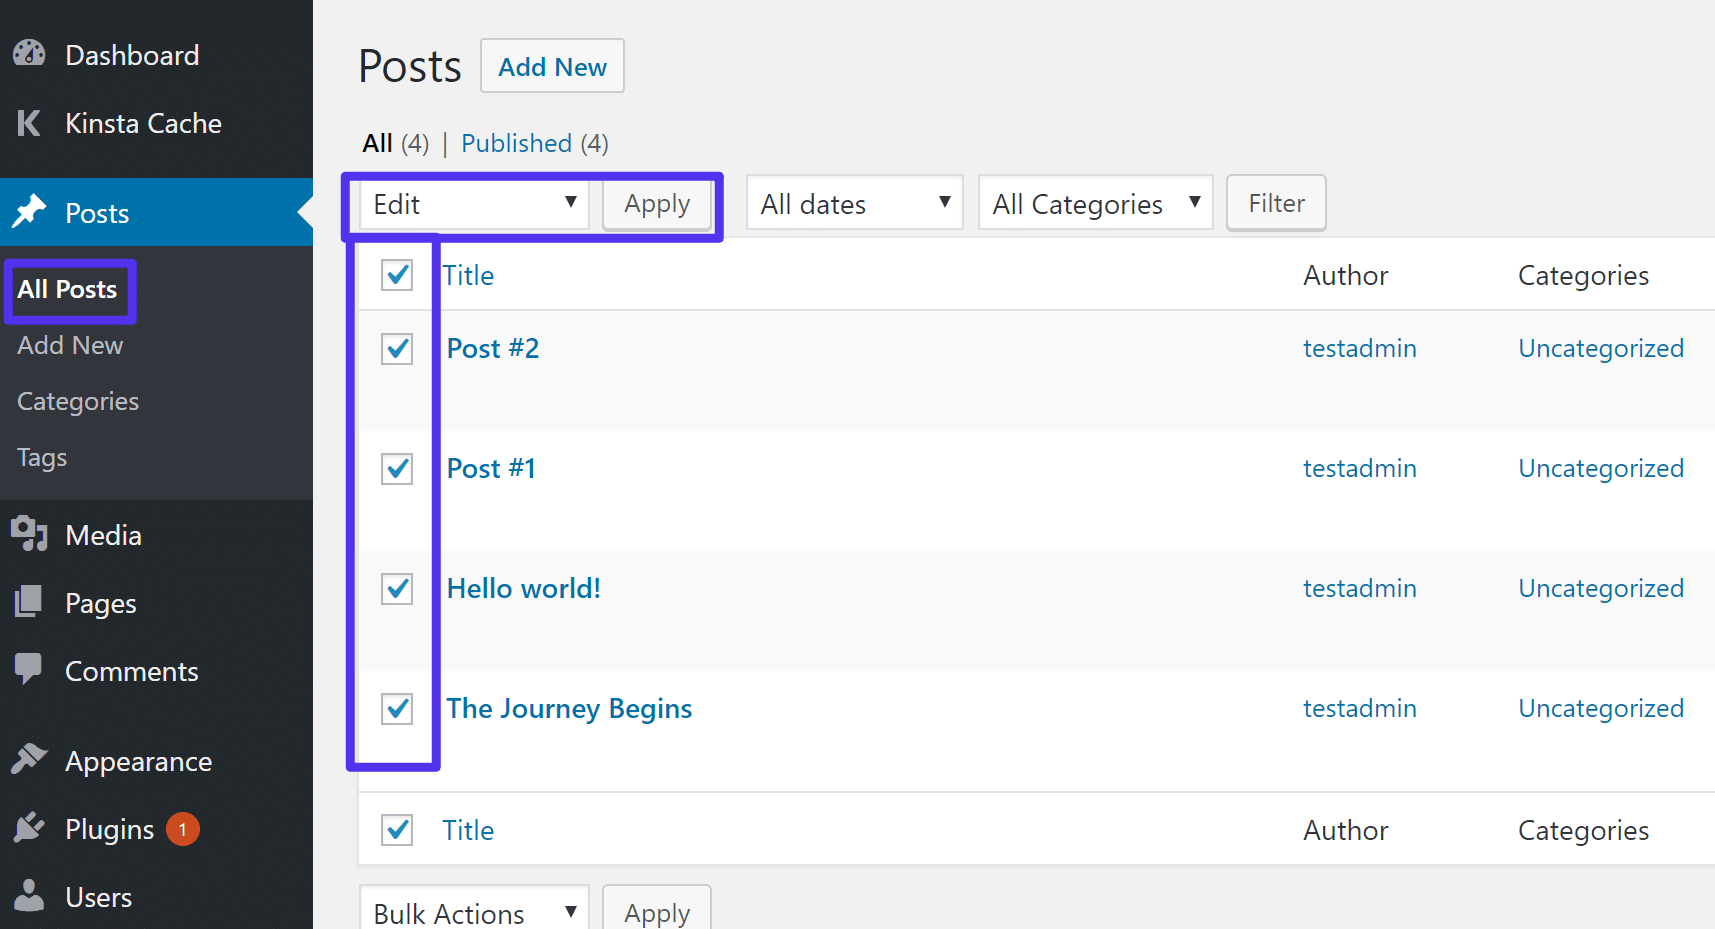
Make a selection your whole posts
This may open a brand new interface. All you wish to have to do is click on the Replace button and the plugin must then import the lacking photographs for you:
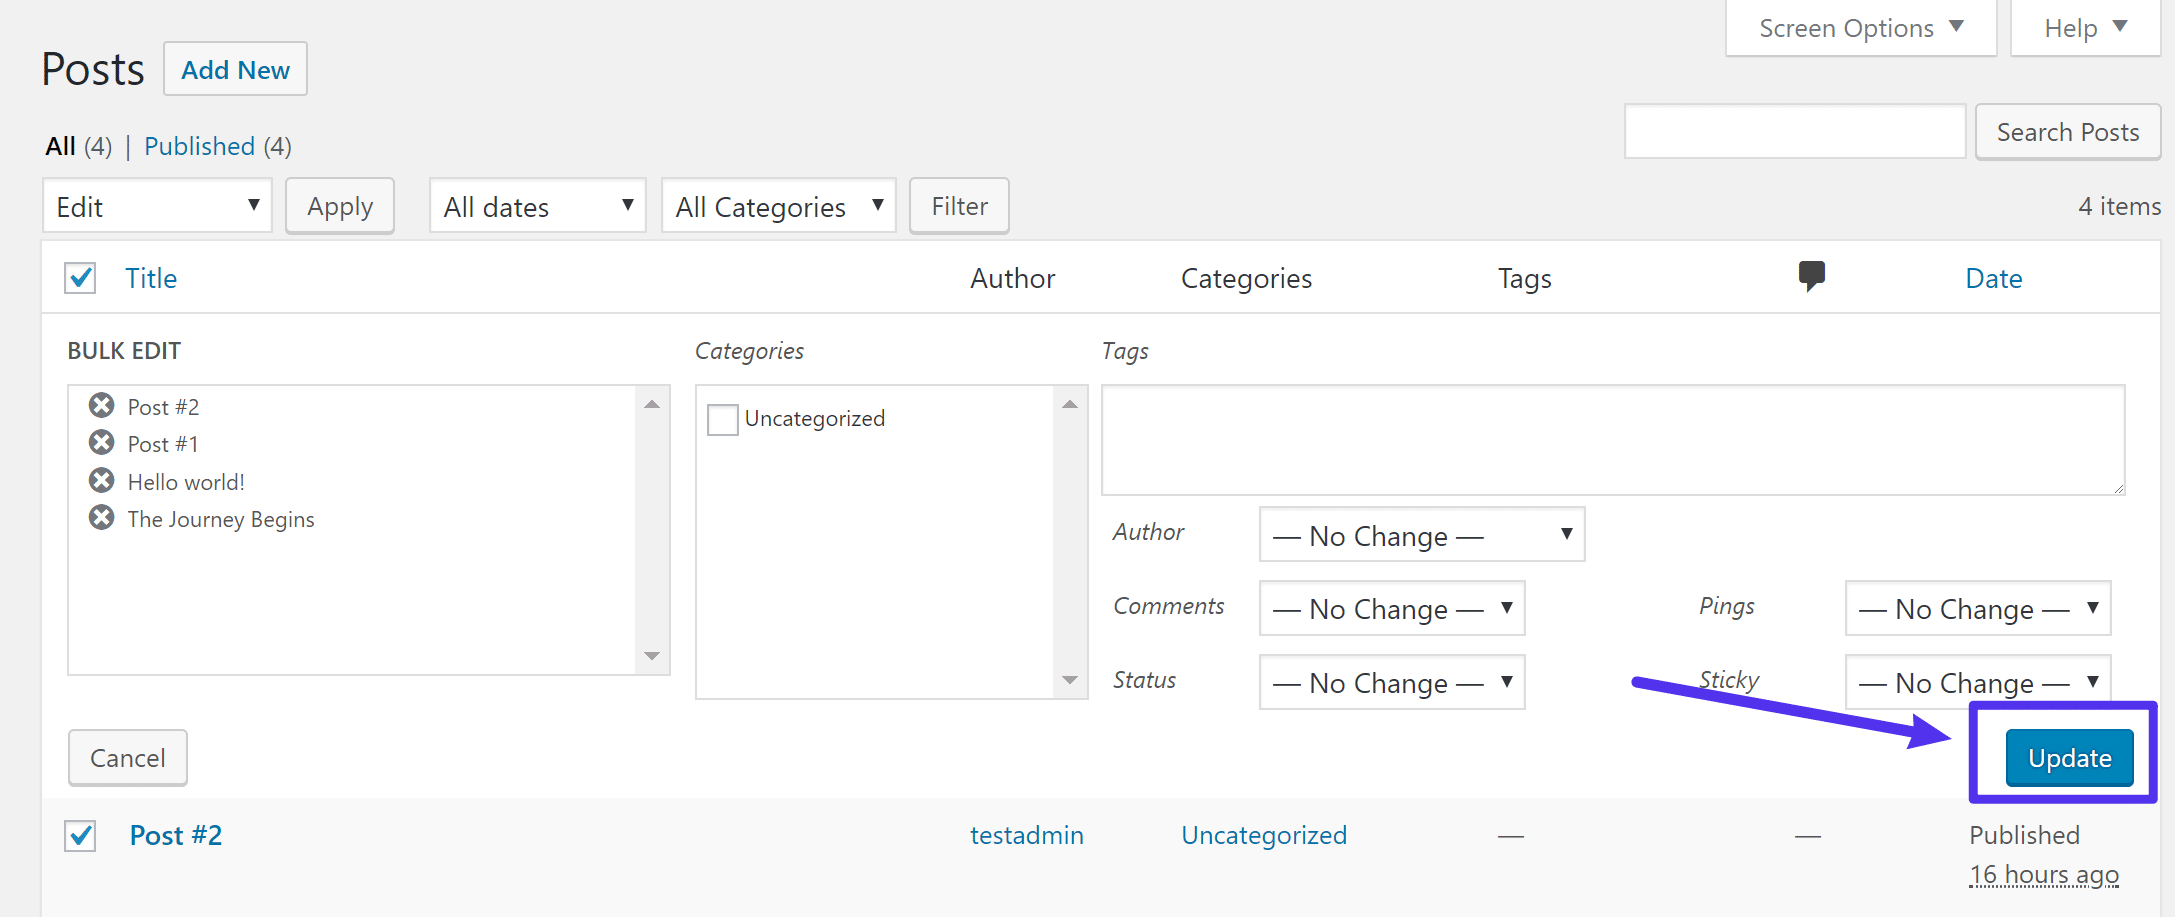
Replace your entire posts
Step 4: Redirect WordPress.com Website online to WordPress.org (Or Make Personal)
At this level, you’ll have a operating self-hosted WordPress.org site with your whole content material from WordPress.com.
Alternatively, there’s nonetheless one necessary factor – what occurs on your WordPress.com site now that you simply’ve moved the whole thing over?
There are two doable eventualities right here, relying at the URL of your WordPress.com site.
Similar URL For WordPress.com And WordPress.org
In the event you had been the use of a customized URL at WordPress.com (yoursite.com) and also you’re the use of the similar customized URL in your WordPress.org web site (yoursite.com), all you wish to have to do is make your previous WordPress.com site personal.
To try this, cross to the Settings space on your WordPress.com dashboard and make a selection the Personal possibility beneath the Privateness settings:
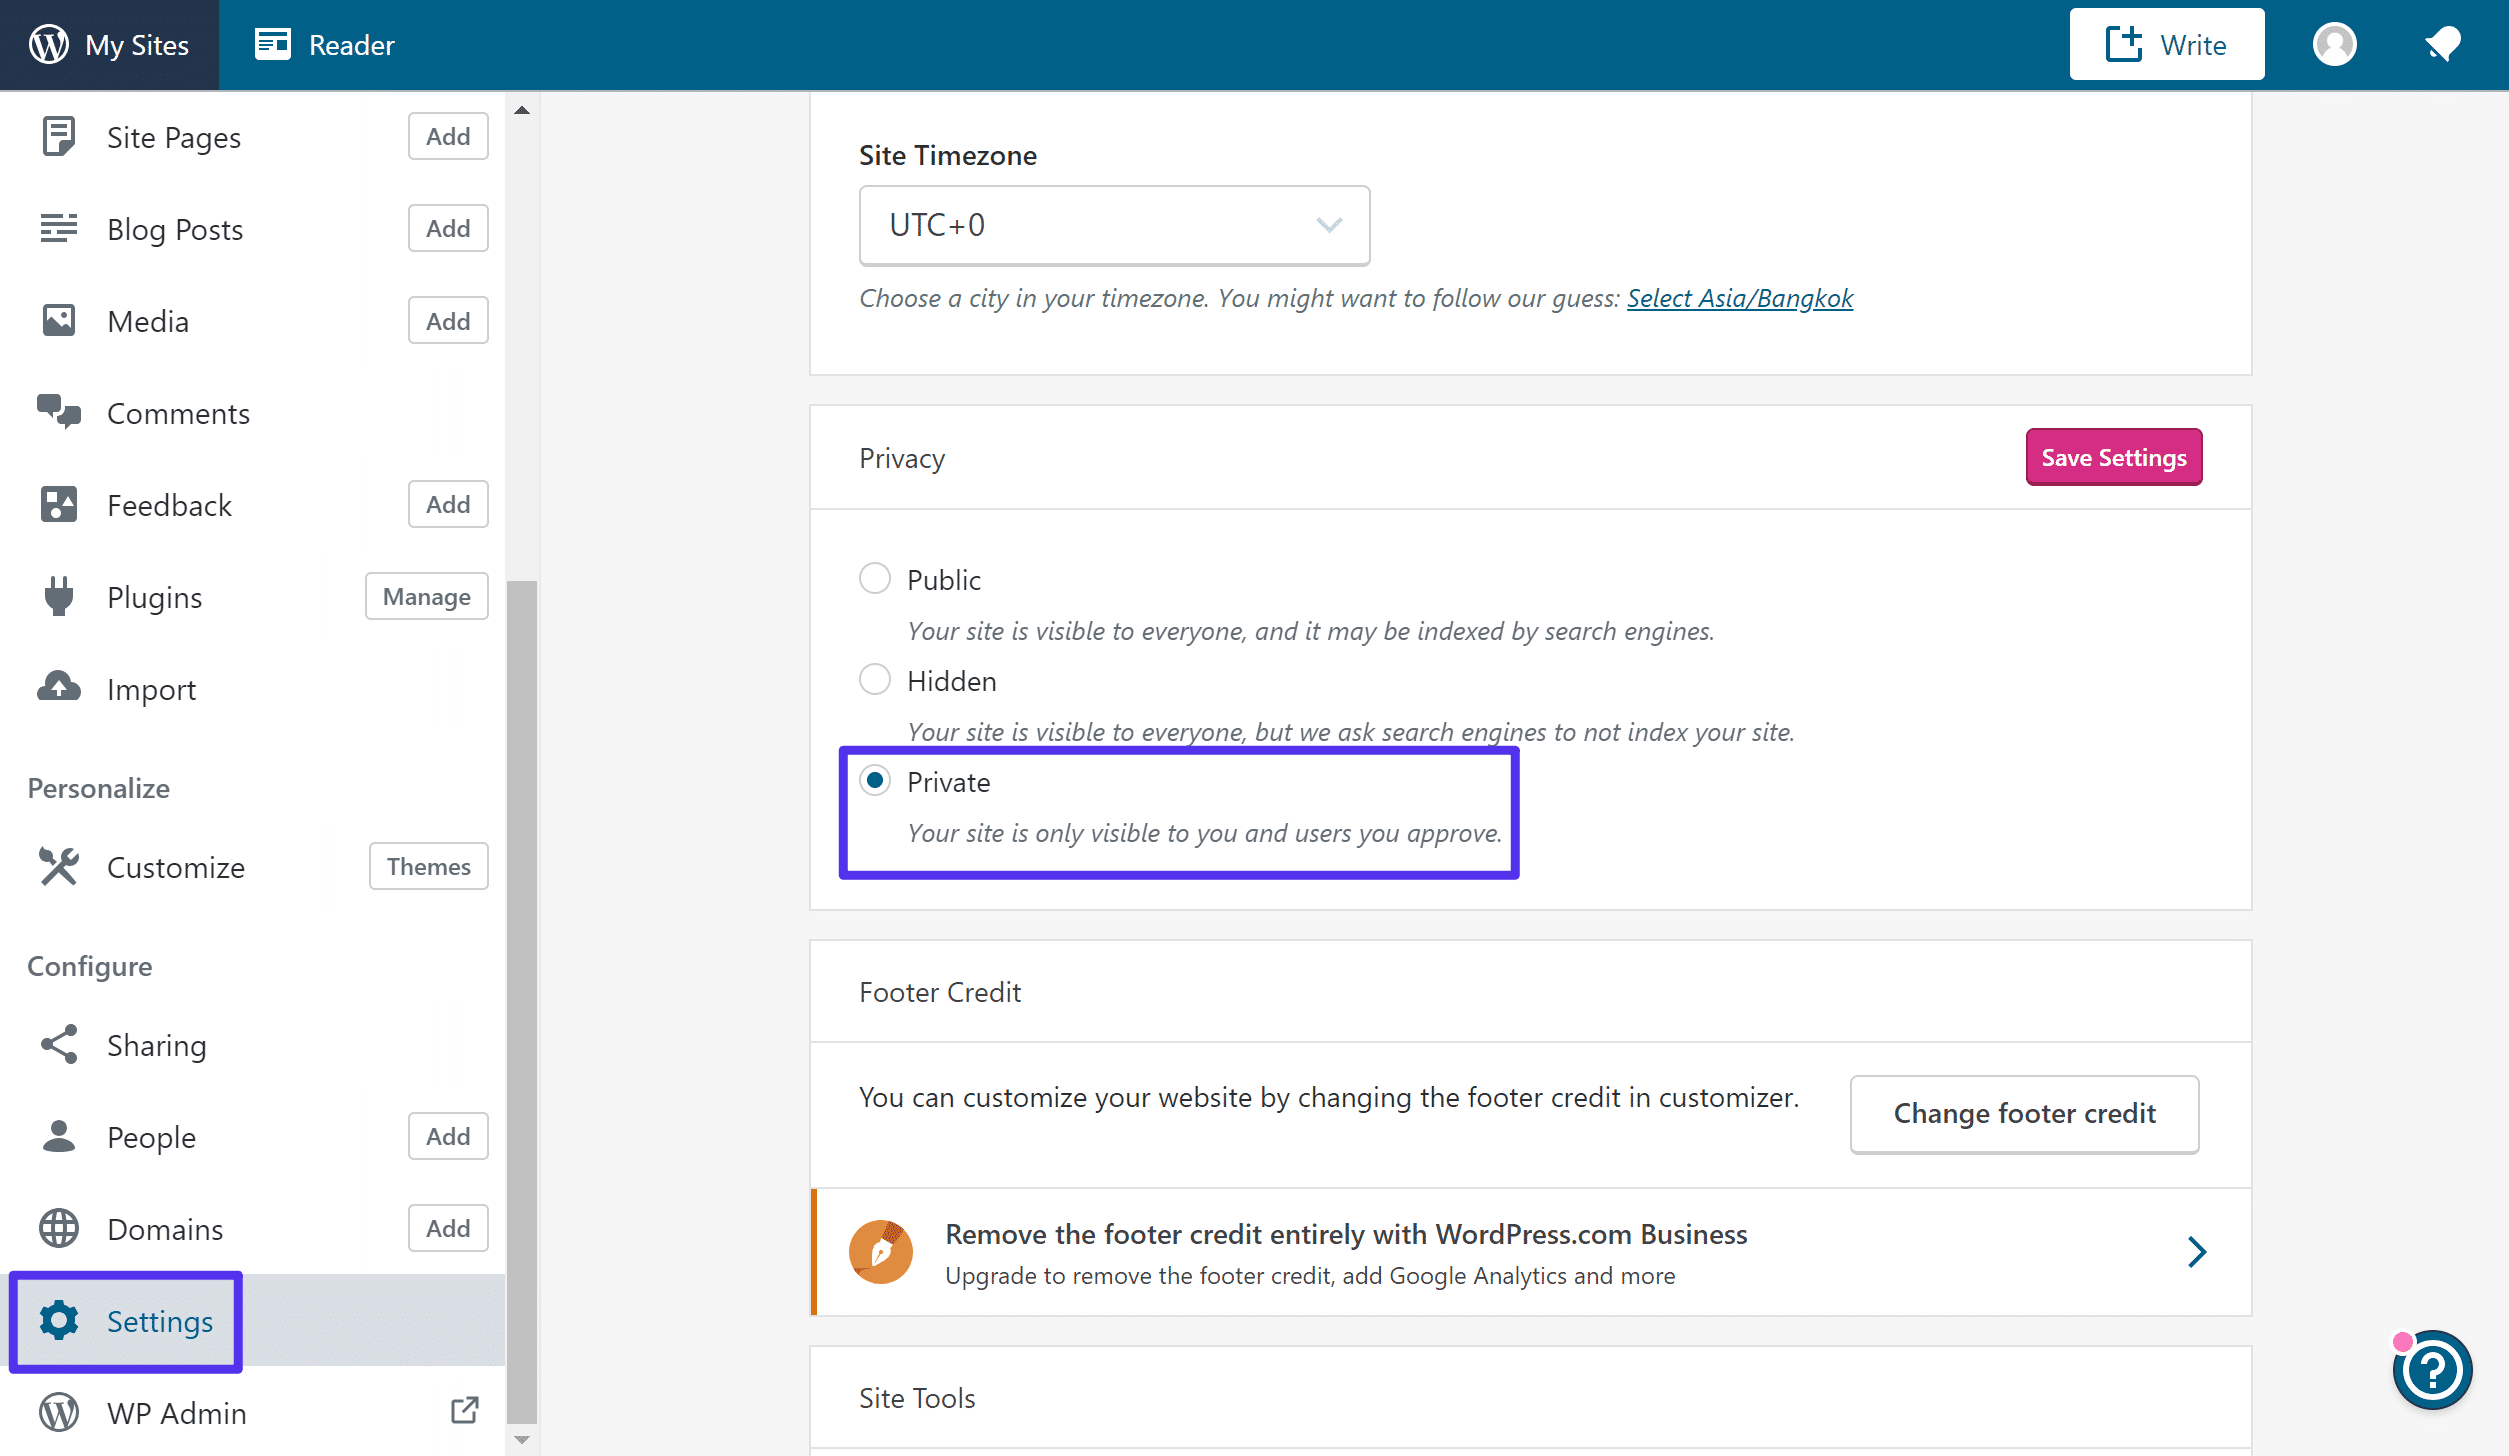
make your WordPress.com web site personal
Other URLs For WordPress.com And WordPress.org
In the event you modified your web site’s URL as a part of migrating from WordPress.com to WordPress.org (e.g. yoursite.wordpress.com to yoursite.com), then issues are a little bit trickier.
See, there’ll technically be two reproduction variations of your web site – one at yoursite.wordpress.com and every other at yoursite.com.
That is unhealthy as a result of:
- Guests may click on for your previous back-links and cross to
yoursite.wordpress.com, when in reality you wish to have them to be atyoursite.com - Google may see reproduction content material and received’t know which site to rank in Google searches.
To mend this factor, you’ll arrange redirect. With a redirect, any person who tries to consult with yoursite.wordpress.com can be taken immediately to yoursite.com as a substitute.
WordPress.com allows you to do that, however they’ll fee you $13 in step with yr for the privilege to take action.
Whilst paying cash isn’t amusing, this small price is worthwhile in case you have an current target market and don’t wish to lose them when you are making the transfer.
To create a redirect, go here and choose the web site that you simply’ve migrated:
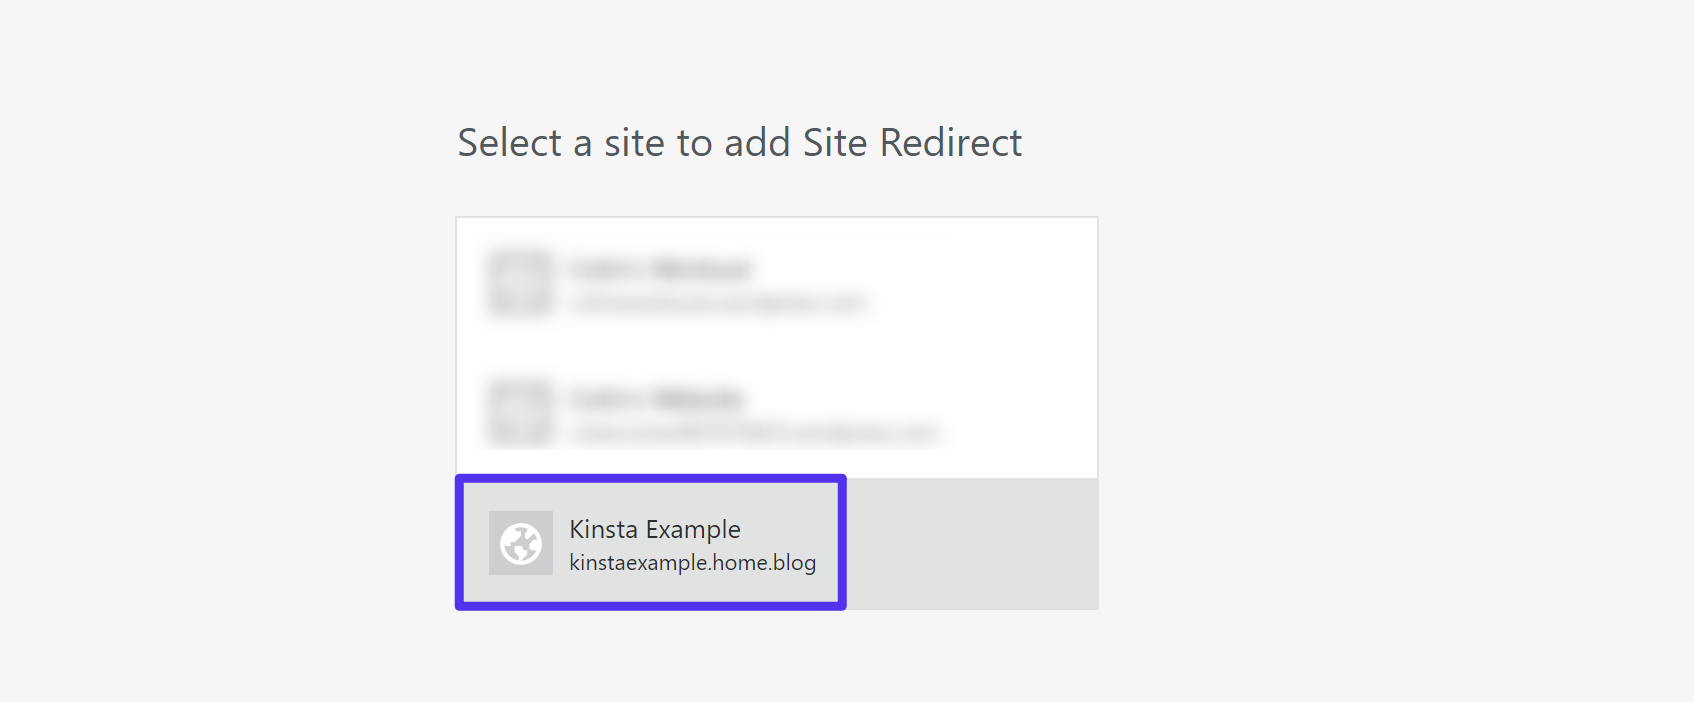
arrange a redirect at WordPress.com
Then, input your new area within the field and click on Pass:
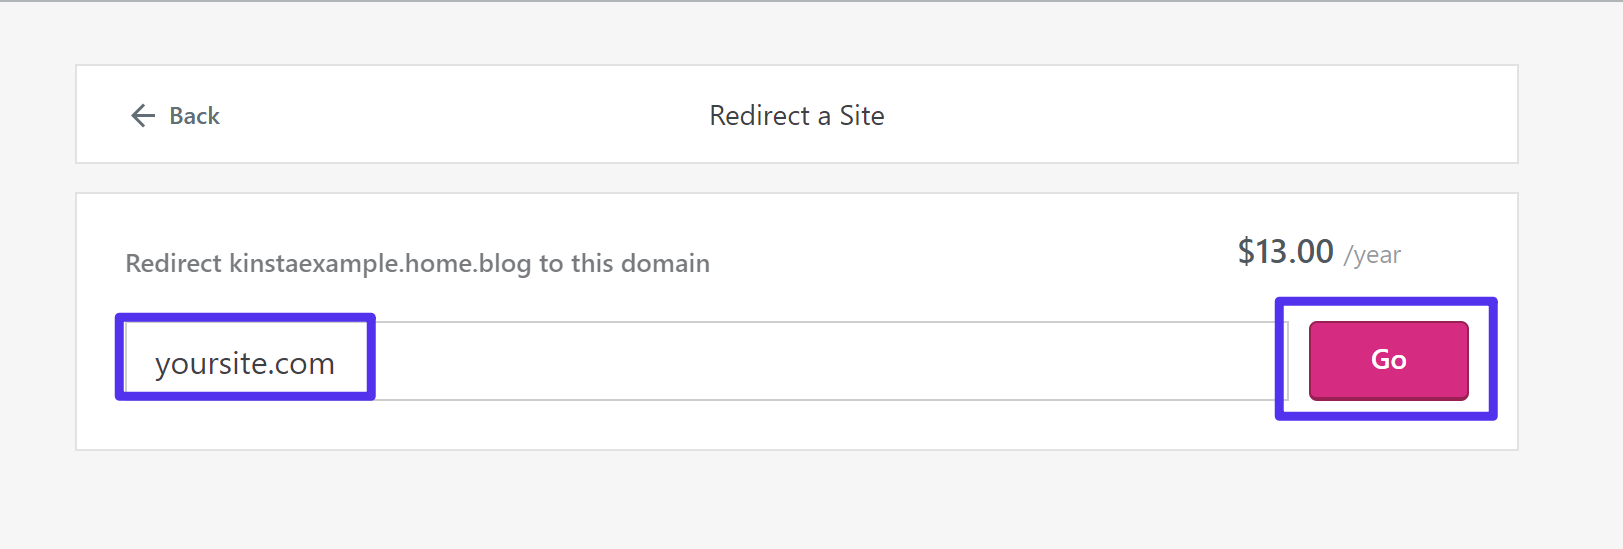
Input new area identify
Then, you’ll wish to input your cost knowledge to complete the method.
If you do not need to pay this $13 in step with yr price to WordPress.com, you’ll additionally simply make your previous web site personal through following the process within the earlier segment. Alternatively, you’ll lose the entire visitors and hyperlinks that cross on your previous WordPress.com web site, which isn’t ultimate.
Use Jetpack to Get right of entry to WordPress.com Capability
At this level, you’re just about performed!
Alternatively, ahead of we end out this educational, we’ll depart you with yet one more pointer:
If you wish to get get entry to to a few WordPress.com capability – like your WordPress.com web site’s Subscribers – you’ll use the loose Jetpack plugin to attach your WordPress.org web site to WordPress.com and get a lot of the similar capability that you simply had ahead of.
Jetpack is evolved through Automattic – the similar corporate at the back of WordPress.com – so it’s in a position to seamlessly upload many WordPress.com options on your new WordPress.org site.
Abstract
Transferring from WordPress.com to WordPress.org can also be a thrilling time. It normally approach you’re able to take the next move and get complete keep watch over over your site. The probabilities of what you’ll do are unending!
You probably have any hassle with migrating from WordPress.com to WordPress.org, you’ll all the time hire a WordPress developer. These kinds of tasks are simple for seasoned builders and they may be able to have your WordPress web site up and operating at Kinsta very quickly.
Have every other issues of our migration information above? Tell us beneath within the feedback.
The publish How to Migrate WordPress.com to WordPress.org (Step by Step Guide) gave the impression first on Kinsta Managed WordPress Hosting.
WP Hosting