Your headline is most often the very first thing other folks learn after they’re visiting your web site. But even so having a actually excellent headline, it’s additionally vital to make other folks realize and in fact learn no matter it’s you’re appearing them. Headlines most often don’t cross omitted on account of their dimension and central place within the hero phase, however if you wish to take it one step additional and actually make the headline pop, this educational is for you.
We’re going to mix Divi’s animation settings to create a headline that stands proud and grabs the eye of your guests. We’ll divide the headline into 5 items and create a flash impact that’ll make your guests wish to practice the motion and skim what’s being shared.
Let’s get to it!
Contents
- 1 Preview
- 2 Let’s Get started Recreating!
- 2.1 Upload New Phase
- 2.2 Upload Row #1
- 2.3 Upload Textual content Module #1
- 2.4 Clone Textual content Module x4
- 2.5 Alternate Replica #1
- 2.6 Alternate Replica #2
- 2.7 Alternate Replica #3
- 2.8 Alternate Replica #4
- 2.9 Upload Unfavourable Margin to Every Textual content Module With the exception of the First One
- 2.10 Become Row
- 2.11 Upload Row #2
- 2.12 Upload Identify Textual content Module to Column 2
- 2.13 Upload Divider Module to Column 2
- 2.14 Upload Description Textual content Module to Column 2
- 2.15 Upload Button Module to Column 2
- 3 Preview
- 4 Ultimate Ideas
Preview
Earlier than we dive into the educational, let’s take a handy guide a rough take a look at the result on other display sizes.
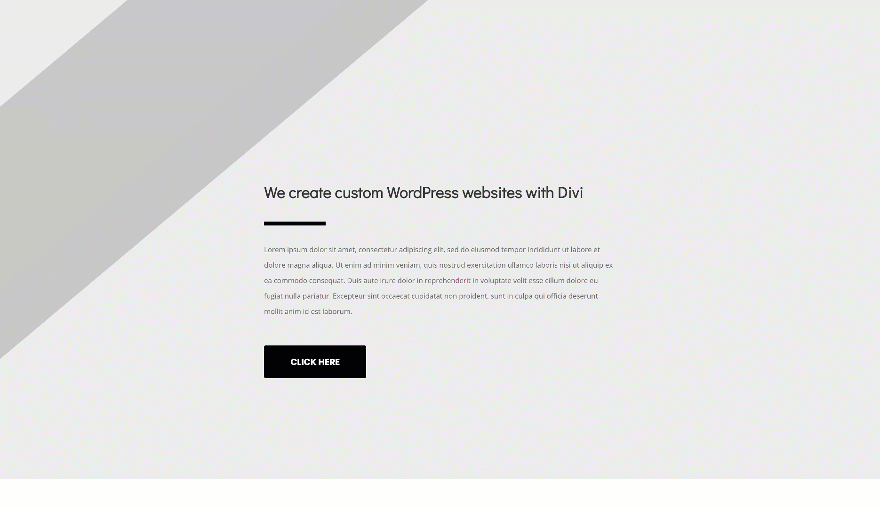
Desktop
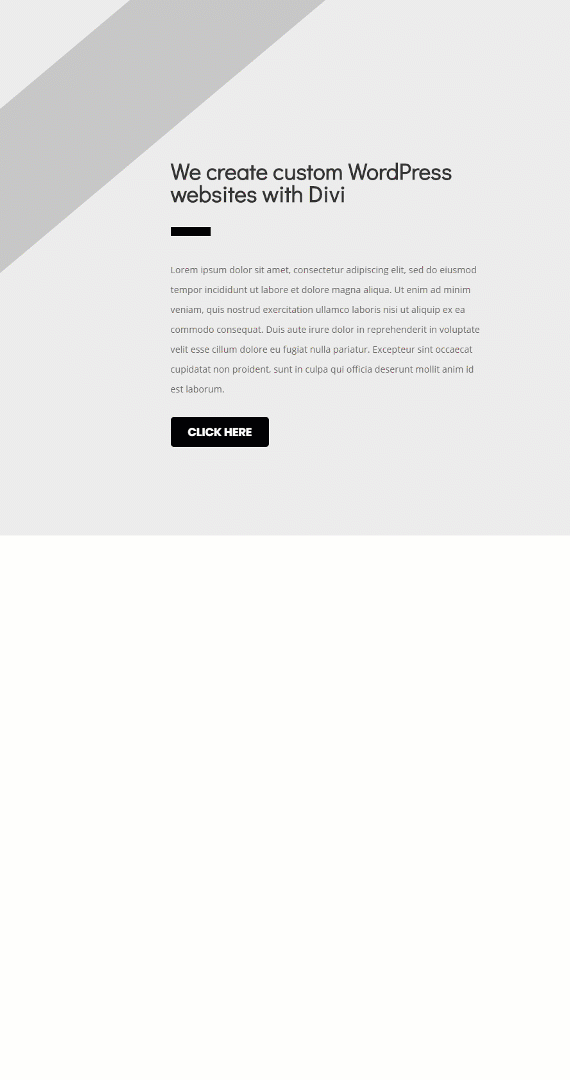
Cellular
Let’s Get started Recreating!
Upload New Phase
Background Colour
Let’s get started developing! Create a brand new web page and upload an ordinary phase to it. Open the phase settings and alter the background colour.
- Background Colour: #ededed

Spacing
Then, cross to the spacing settings of the phase and upload some customized backside padding.
- Backside Padding: 10vw

Upload Row #1
Column Construction
Proceed by means of including a brand new row the usage of the next column construction:

Background Colour
With out including any modules but, open the row settings and alter the row background colour.
- Background Colour: #c9c9c9

Sizing
Cross to the sizing settings subsequent and make allowance the row to absorb all the width of the display.
- Make This Row Fullwidth: Sure
- Use Customized Gutter Width: Sure
- Gutter Width: 1

Spacing
Take away the default best and backside padding of the row as smartly.
- Most sensible Padding: 0px
- Backside Padding: 0px

Upload Textual content Module #1
Upload Content material
Time to start out including modules! The primary module we want is a Textual content Module. Input the primary a part of your headline to the content material field the usage of the paragraph textual content taste.

Background Colour
Then, cross to the background settings of the module and upload a background colour.
- Background Colour: #c9c9c9

Textual content Settings
Alternate the textual content settings within the design tab too.
- Textual content Font: Didact Gothic
- Textual content Font Weight: Daring
- Textual content Colour: #000000
- Textual content Measurement: 10vw
- Textual content Line Peak: 0.9em
- Textual content Orientation: Middle

Spacing
And create the form you wish to have the usage of customized best and backside padding.
- Most sensible Padding: 10vw
- Backside Padding: 3vw

Animation
Ultimate however now not least, we’re going so as to add an animation. It’s vital to verify the animation period and beginning opacity are 0. This may permit the textual content module to turn up with a flash impact.
- Animation Taste: Fade
- Animation Repeat: As soon as
- Animation Period: 0ms
- Animation Prolong: 1000ms

Clone Textual content Module x4
If you’re achieved editing the primary Textual content Module, you’ll be able to cross forward and clone the module as much as as time and again as you wish to have, relying at the period of your headline. For every a part of the headline which you wish to have to turn up with a flash impact, you’ll desire a separate Textual content Module. For this situation, we’ll want 4 further modules.

Alternate Replica #1
Content material
Alternate the reproduction of the primary replica.

Background Colour
Together with the background colour.
- Background Colour: #5900ff

Textual content Colour
Alternate the textual content colour into white.
- Textual content Colour: #ffffff

Animation
And build up the animation lengthen within the animation settings. This may permit your guests to have sufficient time to learn the former Textual content Module ahead of this one presentations up.
- Animation Prolong: 1500ms

Alternate Replica #2
Content material
Alternate the content material of the second one replica subsequent.

Background Colour
Together with the background colour.
- Background Colour: #ffb200

Textual content Colour
And the textual content colour too.
- Textual content Colour: #ffffff

Animation
Once more, we’ll be sure that the animation lengthen is upper than the animation lengthen that used to be used for the 2 earlier modules. We’re leaving 500ms in between every one in all them to provide other folks sufficient time to learn.
- Animation Prolong: 2000ms

Alternate Replica #3
Content material
Proceed by means of converting the content material of the 3rd replica.

Animation
Together with the animation lengthen.
- Animation Prolong: 2500ms

Alternate Replica #4
Content material
Directly to the following and remaining replica. Alternate the content material.

Background Colour
Together with the background colour.
- Background Colour: #000000

Textual content Colour
Alter the textual content colour too.
- Textual content Colour: #3a3a3a

Animation
And build up the animation lengthen within the animation settings.
- Animation Prolong: 3000ms

Upload Unfavourable Margin to Every Textual content Module With the exception of the First One
If you’re achieved customizing all Textual content Modules, you’ll be able to cross forward and create an overlap. To create this overlap, we’re going so as to add some unfavorable best margin to every one of the most replica Textual content Modules. In different phrases, we’re ensuring the entire modules that come after the primary module seem on best of that first Textual content Module.
- Most sensible Margin: -21.98vw

Become Row
Become Translate
Proceed by means of reworking all the row, beginning with the turn into translate settings.
- Backside: -35vw

Become Rotate
Alter the turn into rotate values too.
- Left: 320deg

Upload Row #2
Column Construction
Directly to the second one row! Now that we’ve got the headline impact in position, we will get started including the rest modules. Upload a brand new row the usage of the next column construction:

Sizing
With out including any modules but, open the row settings and make allowance the row to absorb all the width of the display within the sizing settings:
- Make This Row Fullwidth: Sure
- Use Customized Gutter Width: Sure
- Gutter Width: 1

Spacing
Take away the default best padding of the row subsequent.
- Most sensible Padding: 0px

Upload Identify Textual content Module to Column 2
Upload H1 Content material
Time to start out including modules! The primary module we want is a identify Textual content Module. Upload some H1 content material of your selection.

H1 Textual content Settings
Then, cross to the design tab and alter the H1 textual content settings.
- Heading Font: Didact Gothic
- Heading Font Weight: Daring
- Heading Textual content Measurement: 1.8vw (Desktop), 3.8vw (Pill), 4vw (Telephone)

Spacing
Upload some customized margin values to the spacing settings.
- Most sensible Margin: -4vw
- Backside Margin: 2vw
- Left Margin: 30vw
- Proper Margin: 30vw (Desktop), 15vw (Pill & Telephone)

Upload Divider Module to Column 2
Visibility
The following module we want is a Divider Module. Ensure the ‘Display Divider’ choice is enabled.
- Display Divider: Sure

Colour
Then, cross to the design tab and alter the divider colour.
- Colour: #000000

Sizing
Alter the sizing settings too.
- Divider Weight: 8px
- Width: 7%

Spacing
Together with the spacing settings.
- Backside Margin: 1vw
- Left Margin: 30vw

Upload Description Textual content Module to Column 2
Upload Content material
The following module we want is any other Textual content Module. Input some content material of your selection.

Textual content Settings
Then, alter the textual content settings within the design tab.
- Textual content Measurement: 0.8vw (Desktop), 1.3vw (Pill), 1.6vw (Telephone)
- Textual content Line Peak: 2.2em

Spacing
Upload some customized margin values within the spacing settings too.
- Backside Margin: 3vw
- Left Margin: 30vw
- Proper Margin: 30vw (Desktop), 15vw (Pill & Telephone)

Upload Button Module to Column 2
Button Settings
Directly to the following and remaining module, which is a Button Module. Upload some reproduction of your selection and alter the button settings accordingly:
- Use Customized Kinds for Button: Sure
- Button Textual content Measurement: 1vw (Desktop), 1.5vw (Pill), 2vw (Telephone)
- Button Border Width: 0px
- Button Font: Poppins
- Font Weight: Daring
- Font Taste: Uppercase


Spacing
Cross to the spacing settings and upload some customized margin and padding values, and also you’re achieved!
- Left Margin: 30vw
- Most sensible Padding: 1vw
- Backside Padding: 1vw
- Left Padding: 3vw
- Proper Padding: 3vw

Preview
Now that we’ve long gone via the entire steps, let’s take a last take a look at the result throughout other display sizes.
Desktop
Cellular
Ultimate Ideas
On this publish, we’ve proven you tips on how to make your headline pop the usage of Divi’s integrated choices handiest. This can be a nice method for grabbing the eye of your guests and speaking your message in an authentic means. If in case you have any questions or tips, make sure to go away a remark within the remark phase beneath!
The publish How to Make Your Headline Pop with Divi’s Animation Settings gave the impression first on Elegant Themes Blog.
WordPress Web Design