
Sidebars aren’t in reality as fashionable as they was once. In lots of instances, they finally end up being extra distracting than they’re useful. However occasionally a sidebar makes very best sense, particularly when coping with long content material. Because of this I got down to create a sidebar that makes numerous sense.
Nowadays I’m appearing you the way you’ll use the Divi Builder to create a responsive fastened (or sticky) sidebar with easy scrolling anchor hyperlinks (or bounce hyperlinks). For the reason that sidebar stays visual and the anchor hyperlinks easily scroll to other sections at the web page, the sidebar remains married to the content material, making it a useful UX function. Like a record define, this mix makes your internet web page content material extra out there and more straightforward to learn. This is a refreshing answer for the ones lengthy scrolling pages.
Test it out!
Contents
- 1 Sneak Peek
- 2 The Idea
- 3 What You Wish to Get Began
- 4 Including the Structure for your Web page
- 5 Making a New Phase
- 6 Including the CSS IDs to the Sections and Rows
- 7 Creation
- 8 Growing the Mounted Sidebar Structure
- 9 Making Changes for Cell
- 10 The Ultimate Consequence
- 11 Be informed Extra About Mounted Parts and Anchor Hyperlinks
- 12 Ultimate Ideas
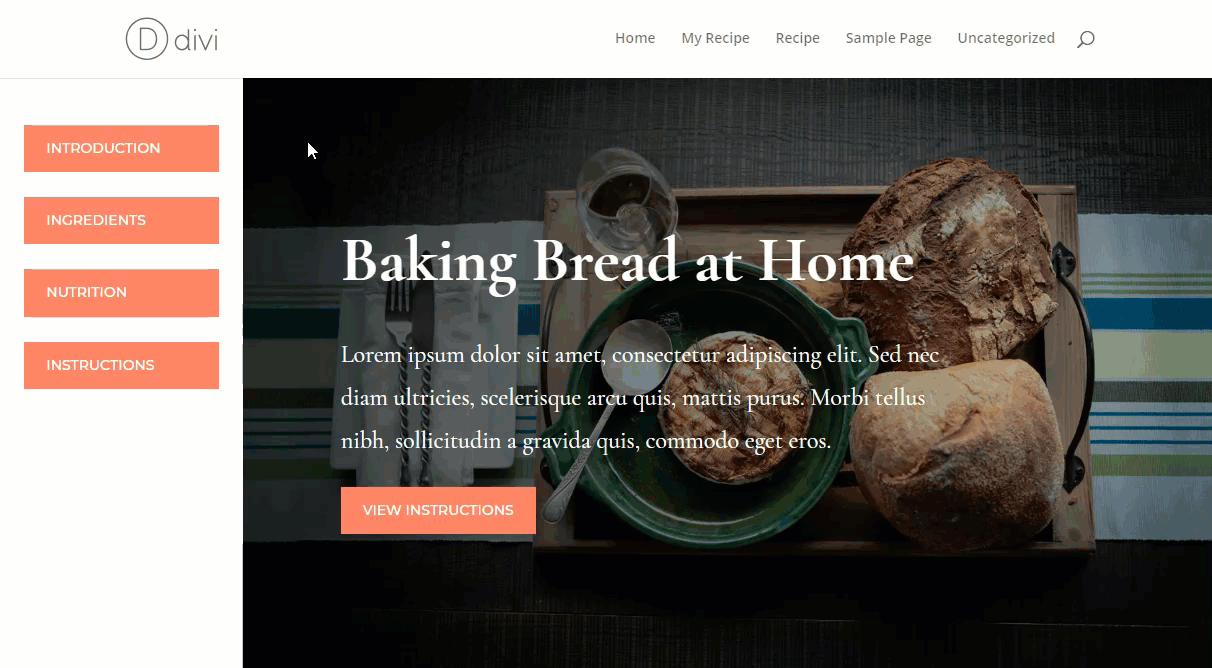
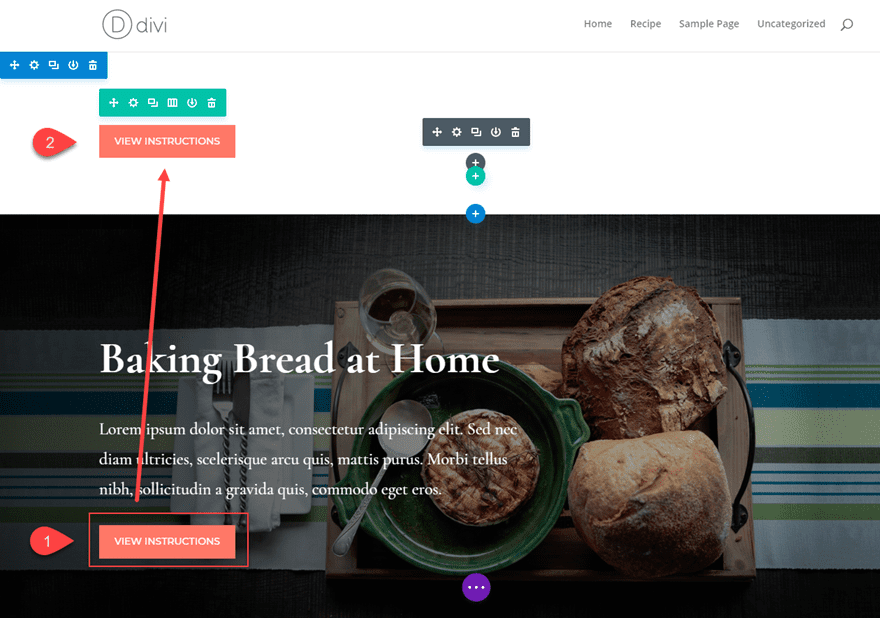
Sneak Peek
Here’s a sneak height of what we can be construction in combination.
The Idea
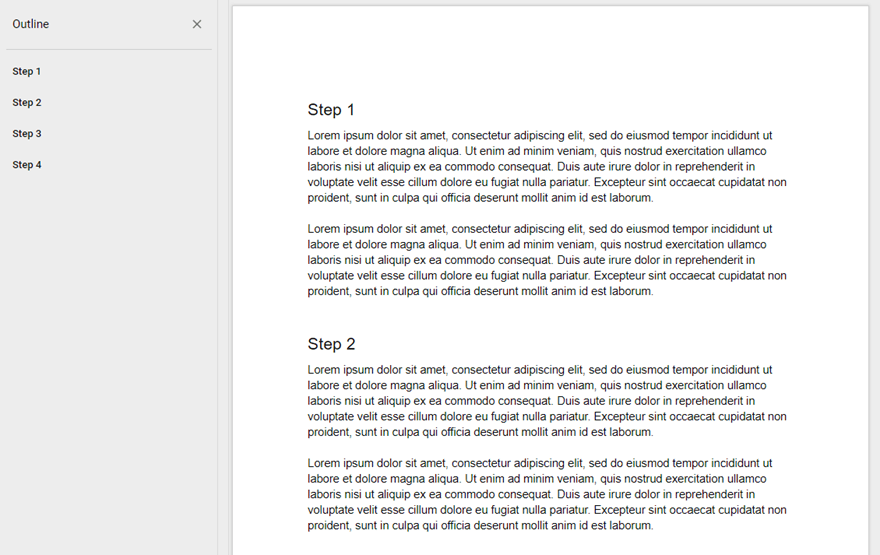
For the ones of you who are living in Google Doctors up to I do, you might be acutely aware of that useful document outline tool that lets you simply deploy a set sidebar with a clickable define that jumps to the other headings in your record. I adore it as it is helping me to find data so much quicker. I believed it could be cool to carry this similar function for your website online.
What You Wish to Get Began
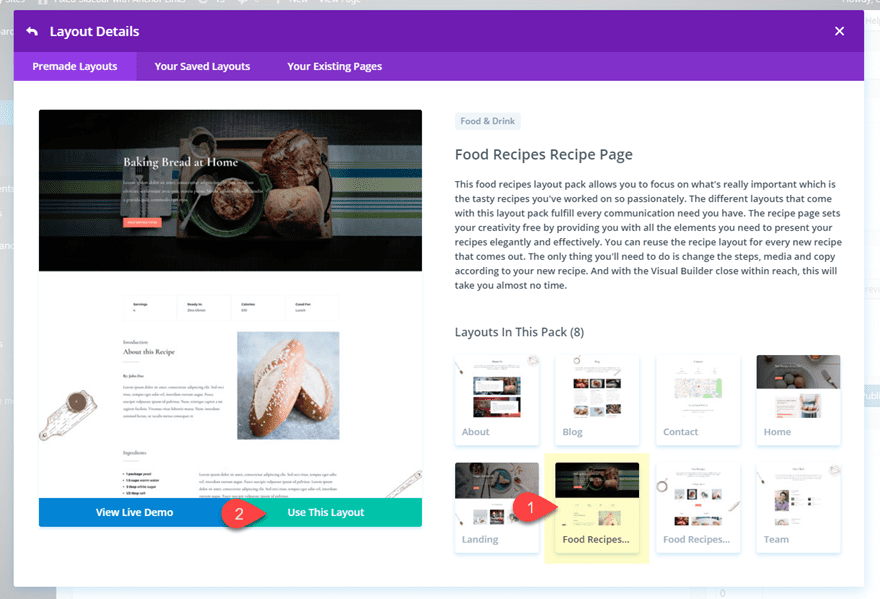
For this instructional, all you in reality want is Divi! We can be even be the usage of the Recipes Web page from the Meals Recipes Structure Pack which is freely out there from the Divi Builder.
Including the Structure for your Web page
To get began, move forward and create a brand new web page and deploy the Divi Builder. Make a selection the solution to “Select a Premade Structure”. From the Load From Library popup, choose the Meals Recipes Structure Pack after which click on to make use of the Recipes Web page.
After the format a lot, click on to construct at the entrance finish.
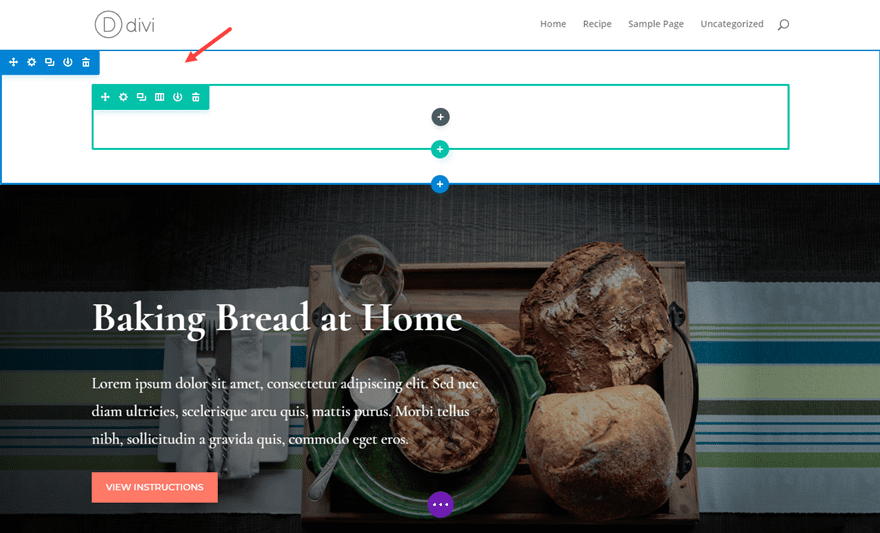
Making a New Phase
From the entrance finish Divi Builder, create a brand new segment and drag it to the very most sensible of the format.
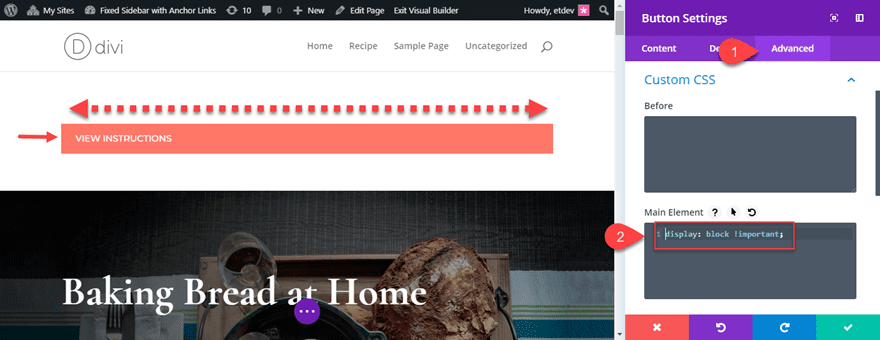
Reproduction the button within the format’s header segment and paste it into the one-column row of the brand new segment you created.
Open the button settings and upload the next customized CSS to the Major Part below the complicated tab:
show: block !essential;
This merely permits the button to span the whole width of the column.
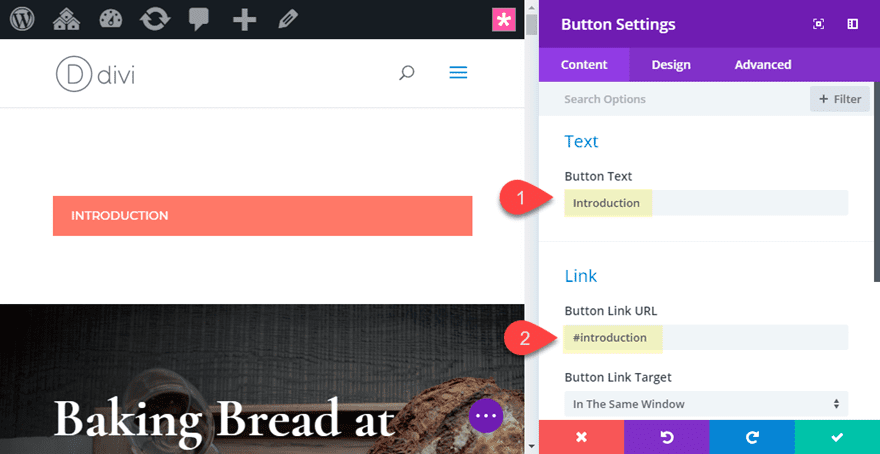
Alternate the button textual content to learn “Creation”. After which upload the next for the button hyperlink url:
#creation
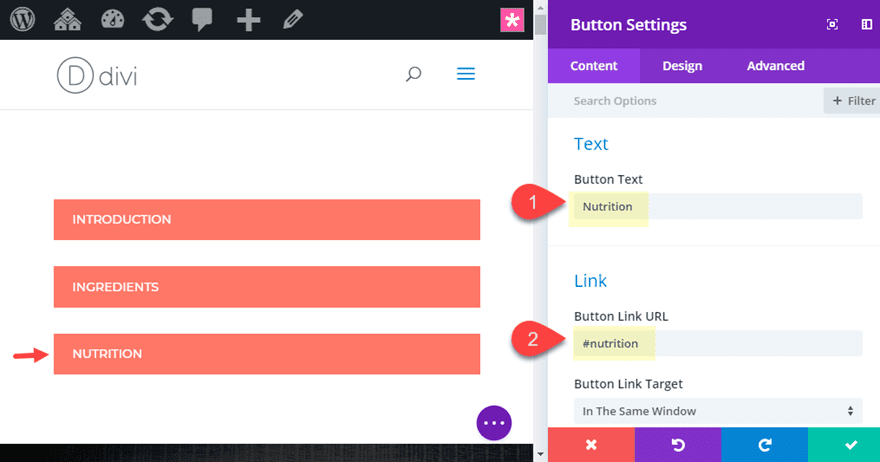
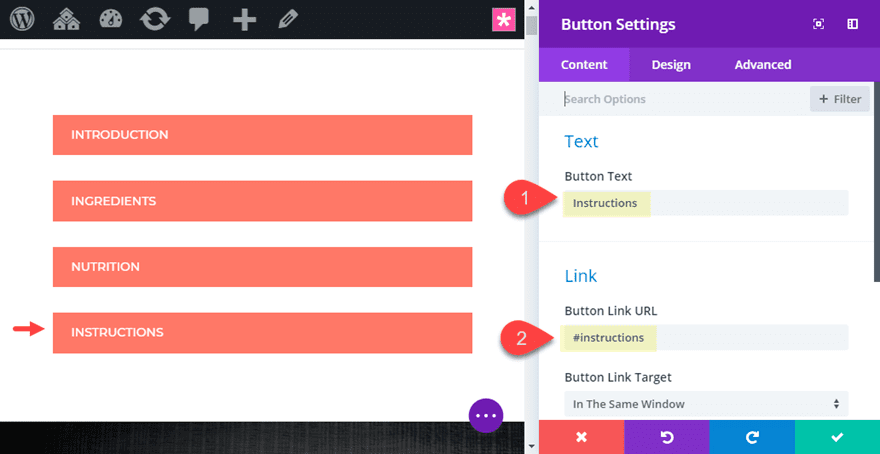
That is the way you create an anchor hyperlink. The hashtag (#) tells the browser you’ll be linking to a CSS ID. The next textual content “creation” will correspond to the title of the CSS ID which we can upload to considered one of our sections within the format. The title of the CSS ID can also be the rest you need. Simply be sure that it fits the CSS ID you give the segment in a while.
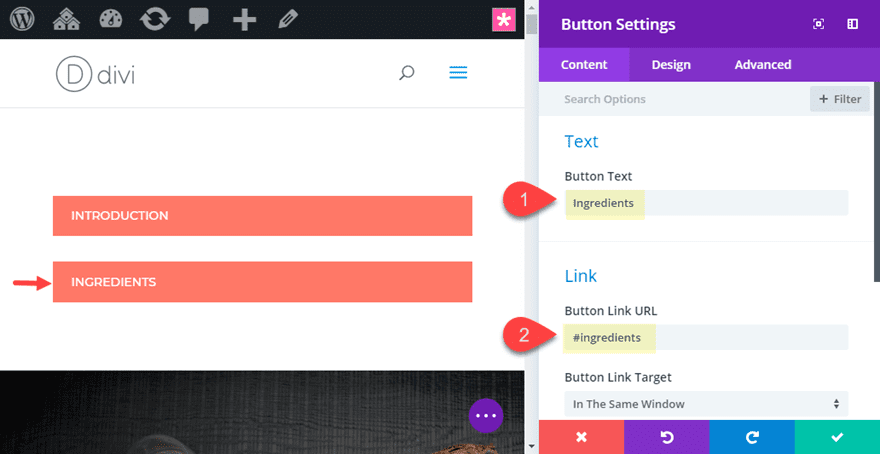
Replica the button after which repeat the method of givin the button a brand new Button Textual content and a brand new Button Hyperlink URL. Since this will probably be an anchor hyperlink that jumps to another segment of the web page, be sure that the CSS ID (the textual content after the “#”) in distinctive and corresponds to the title you are going to give your segment in a while.
For this button, exchange the button textual content to “Components” and the button hyperlink URL to “#components”.
Replica the button once more after which give the brand new button the button textual content “Vitamin” and alter the button hyperlink URL to “#vitamin”.
Replica the button yet one more time after which give the brand new button the button textual content “Directions” and alter the button hyperlink URL to “#directions”.
That’s all we want to do for now. We can circle again to this segment flip it into a set sidebar in a bit of.
Including the CSS IDs to the Sections and Rows
Now that we have got all of our button created with the anchor hyperlinks in position, we’re able so as to add the corresponding CSS ID names to our sections and rows.
Anchor hyperlinks will routinely bounce to any component at the web page with the corresponding CSS ID. A CSS ID can also be carried out to inline textual content, modules, rows, or sections. For those who sought after so as to add a CSS ID to heading the usage of HTML, it could glance one thing like this:
Creation
Then again, since we wish to bounce to a bit of the web page, we will upload the CSS ID to the precise segment of the web page. This may give you the person with sufficient comfy viewing area so the customer can simply acknowledge the place they’re at the web page. Leaping to inline textual content or to a module might purpose confusion for the customer.
As we coated previous each and every of the button urls we created are supposed to correspond to the CSS IDs of the sections they want to bounce to.
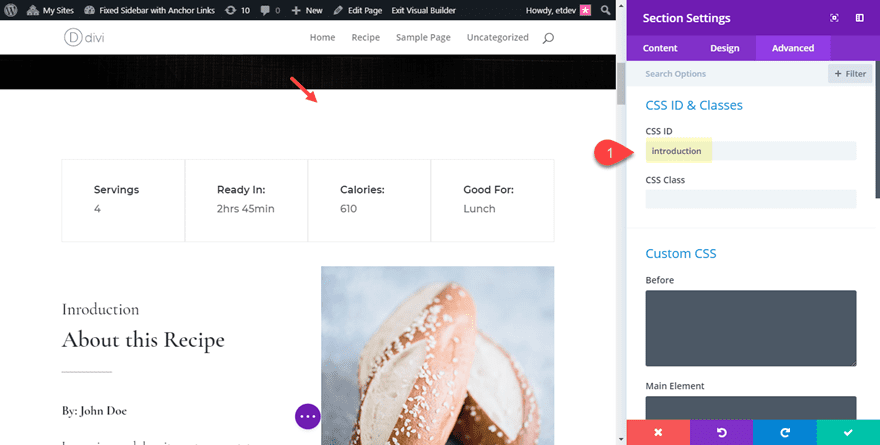
For the “Creation” button, we want to upload the CSS ID to the segment of the web page containing the creation content material. To try this, open the segment settings of the 3rd segment of the web page (the segment immediately below the header) and upload the next CSS ID below the complicated tab:
CSS ID: creation
This may correspond to the Creation anchor hyperlink button we created previous.
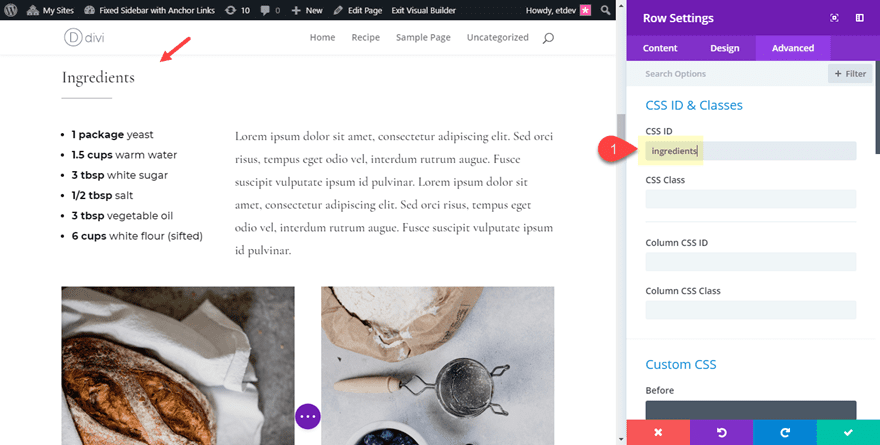
Now in the similar segment, to find the row containing the heading “Components”. Then open the row settings and upload the next CSS ID:
CSS ID: components
This may correspond to the Components anchor hyperlink button we created previous.
Scroll right down to the following segment with the heading “Vitamin” and open the segment settings. Then upload the next CSS ID:
CSS ID: vitamin
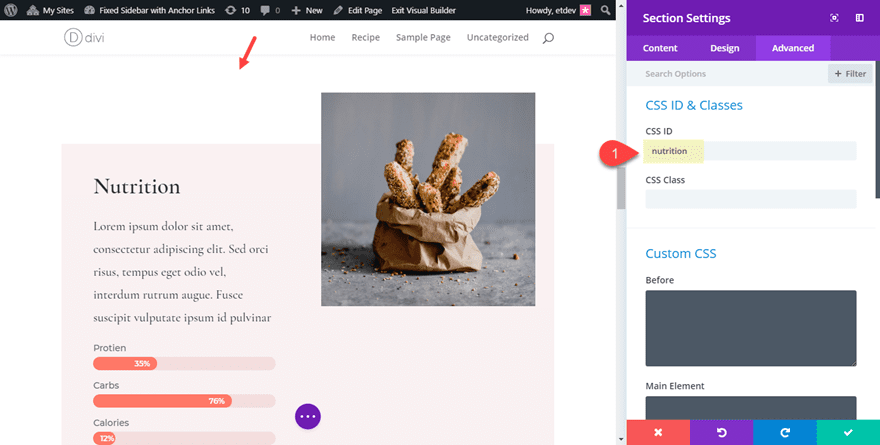
This may correspond to the Vitamin anchor hyperlink button we created previous.
In the end, scroll right down to the following segment of the format with the name “Step by way of Step Directions”. Then open the segment settings and upload the next CSS ID below the complicated tab:
CSS ID: directions
This may correspond to the Directions anchor hyperlink button we created previous.
Prevent adjustments.
Now is a great time to peer in case your anchor hyperlinks are operating. Open the web page in a brand new tab and click on at the buttons within the most sensible segment to ensure they bounce/scroll to their corresponding places at the web page.
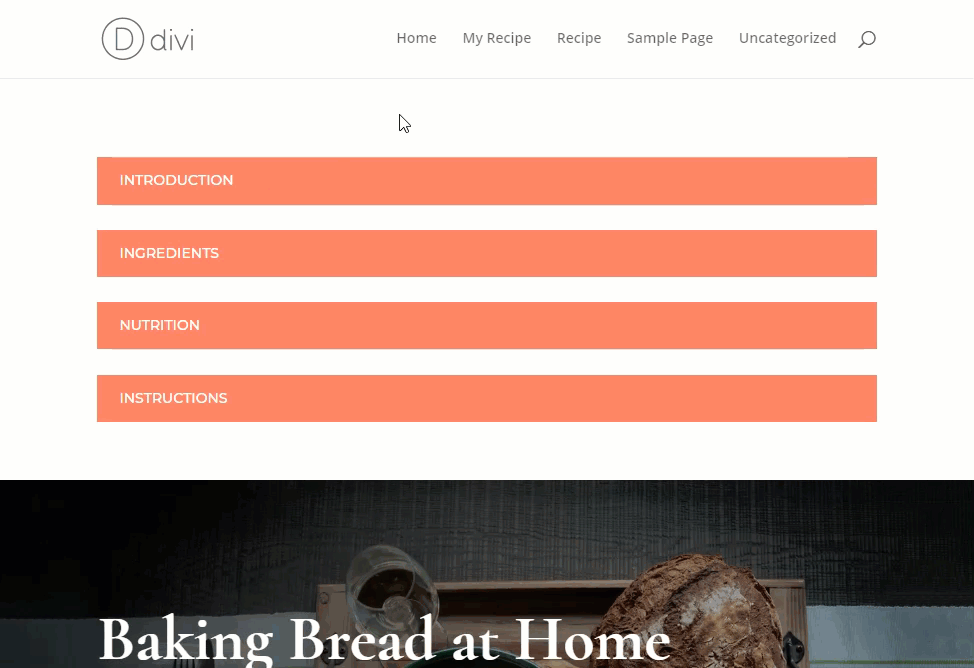
In the event that they aren’t operating, make sure you return and take a look at the CSS IDs are right kind and that they fit.
Growing the Mounted Sidebar Structure
Including Left Margins to Sections to Create House for the Sidebar
Having anchor hyperlinks on the most sensible of the web page is ok for such things as a desk of contents. However for this use case, we wish to stay the ones anchor hyperlinks visual to the person all the time so the person doesn’t must scroll again to the highest of the web page after clicking one of the crucial hyperlinks. A hard and fast sidebar will remedy this downside since it’ll keep fastened at the aspect of the web page because the person clicks the anchor hyperlinks.
However ahead of we place the sidebar, we want to create some area for it at the left aspect of our web page. To try this we can upload a left margin to each and every segment of the format.
The quantity of left margin we upload to each and every segment will probably be equivalent to the width of the sidebar so now’s the time to come to a decision simply how large you need the sidebar to be. For this case, a 20% width will do.
Open the settings of the second one segment (the only immediately below our anchor hyperlink buttons) and upload the next customized margin:
Customized Margin: 20% left
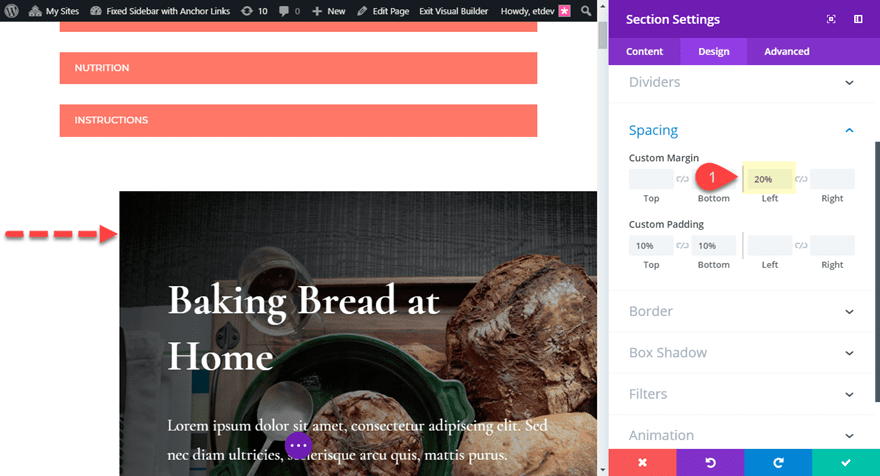
Now ahead of you save the settings, proper click on at the Customized Margin choice and click on “Reproduction Customized Margin” and the save the settings.
On each and every of the rest sections all the way through your web page format, paste the customized margin to the segment by way of proper clicking at the segment and clicking “Paste Customized Margin”.

This may give a 20% left margin to all your sections except for the very most sensible segment containing the anchor hyperlink buttons.
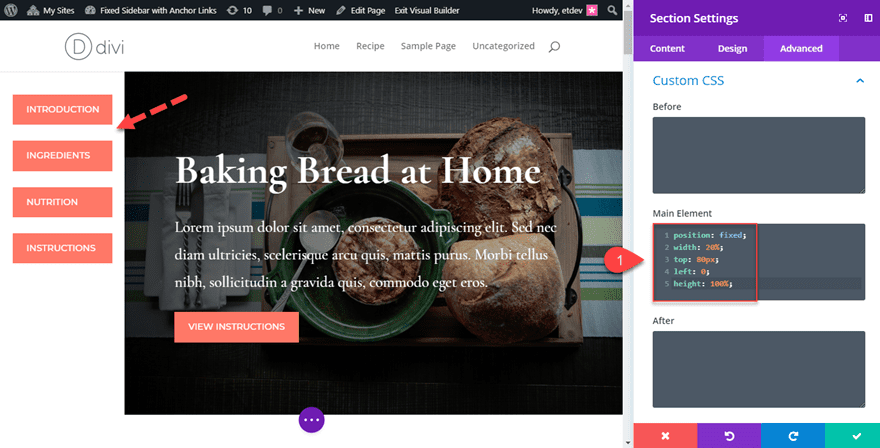
Growing the Mounted Sidebar
To create the sidebar, we can want to upload some customized CSS to the highest segment with a purpose to give it a set place at the left of the web page. So principally, we can flip the highest segment into a set sidebar. To try this open the settings of the highest segment and upload the next customized CSS to the Major Part:
place: fastened;
width: 20%;
most sensible: 80px;
left: 0;
top: 100%;
This CSS offers the segment a set place with a width of 20% of the web page. It additionally positions the segment to the left of the web page and 80px from the highest of the web page to accomodate the peak of the header navigation. The 100% top makes positive the segment spans the whole top of the web page.
Now view the web page in some other browser tab to peer the capability. As you scroll down the web page, the sidebar remains fastened and you’ll click on the anchor hyperlink buttons to navigate to the other sections comfortably.
You will have spotted that the segment is overlapping the ground footer bar on the backside of the web page.
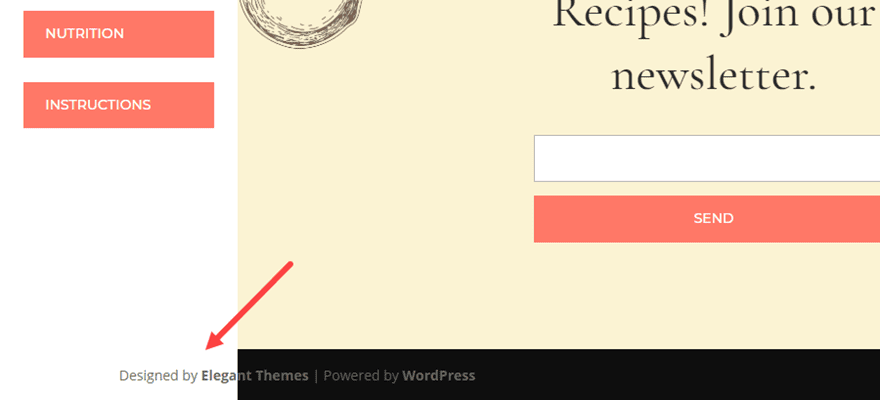
There are a couple of tactics to deal with this downside. As an example, I may just take out “top: 100%” from the customized CSS for the segment or you need to upload some CSS to the web page settings to regulate the width of the footer bar. However if you wish to stay the segment top at 100%, a very simple repair is to take out the segment background colour. Open the segment settings of the segment we’re the usage of for the sidebar and upload the next background colour:
Background Colour: rgba(255,255,255,0)
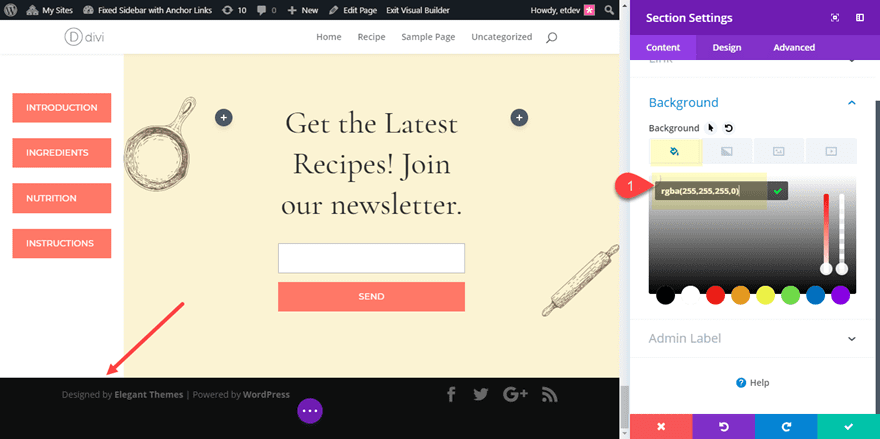
If you wish to exchange the colour of the sidebar, you’ll open the web page settings and alter the Content material House Background Colour.

Because the segment background colour is clear, the content material house background colour in your web page shines thru. And because all of our different sections have background colour, it’ll most effective display in the course of the sidebar segment with out overlapping the ground footer bar.
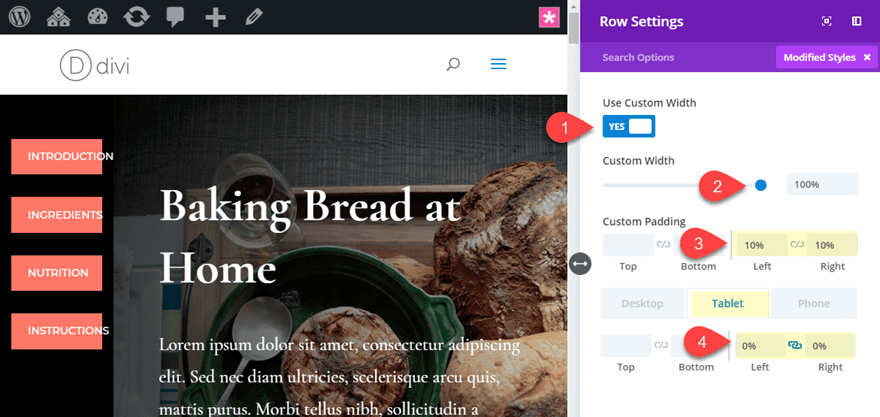
Making Changes for Cell
This design in reality doesn’t make sense for smartphones as a result of there’s no room for a sidebar and having the hyperlinks on the most sensible of the web page would require the person to scroll again up each and every time they wish to click on an anchor hyperlink. However the design will nonetheless paintings for pill, however chances are you’ll want to create some more space for the ones anchor hyperlinks. To try this, open the row settings for the row of the segment sidebar and replace the next:
Customized Width: 100
Customized Padding (desktop): 10% left, 10% proper
Customized Padding (pill): 0% left, 0% proper
Now all we need to do is disguise (or disable) the segment on smartphone. To try this, open the segment settings and move over to the complicated tab and click on the take a look at field to disable on smartphone.

That’s it. You currently have a responsive fastened sidebar menu with easy scrolling anchor hyperlinks!
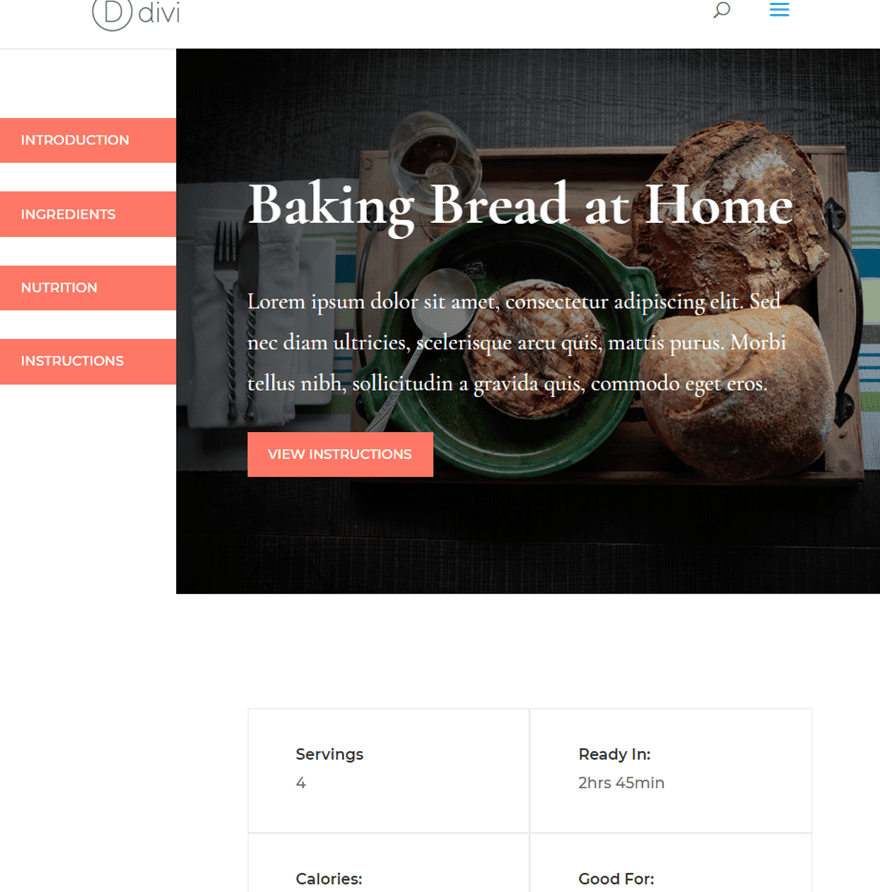
The Ultimate Consequence
Now let’s take a look at the overall outcome.
And here’s what the format seems like on pill.
Be informed Extra About Mounted Parts and Anchor Hyperlinks
For those who discovered this instructional useful, take a look at a few of our similar tutorials under:
- 5 Cool Things You Can Do In Divi with Anchor Links
- How to Make Any Divi Page Element Sticky
- How to Add Fixed Widgets to Your Sidebar in WordPress
- How to Make Your Divi Navigation Start at the Bottom, Then Stay Fixed at Top When Scrolling
- How to Make Your Divi Footer Fixed
- How to Create a Floating Pop-out Menu in Divi
Ultimate Ideas
The wonderful thing about this setup is you’ll simply upload fastened sidebars to any web page with other anchor hyperlinks (or the rest you need). Since your sidebar is principally a Divi segment, you’ll customise it the usage of the integrated settings, upload extra rows and use any aggregate of modules you need.
This setup could be nice for club lessons, tutorials, FAQ’s, portfolios, or lengthy weblog posts. You’ll even use it for one web page internet sites as smartly. Do you could have different makes use of to percentage? I’m to listen to what they’re within the feedback.
Cheers!
The submit How to Build a Responsive Fixed Sidebar with Smooth Scrolling Anchor Links with Divi gave the impression first on Elegant Themes Blog.
WordPress Web Design