
Wrapping textual content round photographs is a commonplace design method maximum often present in print media like magazines and newspapers. However you’ll additionally to find this getting used on the net, particularly for weblog posts. Wrapping textual content round a picture is in fact a beautiful usual a part of WordPress involving a easy alignment adjustment at the WYSIWYG editor. The one downside is that it’s tough to customise the way of your web page the use of the default WordPress editor. That’s the place Divi can assist!
On this educational, I’m going to turn you three ways you’ll use Divi to wrap textual content round photographs. This may increasingly assist you to create vintage print taste layouts with the ability of Divi that can assist you with the design. Here’s what we’re going to quilt:
- How to Wrap Text Around Images (and Blockquotes) Inside a Text Module with WYSIWYG Editor
- How to Wrap text around an Image by Floating an Image Module Next to a Text Module in Divi
- How to Wrap Text Around a Centered Image for a Unique Two-Column Layout
Even if this educational will pay attention to photographs, you’ll in fact use this similar procedure to wrap textual content round any module in Divi.
Contents
- 1 Sneak Peek Here’s a sneak peek of the primary design we can construct lately. Let’s get began! Obtain the Wrapping Textual content Round Photographs Structure for FREE
- 2 Obtain For Unfastened
- 3 You’ve gotten effectively subscribed. Please take a look at your e mail deal with to substantiate your subscription and get get admission to to loose weekly Divi format packs!
- 4 What You Want to Get Began
- 5 How you can Wrap Textual content Round Photographs and Blockquotes Inside of a Textual content Module with WYSIWYG Editor
- 6 How you can Wrap Textual content Round an Symbol by means of Floating an Symbol Module Subsequent to a Textual content Module in Divi
- 7 How you can Wrap Textual content Round a Targeted Symbol or Module for a Distinctive Two-Column Structure
- 8 Be informed extra about find out how to give
- 9 Ultimate Ideas
Sneak Peek
Here’s a sneak peek of the primary design we can construct lately.

Let’s get began!
Obtain the Wrapping Textual content Round Photographs Structure for FREE
To put your arms at the designs from this educational, you’re going to first wish to obtain it the use of the button underneath. To realize get admission to to the obtain it is important to subscribe to our Divi Day by day e mail listing by means of the use of the shape underneath. As a brand new subscriber, you’re going to obtain much more Divi goodness and a loose Divi Structure pack each and every Monday! When you’re already at the listing, merely input your e mail deal with underneath and click on obtain. You’ll now not be “resubscribed” or obtain further emails.
.et_bloom .et_bloom_optin_1 .et_bloom_form_content { background-color: #4843d2 !vital; } .et_bloom .et_bloom_optin_1 .et_bloom_form_container .et_bloom_form_header { background-color: #ffffff !vital; } .et_bloom .et_bloom_optin_1 .carrot_edge .et_bloom_form_content:prior to { border-top-color: #ffffff !vital; } .et_bloom .et_bloom_optin_1 .carrot_edge.et_bloom_form_right .et_bloom_form_content:prior to, .et_bloom .et_bloom_optin_1 .carrot_edge.et_bloom_form_left .et_bloom_form_content:prior to { border-top-color: clear !vital; border-left-color: #ffffff !vital; }
@media simplest display screen and ( max-width: 767px ) {.et_bloom .et_bloom_optin_1 .carrot_edge.et_bloom_form_right .et_bloom_form_content:prior to, .et_bloom .et_bloom_optin_1 .carrot_edge.et_bloom_form_left .et_bloom_form_content:prior to { border-top-color: #ffffff !vital; border-left-color: clear !vital; }
}.et_bloom .et_bloom_optin_1 .et_bloom_form_content button { background-color: #f92c8b !vital; } .et_bloom .et_bloom_optin_1 .et_bloom_form_content .et_bloom_fields i { shade: #f92c8b !vital; } .et_bloom .et_bloom_optin_1 .et_bloom_form_content .et_bloom_custom_field_radio i:prior to { background: #f92c8b !vital; } .et_bloom .et_bloom_optin_1 .et_bloom_border_solid { border-color: #f7f9fb !vital } .et_bloom .et_bloom_optin_1 .et_bloom_form_content button { background-color: #f92c8b !vital; } .et_bloom .et_bloom_optin_1 .et_bloom_form_container h2, .et_bloom .et_bloom_optin_1 .et_bloom_form_container h2 span, .et_bloom .et_bloom_optin_1 .et_bloom_form_container h2 sturdy { font-family: “Open Sans”, Helvetica, Arial, Lucida, sans-serif; }.et_bloom .et_bloom_optin_1 .et_bloom_form_container p, .et_bloom .et_bloom_optin_1 .et_bloom_form_container p span, .et_bloom .et_bloom_optin_1 .et_bloom_form_container p sturdy, .et_bloom .et_bloom_optin_1 .et_bloom_form_container shape enter, .et_bloom .et_bloom_optin_1 .et_bloom_form_container shape button span { font-family: “Open Sans”, Helvetica, Arial, Lucida, sans-serif; } p.et_bloom_popup_input { padding-bottom: 0 !vital;}

Obtain For Unfastened
Sign up for the Divi Newlsetter and we can e mail you a duplicate of without equal Divi Touchdown Web page Structure Pack, plus lots of different wonderful and loose Divi assets, pointers and methods. Apply alongside and you’re going to be a Divi grasp very quickly. If you’re already subscribed merely sort to your e mail deal with underneath and click on obtain to get admission to the format pack.
You’ve gotten effectively subscribed. Please take a look at your e mail deal with to substantiate your subscription and get get admission to to loose weekly Divi format packs!
To import the format in your web page, merely extract the zip record and drag the json record into the Divi Builder.
Let’s get to the academic lets?
What You Want to Get Began
To get began, all you wish to have is Divi and a couple of photographs.
- Divi – Be sure that the Divi Theme is put in and energetic. We can be developing our designs from scratch the use of the Divi Builder at the entrance finish (visible builder).
- Photographs – Additionally, be sure to have no less than one symbol this is 400px by means of 250px to make use of for the academic.
When you’re in a position, pass in your WordPress Dashboard and navigate to Pages > Upload New. Give your new web page a name and deploy the Divi Builder at the entrance finish. Make a choice the choice “Construct from Scratch”. Now you are prepared to head!
How you can Wrap Textual content Round Photographs and Blockquotes Inside of a Textual content Module with WYSIWYG Editor
WordPress makes it simple to wrap textual content round photographs the use of the default WordPress (WYSIWYG) editor. And since Divi’s textual content module has the similar WordPress WYSIWYG editor integrated, we will use the similar approach WordPress customers have all the time used to wrap textual content round photographs.
Right here’s find out how to do it.
Create a normal segment with a one-column row after which upload a textual content module to the row.
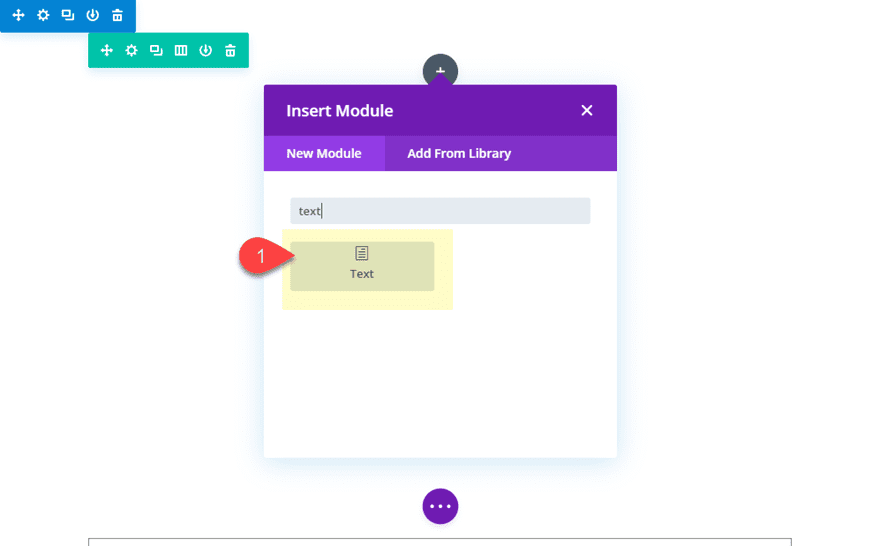
Replace the content material of the textual content module together with your replica. For now I’m the use of a few paragraphs of lorem ipsum.
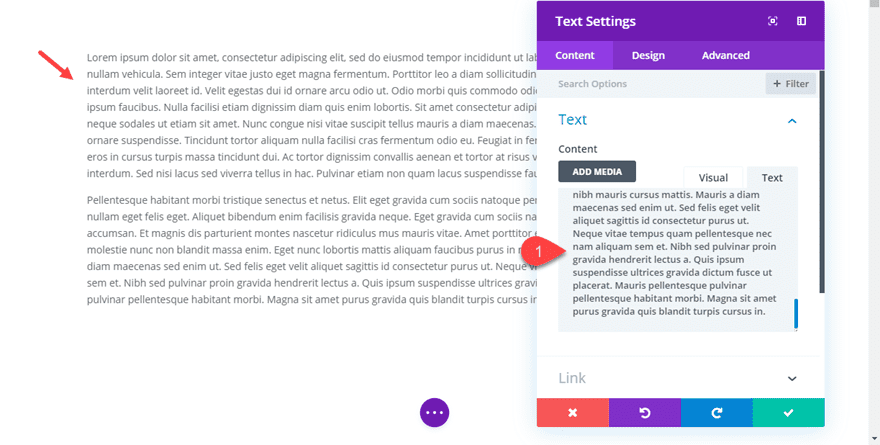
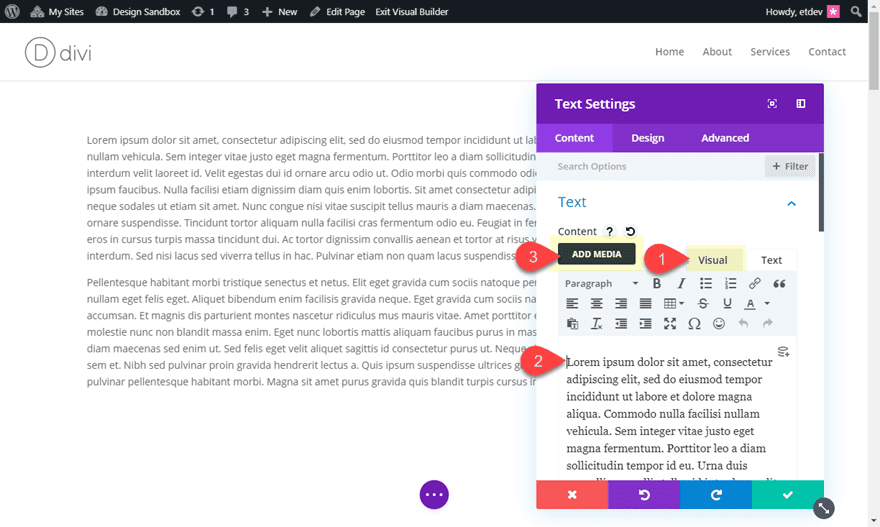
Now for those who haven’t already, make a choice the visible tab at the content material editor. Then be sure to click on the highest of the content material space the place you wish to have so as to add a picture and click on the Upload Media button.
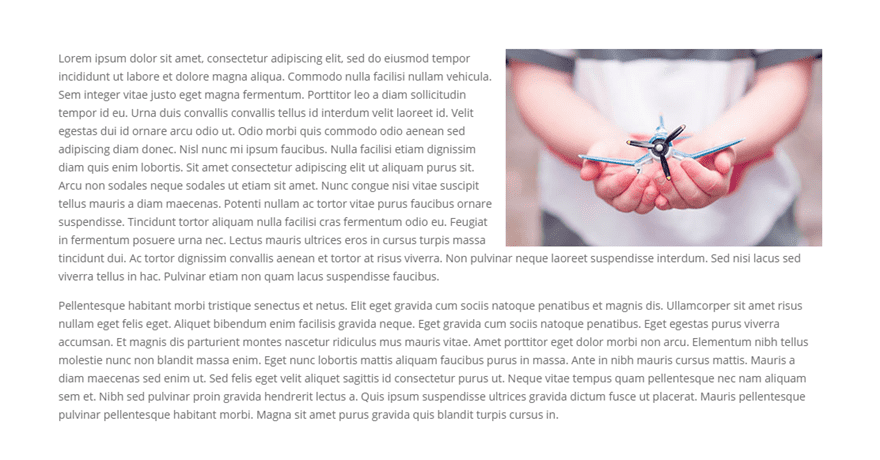
Within the media library popup, make a choice the picture you wish to have to make use of. And underneath the attachment show settings make a choice both left or proper for the alignment choice. For this case, I wish to place the picture to the left.
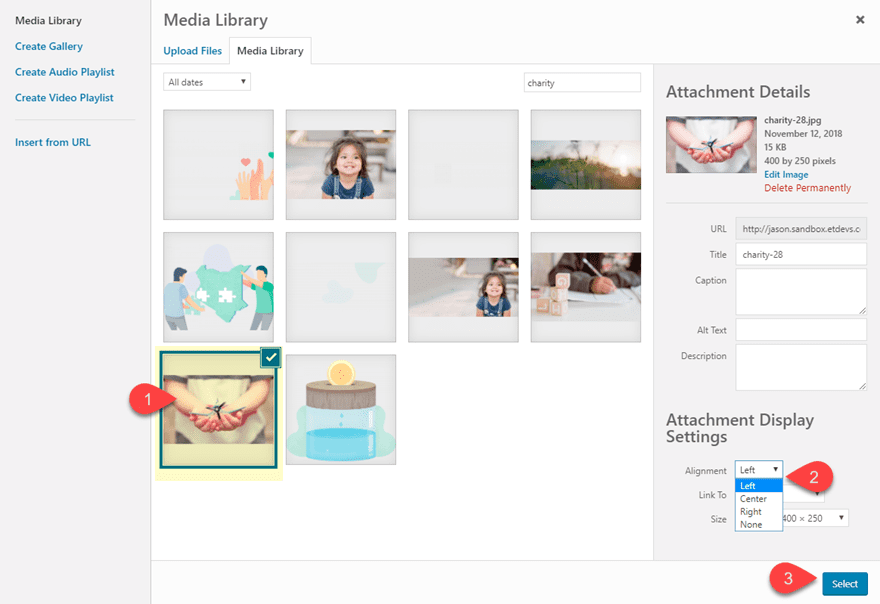
WordPress will upload a category in your symbol (known as “alignleft”) which can go with the flow the picture to the left. The go with the flow assets this is added will permit the textual content to wrap across the symbol. WordPress may even upload a buffer across the symbol the use of margins to create little spacing between the picture and the encompassing textual content.
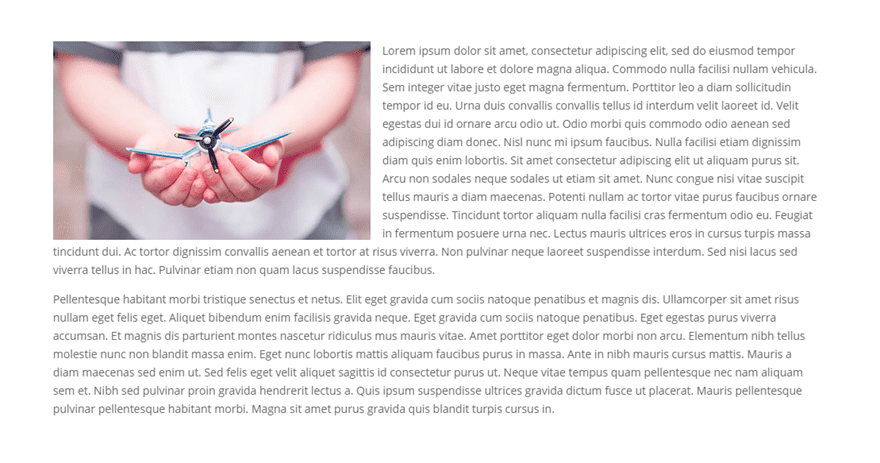
And, in fact, for those who give the picture a proper alignment, the picture will go with the flow to the correct permitting the textual content to wrap across the symbol.
You’ll be able to additionally use a equivalent method to wrap textual content round a blockquote in a textual content module. To try this, create a blockquote the use of the Content material editor.
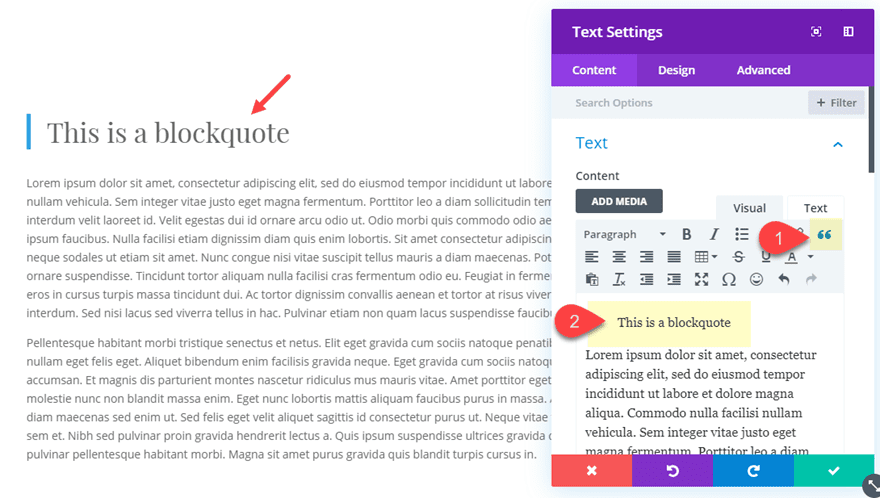
Then taste the blockquote the use of the integrated textual content modules settings for a blockquote.
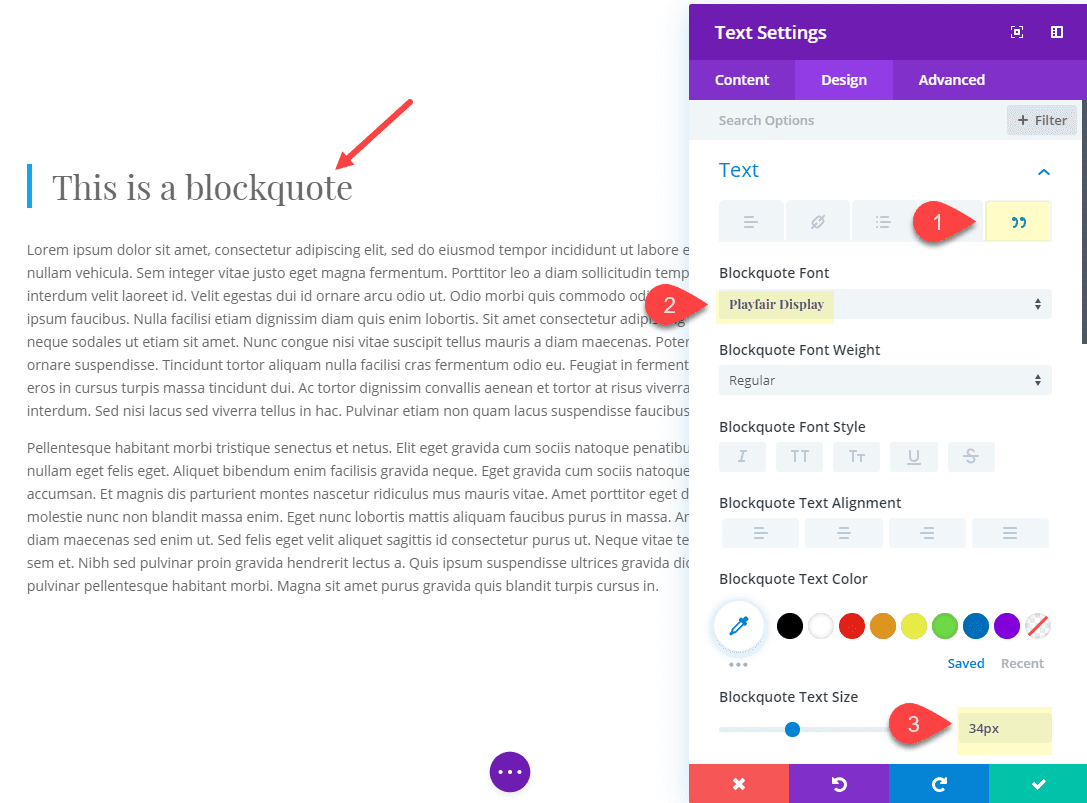
Then return to the content material editor and turn over to the textual content tab. Then upload some inline styling to the blockquote tag to create some spacing across the blockquote and go with the flow it to the left. Your blockquote html must glance one thing like this.
This can be a
 blockquote
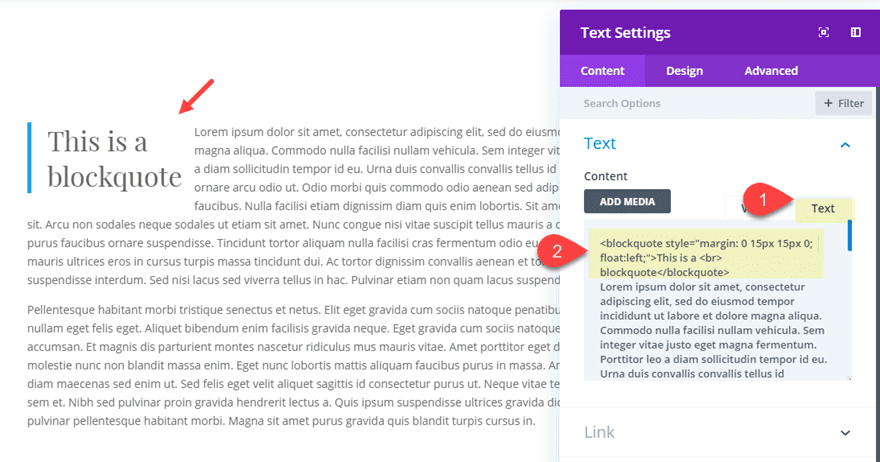
Now the textual content will wrap across the blockquote.
How you can Wrap Textual content Round an Symbol by means of Floating an Symbol Module Subsequent to a Textual content Module in Divi
To wrap textual content round a picture module, we will go with the flow all the symbol module subsequent to a textual content module. This can be a most well-liked strategy to the use of the WordPress editor above as it lets in you complete keep an eye on over the way of your symbol the use of the Divi builder settings as an alternative of including inline styling or exterior css to a picture tag.
Right here’s find out how to do it.
Create a brand new common segment with a one-column row. Then upload a picture module to the row with the picture of your opting for. The picture I’m the use of is from the Charity Structure Pack and is 400px by means of 250px.
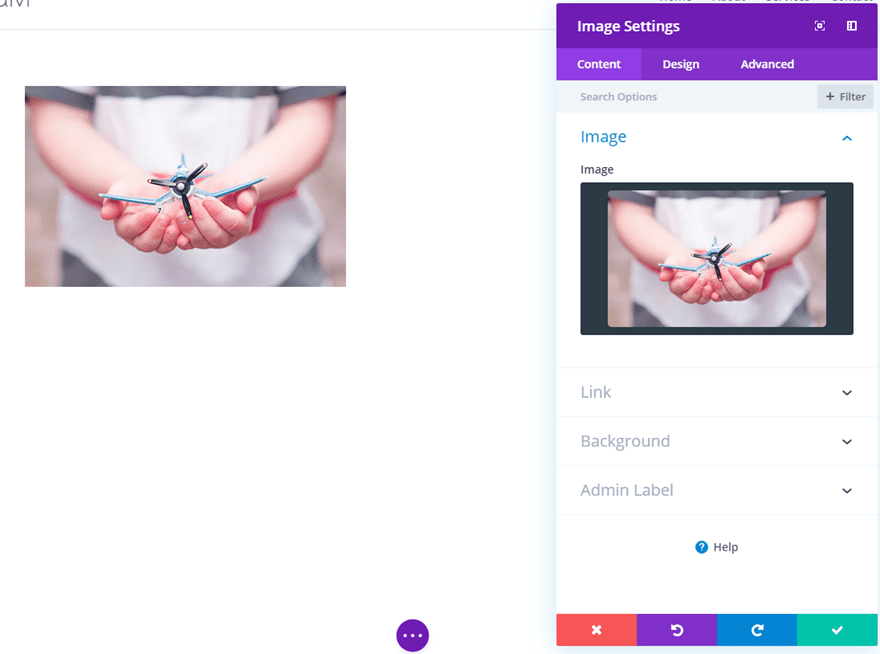
Then upload a textual content module underneath the picture module with some mock textual content content material.
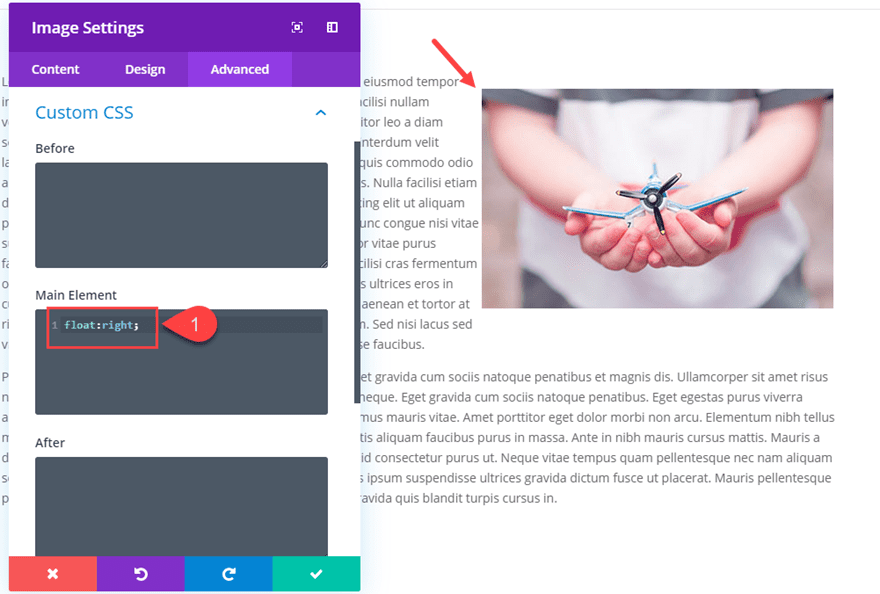
Now with each modules in position, we wish to go with the flow the picture to the left of the textual content module. To try this, open the picture module settings and upload the next customized CSS to the Primary Component:
go with the flow:left;
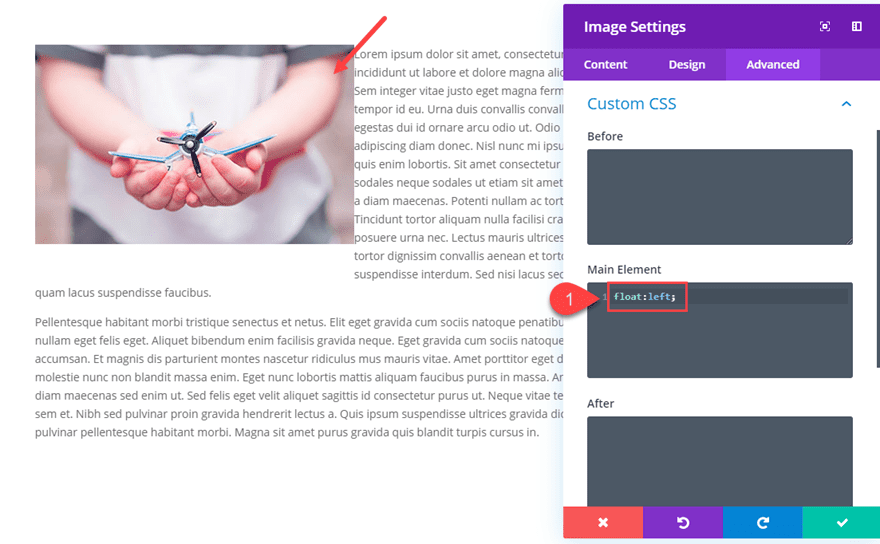
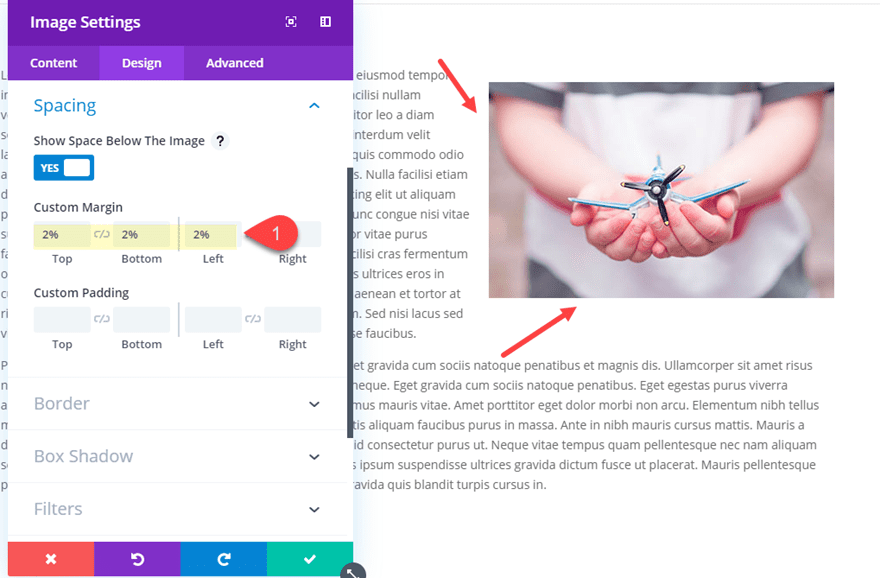
Then replace the customized margin of the picture to create the buffer we want for the textual content wrapping across the symbol:
Customized Margin: 2% height, 2% backside, 2% proper
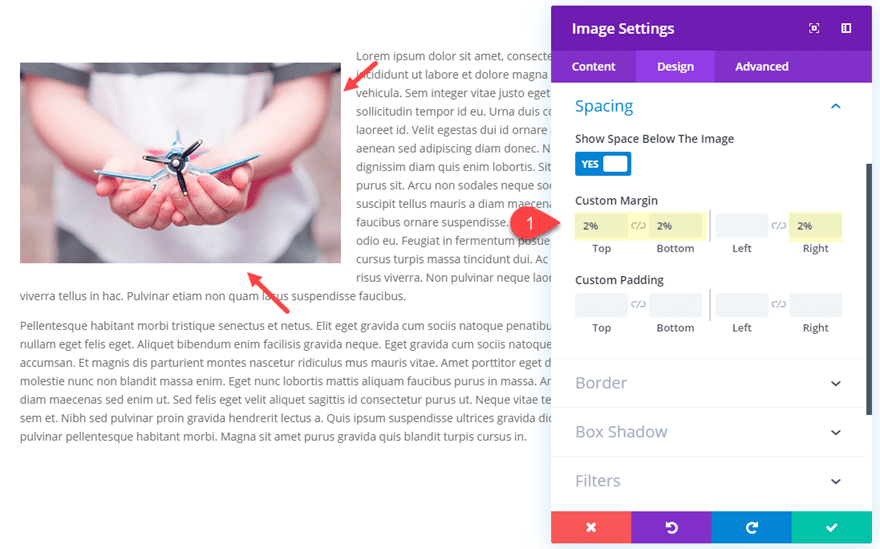
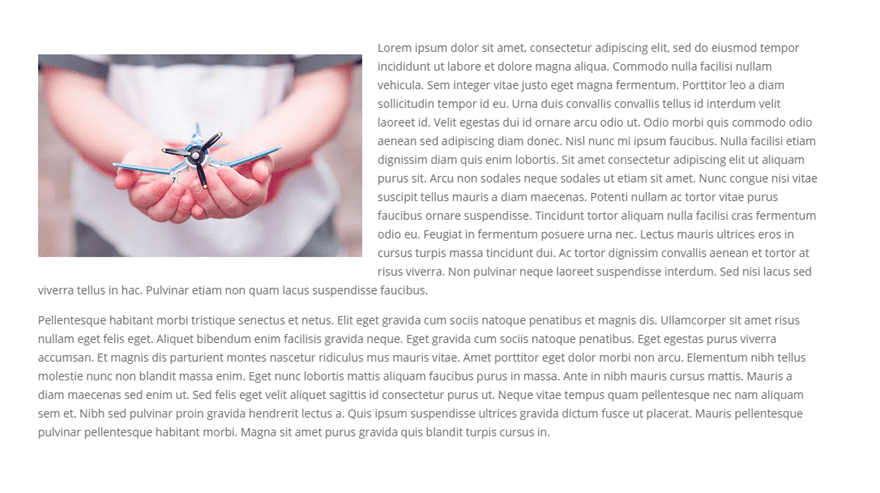
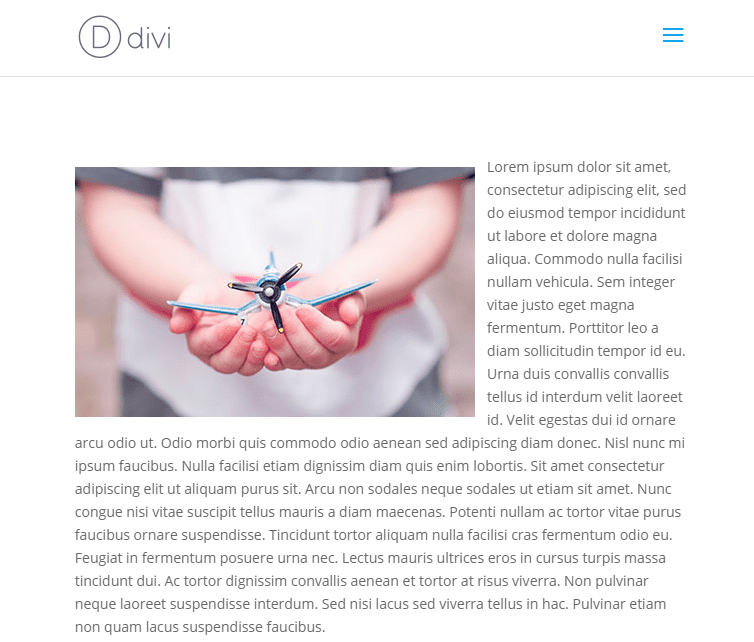
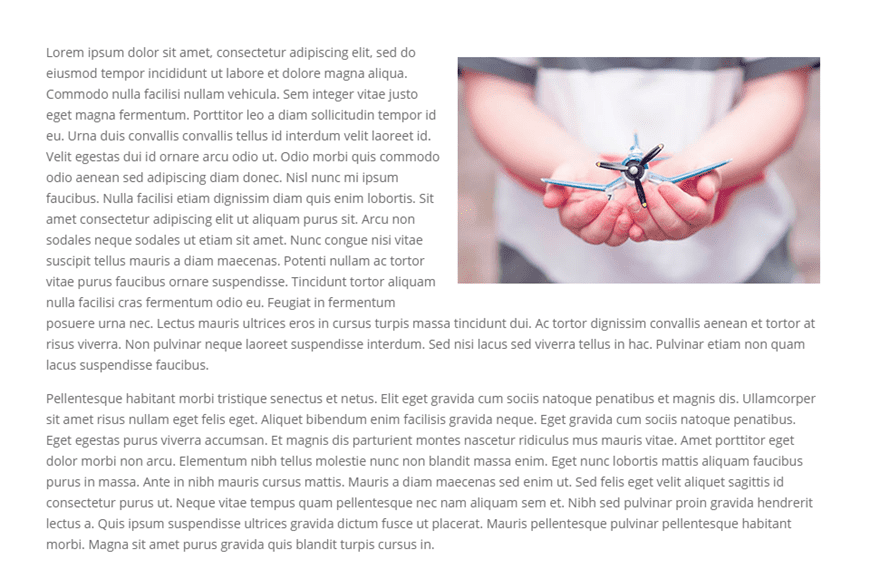
This is the end result.

And, if you wish to go with the flow the picture to the correct, open the picture module settings and exchange the css with the next:
go with the flow:proper;
And replace the margin spacing to the next:
Customized Margin: 2% height, 2$ backside, 2% left
This is the end result.
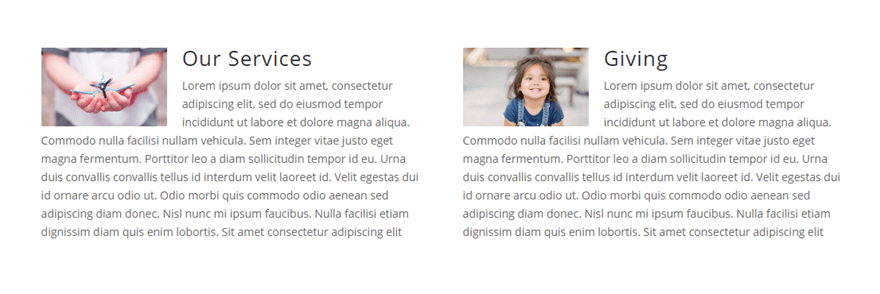
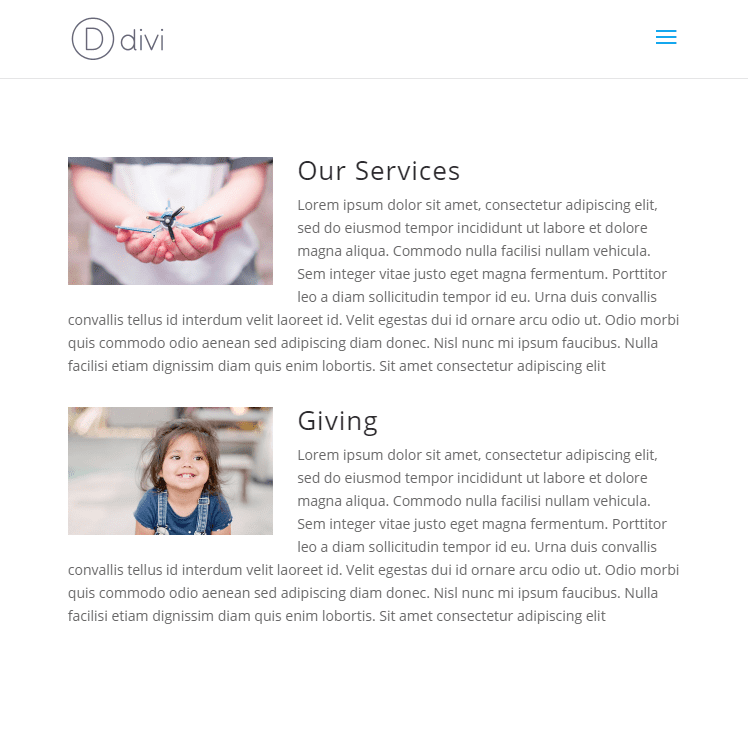
The use of this design on a couple of columns
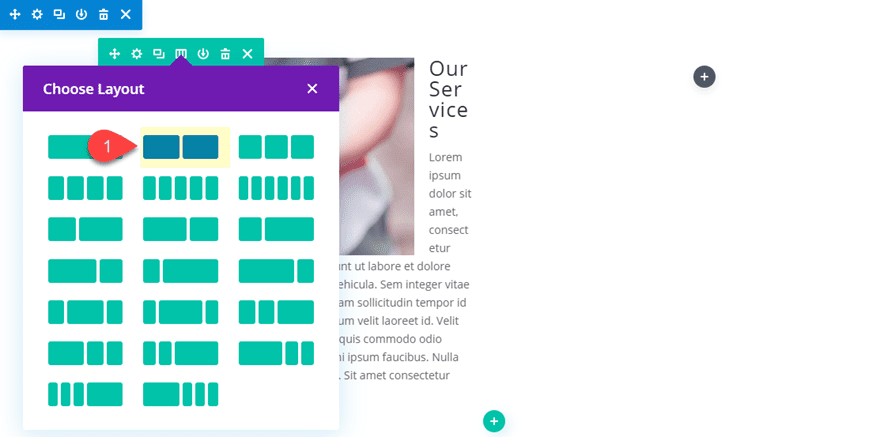
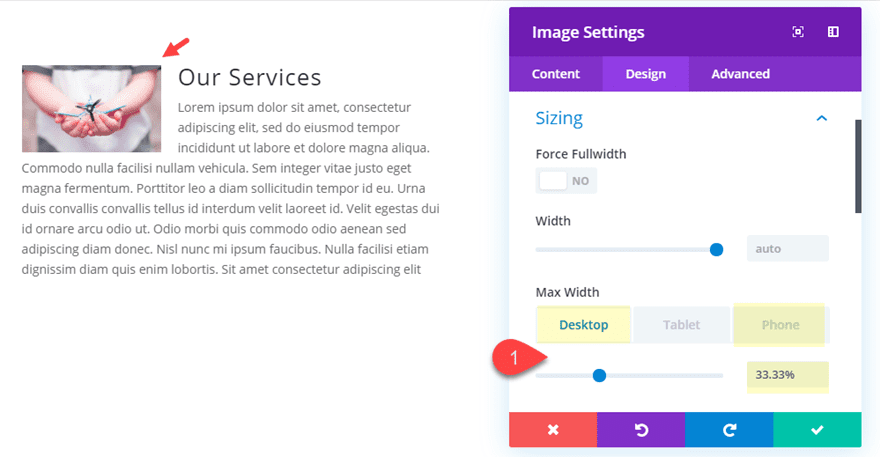
You’ll be able to additionally use this setup in a couple of columns to create a textual content wrapping design for showcasing your products and services. To try this trade your row’s column format to 2 columns.
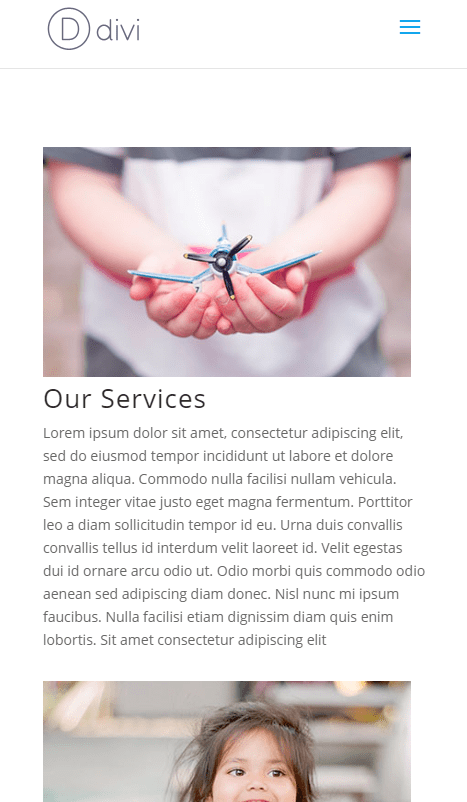
Then give the picture a max-width share price in order that it responds to other browser widths.
Max Width: 33.33% (desktop), 100% (telephone)
Reproduction the picture and textual content module from the primary column and paste them into column 2. Then replace the content material and photographs as wanted.
That’s it. This is the end result.
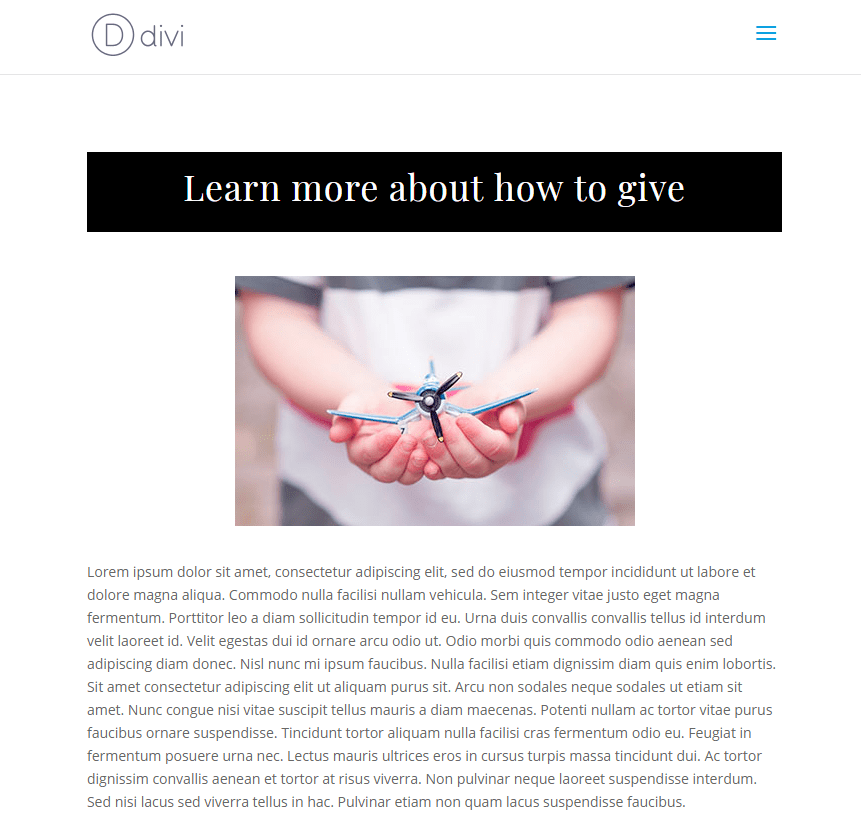
How you can Wrap Textual content Round a Targeted Symbol or Module for a Distinctive Two-Column Structure
On this instance, I’m going to turn you find out how to wrap two columns of textual content round a targeted symbol module. This permits you to create a novel mag or newspaper taste format. However, since there isn’t “go with the flow: middle” css assets, we can wish to get somewhat ingenious with the format for this design to paintings.
Right here’s find out how to do it.
Developing the Best Row Content material with a Targeted Symbol
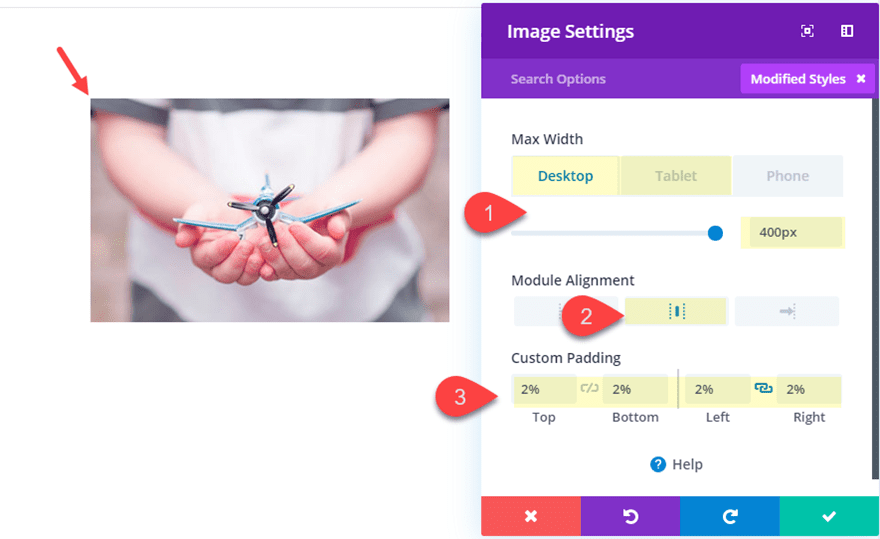
To start out, create a brand new common segment with a one column row. Then upload a picture module in your row. Add a picture this is 400px by means of 250px. The sizing will have to be actual for this design.
Then replace the design settings as follows:
Max Width: 400px (desktop), 100% (pill)
Module Alignment: middle
Customized Padding: 2% height, 2% backside, 2% left, 2% proper
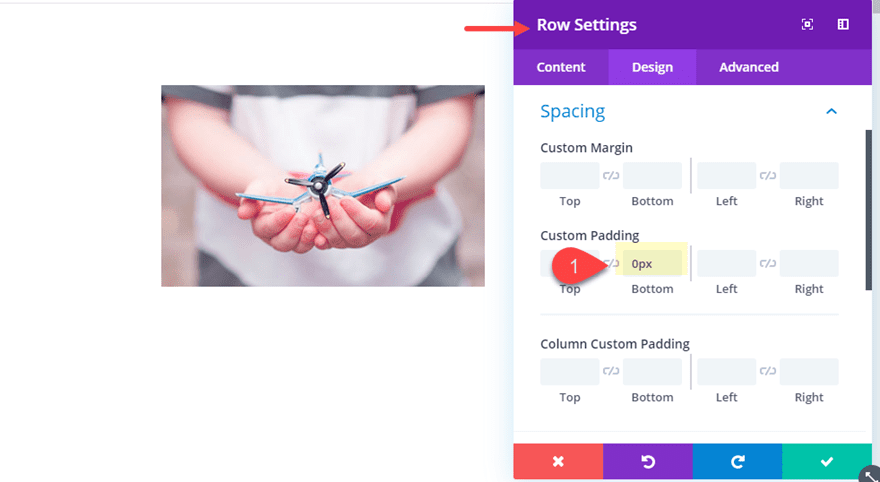
Then save your settings and open the row settings. Take out the ground padding of the row.
Customized Padding: 0px backside
Create the Two Column Row of Textual content
Below the row containing the picture, create a brand new row with a two-column format.
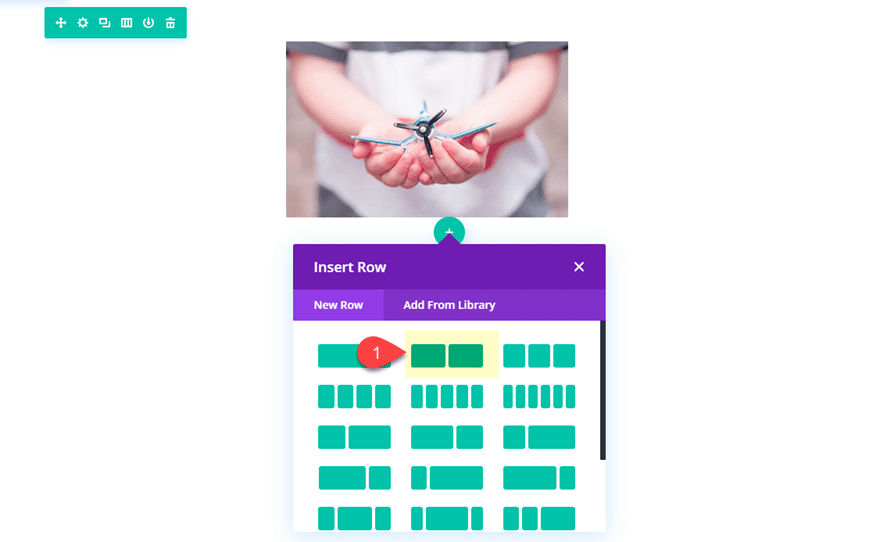
In column 1, upload a textual content module with some mock content material.
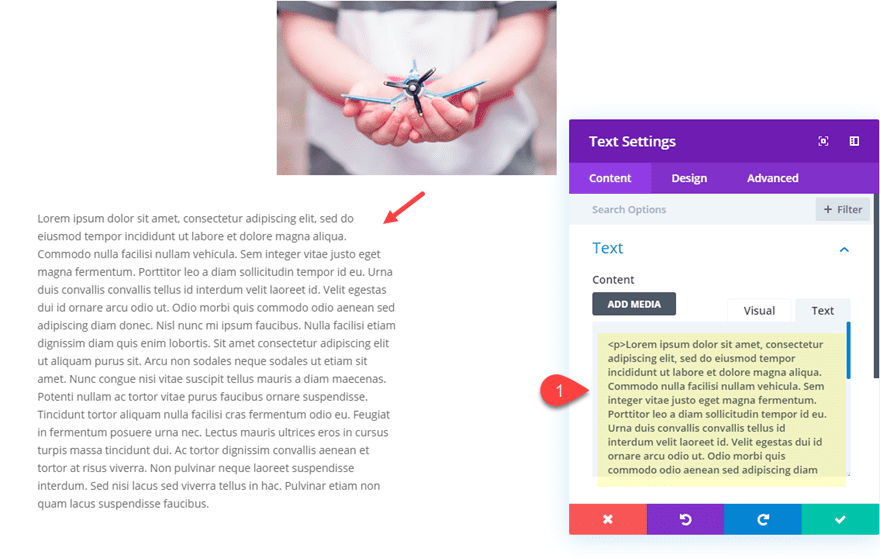
Then replica the textual content module and paste it into column 2 for a 2nd column of textual content.
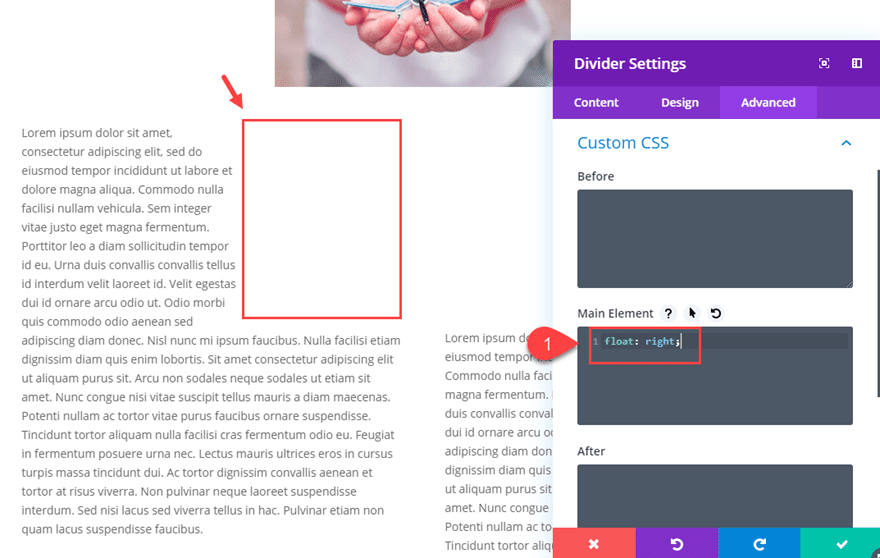
Developing Empty House with Floated Dividers
To create the distance we want for the picture, we will use divider modules. At the left column we can create a divider module this is part the dimensions of the picture and go with the flow it to the correct so our textual content module will wrap across the divider. Then in the correct column we can create every other divider this is part the dimensions of the picture and go with the flow it to the left.
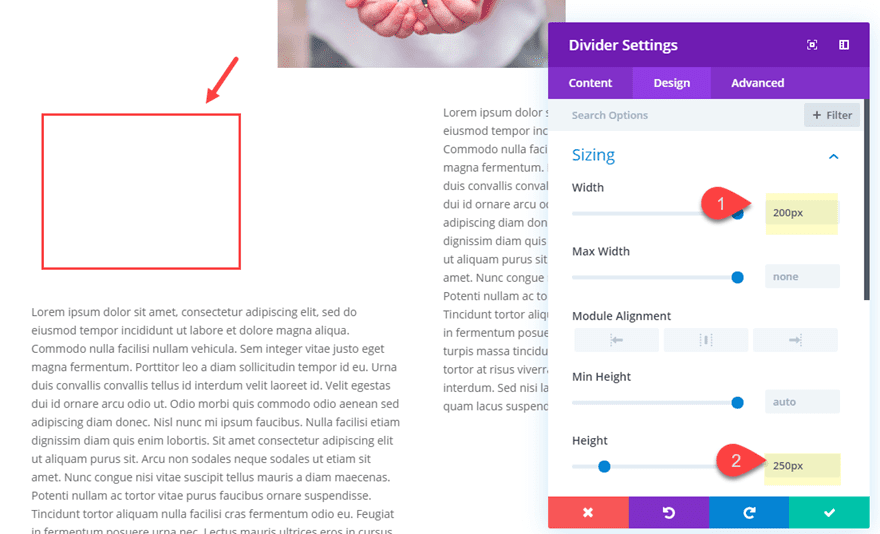
To try this, create a divider module and position it at once above the textual content module in column 1.
Then replace divider module settings as follows:
Display Divider: NO
Width: 200px
Peak: 250px
Be sure that the peak is similar peak of the picture you created previous and the width is strictly part the width of the picture.
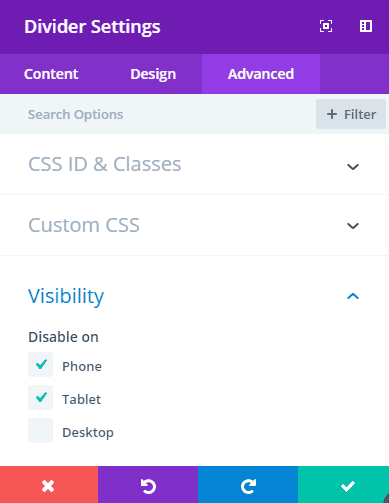
For cellular, we wish to disable the dividers on pill and get in touch with. To try this replace the visibility settings to disable the pill and get in touch with show.
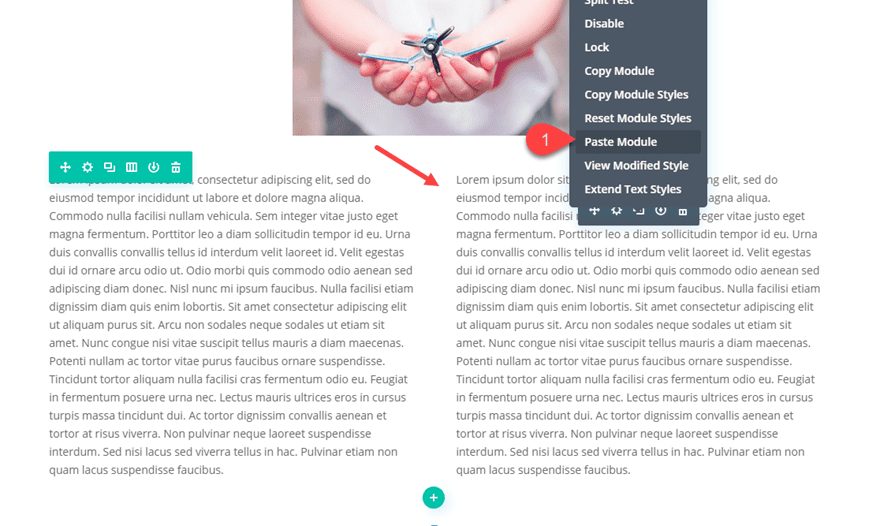
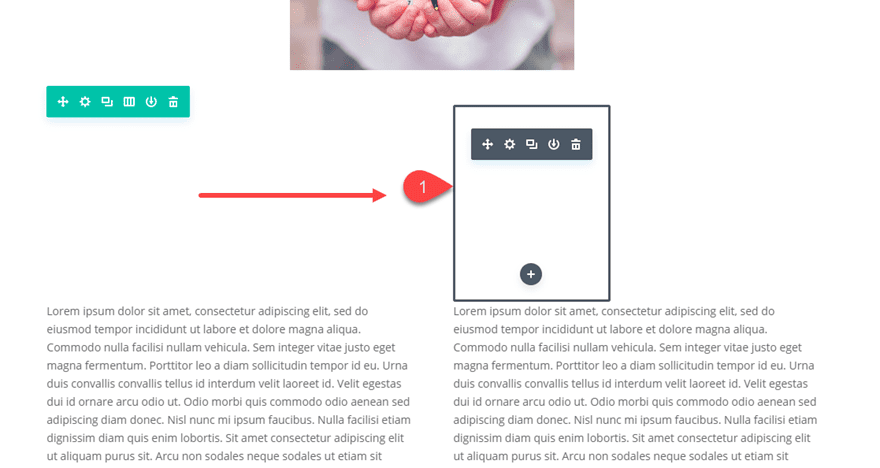
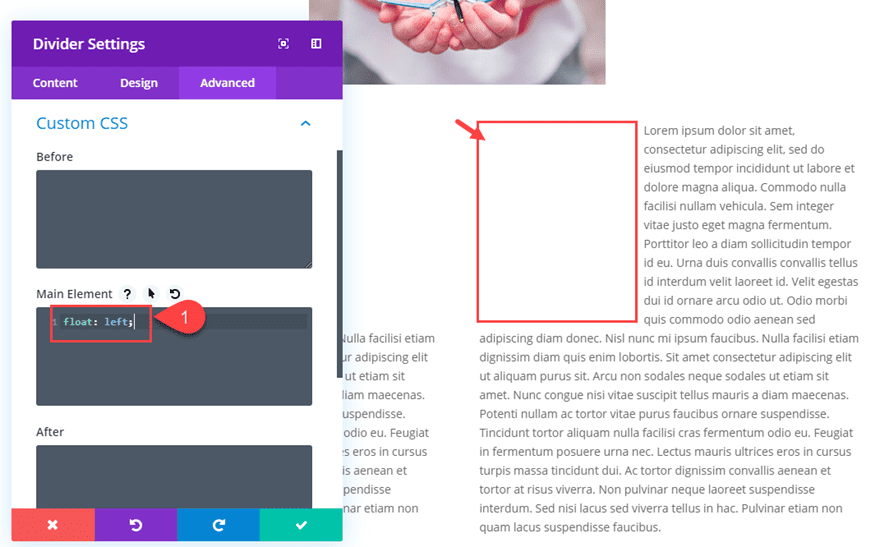
Now that our first divider is created, replica the divider module and paste it above the textual content module in column 2.
Subsequent, we wish to go with the flow our dividers. To try this, open the settings of the divider in column 1 and upload the next customized CSS to the primary component:
go with the flow: proper;
Then, open the settings for the divider module in column 2 and upload the next customized CSS to the primary component:
go with the flow: left;
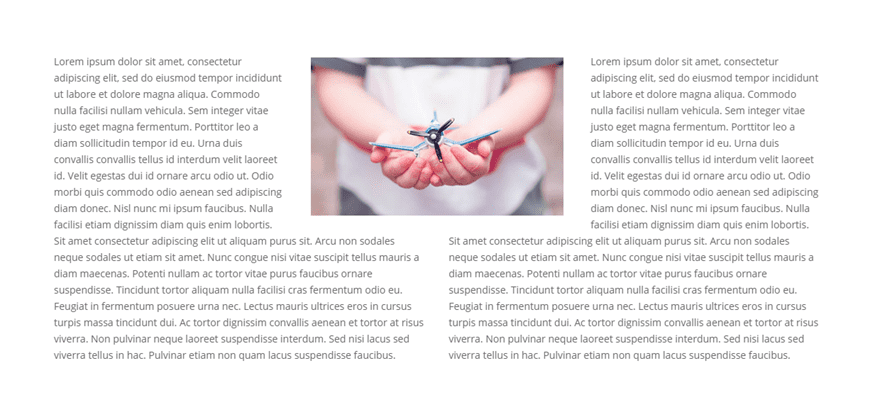
Transferring the Symbol into Position with Customized Margin
Now all we wish to do is convey down our symbol within the first row in order that it suits throughout the area we created with our dividers.
Open the picture module settings and upload the next customized margins:
Customized margin: -250px backside (desktop), 20px (pill)
This is the end result to this point.
Including a Name to the Segment
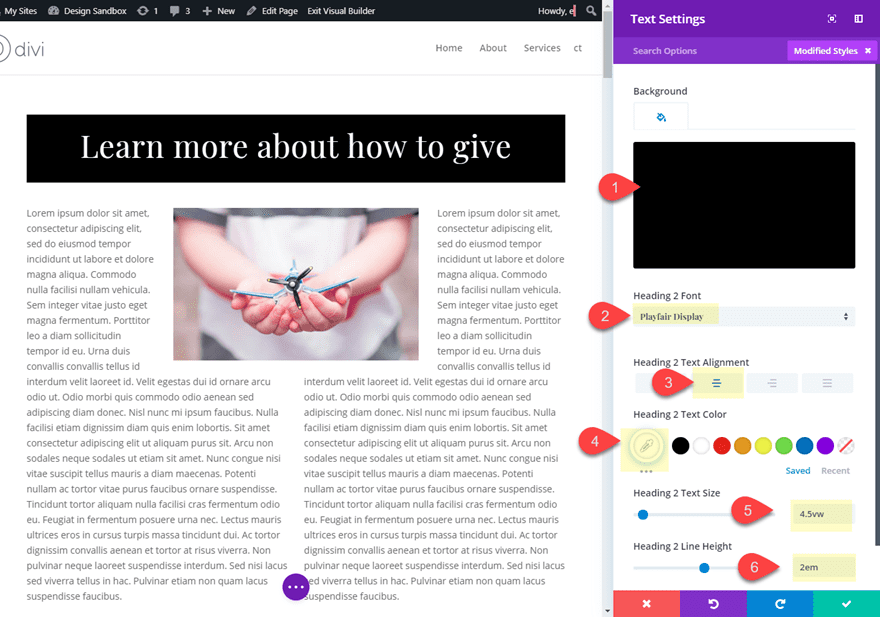
This final step is not obligatory, however for those who sought after so as to add a name to the segment, create a textual content module and place it above the picture.
Then upload the next content material to the textual content module:
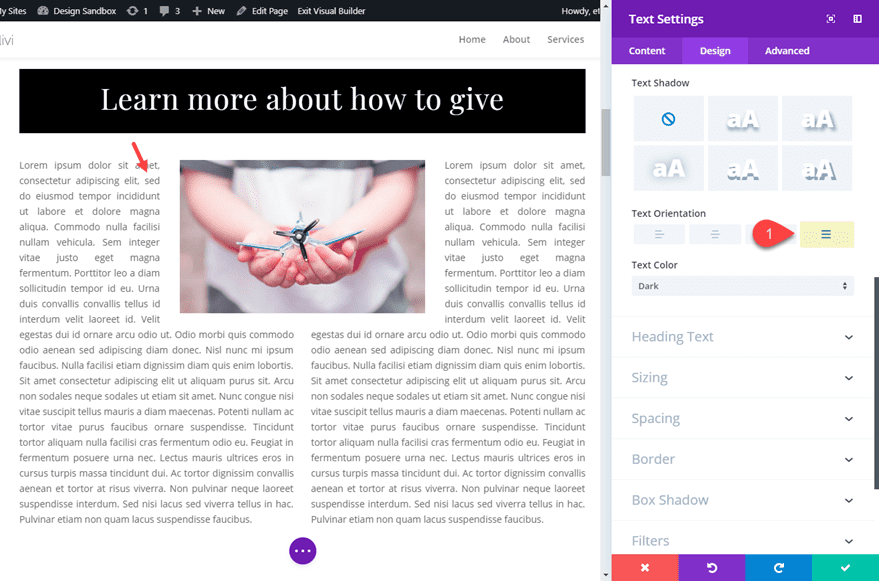
Be informed extra about find out how to give
Then replace the textual content settings as follows:
Background Colour: #000000
Heading 2 Font: Playfair Show
Heading 2 Textual content Alignment: middle
heading 2 Textual content Colour: #ffffff
Heading 2 Line Peak: 2em
Justify Textual content for Cleaner Textual content Wrapping Design
When wrapping textual content round photographs, particularly if the textual content is targeted like this, it’s all the time a good suggestion to make use of justify the encompassing textual content. On this case, all we wish to do is trade the textual content orientation to justify for each textual content modules containing our wrapping textual content content material.
Ultimate End result
This is the general consequence.
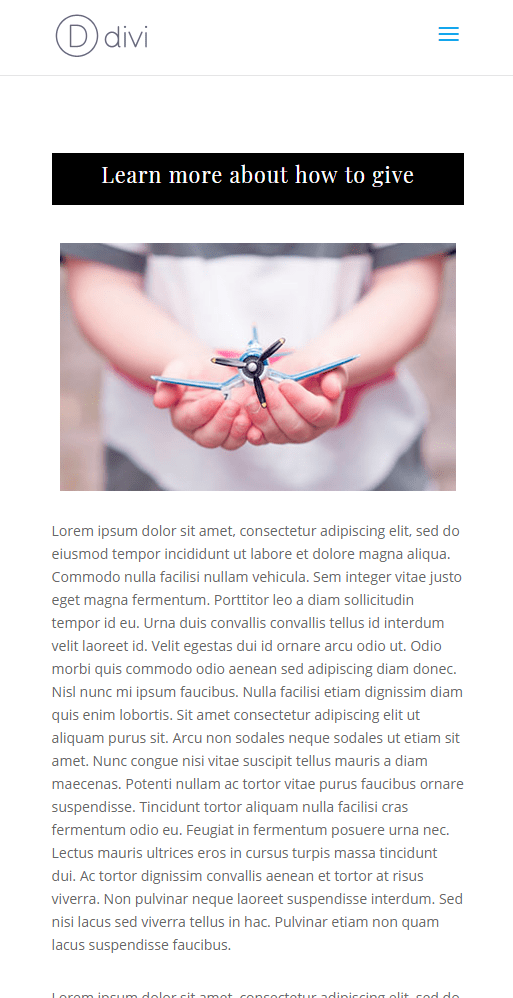
And right here it’s on pill and get in touch with show.
Ultimate Ideas
Understanding find out how to wrap textual content round photographs successfully can in reality make your content material glance skilled and simple to learn. The idea that is lovely directly ahead. All you wish to have to do is go with the flow your symbol to the correct or left after which use customized spacing across the symbol for buffer. And what I really like is that you’ll go with the flow any module (now not simply photographs) to wrap textual content round any form of content material in Divi. I am hoping this offers you a little bit inspiration to your subsequent challenge.
I stay up for listening to from you within the feedback.
Cheers!
The publish How to Wrap Text Around Images in Divi (3 ways) seemed first on Elegant Themes Blog.
WordPress Web Design
@media simplest display screen and ( max-width: 767px ) {.et_bloom .et_bloom_optin_1 .carrot_edge.et_bloom_form_right .et_bloom_form_content:prior to, .et_bloom .et_bloom_optin_1 .carrot_edge.et_bloom_form_left .et_bloom_form_content:prior to { border-top-color: #ffffff !vital; border-left-color: clear !vital; }
}.et_bloom .et_bloom_optin_1 .et_bloom_form_content button { background-color: #f92c8b !vital; } .et_bloom .et_bloom_optin_1 .et_bloom_form_content .et_bloom_fields i { shade: #f92c8b !vital; } .et_bloom .et_bloom_optin_1 .et_bloom_form_content .et_bloom_custom_field_radio i:prior to { background: #f92c8b !vital; } .et_bloom .et_bloom_optin_1 .et_bloom_border_solid { border-color: #f7f9fb !vital } .et_bloom .et_bloom_optin_1 .et_bloom_form_content button { background-color: #f92c8b !vital; } .et_bloom .et_bloom_optin_1 .et_bloom_form_container h2, .et_bloom .et_bloom_optin_1 .et_bloom_form_container h2 span, .et_bloom .et_bloom_optin_1 .et_bloom_form_container h2 sturdy { font-family: “Open Sans”, Helvetica, Arial, Lucida, sans-serif; }.et_bloom .et_bloom_optin_1 .et_bloom_form_container p, .et_bloom .et_bloom_optin_1 .et_bloom_form_container p span, .et_bloom .et_bloom_optin_1 .et_bloom_form_container p sturdy, .et_bloom .et_bloom_optin_1 .et_bloom_form_container shape enter, .et_bloom .et_bloom_optin_1 .et_bloom_form_container shape button span { font-family: “Open Sans”, Helvetica, Arial, Lucida, sans-serif; } p.et_bloom_popup_input { padding-bottom: 0 !vital;}
Obtain For Unfastened
Sign up for the Divi Newlsetter and we can e mail you a duplicate of without equal Divi Touchdown Web page Structure Pack, plus lots of different wonderful and loose Divi assets, pointers and methods. Apply alongside and you’re going to be a Divi grasp very quickly. If you’re already subscribed merely sort to your e mail deal with underneath and click on obtain to get admission to the format pack.
You’ve gotten effectively subscribed. Please take a look at your e mail deal with to substantiate your subscription and get get admission to to loose weekly Divi format packs!
This can be a
blockquote
Module Alignment: middle
Customized Padding: 2% height, 2% backside, 2% left, 2% proper
Width: 200px
Peak: 250px
Be informed extra about find out how to give
Heading 2 Font: Playfair Show
Heading 2 Textual content Alignment: middle
heading 2 Textual content Colour: #ffffff
Heading 2 Line Peak: 2em