
Contents
- 1 Cyber Monday
- 1.1 The Boutique Sale Touchdown Web page Design
- 1.2 Get the Unique Cyber Monday Boutique Sale Touchdown Web page
- 1.3 Including the Boutique Sale Touchdown Web page Format to Your Site
- 1.4 Use Case Educational: How you can Design a Distinctive Featured Merchandise Segment with Divi and Our Unique Boutique Sale Touchdown Web page
- 1.5 Ultimate Ideas
- 2 Cyber Monday
It’s In spite of everything Right here!
Cyber Monday
Did you omit our Black Friday sale over the weekend? Do not be disturbed! Our largest bargain of all time is being prolonged for a restricted time for Cyber Monday. That is the largest bargain now we have ever introduced, and it is just one thing we provide all over our Black Friday and Cyber Monday gross sales. As soon as the sale is over, this bargain would possibly not be to be had till subsequent 12 months. That is a very long time to attend!
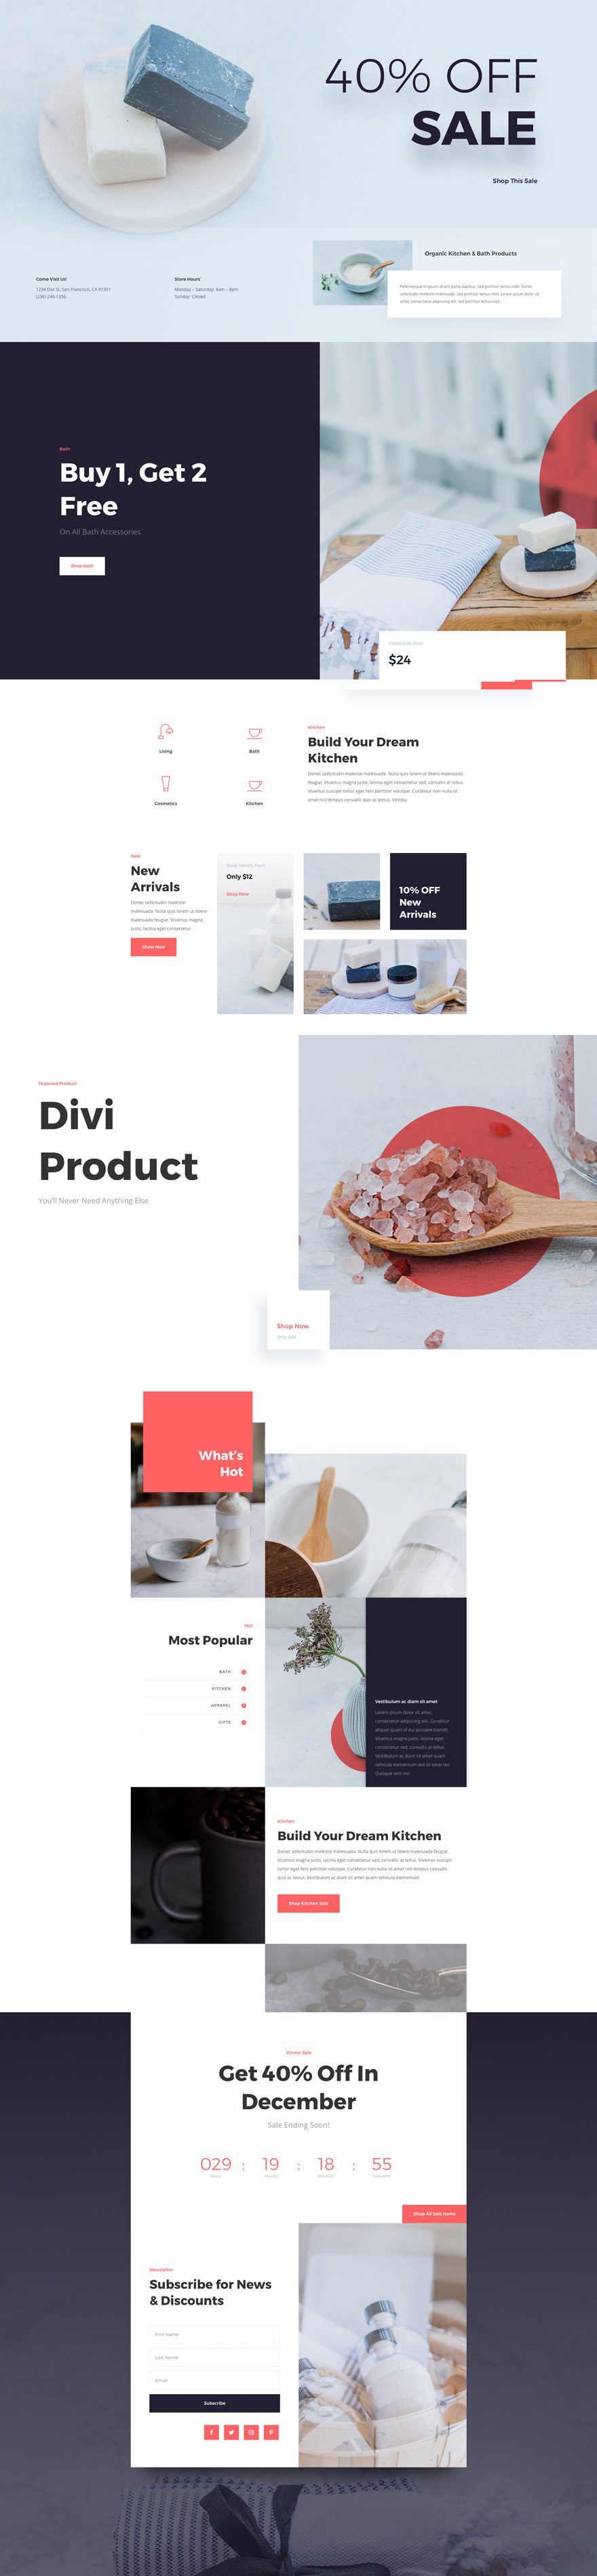
This Boutique Sale Touchdown Web page is without doubt one of the unique web page layouts we’re supplying you with as Lifetime Contributors and new Cyber Monday consumers. The touchdown web page structure and design is exceptional, making it simple to advertise reductions and featured merchandise in a recent new manner. The header includes a robust name to motion to teach customers on a treasured bargain. And the other sections of the web page advertise merchandise consistent with other classes like “new arrivals” and “what’s scorching”. The web page finishes with a robust name to motion within the footer that features a countdown timer as neatly.
On this article, I’ll display you find out how to use the Boutique Sale Touchdown Web page by yourself web site and I’ll additionally stroll you via find out how to design a novel featured merchandise phase with Divi. To try this I’ll be the usage of Divi’s store module in inventive techniques to function your WooCommerce merchandise with a particular class.
Already a Lifetime Member? You’ll be able to download the pack right now, no want to partake in our Cyber Monday sale!
The Boutique Sale Touchdown Web page Design
Get the Unique Cyber Monday Boutique Sale Touchdown Web page
Ahead of coming into the use case educational, it is very important lay your fingers at the Unique Cyber Monday Boutique Sale Touchdown Web page which you’ll get via turning into a brand new Chic Topics Member, upgrading your present account, or via already being a Lifetime Member with us. In case you are certainly already a Lifetime Member you’ll log in to our contributors’ space and obtain all of our unique structure packs right here. Everybody else will want to use the button underneath to shop for or improve earlier than they may be able to observe in conjunction with the remainder of the academic underneath.
Claim the Deal Before It Disappears!
Already a Lifetime Member? You’ll be able to download the pack right now, no want to partake in our Cyber Monday sale!
Including the Boutique Sale Touchdown Web page Format to Your Site
For the rest of this put up we’ll suppose you’ve both taken benefit of our Cyber Monday (or Black Friday) deal or that you’re already a Lifetime Member and feature get entry to to the App Release Touchdown Web page Format.
Whenever you’ve downloaded the brand new Boutique Sale Touchdown Web page Format from our contributors space you’ll watch the video underneath to look simply how simple it’s to arrange. We’d additionally inspire you to observe in conjunction with this tutorial to get your web page in a position for additional customization.
After getting effectively downloaded the structure, imported it to the Divi Library, and added it to a brand new web page, you’re ready to begin the use case educational underneath.
Use Case Educational: How you can Design a Distinctive Featured Merchandise Segment with Divi and Our Unique Boutique Sale Touchdown Web page
In case you are the usage of WooCommerce to in your ecommerce web site, you might have already got taken benefit of Divi’s store module, which lets you simply show your Merchandise anyplace in your web site. On this educational, I’m going to turn you find out how to design a novel line up of store modules, each and every pulling from a unique product class. This lets you design each and every product/store module personally. Plus, you’re going to have the automatic capability that updates the module with a brand new product each time a brand new WooCommerce product is added to the precise class within the store module.
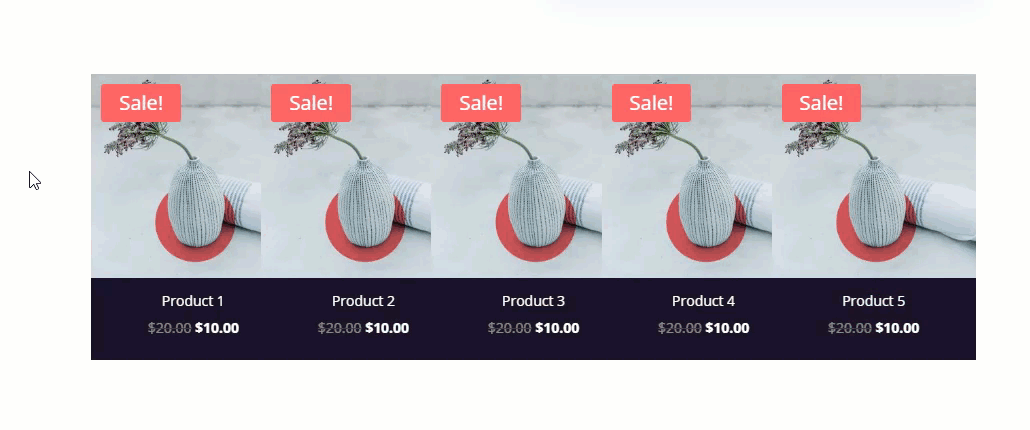
Here’s a sneak peek of what we can construct in combination.
Putting in place your WooCommerce Merchandise
For this educational, it is very important have the WooCommerce Plugin put in and energetic in your web site. After getting WooCommerce up and operating, cross on your WordPress Dashboard and navigate to Merchandise > Upload New. Then replace the next:
Give your new product a Identify and a Description.
Set the cost and sale worth of the product.
Upload a brand new class known as “Featured” and make a choice it.
Upload a featured symbol for the product.
Then submit the product.
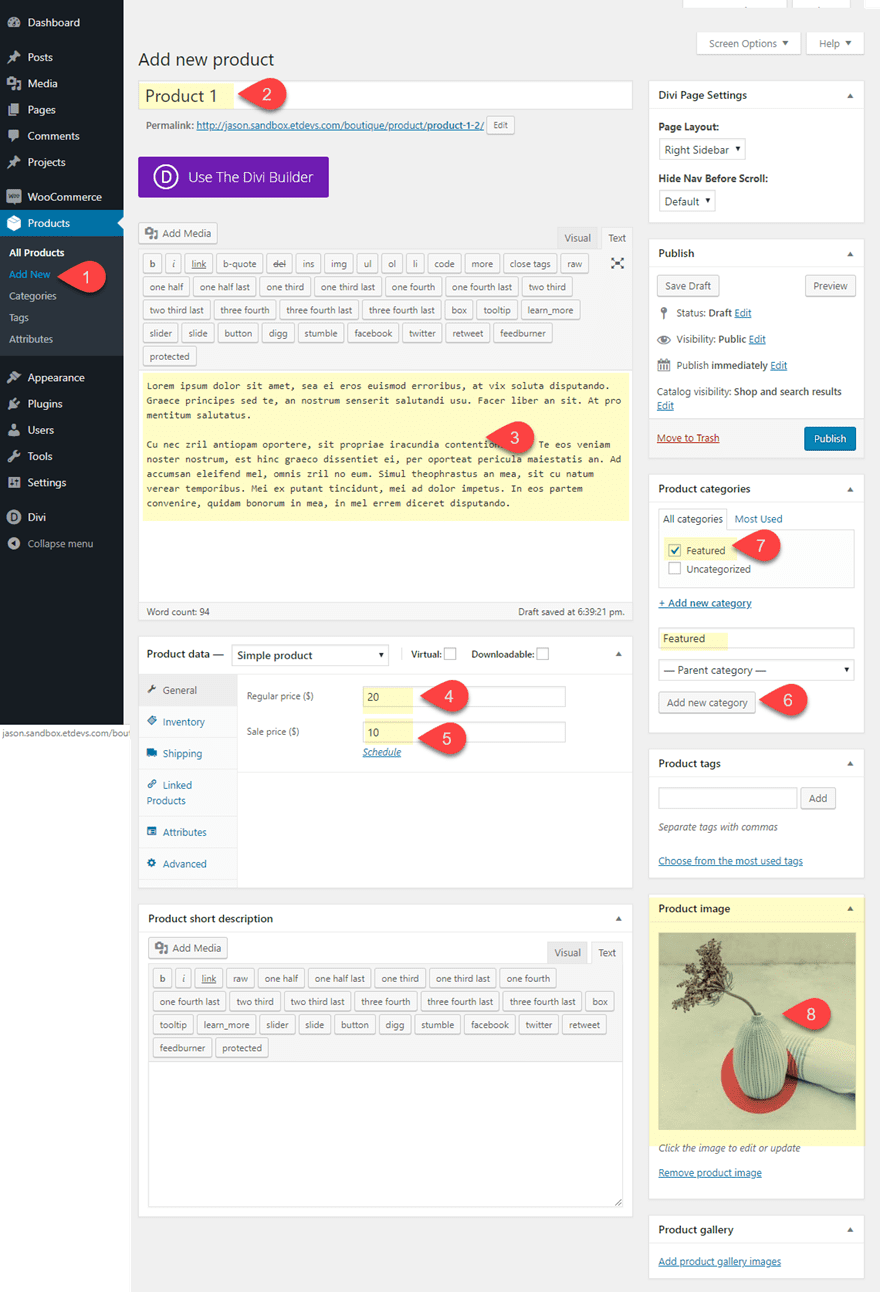
Word: This design works very best when your product featured photographs are all of the identical measurement. The only I’m the usage of for this educational is 981px via 800px. If the photographs don’t seem to be the similar measurement, the featured product packing containers in your web page will range in peak.
Subsequent, proceed the similar steps so as to add 4 extra merchandise. For each and every new product you upload, be sure to assign a unique class to each and every one. That is essential in order that the store module will be capable to show the latest product in that class. For this educational, I’m simply giving my merchandise the next classes: Featured, Featured 1, Featured 2, Featured 3, Featured 4, Featured 5.

As soon as accomplished, you’re ready to begin growing the featured merchandise phase at the Boutique Sale Touchdown Web page.
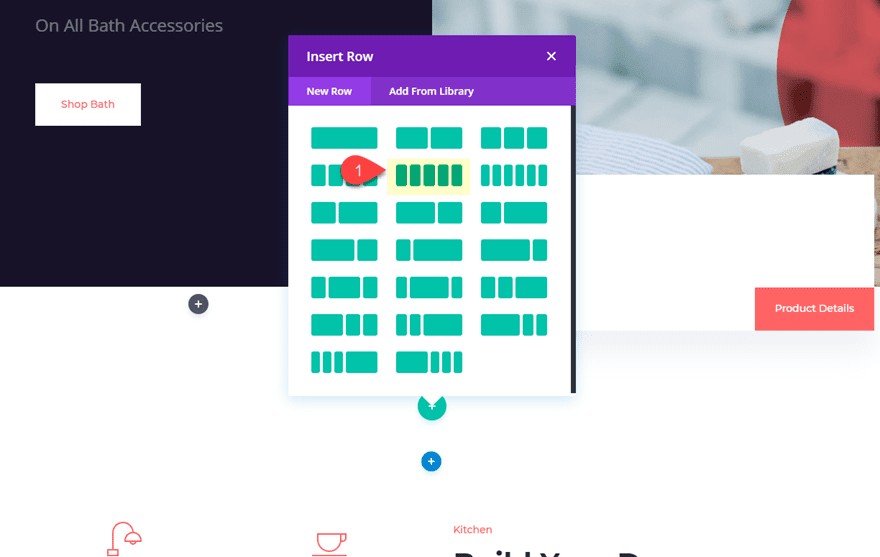
Move to the web page the place you will have imported the Boutique Sale Touchdown Web page and deploy the visible builder.
Below the second one phase of the structure, create a brand new common phase with a 5 column Row.
Configuring the Store Modules to Pull from a Sure Class
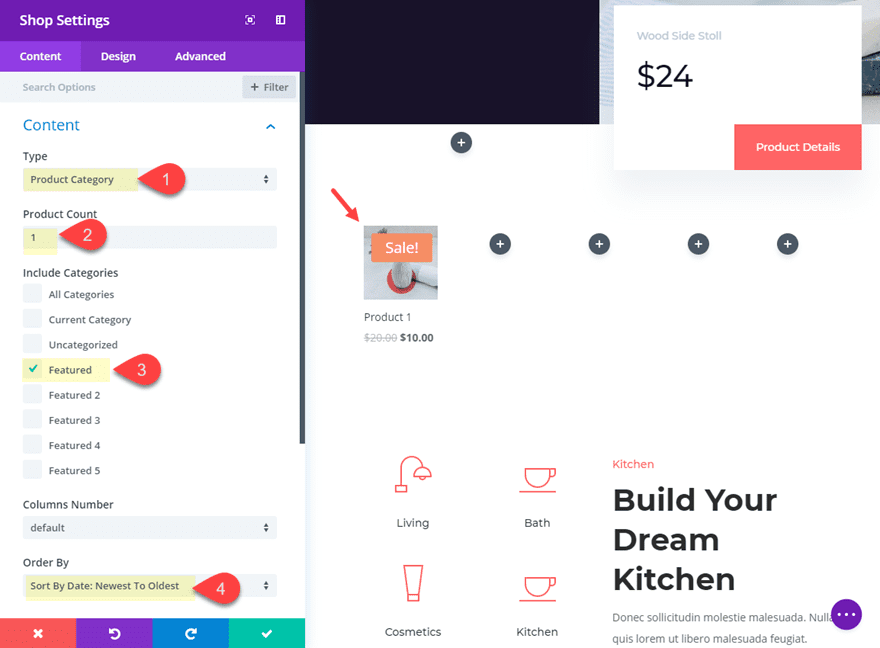
Now it’s time to begin including our store modules to our columns. Then we will be able to configure each and every one to drag from a unique class. Within the first column upload a store module and replace the next:
Sort: Product Class
Product Rely: 1
Come with Classes: Featured
Order By way of: Type By way of Date: Latest to Oldest
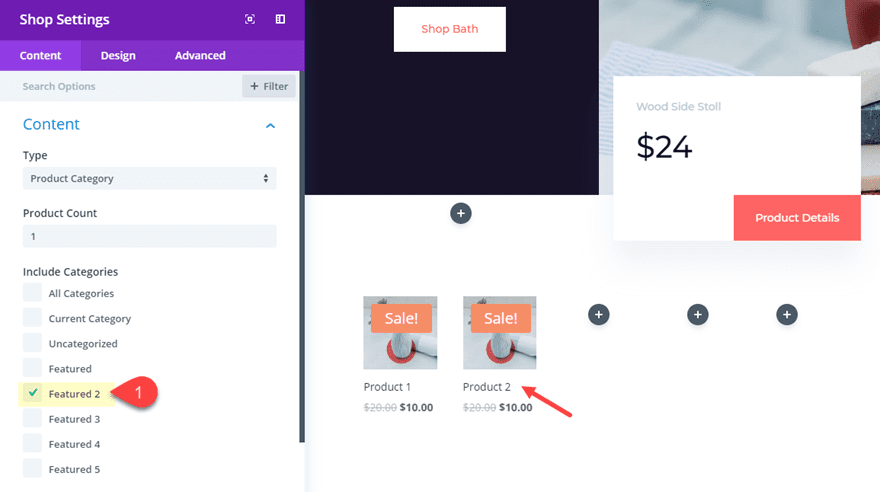
Subsequent, reproduction and paste the store module into column 2 and replace the store settings to incorporate handiest the class “Featured 2”.
Then proceed this procedure for the rest columns as follows:
Reproduction and paste the store module into column 3 and replace the store settings to incorporate handiest the class “Featured 3”.
Reproduction and paste the store module into column 4 and replace the store settings to incorporate handiest the class “Featured 4”.
Reproduction and paste the store module into column 5 and replace the store settings to incorporate handiest the class “Featured 5”.
With this capability in position, whenever you upload a brand new product in any of the types implemented, the store module will mechanically show that product on your featured phase. So it is a nice technique to display the latest product from 5 other classes multi function position.
Designing the Store Modules
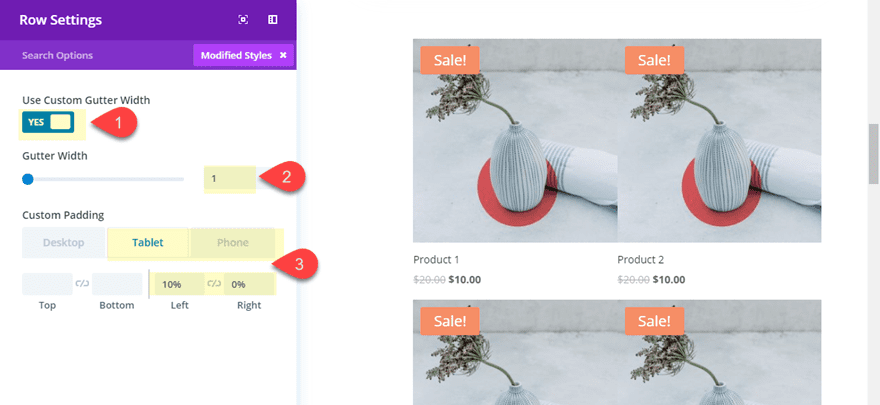
Ahead of we begin designing our store modules, cross forward and open the row settings and replace the next:
Gutter Width: 1
Customized Padding (Pill): 10% left, 0% proper
Customized Padding (smartphone): 20% left, 0% proper
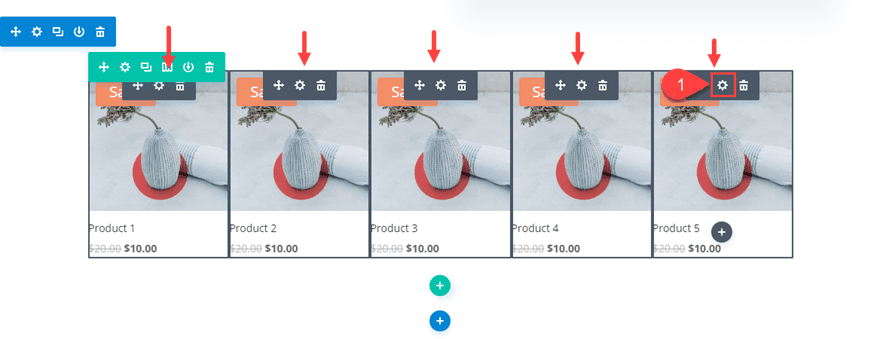
Since we need to follow the similar design for all of our store modules immediately, we will be able to use Divi’s multiselect function to make a choice the entire store modules. To try this cling cmd (or ctrl) and click on on each and every of the modules till all are decided on. Then click on the atmosphere icon on one of the most decided on modules to open up the part settings modal. Any design adjustments you are making right here might be implemented to all modules.
Replace the next:
Background colour: #241f32
Background colour (hover): #ff6363
Icon Hover Colour: rgba(0,0,0,0)
Hover Overlay Colour: rgba(0,0,0,0)
Sale Badge Colour (default): #ff6363
Sale Badge Colour (hover): #241f32
Textual content Orientation: Middle
Identify Textual content Colour: #ffffff
Worth Textual content Colour: #ffffff
Width: 120% (desktop), 100% (pill), 100% (smartphone)
Customized Margin (desktop): -20% proper
Customized Margin (hover): -20% left, 0% proper
Customized Margin (pill): -20% left, 0% proper
Customized Padding: 5px backside
By way of atmosphere the width (technically max width) to 120%, on hover, you’ll lengthen the module past its guardian column the usage of a detrimental left margin of -20%.
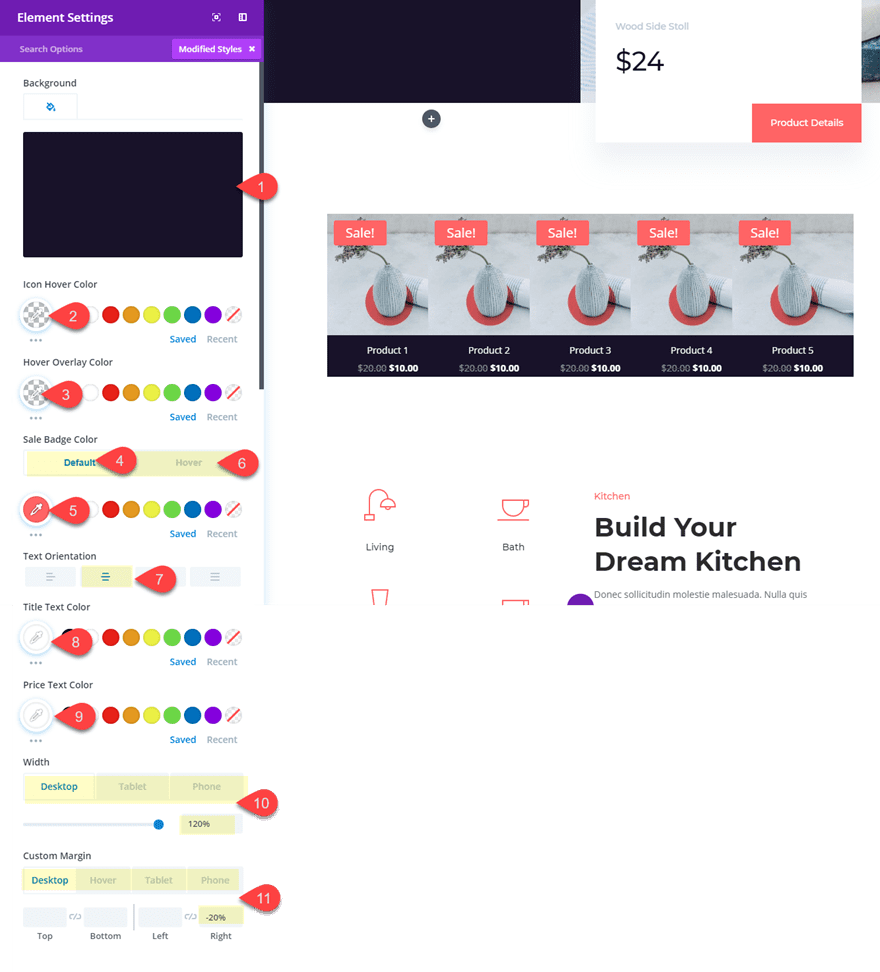
For the reason that store module in column 5 doesn’t want the hover impact that strikes to the left, cross forward and disable the customized margin hover impact on that module.
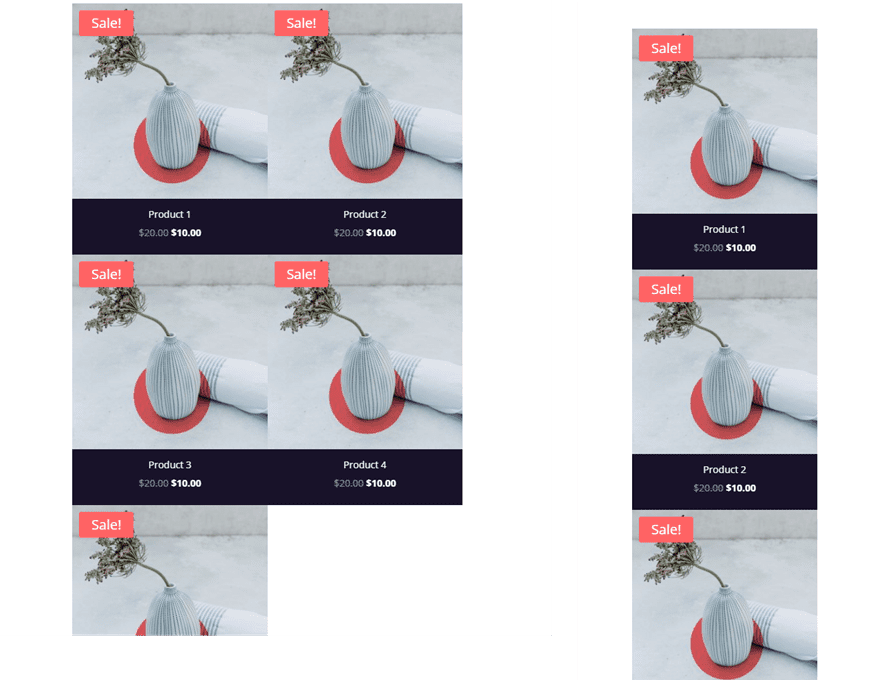
This is the overall consequence.
And on account of how we set our customized margins, the hover impact that strikes the module to the left is disabled on cell. And the design does reply effectively.
In fact, be happy to experiment with extra settings for various designs and hover results. Additionally, for those who just like the design however don’t need to use the store module, you’ll all the time create a identical design the usage of blurb modules. Then you must hyperlink each and every blurb to a product class web page or one thing.
Ultimate Ideas
This use case is a part of our Cyber Monday Deal the place we proportion 6 FREE restricted version touchdown pages with Black Friday consumers and lifelong contributors. By way of becoming a member of our empowered neighborhood all over at the present time and turning into a member, you’ll get:
- 25% OFF EVERYTHING
- All the 6 touchdown pages without spending a dime
- Get right of entry to to our superior topics and plugins
- Bonus Prizes
Grasp the chance and change into a member these days!
The put up How to Design a Unique Featured Products Section with Divi & Our Exclusive Boutique Sale Landing Page gave the impression first on Elegant Themes Blog.
WordPress Web Design