
Since a WordPress footer is so helpful, sooner or later, you should be informed in regards to the footer, the way it works, what’s imaginable on the subject of modifying it, and the way to take away preset footer content material that’s no longer related in your logo. That’s why we need to display you the way to edit a footer in WordPress, together with a complete rationalization of a footer’s advantages and what can pass into one.
Web page footers have an extended historical past of containing no matter data doesn’t are compatible inside of a site’s major menu. From hyperlinks to enhance paperwork and social media pages, more than a few parts pass moderately smartly in a footer.
Let’s get began!
Contents
- 1 What Is a WordPress Footer?
- 2 Causes To Have (and Edit) a WordPress Footer
- 3 How To Edit a Footer in WordPress (Self-Hosted Model)
- 4 Signal Up For the Publication
- 5 How To Edit a Footer in WordPress.com
- 6 How To Upload Social Media Icons to WordPress Footer
- 7 How To Upload a Background to Your WordPress Footer
- 8 Eliminating “Powered by means of WordPress” Textual content
- 9 How To Take away the WordPress Footer Totally
- 10 Abstract
Footers aren’t unique to WordPress. Maximum site developers and content management systems be offering the power to incorporate a footer. Then again, WordPress gives its distinctive footer capability, together with a preset footer design that in most cases comes with the theme you install.
A WordPress footer sits on the base of your site. It’s a static content material space that presentations up on the very backside, without reference to which web page a consumer lands on. Even supposing no longer as visited because the header, the footer remains to be extraordinarily essential to supply customers with social media buttons, customer support links, and call data.
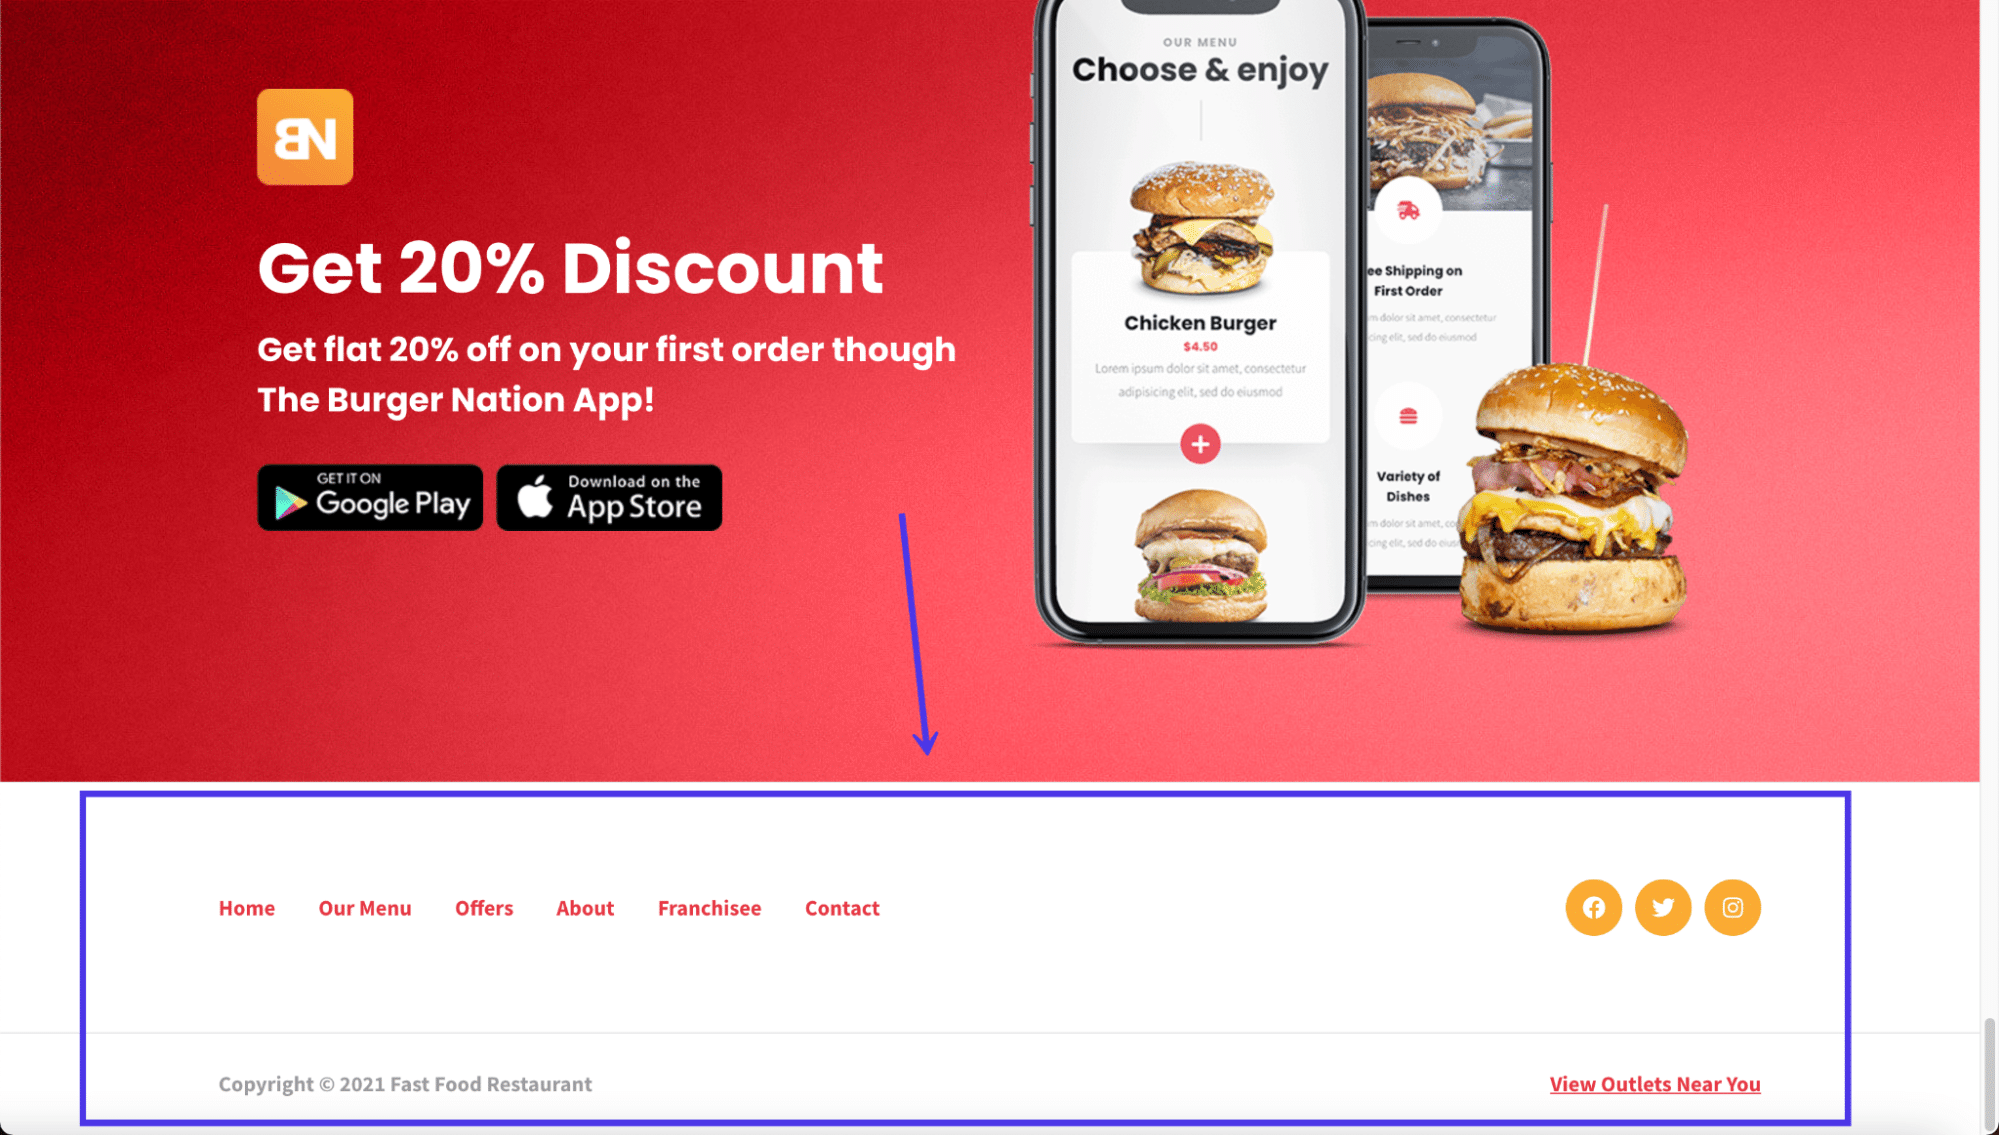
An instance eating place footer menu.
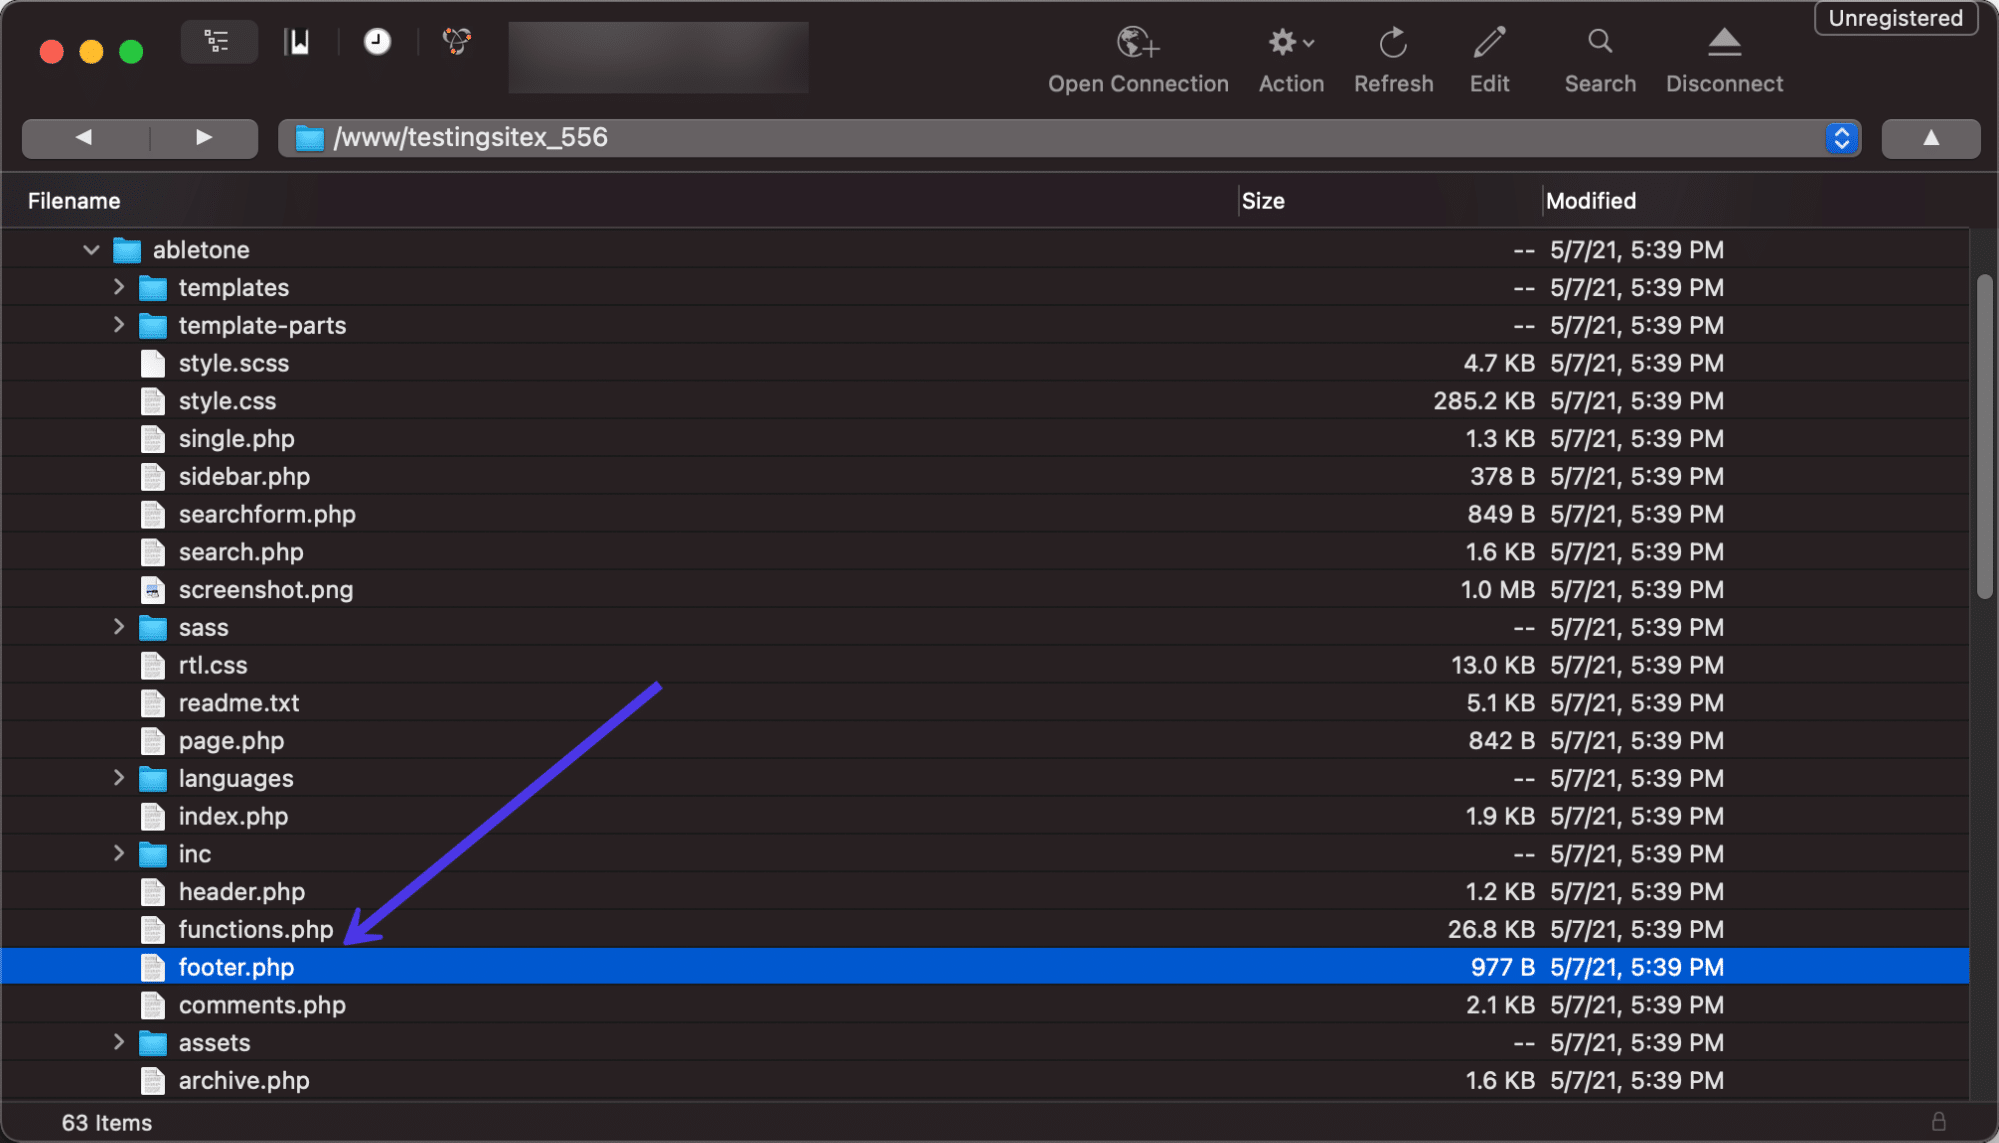
General, if you’re making a site on WordPress, you’ll be able to be expecting to look a footer positioned on your design by means of default. WordPress has a core record constructed into its machine particularly to regulate the footer (footer.php).
Footers are available in all styles and sizes, and you’ll be able to edit them to incorporate other colours, fonts, and backgrounds. You’ll additionally insert content material parts inside the footer, comparable to weblog publish lists, safety badges, or even forms and photographs.
Website footers: extremely useful, but potentially confusing to edit.  Learn how to get started here
The footer is like the belief to all of your site. It presentations crucial hyperlinks and knowledge for the ones serious about and dug deep into your content material. In the end, the footer completes the entire design of your website, just like the overall slide in a slideshow presentation or the belief to a speech.
A footer with touch and copyright data
It’s tempting to overlook about your footer or depart it because the last thing you design. Many of us even need to take away their footers since they don’t see a lot worth in them. This isn’t the best plan. The footer does have worth, even though it’s no longer considered or clicked on up to your major menu or number one content material spaces.
To provide you with an concept of what makes a footer precious, right here’s an inventory of all of the causes to have one and learn to edit a footer in WordPress to suit your logo.
- The WordPress footer gives a static module proven on each web page of your site, making it extra visual than a typical web page that disappears when anyone clicks away.
- It completes the site’s design, each visually and in your WordPress files. It tells WordPress the place to finish its code and signifies to customers when the content material ends. To not point out, it makes for a cleaner interface.
- Many web customers have come to be expecting particular hyperlinks and content material within the footer, in order that they’ll pass at once to the footer to seek out them. Suppose enhance hyperlinks and social media buttons.
- The footer supplies extra conversion and engagement opportunities, like a decision to motion on the finish of a weblog publish. You’ll upload paperwork, hyperlinks to different content material, or perhaps a corporate tagline.
- It’s a spot to incorporate essential hyperlinks that would possibly not make the minimize for the principle menu.
Now that we all know some great benefits of the usage of a footer, the large query of what to position within the footer comes into play. All topics fluctuate, but it surely’s commonplace to look a “Powered by means of WordPress” message within the footer after putting in a brand new theme.
The “Powered Via WordPress” credit score.
Different occasions, theme builders would possibly come with their very own premade designs or messages about who made the theme.

A easy default footer in a loose theme.
None of that’s dangerous, however the objective is to customise your WordPress footer to hyperlink in your precious pages, come with content material comparable in your logo, and filter the default content material like messages from theme builders or WordPress. It’s additionally sensible to regulate the styling to check your branding with customized fonts and hues.
So, what are some parts to position inside of your WordPress footer?
- Paperwork for customers to subscribe in your publication messages or weblog updates
- Hyperlinks to buyer enhance sources, like FAQs, knowledgebase articles, and boards
- Icon hyperlinks to obtain virtual merchandise like apps and podcasts
- An inventory of upcoming events
- An inventory of latest weblog publish articles
- Hyperlinks to loyalty and affiliate programs
- Hyperlinks to informational pages, like an About Us or Profession web page
- Badges and icons to advertise your popularity, previous awards, or website safety
- Social media icons that hyperlink to the pages
- A full sitemap for more uncomplicated navigation all the way through your site
- Criminal statements like copyright claims, privacy policies, and phrases and stipulations
- Touch data comparable to your cope with, places, telephone quantity, and trade hours, or a contact form
- A search box for advanced navigation
- Every other further pages that don’t are compatible on your major menu however nonetheless want a spot in your website
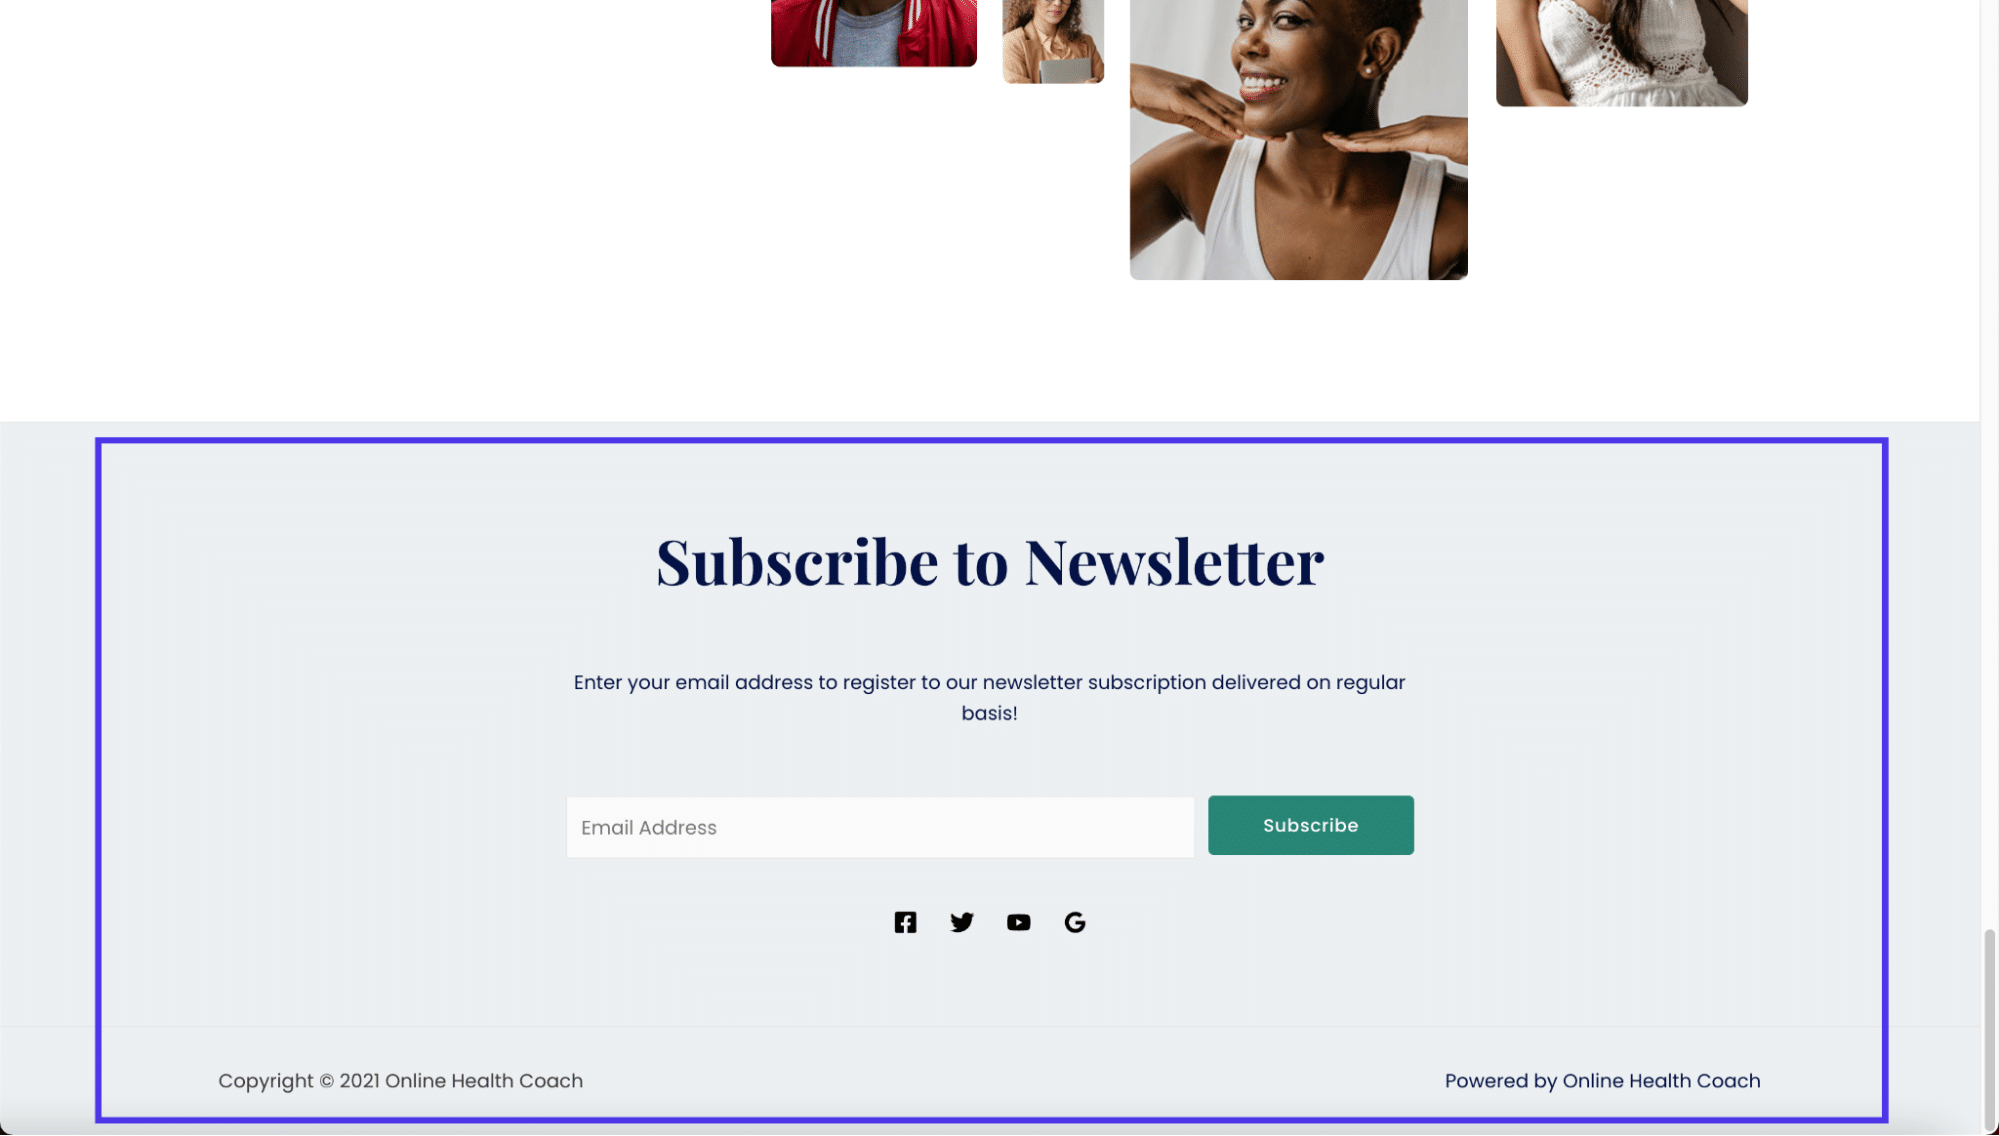
Footer with an e-mail subscription shape, social buttons, and copyright data
There are a handful of techniques to edit the footer of a WordPress.org (self-hosted) website. Within the following sections, we’ll discuss modifying a footer in WordPress the usage of the theme customizer, widgets, plugins, and code. As an advantage, we’ll talk about managing the WordPress footer with a visible web page builder like Elementor.
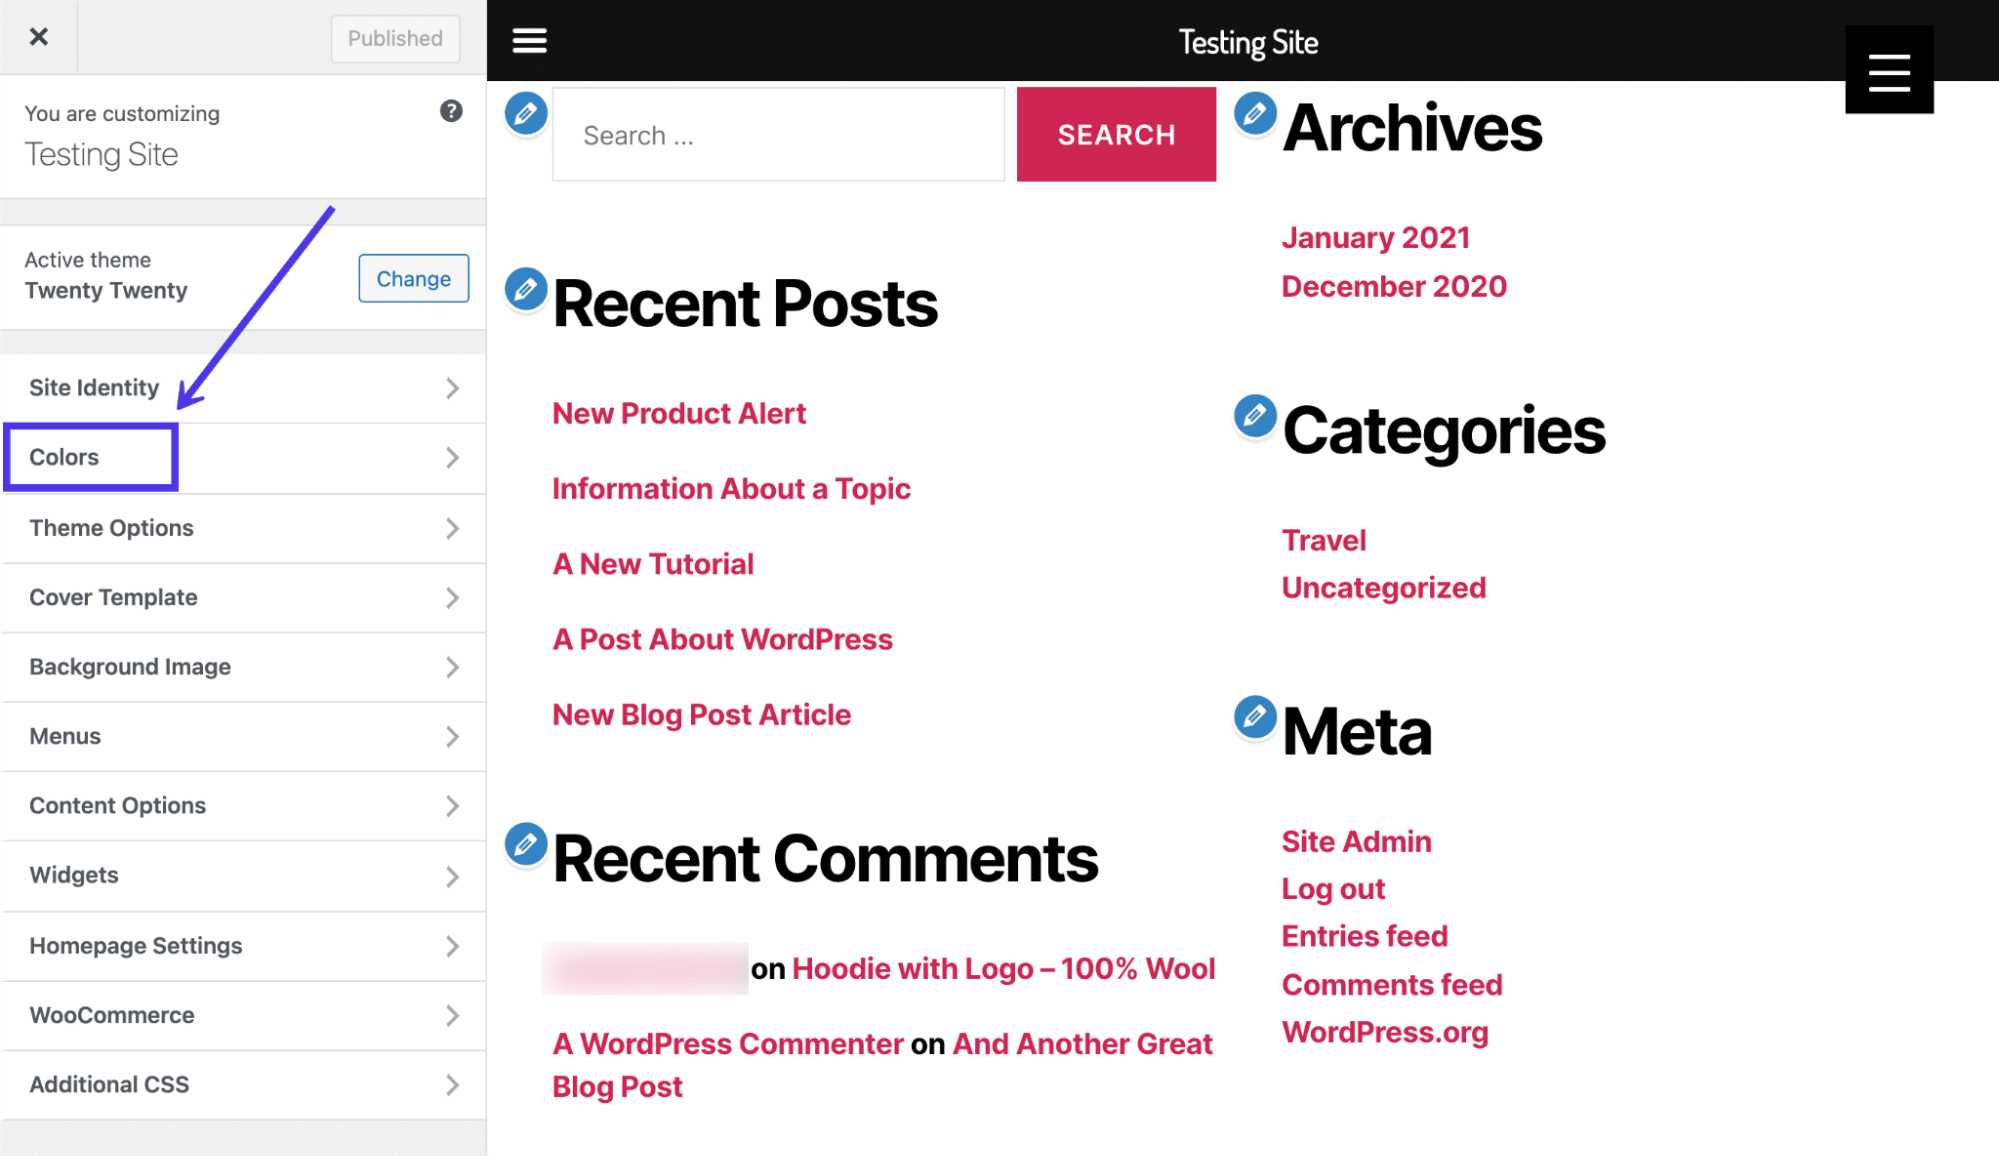
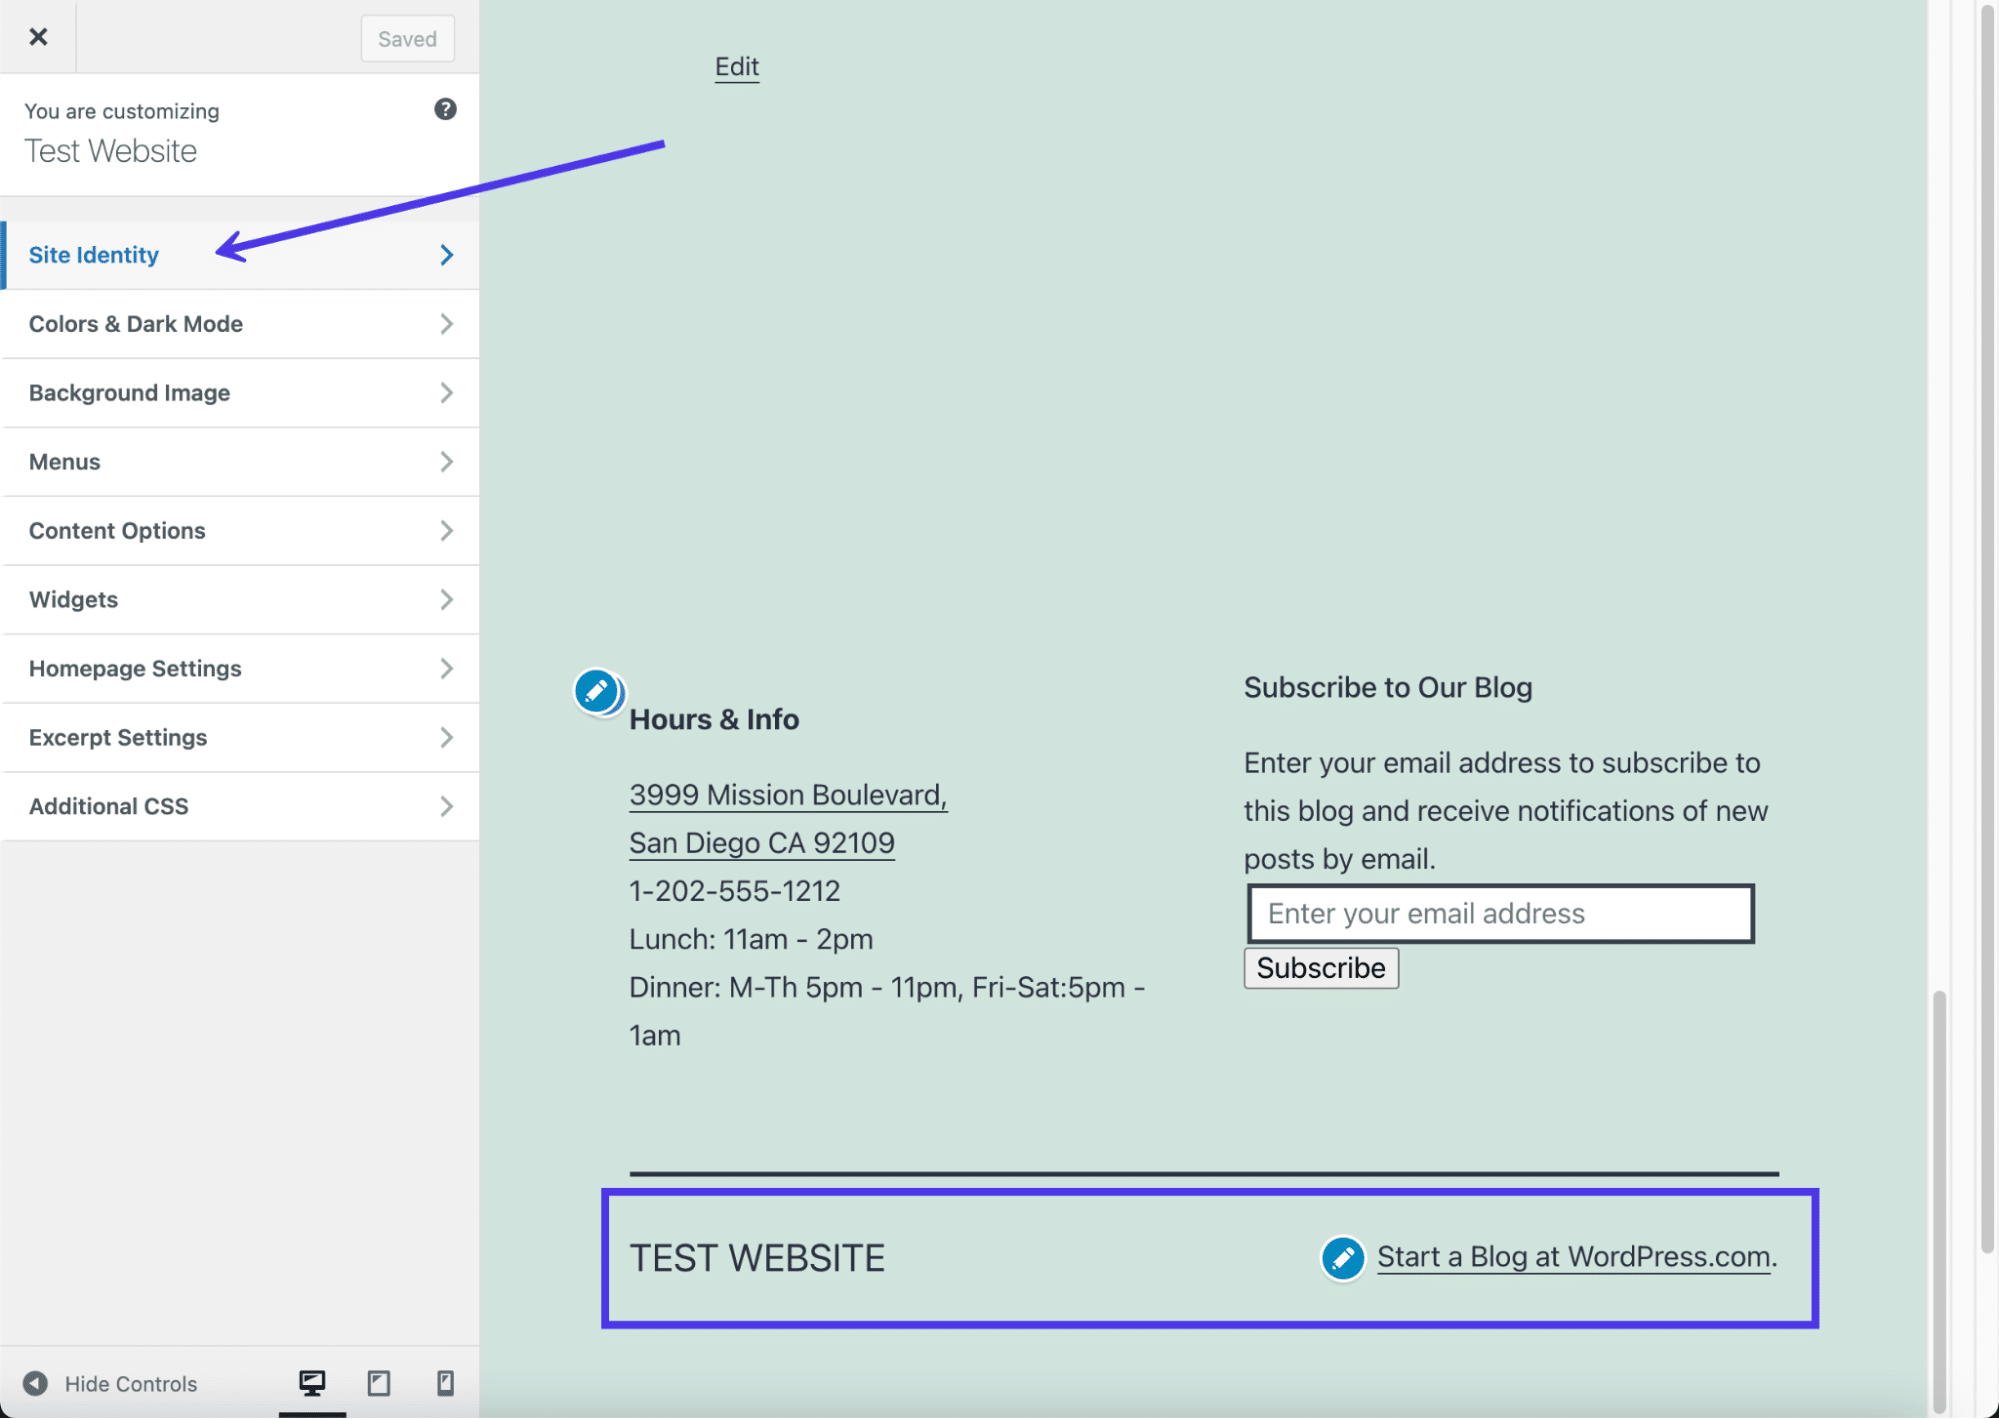
The quickest and most productive solution to edit a WordPress footer is by using the built-in WordPress Theme Customizer. The Theme Customizer settings range relying in your selected theme, however the customizer itself is all the time situated within the precise location at the WordPress dashboard.
To start the method, pass to the dashboard and click on on Look after which Subject matters.
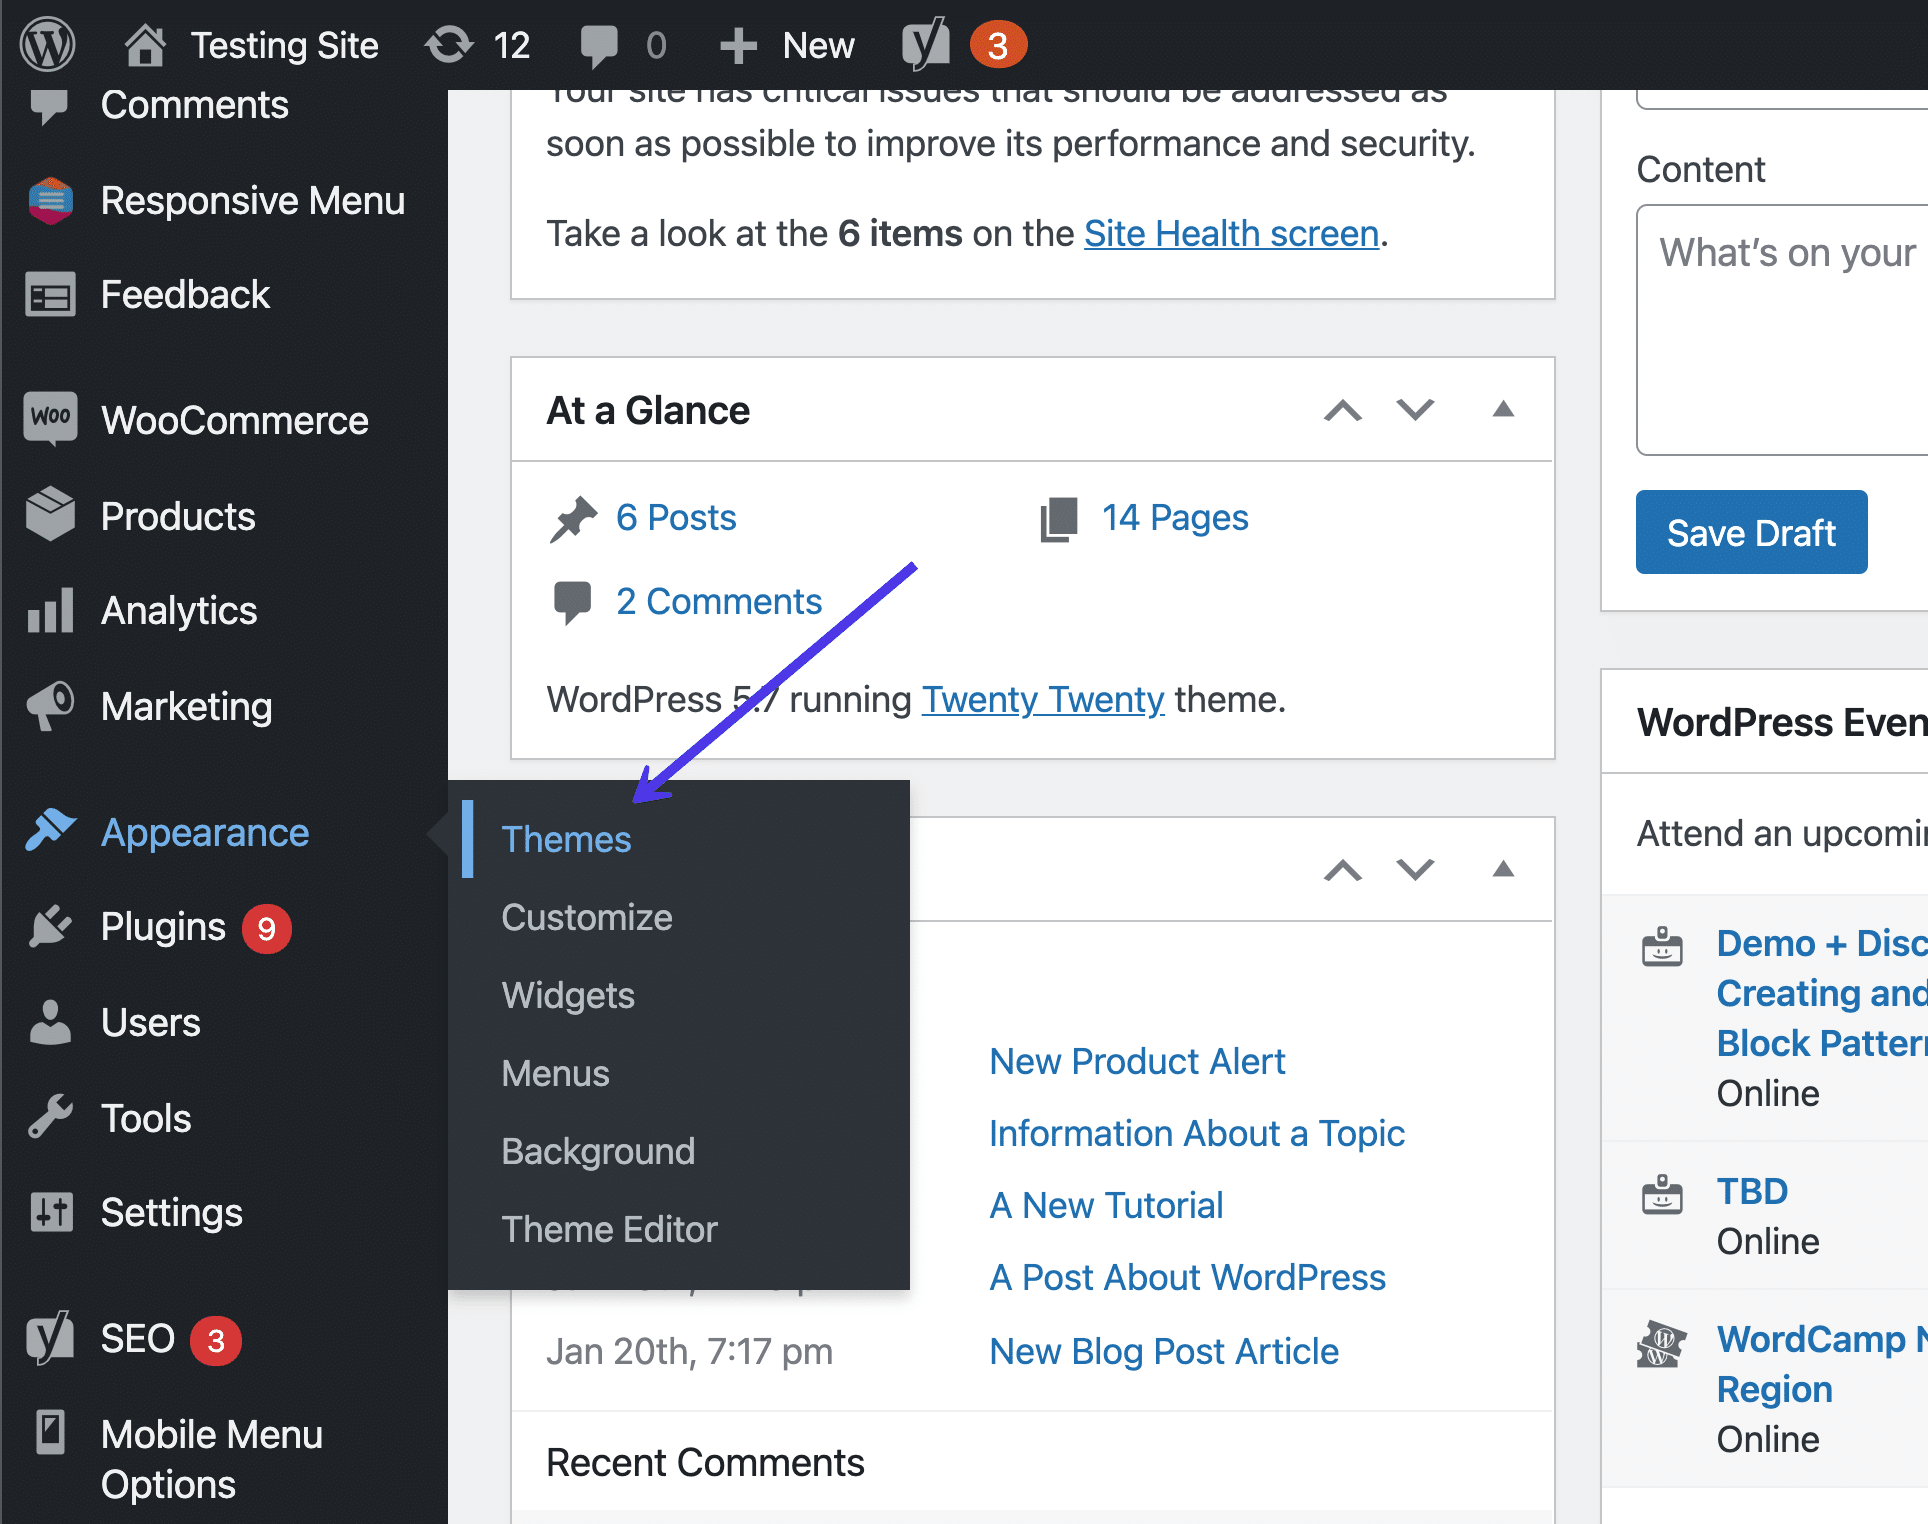
The Subject matters button in WordPress.
Then, click on the Customise button beneath the recently lively theme.
Be at liberty to swap out themes to look how the footers trade from theme to theme.
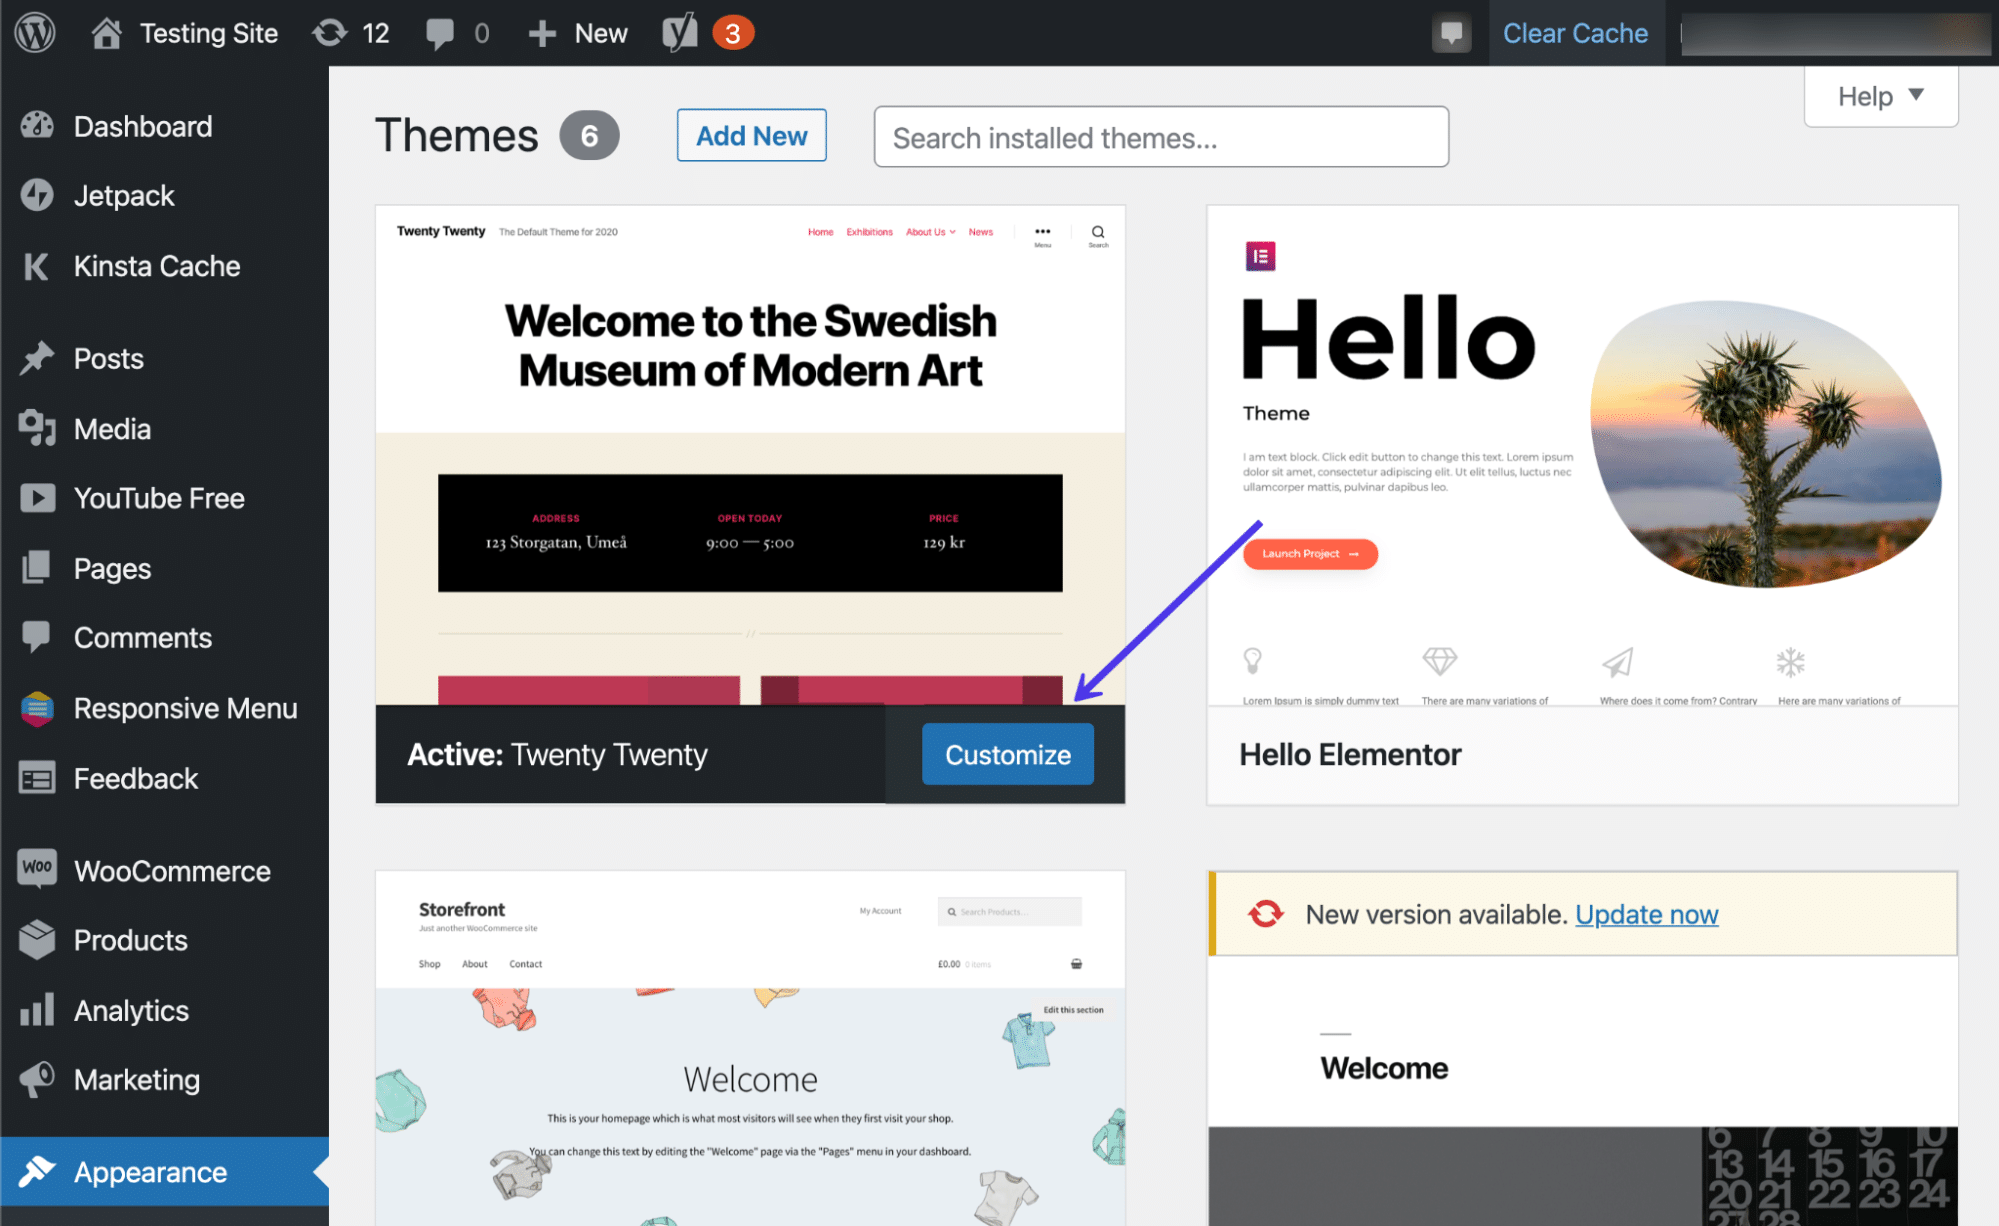
Customise your lively theme.
As a somewhat quicker choice, you’ll be able to additionally click on on Look > Customise, which brings you at once to the WordPress Theme Customizer for the lively theme.
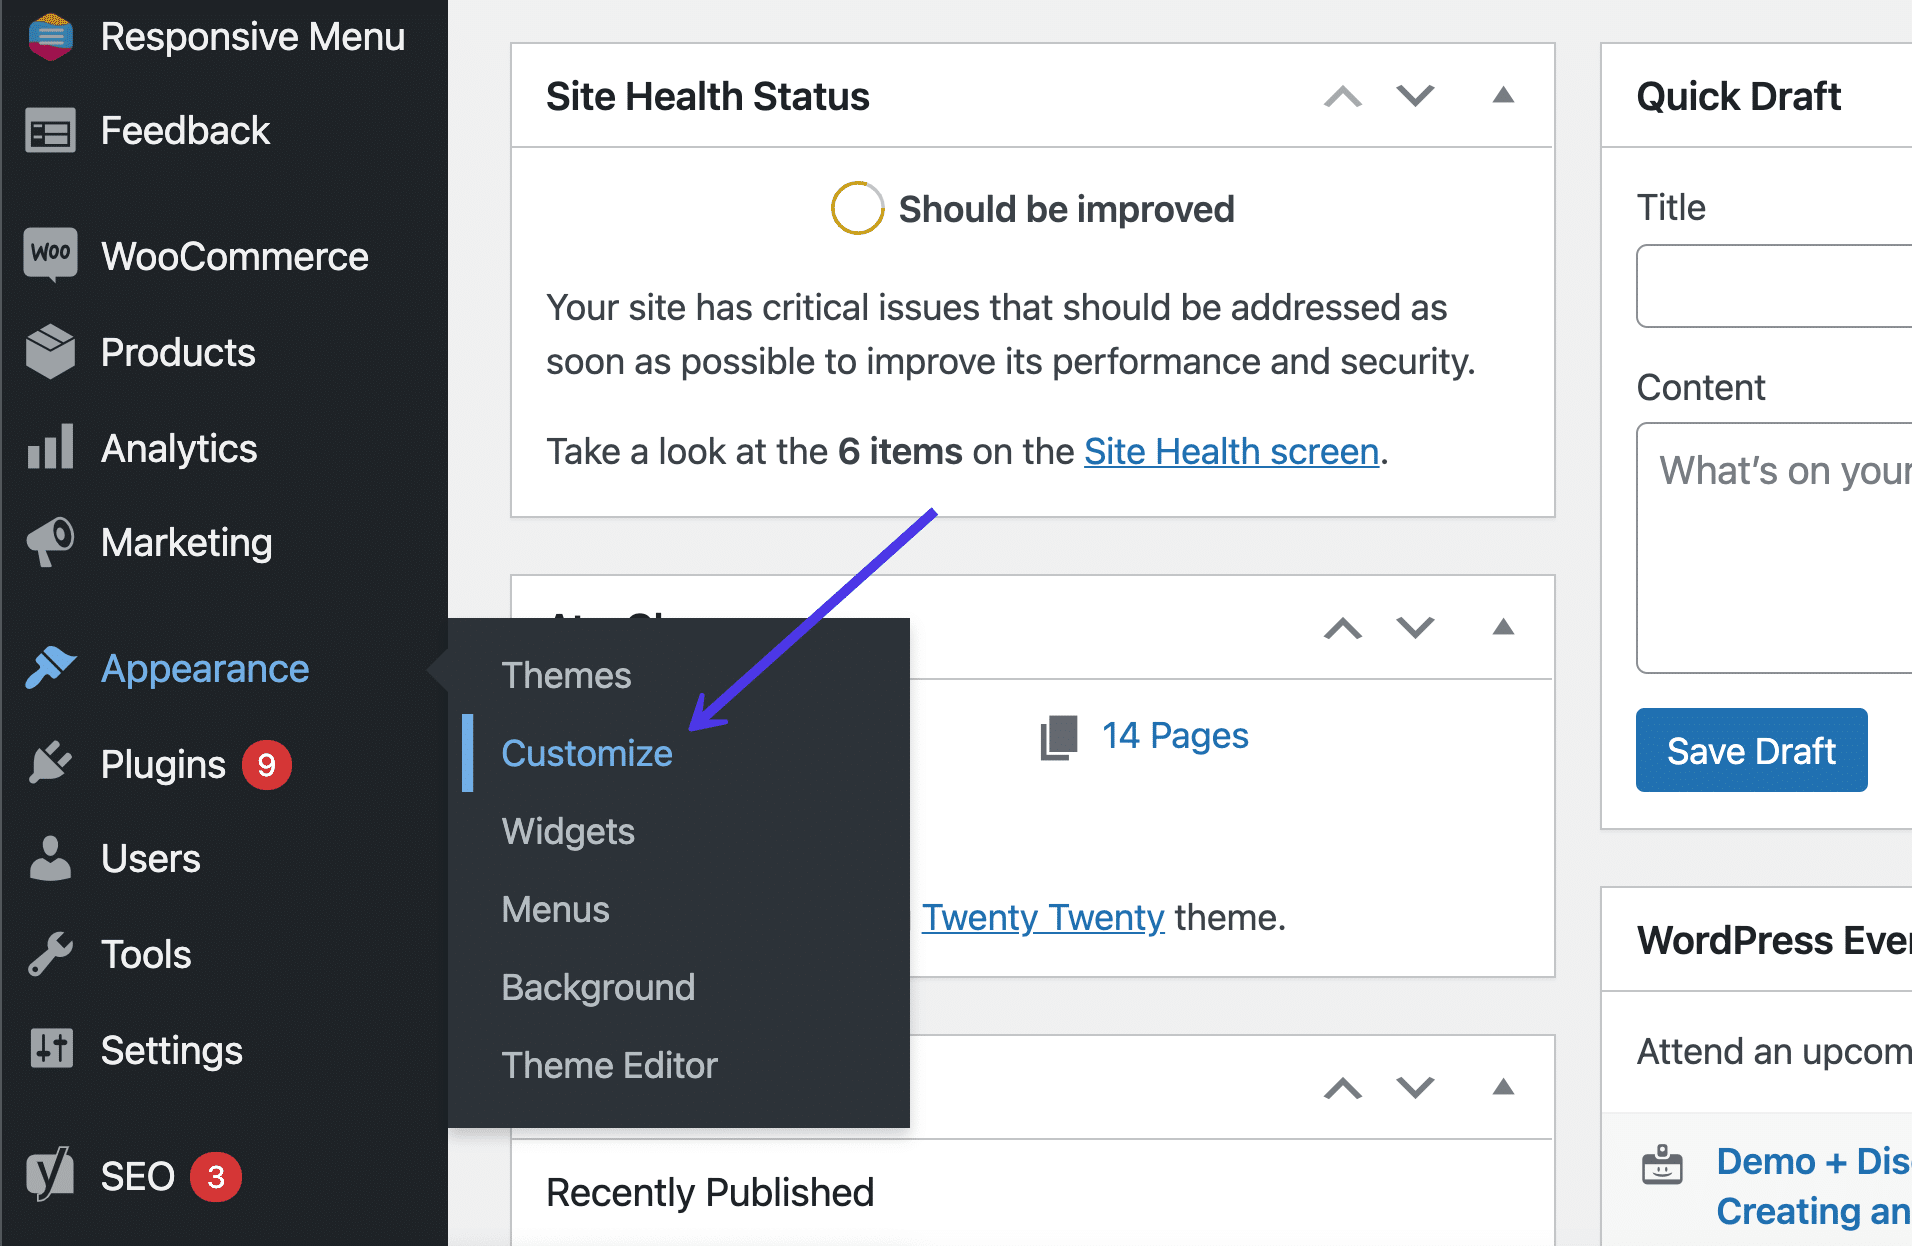
Click on the Customise button.
The WordPress Theme Customizer items a visible of your site at the appropriate aspect and several other menu pieces at the left that result in settings and customization equipment. Once more, each theme has various customization choices, so your display screen might glance a bit other than what’s in our screenshots.
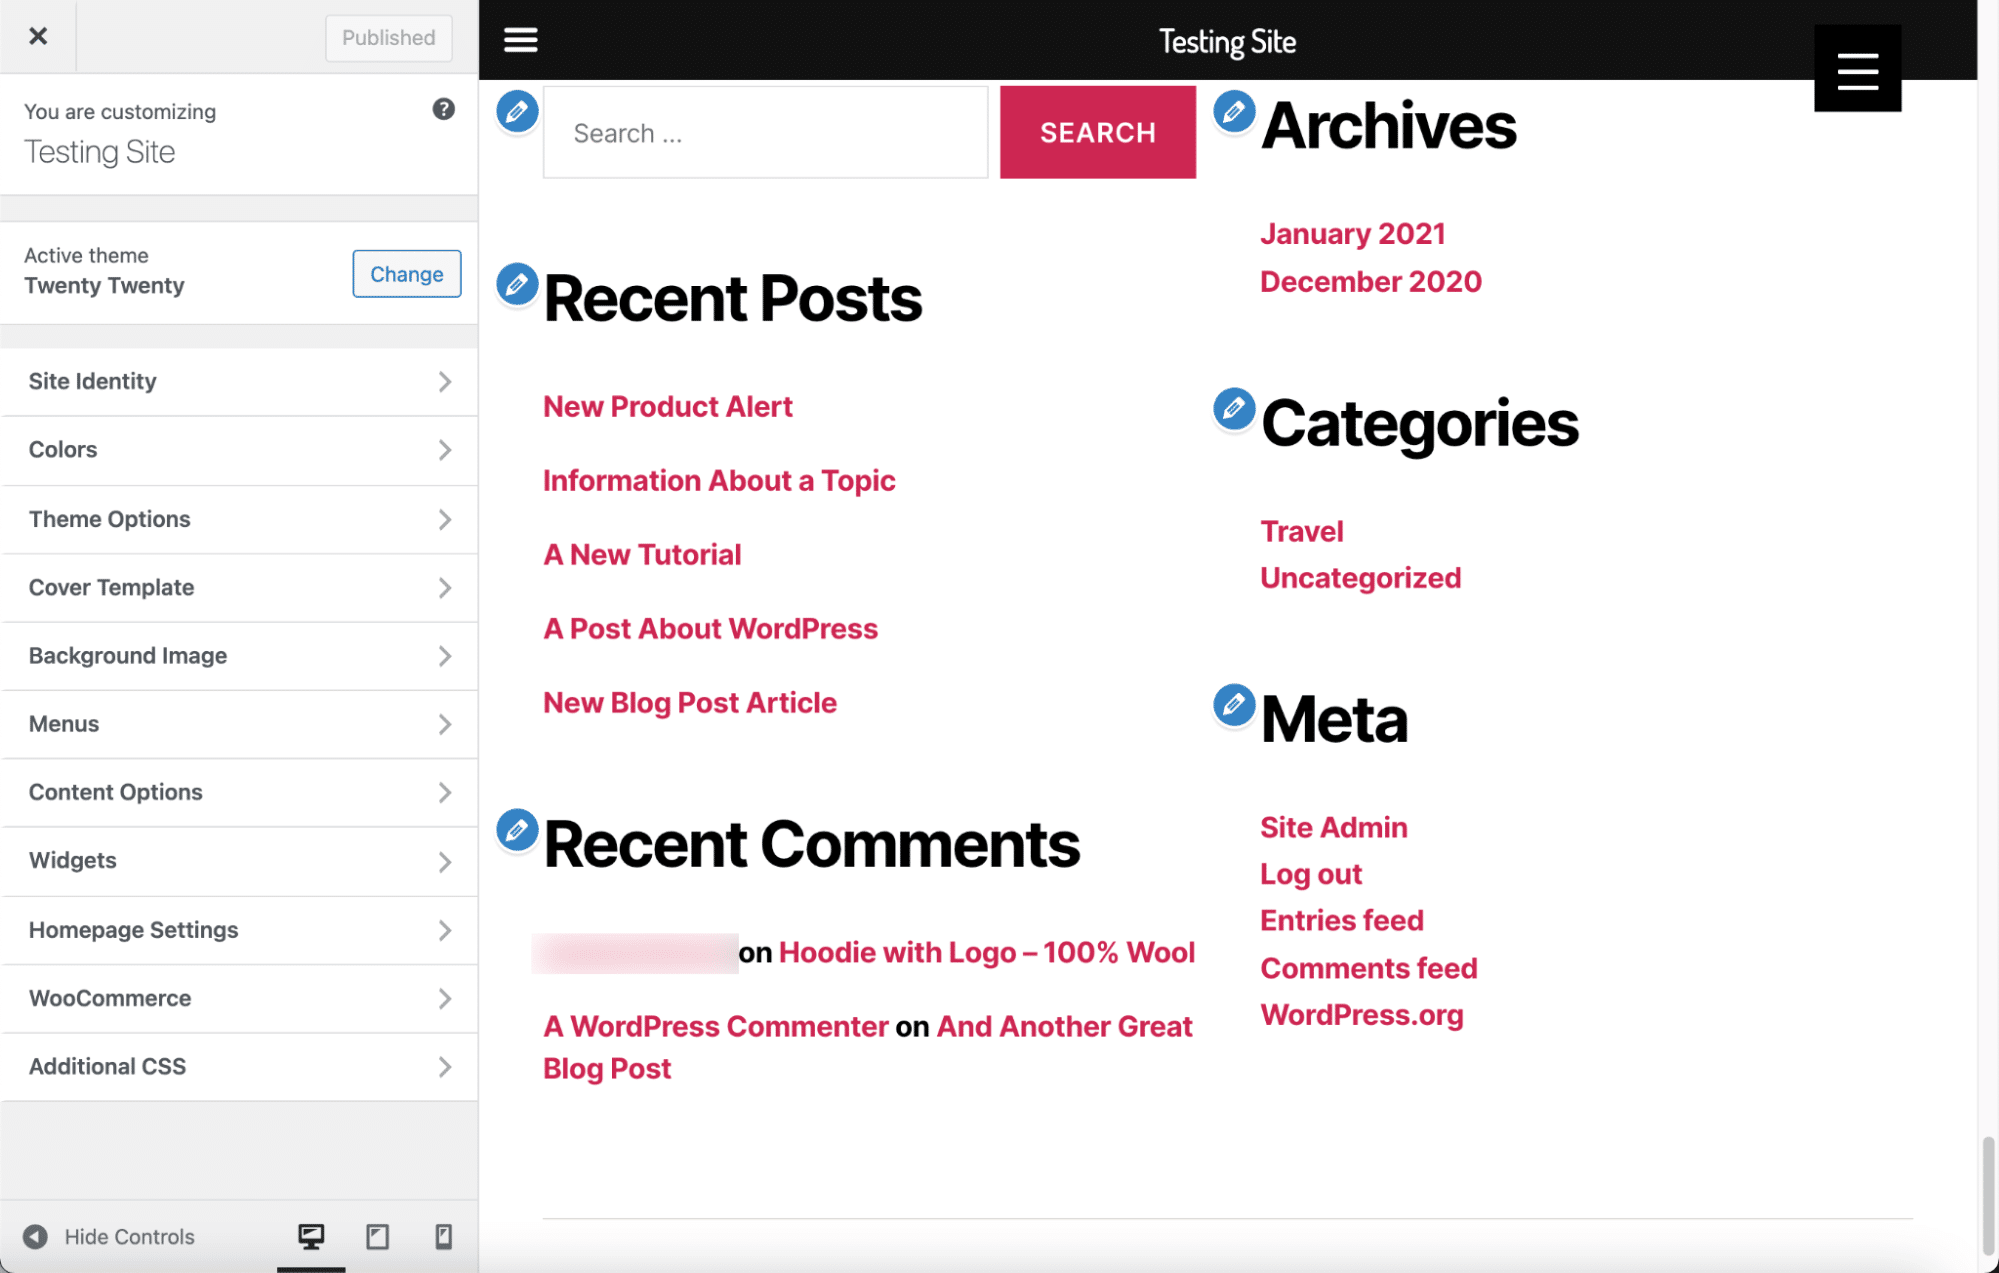
The Theme Customizer with footer in view.
A lovely position first of all your footer customization is with the colors.
Our present theme has a Colours button, making it simple to spot the place we wish to pass.
Make a selection the Colours button if that’s to be had on your theme.
The Colours tab.
Make a selection the Make a selection Colour button underneath the Header and Footer Background Colour box.
Use the colour picker to check all forms of colours and notice which of them fit your logo or glance just right against the tip of your web page.
With this actual theme, any colour adjustments if truth be told regulate the font colours as smartly, making them glance transparent without reference to the background colour.
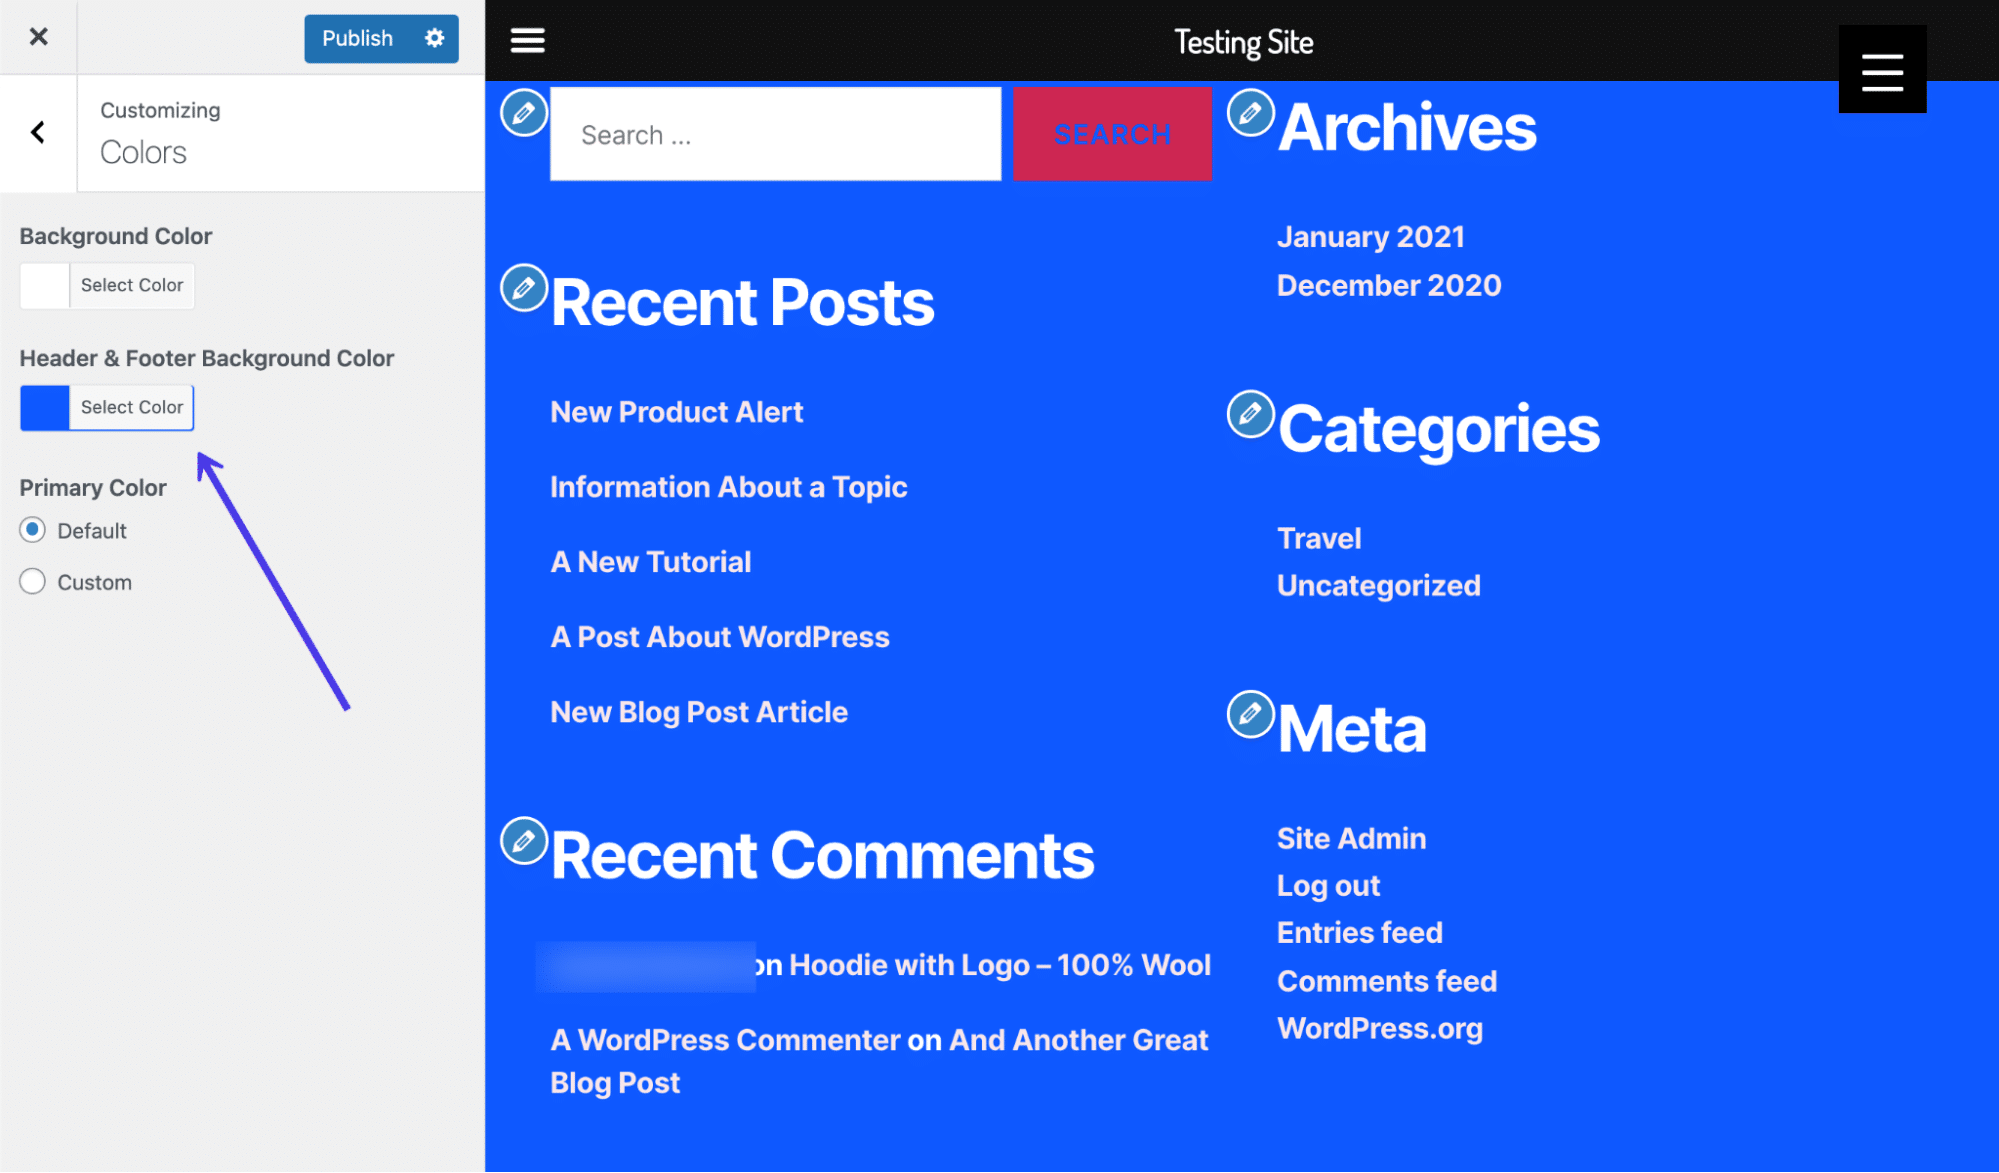
Make a selection a Header and Footer Background Colour.
As you’ll be able to see, a darker WordPress footer colour robotically adjustments the font colours for hyperlinks, headers, and paragraph textual content, getting rid of the desire so that you can do this by yourself.
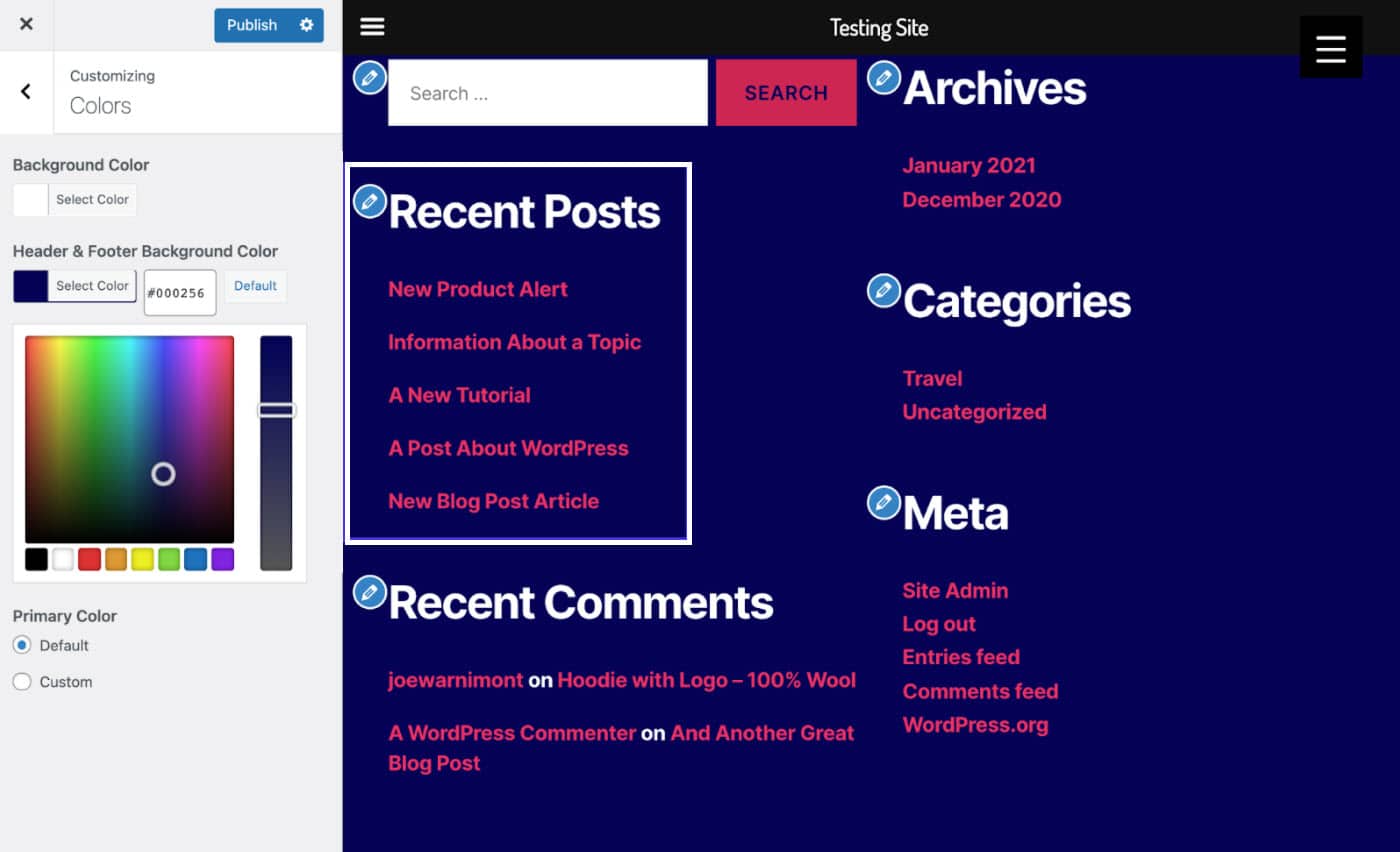
The textual content adjustments colours while you regulate the background colour on this theme.
Now let’s take a look at any other theme. On this case, we’ve swapped out the Twenty Twenty theme for the Storefront theme.
Certain sufficient, the WordPress Customizer for the Storefront theme presentations buttons no longer proven within the Twenty Twenty theme.
Due to this fact, your theme dictates how a lot keep watch over you could have over the footer within the WordPress Customizer. Some topics are higher than others on this recognize.
For the Storefront theme, we’ve got a Footer tab. Click on on that to look what’s to be had for customizing the footer.
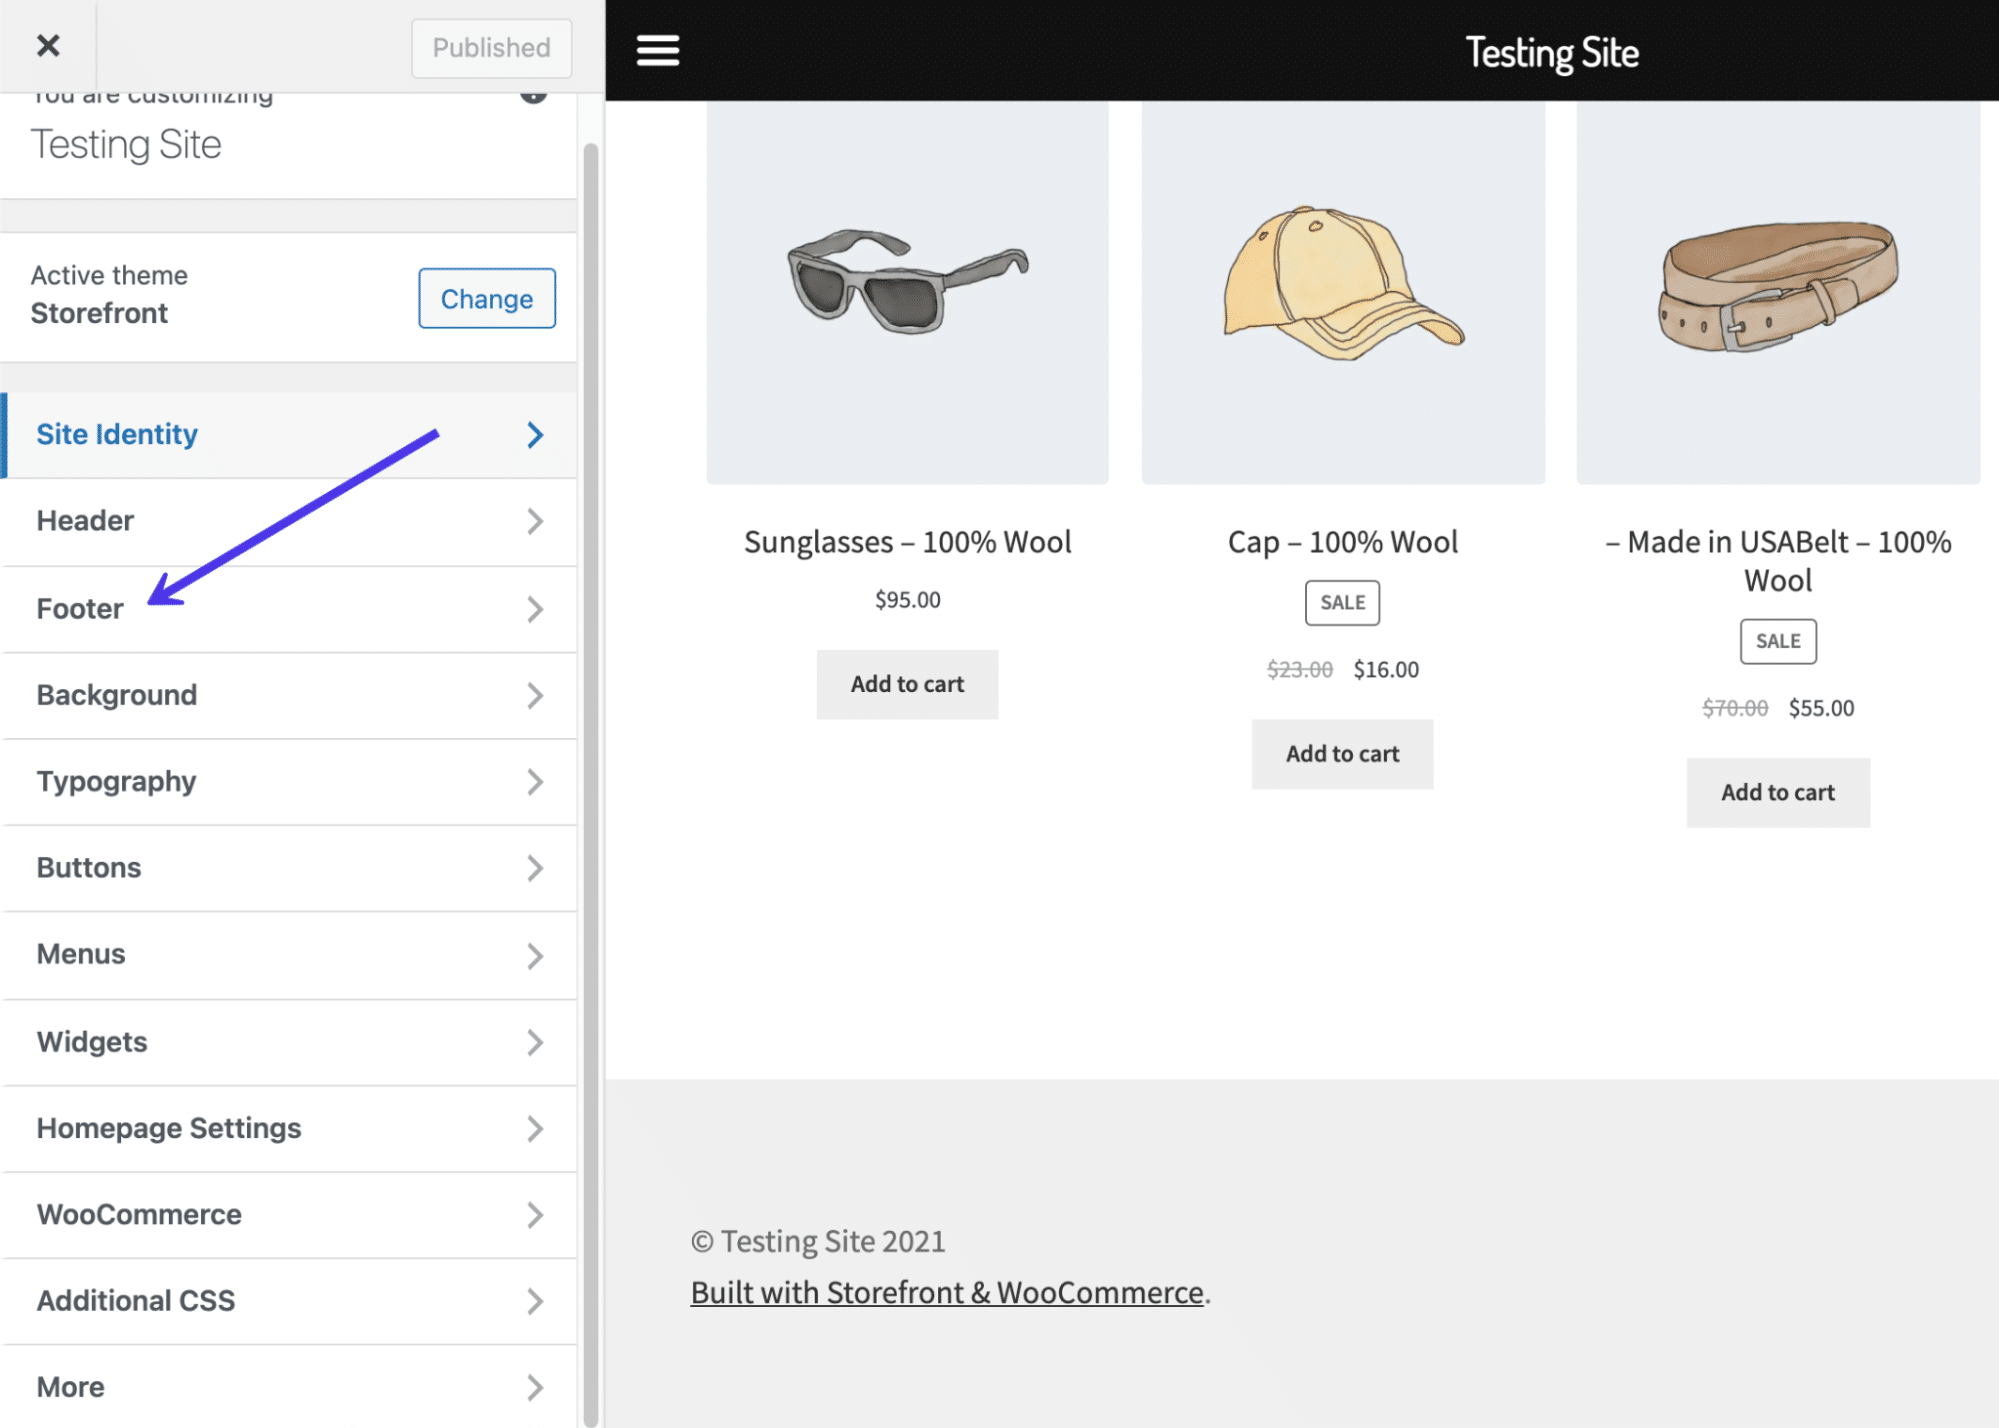
The Footer tab within the Storefront theme
In contrast to the former theme, Storefront doesn’t robotically trade textual content and hyperlink colours while you regulate the background colours. Then again, you’ll be able to keep watch over all of those colours on their very own, with fields for the Background Colour, Heading Colour, Textual content Colour, and Hyperlink Colour.
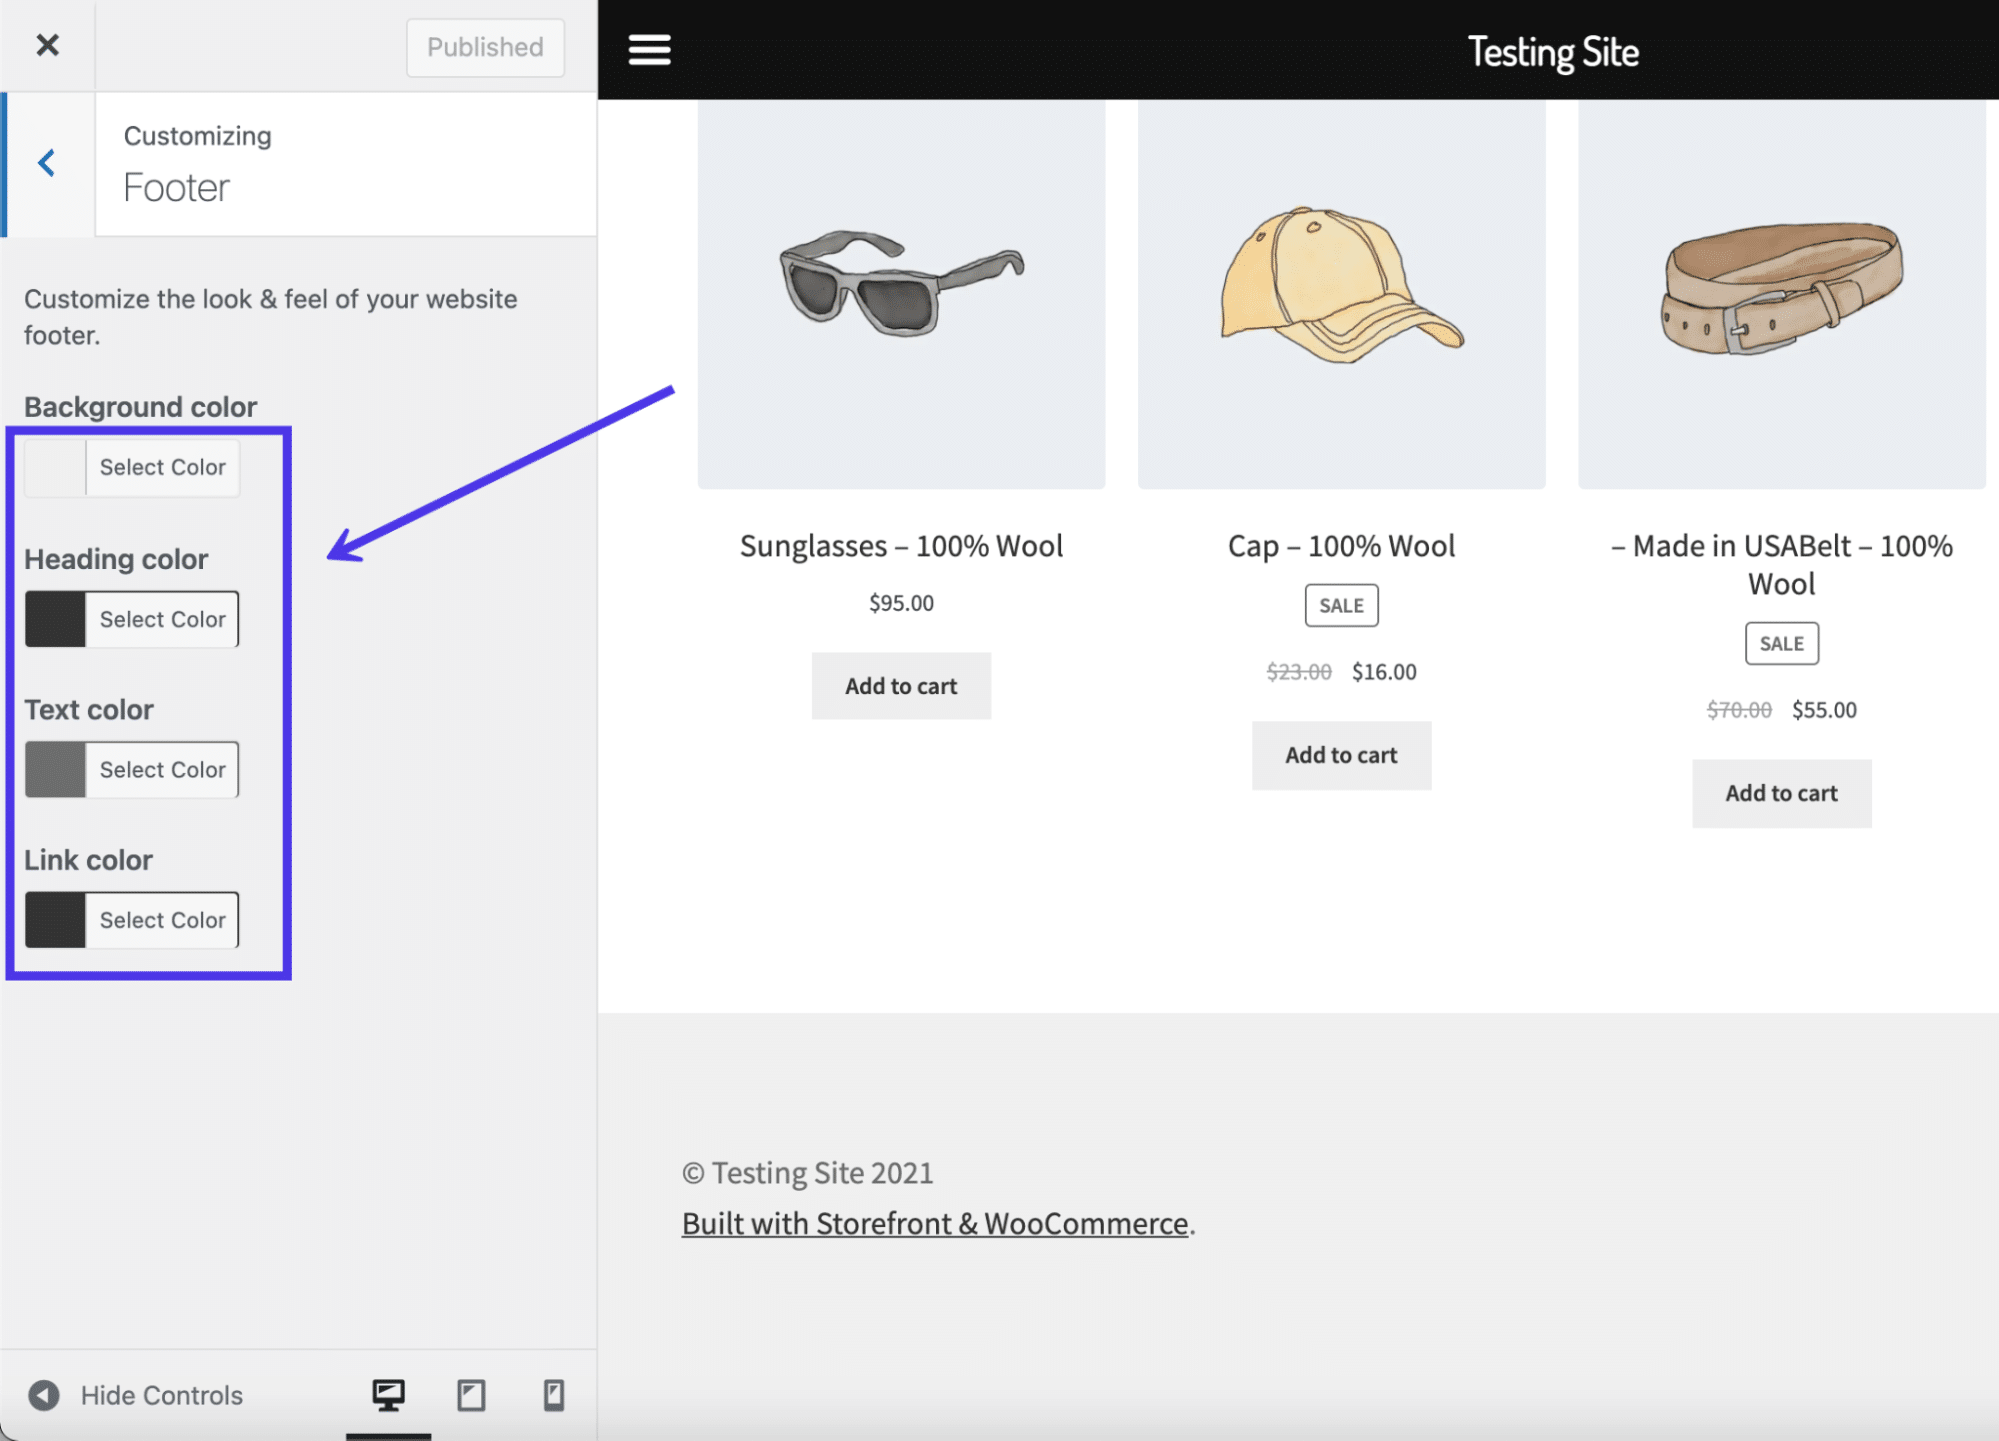
Footer colour settings.
Footer colour settings
A snappy variety finds the leads to our WordPress footer preview. After this, you must click on at the Submit button to look the brand new footer colours at the entrance finish.
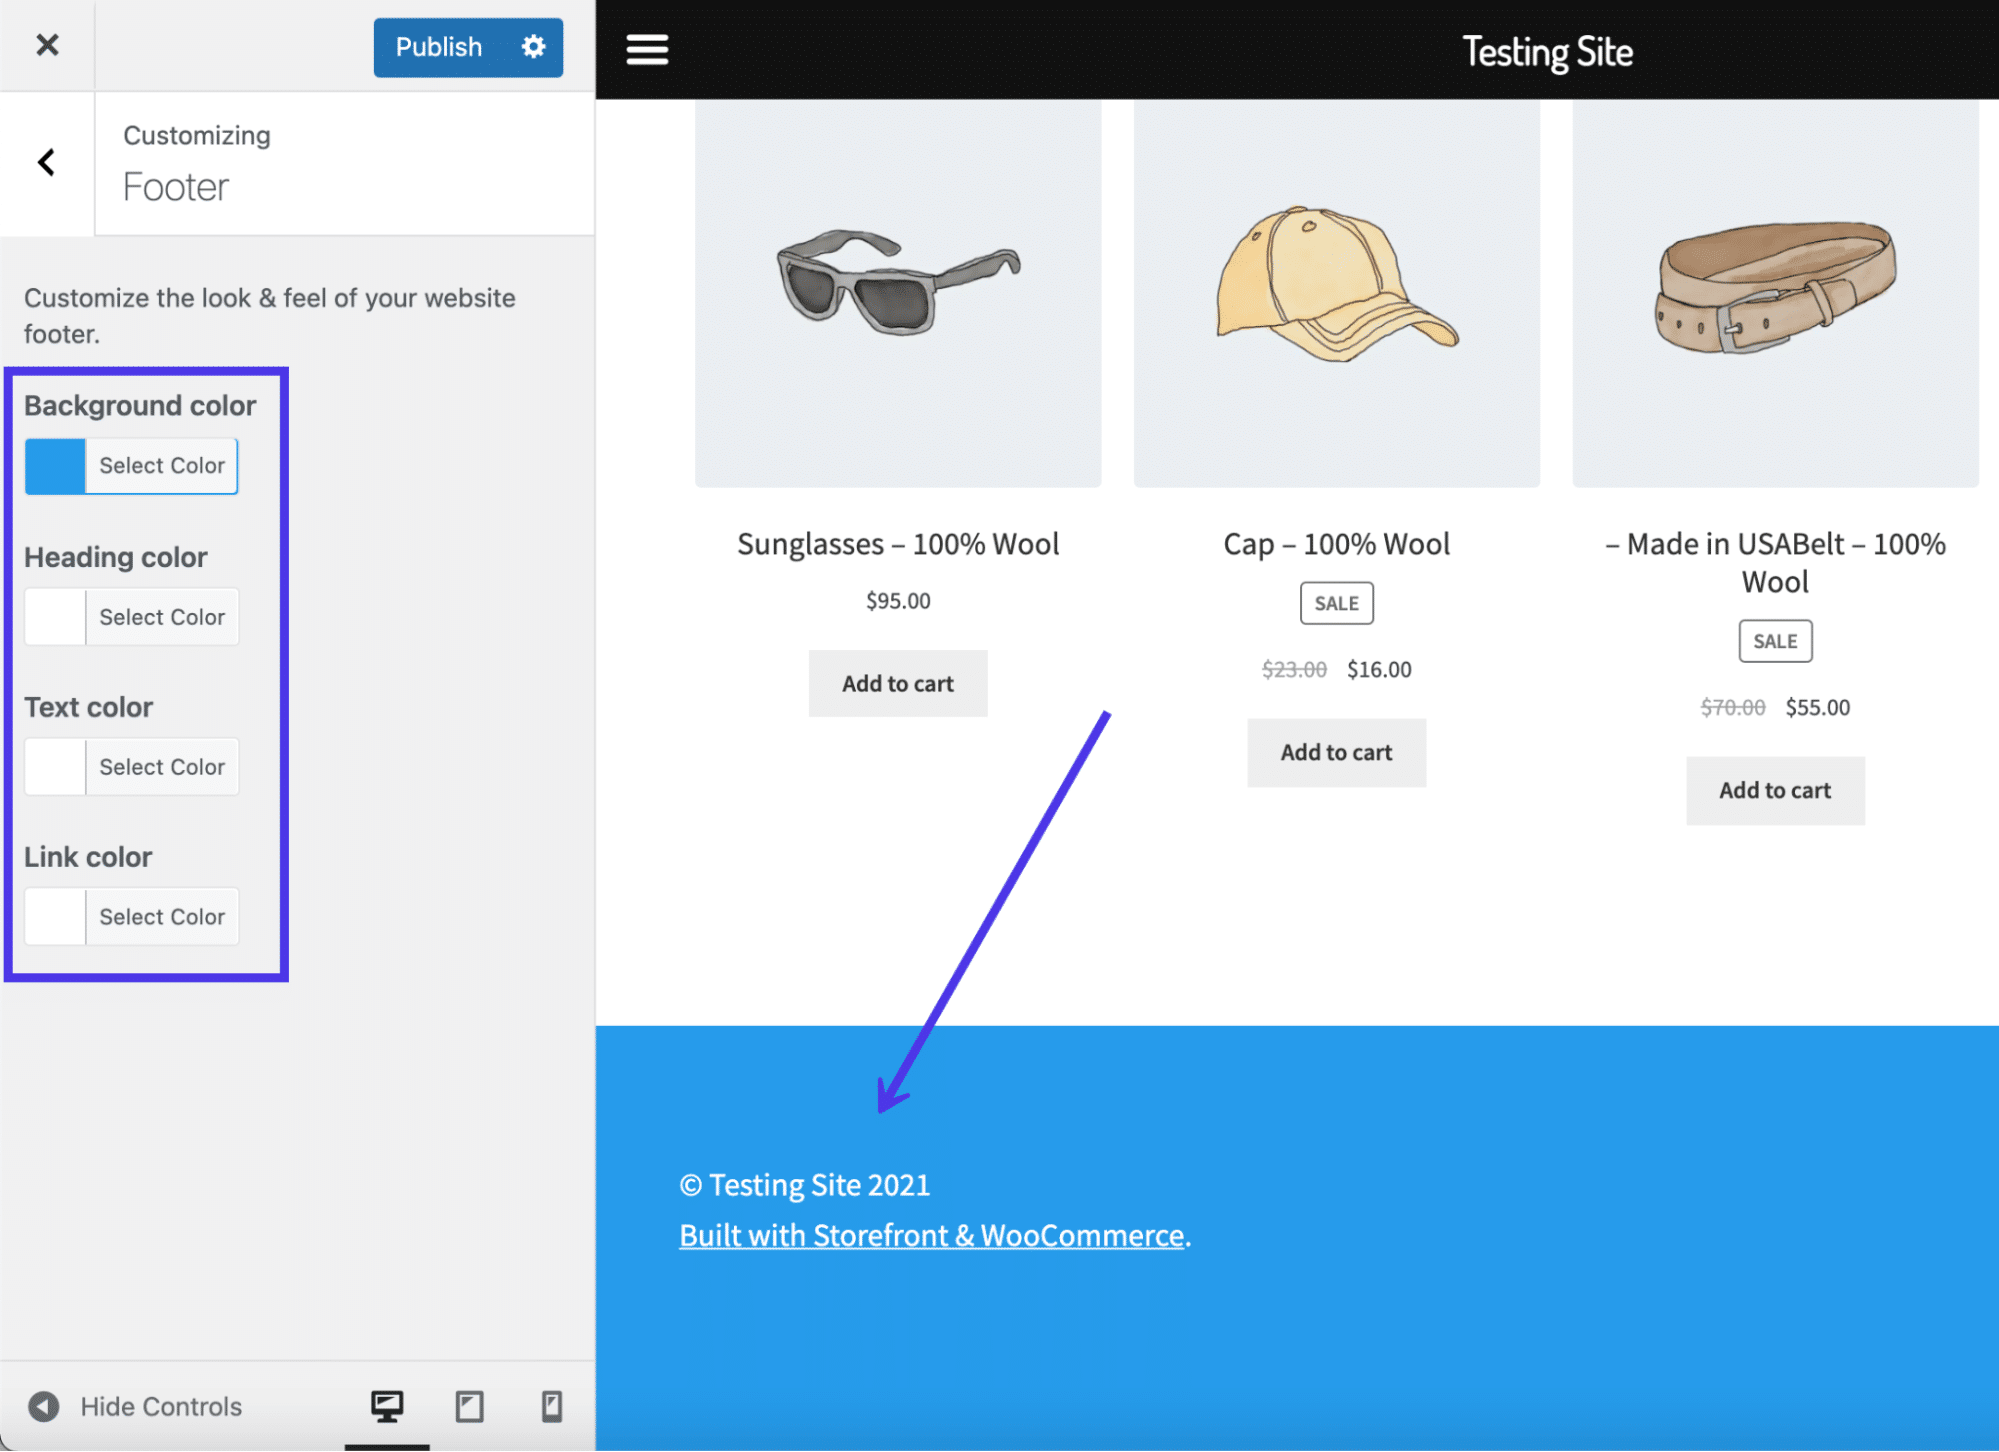
A brand new background and textual content colour within the WordPress footer.
However what in regards to the hyperlinks and textual content parts offered by means of default within the footer?
Once more, the main strategy to regulate the footer content material is within the WordPress Customizer. Within the coming sections, we’ll provide an explanation for the way to upload and take away textual content and hyperlink content material from the footer the usage of two strategies: as menu pieces and as widgets.
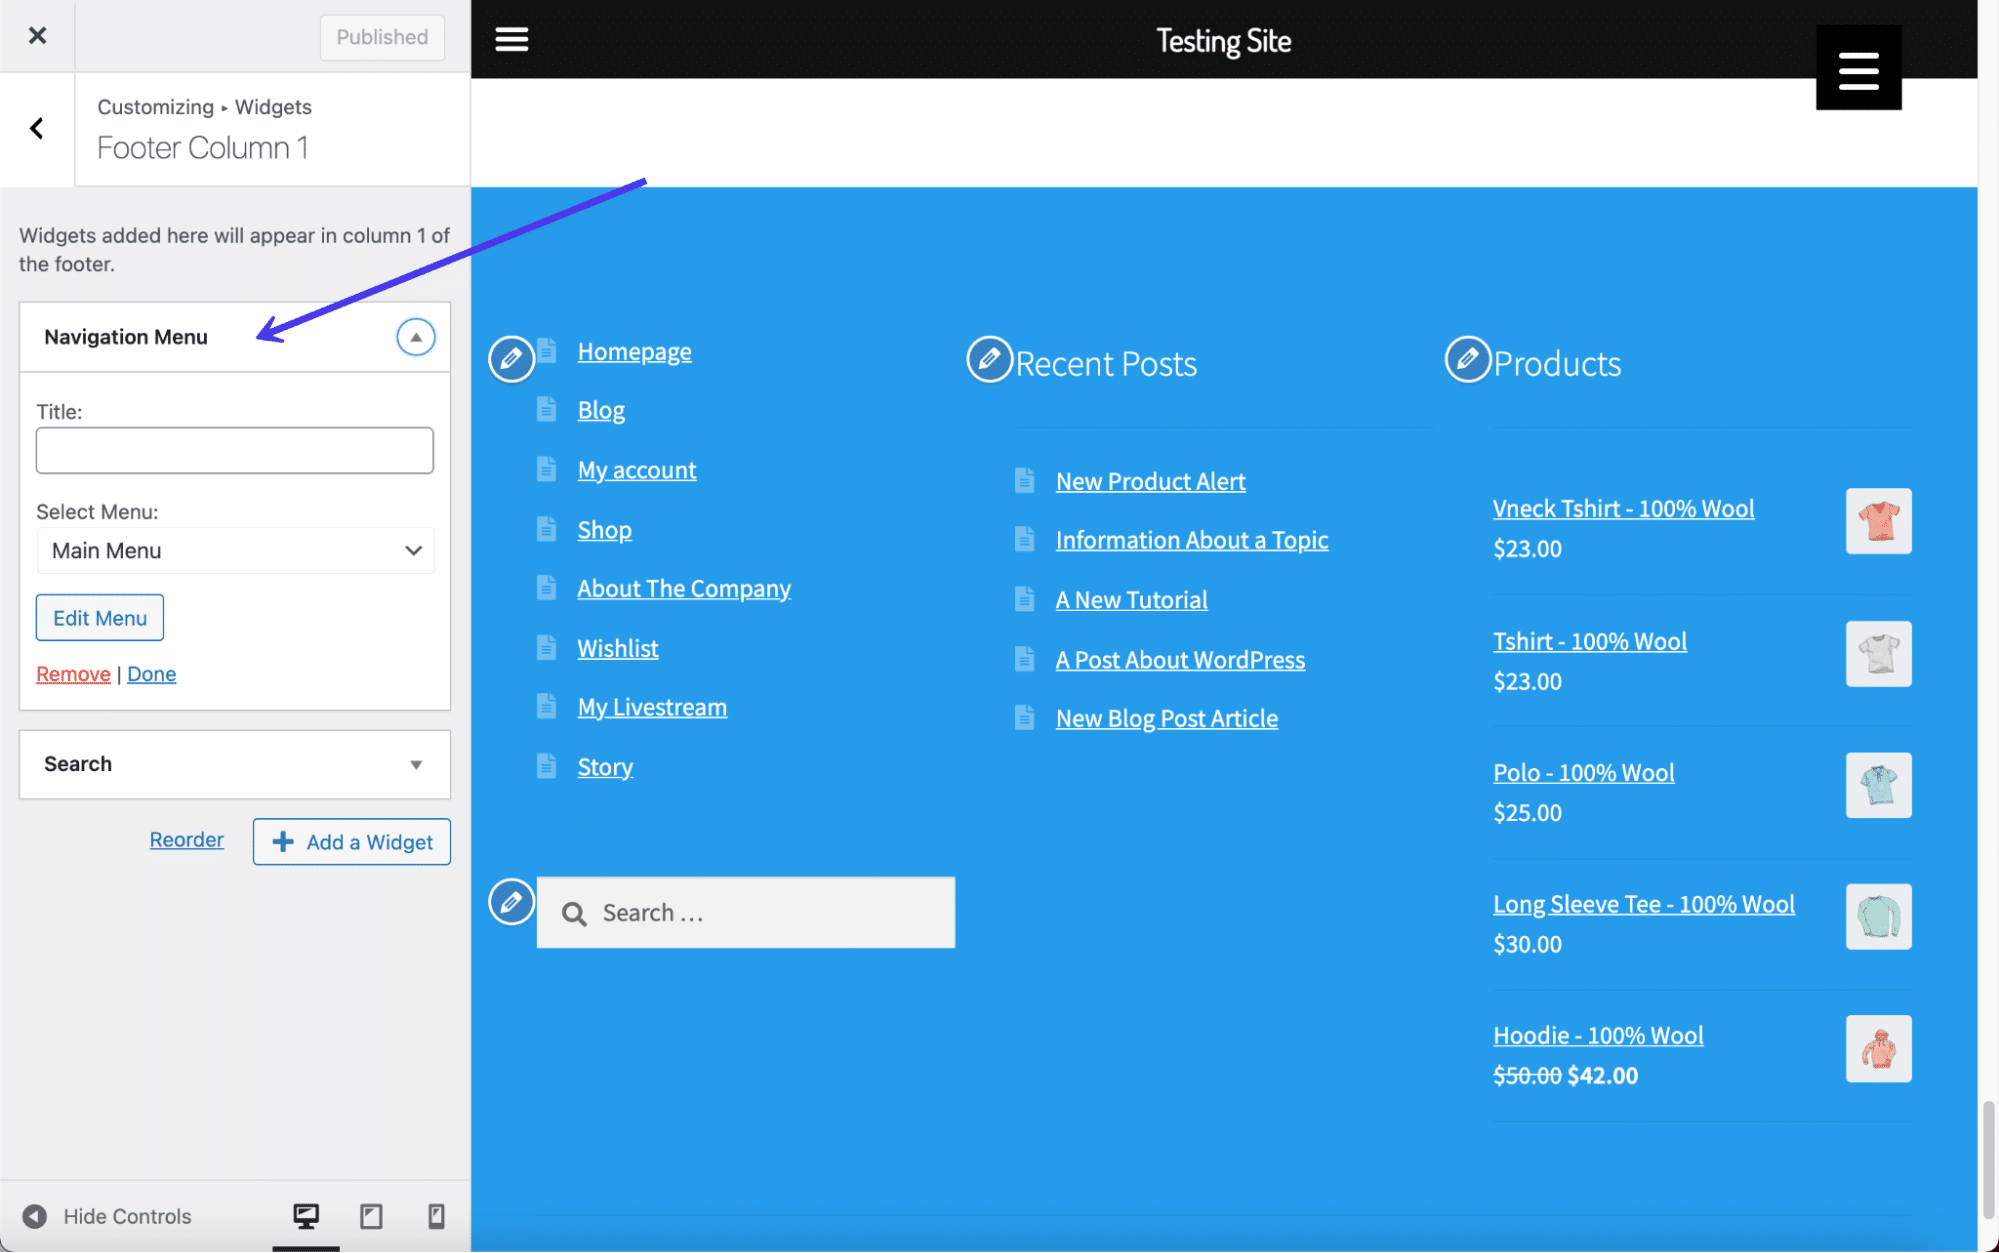
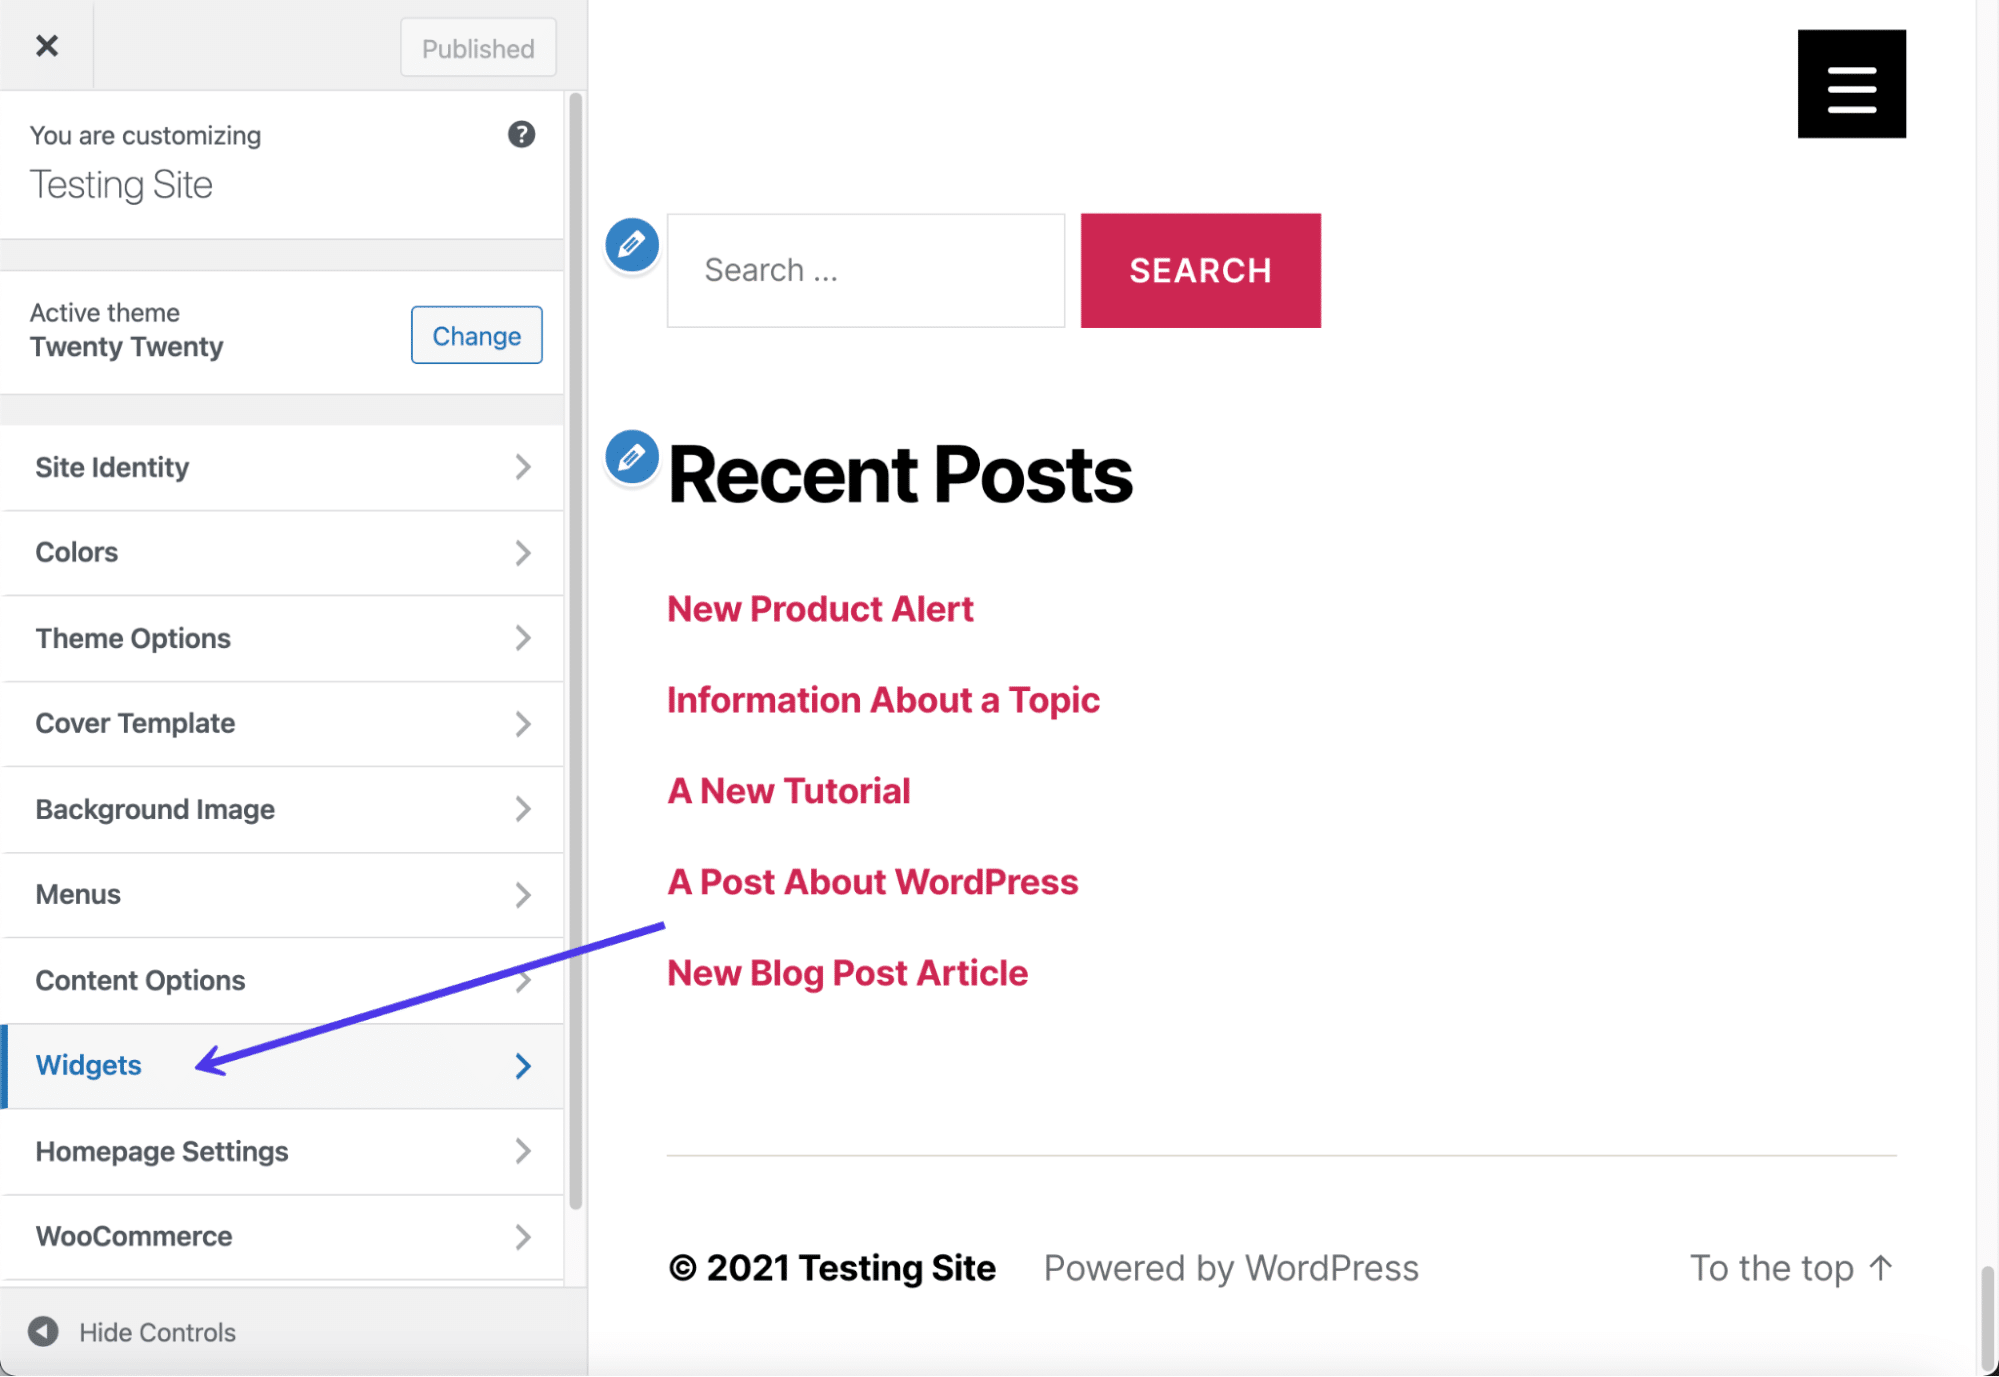
One solution to edit the footer content material is by means of including widgets. WordPress widgets have many purposes, together with a number of places for them to head, together with the sidebar and footer, supplied your theme helps that.
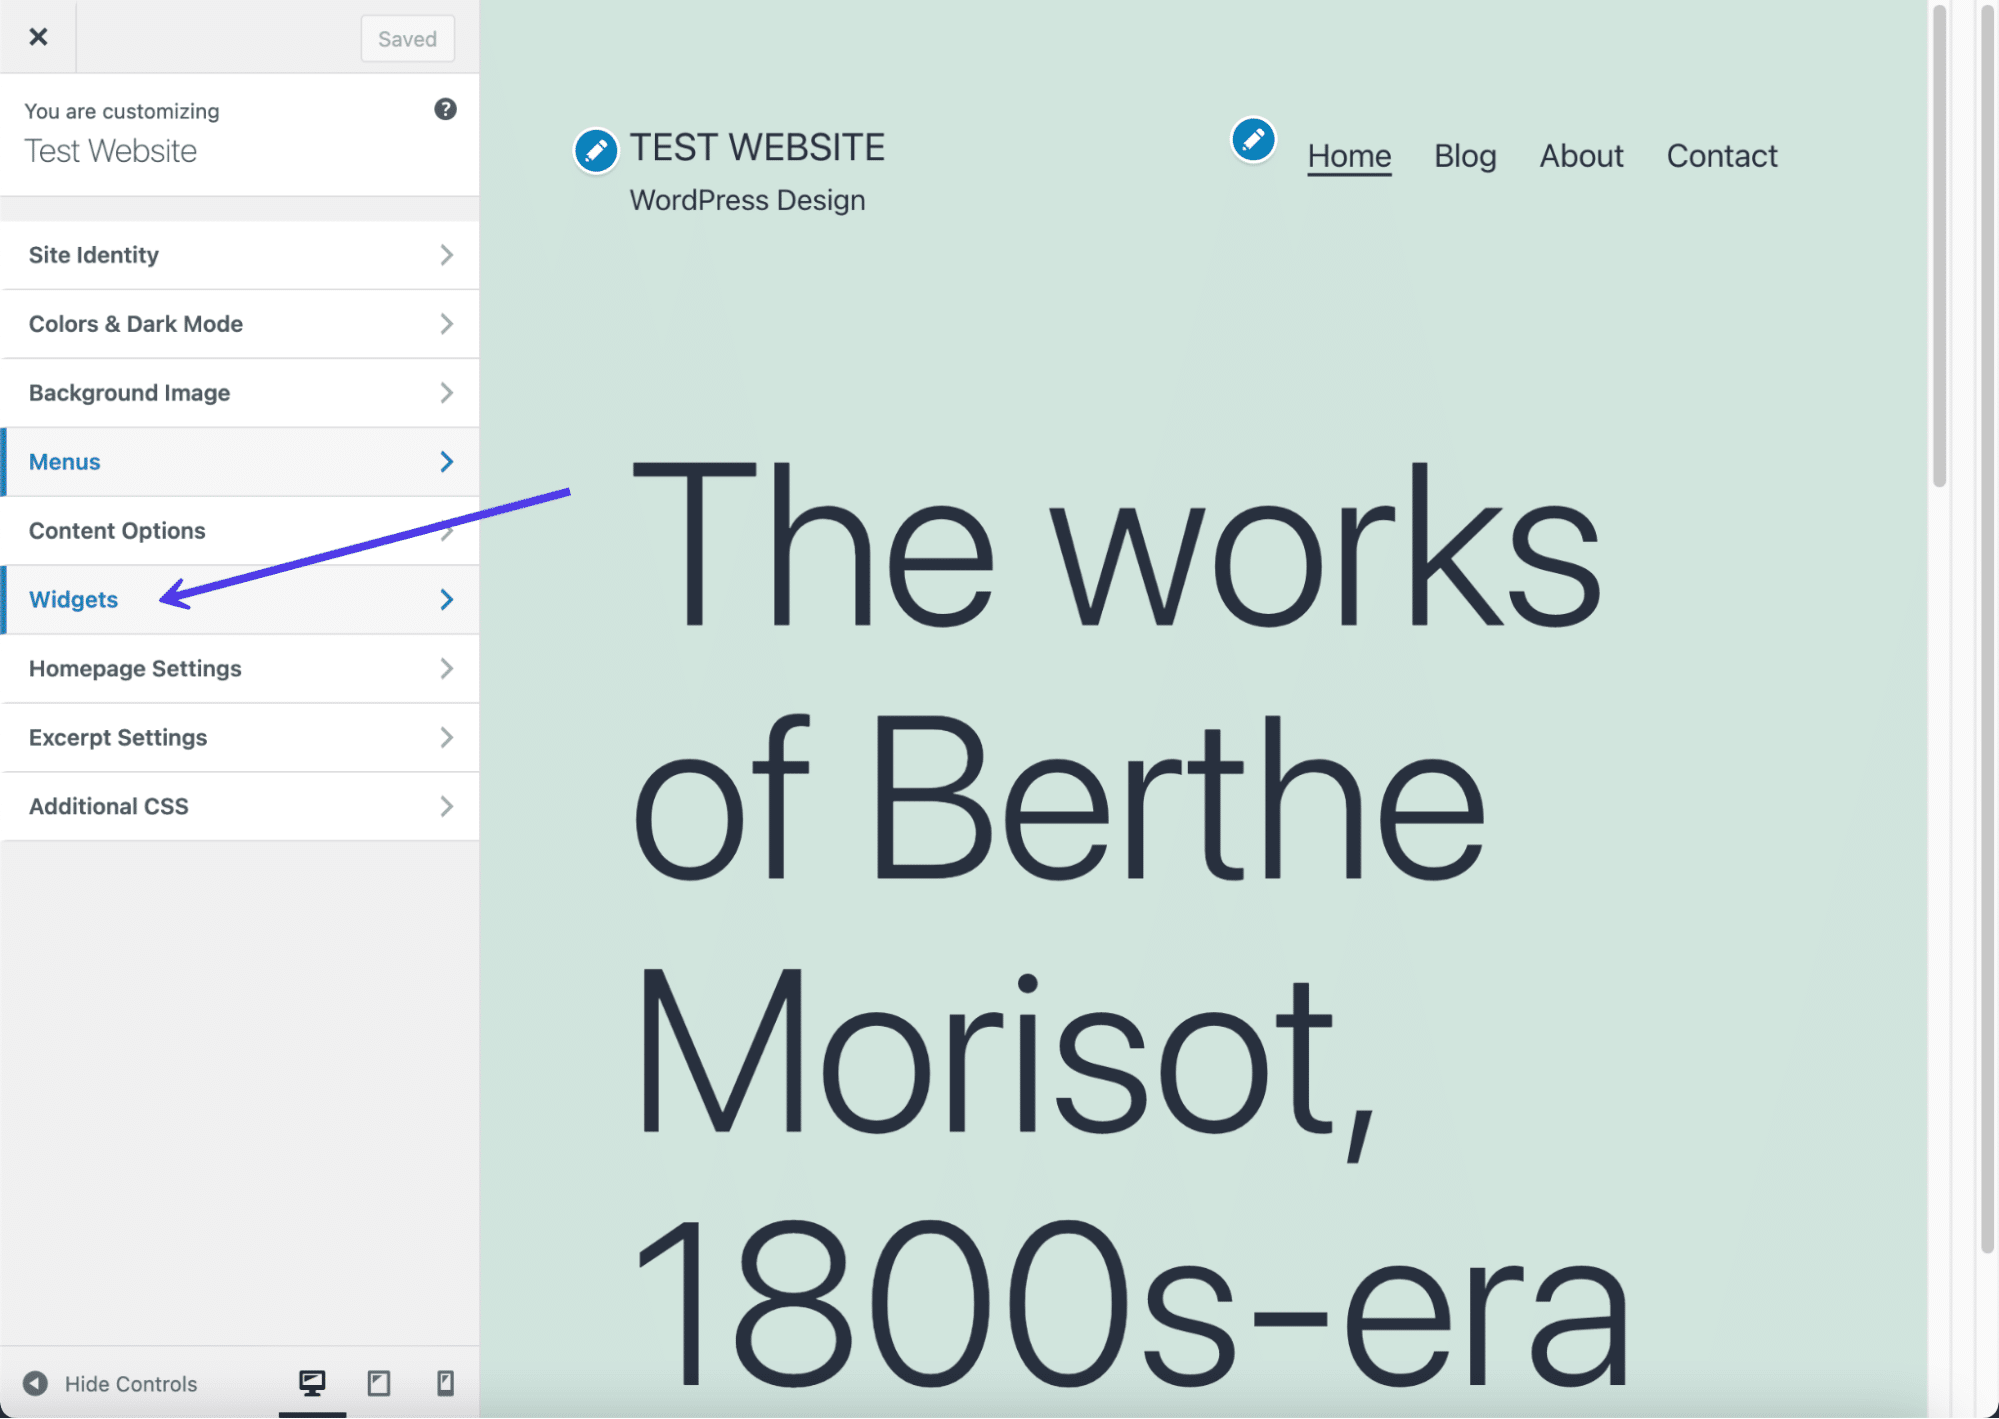
Again within the WordPress Customizer, search for the Widgets tab.

The Widgets tab.
Peruse the record of spaces to place widgets on your website. You may even see choices for areas just like the sidebar, best menu, and backside menu. With a bit of luck, your theme additionally contains the footer as a space to position widgets. If no longer, there are different ways to edit your footer, despite the fact that should you’d moderately pass with widgets, believe switching to another theme that permits for widgets throughout the footer.
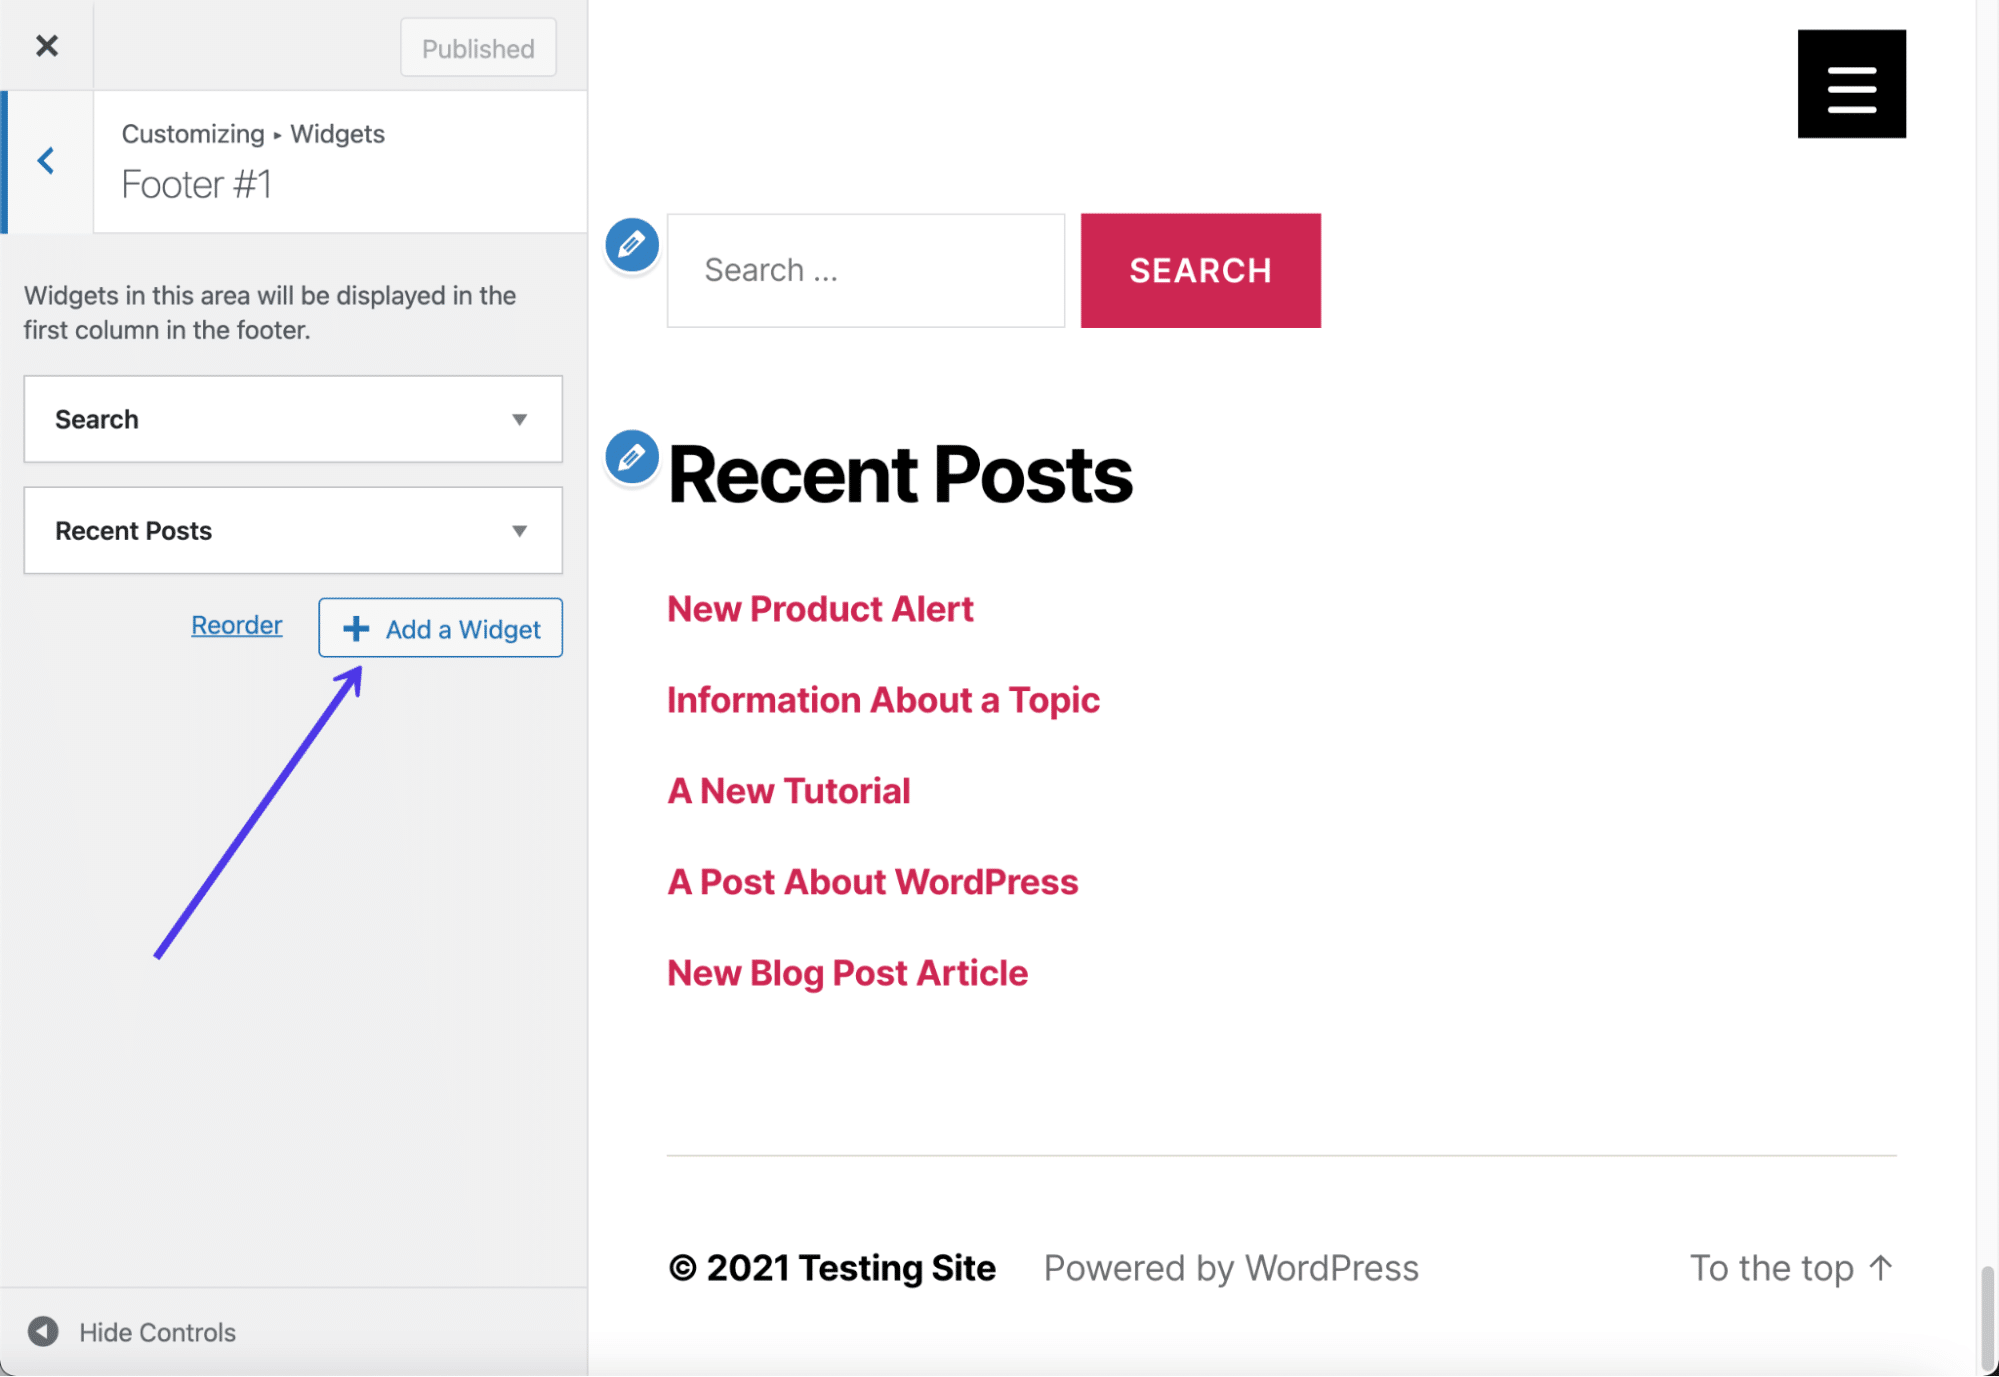
This theme if truth be told supplies 4 widget places within the footer, organized in 4 columns stacked aspect by means of aspect to make an exquisite layout that matches as a lot content material throughout the footer as imaginable.
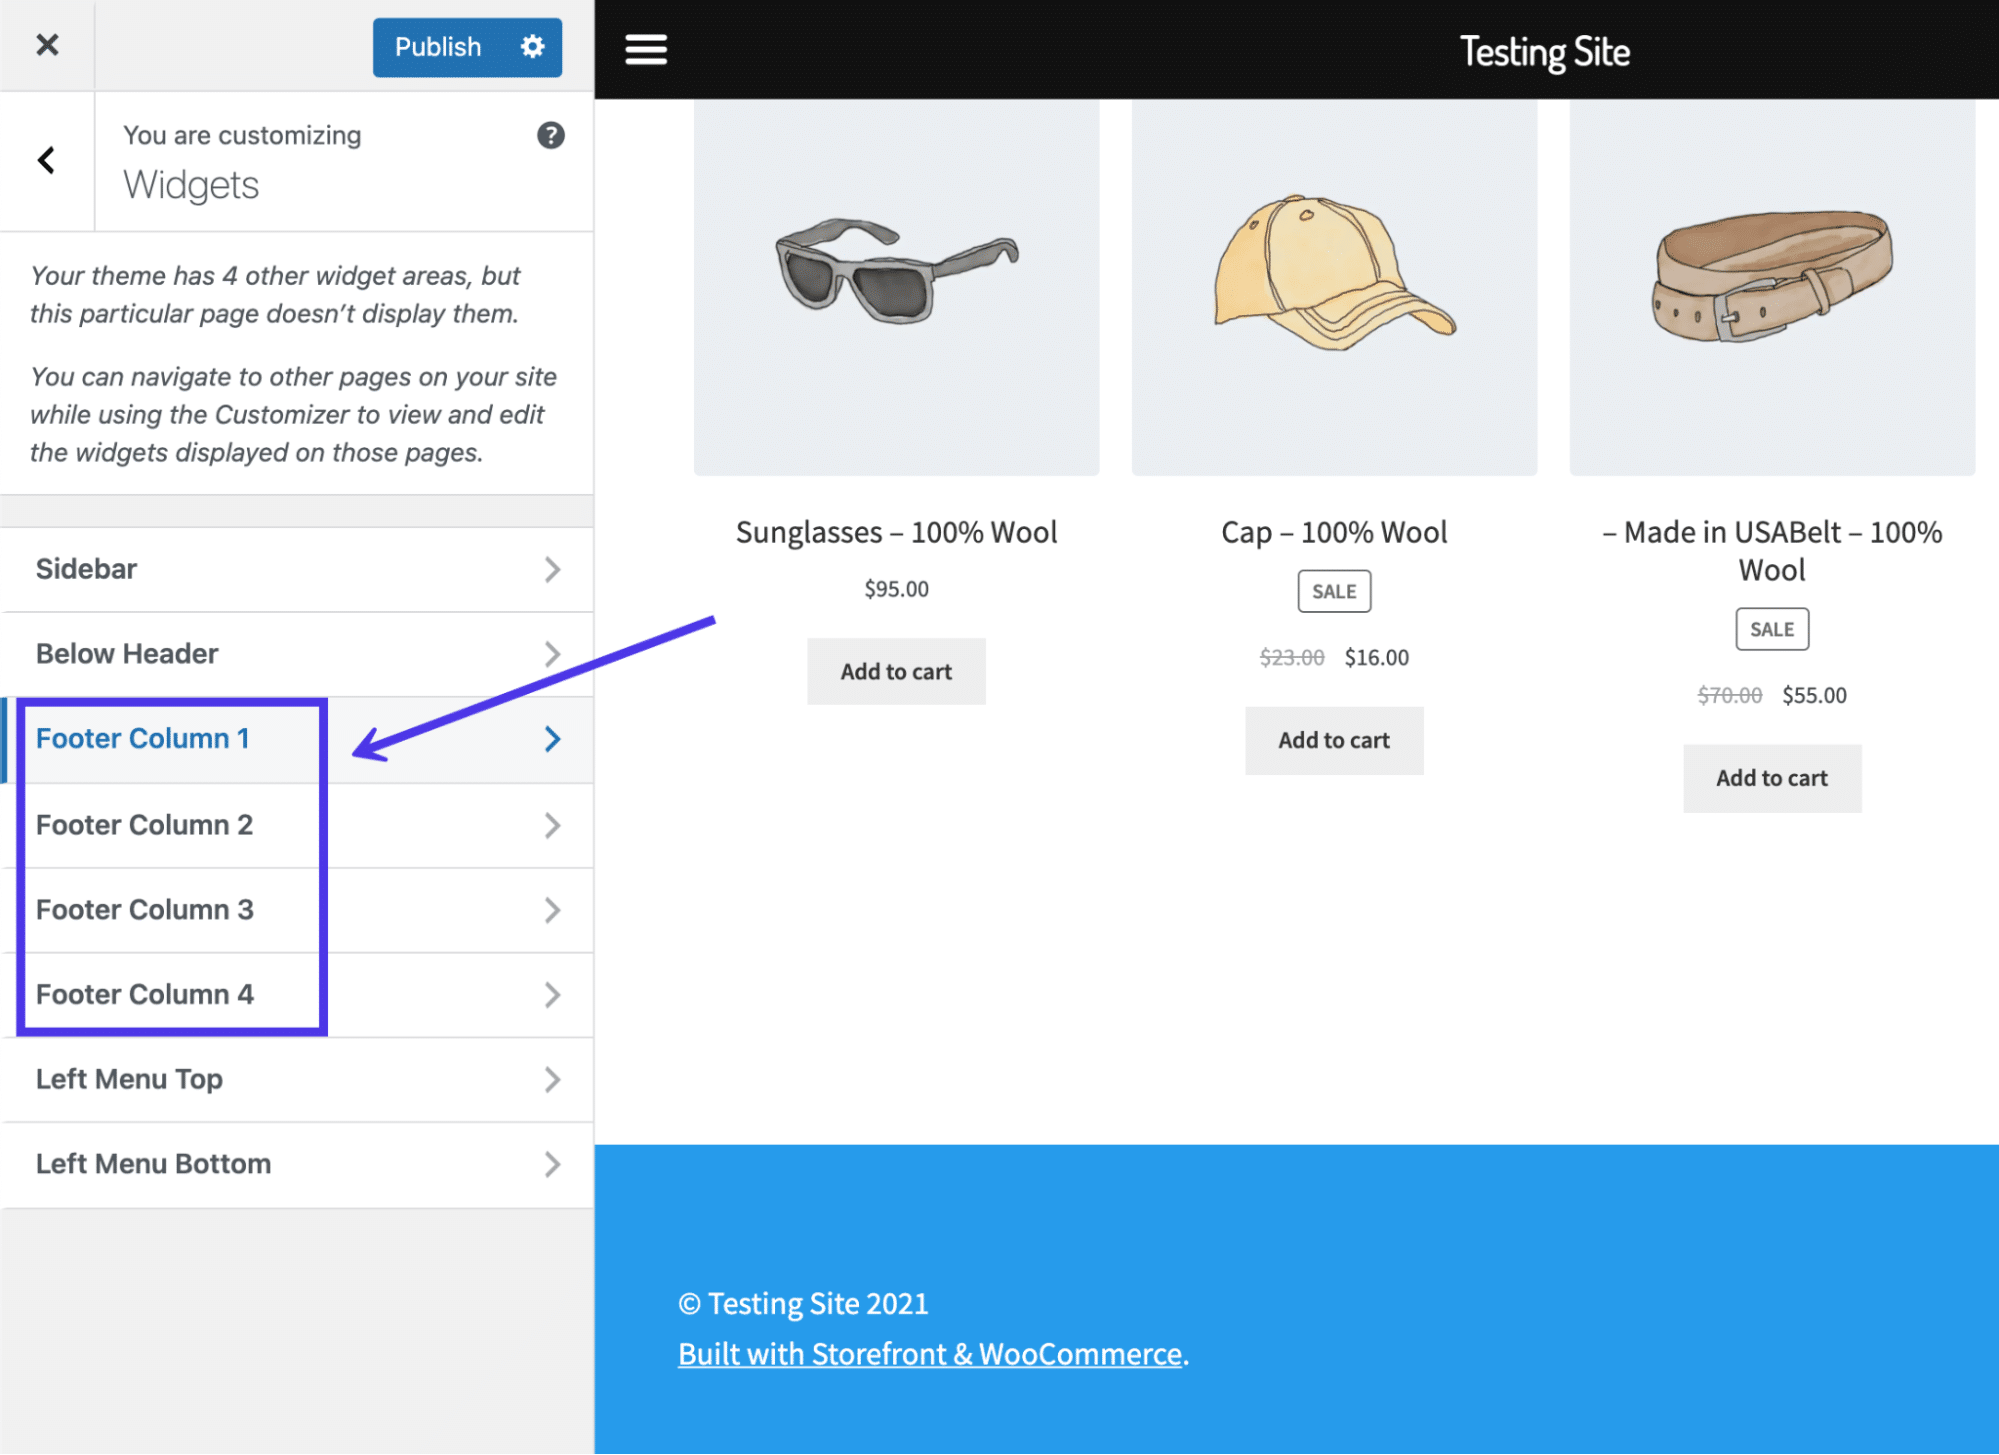
Make a selection a footer column.
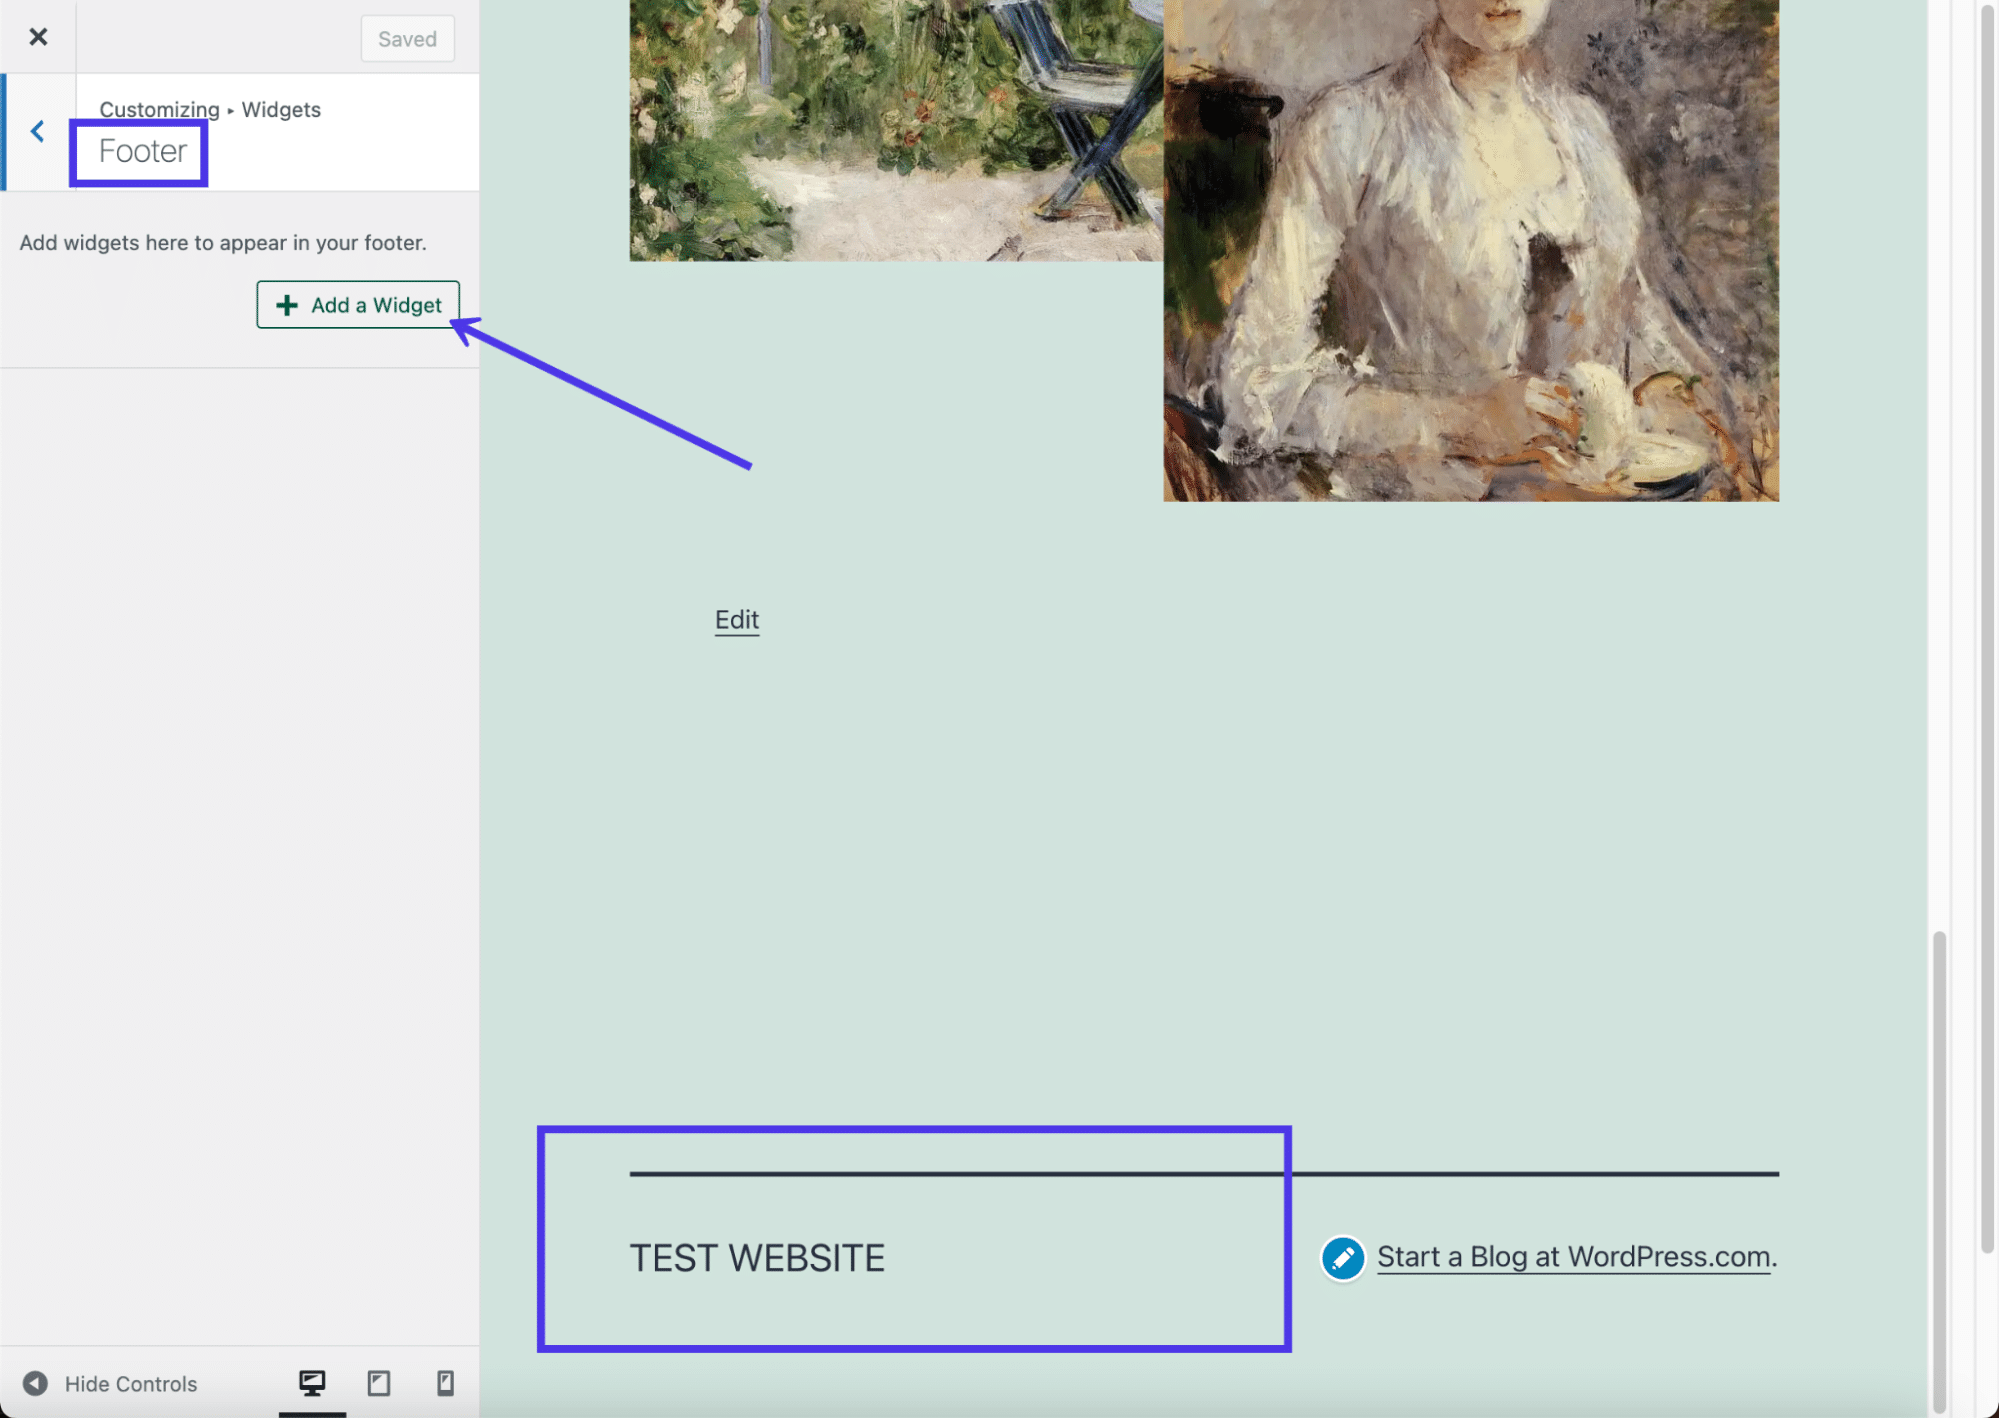
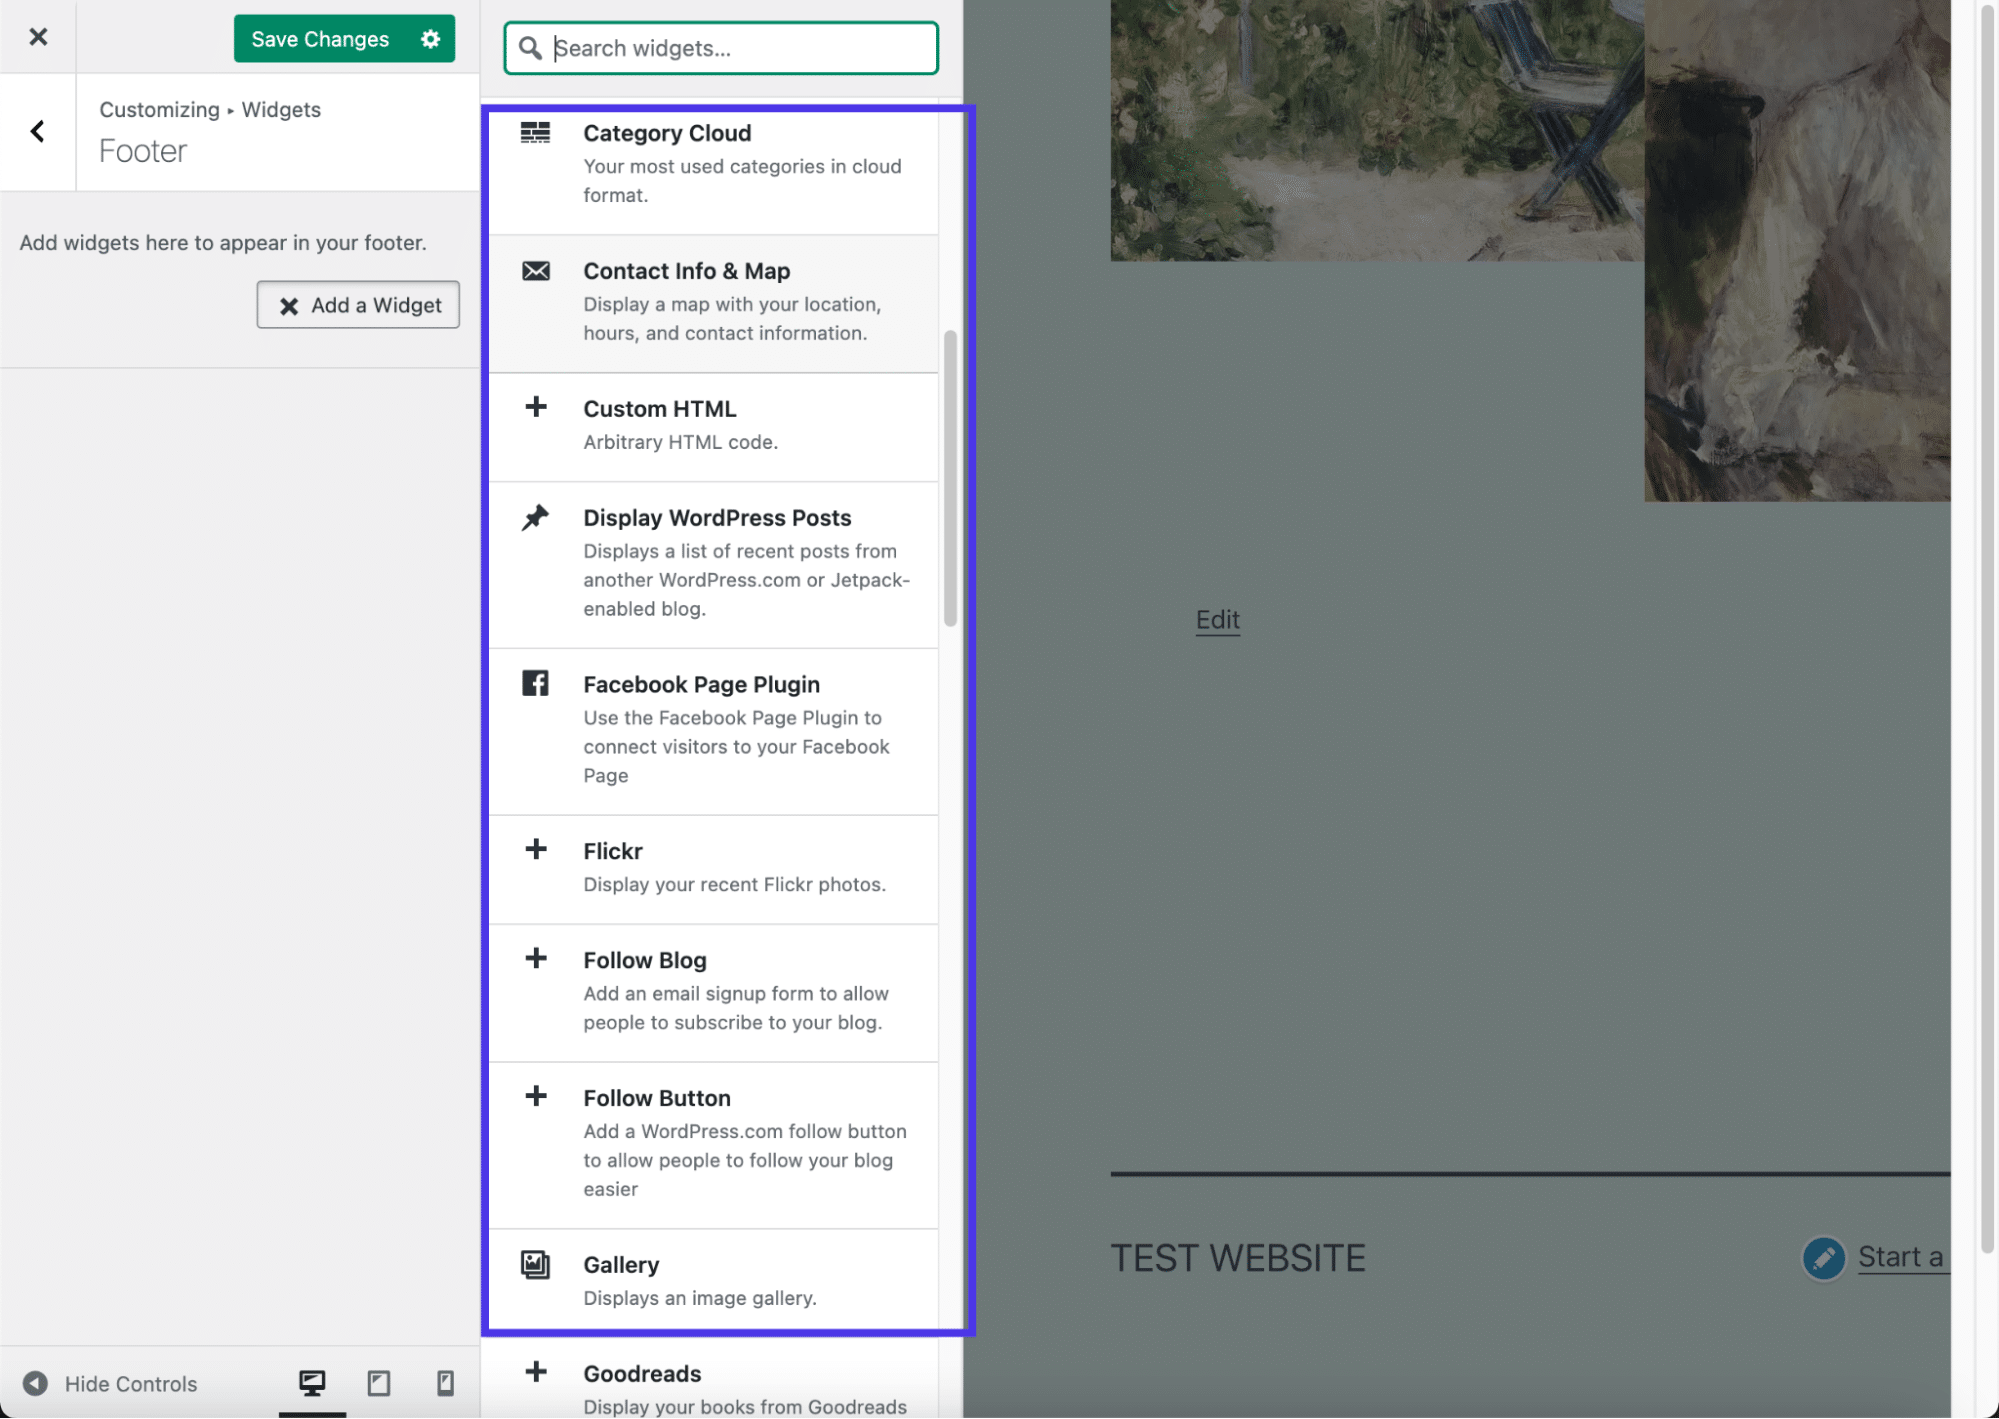
Click on on any of the footer widget places to expose a space to Upload A Widget. Click on on that button to turn a slideout view of all to be had widgets on WordPress and the theme. As soon as once more, you may even see an absolutely other set of widgets, taking into account some topics come with their very own widgets, or you will have installed an extension or plugin so as to add extra widgets in your dashboard.
Commonplace widgets vary from Archives to Audio and Customized HTML to Product Filters.
All it’s important to do is make a selection the widgets so as to add to this actual widget space. They’ll display up at the left-hand aspect so that you can reorganize and configure their particular person settings.
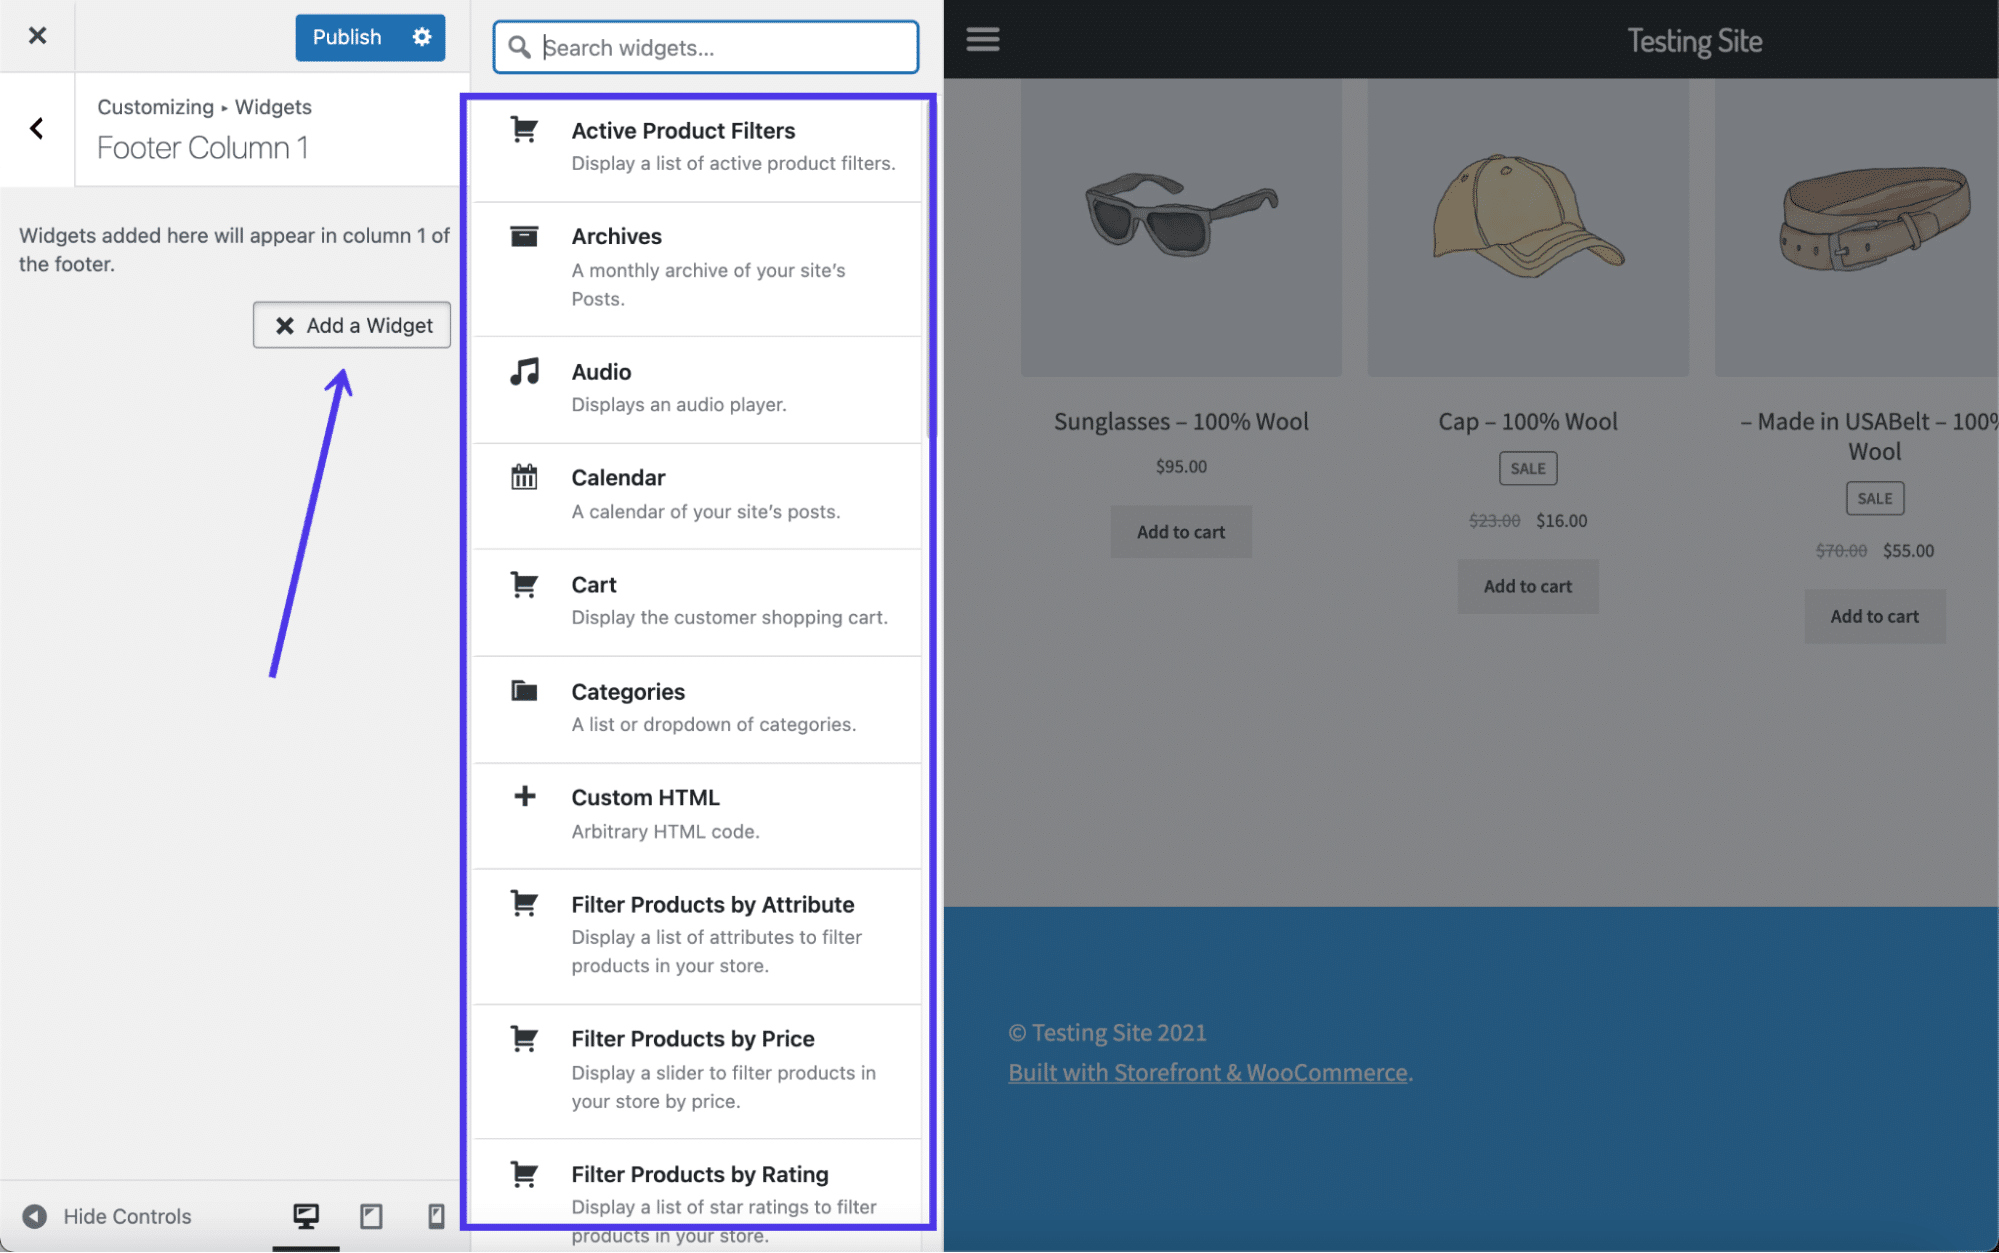
Scroll in the course of the record of widgets.
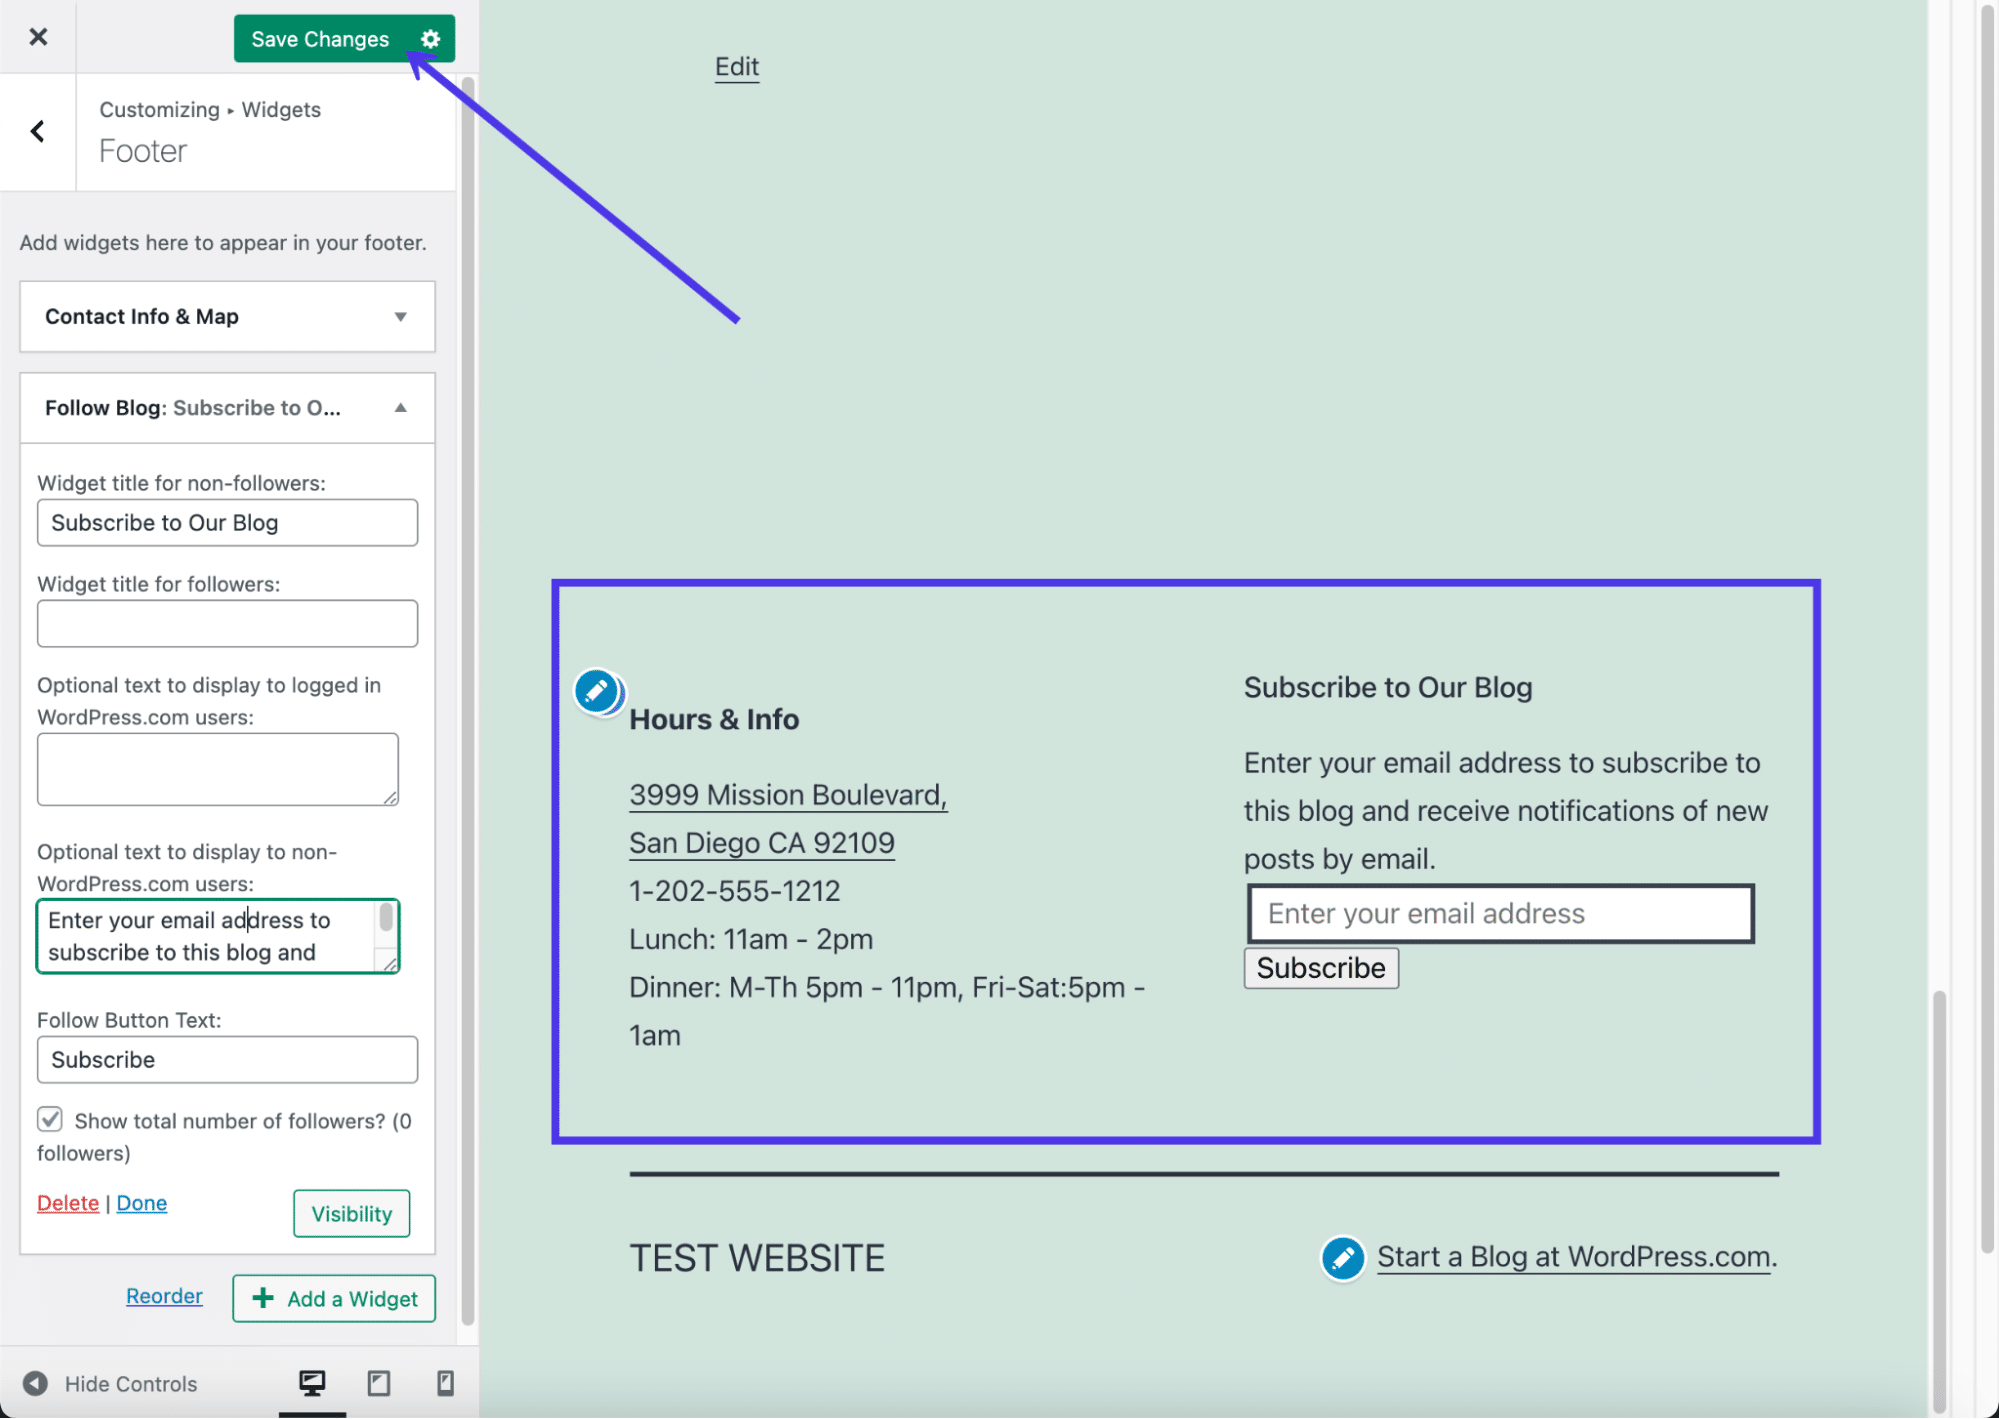
After some fast paintings, we’ve positioned a number of widgets in 3 of the footer column modules, together with a prime menu, an inventory of latest posts, and among the merchandise from our store. You’ll additionally realize we added a seek bar to make navigation a bit more uncomplicated for our customers.
One essential space to notice is the widget settings segment. Each and every widget has its personal settings at the left, so remember to stroll thru the ones fields and lead them to glance precisely as you wish to have.
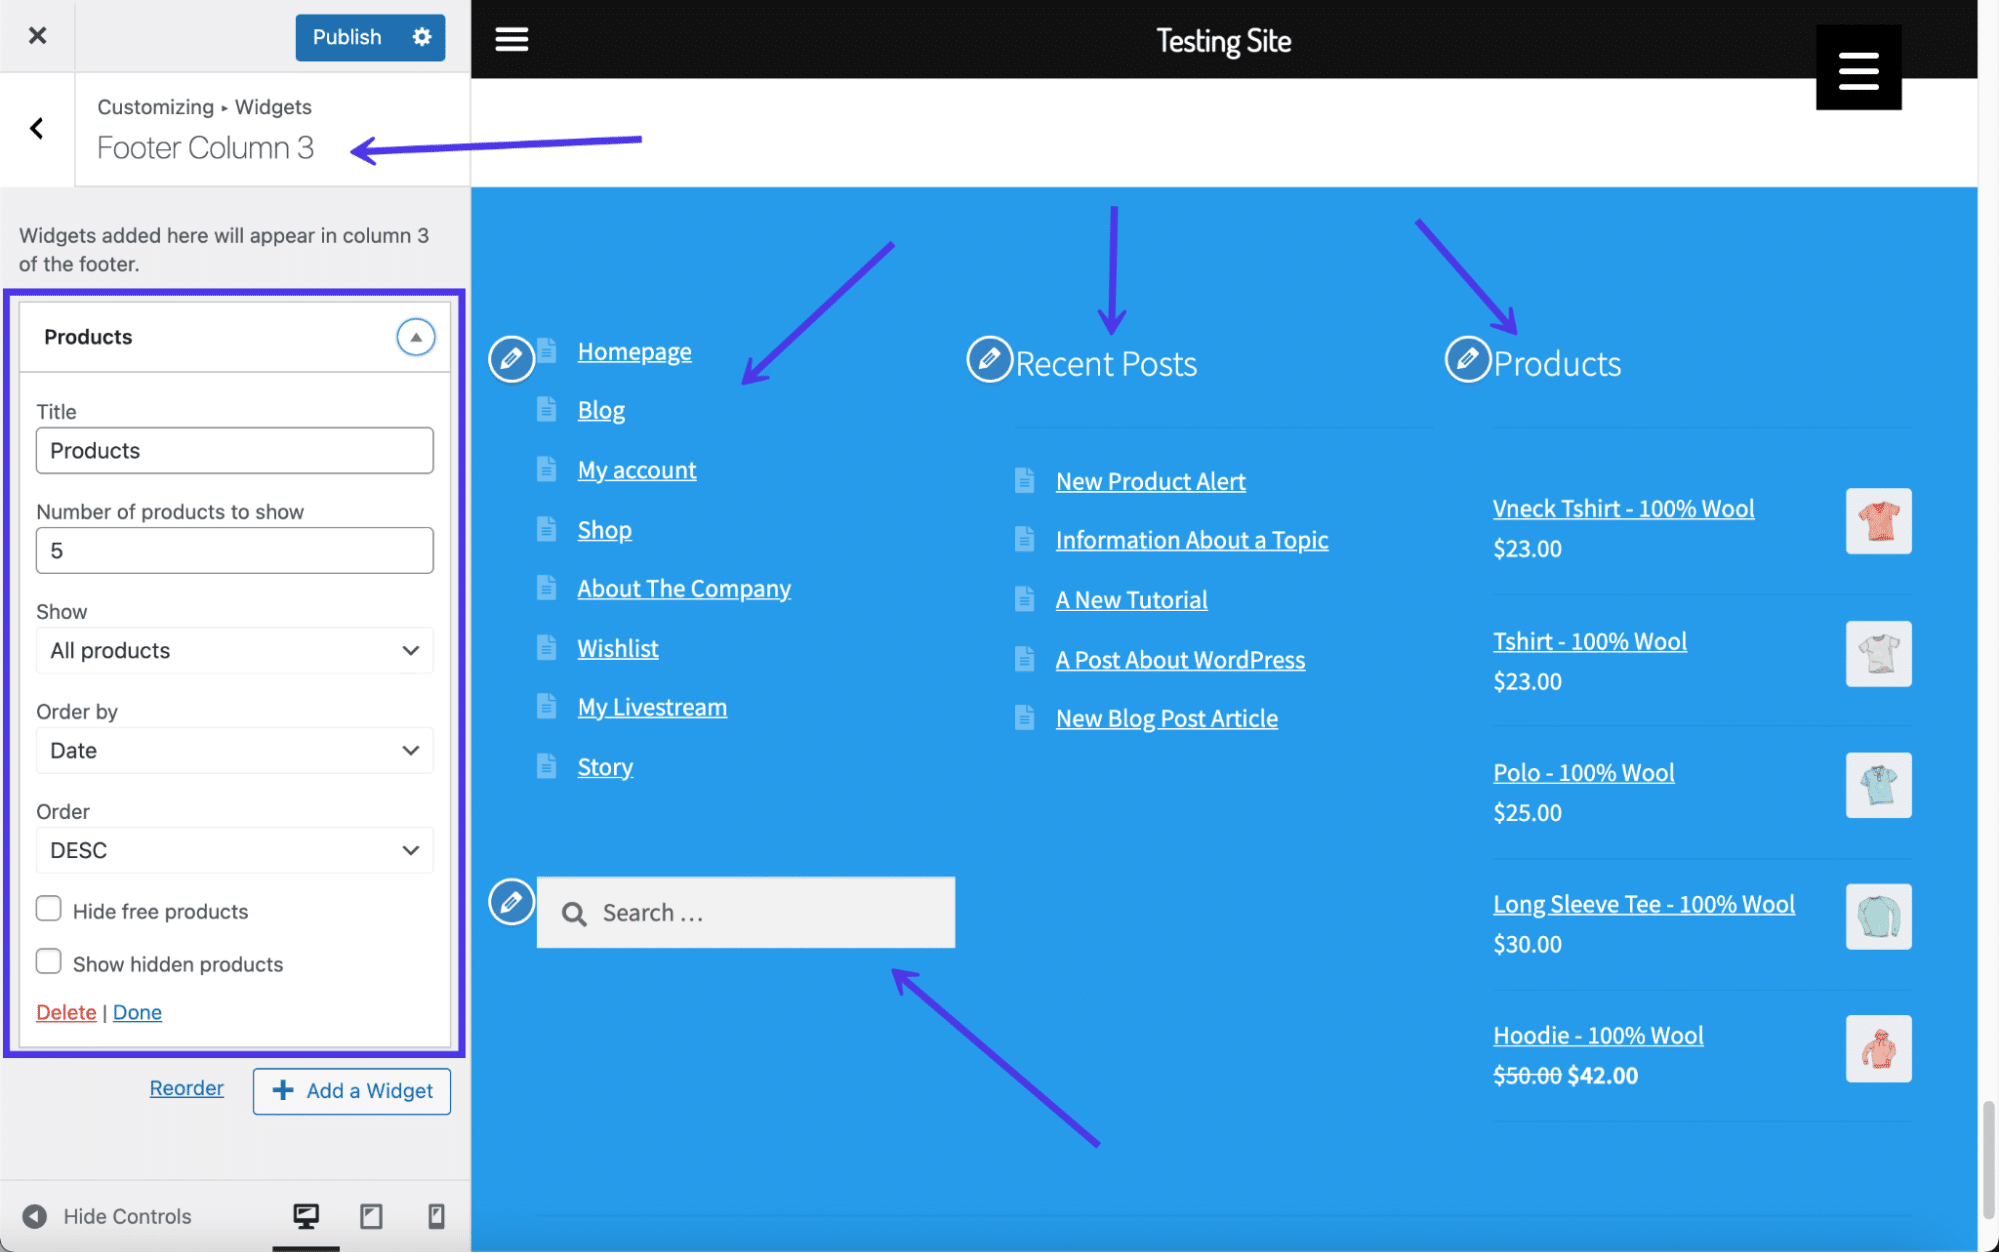
A finished WordPress footer with a number of widgets.
As it’s possible you’ll be informed whilst surfing in the course of the theme settings, no longer all topics have tactics so as to add menus at once to the footer space the usage of the usual Upload Menu atmosphere. Our theme right here, as an example, has spots to turn on menus as number one, secondary, hand held, and cellular menus, however not anything for footers.
We’ll duvet menus within the subsequent segment, however we would have liked to provide an explanation for a handy guide a rough workaround so as to add a menu with a widget, simply if your theme doesn’t enhance menus in the standard approach.
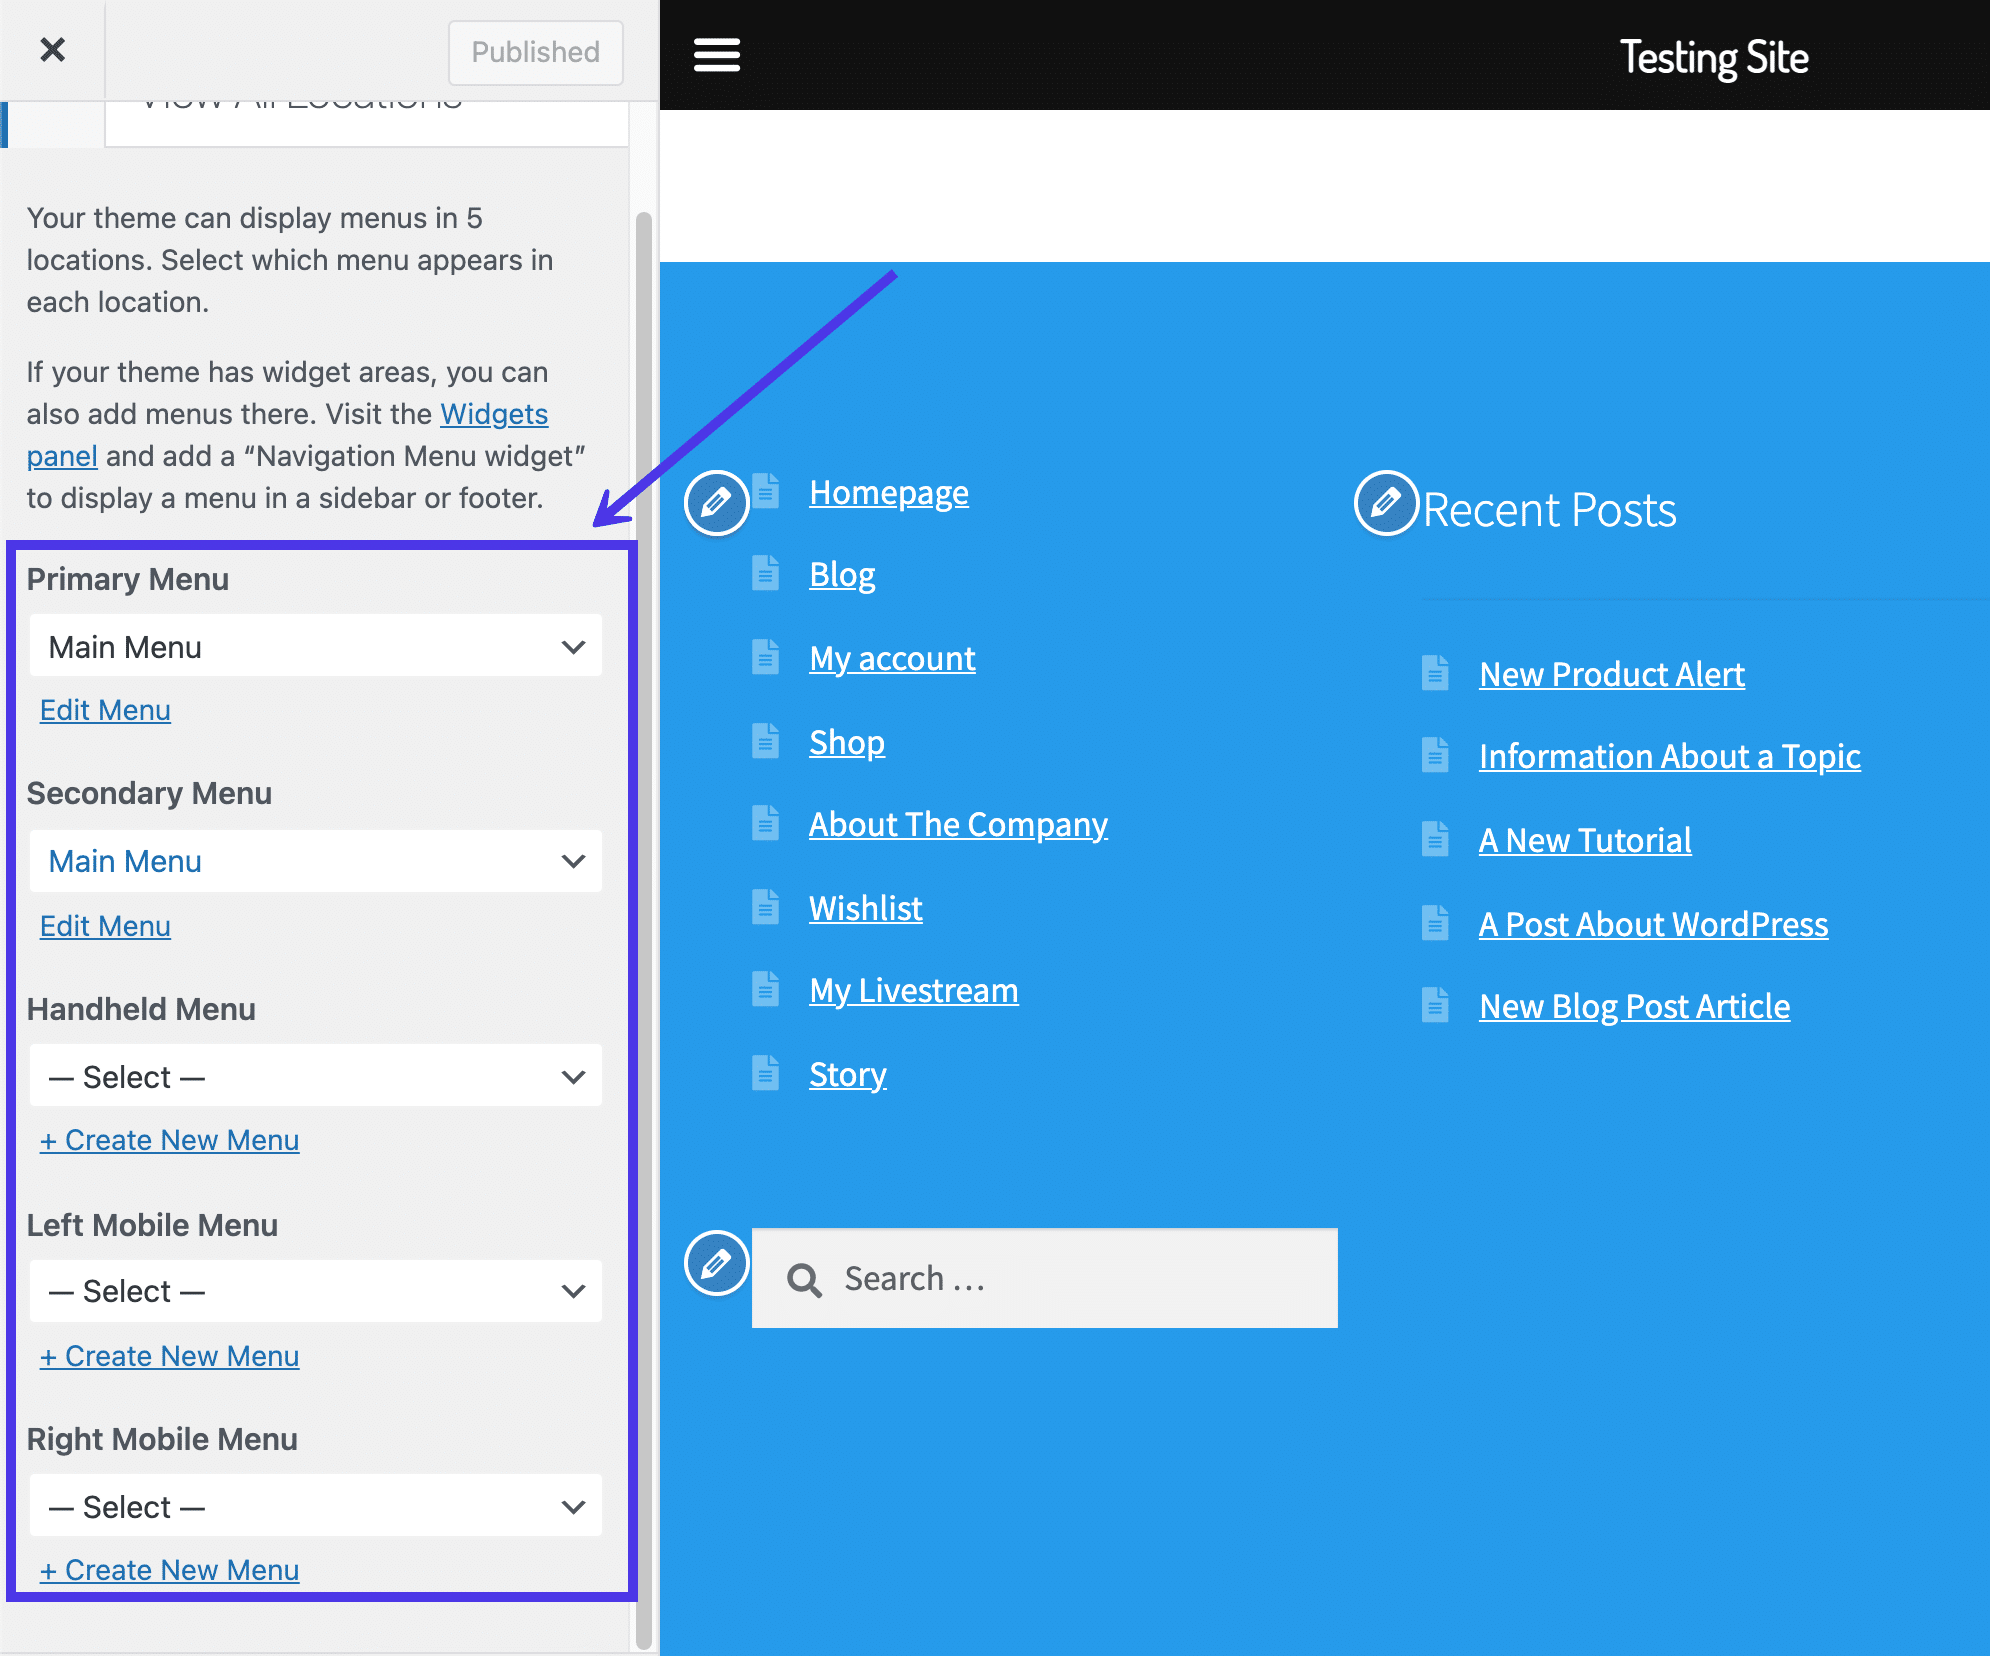
Some topics don’t have spots to position menus in footers.
Necessarily, all it’s important to do is pass to certainly one of your widget footer modules and seek for the Navigational Menu widget. Right here, you’ll be able to click on on a dropdown box to view all created menus in your site. Be at liberty to generate a menu particularly in your footer (within the Menus segment of the dashboard) and upload it as a widget on this segment.
Instead, go for the principle menu, or no matter menus you’ve created. They must all display up within the menu widget dropdown.
After that, the menu of your selection presentations up within the footer, so long as you’ve added the Navigational Menu widget in the correct footer space and clicked the Submit button. You’ll even kind in a identify for that menu should you’d like to provide an explanation for what the next hyperlinks comprise.
A Navigation Menu widget.
Many WordPress widgets be offering pre-configured lists of content material, just like the Fresh Posts widget or the Seek Bar.
Then again, occasionally it’s possible you’ll need to edit the WordPress footer to incorporate totally customized content material, comparable to easy textual content, pictures, or a bit of of code, to create one thing totally new.
WordPress supplies a widget for each and every of those.
All that’s required is to visit the Theme Customizer > Widgets. Then, make a selection the widget space that displays the place you wish to have the widgets to head within the footer.
Click on at the Upload A Widget button and seek for “picture”.
Upload the Symbol widget and customise the identify. Click on on Upload Symbol, then believe together with a hyperlink to the picture as smartly. You’ll edit the picture length by means of clicking on Edit Symbol.
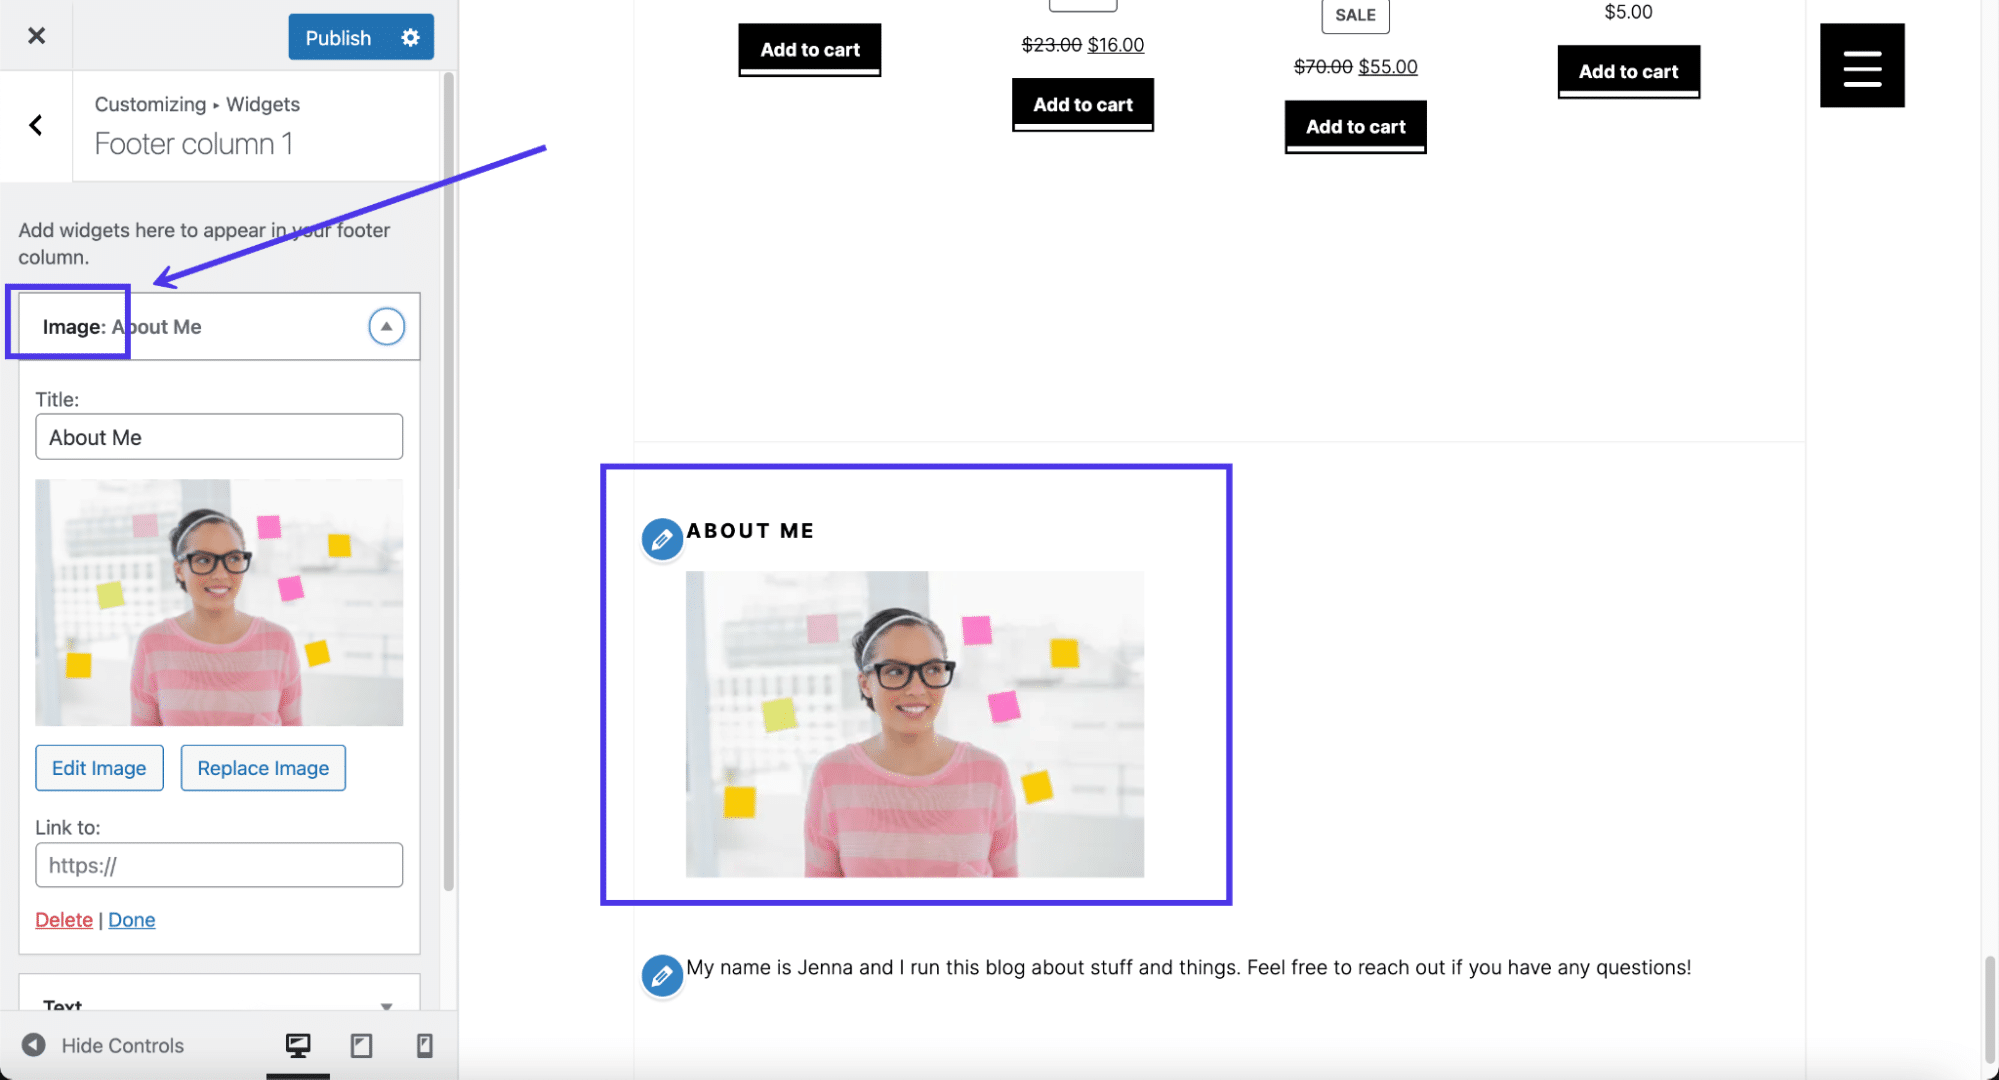
The Symbol widget.
Subsequent up, seek for “textual content” within the widget library.
Upload the Textual content widget in your footer and sort in anything else you wish to have. It additionally has a identify box together with a visible editor, just like you obtain when creating a weblog publish or web page in WordPress. We’ve attempted placing pictures in the course of the Textual content widget (because it’s technically imaginable) however many topics don’t permit it.
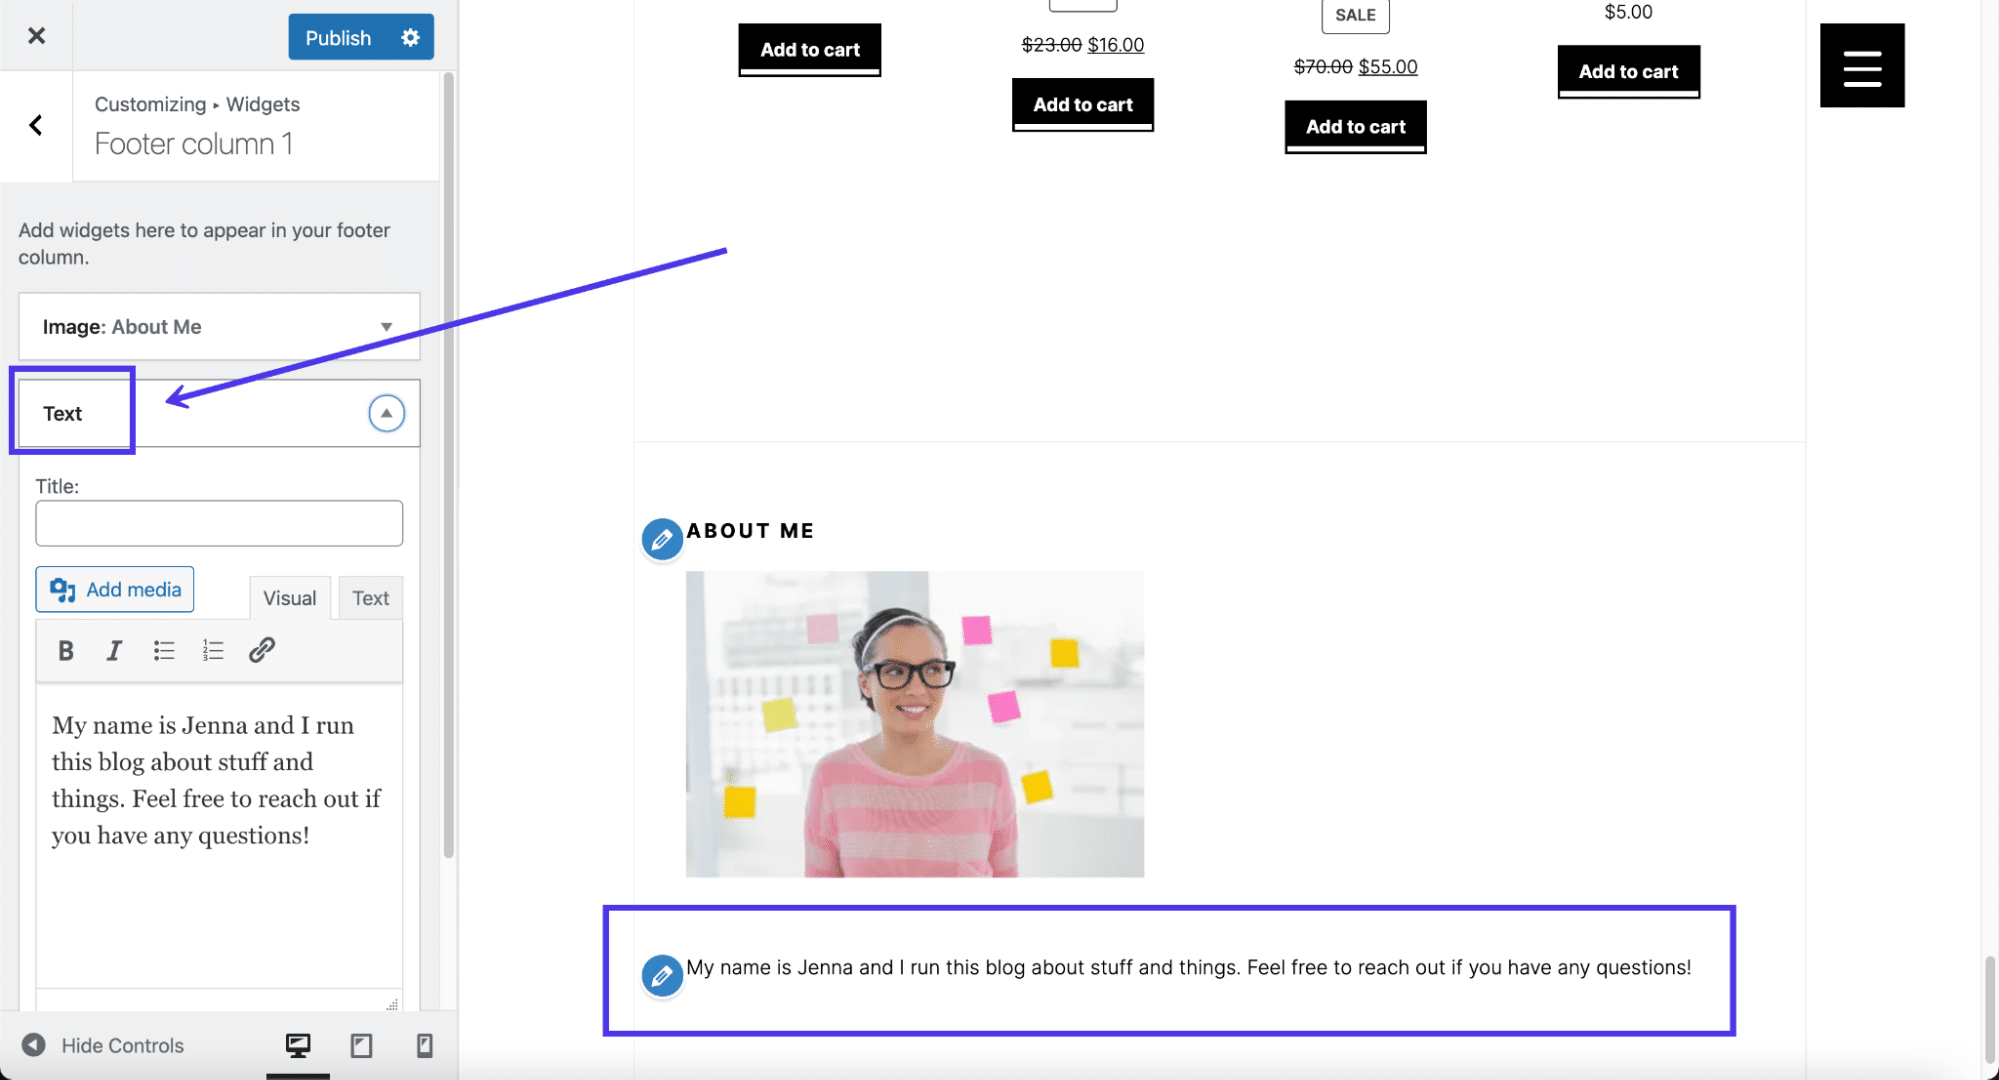
The Textual content widget.
In the end, it’s possible you’ll to find that the usage of a Customized HTML widget is the most efficient plan of action, particularly if you wish to have complete keep watch over over the footer design or to include a novel design for one thing like an e-mail signup shape.
For that, seek for “HTML” within the widget library and make a selection the Customized HTML widget.
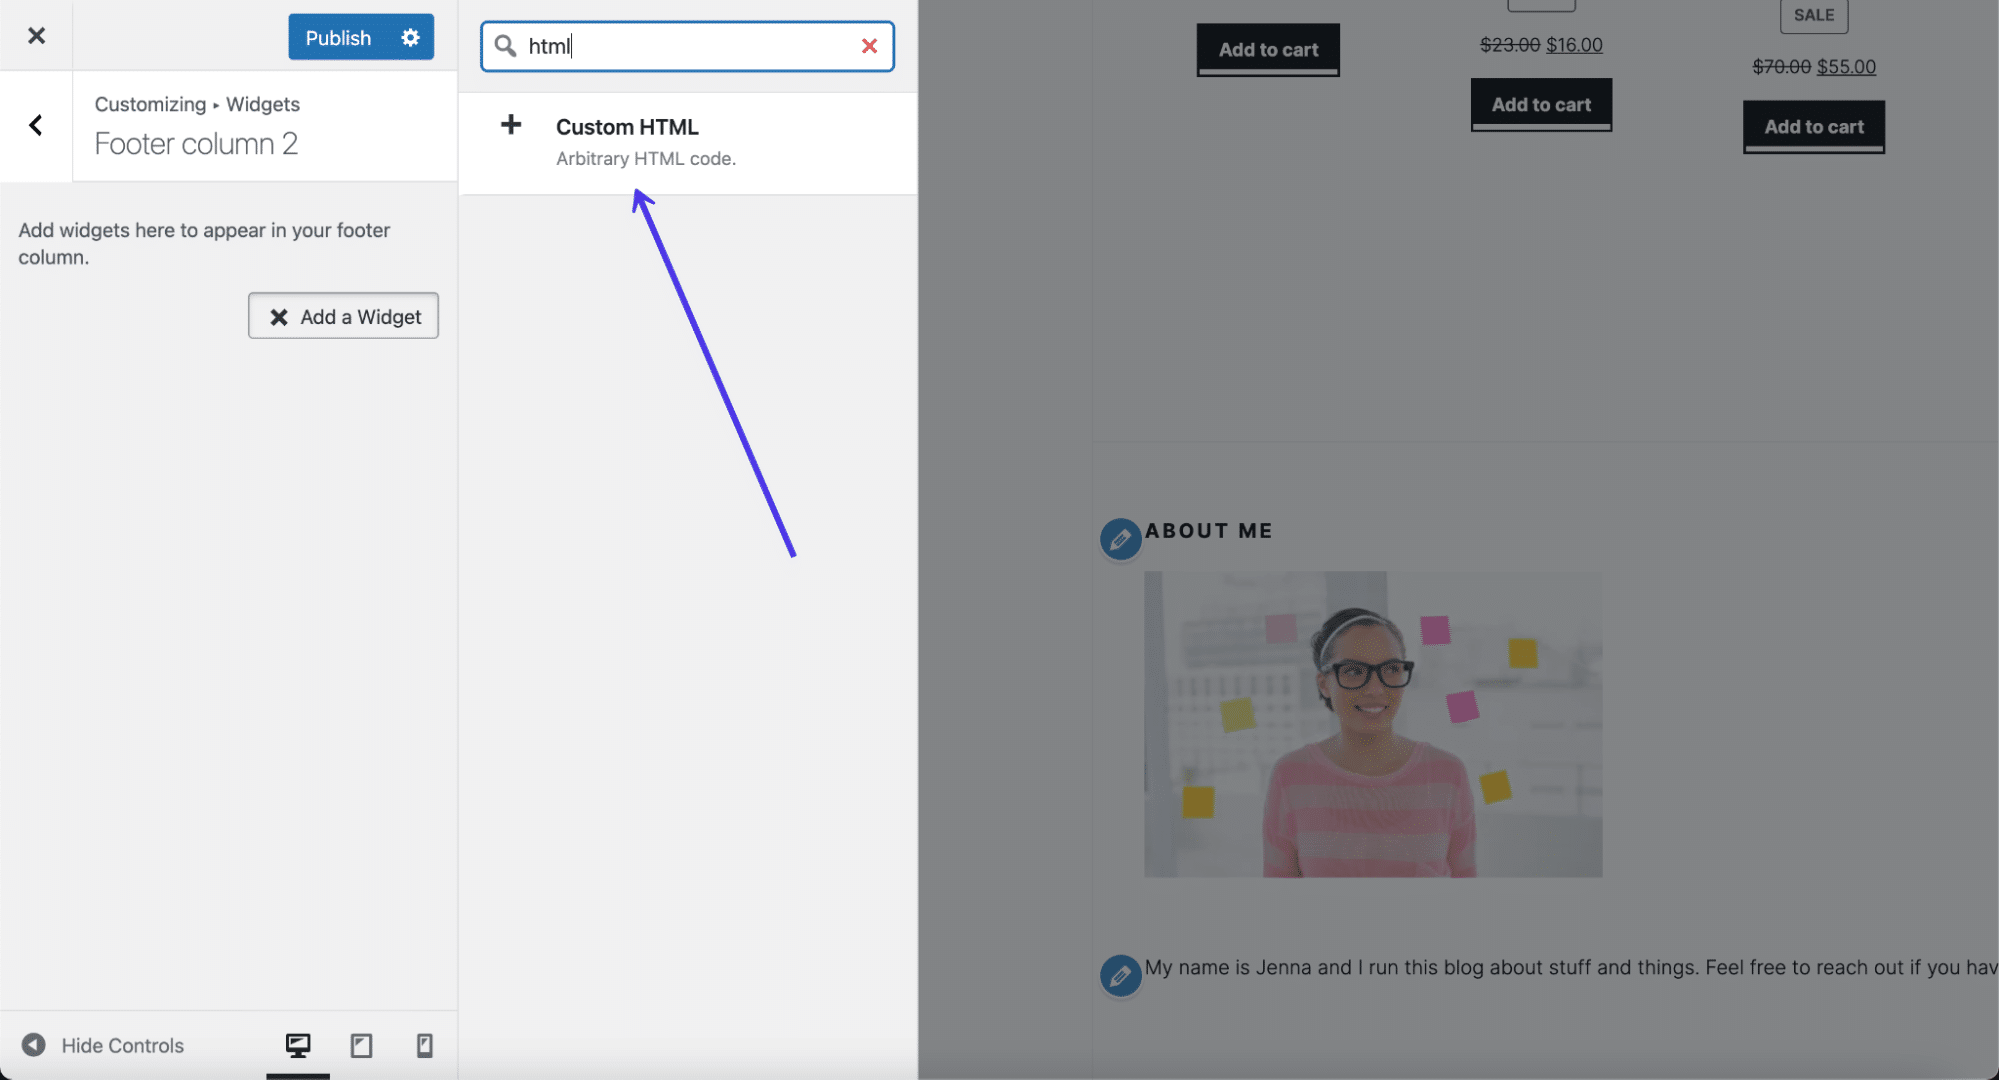
The Customized HTML widget.
Paste or type in your custom HTML and regulate the right-side preview to verify it appears how it’s intended to. You may additionally need to add some CSS styling to make it seem the way in which you wish to have.
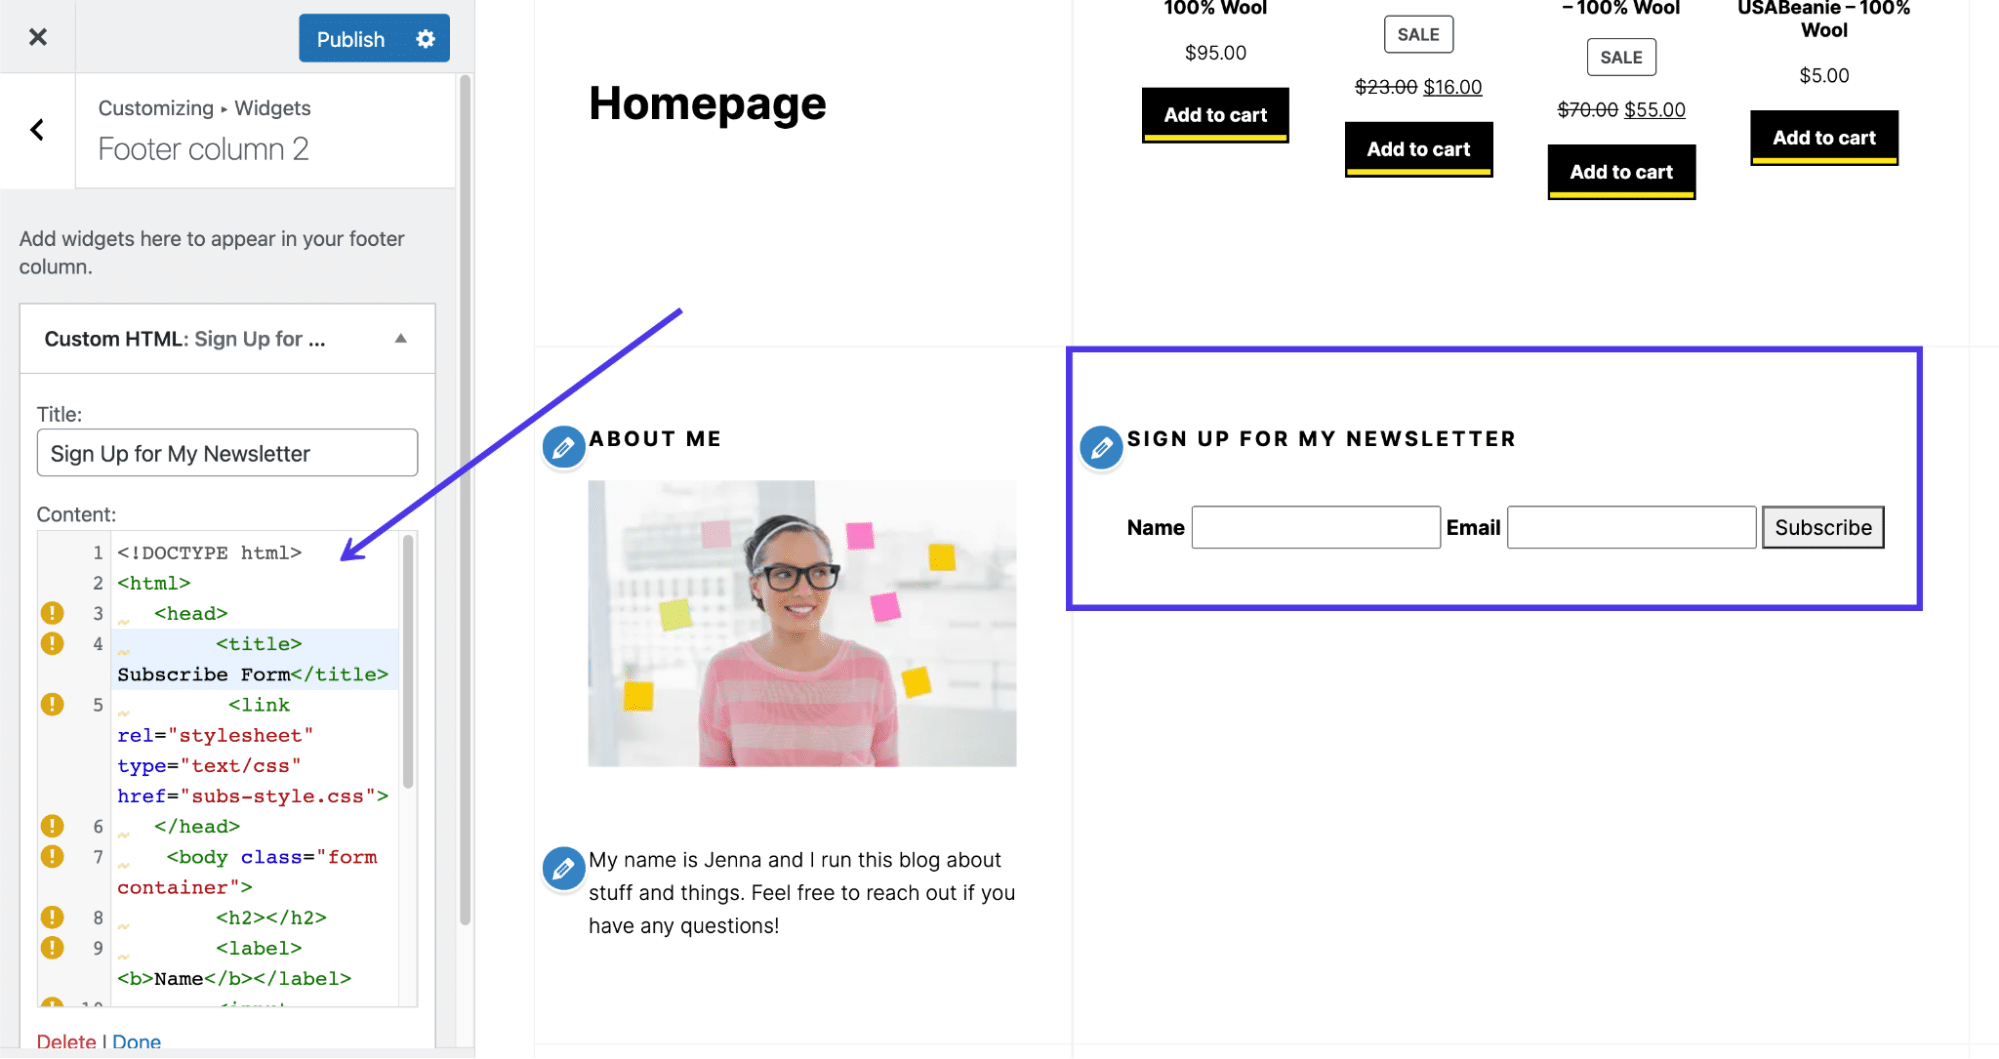
Paste HTML code into the widget.
As all the time, take note to click on the Submit button on the finish.
You’re making menus in WordPress by means of going to Look > Menus. Whenever you’ve established a menu, it’s able so as to add, no less than the places supported by means of your selected theme.
It’s additionally imaginable to create your menu inside the WordPress Customizer, so it simply is determined by the place you’re feeling maximum relaxed including new pages and hyperlinks in your menus.
As a reminder, no longer all WordPress topics permit for menus inside the footer. In truth, a few of them most effective have one or two menu places, so that you’ll have to test to look in case your theme helps menus. If no longer, refer again to the former segment for a workaround that makes use of a widget to include a menu within the footer.
If the usage of a theme that permits for menus within the footer, pass to the WordPress Customizer and click on at the Menus tab.
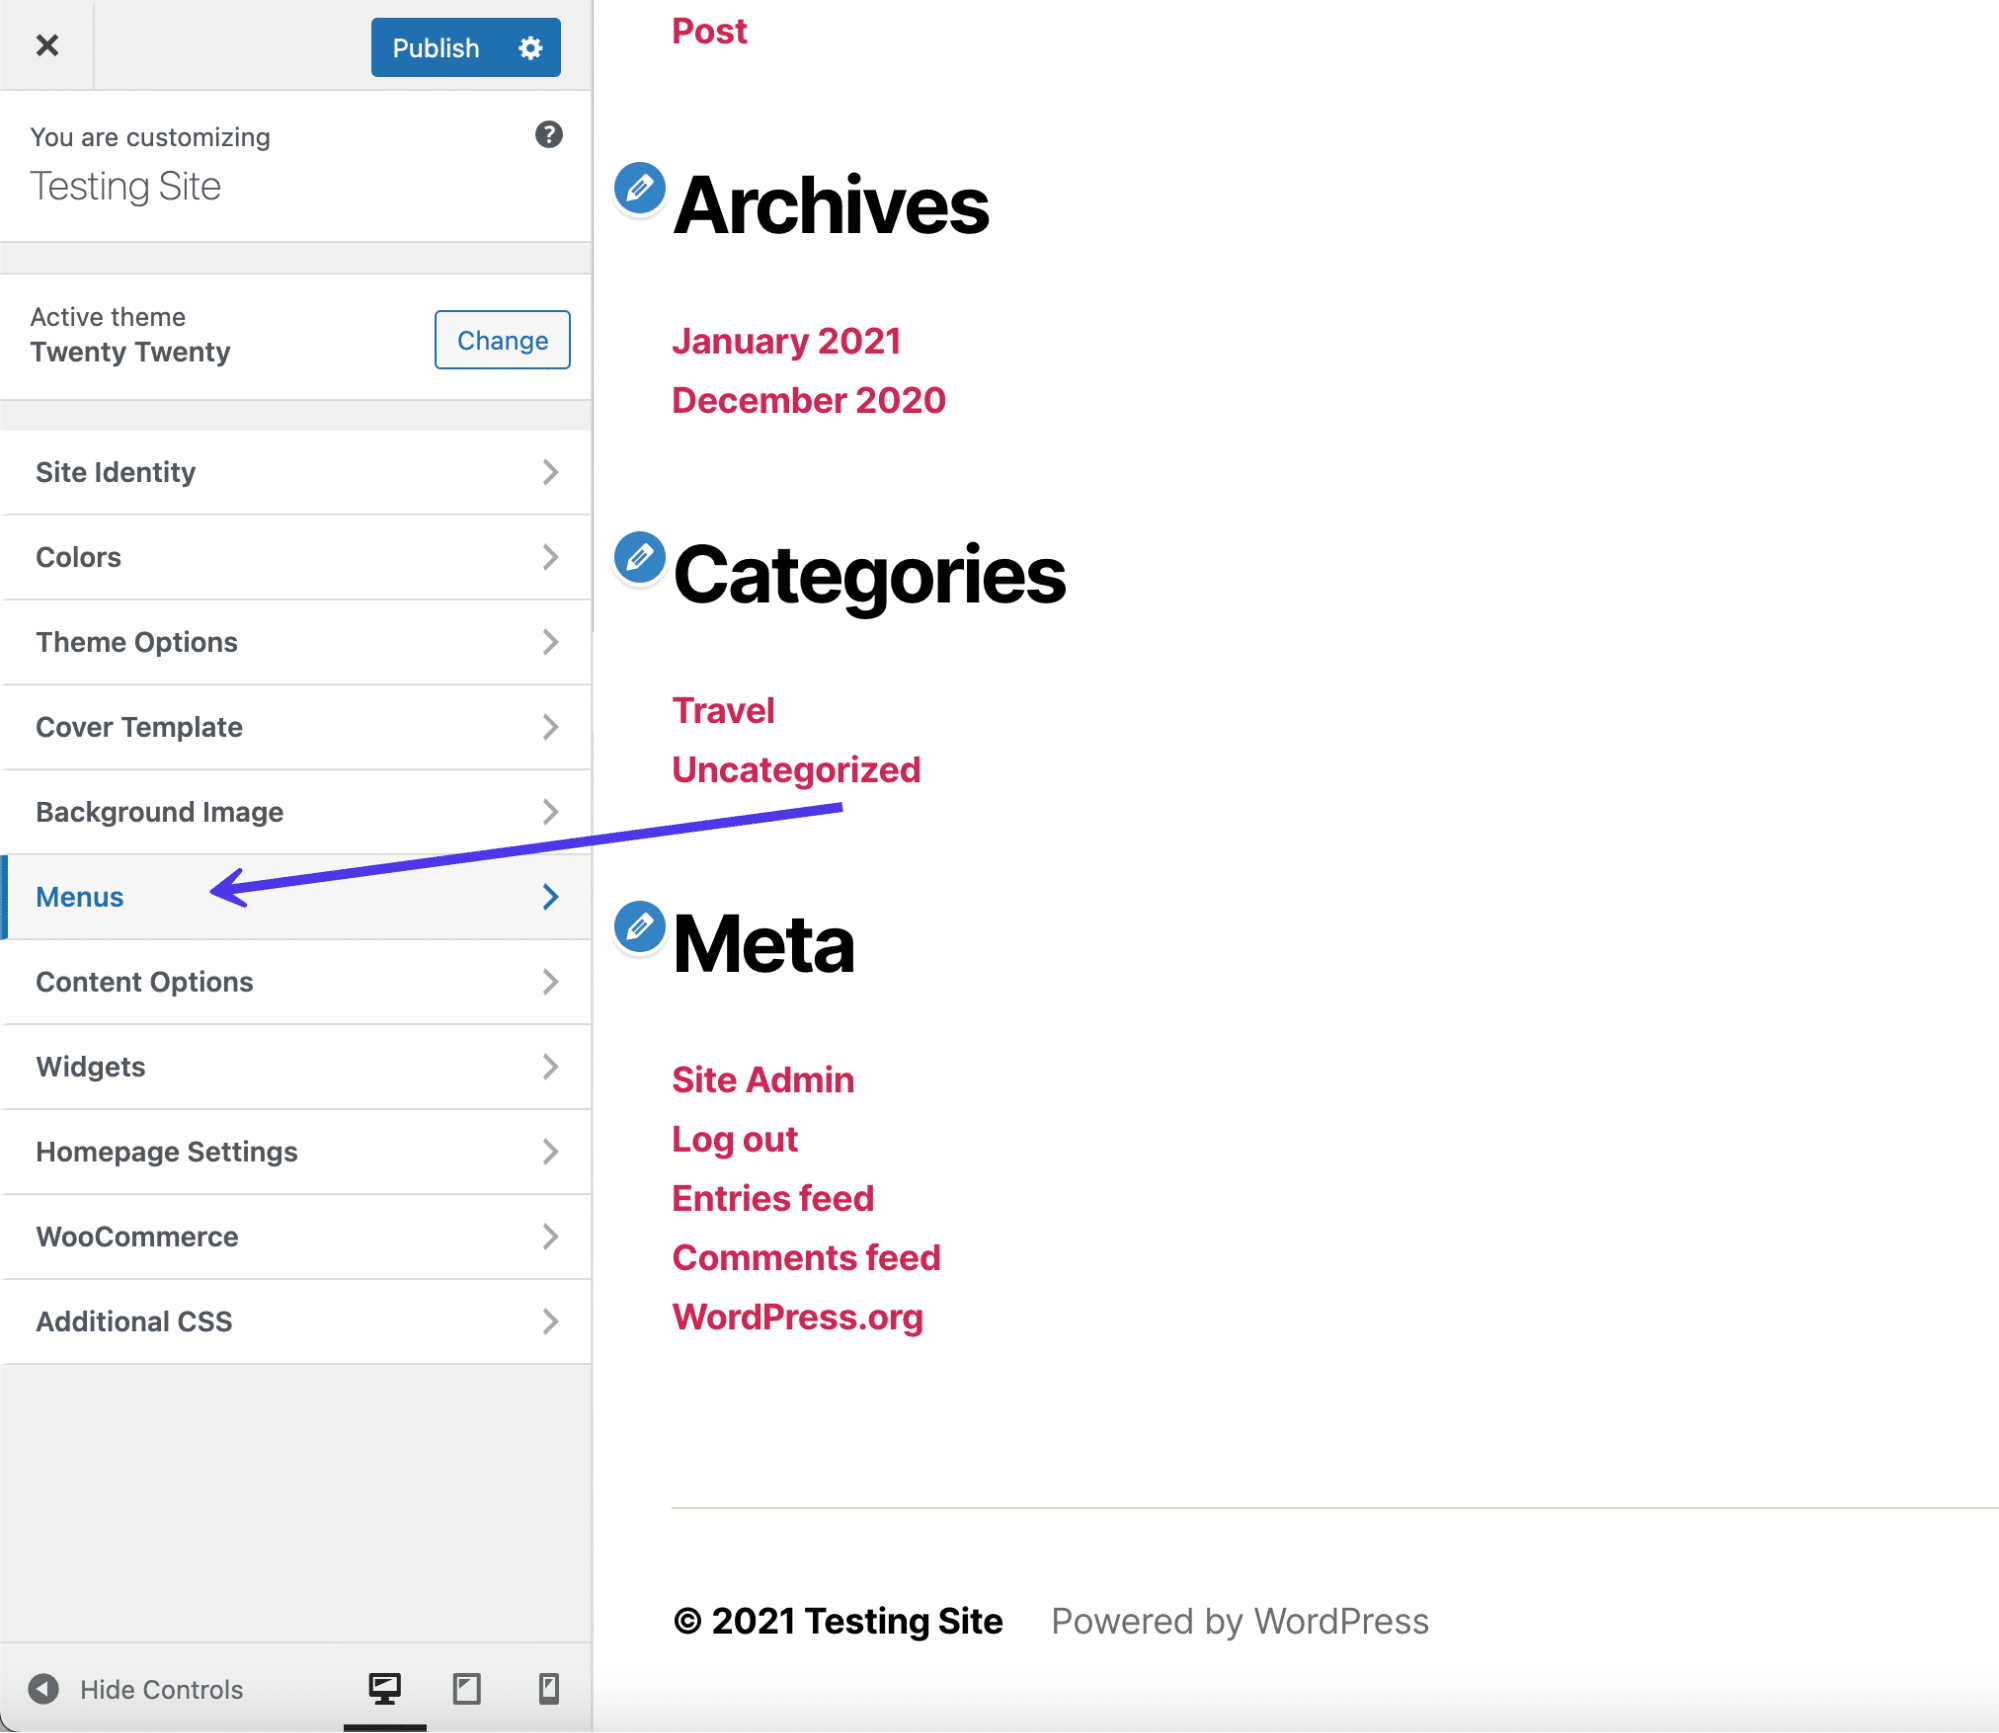
The “Menus” tab
You’ll possibly see an empty menu web page with a number of buttons to come to a decision on. One of the most buttons permits you to make a selection which menus to expose and the place to turn them. The View All Places tab stocks the place menus are supported in your theme.
In the end, the Create New Menu button works just like the usual menu introduction panel within the dashboard, except for it doesn’t require you to go out out of the Customizer.
Click on at the Create New Menu button. If you have already got a menu able to head, you’ll be able to upload it to the footer by means of going to View All Places.
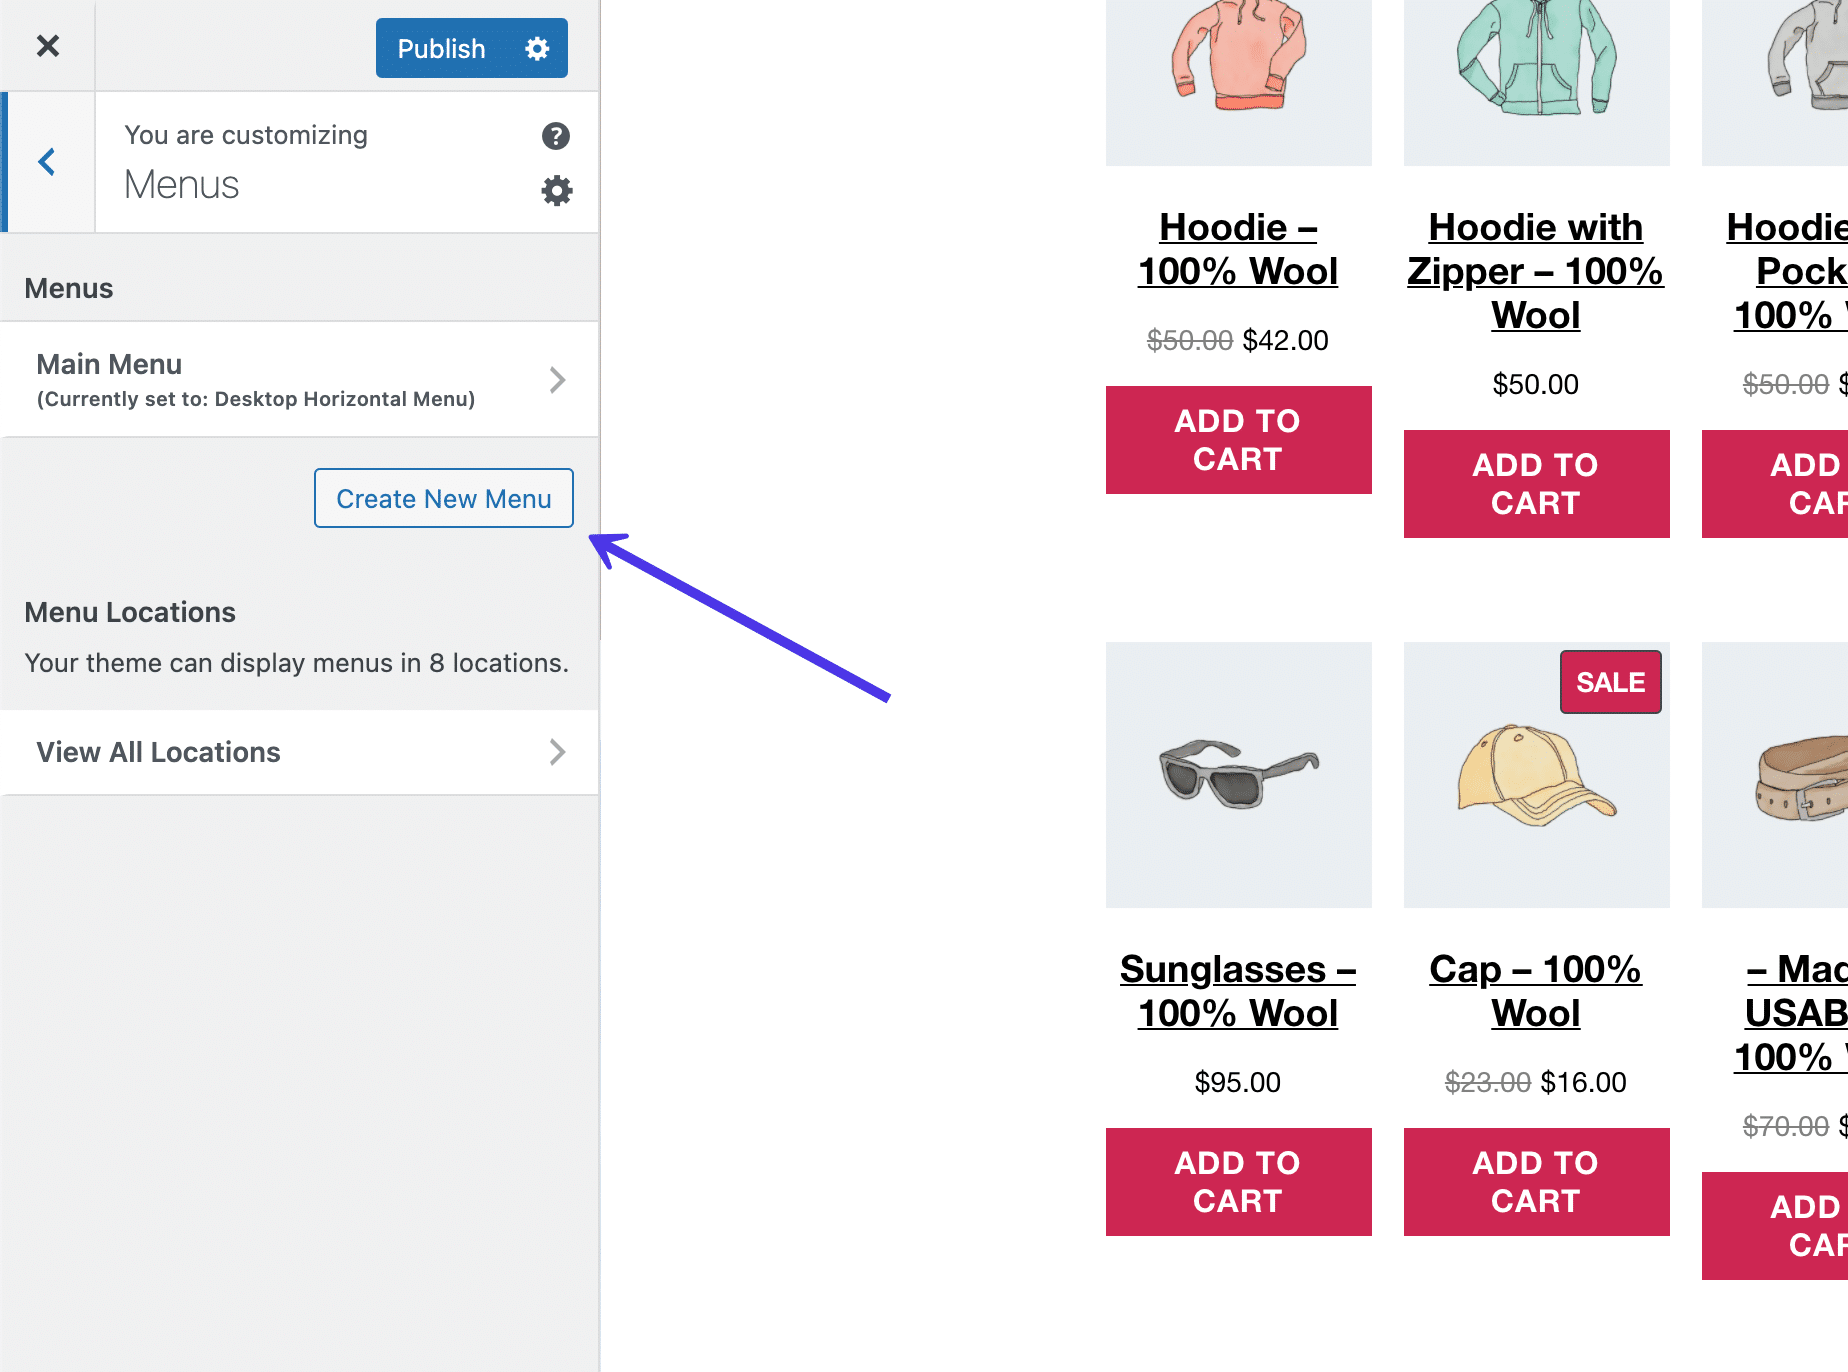
“Create New Menu” button
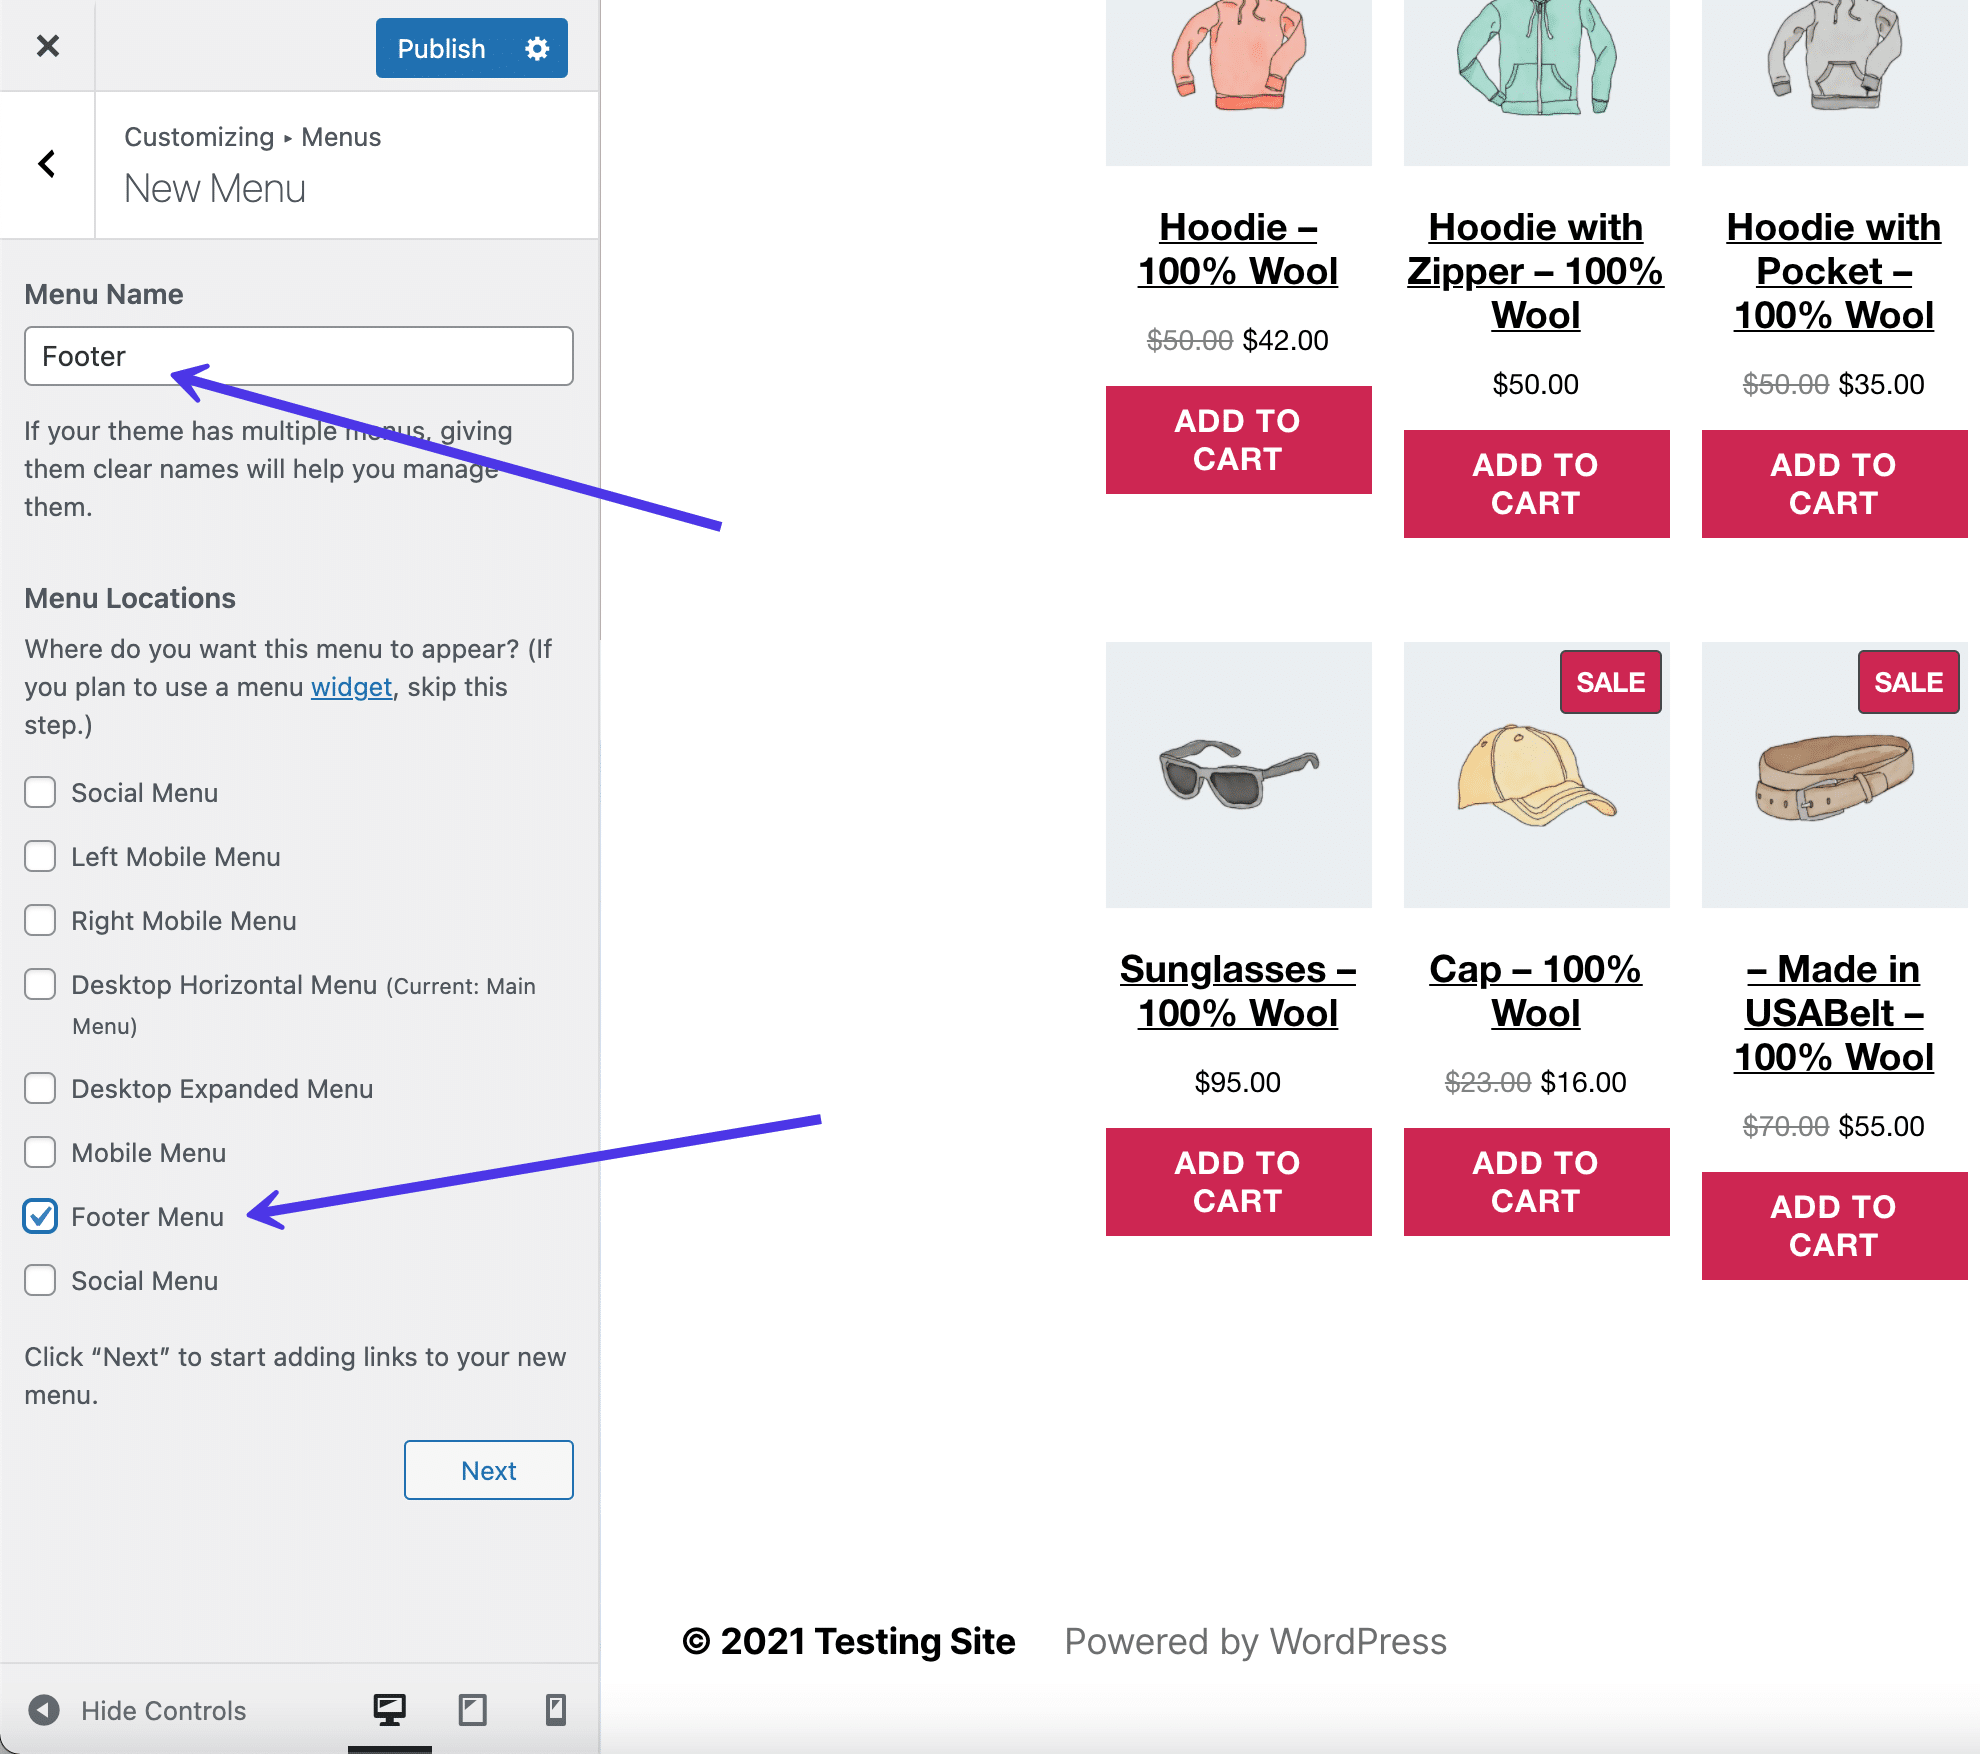
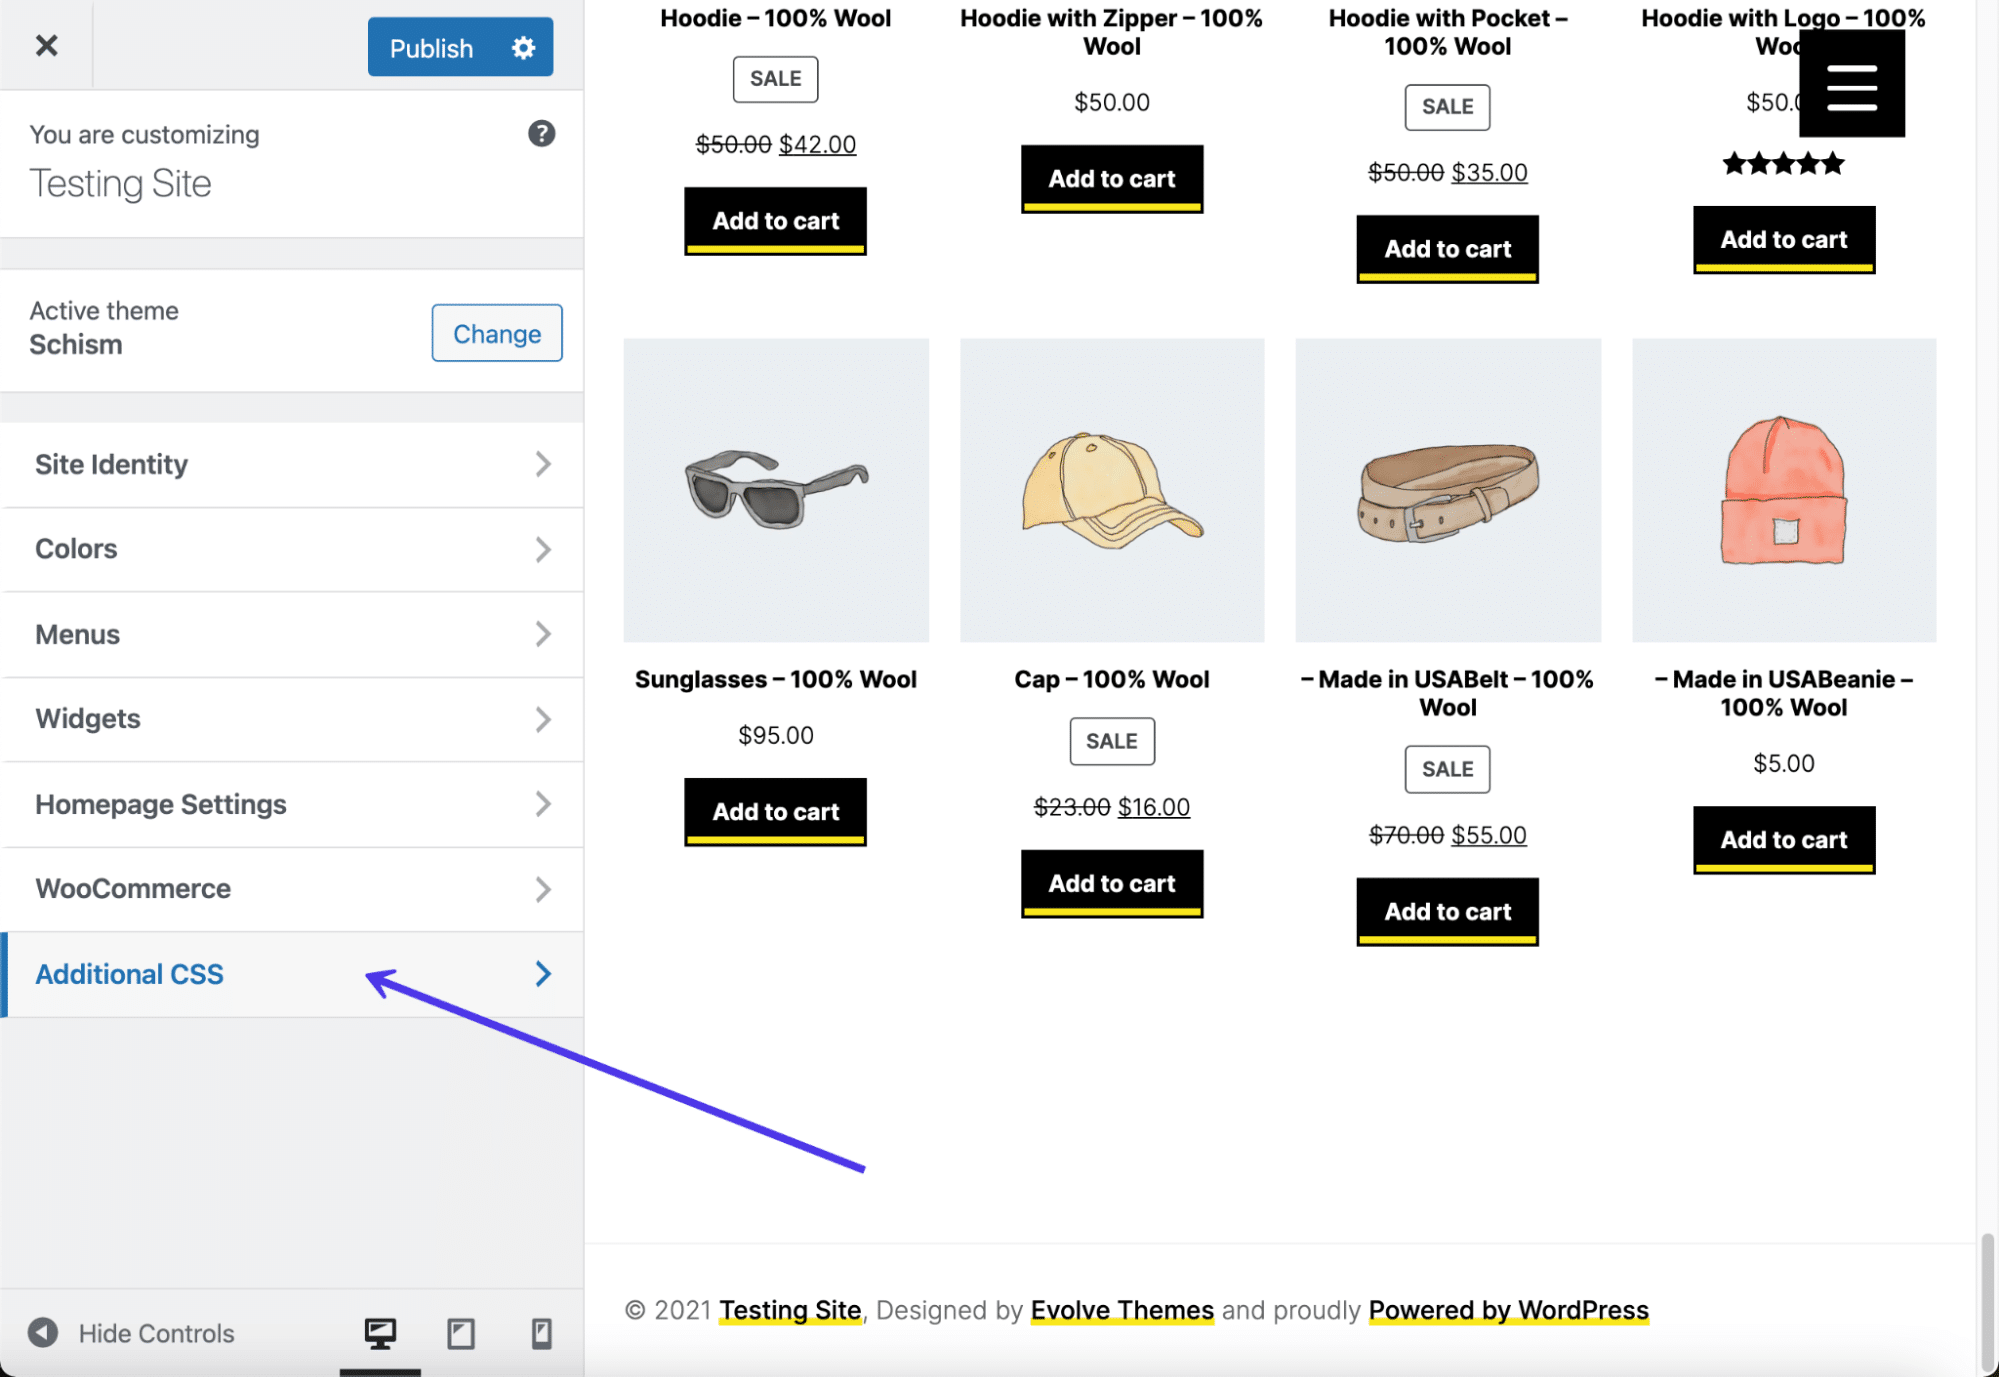
Identify your menu (on this case we’ll pass with the most obvious Footer identify) and examine the field referred to as Footer Menu. This tells WordPress you wish to have the Footer menu you create to turn up within the Footer location. They’re separate issues; one is the true menu and the opposite is the area of your site the place the menu is going. You’re greater than welcome to modify the identify of your footer menu should you to find it a bit of complicated.
Click on at the Subsequent button on the backside of the panel to continue.
Upload the Footer Menu.
Now you could have a menu named Footer, but it surely lacks any buttons or hyperlinks to make it a in point of fact practical menu.
Click on the Upload Pieces button to start out striking hyperlinks and buttons to pages on your menu.
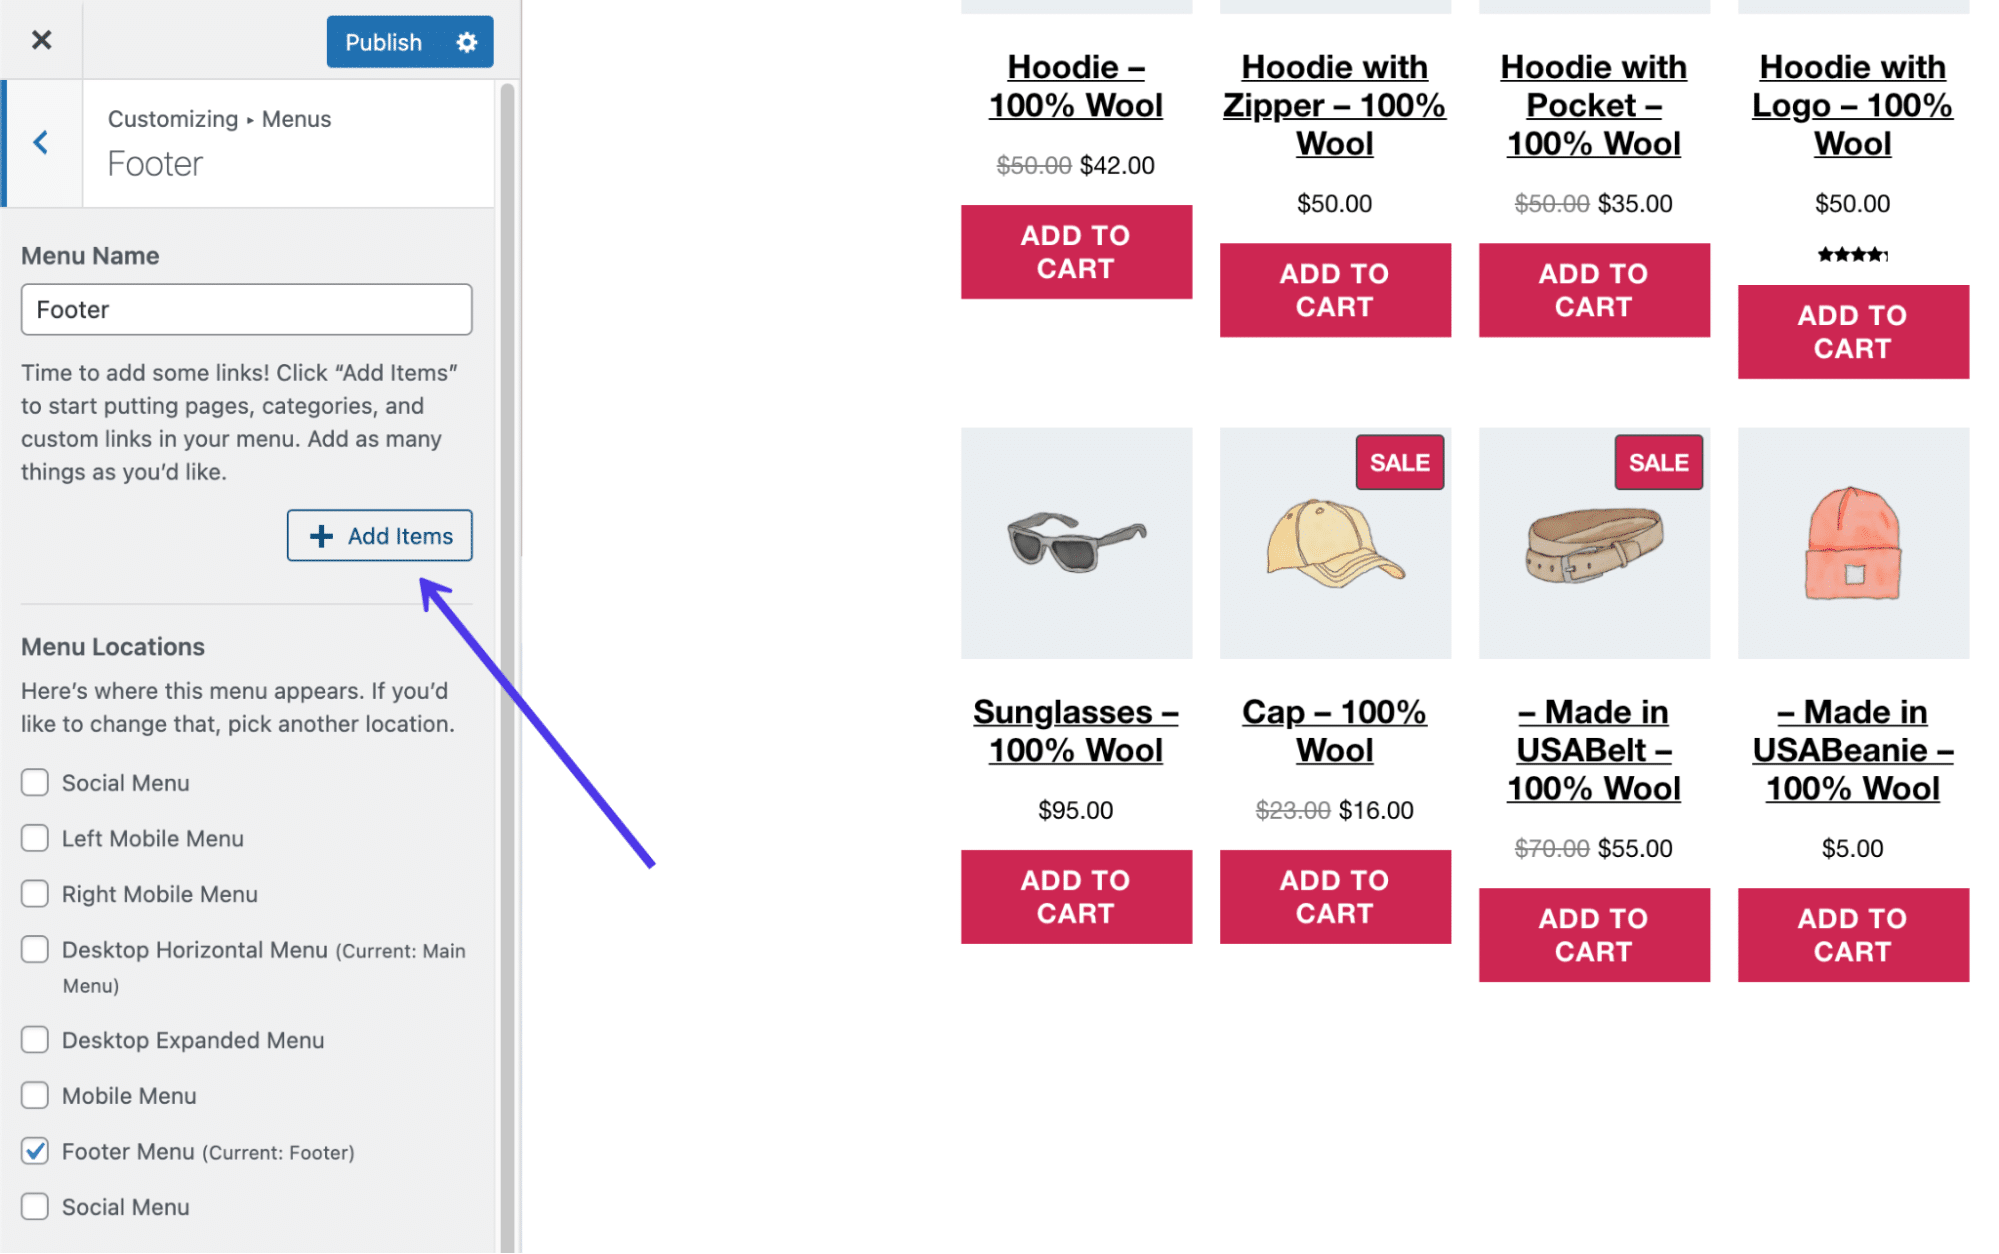
The Upload Pieces button.
A brand new slideout panel seems with all of the choices so as to add in your menu. As an example, you’ll be able to come with customized hyperlinks to interior or exterior pages, posts out of your weblog, pages from your personal website (already created pages), merchandise, tags, and classes, together with no matter different forms of content material pages you will have.
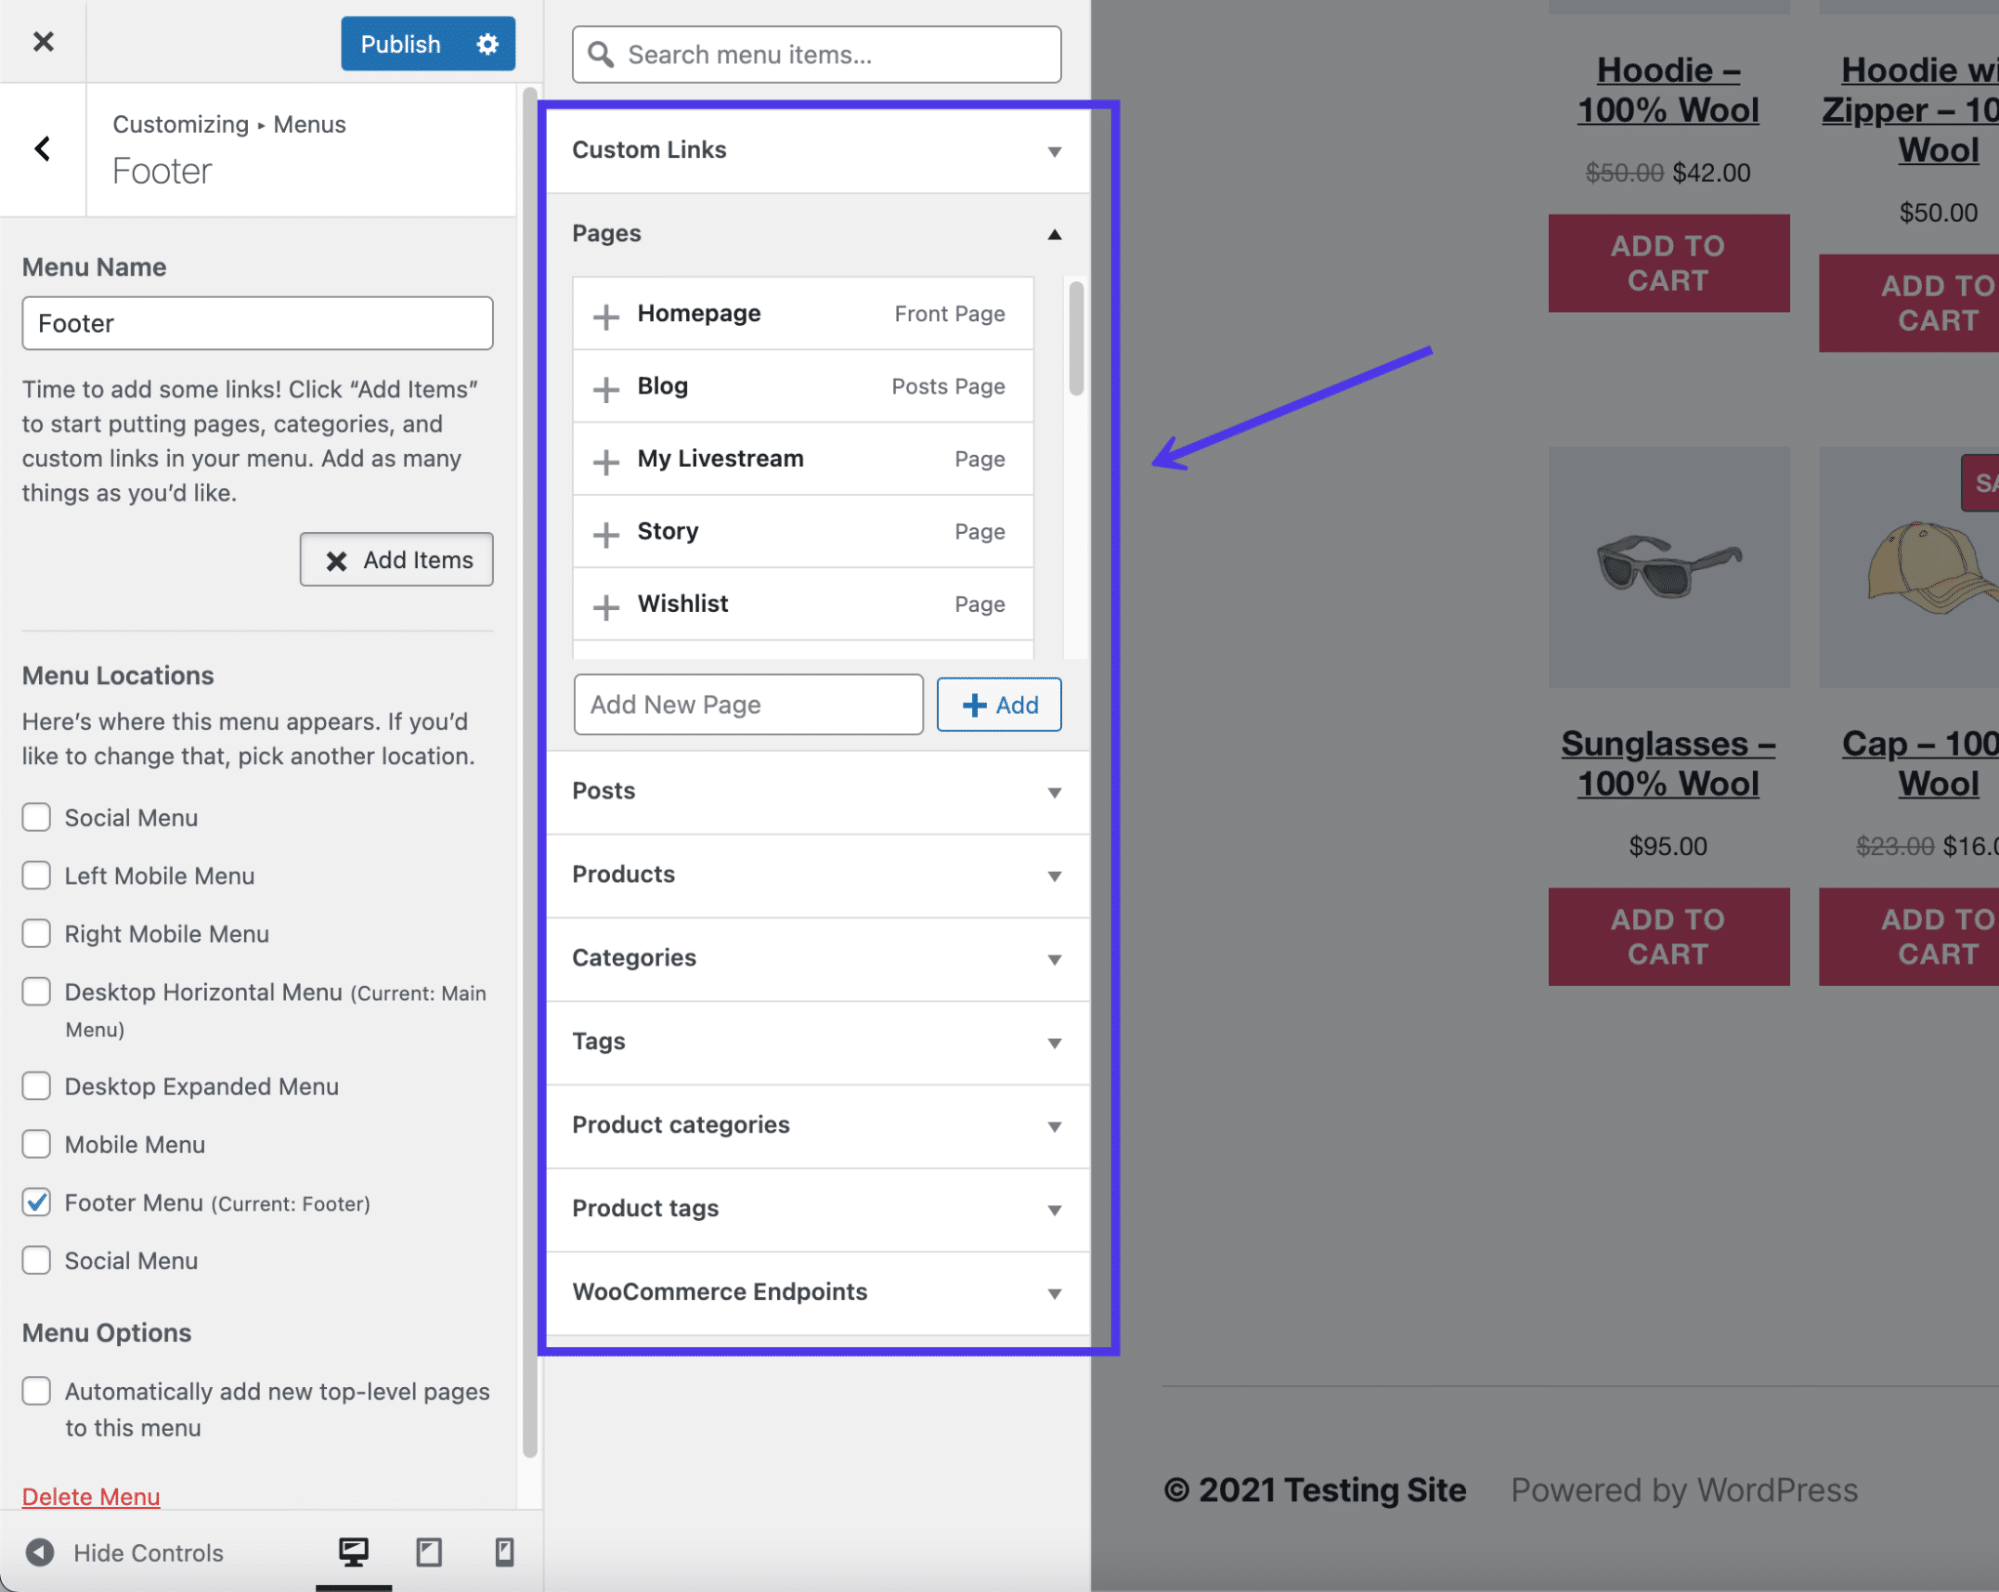
Upload pages and different parts to the menu.
Each and every menu merchandise you select will get positioned and proven within the menu panel, the place you’re in a position to reorganize them and click on on each and every one to edit their particular person settings. For this case, we’ve added 5 hyperlinks to pages all the way through our site, together with the weblog, a livestream web page, and an About The Corporate web page.
Refer again to our record at first of this text for concepts on what to incorporate on your footer.
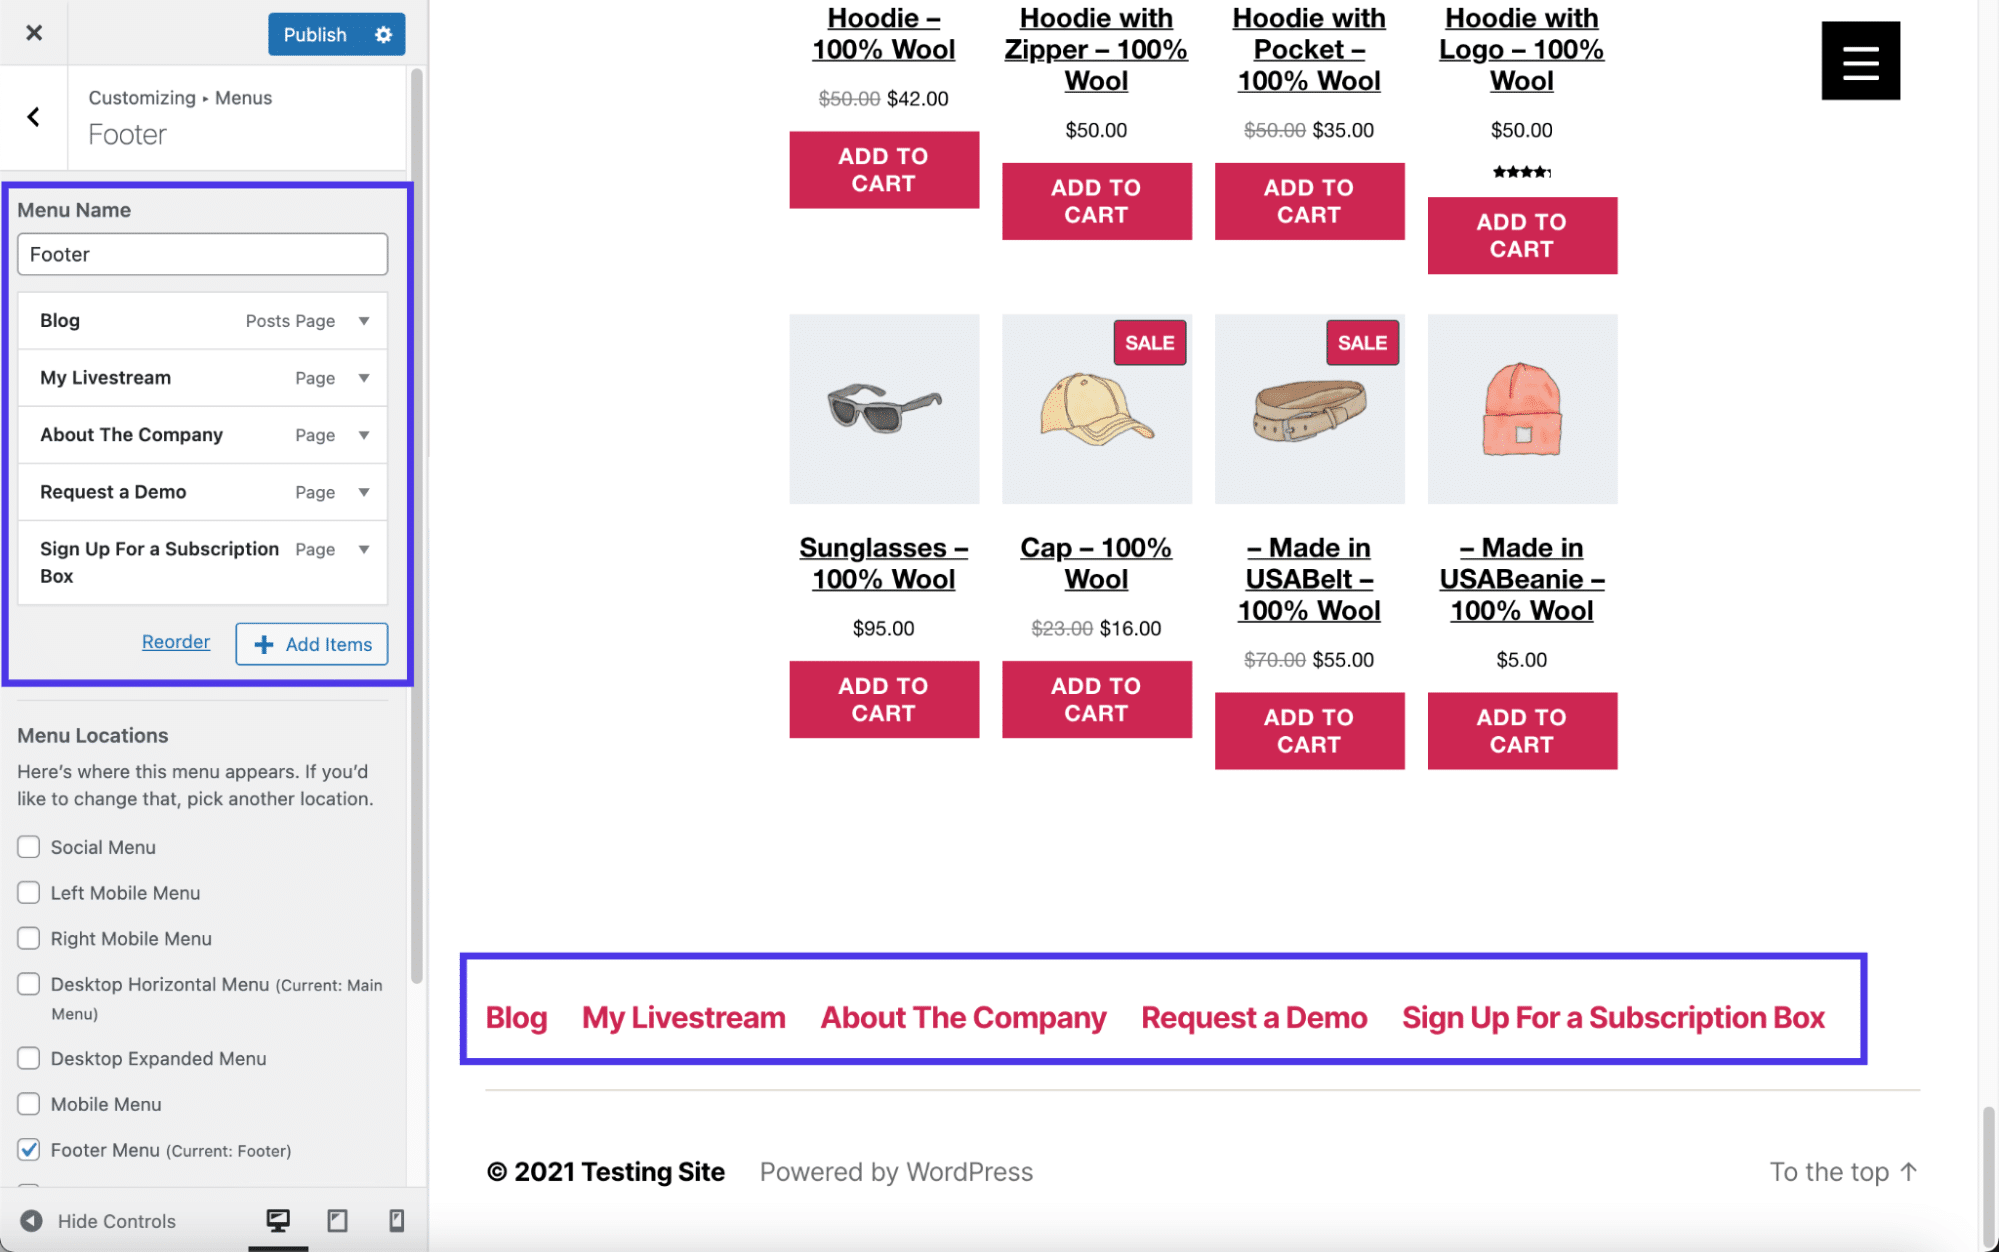
An instance of a menu throughout the footer.
WordPress already has integrated equipment to change your footer, however the extent to which you’ll be able to edit your explicit website’s footer depends on your theme of selection and whether or not or no longer you wish to have to debris with any code.
As you’ll be informed additional down on this article, taking away the default “Powered Via” textual content calls for you to faucet into the footer.php record and take away some code. Due to this fact, it’s transparent a number of sides of footer modifying could also be from your succeed in should you don’t have the enjoy or willingness to debris with code or discover a new theme.
That’s the place WordPress plugins come into play. Rather a couple of plugins be offering footer modifying and enlargement options to take away the wish to edit code manually and occasionally to make fast adjustments in your footer, like with colours and columns.
WordPress footer plugins we advise come with the next:
- Footer Mega Grid Columns — This plugin fixes any issues you could have with a theme the place the footer lacks a grid layout with 3 columns. Some topics most effective be offering one or two columns, whilst different occasions a footer will get totally stripped from the theme. Footer Mega Grid Columns provides a footer widget not to most effective show 3 columns however further ones if wanted.
- Remove Footer Credit — Use this plugin to totally take away the footer credit score positioned there by means of WordPress or your theme developer. You additionally give you the option to kind on your personal HTML code to create a footer credit score or a bit of of content material that’s extra appropriate in your website.
- Header Footer Code Manager — This plugin has a slight finding out curve, but it surely’s a super resolution for intermediate WordPress customers who would moderately have get right of entry to to footer and header coding spaces within the dashboard, versus opening up the website recordsdata. You’ll upload a limiteless collection of kinds and scripts to the footer, which ceaselessly turns out to be useful for appearing data after each weblog publish or web page.
- Footer Putter — Use this plugin to insert a widget for copyright data or in your logos. This can be a moderately helpful resolution for putting information about your corporate within the footer space, together with such things as hyperlinks, trade hours, phone numbers, and extra.
- Footer Text — As some of the most simple tactics to change your WordPress footer, the Footer Textual content plugin turns on a frontend and backend modifying panel to switch what’s on your footer. It comes with a WYSIWYG (What You See Is What You Get) editor, so it’s imaginable to layout your textual content and probably upload pieces like footage.
Within the following sections, we’ll discover the way to use a few of these plugins for duties like including social media buttons or placing customized code into the WordPress footer.
A extra technical approach of modifying your WordPress footer comes to tapping into the footer.php record and modifying its contents.
You should have enjoy with coding — or be eager to learn — with a view to make this technique helpful for you, however there are some minor tweaks that each one rookies can deal with (basically simply taking away preset textual content within the footer). Check out our guide to adding header and footer code for essentially the most detailed data.
To get right of entry to the footer.php record, hyperlink in your WordPress website recordsdata by means of using an FTP client. We additionally suggest testing this text on how to use SFTP to hyperlink to WordPress as SFTP is more secure than FTP.
As soon as attached in your WordPress website recordsdata thru your FTP consumer, find the /public folder. Click on on /wp-content after which /topics to expose all topics recently put in in your WordPress dashboard. Word which theme is lively at the website and open the folder for that one.
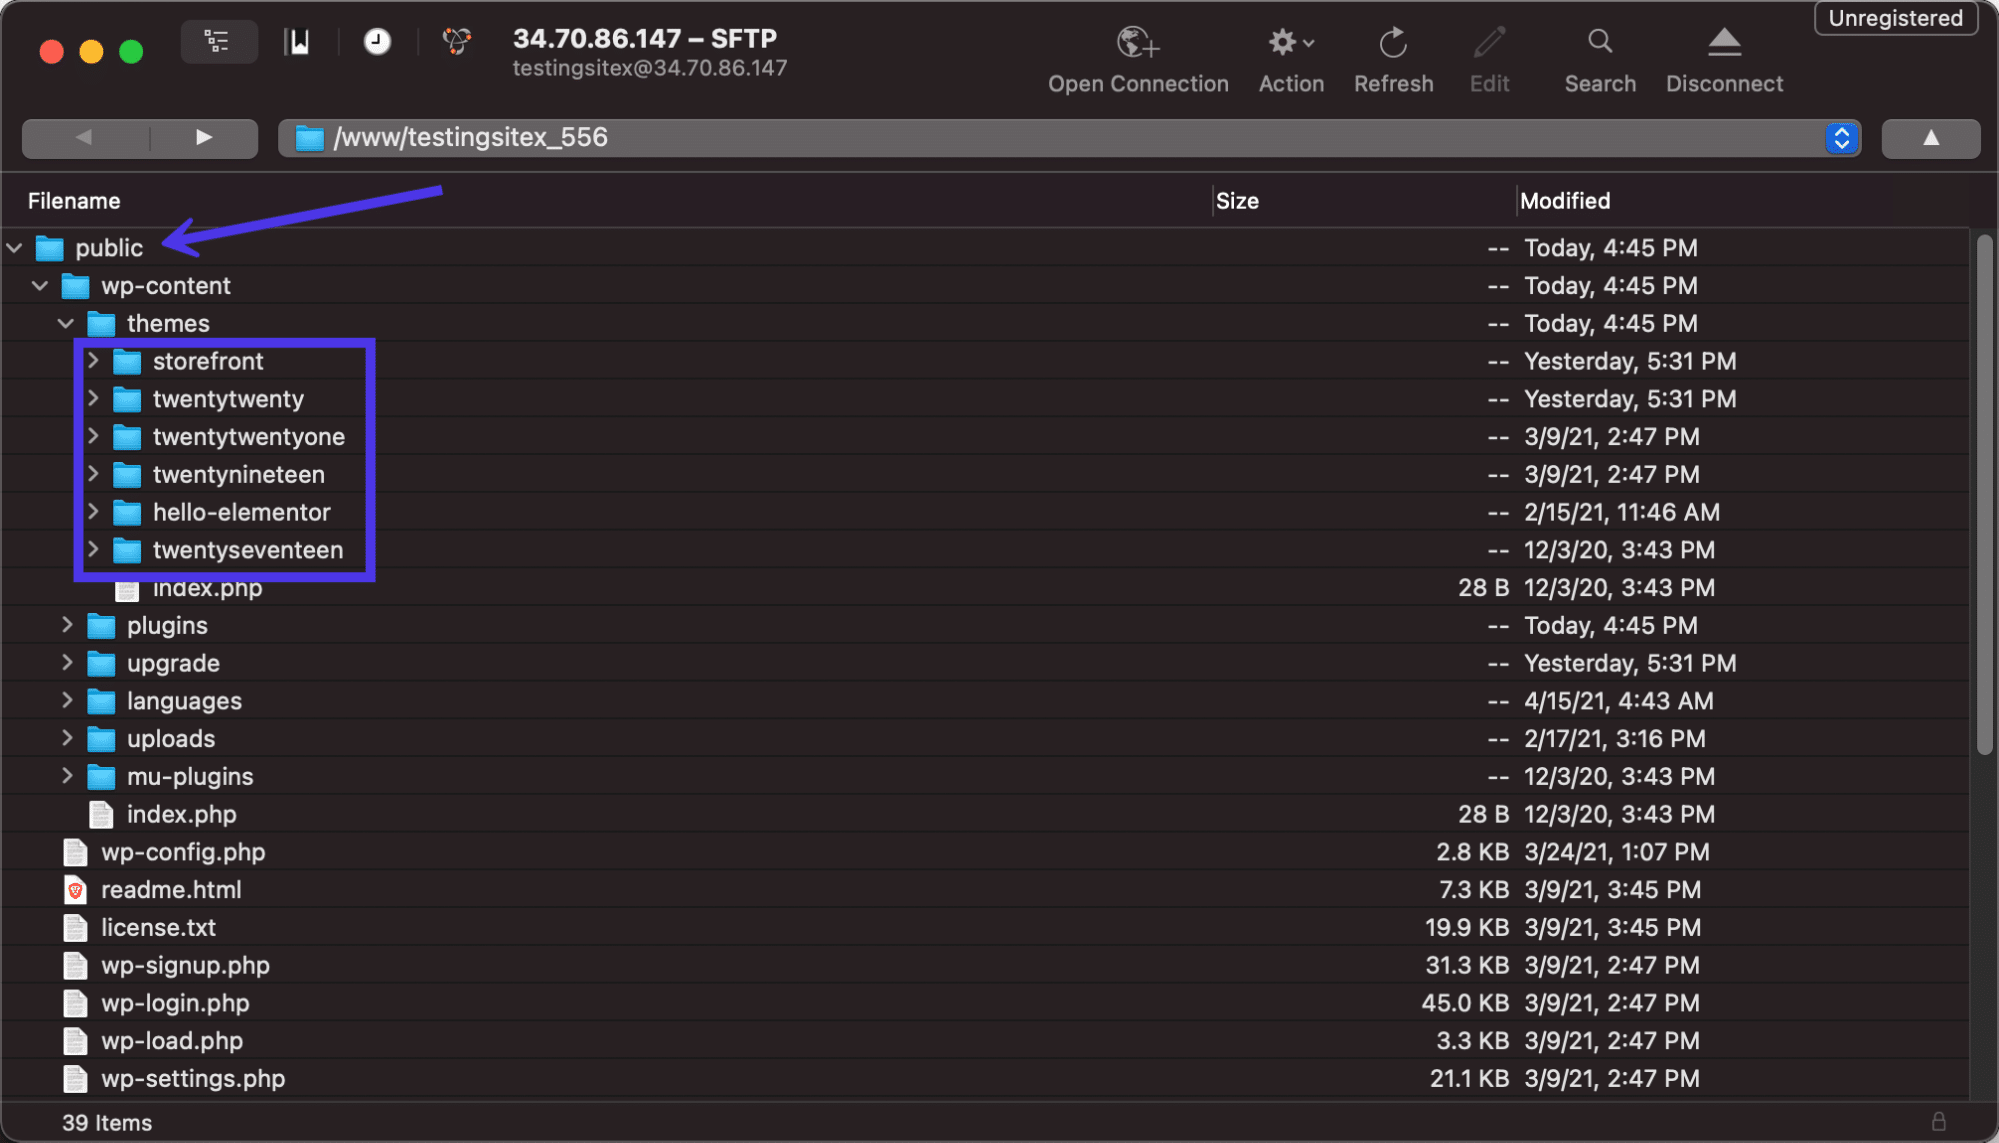
Use an FTP consumer to open your website recordsdata.
All WordPress topics have a footer.php record someplace within the theme folder. Scroll in the course of the batch of recordsdata to find that footer.php record.

Make a selection the footer.php record for the correct theme.
Open the record with the editor of your selection. As soon as in there, you’ll be able to edit the present code or upload new content material relying on what you’re making an attempt to reach. The get_template_part segment is ceaselessly changed to insert new bits of textual content, however we’ll depart that as much as you since each footer is other.
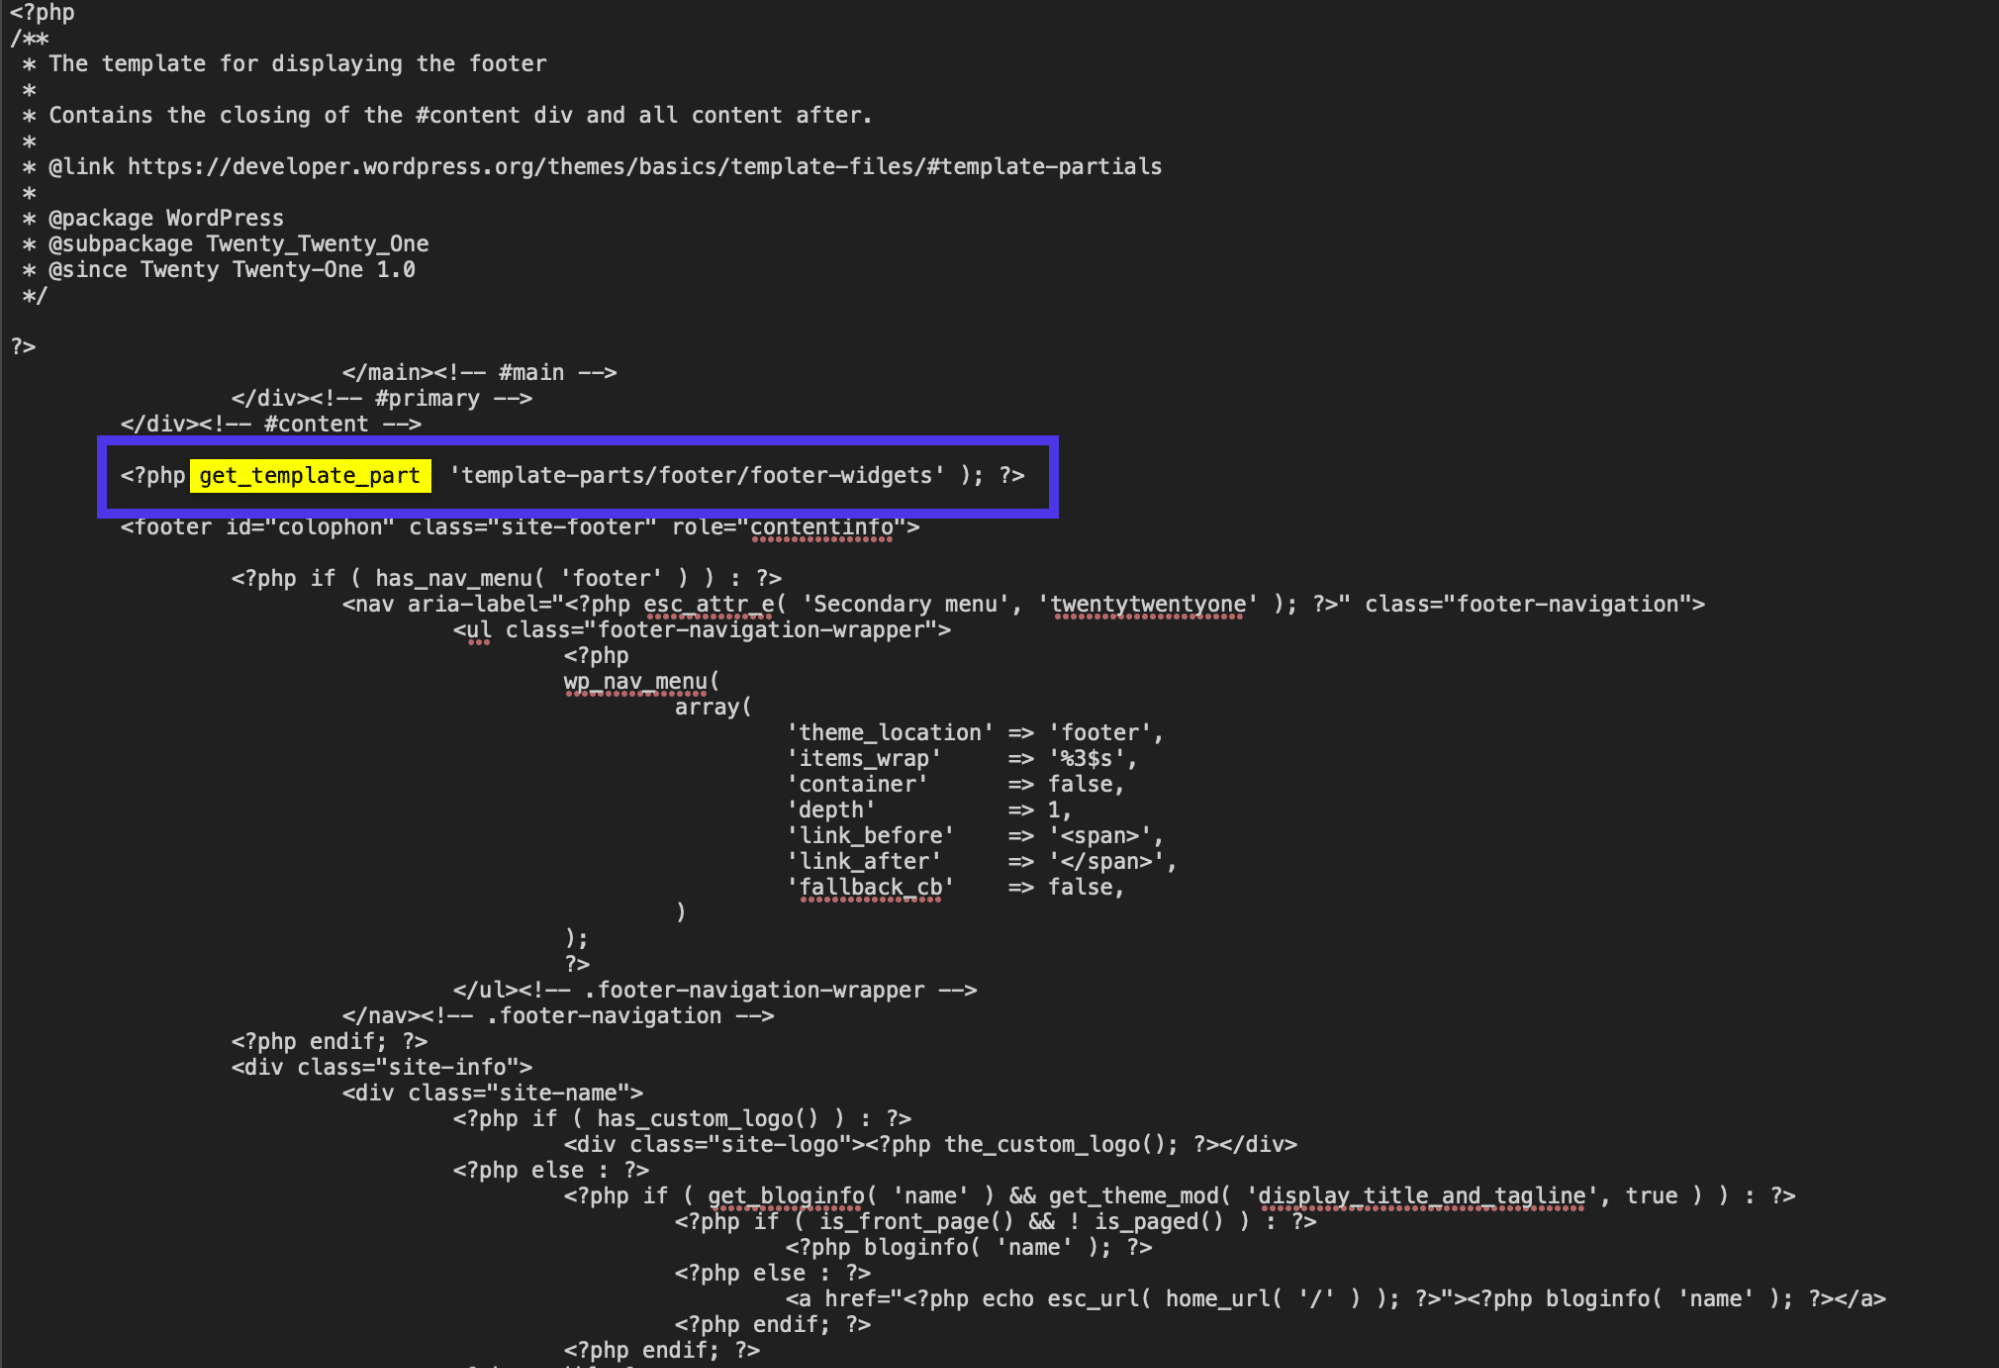
The opened footer.php record.
Instead, you’ll be able to edit the footer code by means of the usage of a plugin that presentations a visual view for the footer.php record. This fashion, you don’t have to put in an FTP consumer and hyperlink it in your site. It’s additionally a extra intuitive, beginner-friendly procedure that is still to be had in your dashboard all the time for long run edits.
To make this occur, set up and turn on the Header Footer Code Manager plugin.
The Header Footer Code Supervisor plugin.
As soon as it’s been put in, click on at the HFCM tab that looks within the WordPress dashboard. Then, identify the snippet, make a selection the place you wish to have it displayed and set the site as Footer.
A very powerful phase is the Snippet/Code box, which you’ll fill in with no matter code you wish to have. Some folks use this plugin for such things as verification or monitoring codes that don’t display up at the entrance finish. Then again, it’s additionally to be had so that you can use for typing in new textual content and gaining nearly whole keep watch over over the content material on your footer.
Make sure to click on at the Save button to look the consequences.
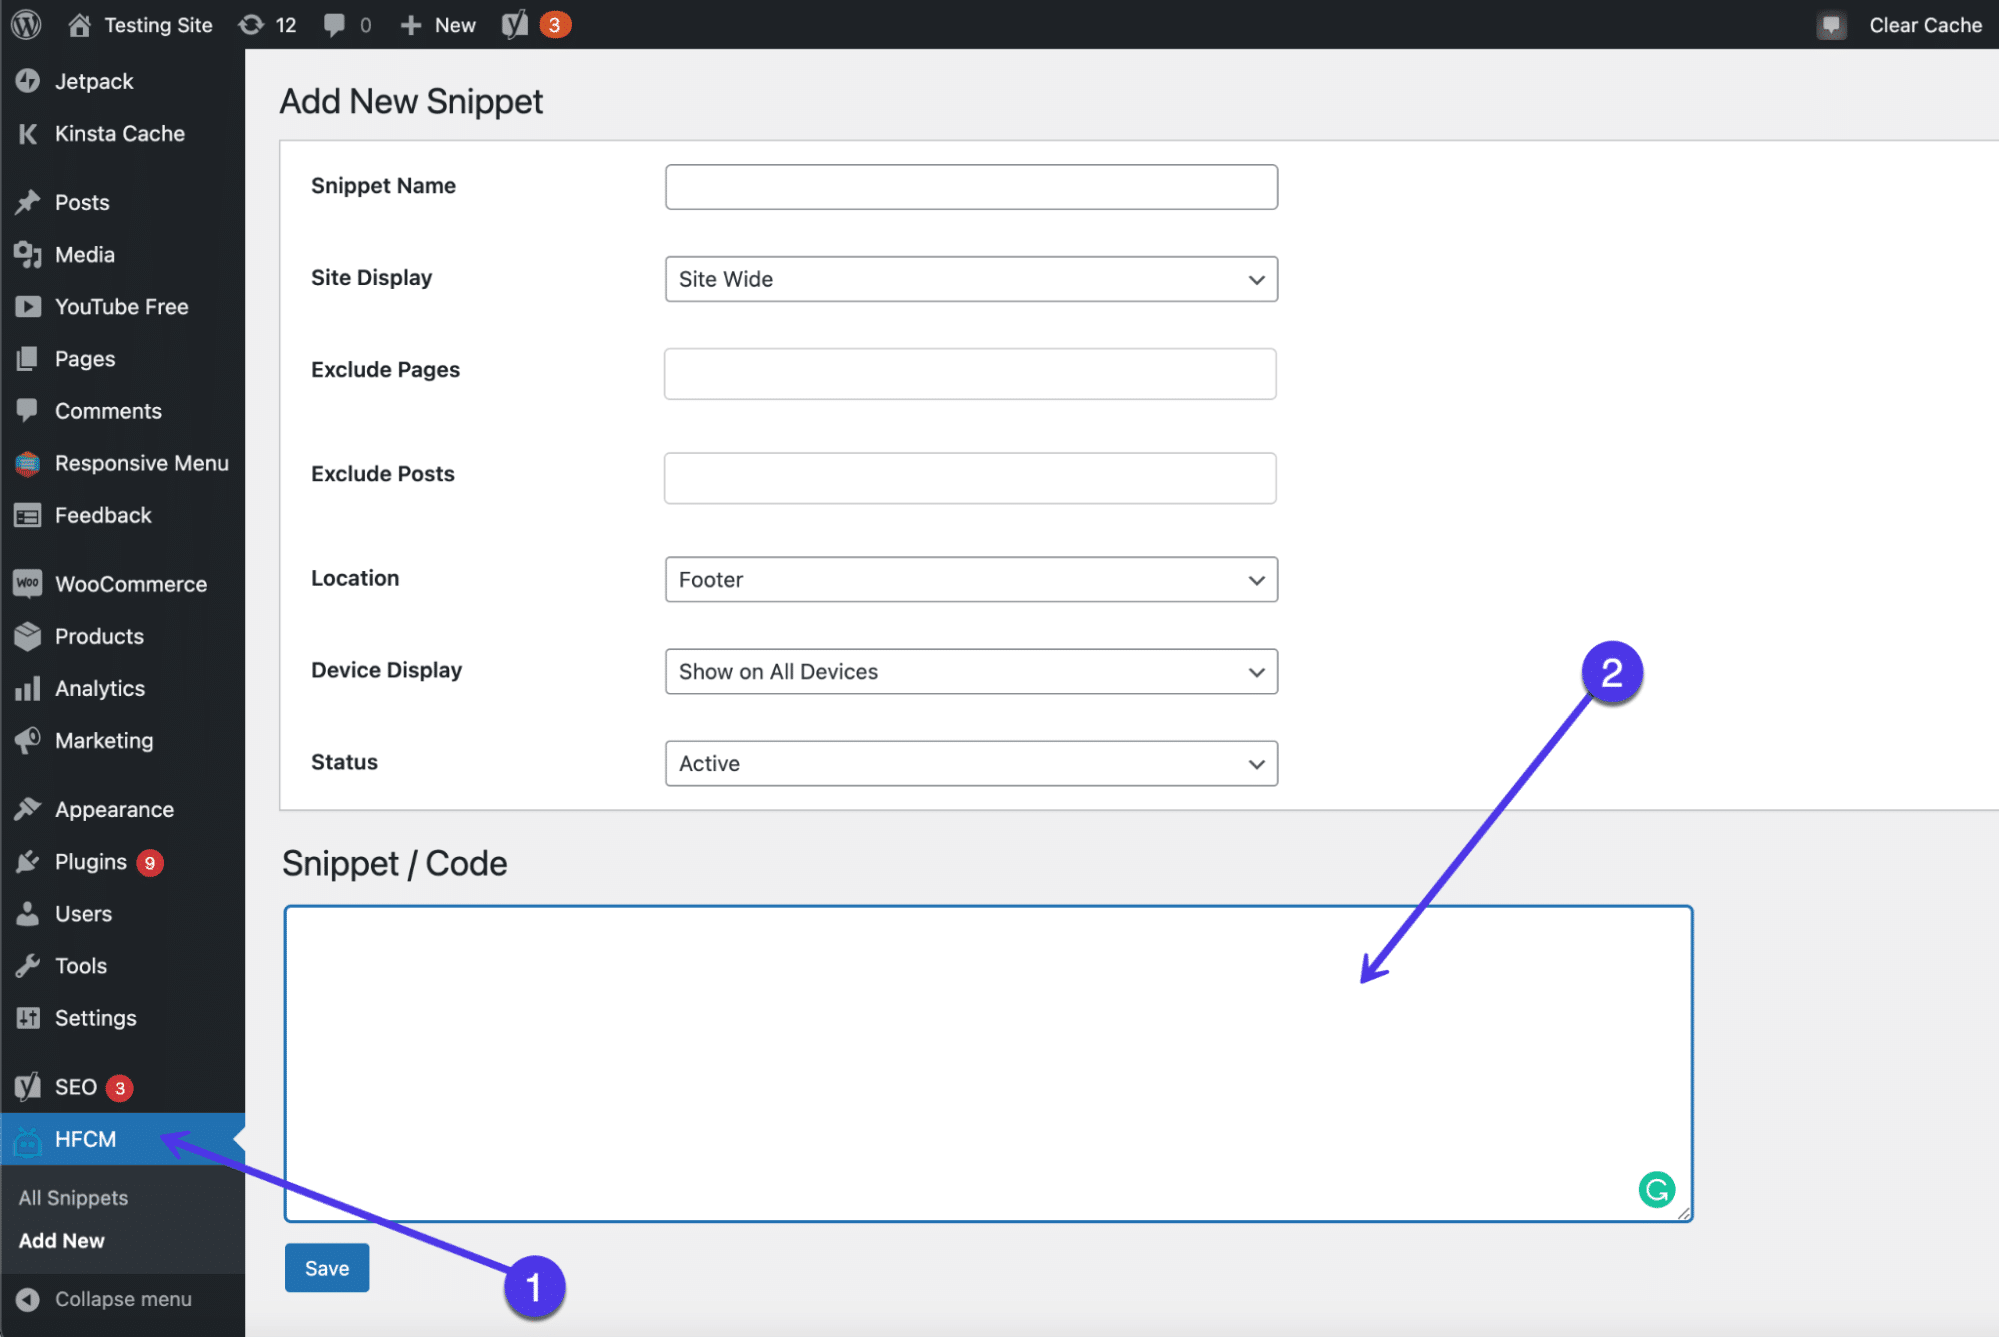
Paste in a Snippet or Code.
An advantage solution to regulate your WordPress footer, with out the desire for code or most of the same old WordPress footer equipment, is with a web page builder. Now not all web page developers be offering footer editors, so it’s essential to conduct some research and make sure that both your present web page builder gives it or the only you propose on purchasing has footer options.
Regardless, this can be a rather elementary characteristic for a web page builder, so it’s a good suggestion to just opt for a web page builder should you plan on customizing all of your website with it.
A couple of different web page developers be offering footer modifying, however our favorites come with Elementor and Visual Composer.
To create a customized footer with Visible Composer, you should have the Professional model. There are some workarounds to edit the decrease a part of your site with the loose model, however the real drag-and-drop builder for the footer calls for an improve.
As soon as put in, click on at the Pages button on your dashboard. Scroll in the course of the pages you wish to have to edit and make a selection the Edit With Visible Composer hyperlink on any of the ones pages.
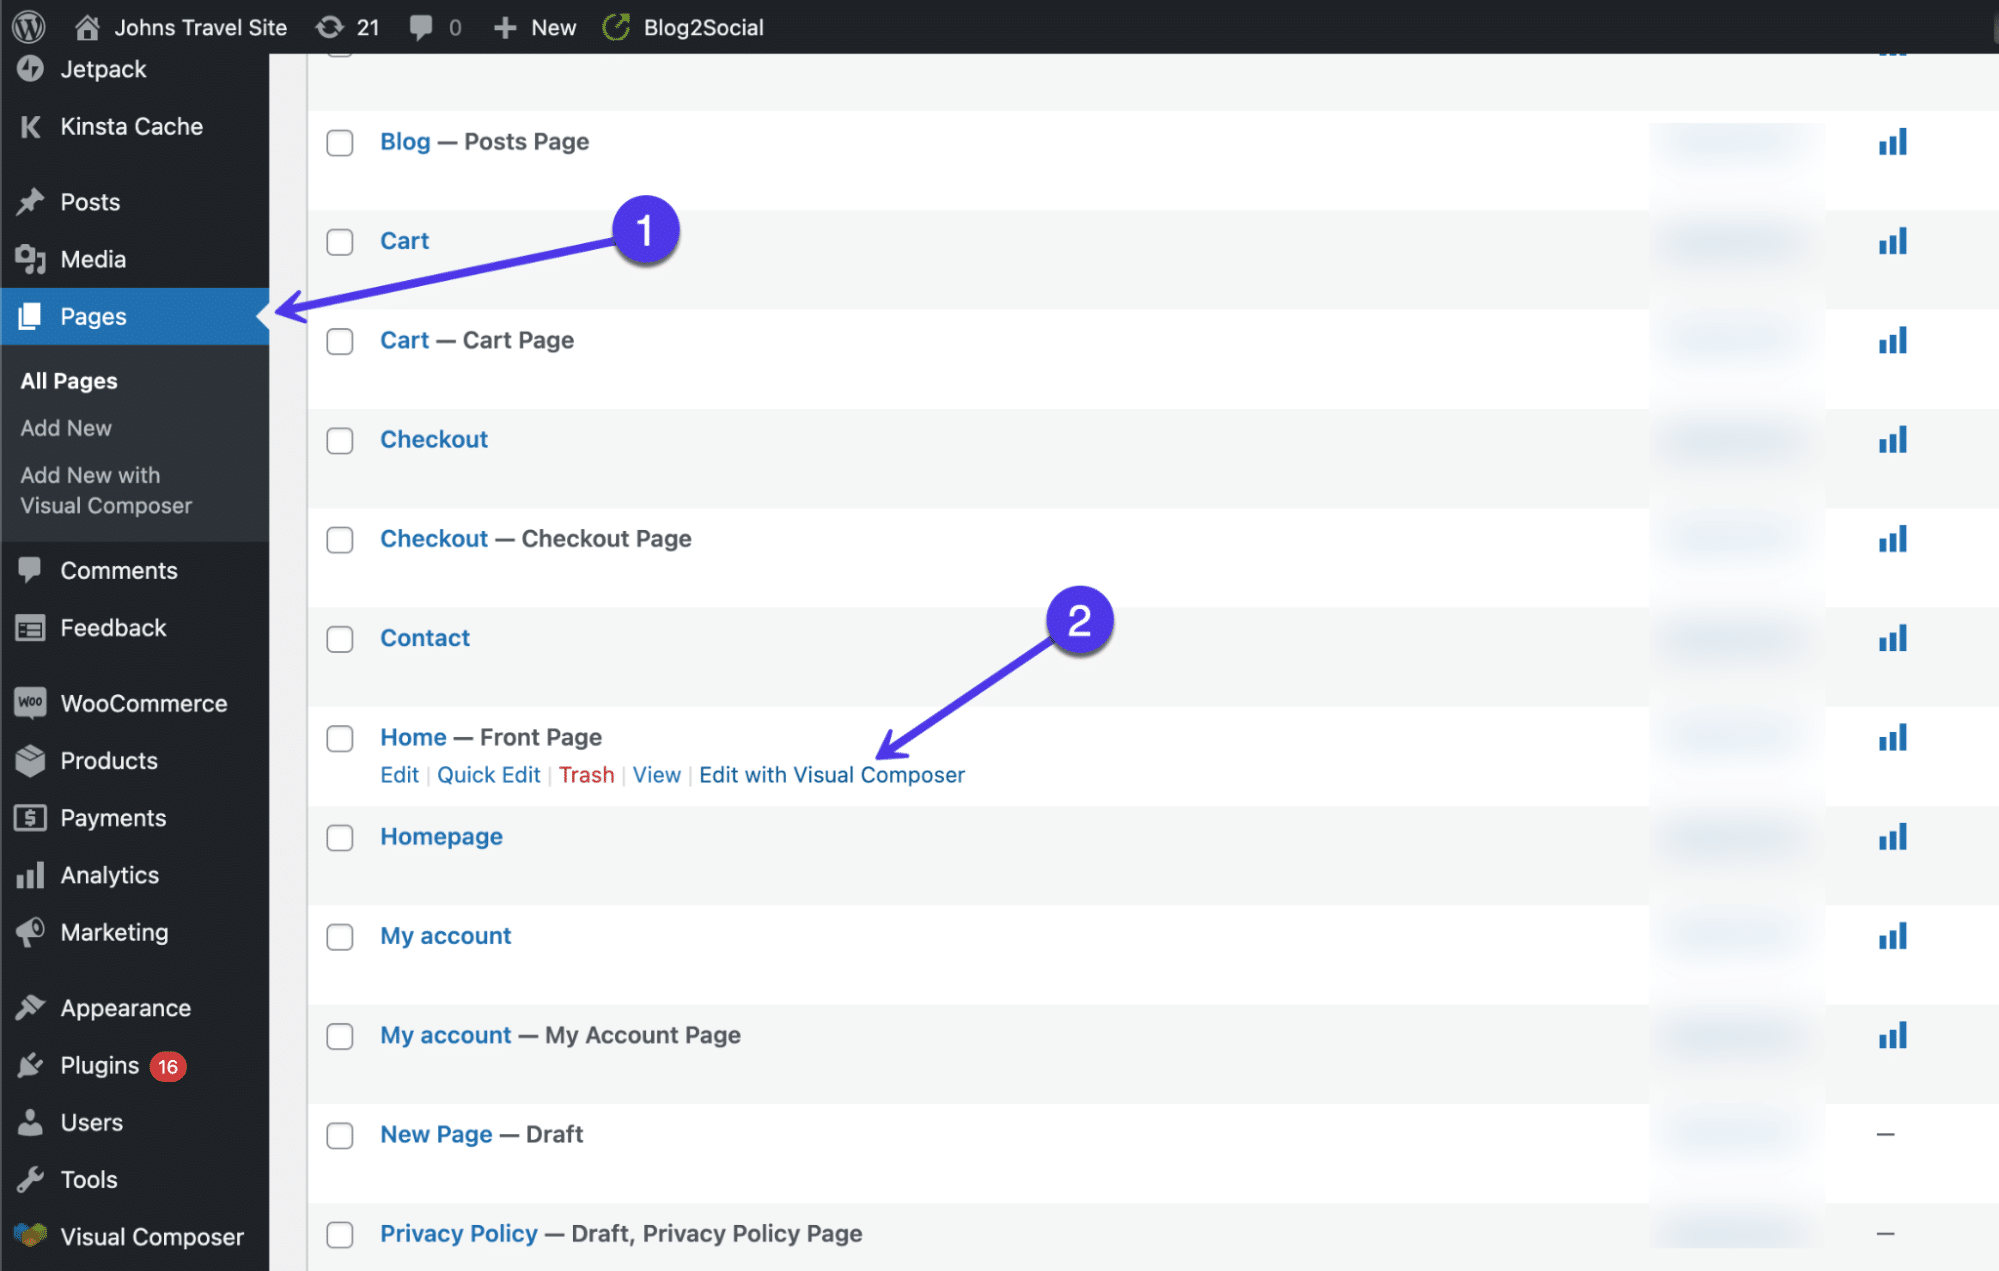
Edit With Visible Composer.
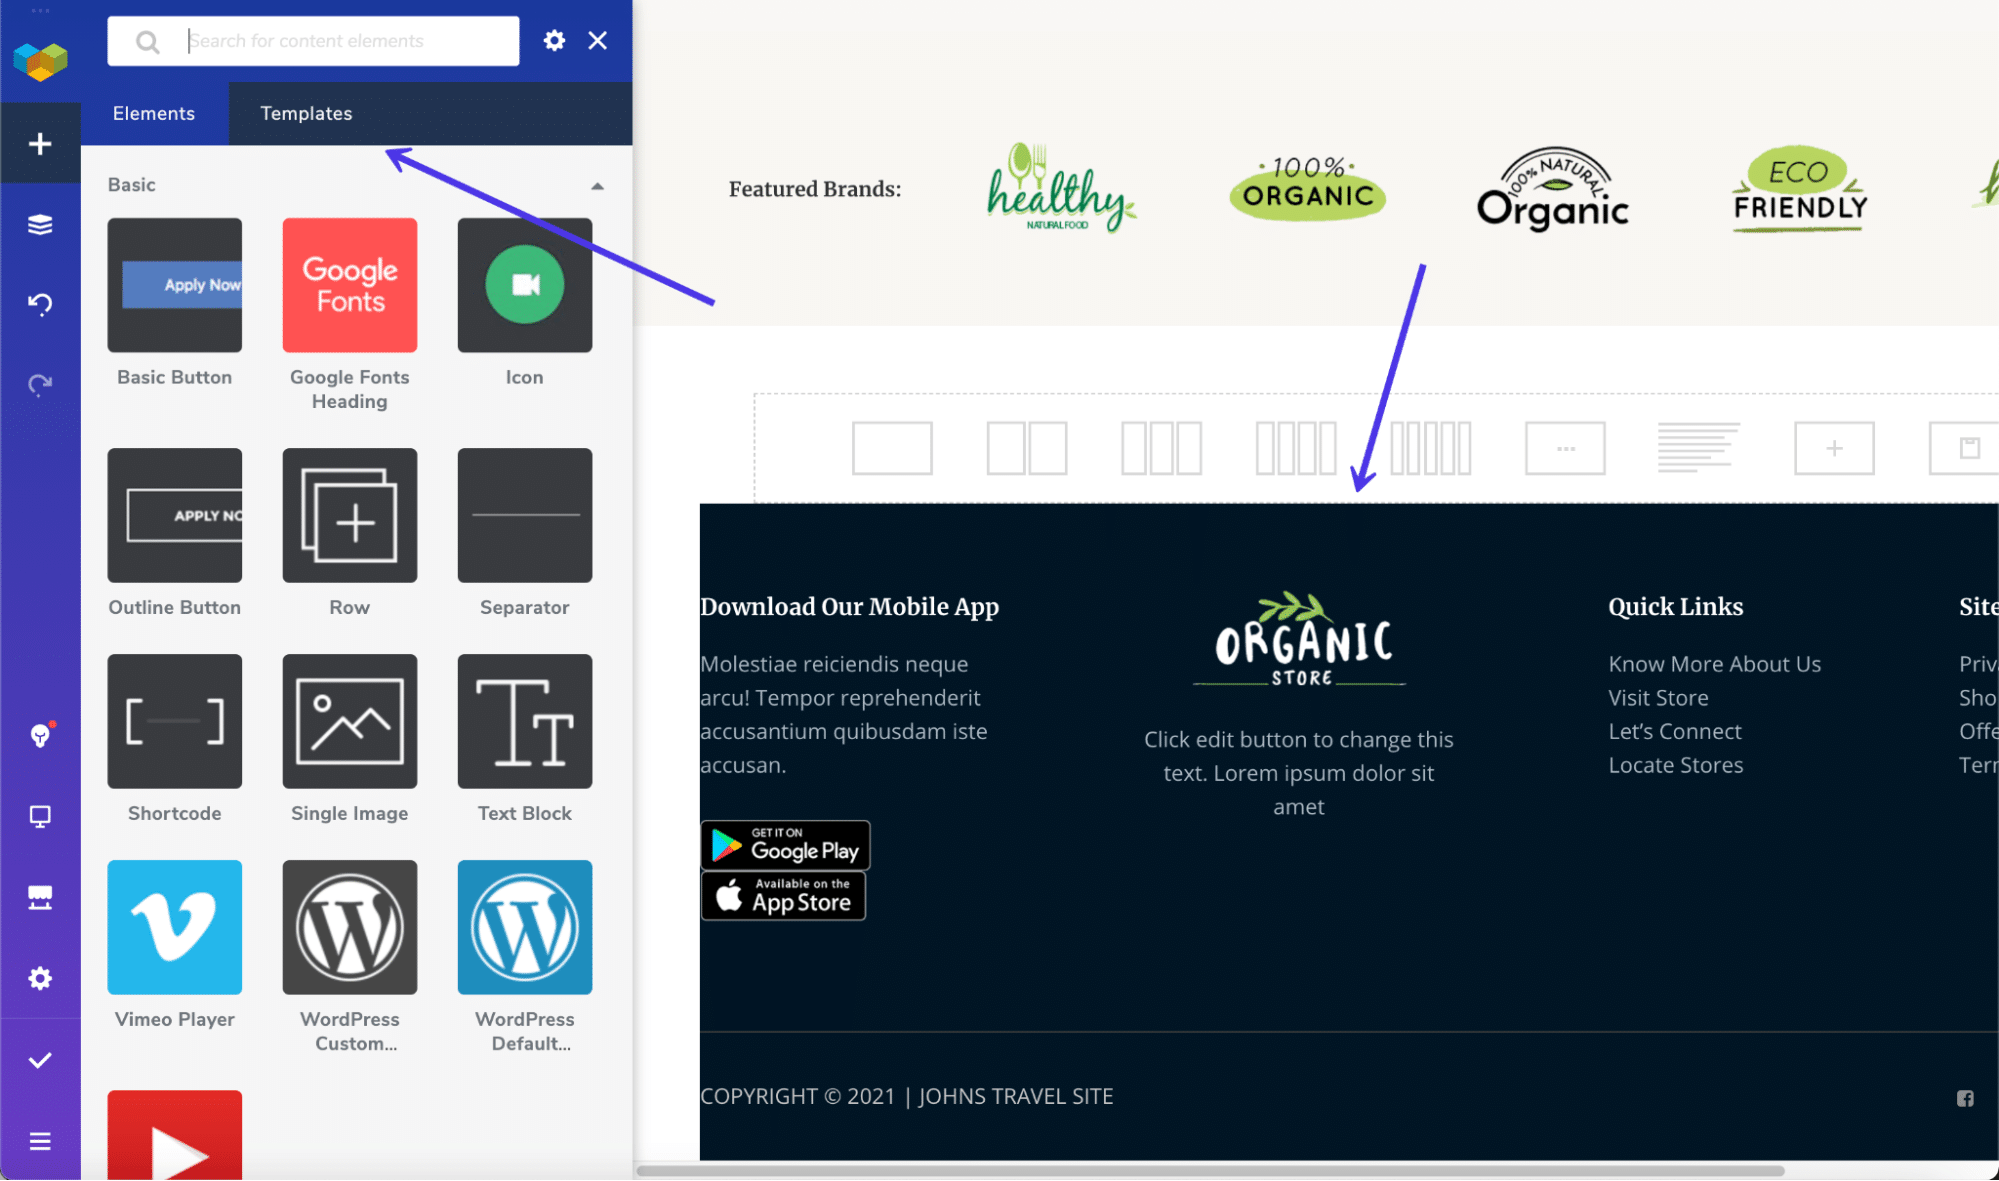
That brings up the Visible Composer fashion designer, with a reside preview of your webpage at the appropriate aspect and drag-and-drop design equipment like parts and templates at the left.
One of the most perfect tactics to enforce an exquisite footer is to easily make a selection a template (a lot of that are loose). Those templates supply skilled designs for all of your website, together with a pleasant footer that’s customizable.
A premade footer that includes some of the Visible Composer templates.
To look what’s to be had, you’ll be able to click on at the Templates tab, then the Get Extra Templates button. Visible Composer gives templates for all sides of your website, together with headers, footers, and sidebars.

The following window presentations a big library of templates, all classified underneath filters for such things as Components, Templates, Blocks, and Footers.
Make a selection the Footers tab to turn all premade footer templates.
As soon as once more, this a part of Visible Composer calls for the Professional model. As soon as lively, you’ll be able to scroll in the course of the dozens of footer templates to enforce them in your site and edit them as you please.
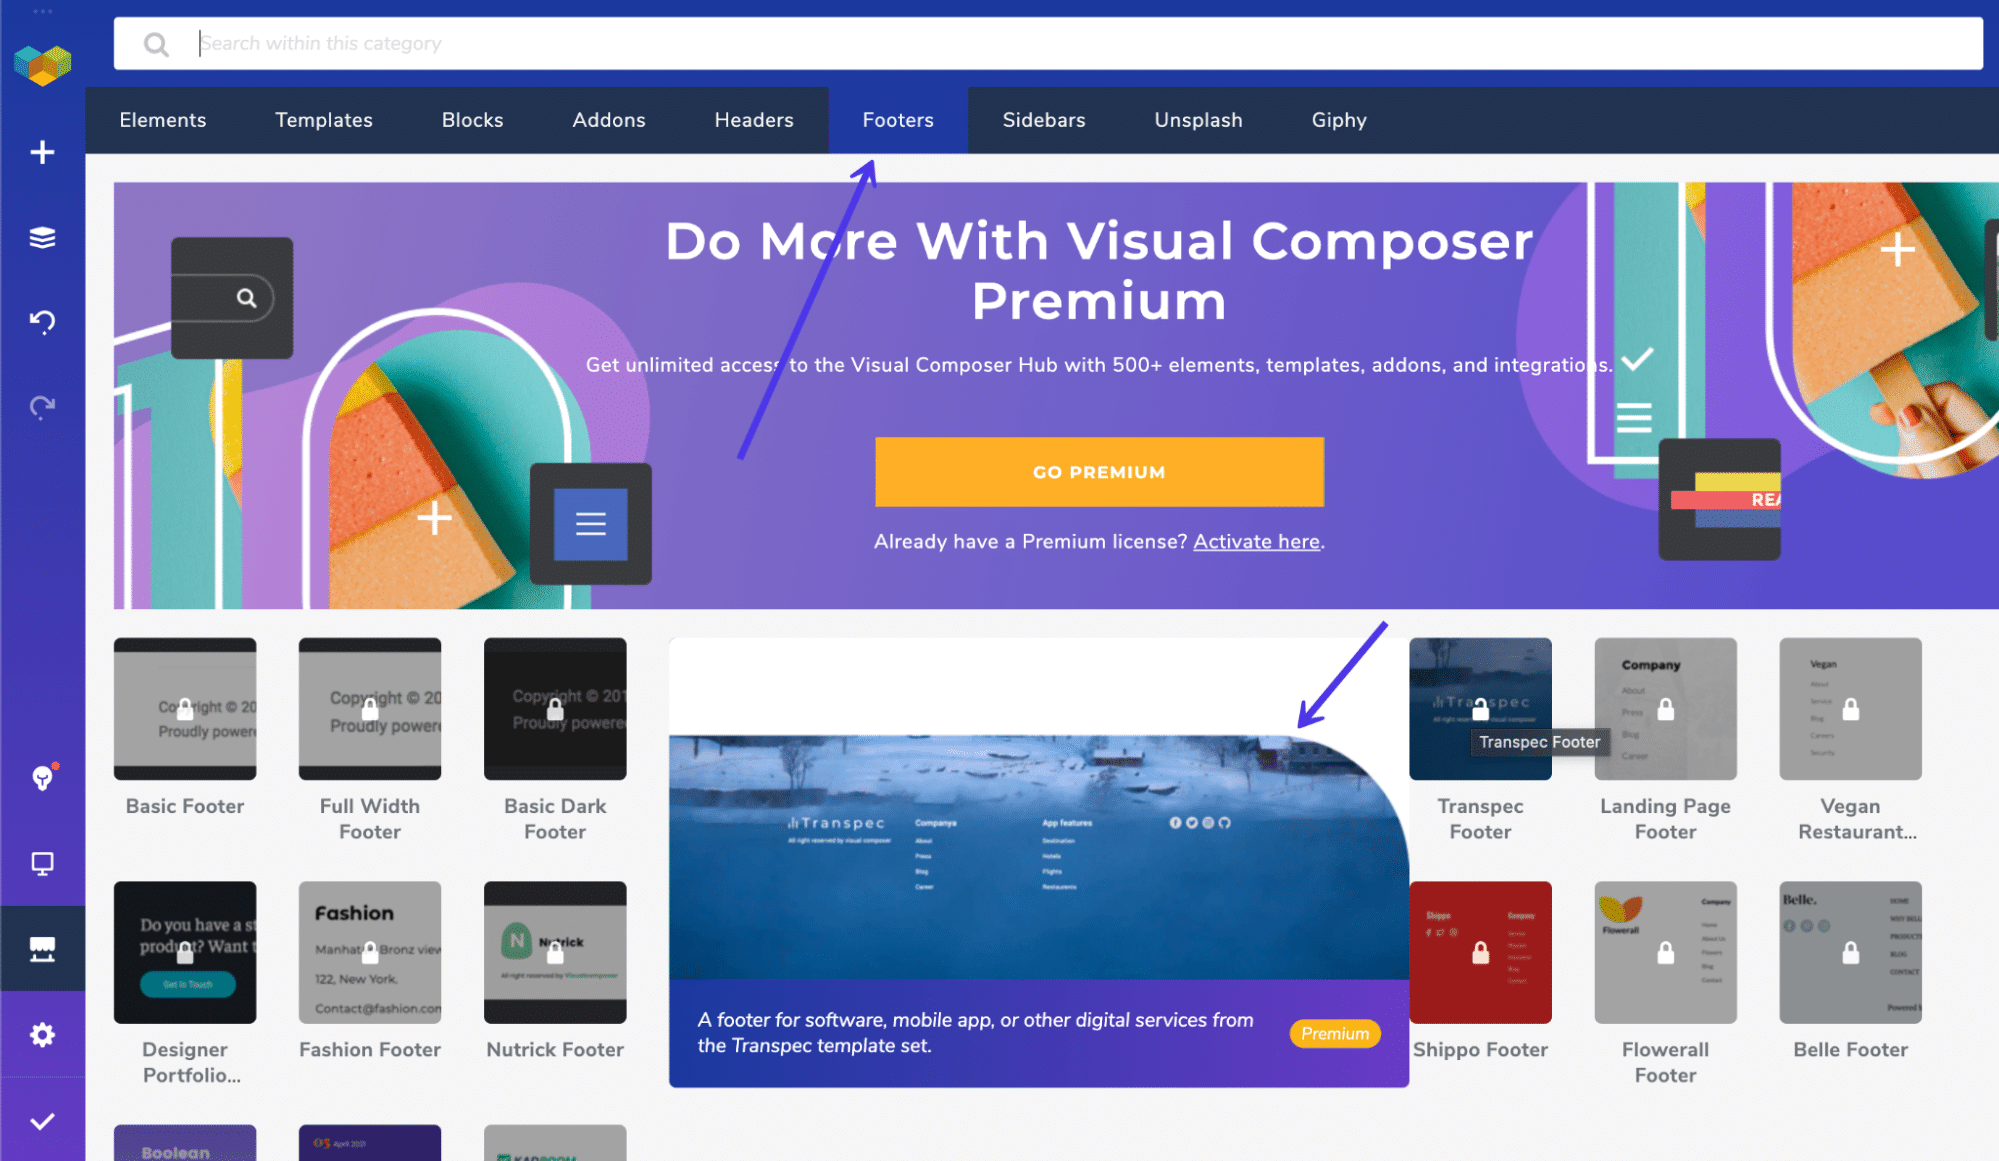
Footers in Visible Composer.
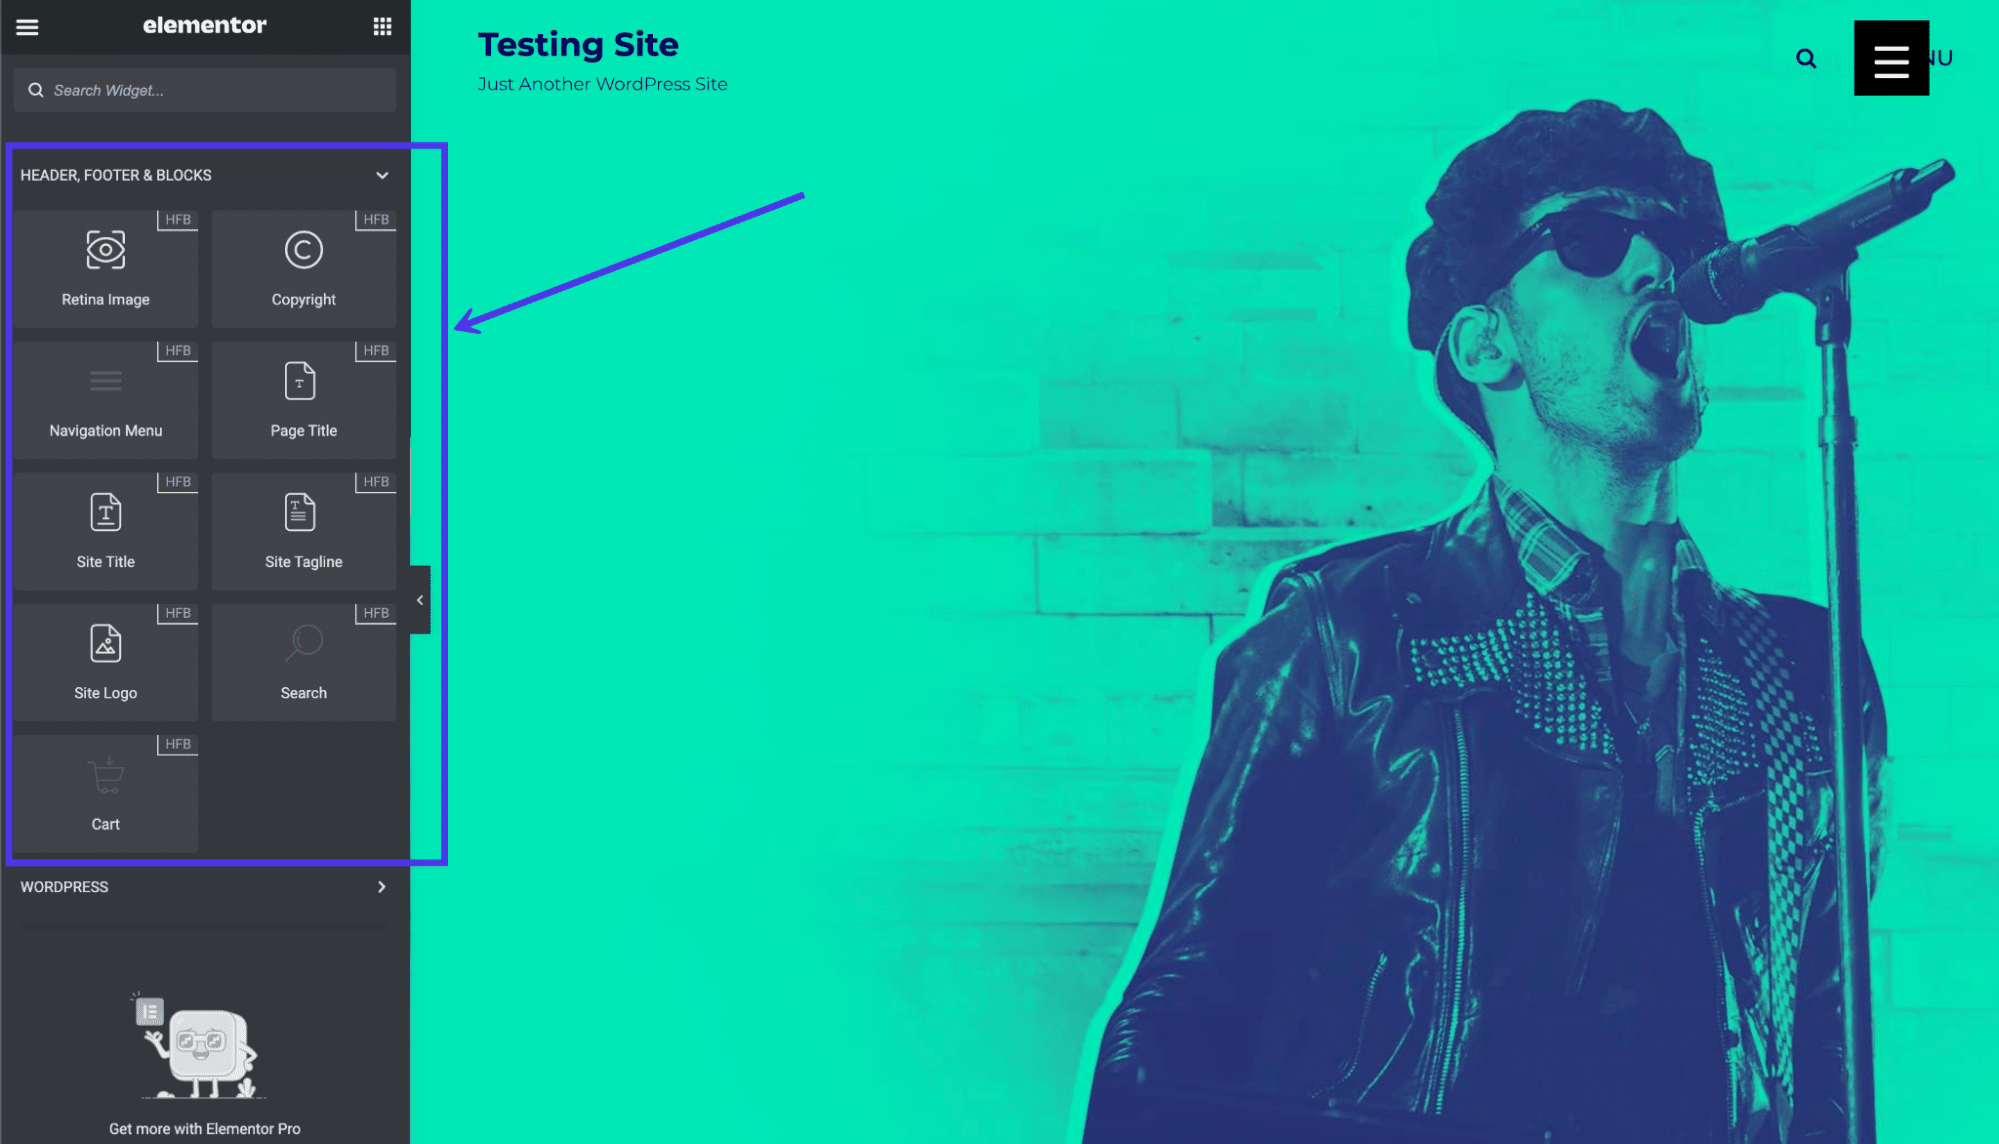
One of the most different web page developers with footer modifying equipment is known as Elementor. Similar to Visible Composer, Elementor supplies a complete site builder for developing homepages, product pages, footers, and extra.
Understand that you do obtain footer content material blocks without spending a dime with this technique, however the true footer builder makes use of the Professional model of Elementor. Like Visible Composer, you want to improve for complete capability.
To get began, set up and turn on each Elementor and the Elementor Header Footer and Blocks Template plugins.
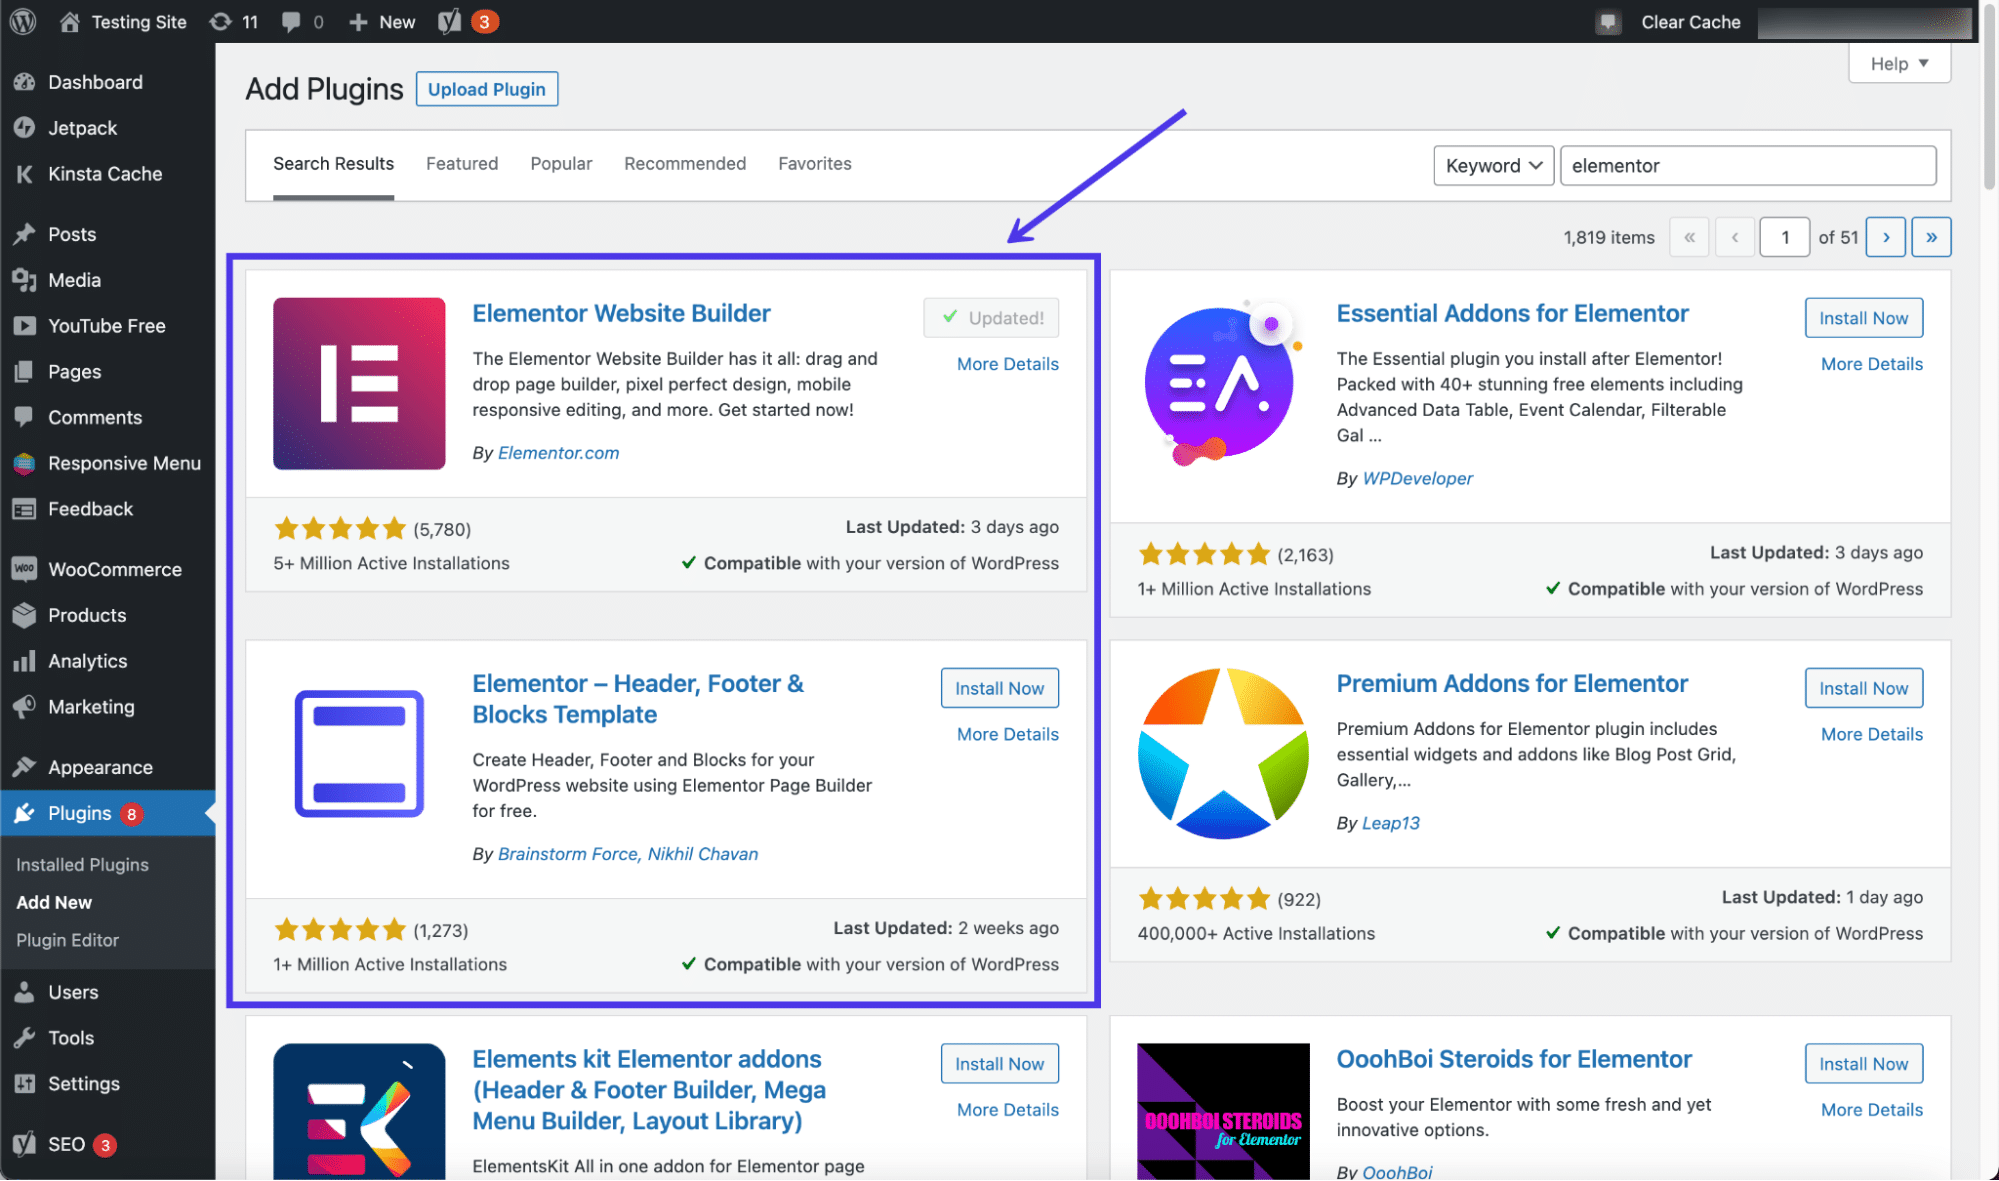
Elementor plugins.
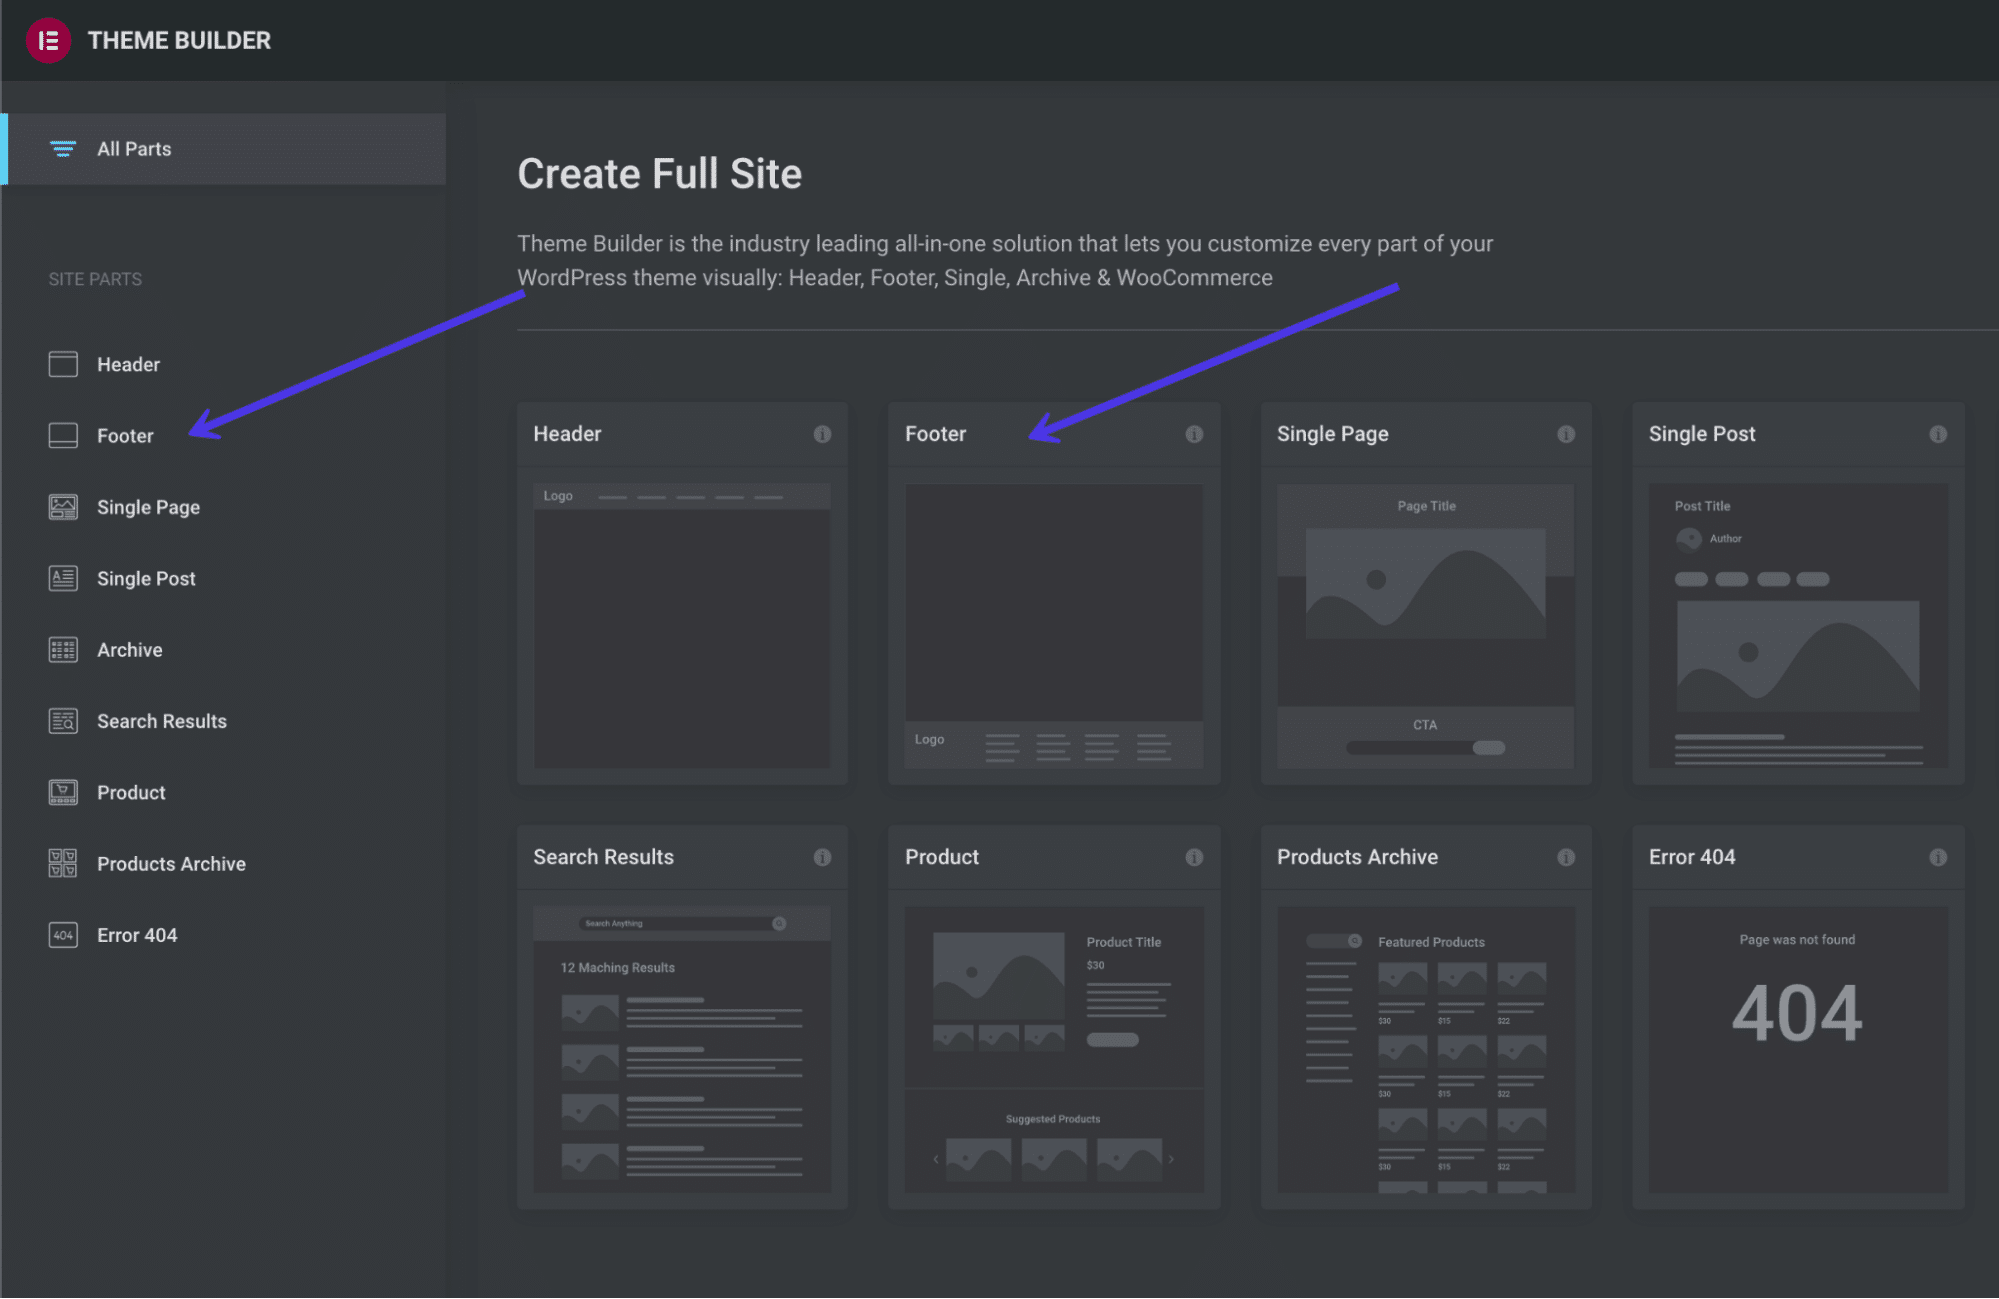
Click on on Templates > Theme Builder to open the whole site builder from Elementor.
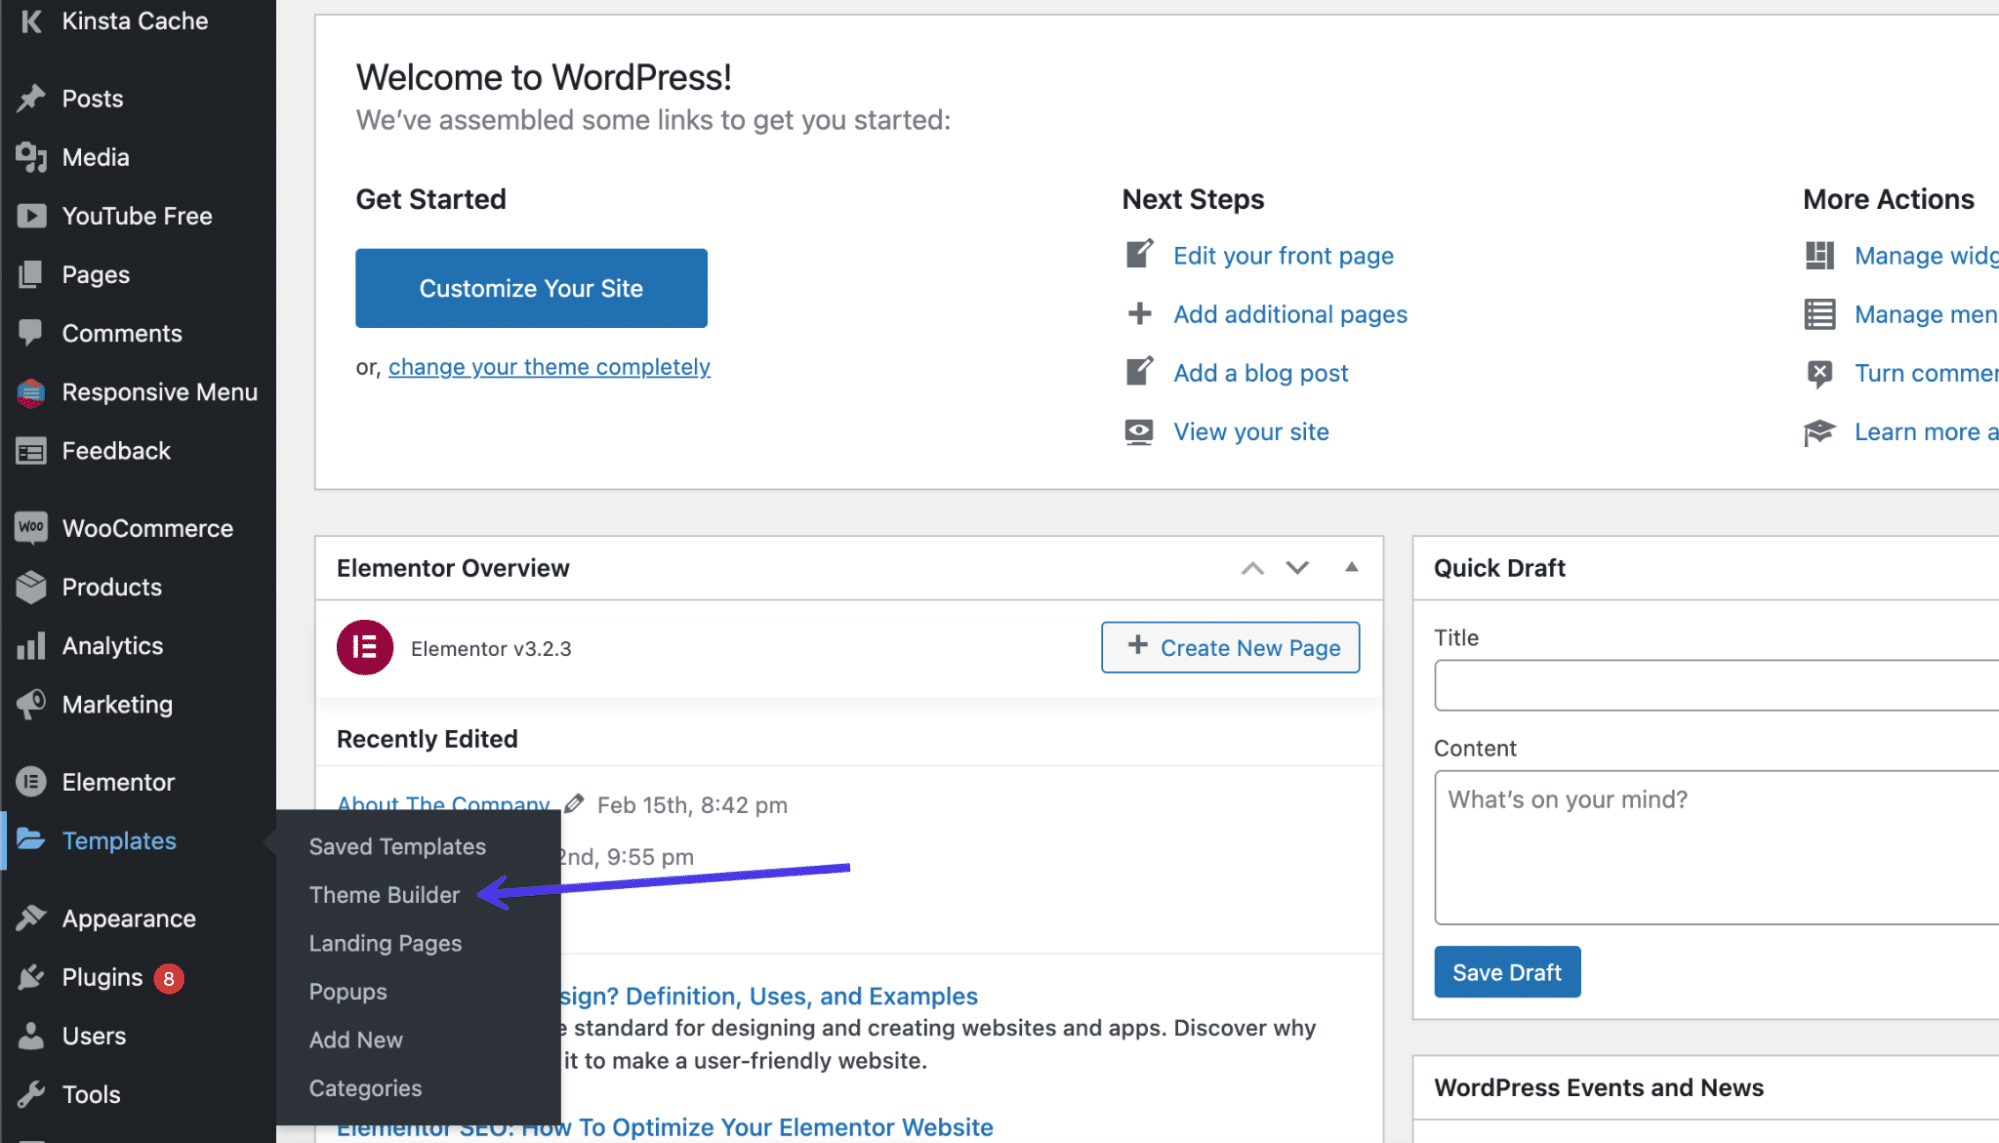
The Elementor Theme Builder.
Right here, you’ll see a menu to edit more than a few components of your website such because the header, footer, and unmarried pages.
Make a selection the components of your website you wish to have to customise at the left aspect menu or with the icon buttons in the course of the web page. As you’ll be able to see, there’s a Footer hyperlink in two puts.
Signal Up For the Publication
Footer modifying choices in Elementor.
The footer editor works in a similar fashion to each different editor in Elementor: You’ll trade the format, regulate the way, and click on at the block to kind in new content material. Each facet of the footer is customizable when the usage of Elementor, making it some of the extra versatile and fascinating choices in terms of footer keep watch over and finding out the way to edit a footer in WordPress.
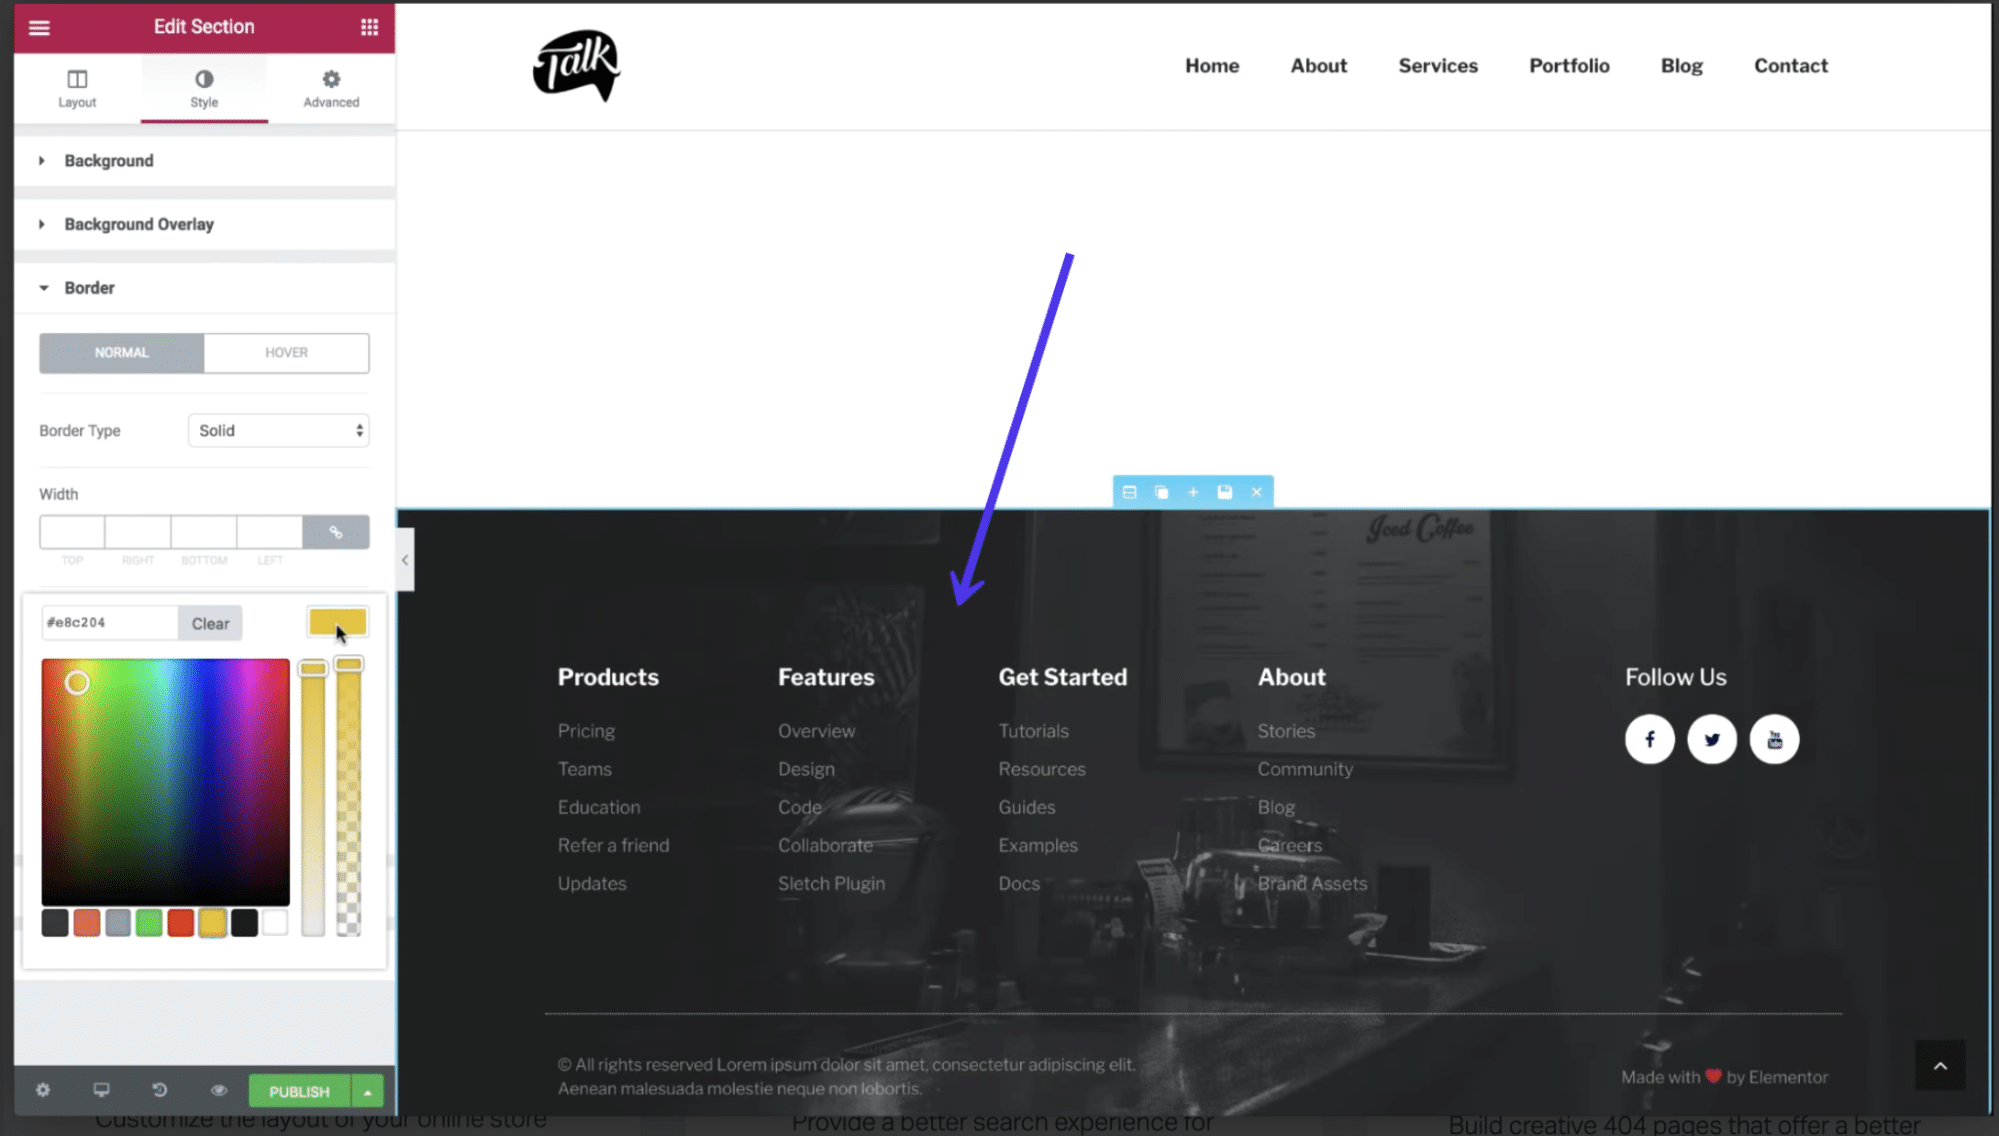
Modifying the footer with Elementor.
The Header Footer and Blocks plugin supplies content material modules made particularly for headers and footers. In the case of the footer blocks, you’ll be able to choose between modules like copyright data, pictures, website titles, and taglines.
To make use of those blocks, pass to Look > Header Footer and Blocks within the dashboard.
You’ll additionally make a novel block and make a selection to edit it within the Elementor web page builder. As soon as in Elementor, scroll all the way down to the block assortment for Headers Footers and Blocks, then drag any of those parts into your present design to turn on one of the vital extra commonplace content material pieces inside of a footer. As discussed, you’ll be able to to find the entirety from seek bars to website trademarks and cart icons to copyright textual content in those blocks.
Footer block examples.
WordPress.com, the hosted model of WordPress, contains footers for lots of of its topics, with choices to take away or trade the footers with a couple of clicks. The strategies for modifying footers in WordPress.com are slightly very similar to the way it’s executed within the self-hosted WordPress.org model, however with a couple of variations.
To begin with, the interface doesn’t glance precisely the similar.
You should log in in your WordPress.com dashboard and set up your footer within the Theme Customizer. Fortuitously, most of the topics introduced for WordPress.com are an identical or precisely the similar as what you’d to find for WordPress.org. Then again, that still approach the way in which through which you edit the footer in WordPress.com is determined by which theme you put in.
To start, pass to Look > Customise within the dashboard.
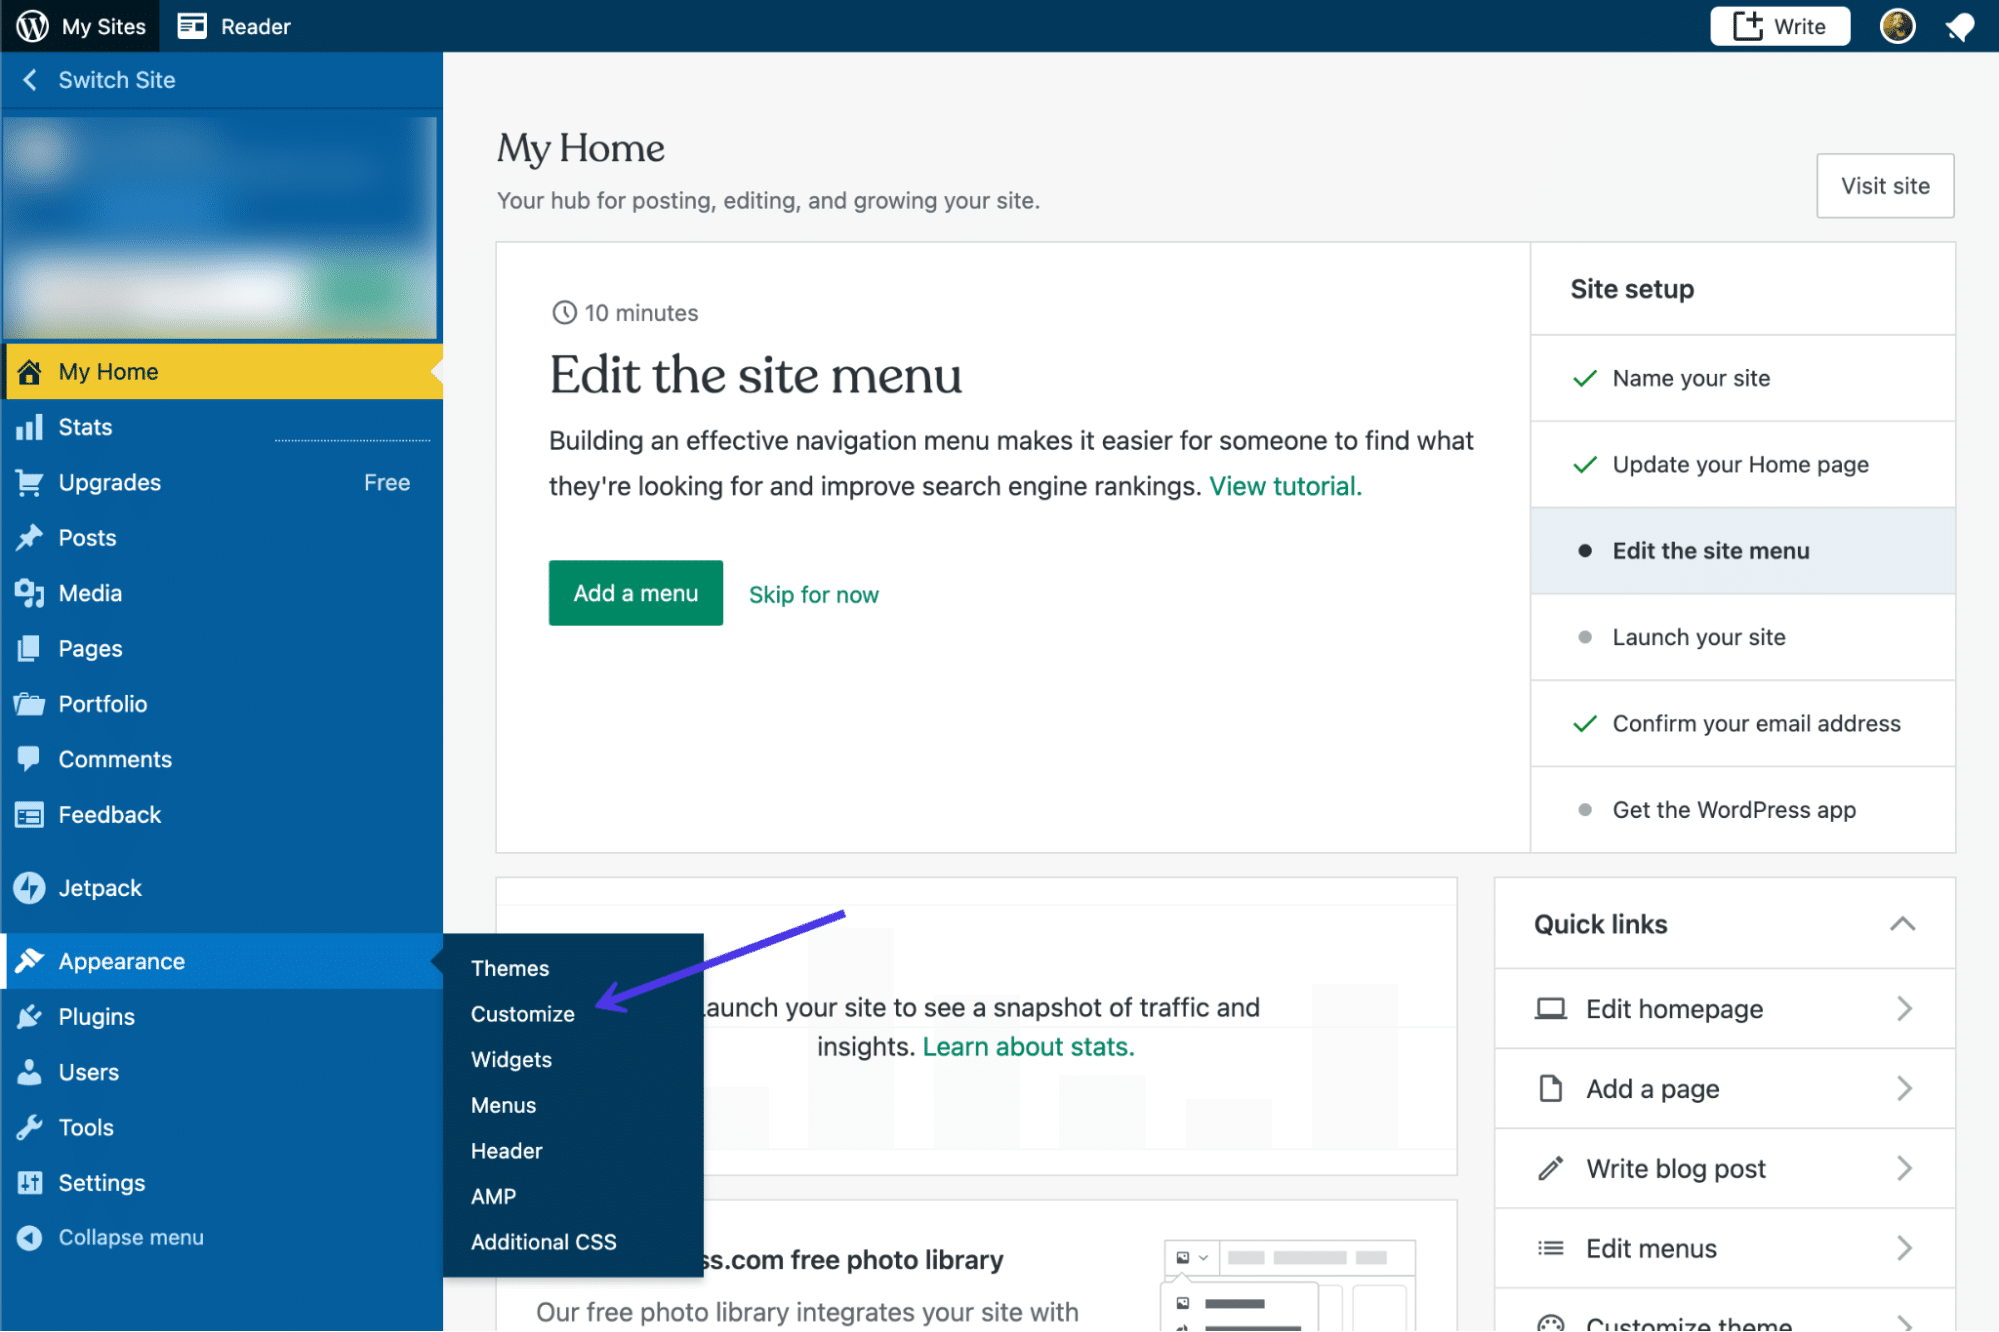
Move to the Theme Customizer.
Take a look at the Theme Customizer tabs to be had for that specific theme. Maximum topics have a Widgets tab, however you should work out if a footer space for putting widgets is supplied with your theme. Click on at the Widgets tabs to determine.
Click on at the widgets tab.
This present theme we’re the usage of supplies a Footer Widget module. Should you don’t see an strategy to put widgets within the footer, believe making an attempt a brand new theme, or use menus as an alternative of widgets.
For this case (with a footer widget space), click on at the Upload A Widget button.
Upload A Widget button.
A slideout menu seems with a selection of widgets. You’ll make a selection whichever widgets take advantage of sense in your corporate.
Once more, the theme dictates what number of widgets you’ll be able to are compatible into the footer with out it having a look too cluttered. It sounds as if this actual theme lets in for approximately 3 columns of widgets ahead of the design begins having a look messy.
For our instance, we’ll make a selection a Touch Data and Map widget, together with a Observe Weblog widget, which activates guests to enroll with their e-mail addresses.
The lengthy record of WordPress widgets.
The preview at the appropriate presentations the widgets in motion. We advise going thru each and every widget settings panel to configure particular person parts just like the show textual content and make a selection which fields you wish to have to turn in each and every widget.
Make sure to click on at the Save Adjustments button so the widgets seem at the entrance finish of your site.
A finished footer with touch information and subscription widgets.
You additionally might realize that WordPress.com robotically provides your website identify and a WordPress credit score on the very backside of your footer. You’ll in most cases eliminate the website identify if you wish to have, however the WordPress credit score removing calls for you to pay for the Trade Plan.
To change either one of those parts, click on at the Web site Id button.
Move to Web site Id.
First off, pass to the ground of the settings to seek out the Footer Credit score box. Click on that dropdown to expose all imaginable choices.
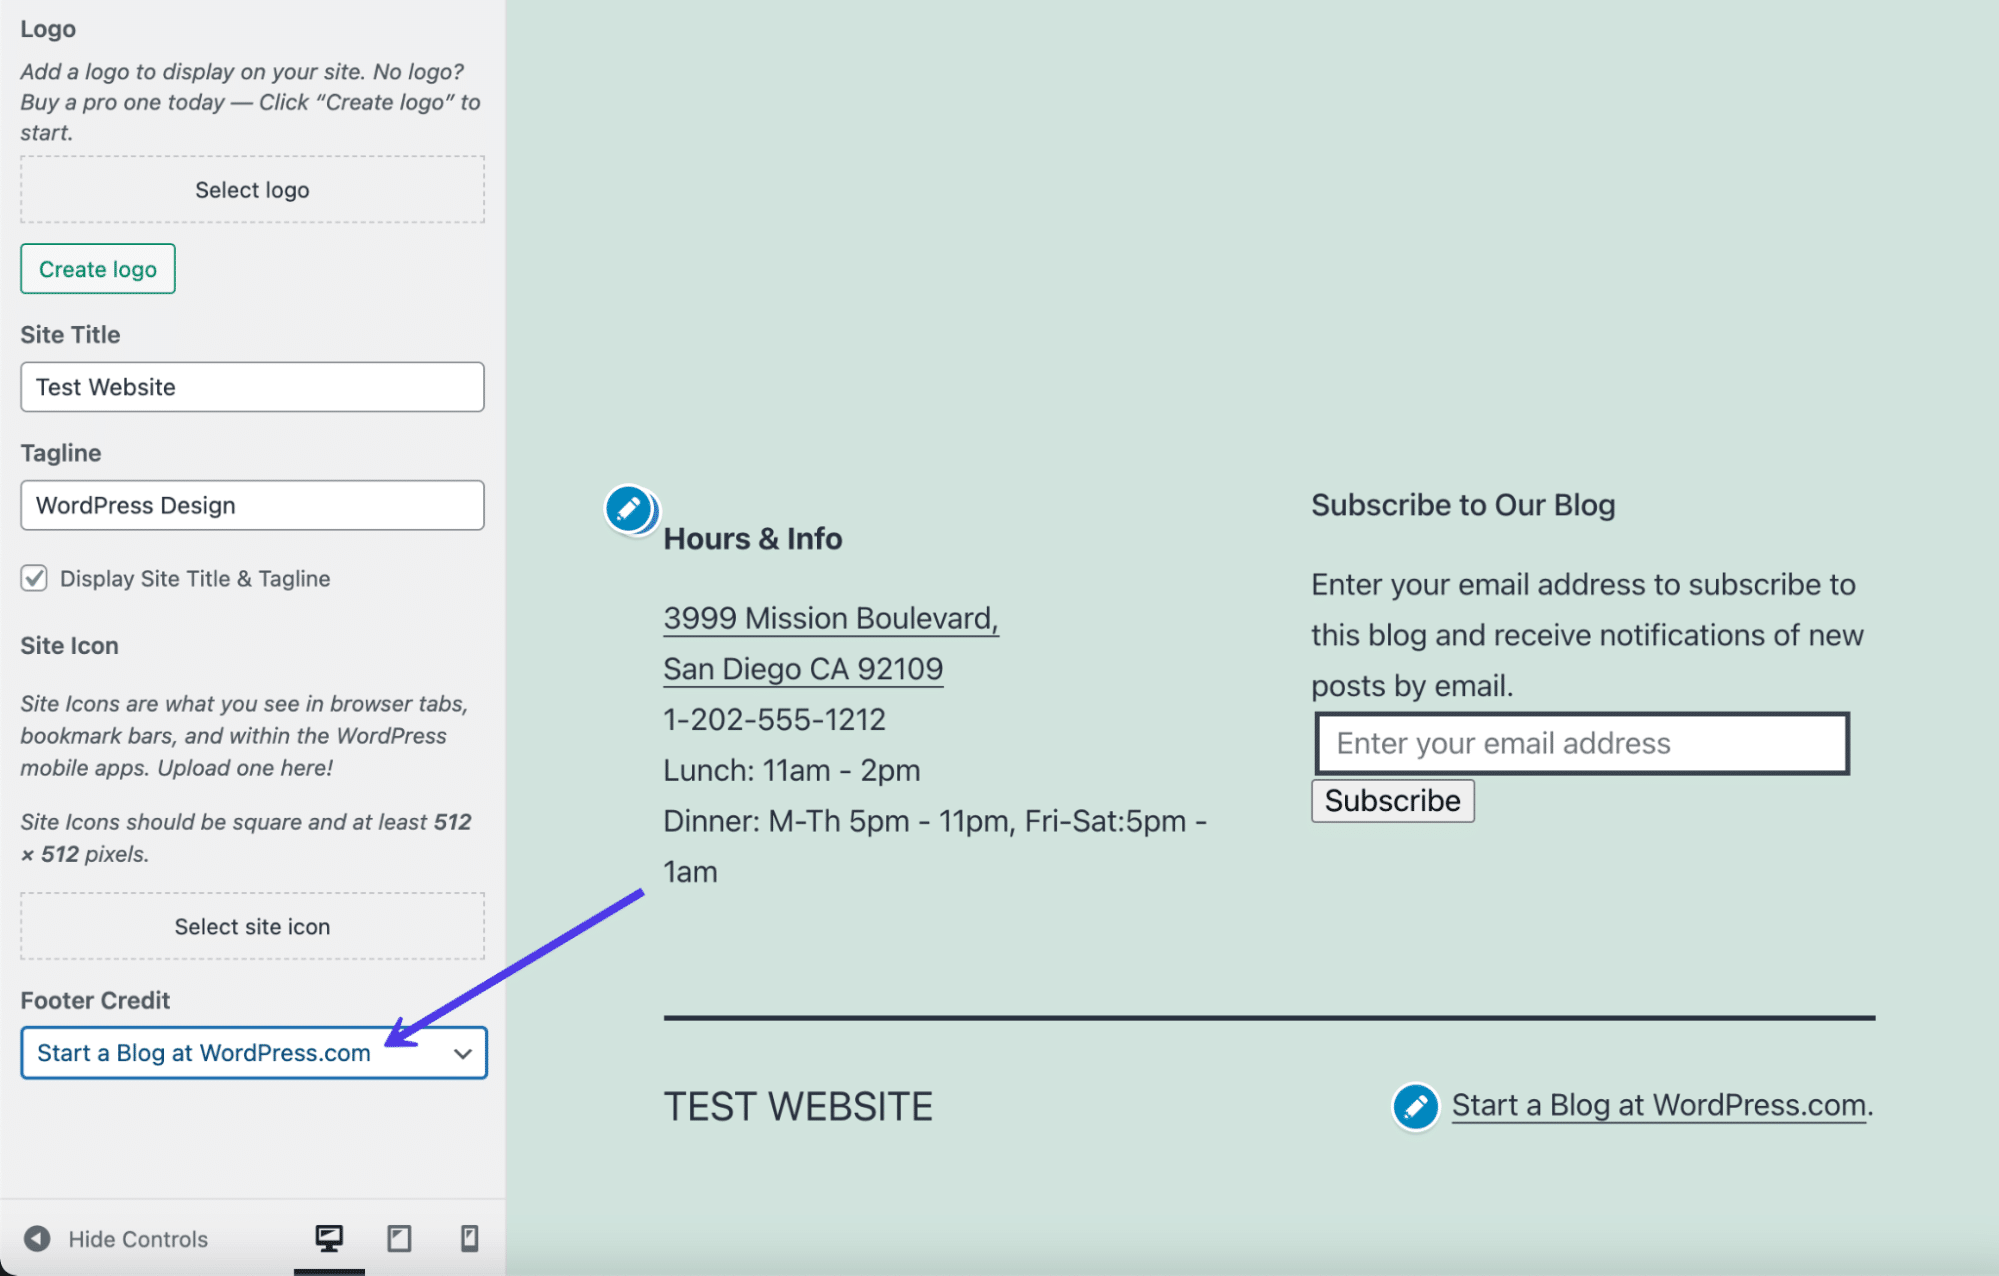
The Footer Credit score dropdown.
Each some of the credit has some form of connection with WordPress. A WordPress credit score isn’t a large deal should you’re operating a private weblog or on-line magazine, however we advise you improve to the Trade Plan and take away the credit score in case your website is for a valid trade.
After that, you’ll be able to click on at the dropdown menu and make a selection the Conceal strategy to eliminate the credit score totally.

You should have the Trade Plan to cover the WordPress credit score.
The credit score then disappears within the preview, leaving no matter widgets you added to the footer together with the website identify.
A footer with out the WordPress credit score.
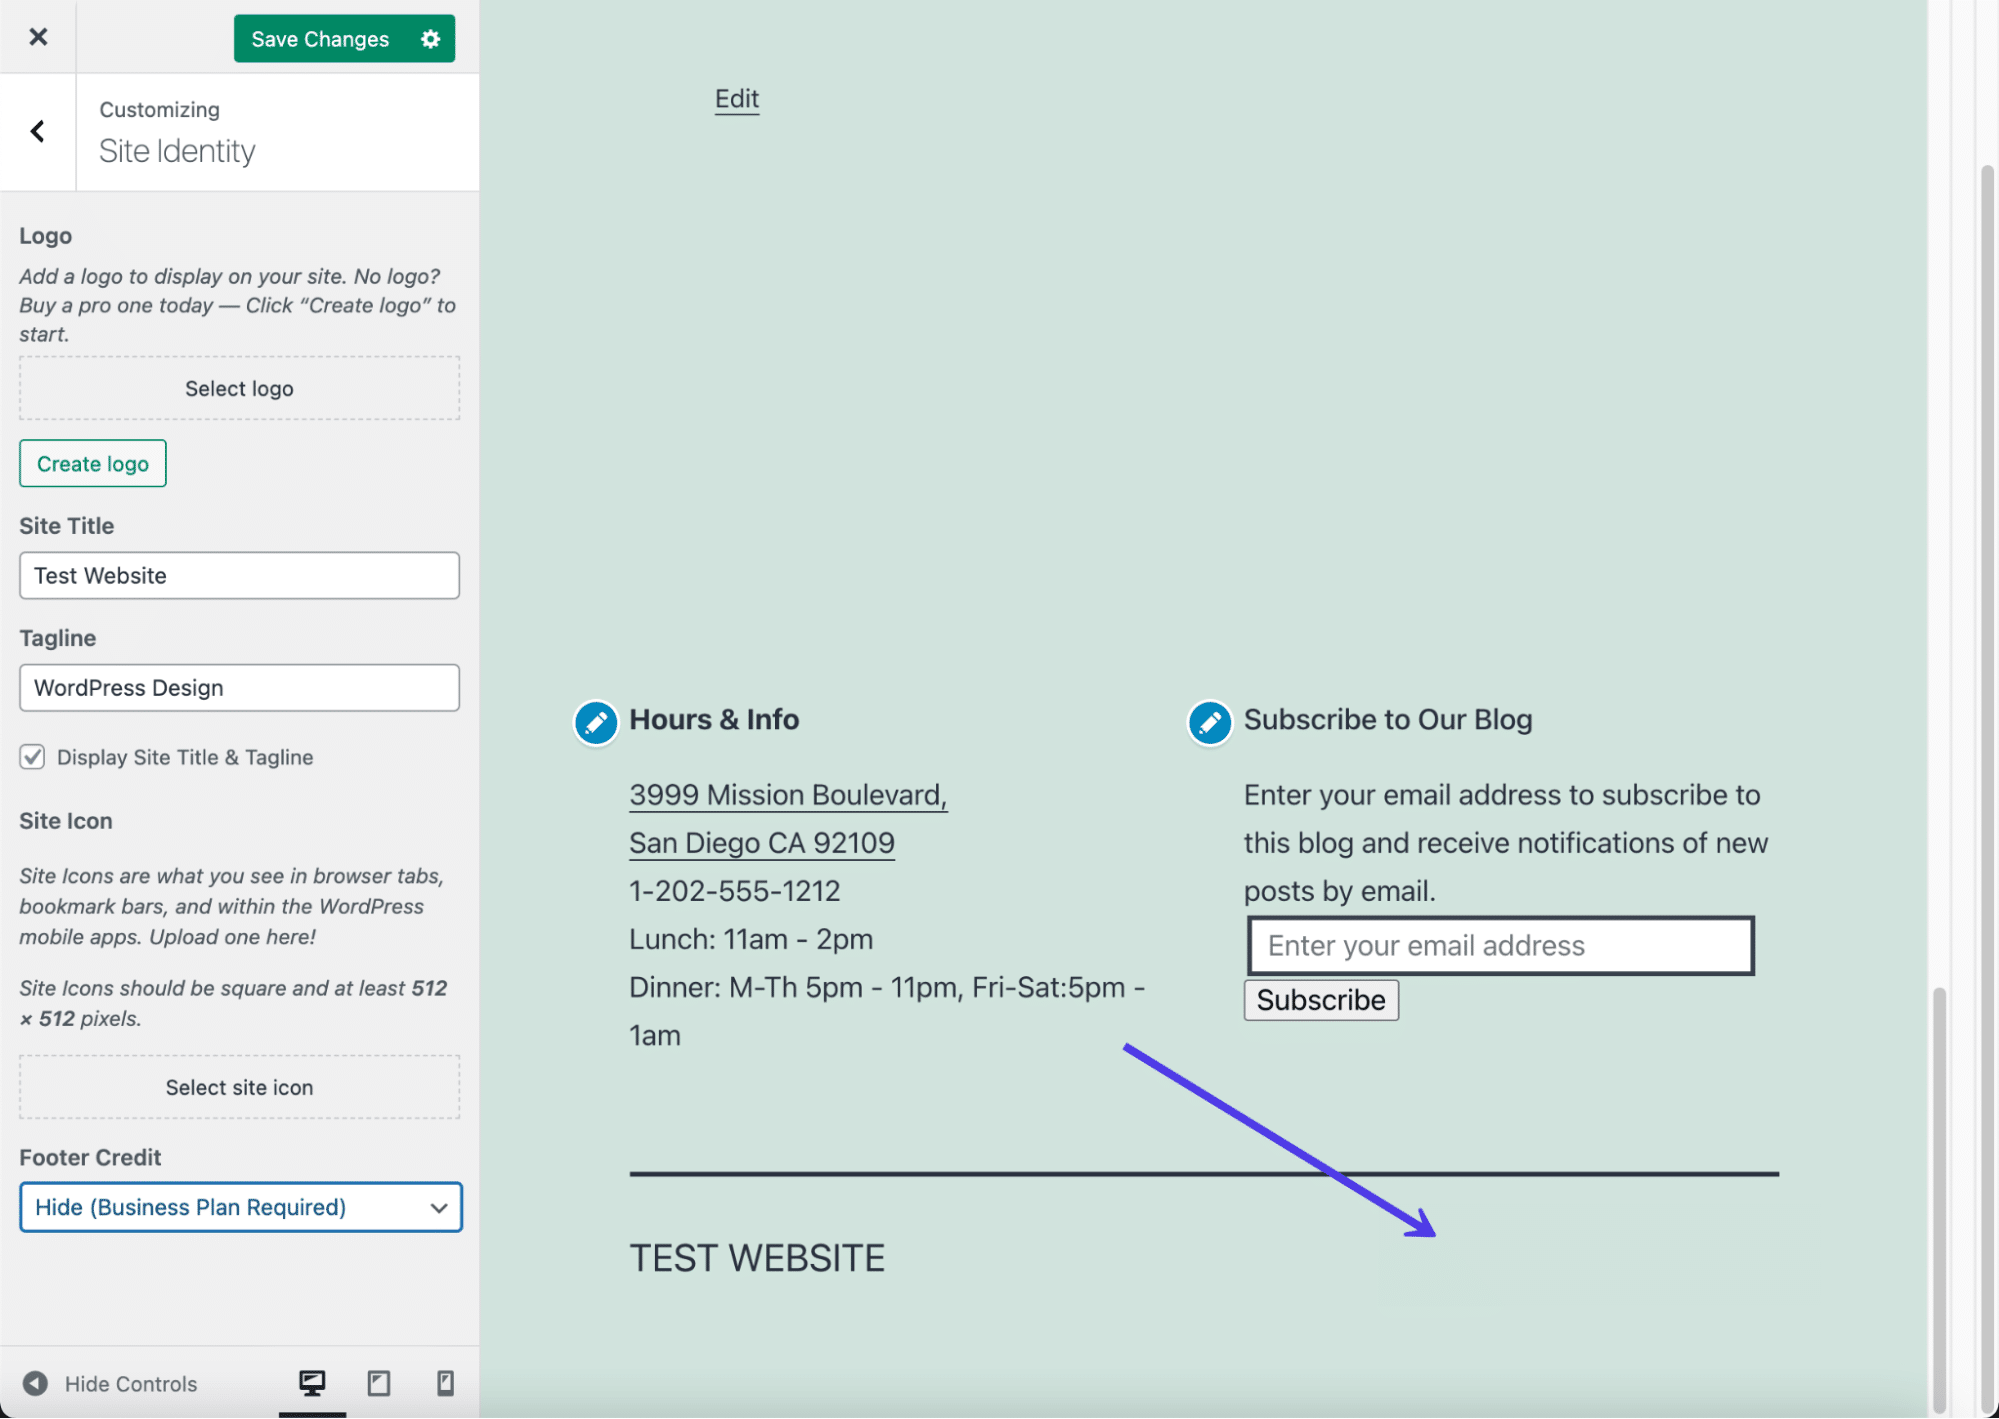
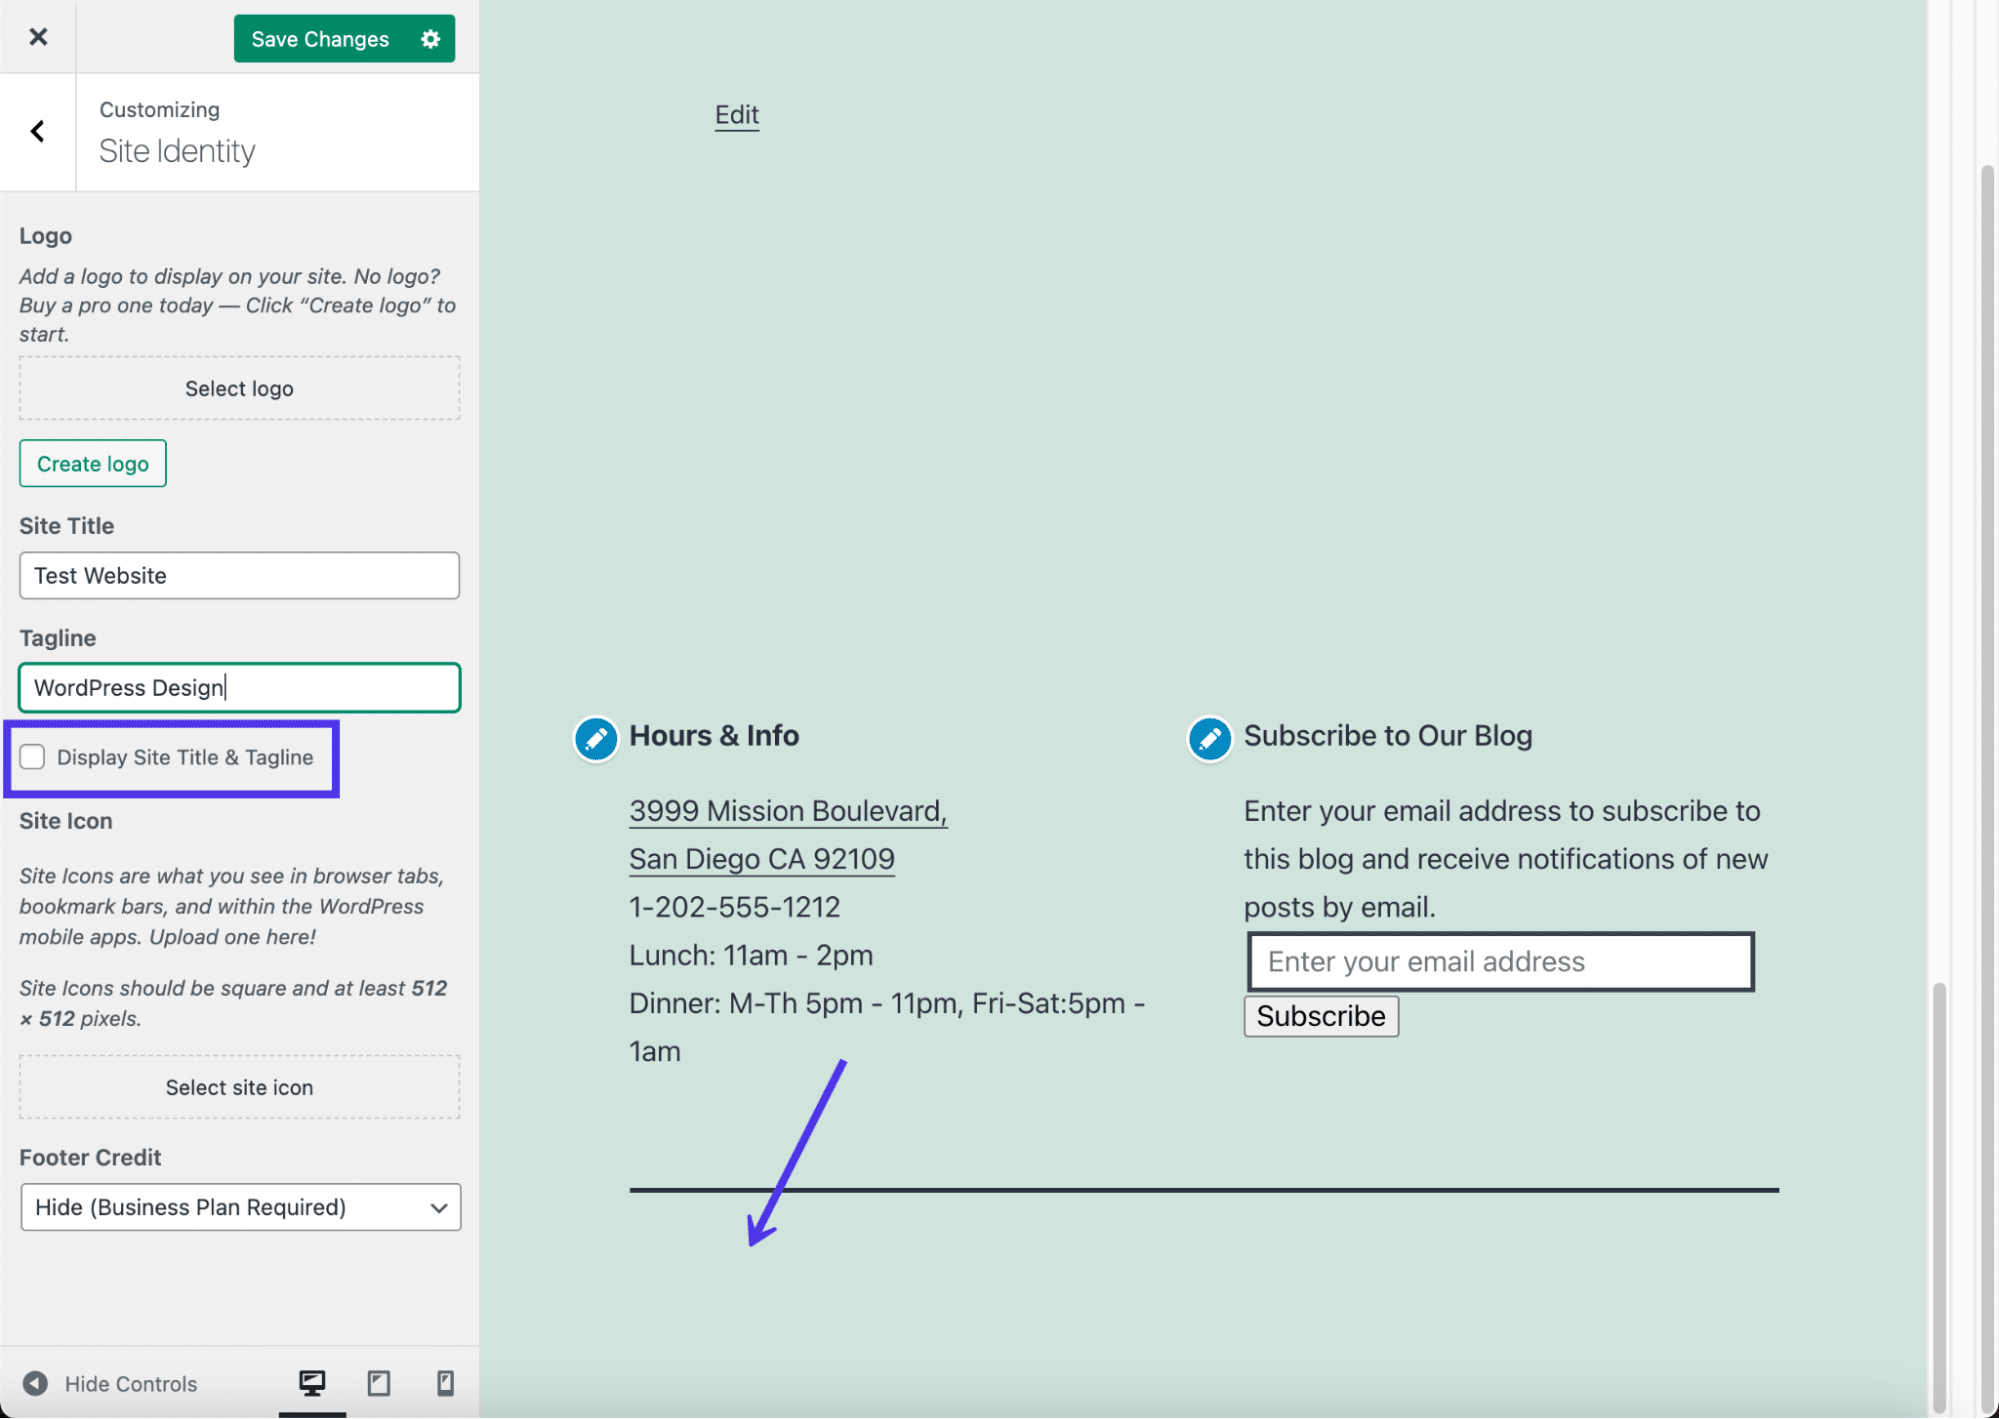
Some topics be capable of take away the website identify from the footer as smartly. One of the simplest ways is to uncheck the Show Web site Name and Tagline field. That eliminates the website identify within the footer and probably the header. For the header, we advise importing a symbol anyway.
Different topics have alternative ways of taking away the website identify and tagline. Every so often it’s no longer imaginable in any respect, whilst different occasions the website identify isn’t integrated within the footer, initially. When unsure, take a look at deleting what’s throughout the Web site Name box should you don’t have the Show Web site Name and Tagline examine field.
A footer with out the Web site Name.
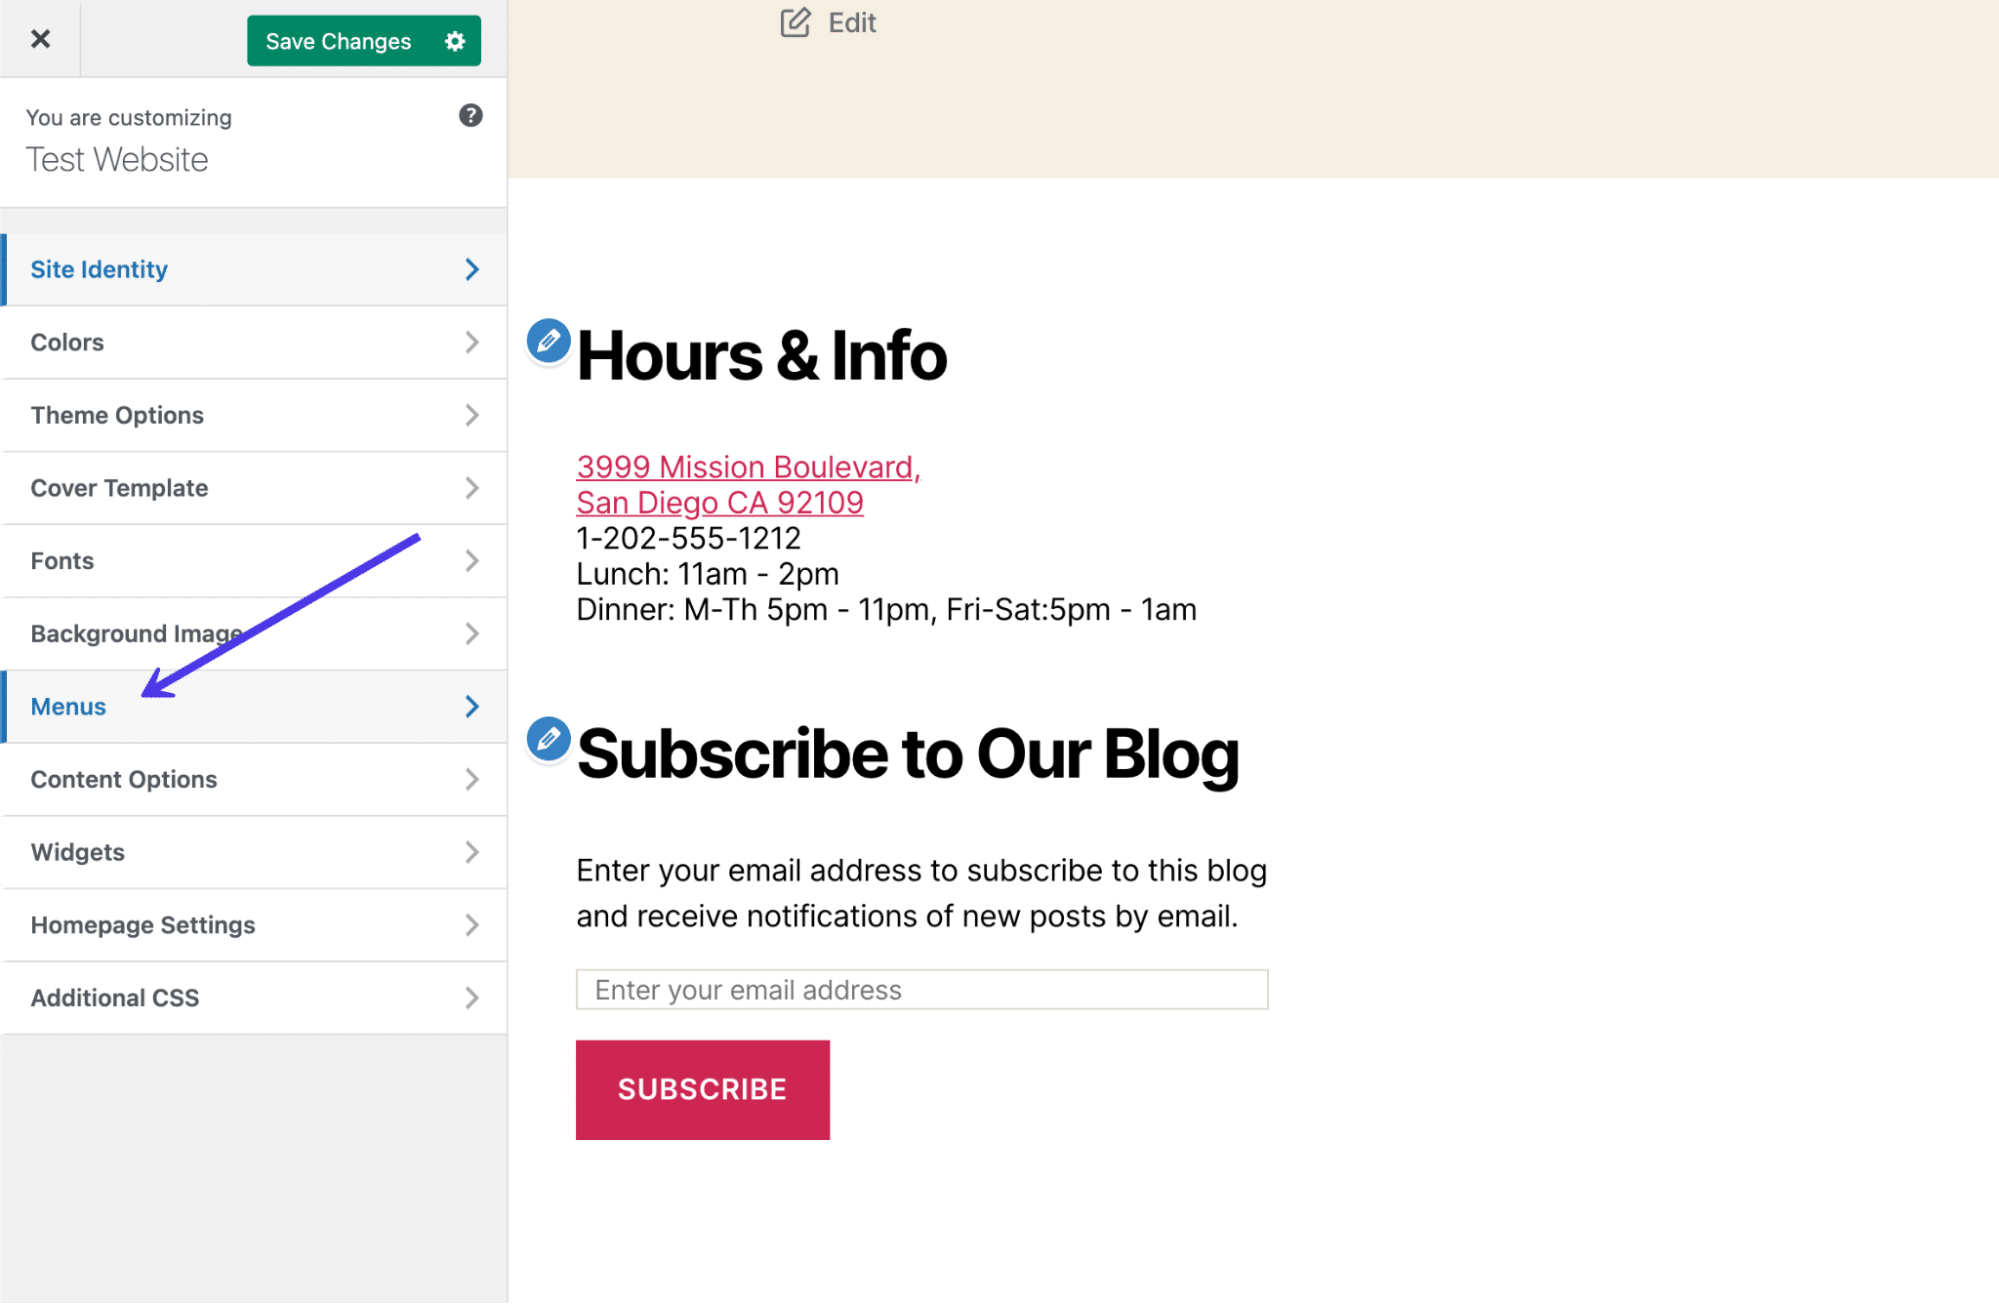
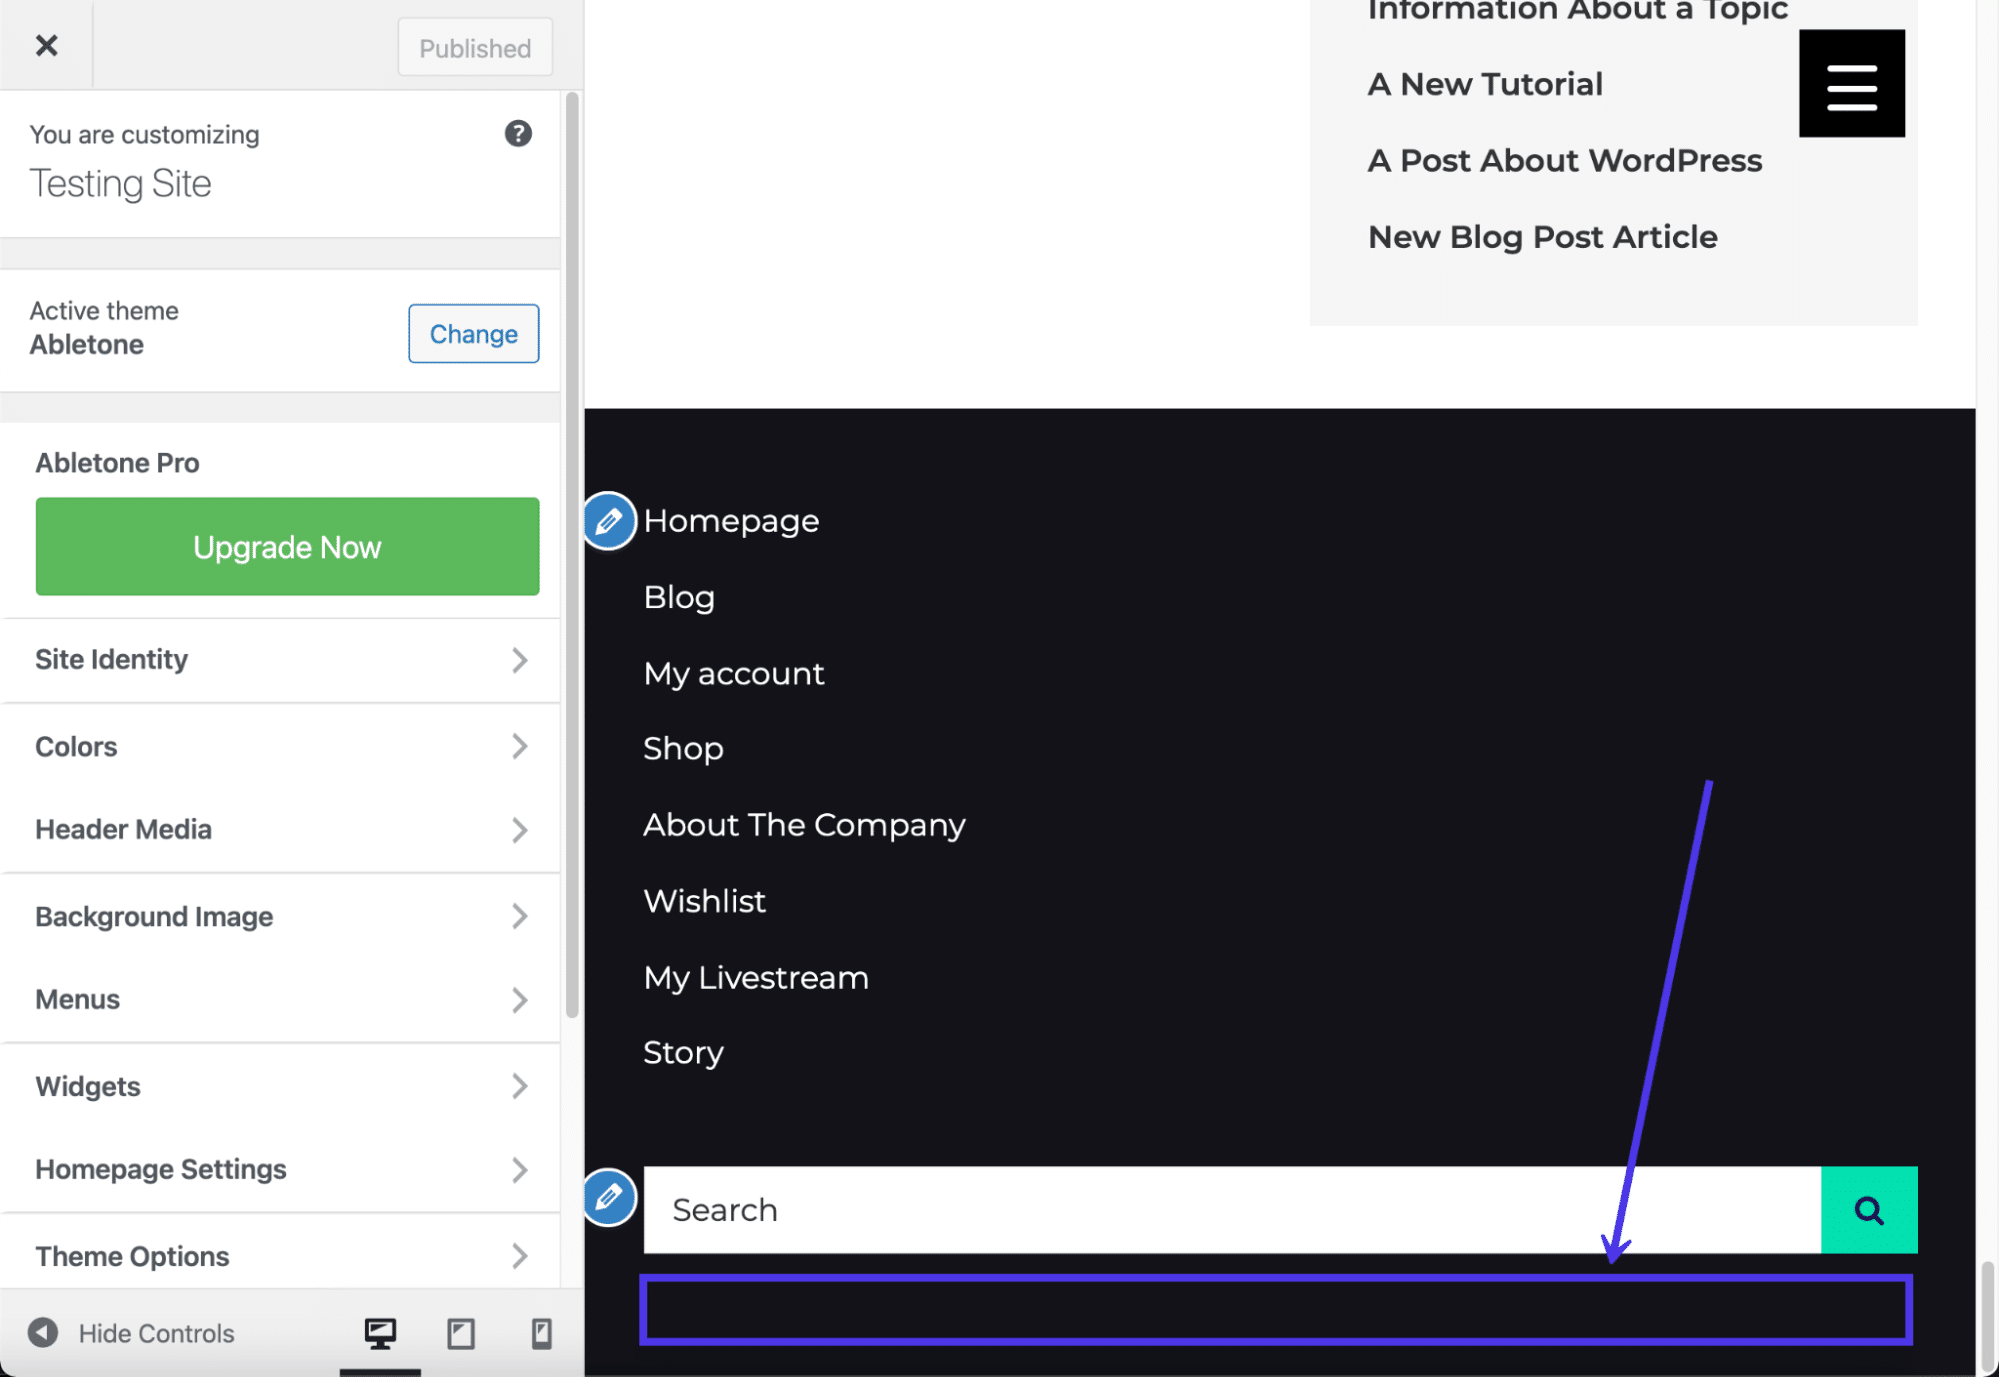
In a different way to insert content material on your WordPress footer is by using the Menus panel. Now not all topics permit for menus within the footer, but it surely’s a good suggestion to no less than examine.
Click on at the Menus tab to proceed.
Click on at the Menus tab.
Make a selection View All Places. This brings up an inventory of the place you’re allowed to position menus on this explicit theme.
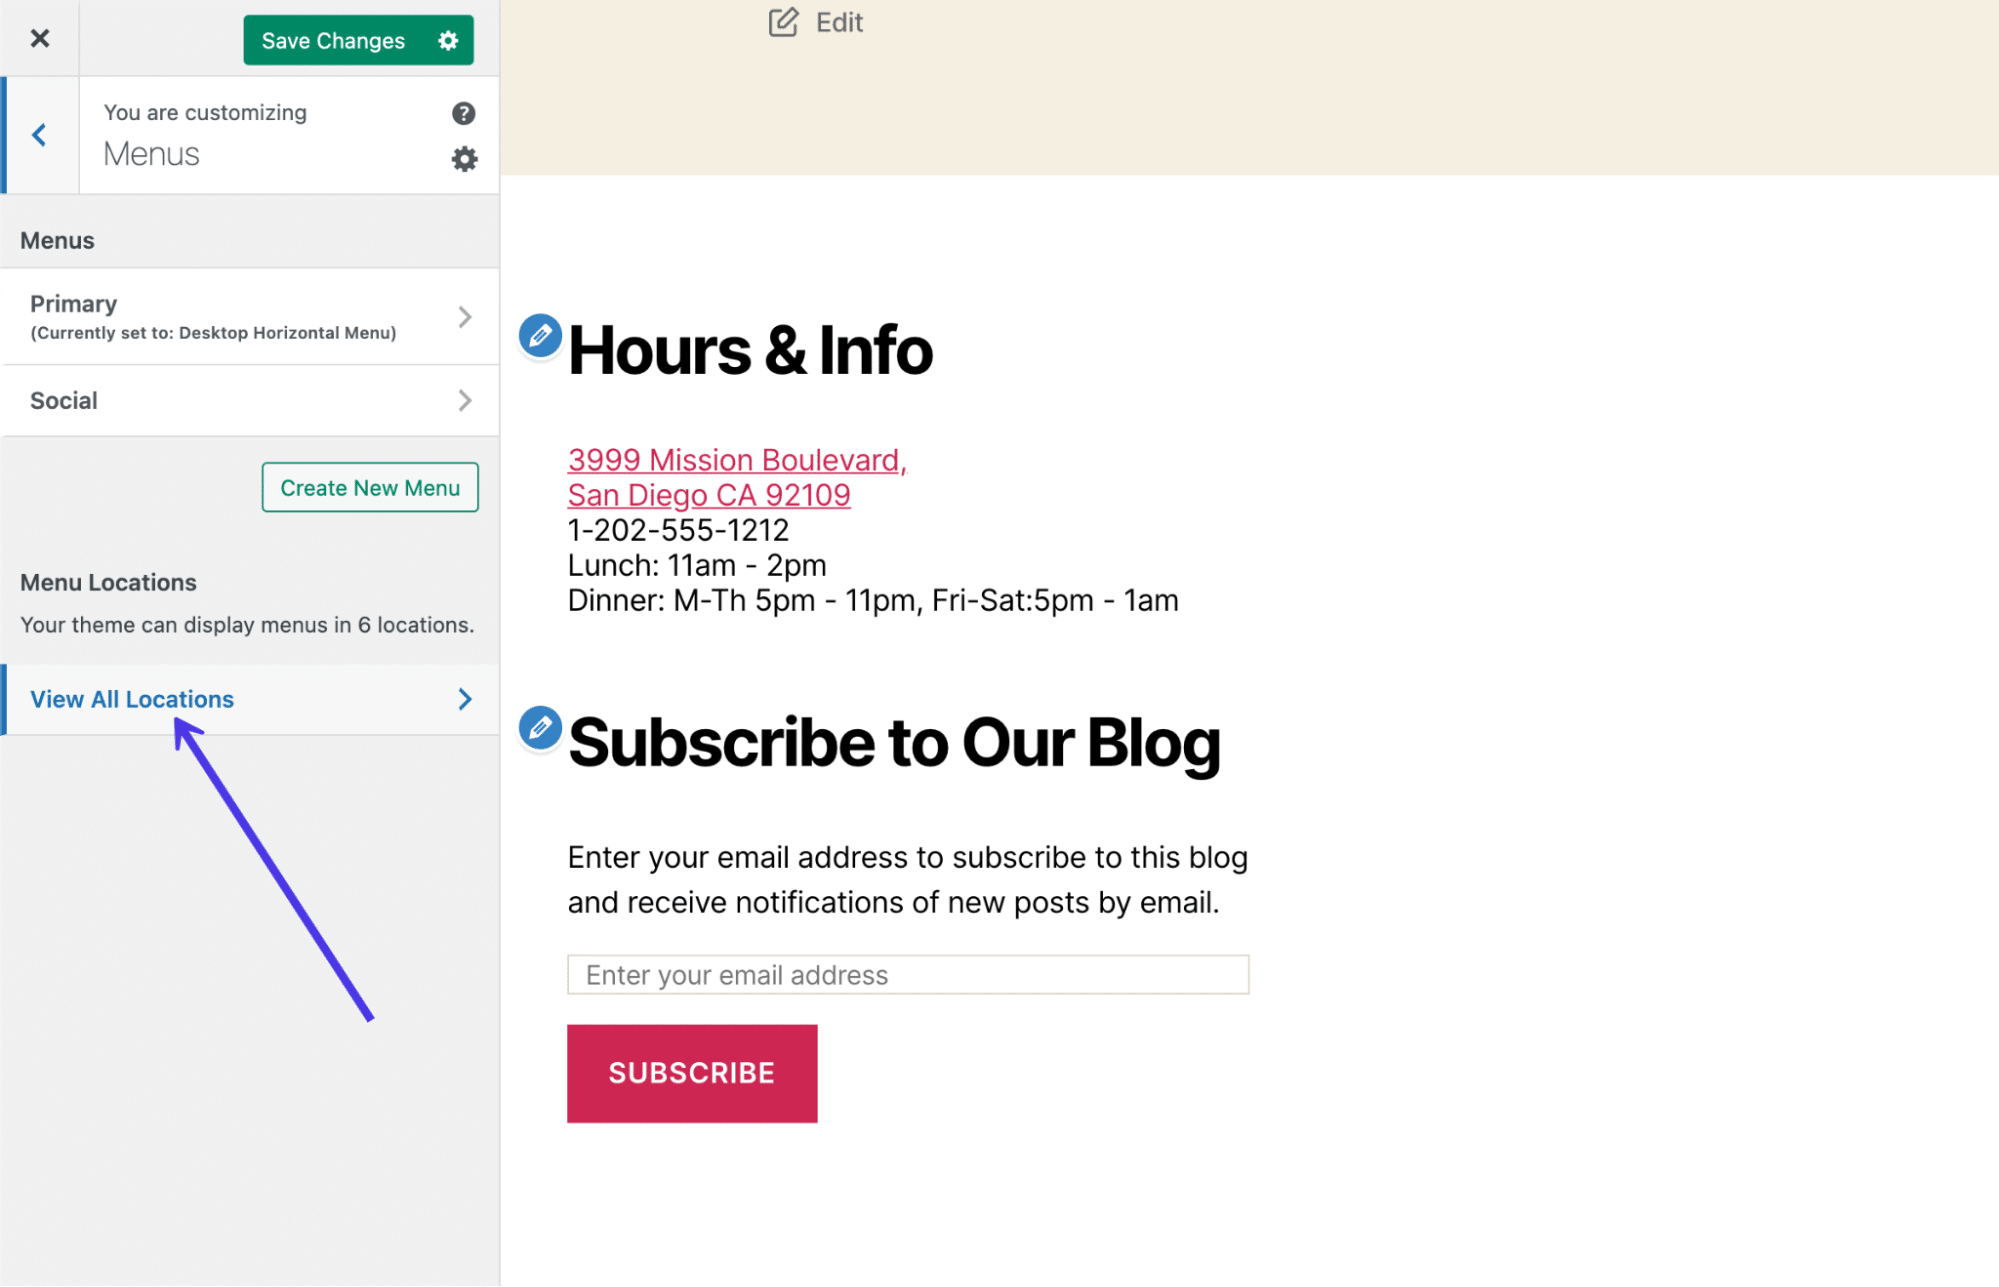
Make a selection the “View All Places” choice
For our instance theme, we’ve got slightly a couple of menu location choices, certainly one of which is for the footer. You received’t be so fortunate with each theme you come upon, so be ready to both switch them out or believe the usage of the widget method for modifying your footer as an alternative.
With topics that enhance footer menus, click on at the Footer dropdown box.
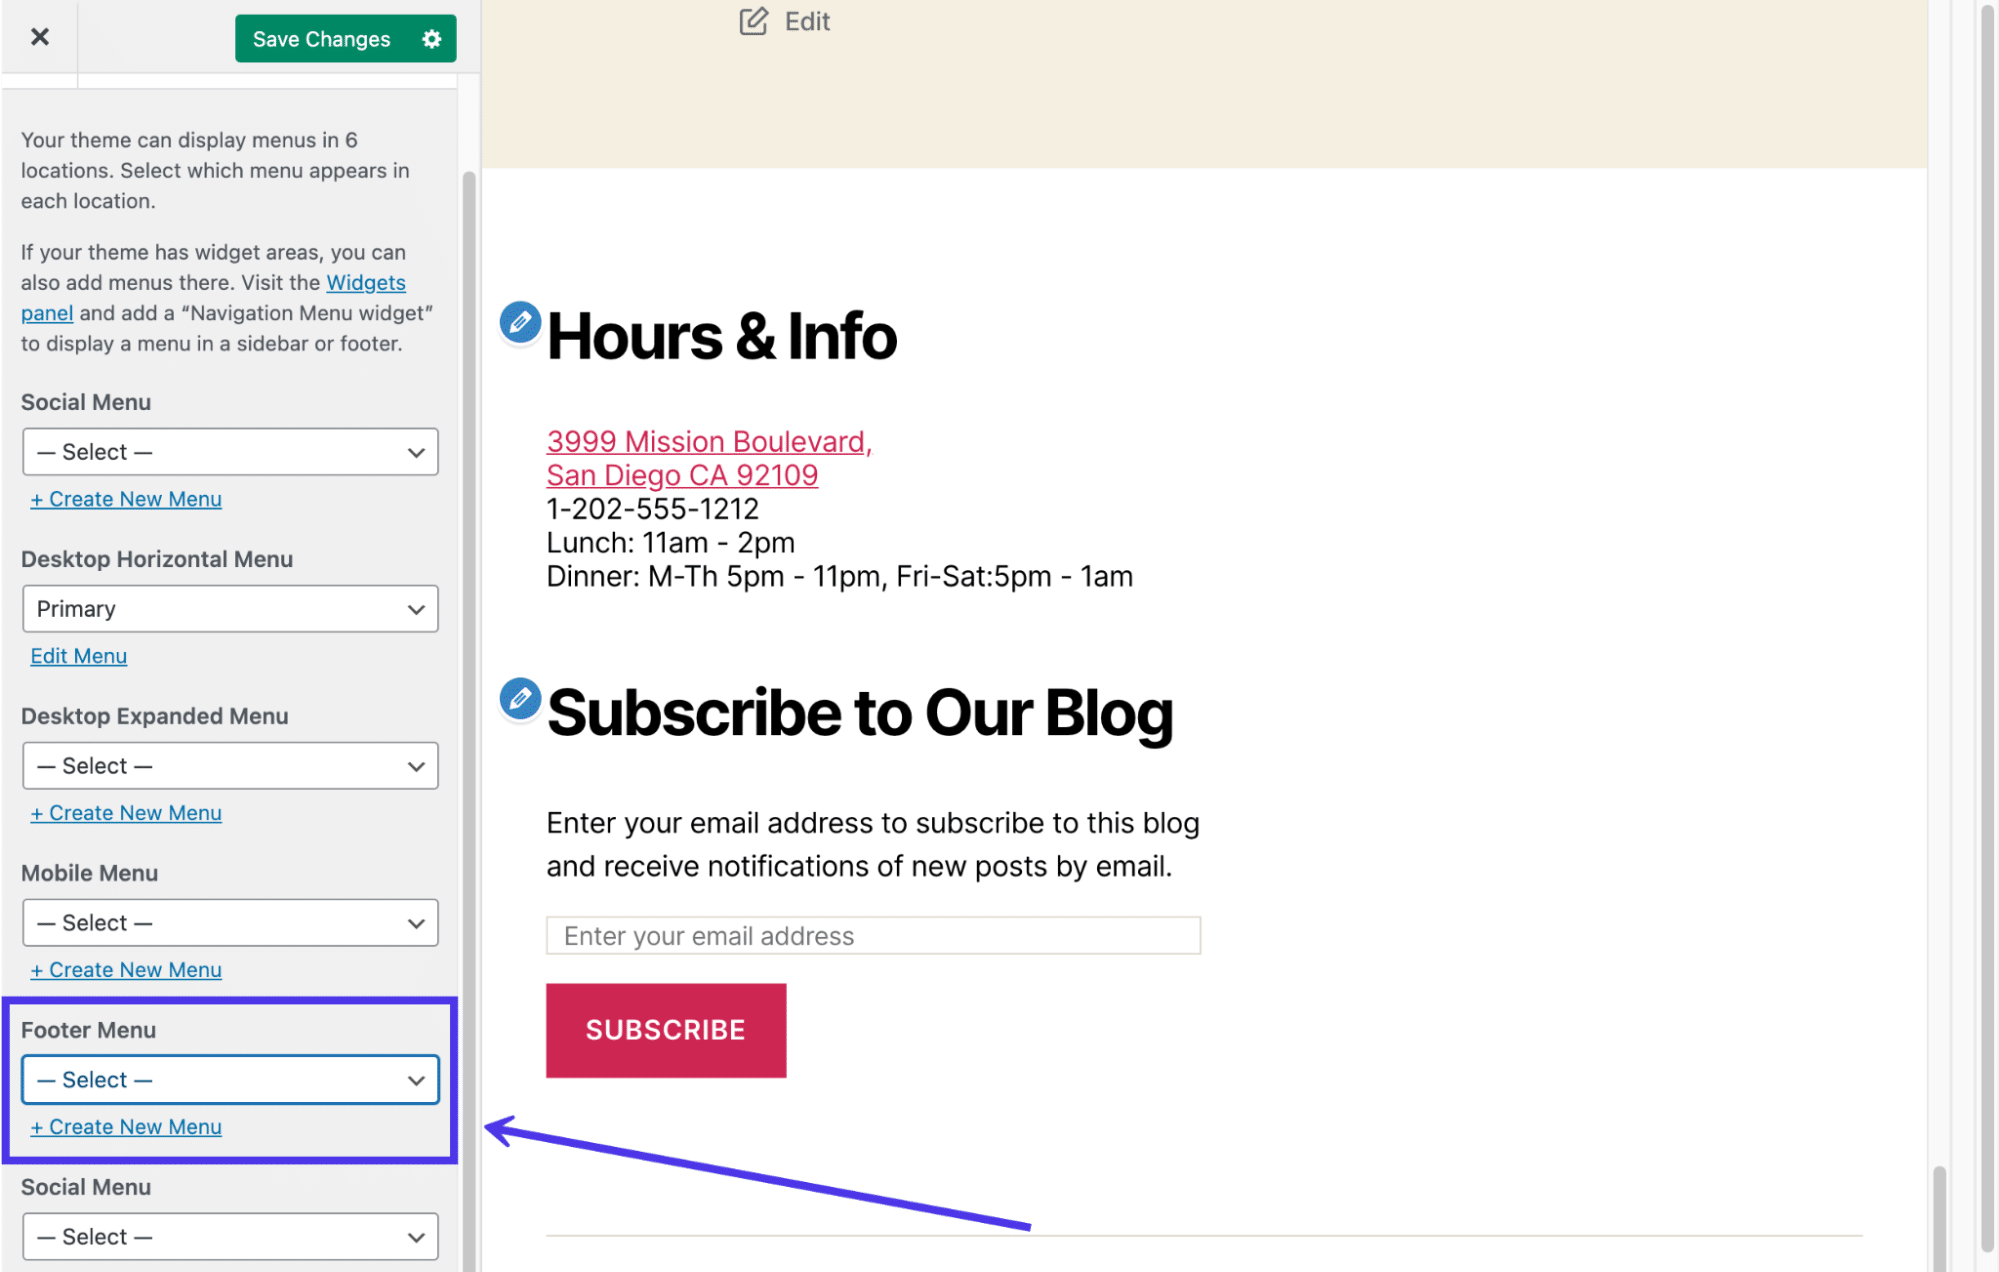
This theme has a place to position a menu within the footer.
We selected a premade Social menu for the footer. Be at liberty to make a choice the Create New Menu hyperlink should you don’t have already got an appropriate menu.
The outcome is a straightforward textual content/hyperlink menu that looks above no matter widgets you already added to the footer. It’s imaginable you’re not able so as to add widgets in your theme, so that you would possibly not see the very same layout.
Understand that all menus are merely lists of textual content and hyperlinks, so that you received’t be capable of incorporate one thing like a social media icon menu except you believe a separate plugin that helps that.

Including a menu to the Footer space.
A mainstay of the footer space is the vintage record of social media buttons. Many web pages upload them of their number one menus, but it surely’s additionally an exquisite thought to have them on the backside of your site as smartly, or as an alternative choice to striking the social buttons on the best of your website. Usually, if you’re feeling the header is already cluttered, opt for footer placement as an alternative.
Quite a few plugins supply widgets so as to add social media icons and hyperlinks in your footer and header. Due to this fact, we advise straying clear of any customized coding right here.
Even supposing many social icon plugins exist, the objective for our functions is to seek out one who particularly supplies a handy guide a rough widget for including your hyperlinks and customizing the buttons.
A well-liked, highly-rated resolution is known as Social Icons Widget & Block by WPZoom. It has over 400 icons for social media and different platforms, together with a widget to position your icons at once into your footer. Now not most effective that, however you’ll be able to add your personal customized icons and turn settings for colours and sizes.
Desire a website hosting resolution that provides you with a aggressive edge? Kinsta’s were given you lined with fantastic velocity, cutting-edge safety, and auto-scaling. Check out our plans
Social Icons Widget plugin by means of WPZOOM.
After putting in the plugin, you’ll be able to pass to the Settings web page and disable positive font applications should you don’t need them. Then again, they all are already lively, so skip the settings should you’d moderately have the entirety to be had to you.
So as to add social icons in your WordPress footer, pass to Look > Customise.
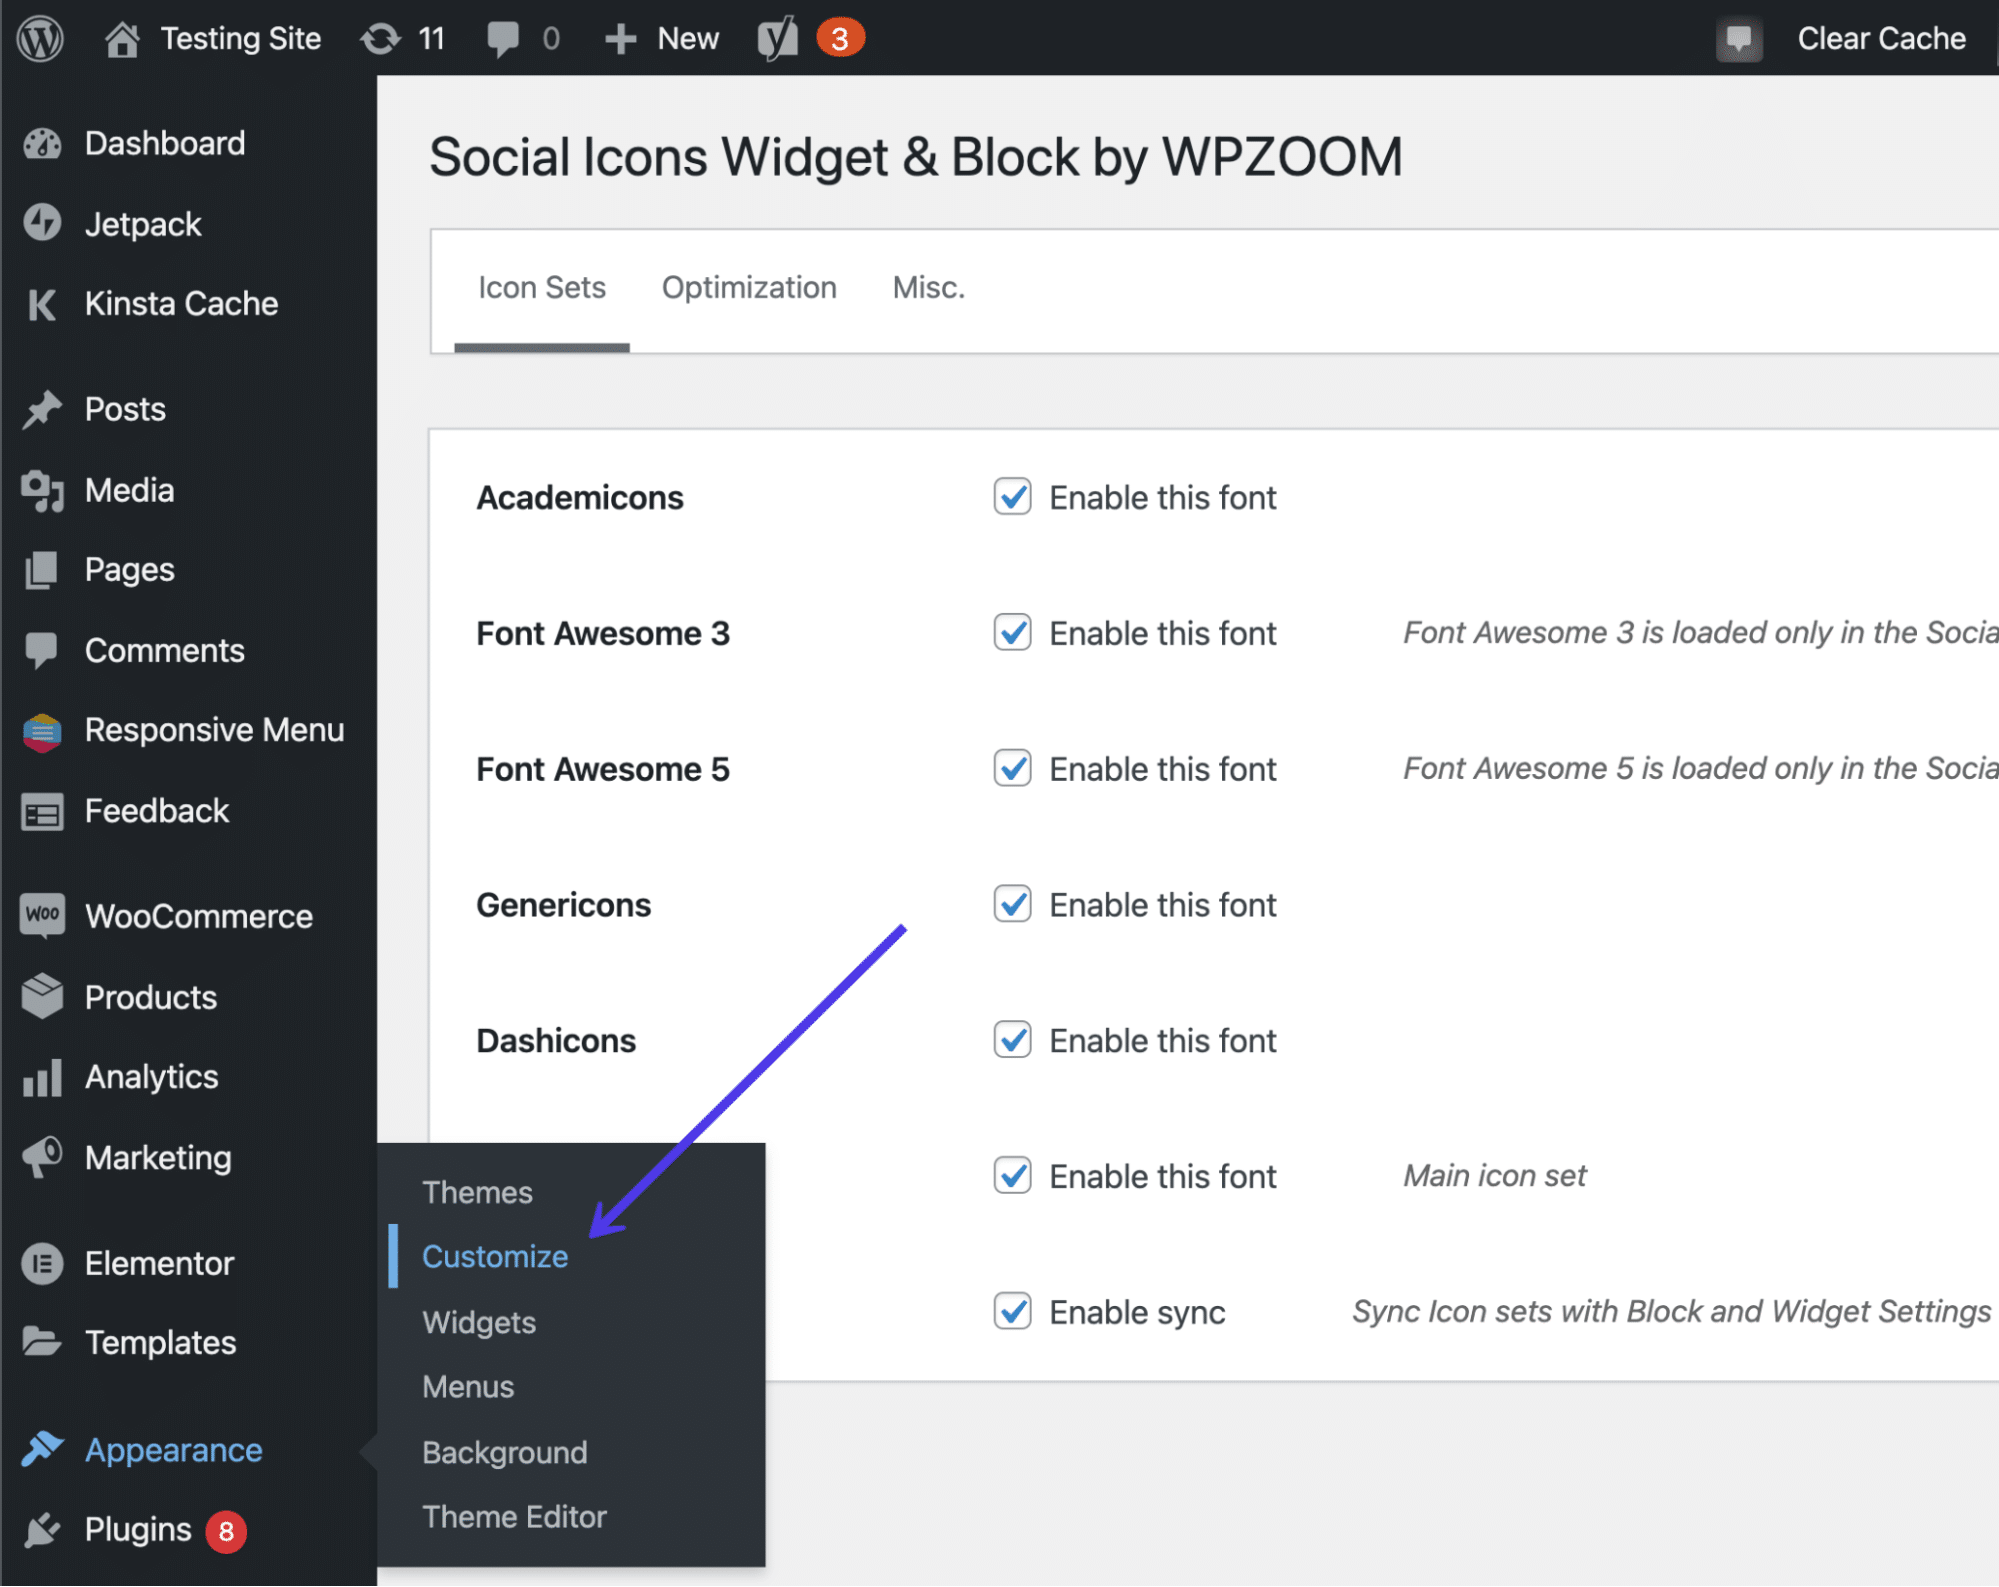
Going to the Theme Customizer.
This brings you into the WordPress Theme Customizer, the place you’re in a position so as to add widgets to the footer (so long as your theme helps widgets within the footer). As we’ve discussed previous within the article, the one solution to get round a theme that doesn’t have a footer widget is to discover a new theme or customized code the footer your self.
To find and click on at the Widgets tab to continue.
The Widget button within the Theme Customizer.
This theme has two spaces so as to add widgets to the footer. That’s no longer the case with all topics, so it’s possible you’ll to find that your theme has no footer widgets spaces. However, you could get fortunate and feature 4 or 5 spots to position widgets on your footer. All of it is determined by the theme you put in.
Click on on some of the Footer tabs.

The Footer widget places.
It’s imaginable so as to add a myriad of widgets — or no less than whichever widgets you could have put in — to the footer.
Click on at the Upload A Widget button to turn the menu of widgets to be had to you.
The Upload A Widget button.
The slide-out menu supplies a seek bar and an inventory of imaginable widgets. Scroll all the way down to find the widget referred to as Social Icons Via WPZOOM.
The Social Icons widget is situated within the widgets record.
You must now see the default social media icons and buttons within the preview in your site.
Then again, you’ll nonetheless wish to customise the settings for those buttons to settle at the length of the ones buttons, coloring, and which hyperlinks you wish to have them to result in.
Get started by means of typing in a identify for the widget, which seems within the footer (you’ll be able to additionally depart this clean should you’d like). Proceed by means of specifying settings like whether or not you wish to have icon labels, nofollow hyperlinks, and particular icon alignments.
Trade social icon settings and search for the brand new designs at the appropriate.
Proceed on with the settings to specify the icon taste, background taste, and padding. You’ll additionally make a selection an icon length and colour. Understand that you want to click on at the Save button on the backside of the widget customization module with a view to see the result of your adjustments within the preview.
Regulate settings like Icon Taste, Background Taste, and extra.
The Icons box already has some default social icons in there for you. Make an inventory of the social media websites you run in your corporate, and duplicate and paste the hyperlinks into the respective fields. Take away any icons that don’t make sense for your enterprise.
To open up the icon library and upload extra icons, click on at the Upload Extra button on the backside of the sphere record.
Upload as many social icons as you wish to have.
The plugin gives a big selection of icons, with choices to set icon colours, hover colours, and the icon equipment supply. The main equipment is known as Socicons, however a number of different kits include the plugin without spending a dime. Click on at the Make a selection Icon Package dropdown to look your choices.
In the end, browse in the course of the icons supplied with each and every equipment. A lot of them you would possibly not even acknowledge, so most effective persist with those that you simply actively run and which is able to supply worth in your consumers.
In our instance, we’ll make a selection the YouTube icon so as to add to our footer as smartly.
Click on at the Save button to position it into the record, then click on the following Save button on the backside of the widget field to look your adjustments.
The plugin has dozens of icons to make a choice from.
As you’ll be able to see, we’ve made adjustments to the scale and form of the icons, whilst additionally including an additional social icon. In case your alterations don’t glance slightly appropriate, return into the widget settings to get to the bottom of the problems.
All the time take note to hit the Submit button to ensure that the widget to take impact at the entrance finish of your site. We additionally suggest checking the frontend your self to verify the social icons seem the correct approach.
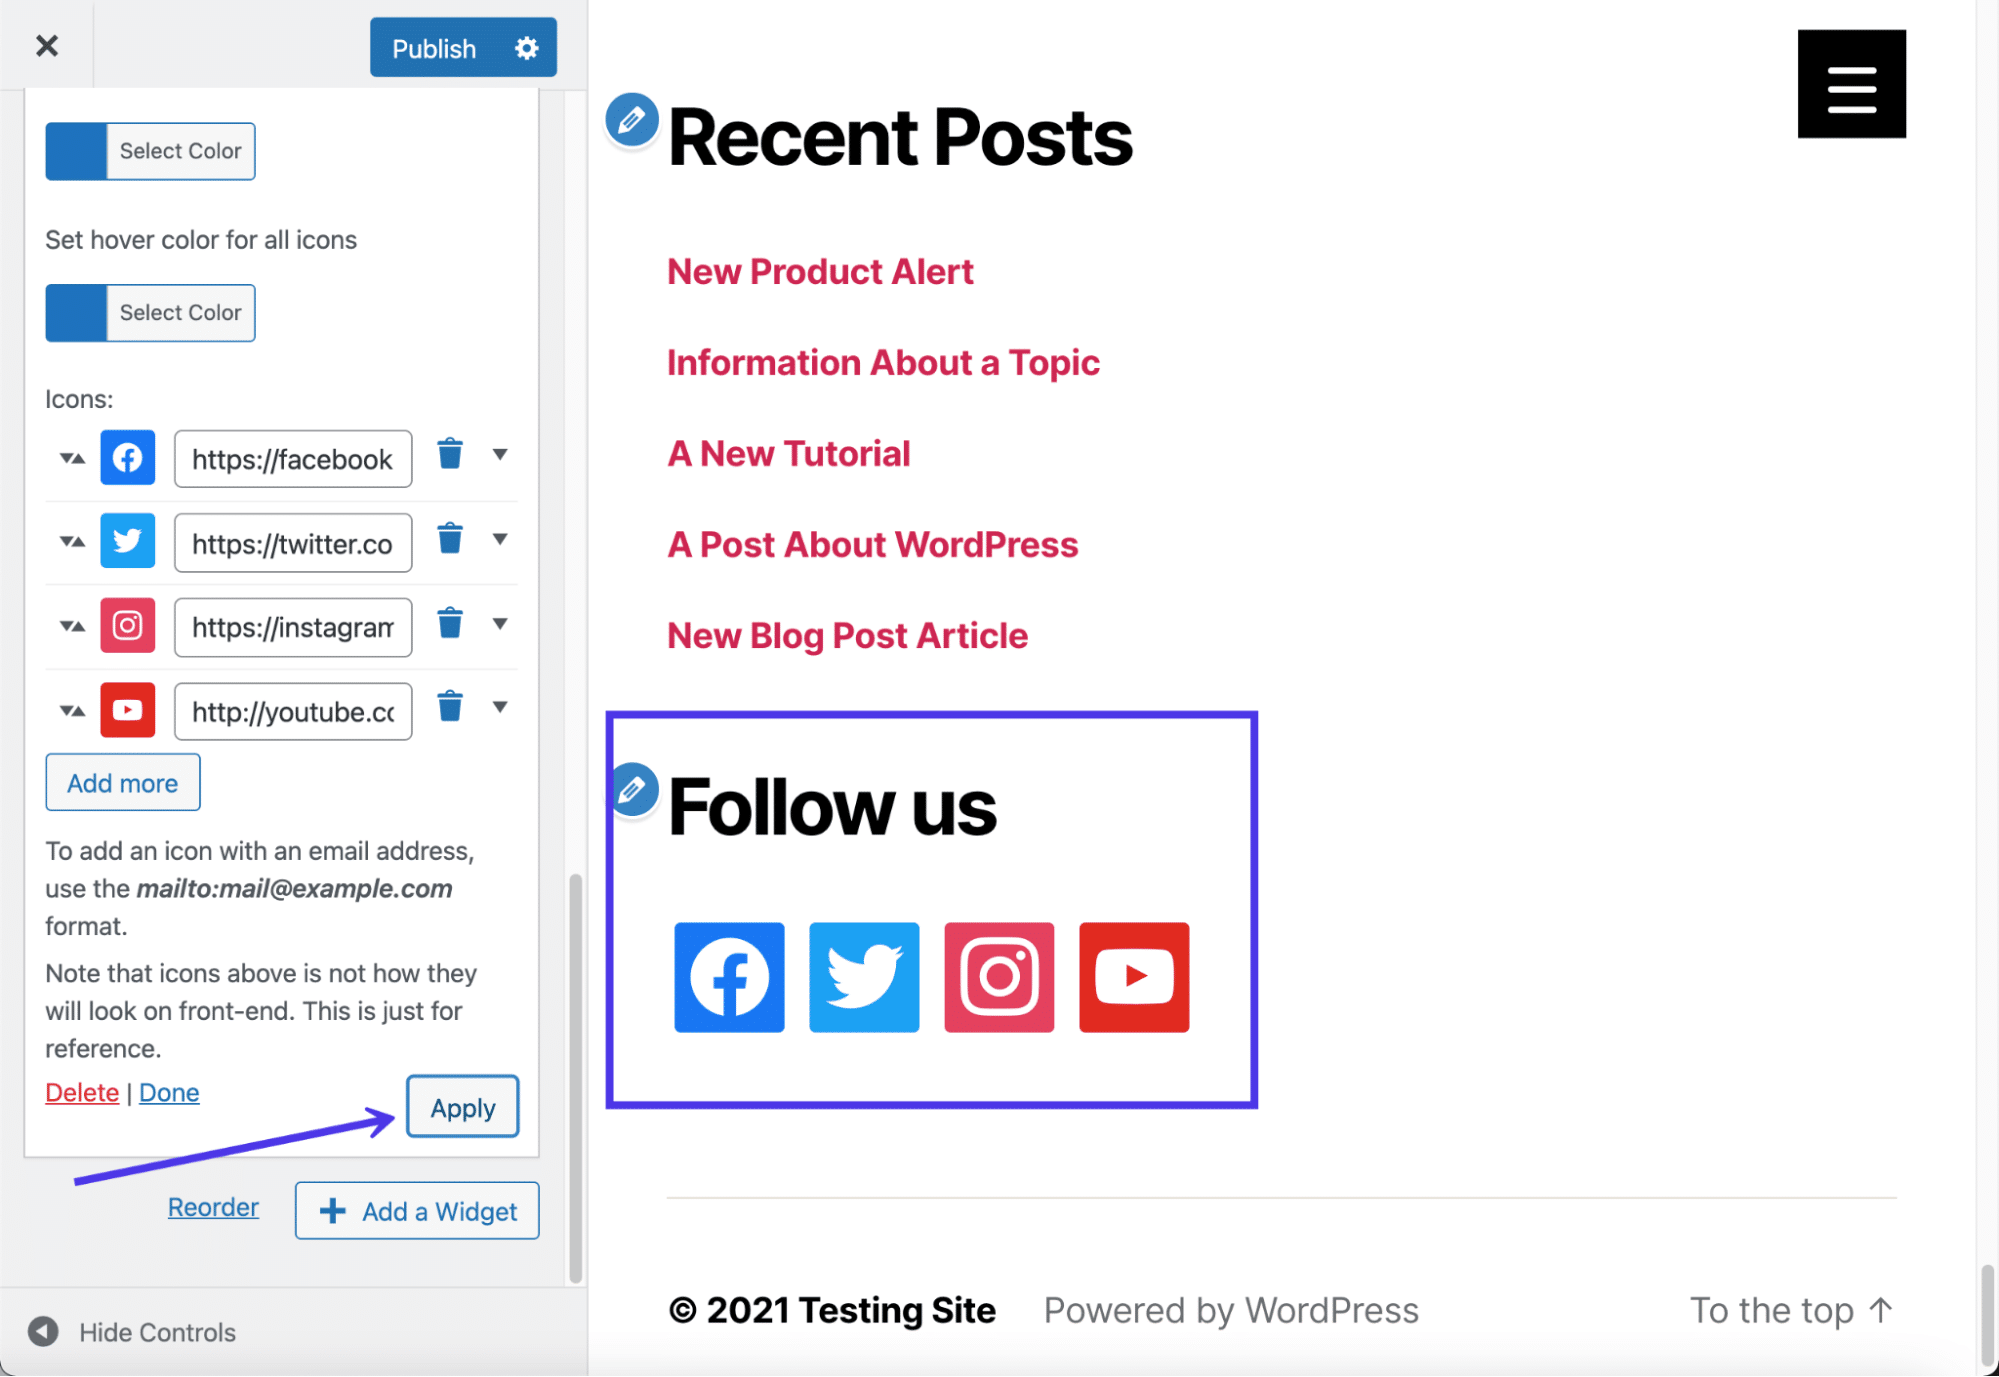
A view of the completed social media buttons.
Footer backgrounds are imaginable with the assistance of some footer plugins and web page developers. Then again, you additionally be capable of place an image or color background in the back of your footer by means of the usage of the elemental settings that include your theme.
In case all else fails, we’ll display you the way to insert CSS code so as to add a background to the WordPress footer.
Sooner than anything else, examine your theme settings to look if footer background features come same old. The Abletone Theme, for example, gives a Footer Background Symbol tab throughout the Theme Customizer.
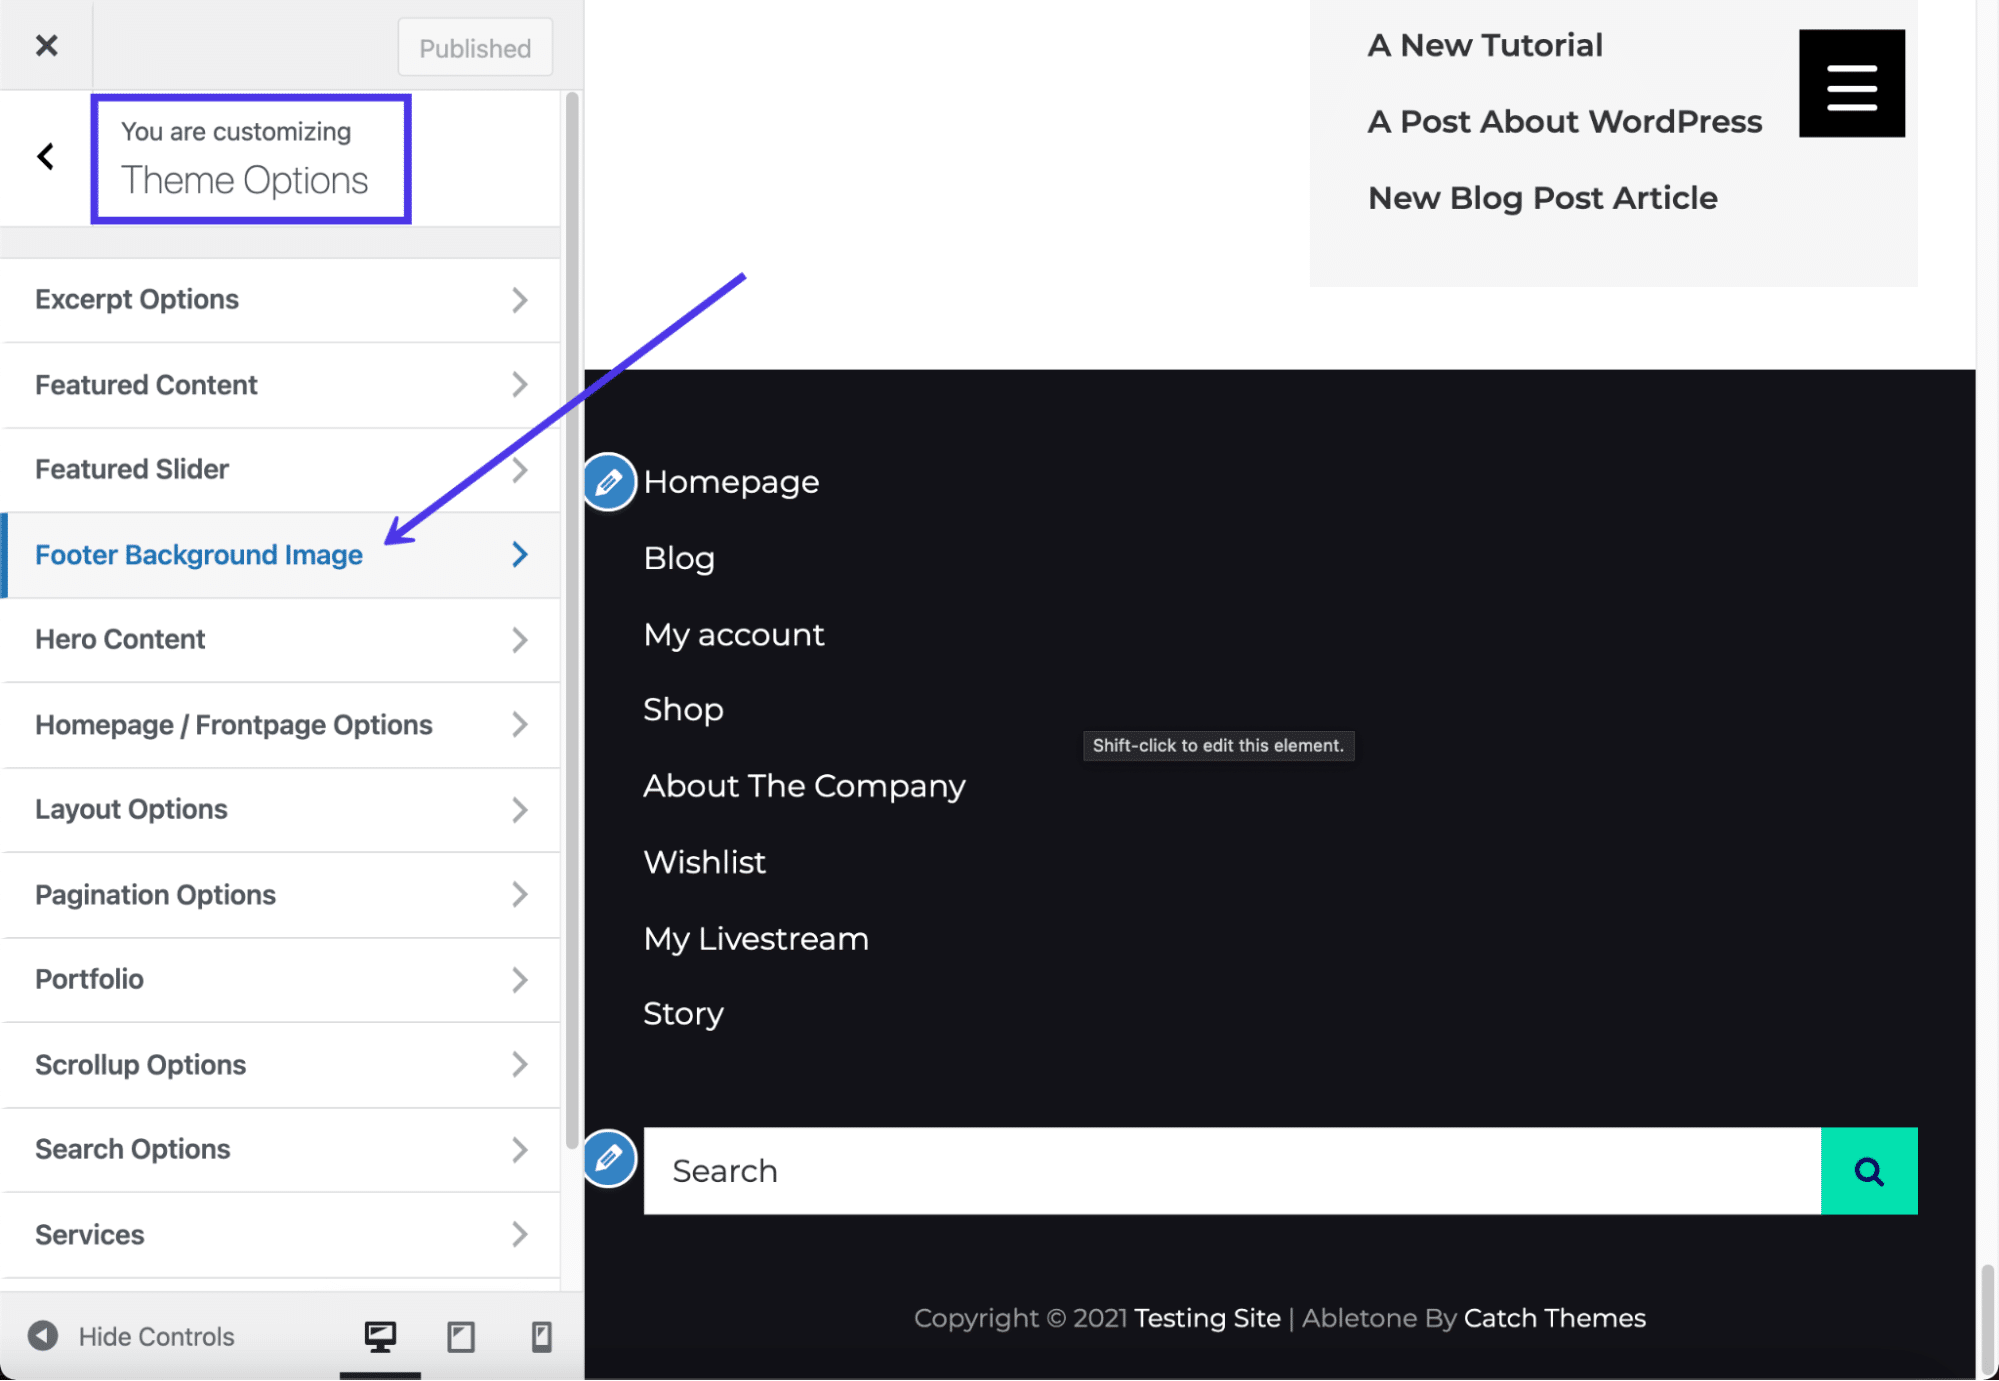
This theme has a Footer Background Symbol characteristic.
All that’s required is so that you can click on at the Make a selection Symbol button and seek for a picture in your Media Library, add a brand new one out of your pc, or look for a stock photo that may fit your wishes.
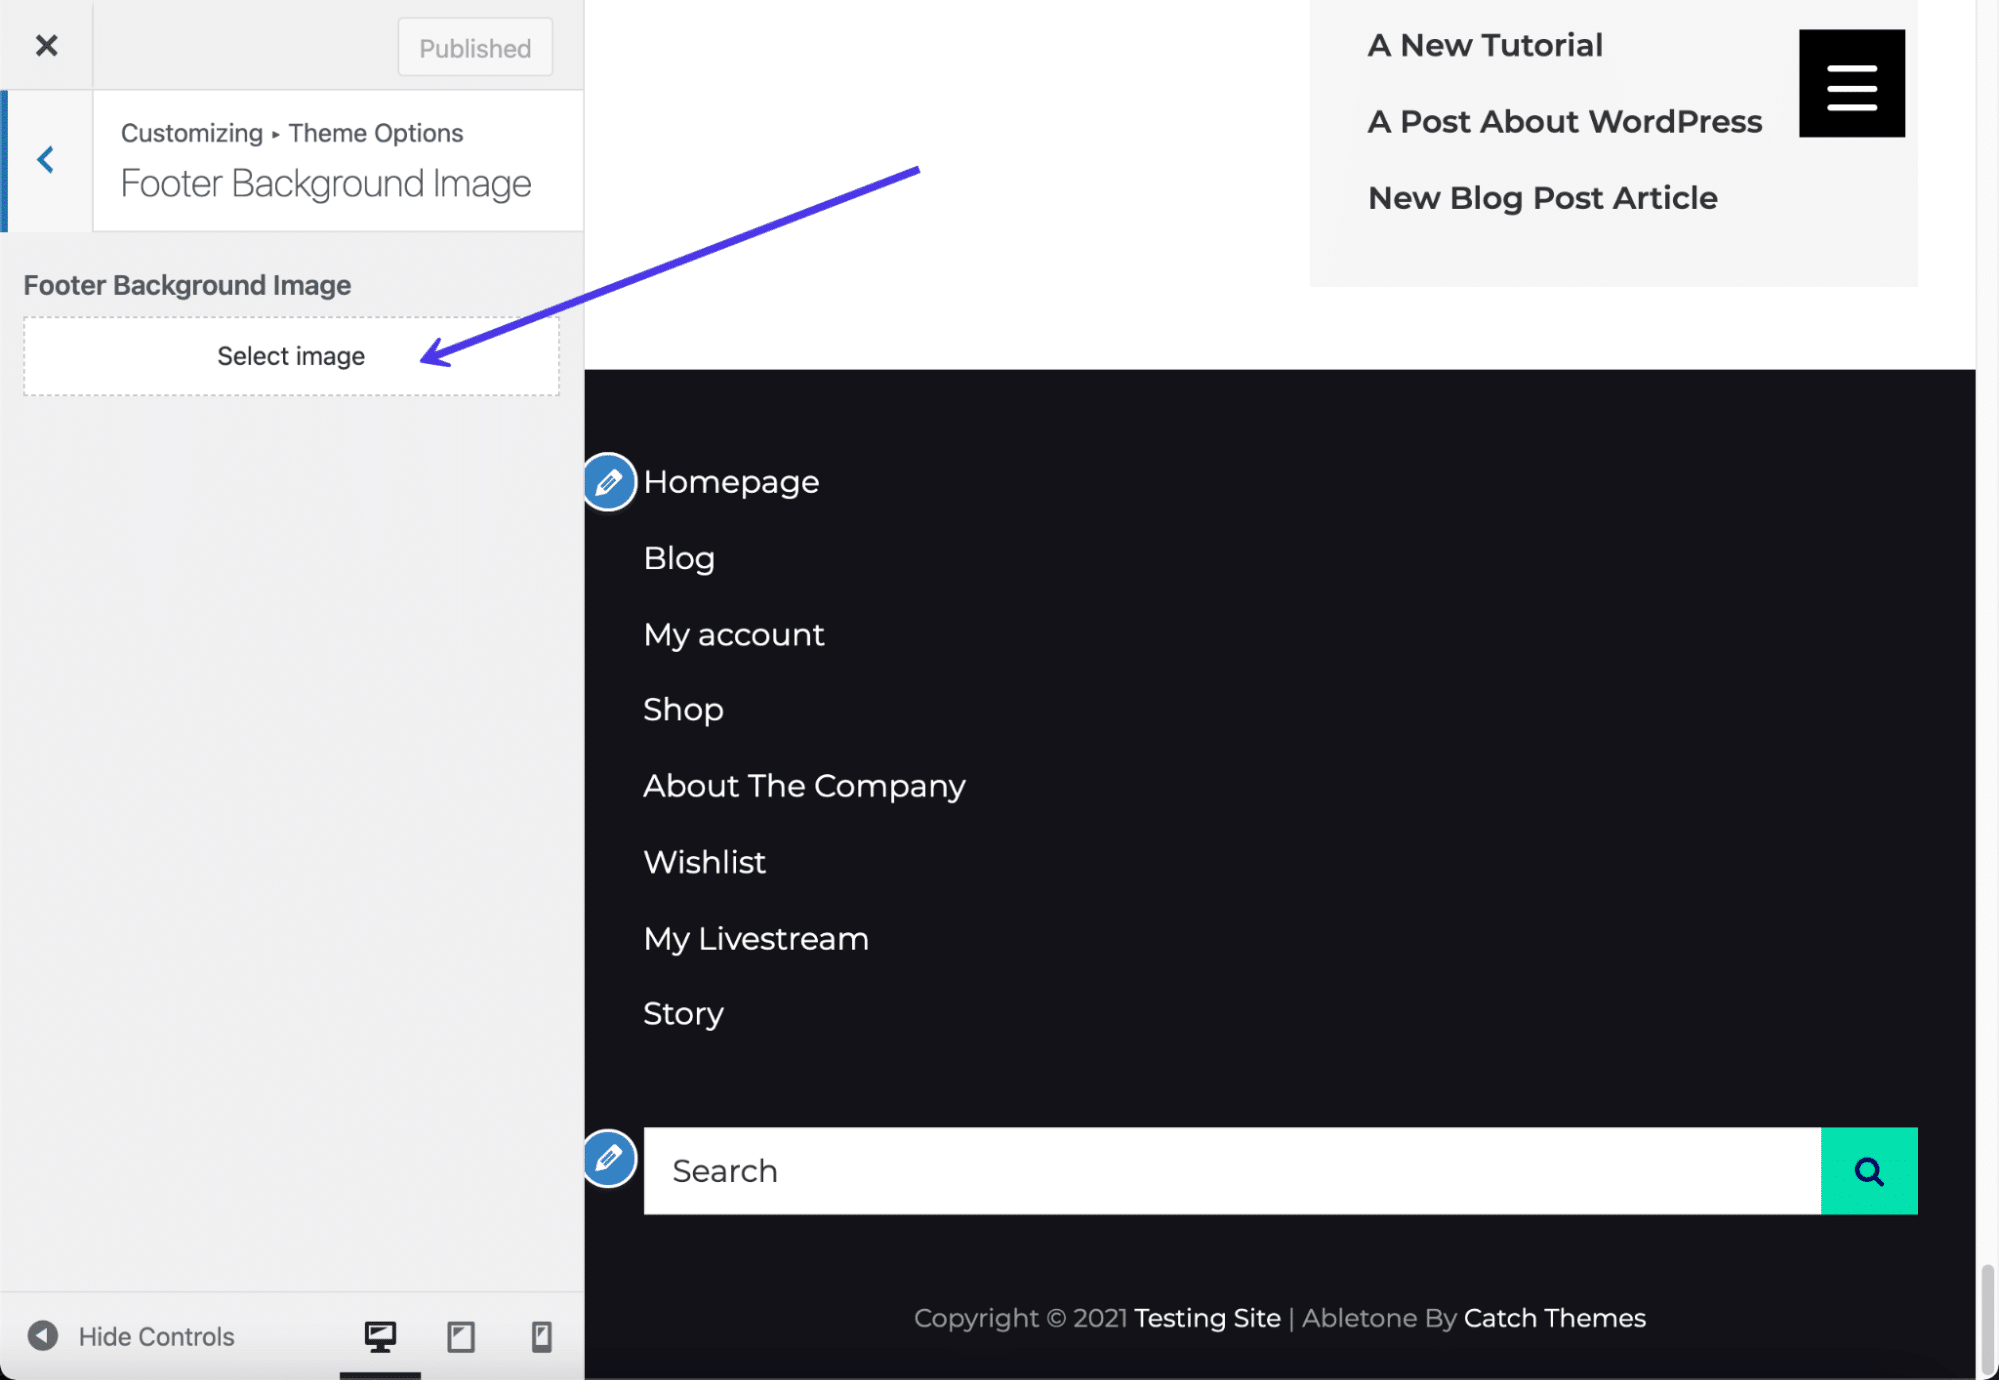
The Make a selection Symbol button within the Theme Customizer.
As soon as uploaded, the picture seems because the background in your WordPress footer. Some topics be offering further settings for stretching or tiling the picture, however with out modifying the CSS your self, you’re caught with no matter settings include the theme.
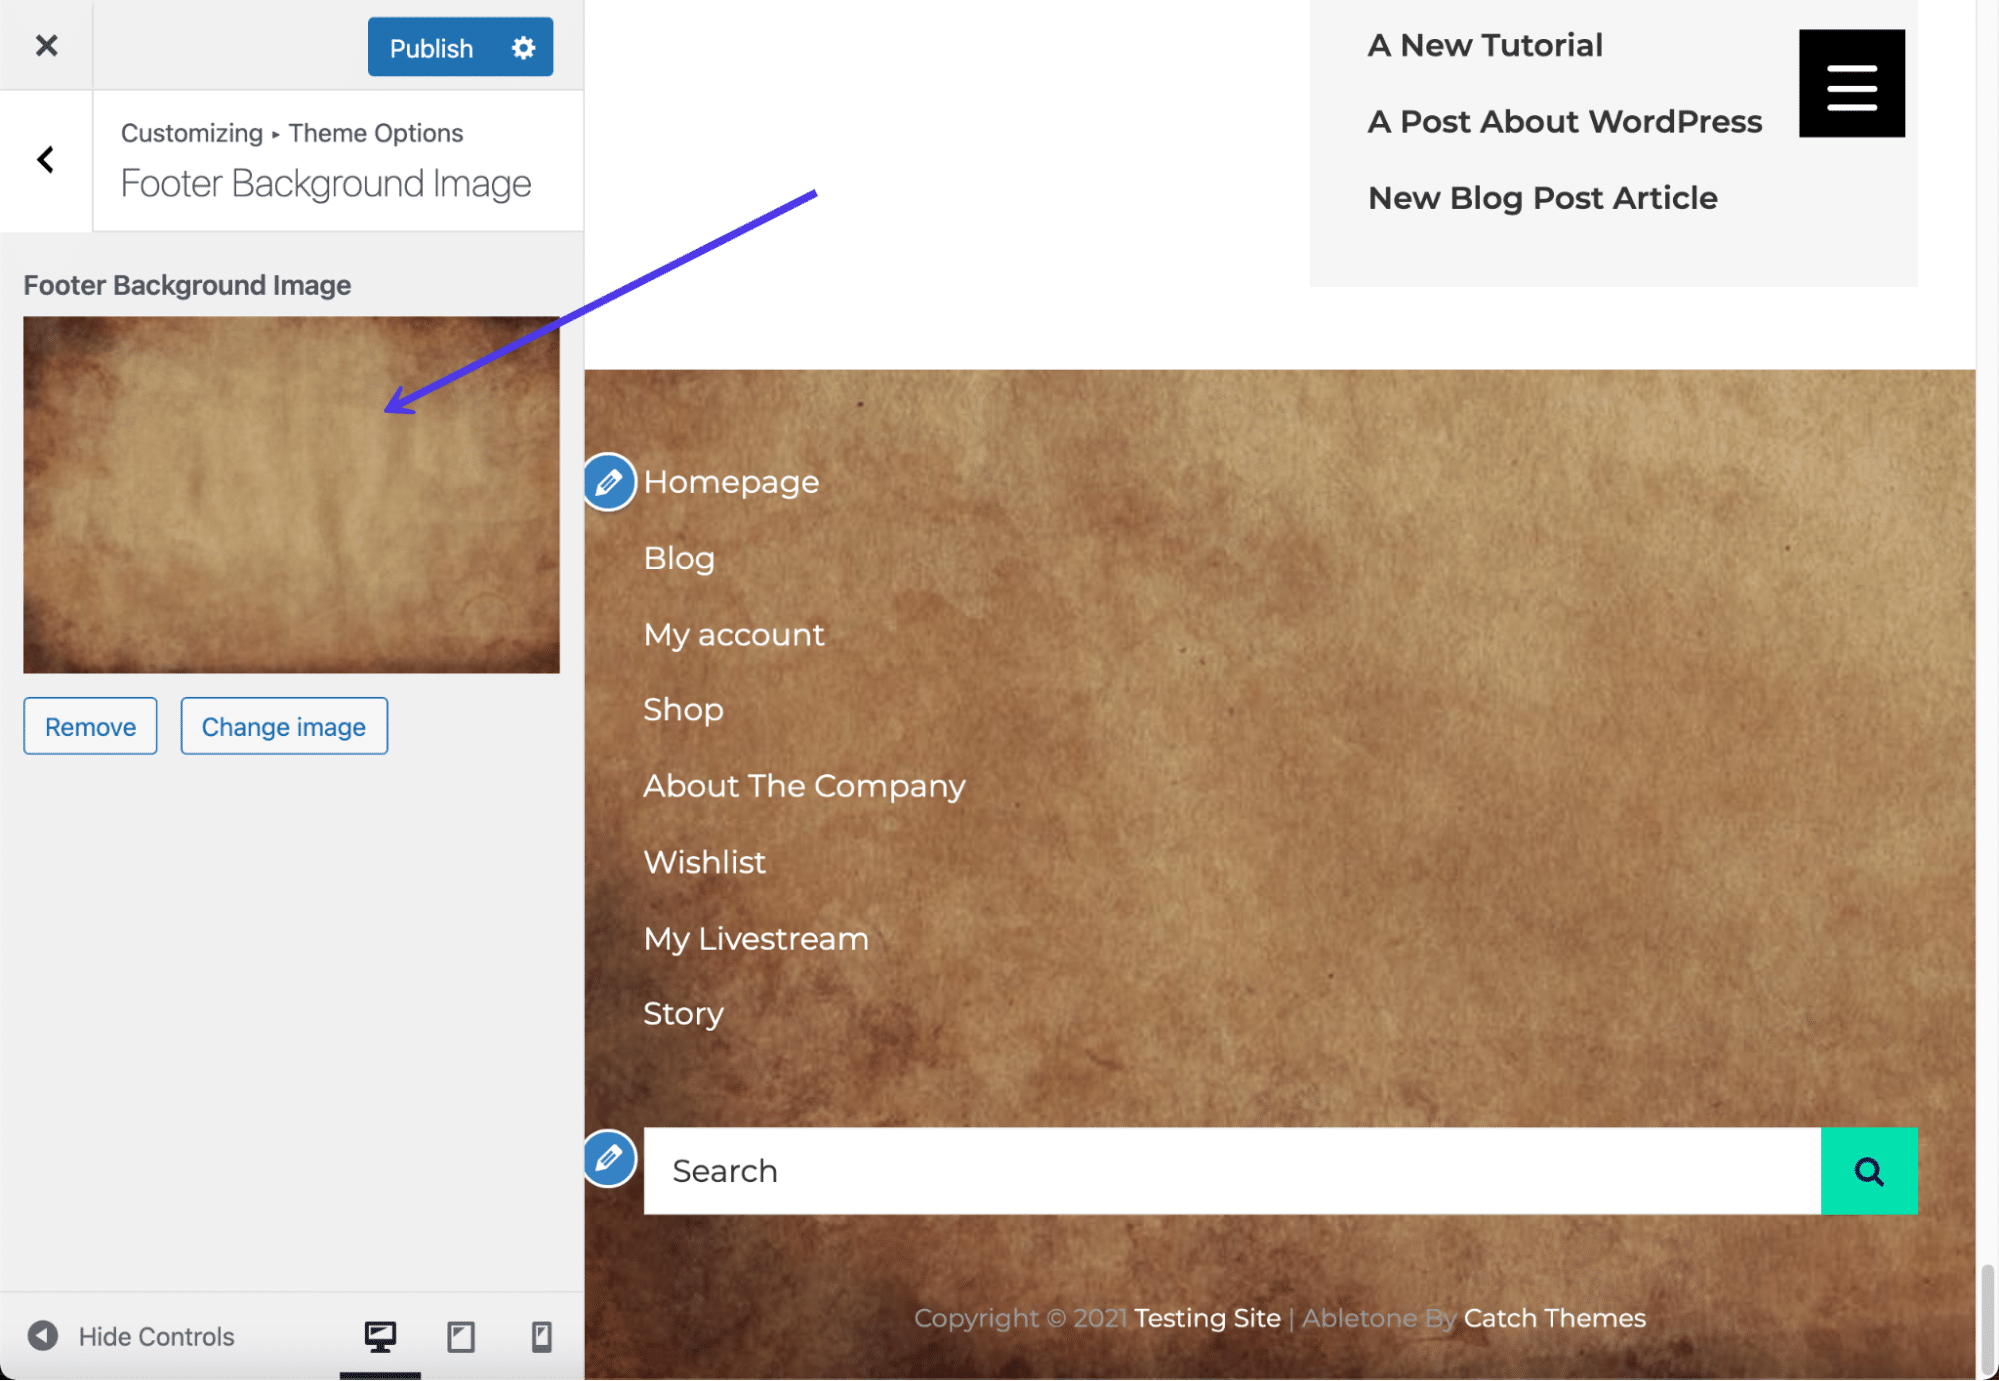
You’ll see the background thumbnail preview.
Should you don’t have a theme, web page builder, or plugin that does the trick for including a footer background, despite the fact that, including CSS code handles this activity without reference to your theme or web page builder.
Move to the Theme Customizer in WordPress, then click on at the Further CSS menu merchandise.
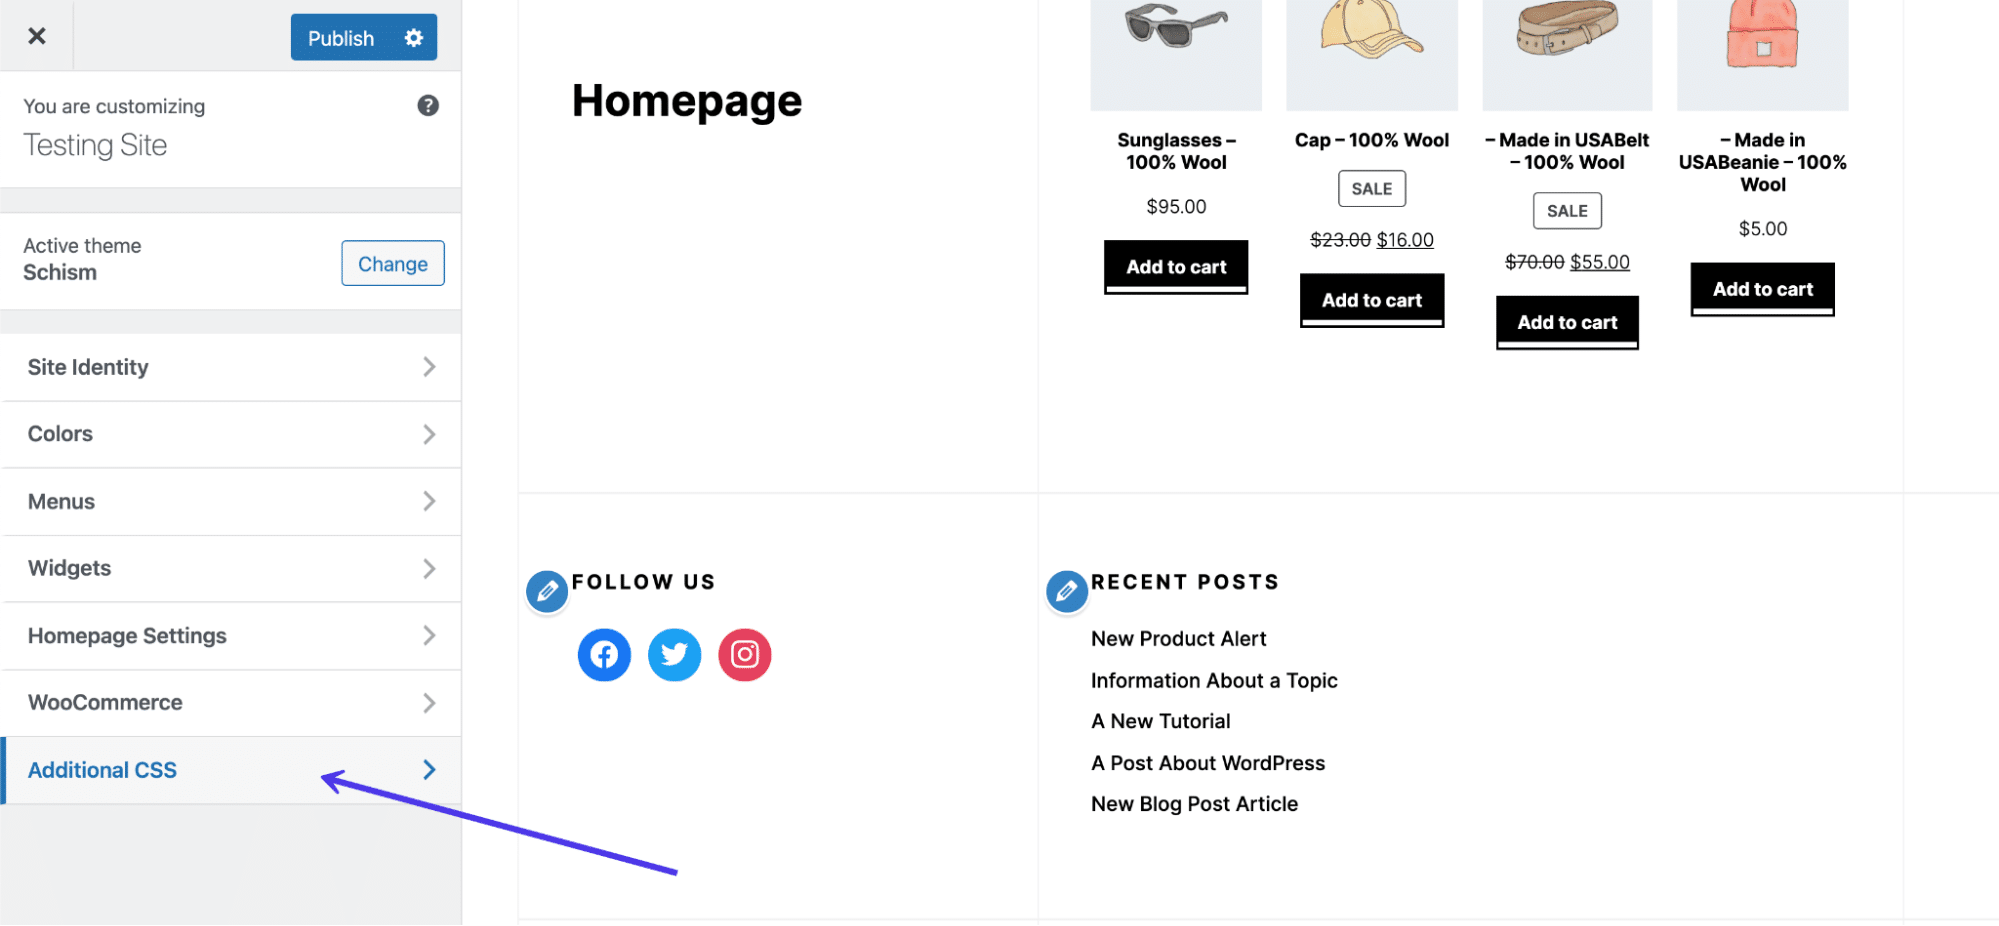
Click on at the “Further CSS” tab
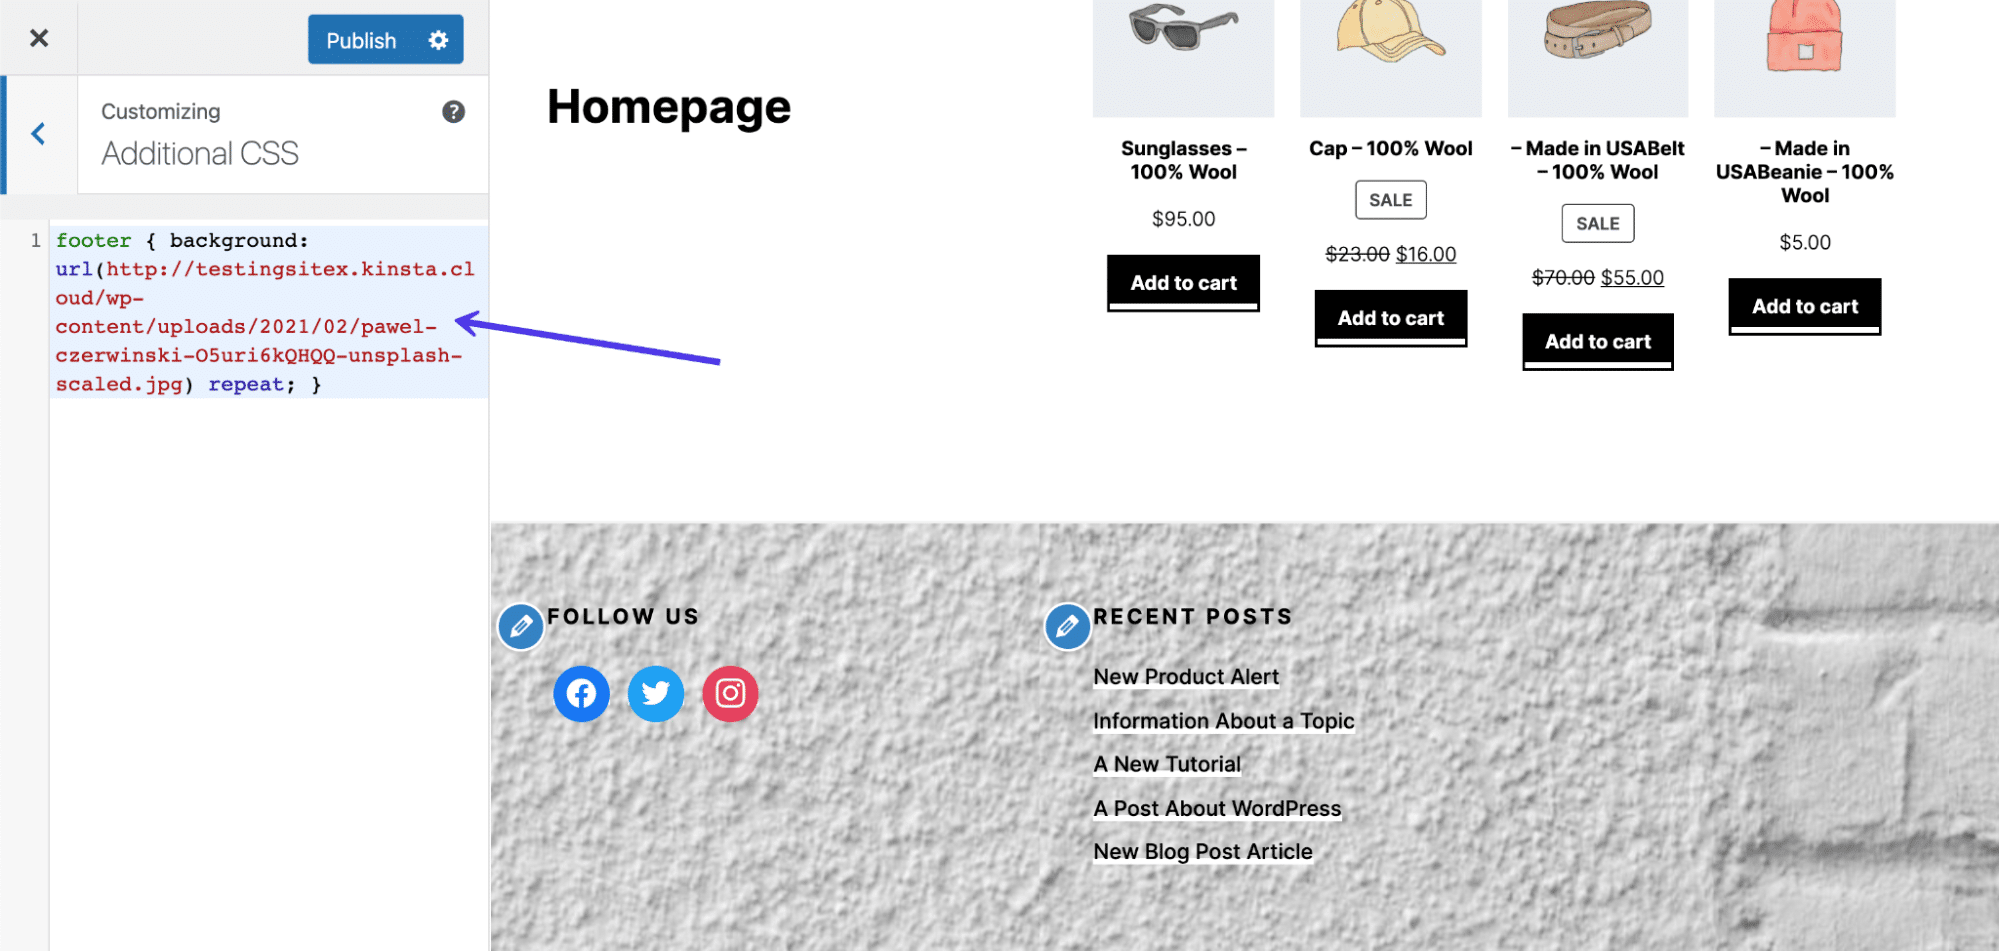
Paste this CSS code into the sphere, however substitute the YOURIMAGEURL with the URL of your required picture:
footer { background: url(YOURIMAGEURL) repeat; }You’ll to find the URL for any picture in its main points view after it’s been uploaded in your Media Library.
Be sure you click on at the Submit button to look it at the entrance finish.
You’ll additionally insert different bits of code to switch parts like sizing and background stretch length or repetition. As it’s possible you’ll believe, including the CSS code is rather less easy than clicking on plugin buttons, however a handy guide a rough seek on-line allow you to to find the correct code in your wishes.
Paste your personal CSS code into the sphere.
Eliminating “Powered by means of WordPress” Textual content
Within the earlier segment, we lined how to take away the WordPress credit score on your WordPress.com footer. It’s a bit tricker on a self-hosted WordPress website since maximum topics don’t be offering some way to take away the credit score within the Web site Id segment of the Theme Customizer.
Due to this fact, we should take a look at different ways to take away the “Powered by means of WordPress” textual content within the footer.

An instance of the “Powered Via WordPress” message.
To take on this procedure, learn our in-depth guide on removing the “Powered By WordPress” tag on your footer. This data base article covers all the following subjects:
- Why it’s possible you’ll need to take away the “Powered Via WordPress” message
- Whilst you would possibly no longer need to take away it
- How to keep away from when making an attempt to take away the credit score
- How to take away the credit score with a plugin
- manually take away the “Powered Via WordPress” credit score
- Changing the footer credit score with your personal code
Modifying the footer credit score with a plugin is considerably more uncomplicated for the common WordPress consumer. Then again, going the handbook direction guarantees you could have complete keep watch over over the footer, and it gets rid of the wish to have any other plugin put in in your dashboard.
Is It Criminal to Take away “Proudly Powered by means of WordPress”?
Making an allowance for that WordPress makes it a bit tough to take away the “Proudly Powered by means of WordPress” textual content out of your footer, it’s possible you’ll wonder if it’s kosher to eliminate the message.
The solution is that you simply’re greater than welcome to take out the “Powered by means of WordPress” textual content on your footer with no need to fret about any prison repercussions or violations of the WordPress Terms of Service. It is because WordPress use falls underneath a GPL (Basic Public License), that means any person can redistribute and change WordPress whatsoever they see are compatible.
General, we extremely suggest taking away the “Proudly Powered by means of WordPress” textual content because it has not anything to do along with your logo and easily promotes any other group. Sure, it’s great to get the phrase out about WordPress, however no longer on the expense of your personal branding and precious site house.
Now, footer messages proven by means of your theme developer are a special tale. We’ll discuss that within the subsequent segment.
We now know that you simply’ll haven’t any issues of the legislation or WordPress when getting rid of the “Proudly Powered by means of WordPress” footer message. However what about one of the vital theme builders who put “Powered by means of XYZ Theme” within the footer?
Fortuitously, the majority of WordPress topics additionally fall underneath a Basic Public License, making it totally applicable to chop out that textual content and substitute it with one thing extra appropriate for your enterprise. Then again, it’s prudent to double-check along with your theme developer to verify they don’t have a demand of their phrases and stipulations that stipulates that you simply stay the advance credit score within the footer.
You’ll do that by means of merely asking the developer if the theme falls underneath a Basic Public License. And if it doesn’t, or their phrases and stipulations make it a demand to go away the credit score, we advise seeking out another theme, as that’s no longer precisely a fascinating merchandise to have in your site.
So how do you pass about taking away the “Powered by means of XYZ Theme” textual content on your footer?
Some plugins that take away the “Powered by means of WordPress” message may also scrap any messaging inserted by means of the theme developer. Then again, this isn’t a certain factor.
Due to this fact, we advise choosing some of the following strategies:
- Edit the footer website recordsdata at once to do away with the credit score message.
- Ask the developer to take away it for you.
- Improve to the top rate model of the theme.
Modifying the footer website recordsdata takes a bit of of technical wisdom, however you’ll be able to ceaselessly get this executed in a question of mins. Asking the developer to take away the theme developer credit score may finally end up running, however you’re necessarily hoping you’ll get a pleasant developer who’s prepared to stroll you in the course of the procedure. Most often, they received’t be offering this should you’re most effective the usage of the loose model in their theme.
The very best choice is to improve to the premium version of that theme. Many top rate theme builders give away simplified, loose variations in their topics within the hopes you’ll improve for advanced options and greater keep watch over.
Since upgrading to a top rate theme and talking with the developer will also be executed by yourself, we’ll basically discuss the way to edit the theme website recordsdata to eliminate that credit score message.
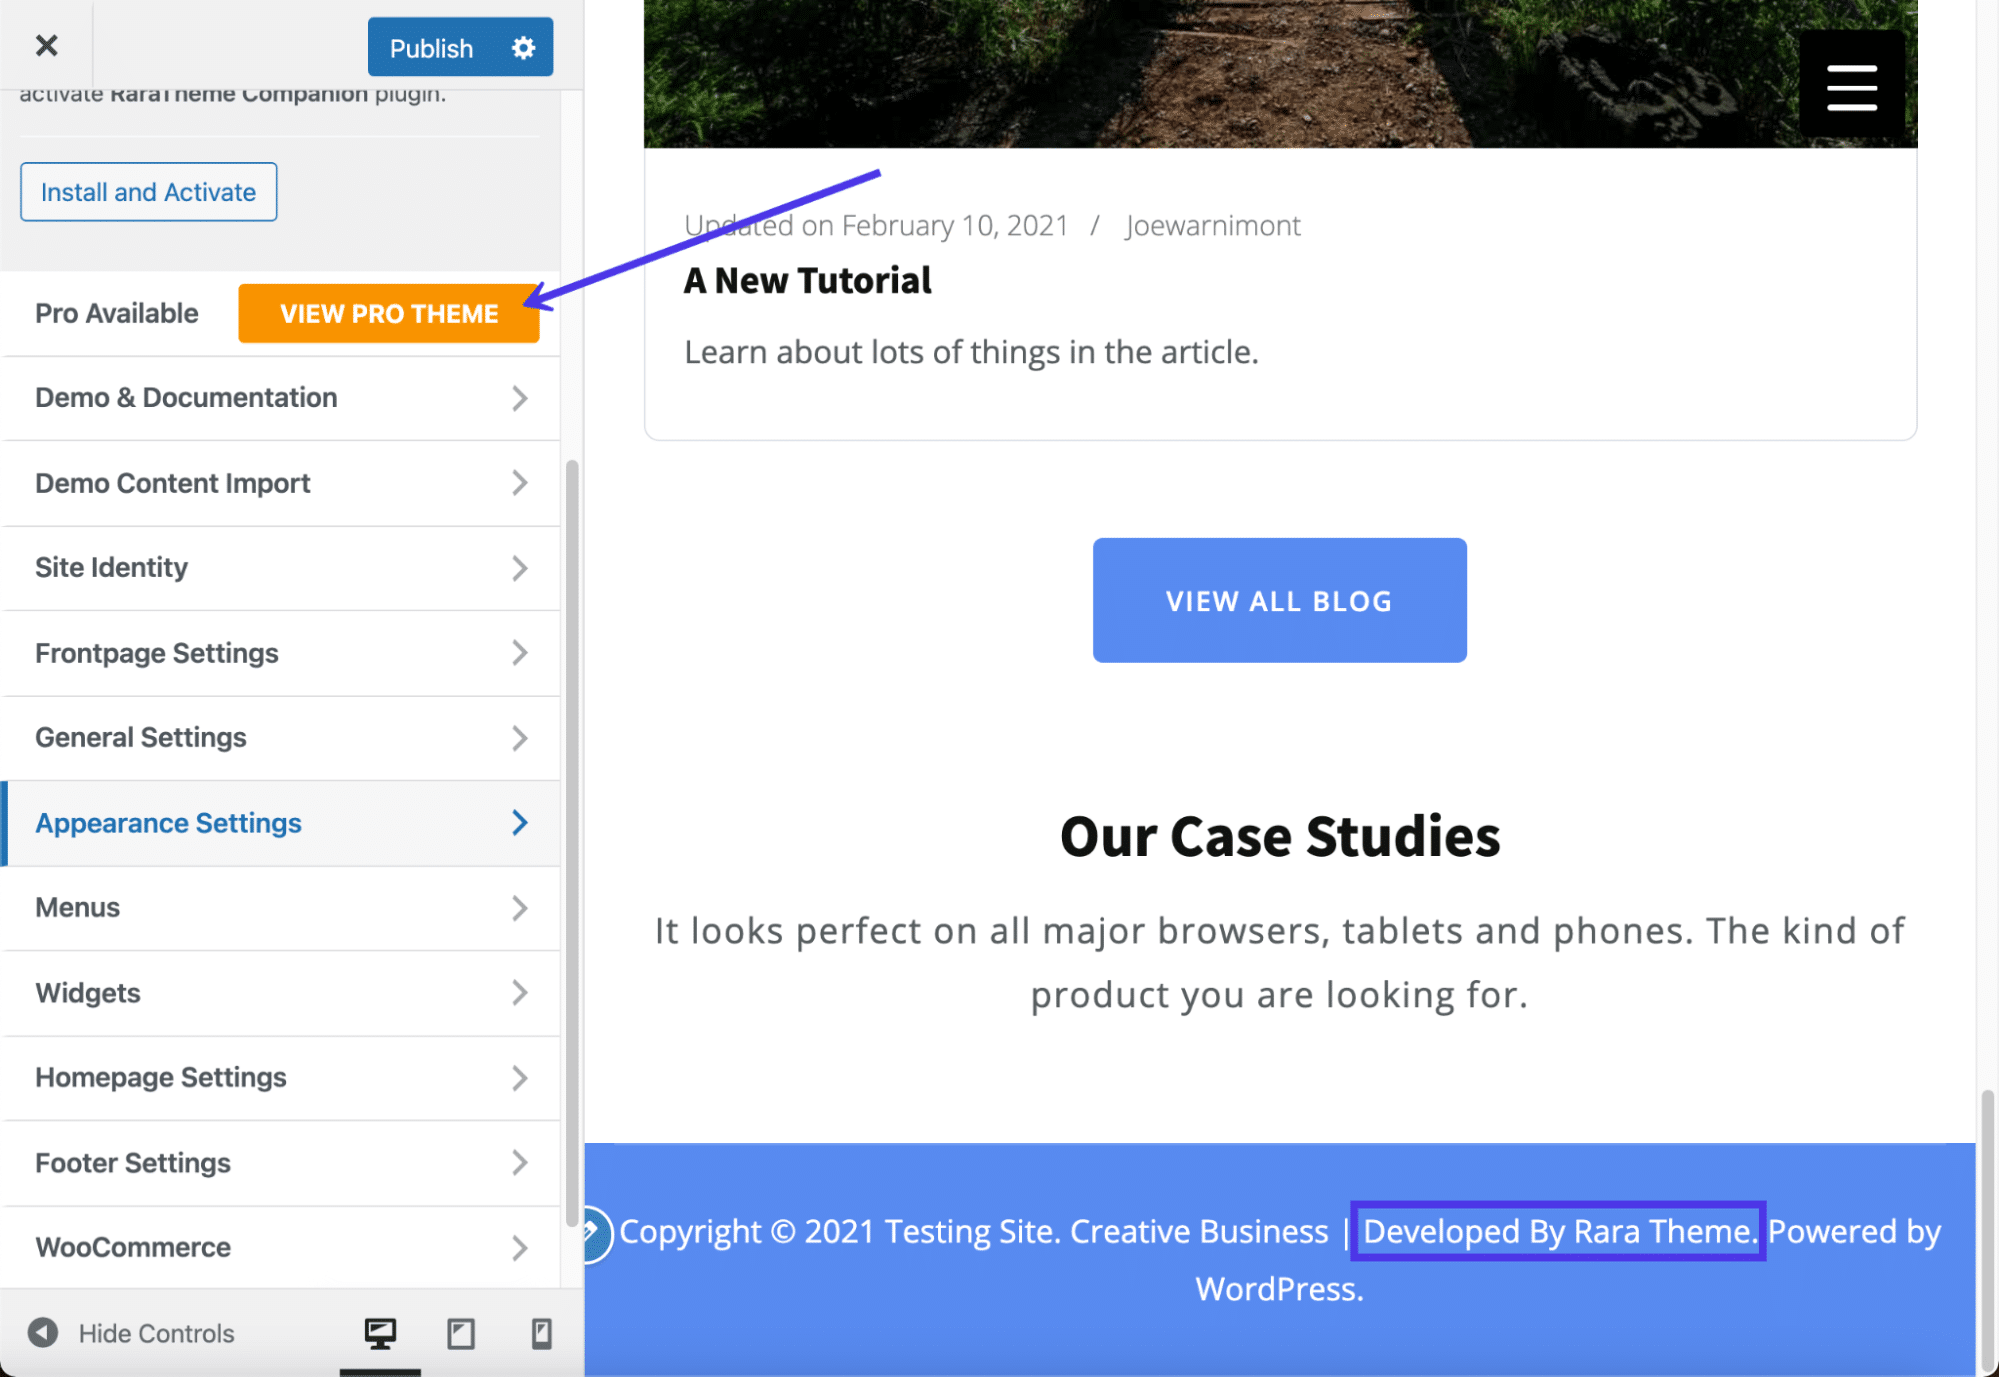
To start, take a look at your theme’s footer to verify you probably have developer credit score at the backside. If that is so, take into account of the precise textual content being displayed, as this would assist hunt down the message on your website recordsdata.
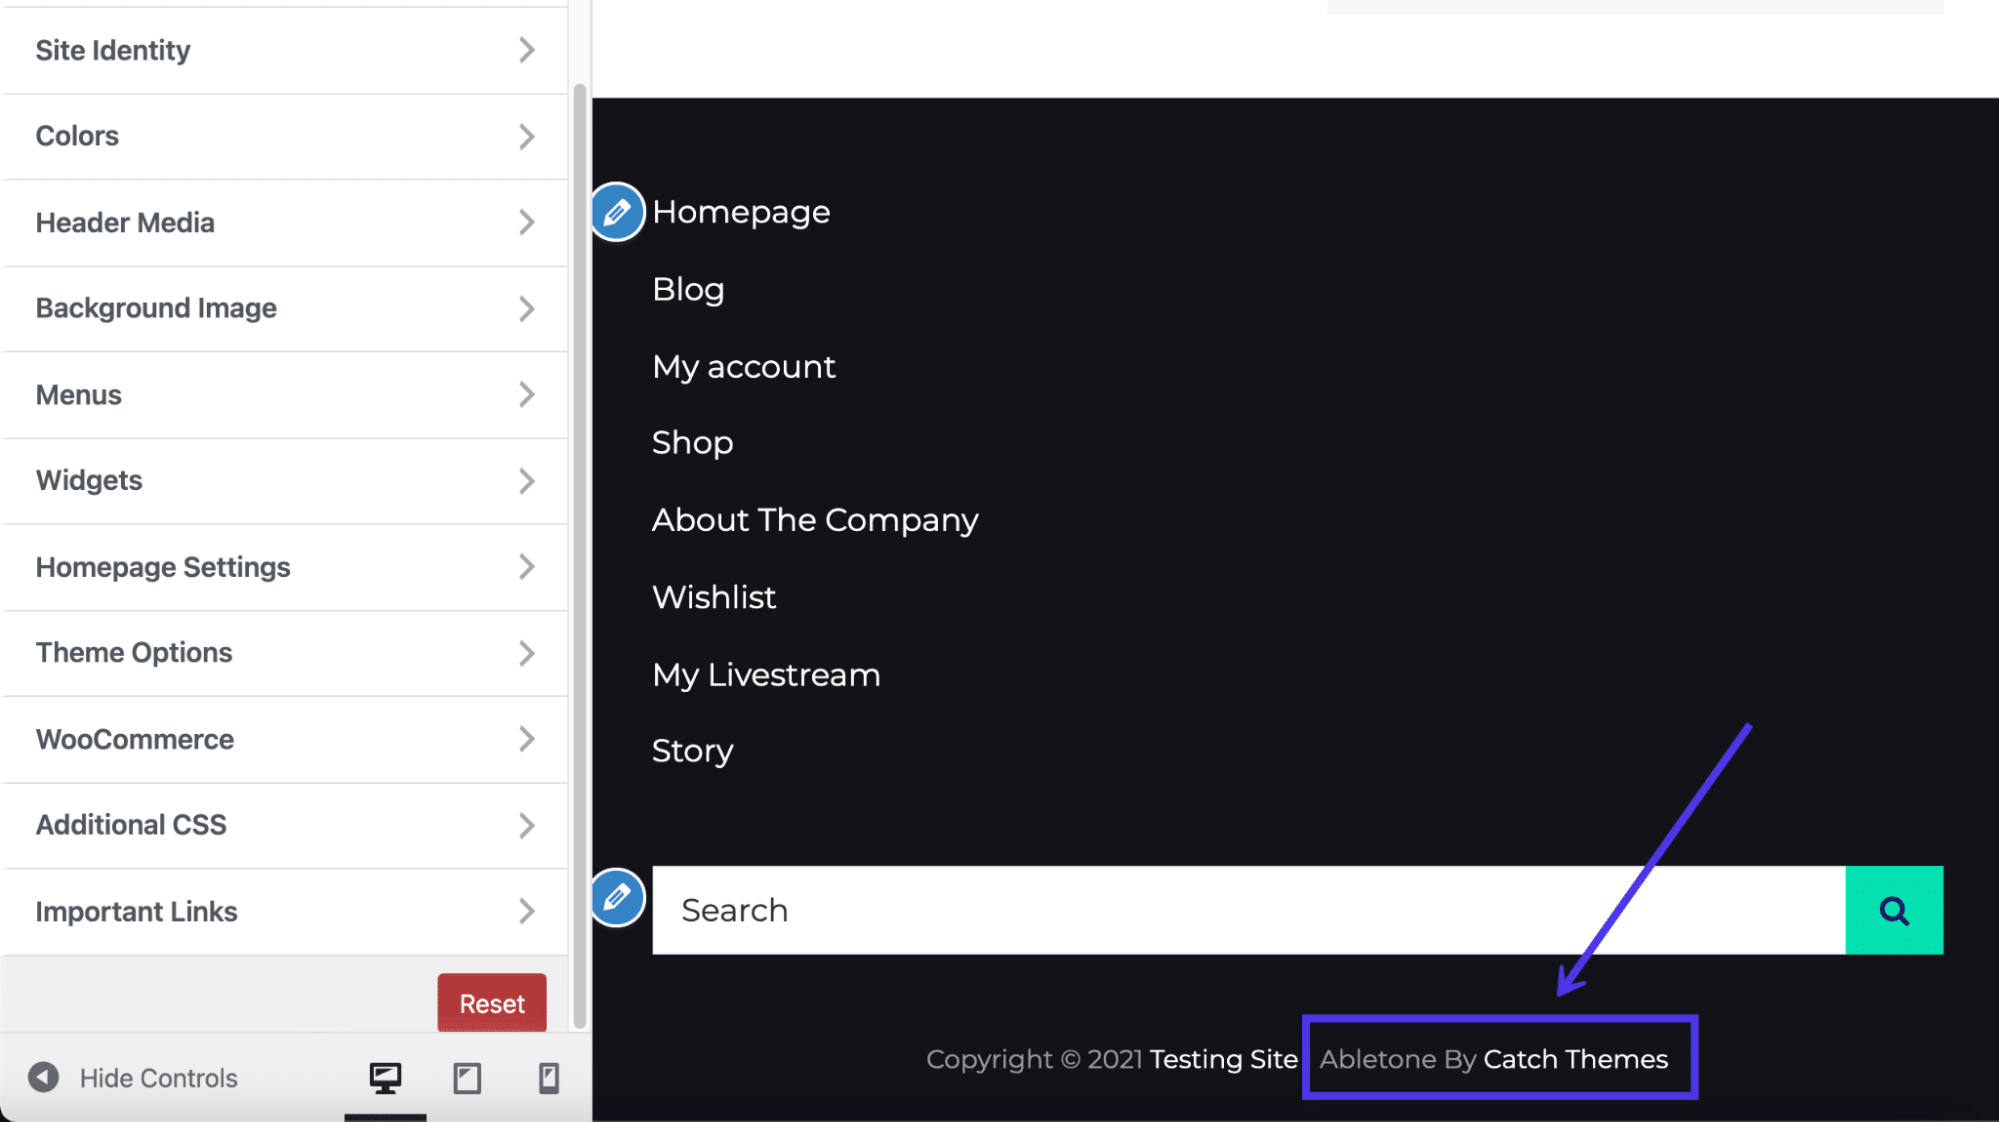
A theme developer credit score within the footer.
Attach in your website recordsdata the usage of an FTP consumer, as mentioned previous on this article. Each and every theme developer differs on the place they put the footer credit score, however a just right position to start out goes to /public/wp-content/topics.
Make a selection the theme you could have activated in your site.
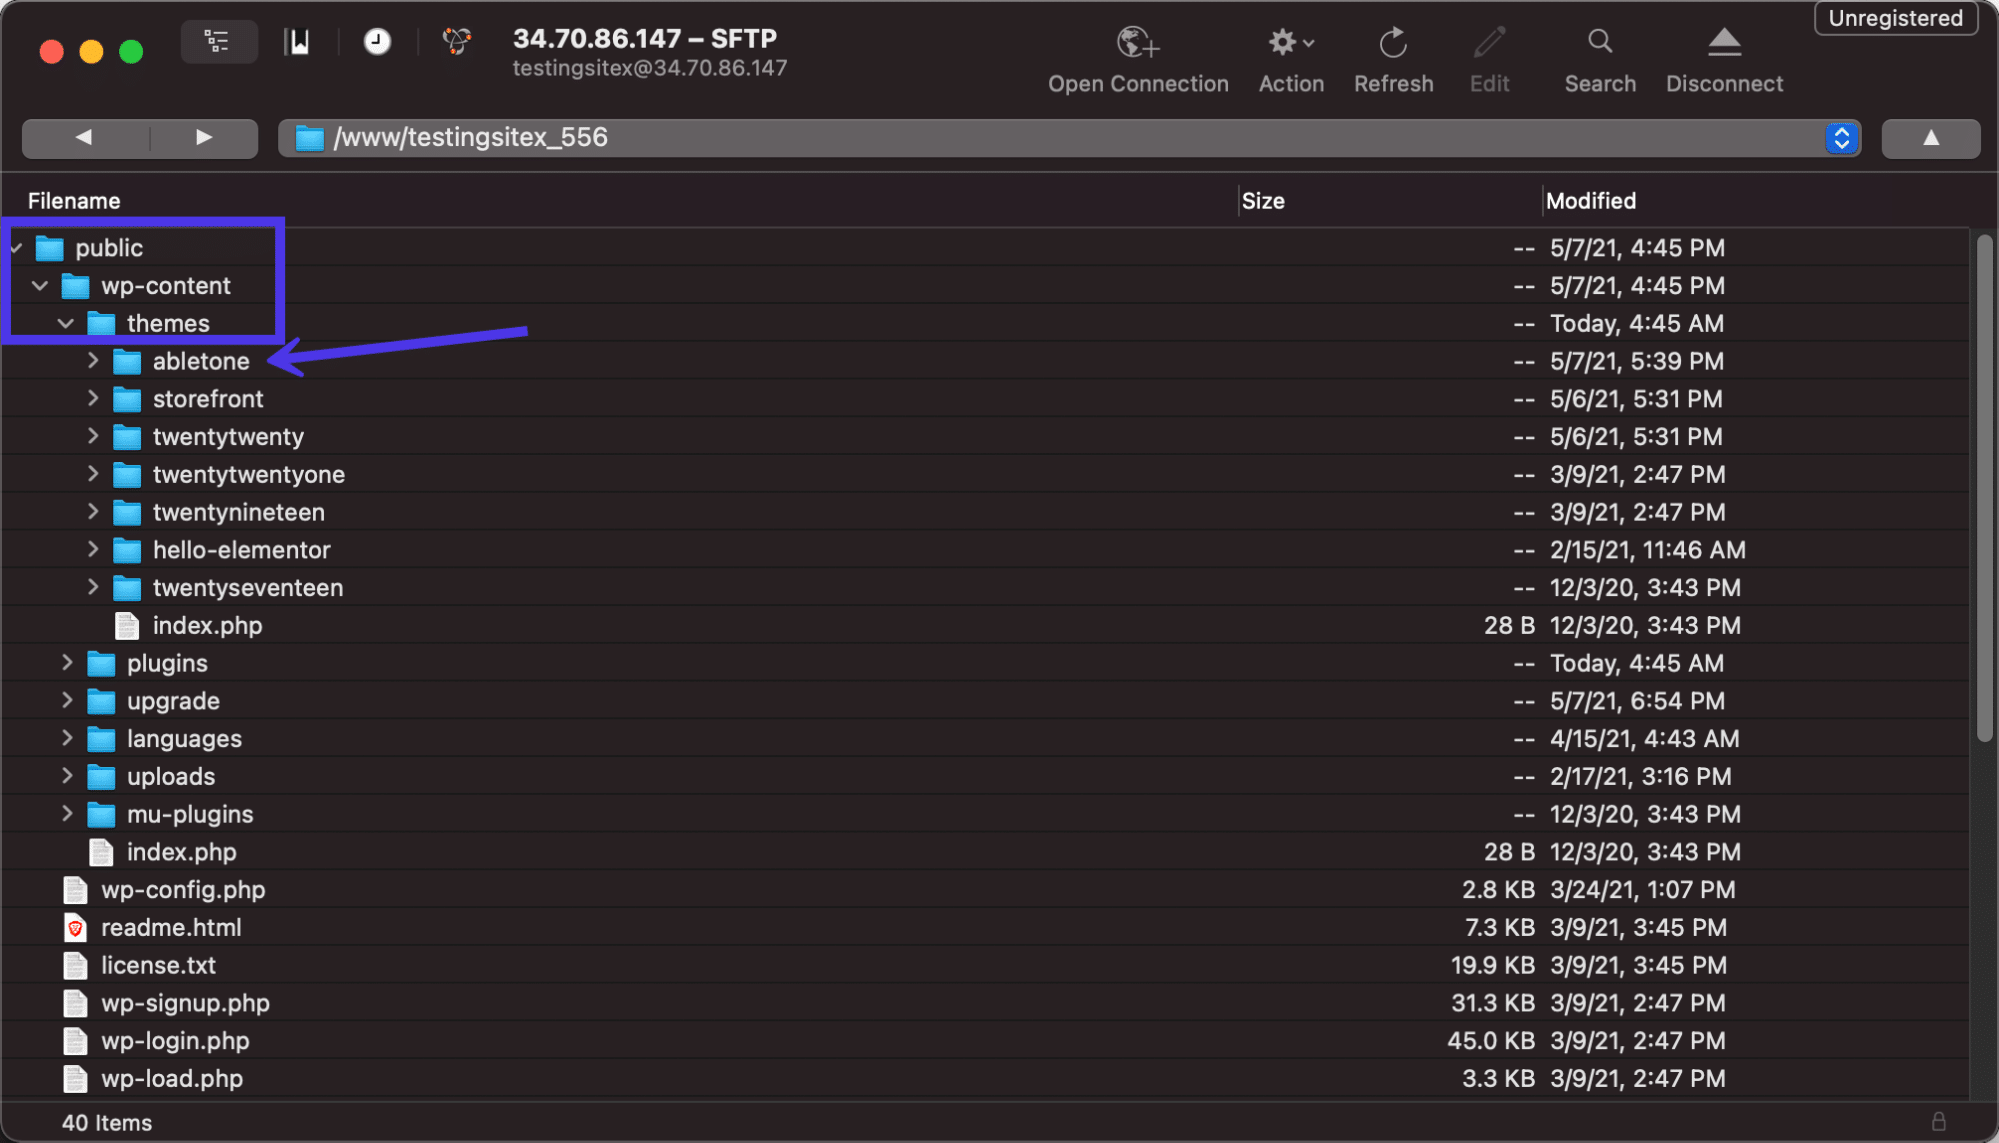
To find the correct theme folder.
From right here, one choice is to open the principle footer.php record in a text editor or PHP IDE and seek for references to the footer credit score. Use the To find serve as on your selected editor to kind in and seek for the precise textual content that looks because the credit score message on your footer.
As with every topics, this is probably not the correct record for taking away the footer credit score; it totally is determined by how the theme used to be constructed. If you don’t have any success with the footer.php record, proceed having a look somewhere else.
The footer.php record.
One of the crucial commonplace puts to seek out the footer credit score data code is within the /template-parts folder. We discovered this used to be the case for the present check theme we’ve got put in for this educational.
We will pass to the /footer folder, then click on at the site-info.php record. That site-info.php record (or some variant of that) is a commonplace position for storing the theme’s footer credit score data.

The positioning-info.php record.
Be at liberty to both delete the footer credit or substitute them with one thing else. For this case, we’ll merely take away the credit hook and the do_action credit code on the backside.
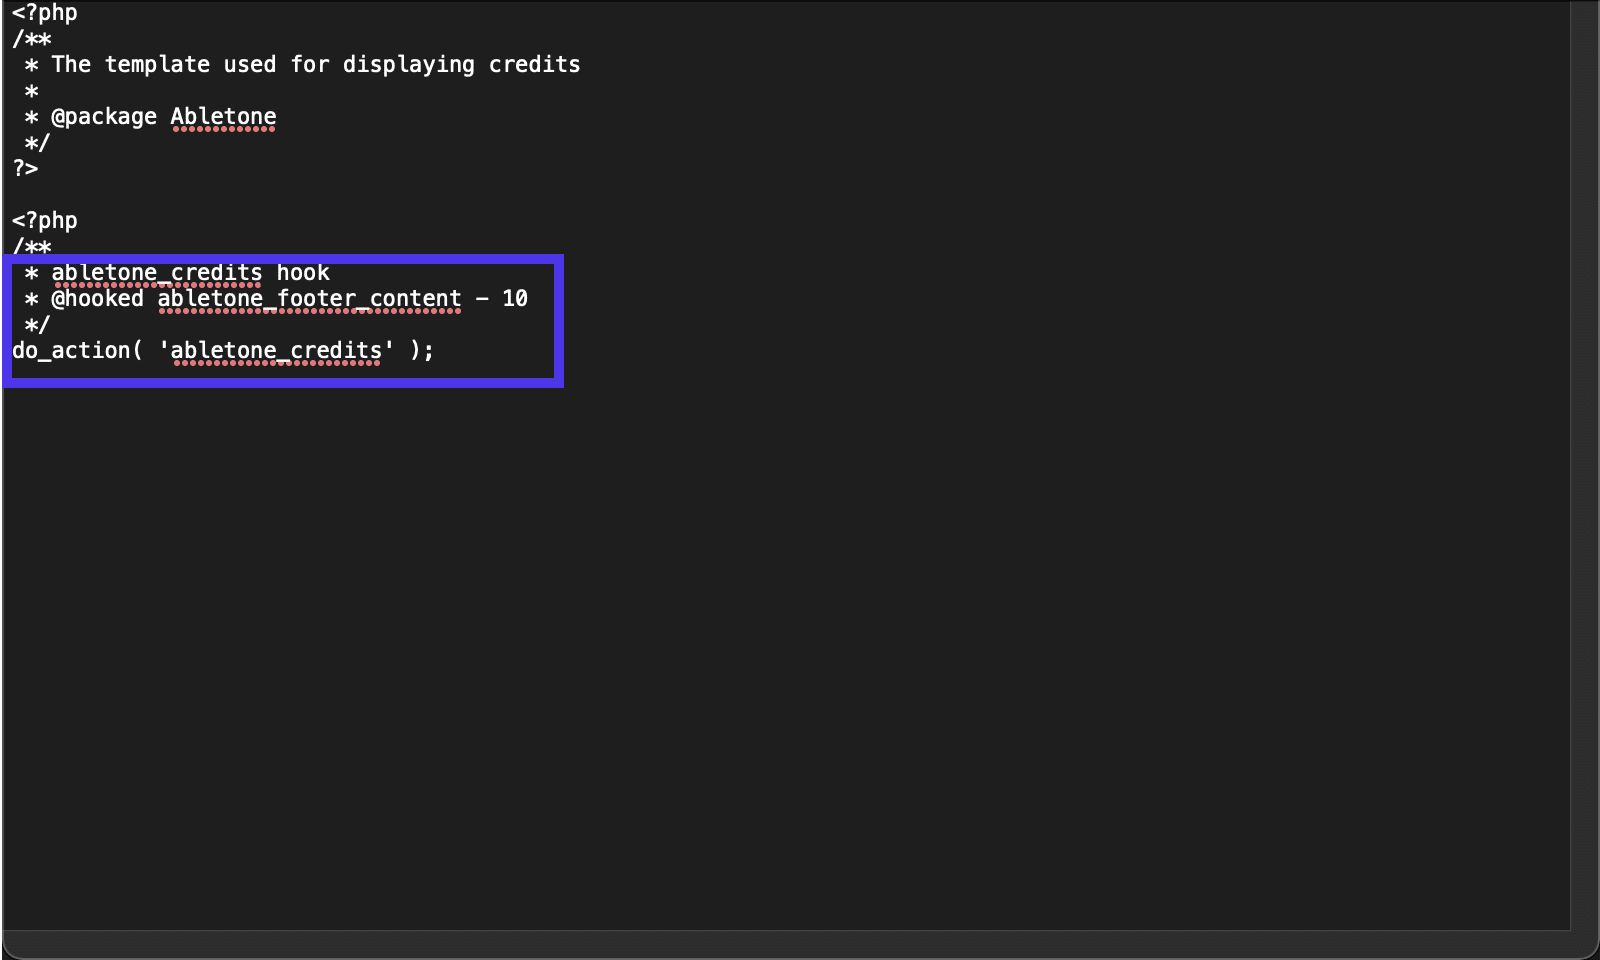
Take away the credit hook and the do_action credit code.
And that’s effectively got rid of the whole lot of the credit score being proven for the theme developer. It additionally didn’t have any impact at the footer content material, like our widgets and menus.
Not more footer credit score!.
As discussed ahead of, one solution to conceal the footer credit score, whilst additionally supporting the theme developer and receiving some distance higher options, is to improve to the top rate model of the theme. Stay an eye fixed out for a button on your dashboard to improve to a Professional model, or pass to the developer’s website to make a fee.
Imagine upgrading to top rate theme variations to take away footer credit.
Even supposing no longer beneficial for many websites, it occasionally is sensible to take away the WordPress footer in positive eventualities altogether.
Should you to find {that a} WordPress footer reasons an excessive amount of litter (which is commonplace with touchdown pages), or should you’d as an alternative the footer didn’t get crawled by search engines, taking the footer out of the equation totally is probably not a nasty choice.
Bear in mind, then again, that you simply’re no longer deleting the footer out of your WordPress recordsdata. The footer.php record is a core a part of the WordPress recordsdata, so that you should depart it. Then again, we will use CSS code to inform WordPress to not show the footer and its content material.
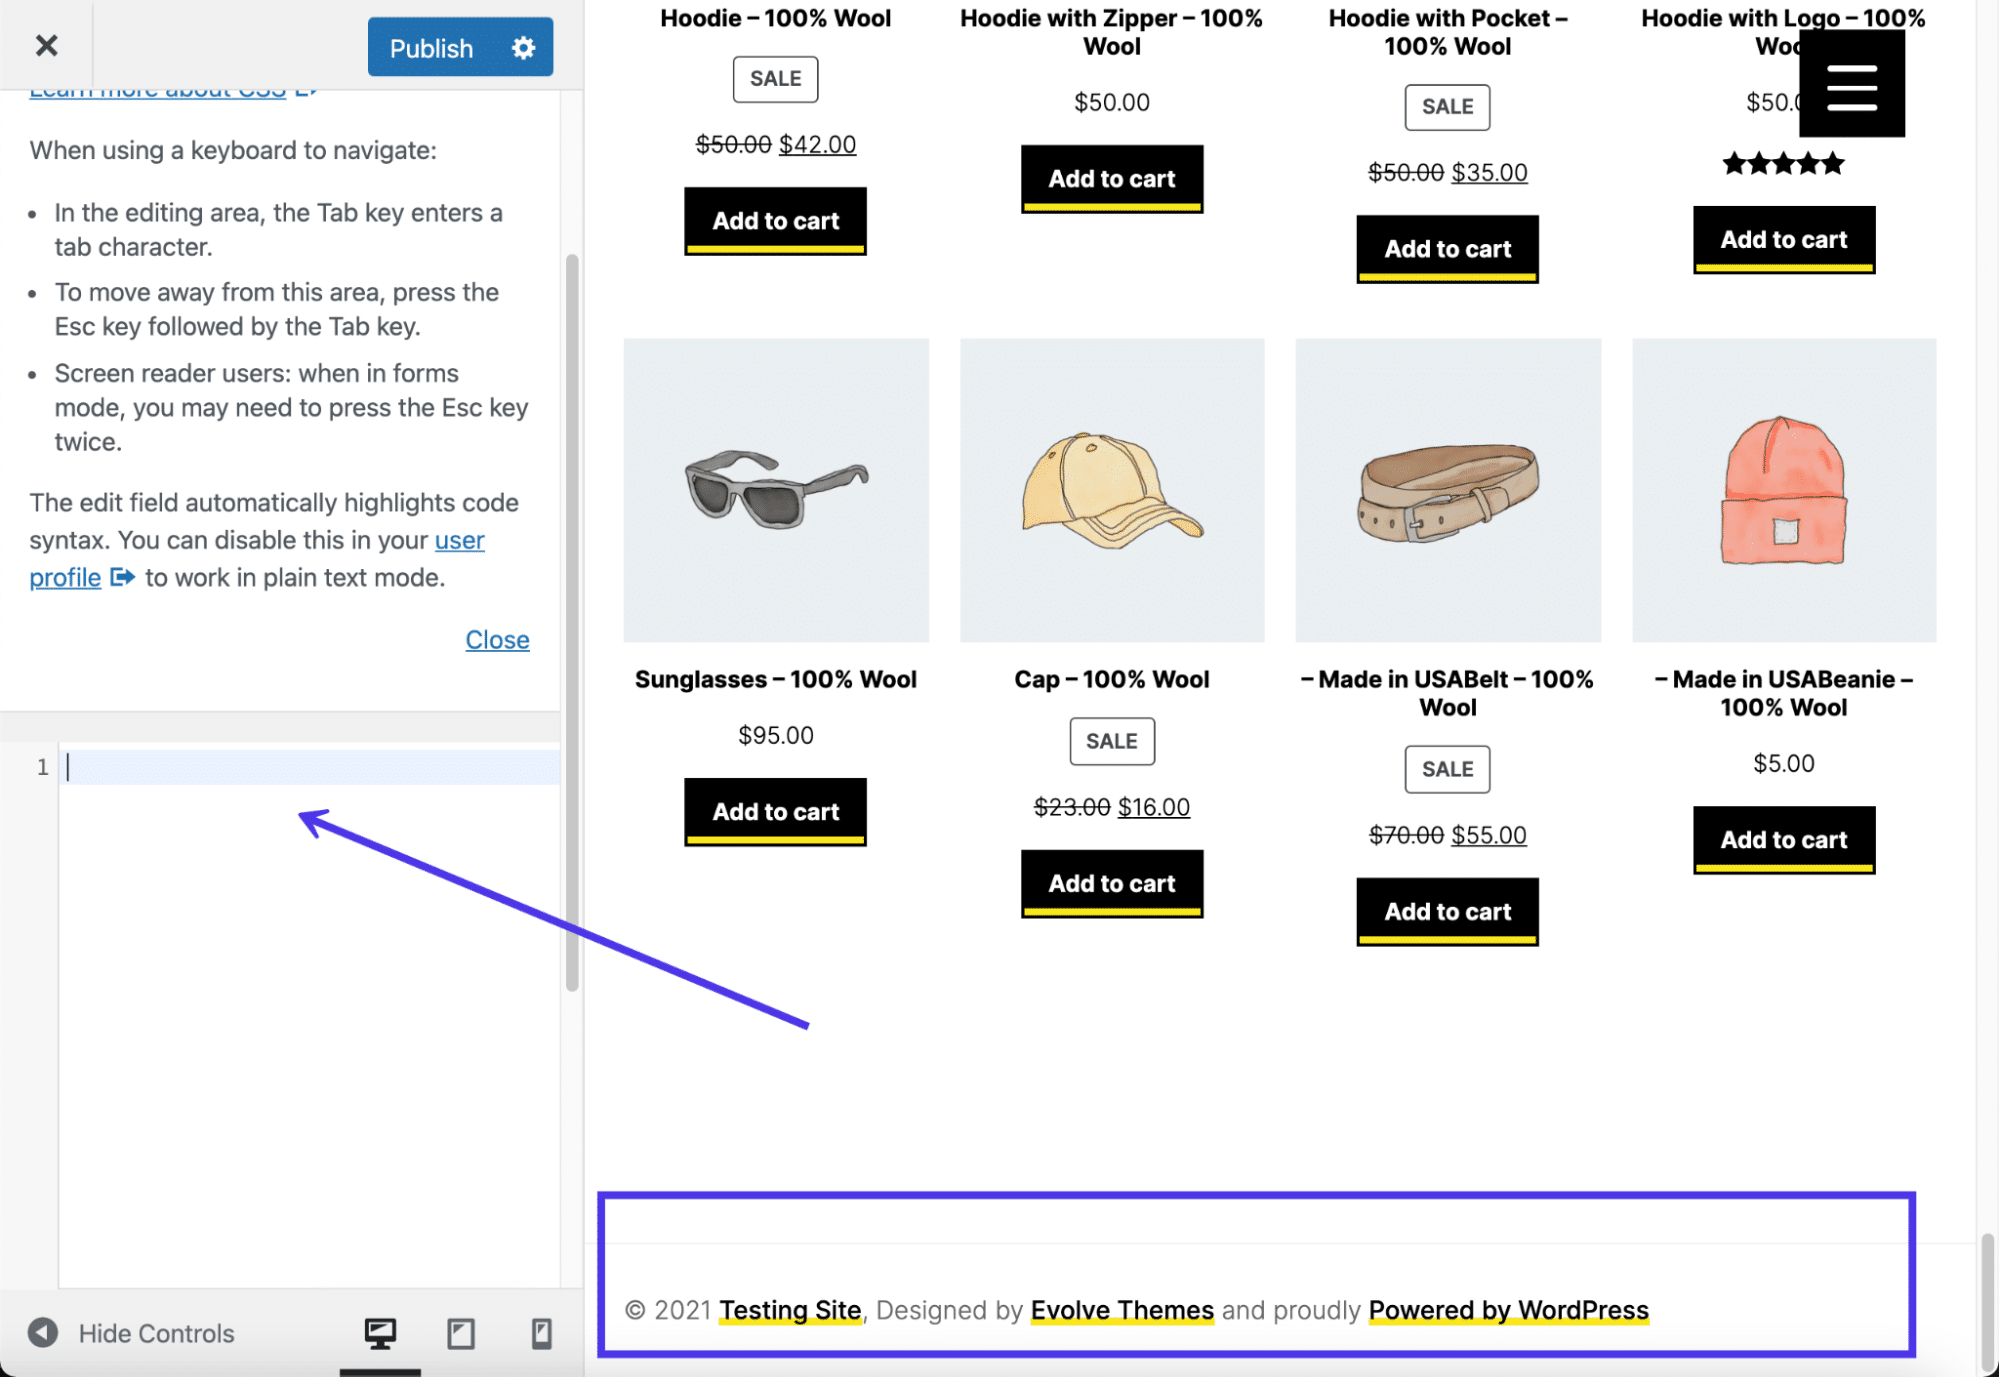
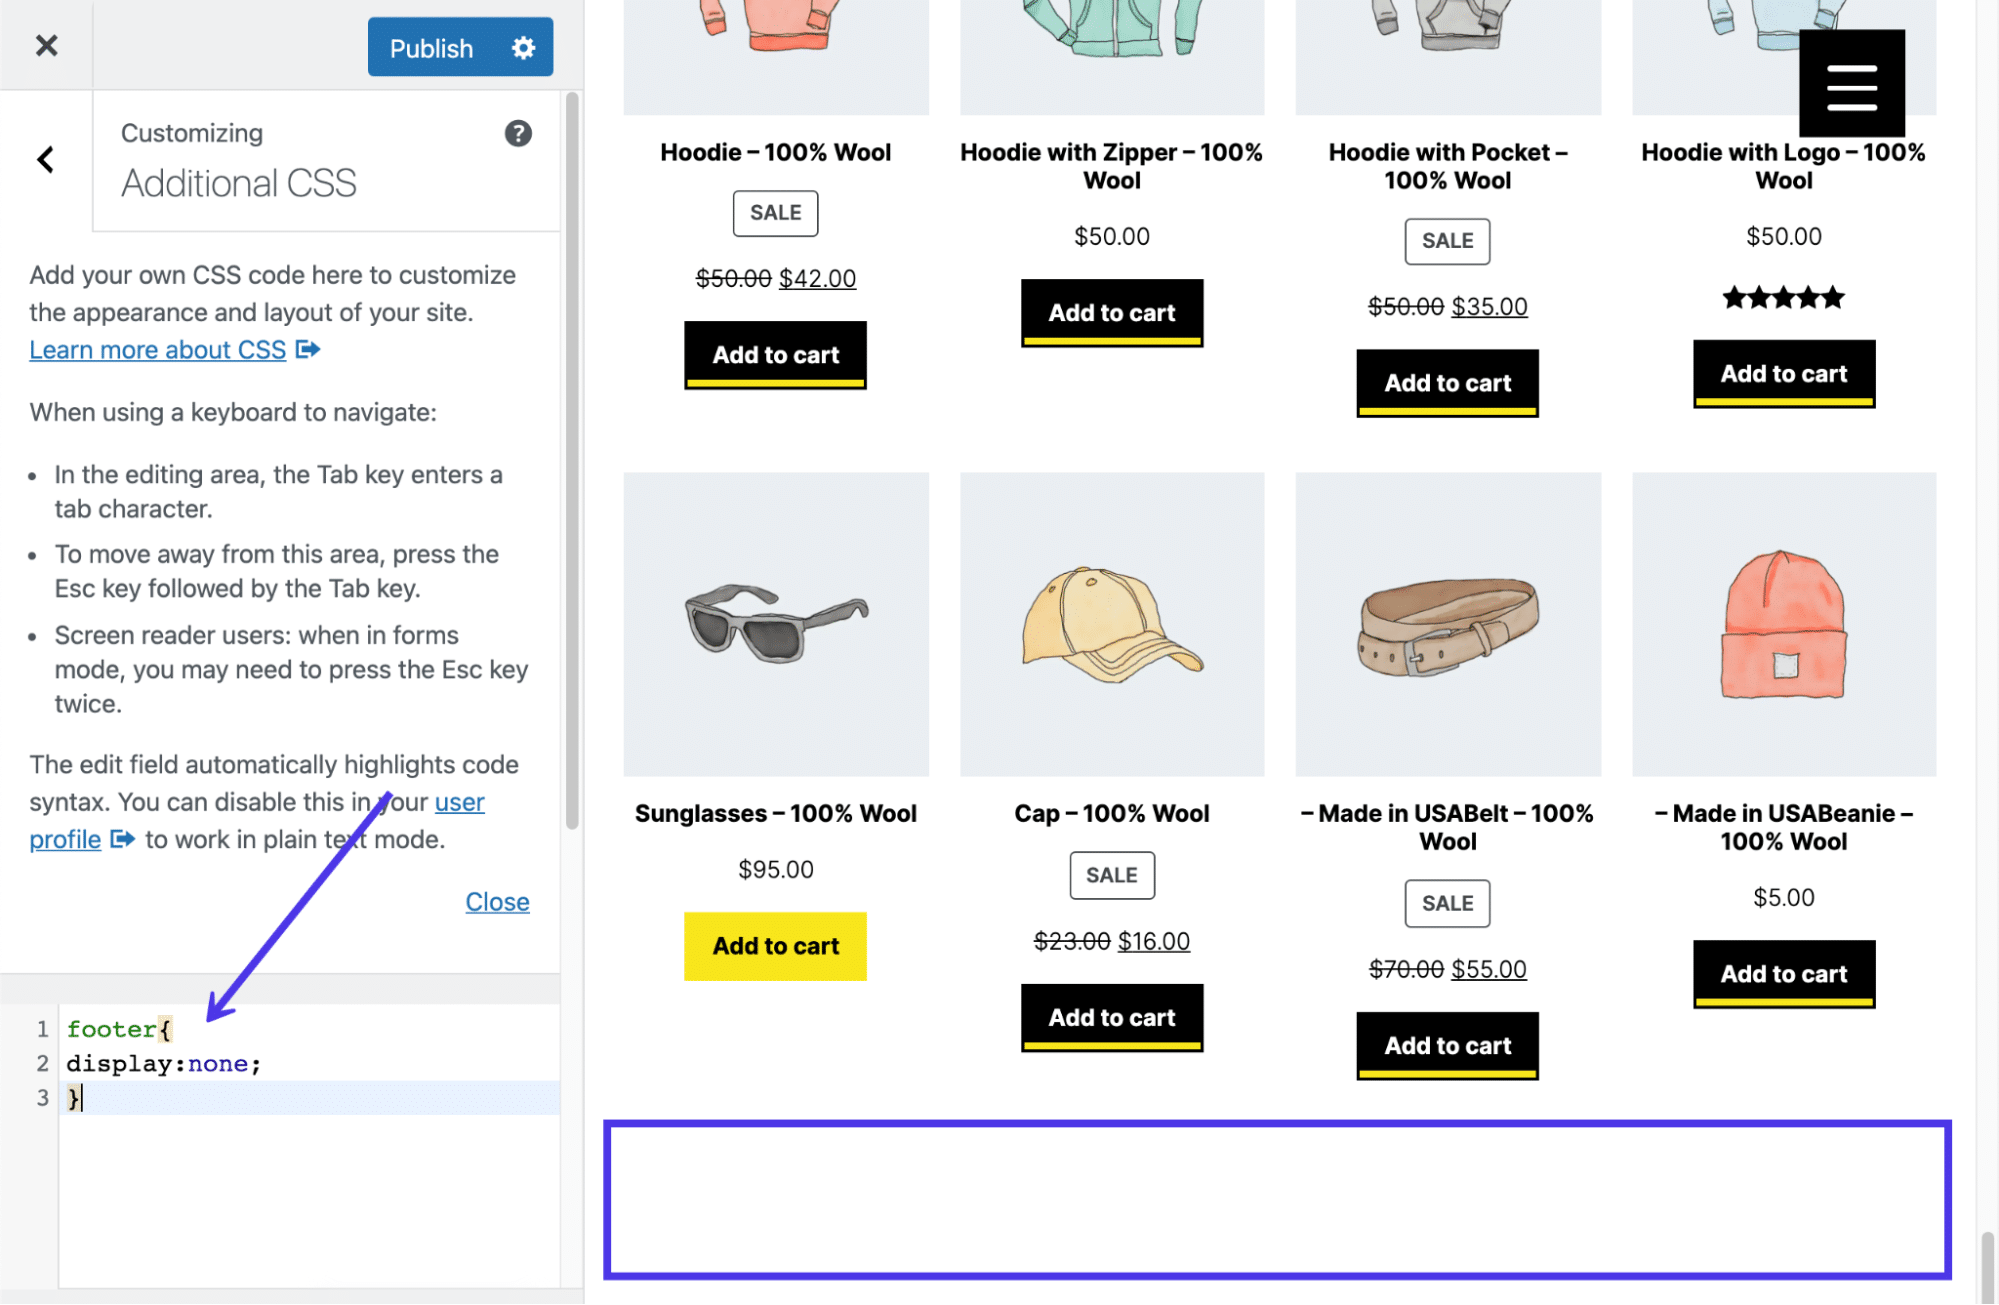
To cover the WordPress footer totally, pass to the Theme Customizer and click on at the Further CSS tab.
Click on at the “Further CSS” tab.
The objective is to stick CSS to inform WordPress that we don’t need to see the footer on our site.
We’re seeking to conceal the entirety on this instance, from the copyright data to the WordPress and theme developer credit. You’ll additionally use this strategy to conceal pieces like widgets and menus inside of your footer.
The Customized CSS module.
Move forward and paste the next code within the CSS field:
footer{

show:none;

}
This tells WordPress to cover the entirety inside the footer.php record. The record stays inside of your record listing, simply in the event you’d love to re-add content material sooner or later.
The Theme Customizer preview must now display a clean house. Make sure to hit the Submit button to look the consequences at the entrance finish.
Paste within the CSS code.
Even supposing that CSS must paintings for many topics, it’s possible you’ll to find that the theme developer has a special record configuration. In a different way to probably take away lots of the footer content material is by means of the usage of the next code as an alternative of the former code mentioned:
.site-info { show:none; }This feature is much less more likely to paintings, but it surely’s no longer remarkable for theme builders to make a record referred to as site-info.php in a footer’s template-parts folder.
 Learn how it works in this guide
Abstract
WordPress footers have many functions, from including social media buttons to exhibiting fresh weblog posts, enhance pages, and paperwork. The objective is to benefit from this additional house, because it’s no longer sensible to pack your major menu with too many hyperlinks or attempt to fill your sidebar with an onslaught of content material.
You’ve realized some ways to edit a WordPress footer. We are hoping you’ll be able to now effectively edit and customise footers on any WordPress website!
Tell us within the feedback under you probably have any questions on modifying the footer in WordPress!
The publish How To Edit the Footer in WordPress Using Every Method Possible seemed first on Kinsta®.
WP Hosting