
In relation to ecommerce, status out method ditching cookie-cutter templates for product pages that no longer simplest captivate but in addition convert. With Divi 5‘s Woo Product Modules, you’ll construct high-impact product pages solely from scratch, all whilst seamlessly integrating real-time WooCommerce knowledge.
On this publish, we’ll stroll you thru making a product web page from scratch the use of Divi 5’s 17 Woo Product Modules and the Theme Builder. Let’s get began.
Contents
- 1 Figuring out The Woo Product Modules In Divi 5
- 2 Obtain For Loose
- 3 You may have effectively subscribed. Please take a look at your electronic mail deal with to verify your subscription and get get right of entry to to unfastened weekly Divi format packs!
- 4 How To Create A Customized Product Web page In Divi 5
- 4.1 Step 1: Create A New Template
- 4.2 Step 2: Upload Content material
- 4.2.1 Upload The Woo Breadcrumbs Module
- 4.2.2 Upload The Woo Product Pictures Module
- 4.2.3 Upload The Woo Product Identify
- 4.2.4 Upload The Woo Product Score Module
- 4.2.5 Upload The Woo Product Description Module
- 4.2.6 Upload The Woo Product Value Module
- 4.2.7 Upload The Woo Product Upload To Cart Module
- 4.2.8 Upload The Woo Product Meta Module
- 4.2.9 Upload The Woo Product Tabs Module
- 4.2.10 Upload The Woo Similar Merchandise Module
- 4.3 Step 3: Check For Responsiveness
- 4.4 Step 4: Save The Web page
- 5 Construct Your Subsequent Ecommerce Website online In Divi 5!
Figuring out The Woo Product Modules In Divi 5
Divi 5’s Woo Product Modules constitute a step ahead in ecommerce design, providing 17 local modules that pull dynamic knowledge at once from WooCommerce. You’ll have complete keep an eye on over each and every component, from crowd pleasing visuals to seamless person interactions by the use of Divi’s intuitive Visible Builder.
To make sense of this toolkit, we’ve grouped the 17 modules into 4 intuitive classes in line with their roles in a regular product web page glide. Each and every integrates without problems with Woo’s backend, making sure your content material remains contemporary and useful. Let’s wreck them down:
Get started sturdy by way of guiding customers and holding them knowledgeable with those foundational parts that take care of orientation and real-time comments.
- Woo Breadcrumbs: This module generates a dynamic navigational path, linking out of your homepage hyperlinks thru classes to the present product web page. This is helping customers retrace their steps. It pulls retailer construction knowledge at once from WooCommerce, making it superb for in-depth critiques of your catalog.
- Woo Understand: Very best for surfacing Woo machine indicators — like cart addition confirmations, error messages, or luck notifications. The module dynamically renders those parts, making sure that your customers keep knowledgeable with out disrupting the design glide.
Product Show
On the center of any compelling product web page, those modules exhibit the necessities: visuals, main points, and specifications that hook guests and construct consider.
- Woo Product Identify: Render the product’s title as a daring, customizable heading, sourced directly from Woo’s publish knowledge. It serves as your web page’s anchor for Search engine marketing-friendly hierarchy.
- Woo Product Description: Show the lengthy (or brief) description, pulling content material from Woo fields to create attractive, story-driven sections.
- Woo Product Pictures: Show off the featured symbol with pro-level choices, corresponding to zoom results or lightbox popups, and fetch Woo’s number one and gallery pictures.
- Woo Product Gallery: Make bigger the view with a grid or slider of extra pictures, seamlessly built-in from Woo’s gallery attachments.
- Woo Product Data: Show variable attributes (colours, sizes, fabrics), leveraging Woo’s database to elucidate choices and decrease cart abandonment.
- Woo Product Meta: Show taxonomy main points, corresponding to classes and tags, to toughen discoverability and context with out litter.
- Woo Product Value: Show dynamic pricing, together with sale pricing or variable charges, at once from Woo for accuracy that builds purchaser self assurance.
- Woo Product Score: Display famous person scores along evaluation counts, leveraging Woo’s aggregated comments so as to add social evidence.
- Woo Product Inventory: Show availability badges, such as ‘In Inventory’ or ‘Low Inventory’, pulled from WooCommerce stock.
Interactions And Critiques
With those modules, you’ll flip passive browsers into energetic patrons.
- Woo Upload To Cart: Show off easy or variable product choices and an Upload To Cart button that you’ll taste the use of the Visible Builder.
- Woo Product Critiques: Create a scrollable listing of purchaser testimonials, entire with submission bureaucracy, all powered by way of Woo’s critiques for social validation.
- Woo Product Tabs: Prepare content material into tabs for descriptions, additional info, and critiques, for a blank, mobile-optimized enjoy.
Similar And Lists
Wrap up with good upselling and broader explorations, the use of those to increase classes and inflate order values.
- Woo Similar Merchandise: Show pieces in line with Woo’s integrated common sense, displayed in columns to encourage the ones “shoppers additionally purchased” moments.
- Woo Product Upsell: Spotlight top rate or bundled possible choices out of your Woo upsell settings, strategically positioned to lift carts with higher-margin tips.
- Woo Merchandise: Create product grids to show merchandise and filter out them by way of class, tags, and extra. With quite a few customization choices, you’ll regulate the collection of columns, the show order, and extra.
With those modules, you’re no longer simply development pages however developing reports that convert. Within the subsequent phase, we’ll roll up our sleeves and step thru development a customized product web page, from format to release. Should you’d love to observe in conjunction with a finished design, fill out the shape underneath to obtain the information.
@media simplest display and ( max-width: 767px ) {.et_bloom .et_bloom_optin_1 .carrot_edge.et_bloom_form_right .et_bloom_form_content:sooner than { border-top-color: #ffffff !essential; border-left-color: clear !essential; }.et_bloom .et_bloom_optin_1 .carrot_edge.et_bloom_form_left .et_bloom_form_content:after { border-bottom-color: #ffffff !essential; border-left-color: clear !essential; }
}.et_bloom .et_bloom_optin_1 .et_bloom_form_content button { background-color: #f92c8b !essential; } .et_bloom .et_bloom_optin_1 .et_bloom_form_content .et_bloom_fields i { colour: #f92c8b !essential; } .et_bloom .et_bloom_optin_1 .et_bloom_form_content .et_bloom_custom_field_radio i:sooner than { background: #f92c8b !essential; } .et_bloom .et_bloom_optin_1 .et_bloom_border_solid { border-color: #f7f9fb !essential } .et_bloom .et_bloom_optin_1 .et_bloom_form_content button { background-color: #f92c8b !essential; } .et_bloom .et_bloom_optin_1 .et_bloom_form_container h2, .et_bloom .et_bloom_optin_1 .et_bloom_form_container h2 span, .et_bloom .et_bloom_optin_1 .et_bloom_form_container h2 sturdy { font-family: “Open Sans”, Helvetica, Arial, Lucida, sans-serif; }.et_bloom .et_bloom_optin_1 .et_bloom_form_container p, .et_bloom .et_bloom_optin_1 .et_bloom_form_container p span, .et_bloom .et_bloom_optin_1 .et_bloom_form_container p sturdy, .et_bloom .et_bloom_optin_1 .et_bloom_form_container shape enter, .et_bloom .et_bloom_optin_1 .et_bloom_form_container shape button span { font-family: “Open Sans”, Helvetica, Arial, Lucida, sans-serif; } p.et_bloom_popup_input { padding-bottom: 0 !essential;}

Obtain For Loose
Sign up for the Divi E-newsletter and we can electronic mail you a duplicate of without equal Divi Touchdown Web page Structure Pack, plus lots of different superb and unfastened Divi sources, guidelines and tips. Practice alongside and you’ll be a Divi grasp very quickly. If you’re already subscribed merely sort to your electronic mail deal with underneath and click on obtain to get right of entry to the format pack.
You may have effectively subscribed. Please take a look at your electronic mail deal with to verify your subscription and get get right of entry to to unfastened weekly Divi format packs!
How To Create A Customized Product Web page In Divi 5
This phase will information you thru developing a contemporary product web page the use of Divi 5’s Woo Product Modules. By way of the tip, you’ll have a completely useful product web page that superbly showcases every product for your web site. Right here’s a snappy preview:
You’ll wish to make certain that WooCommerce is put in and activated and that you’ve got created no less than one product.
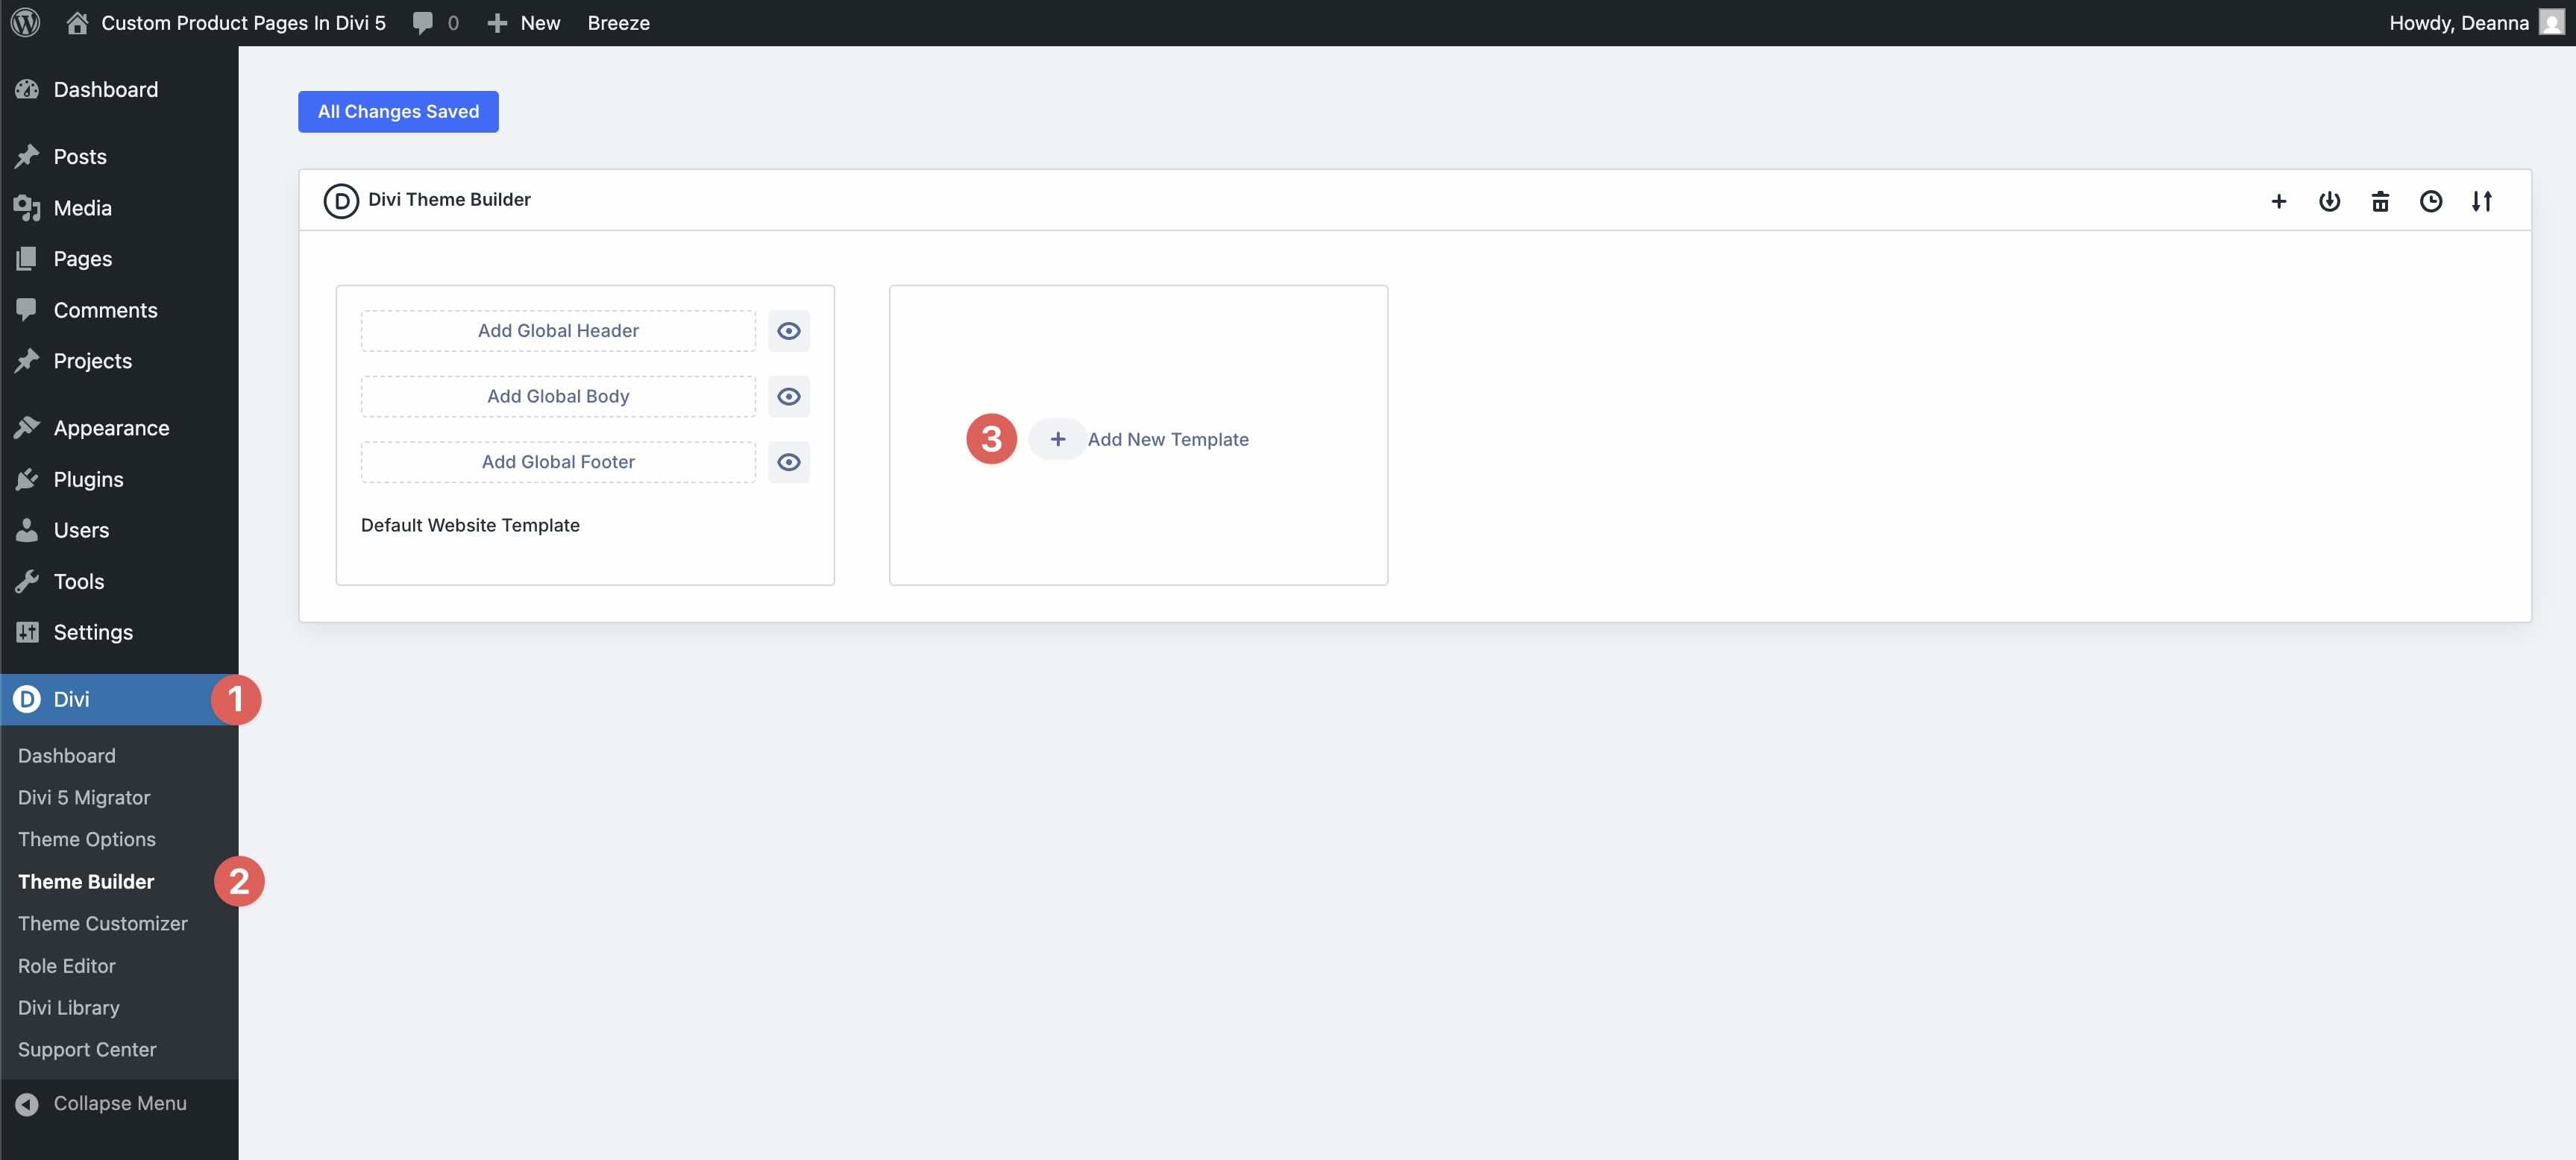
Step 1: Create A New Template
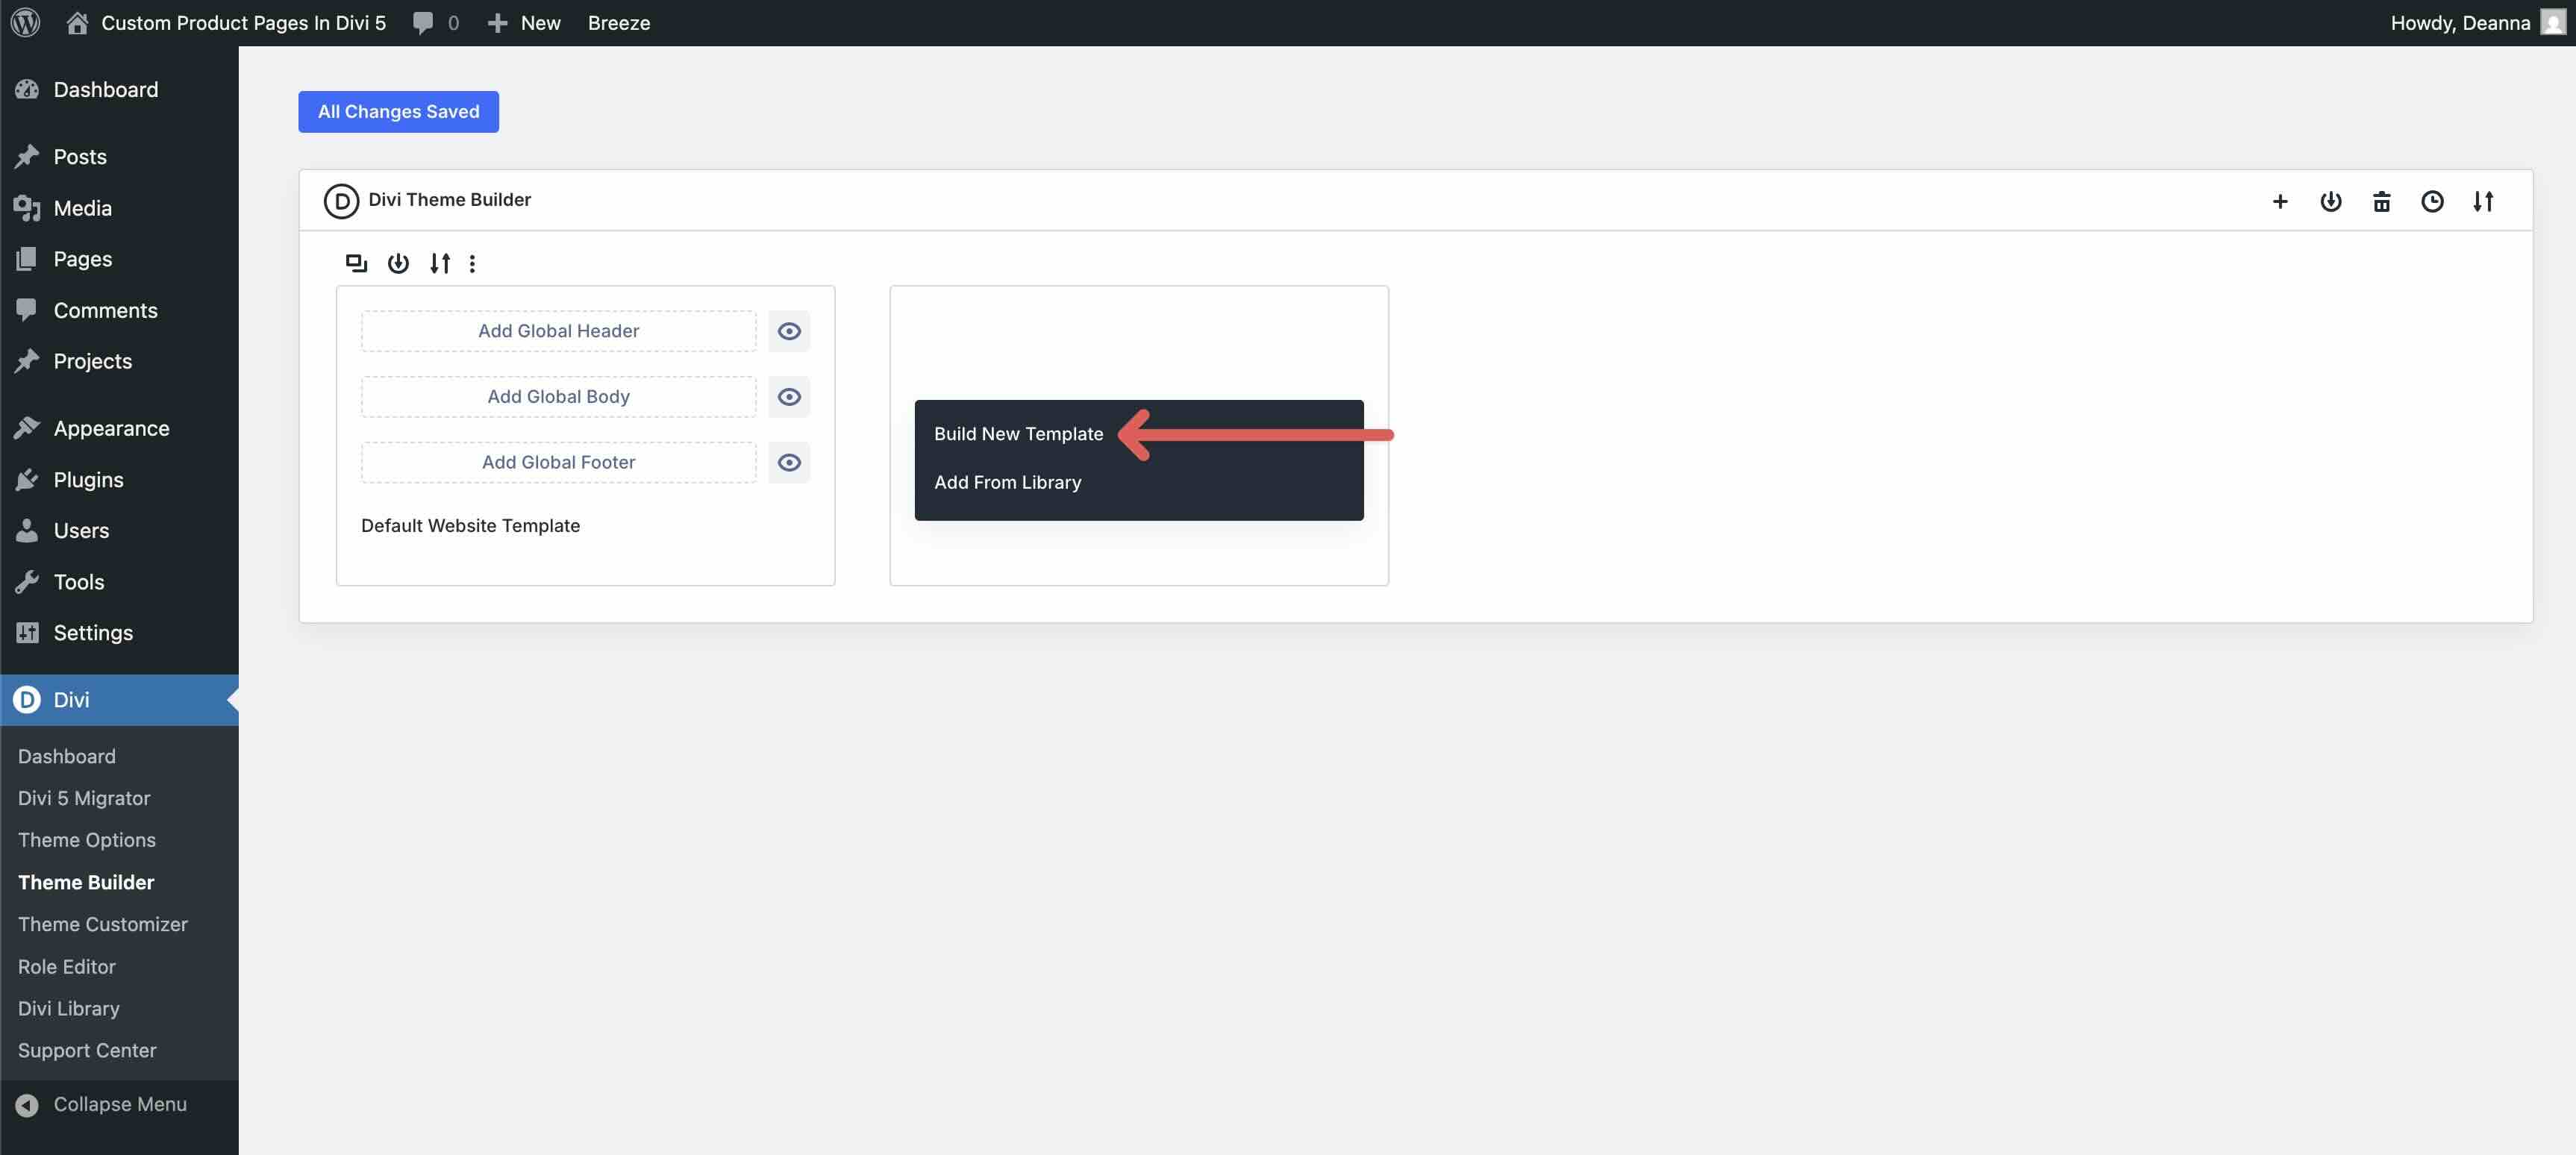
Subsequent, navigate to Divi > Theme Builder and click on the + Upload New Template button.
As soon as the modal seems, click on Construct New Template.
Within the Template Settings modal, scroll all the way down to and take a look at All Merchandise. Click on Create Template to proceed.
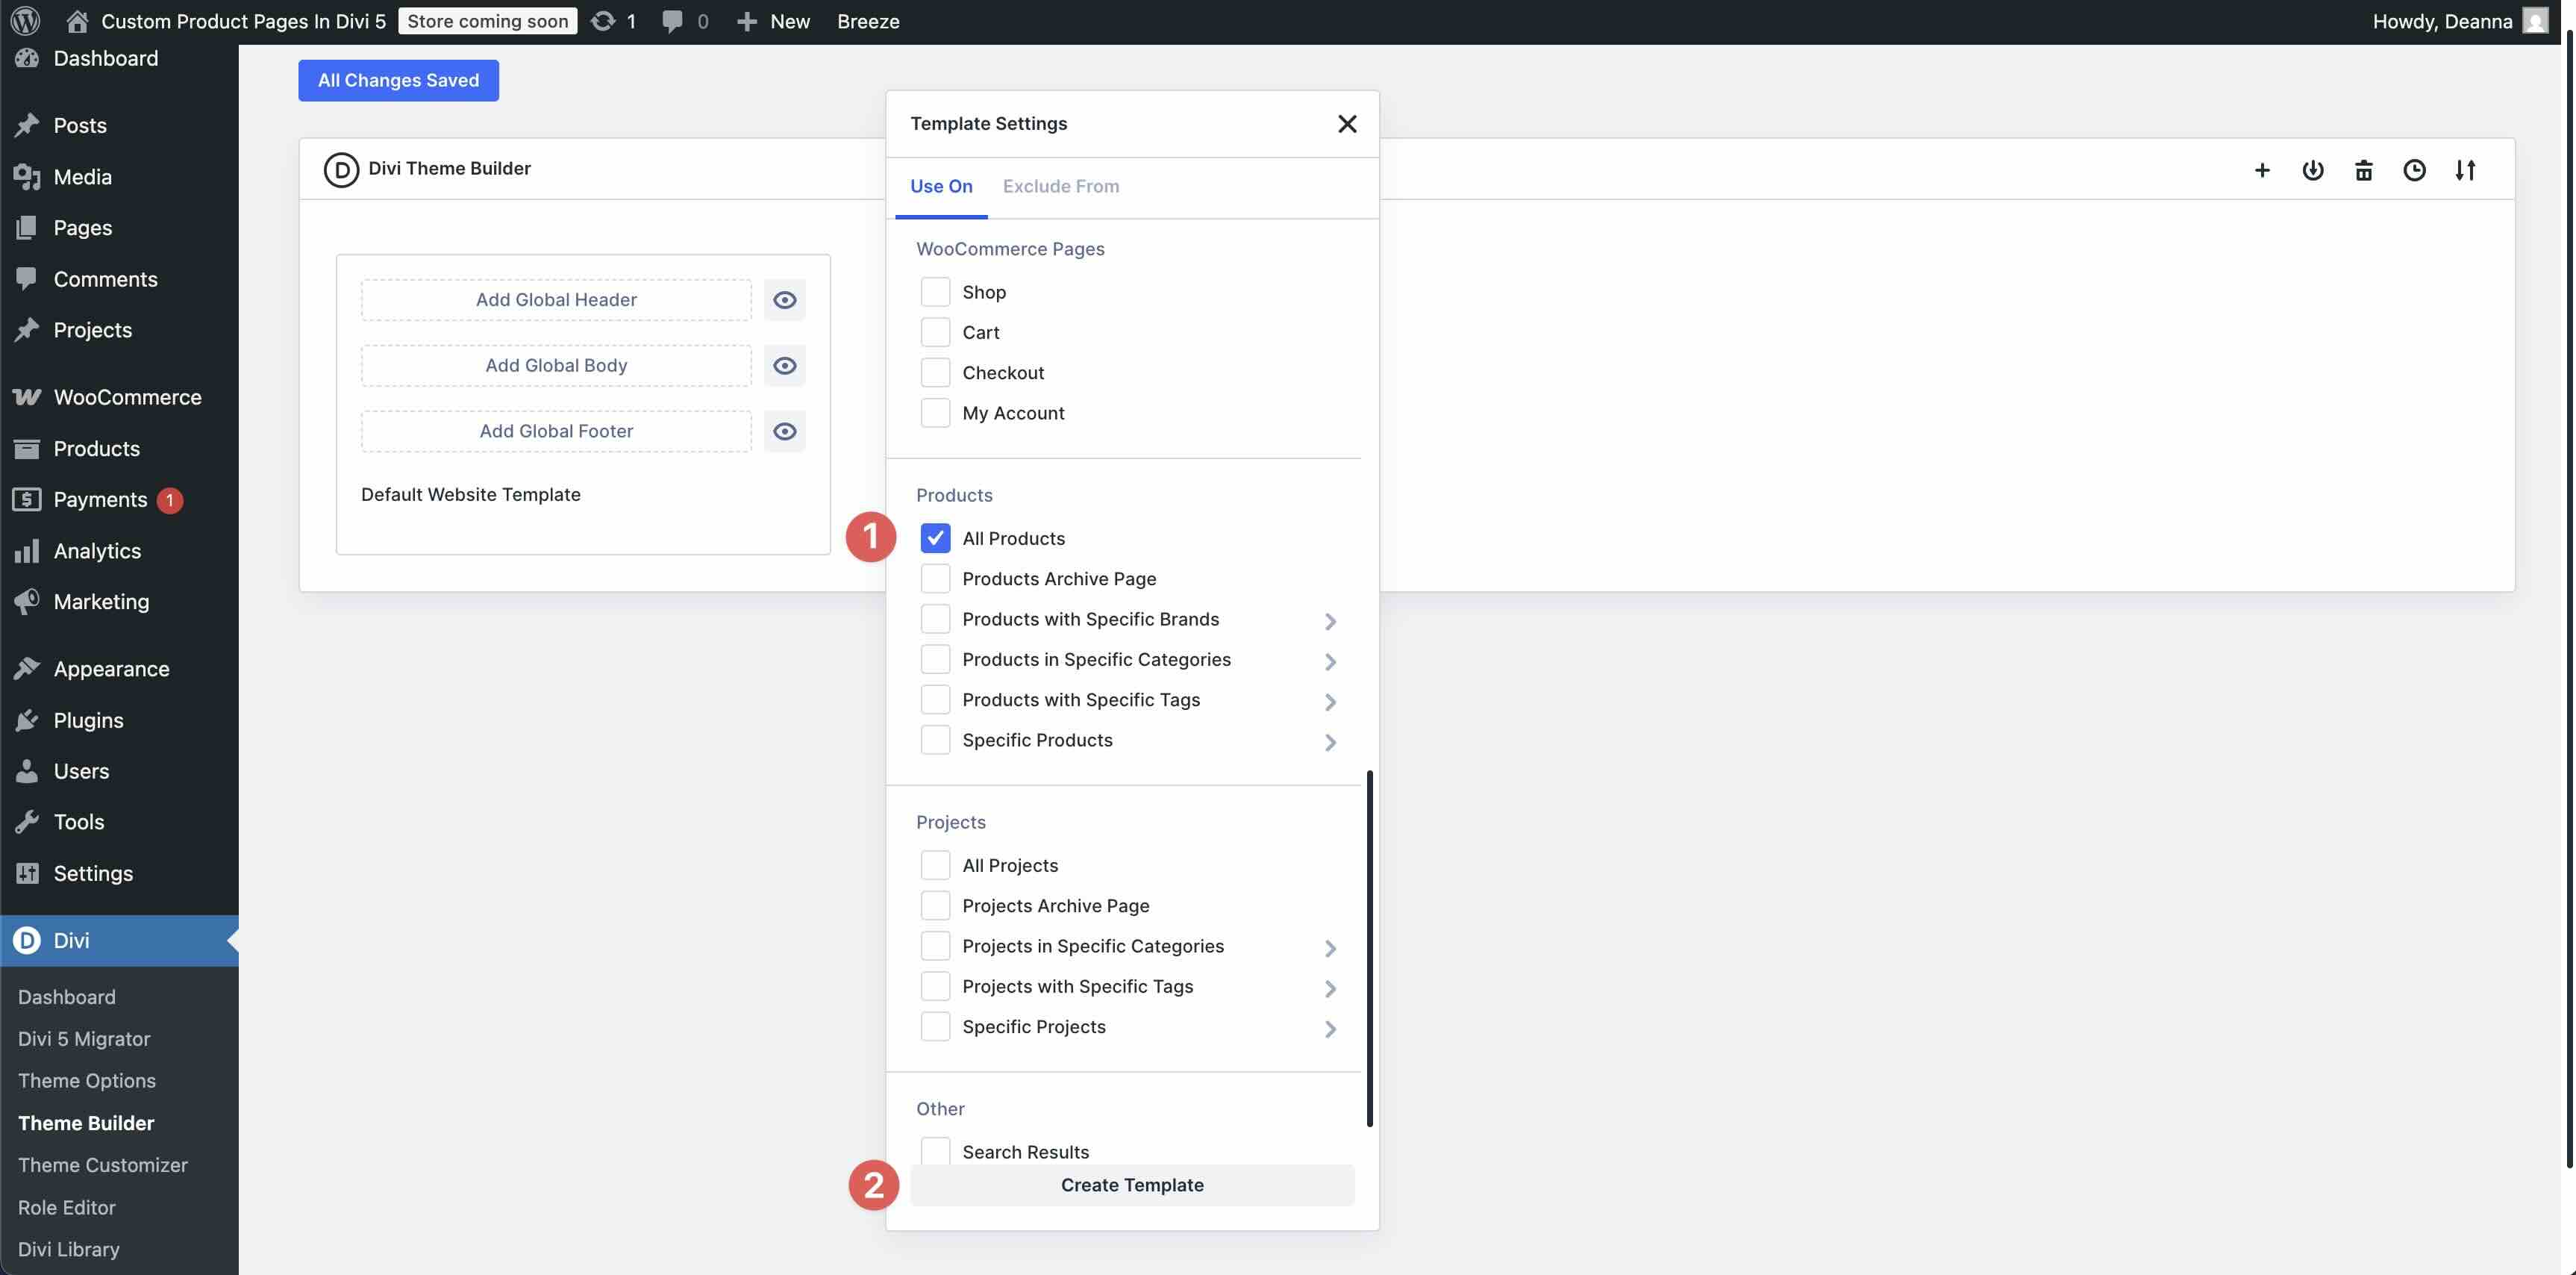
Subsequent, click on Upload Customized Frame.
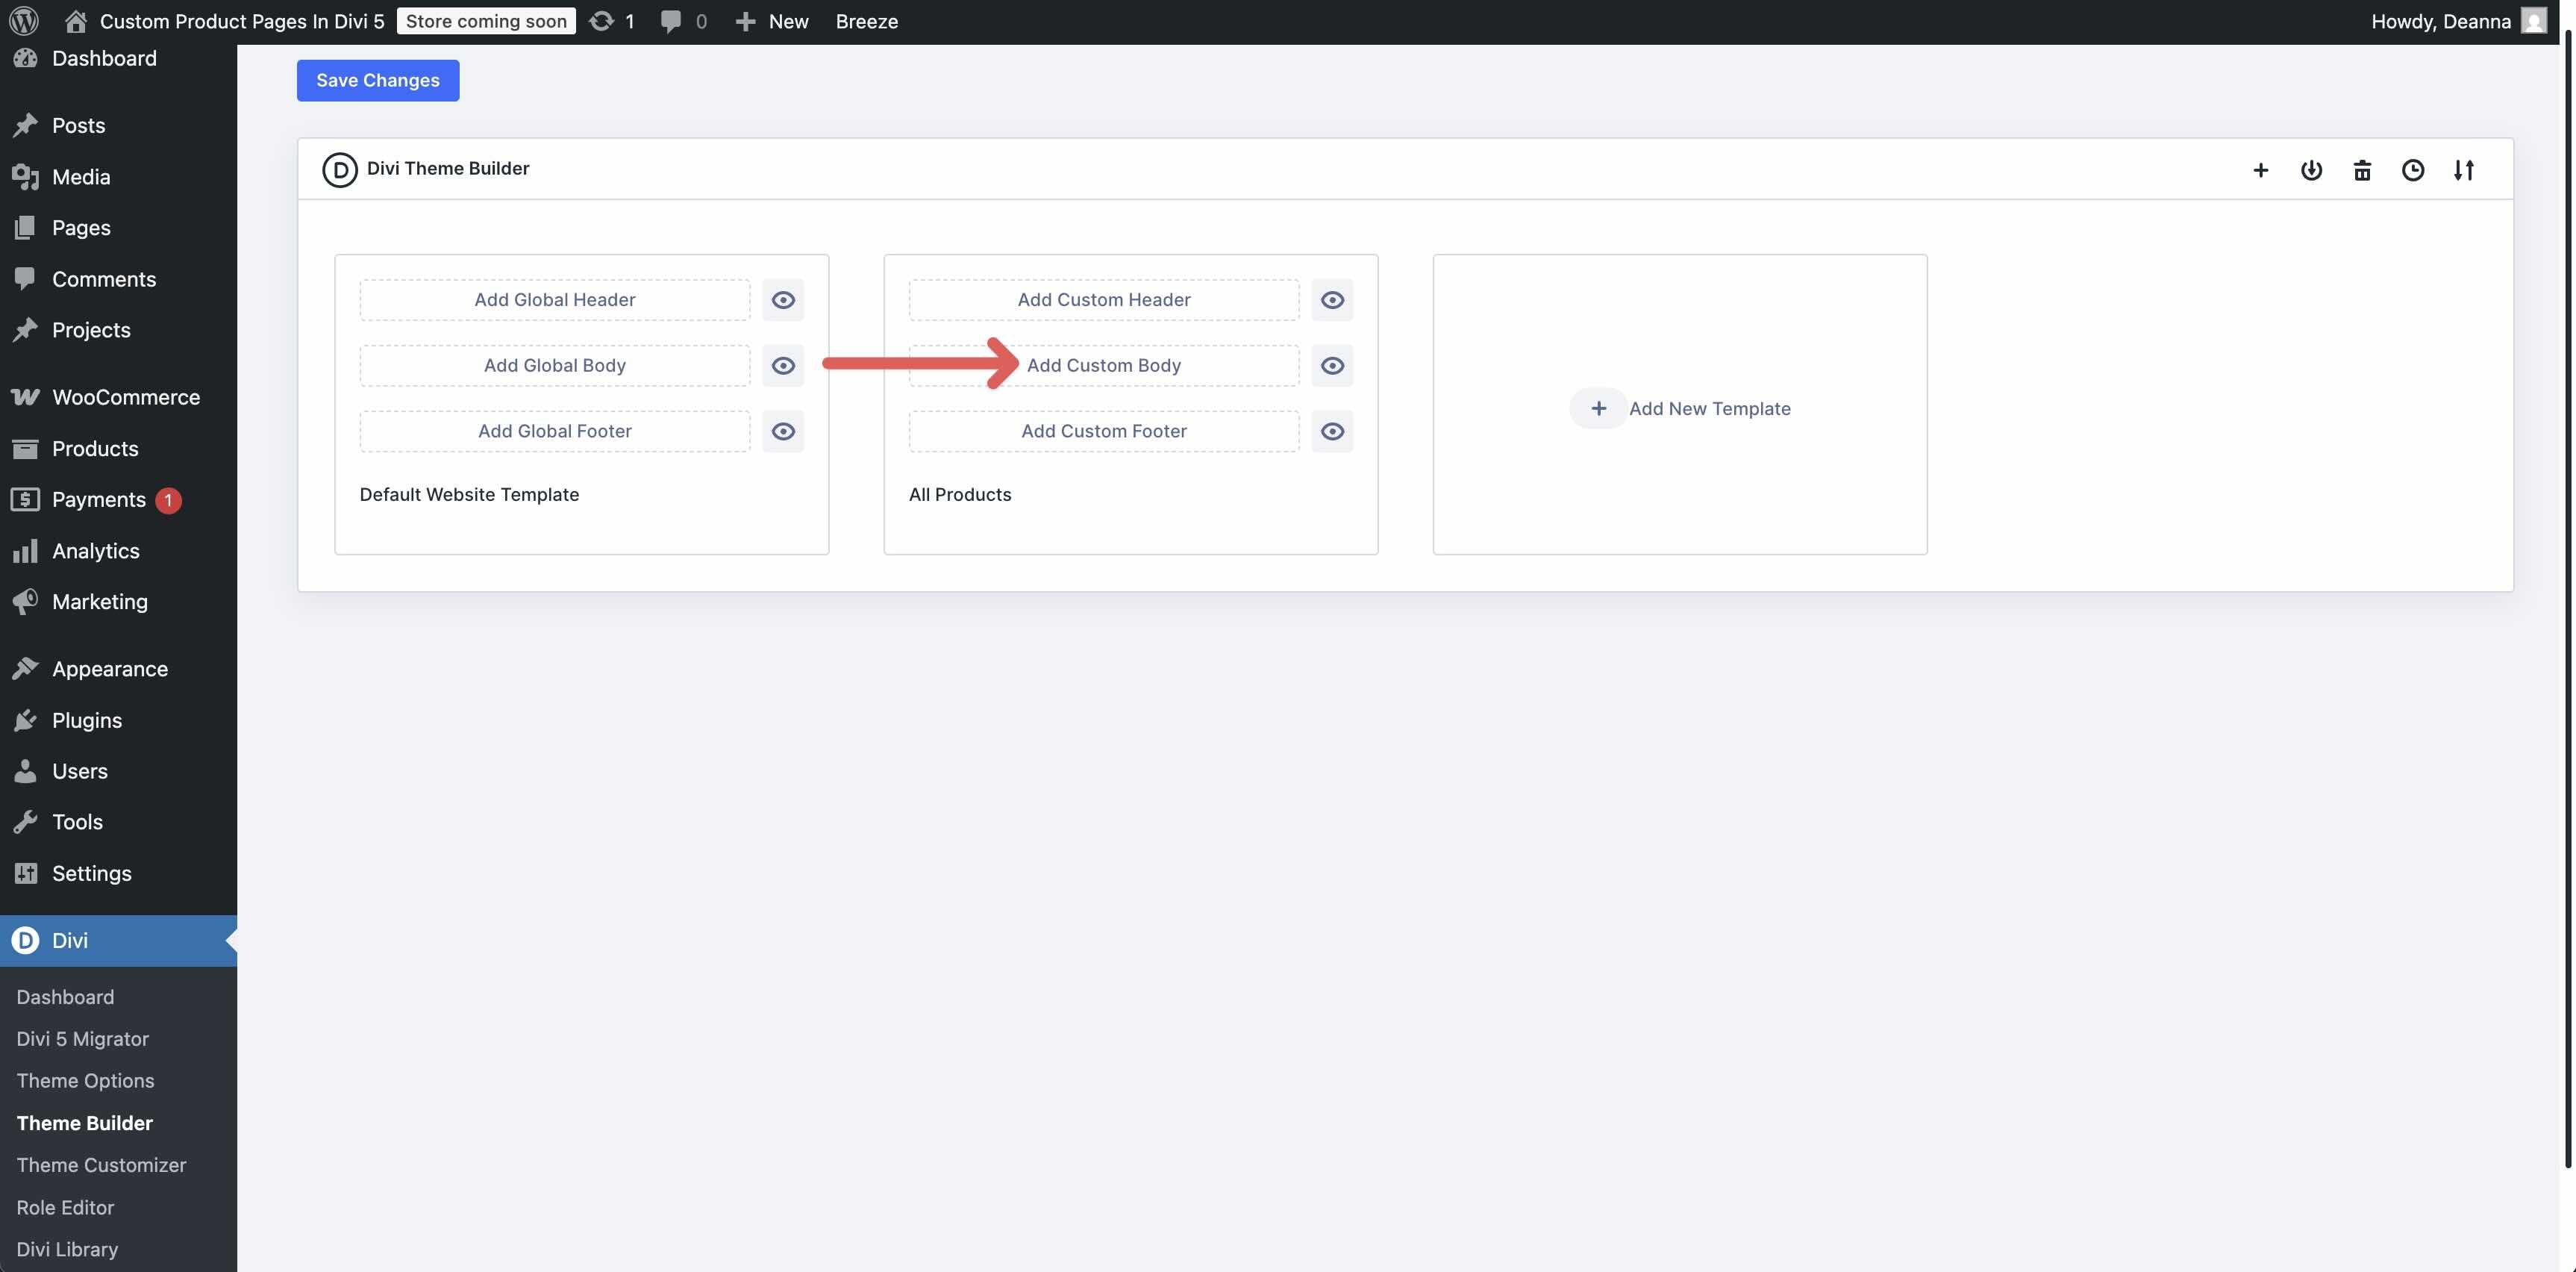
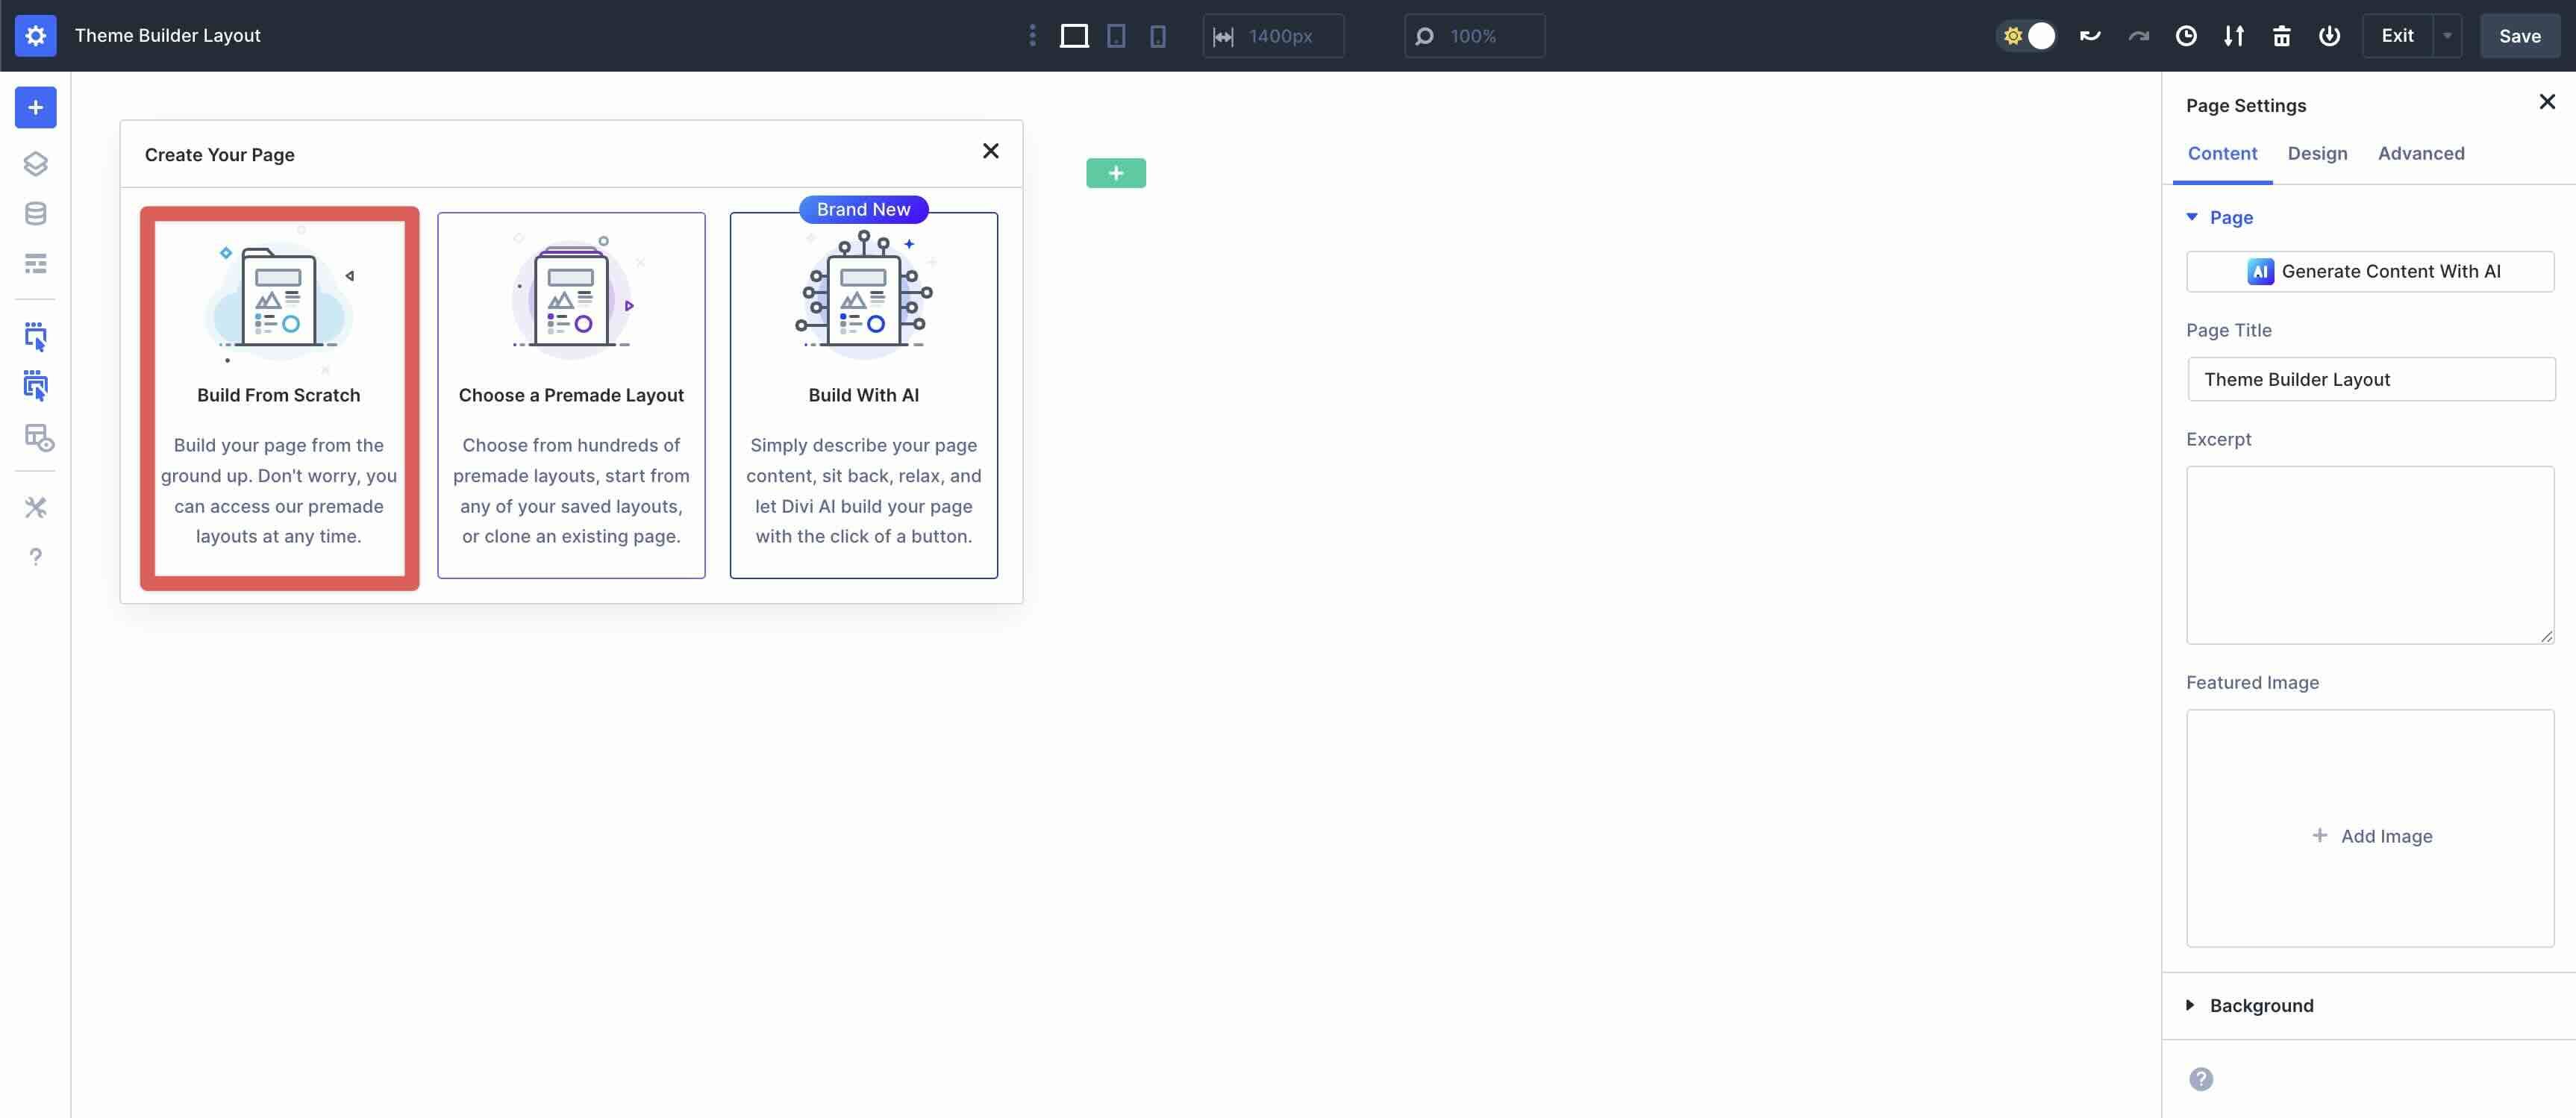
When the Theme Builder a lot, make a selection Construct From Scratch from the to be had choices.
Step 2: Upload Content material
Upload a unmarried column row to the web page.

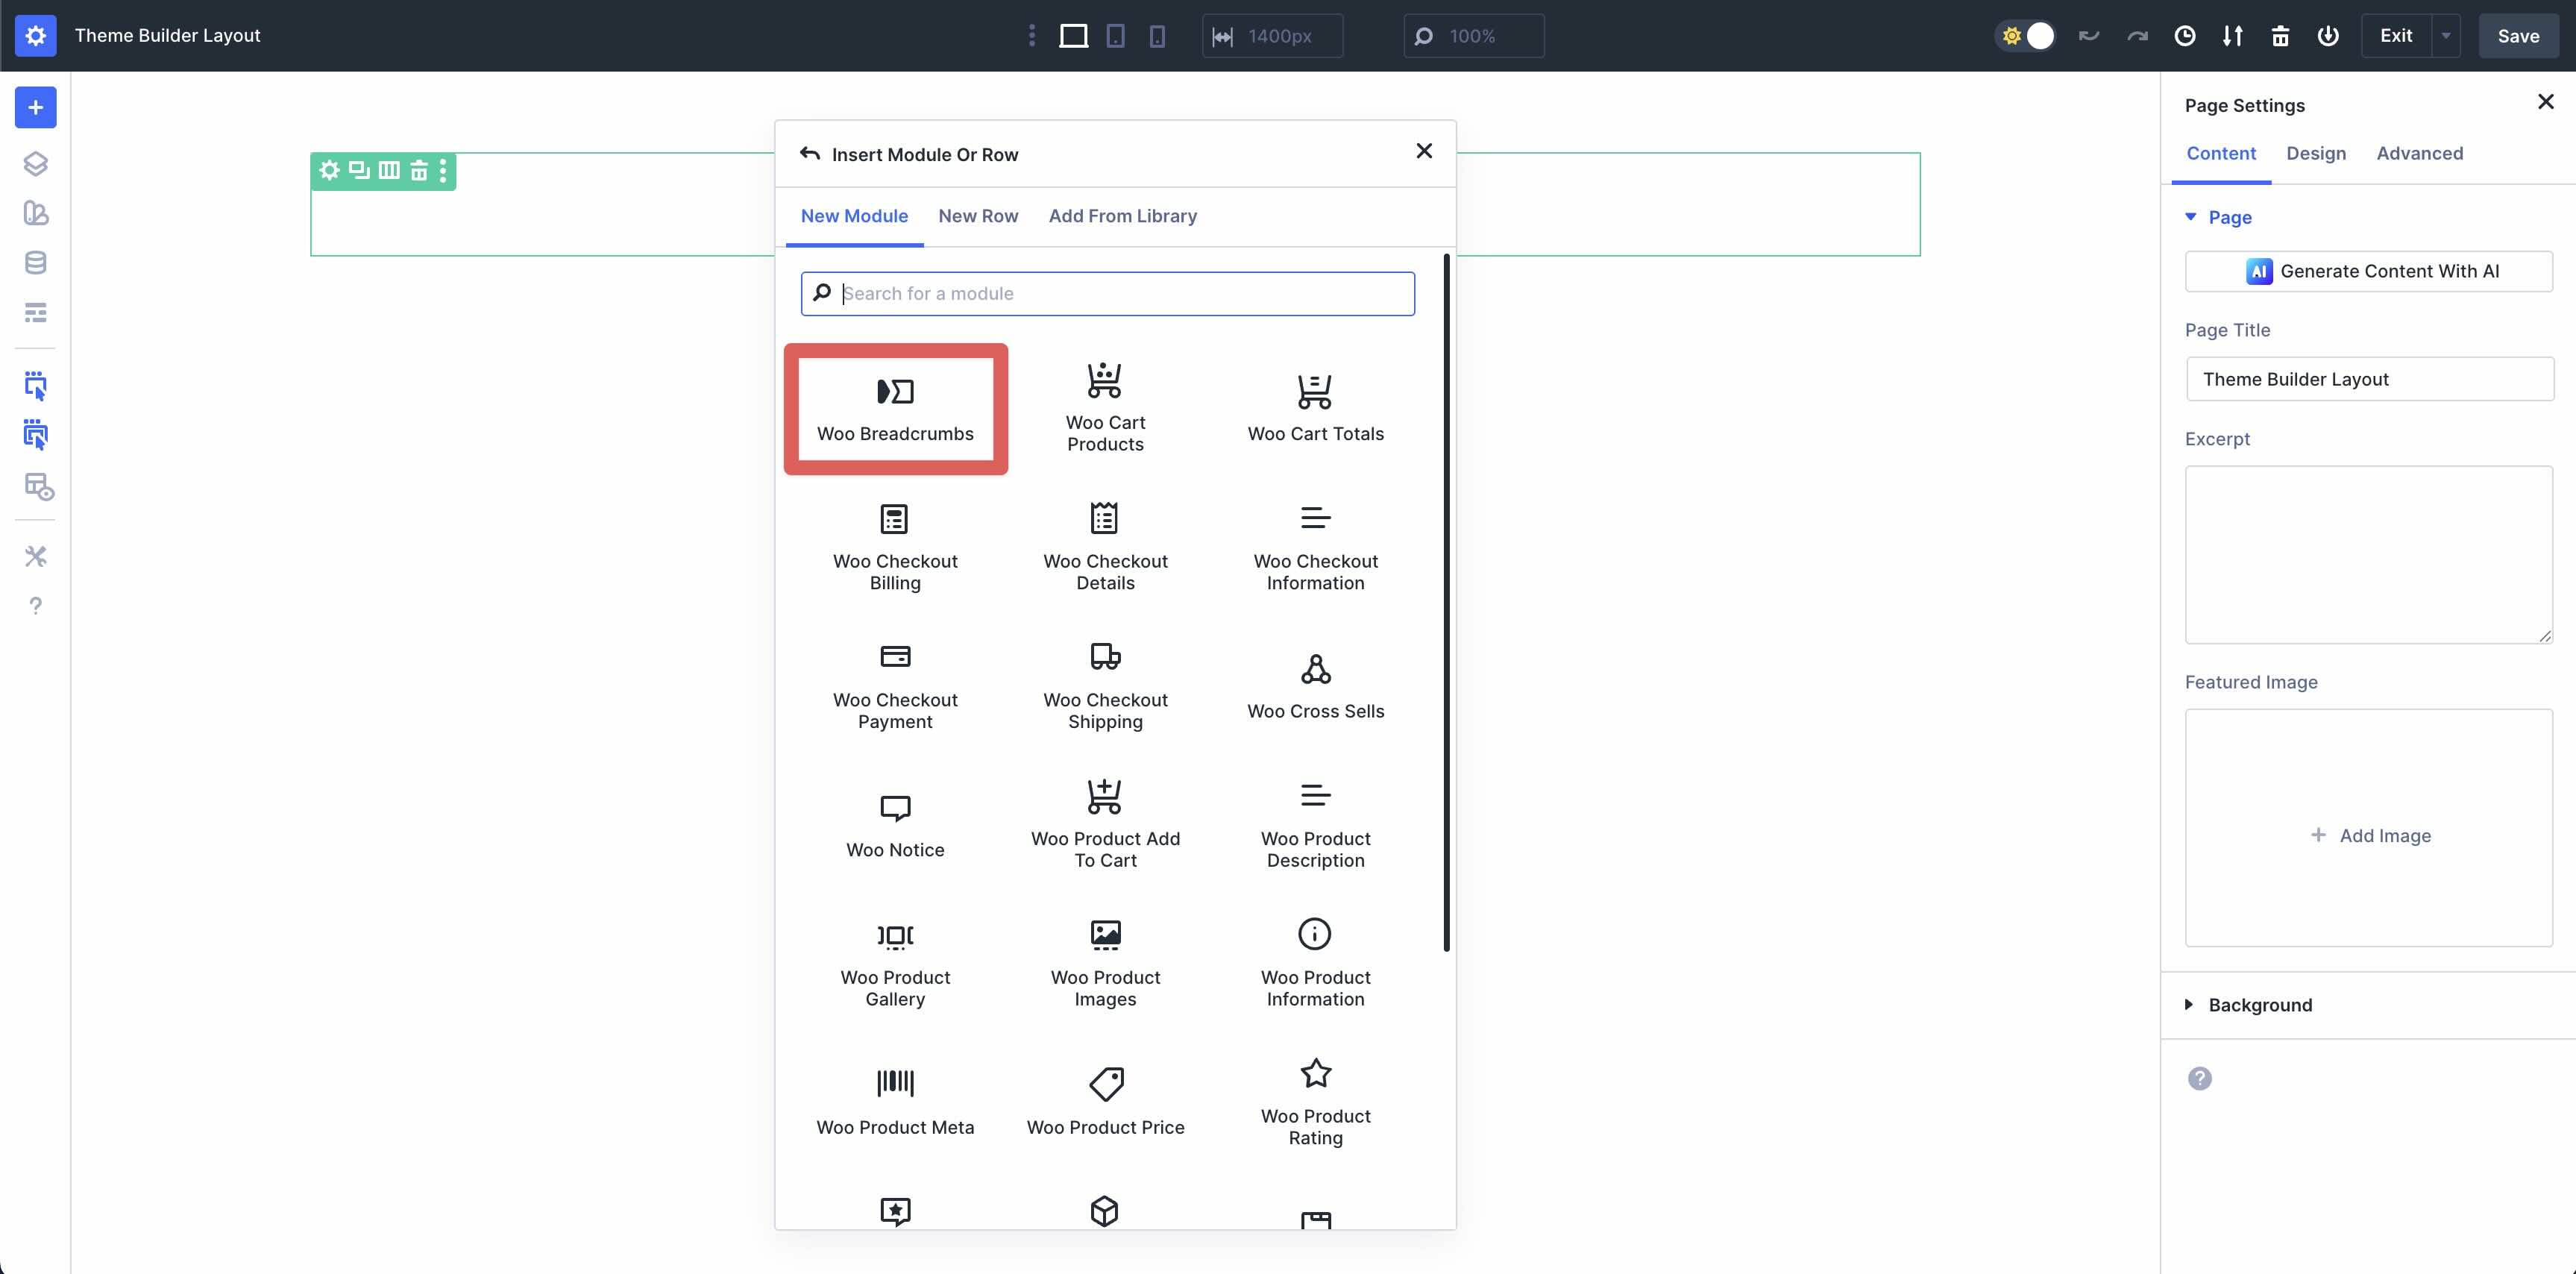
When the Insert Module Or Row modal seems, find the Woo Modules choice and make a selection it.
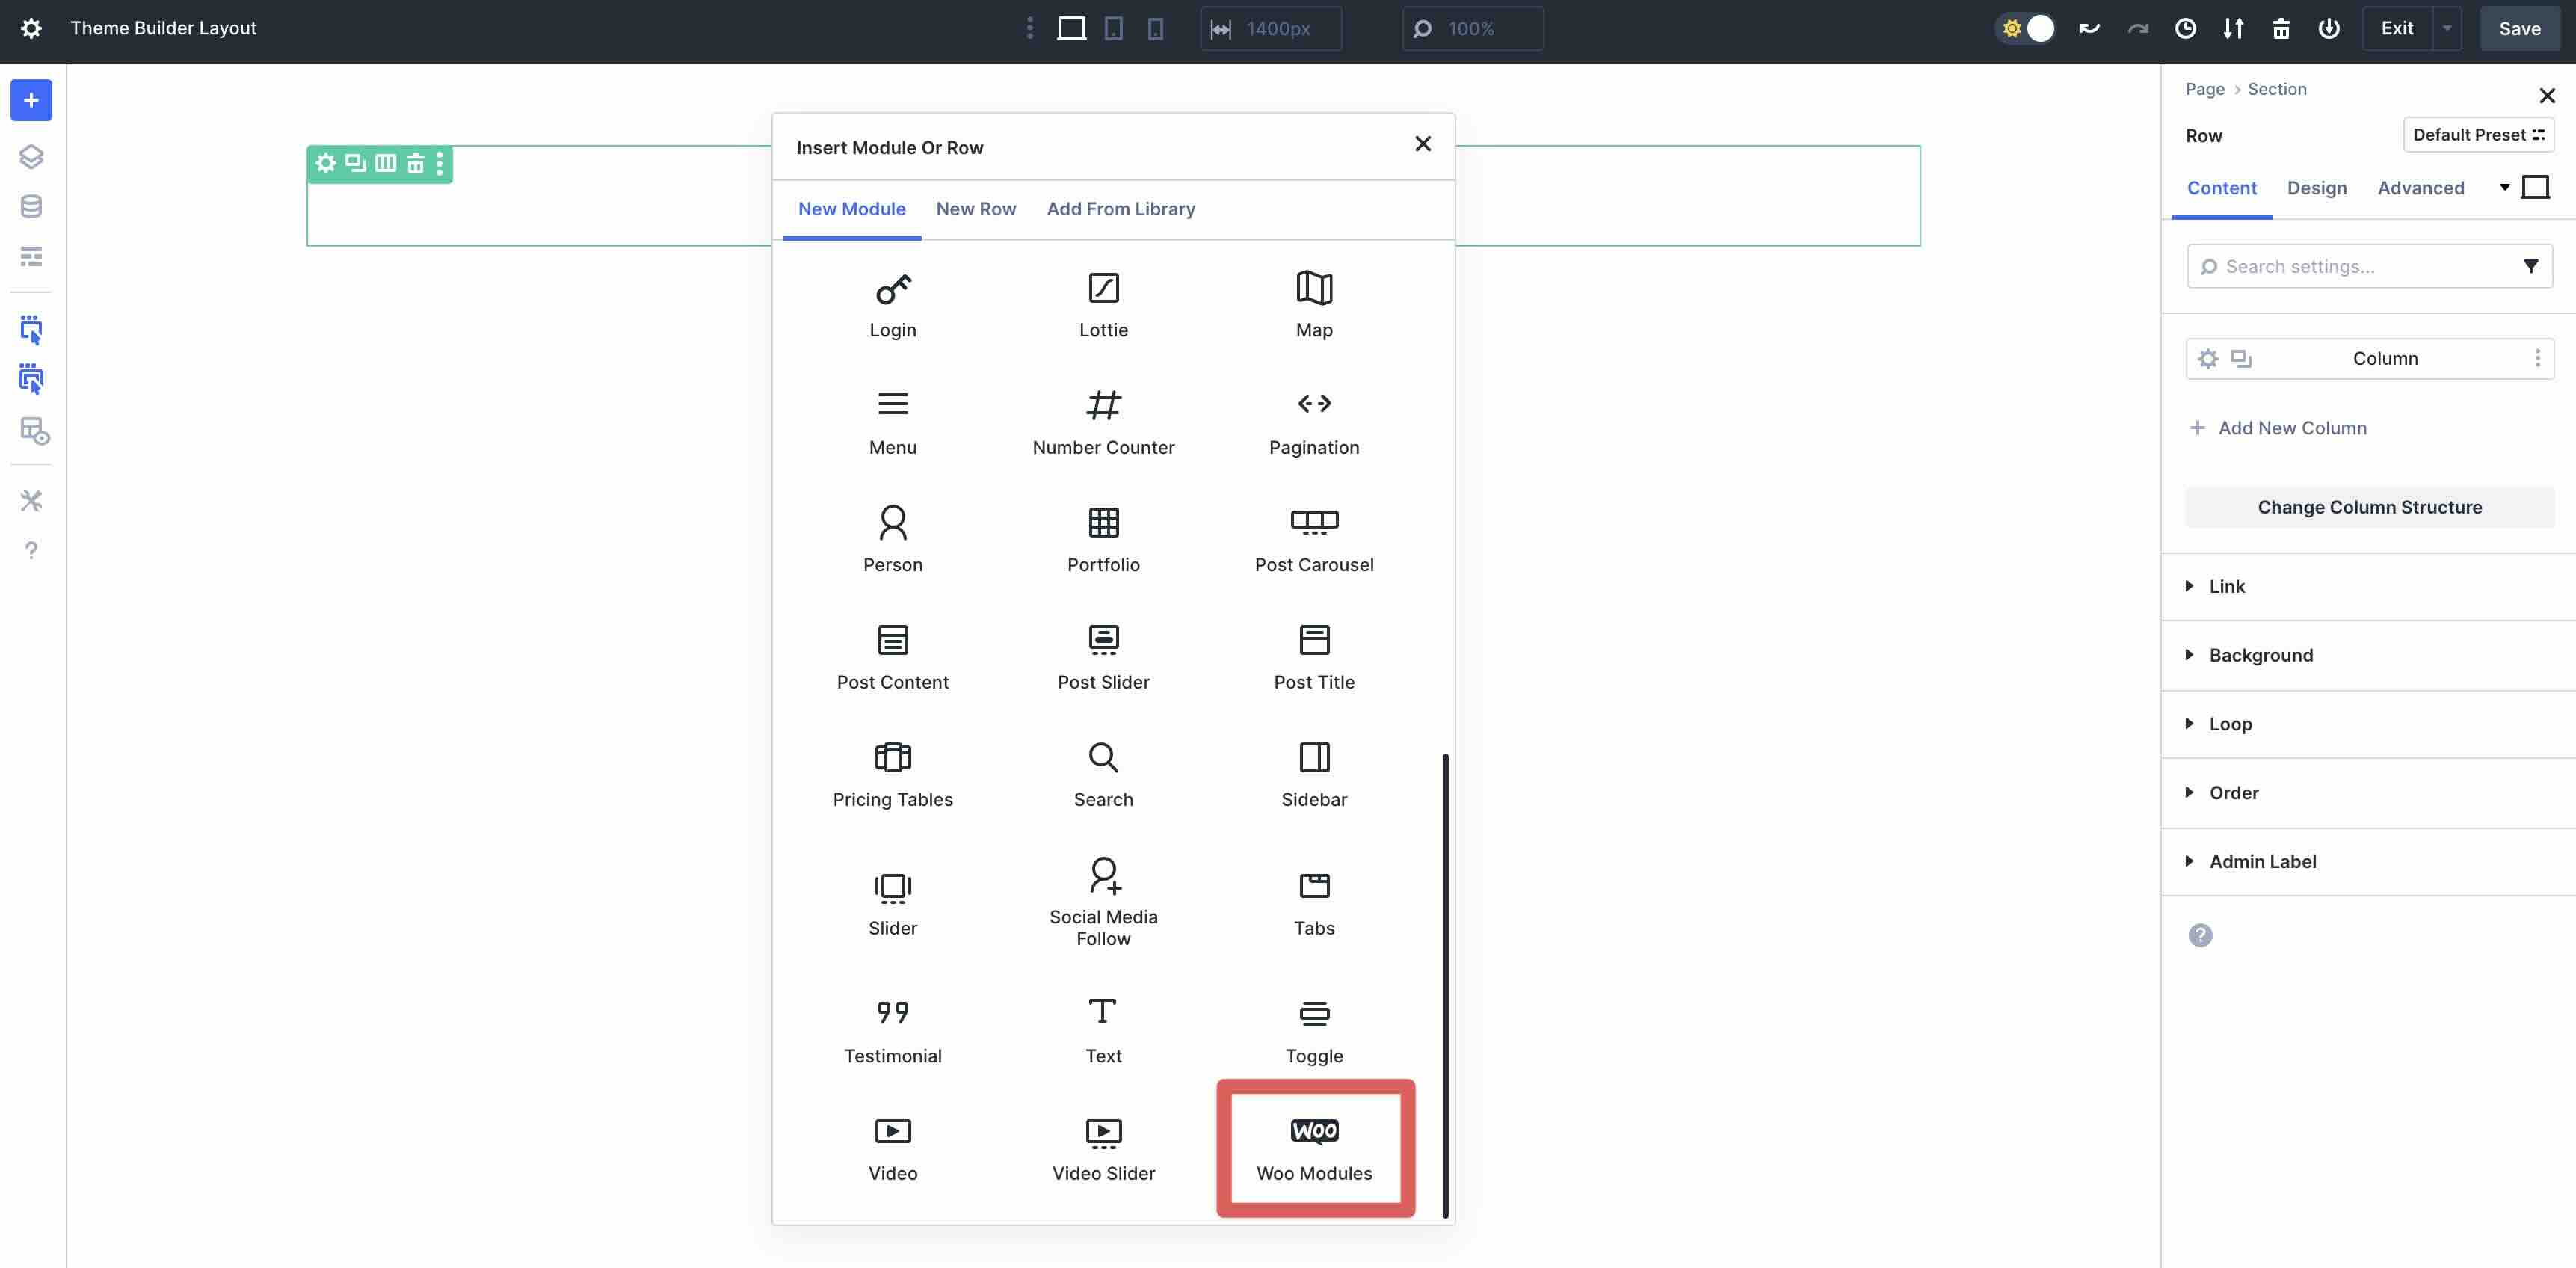
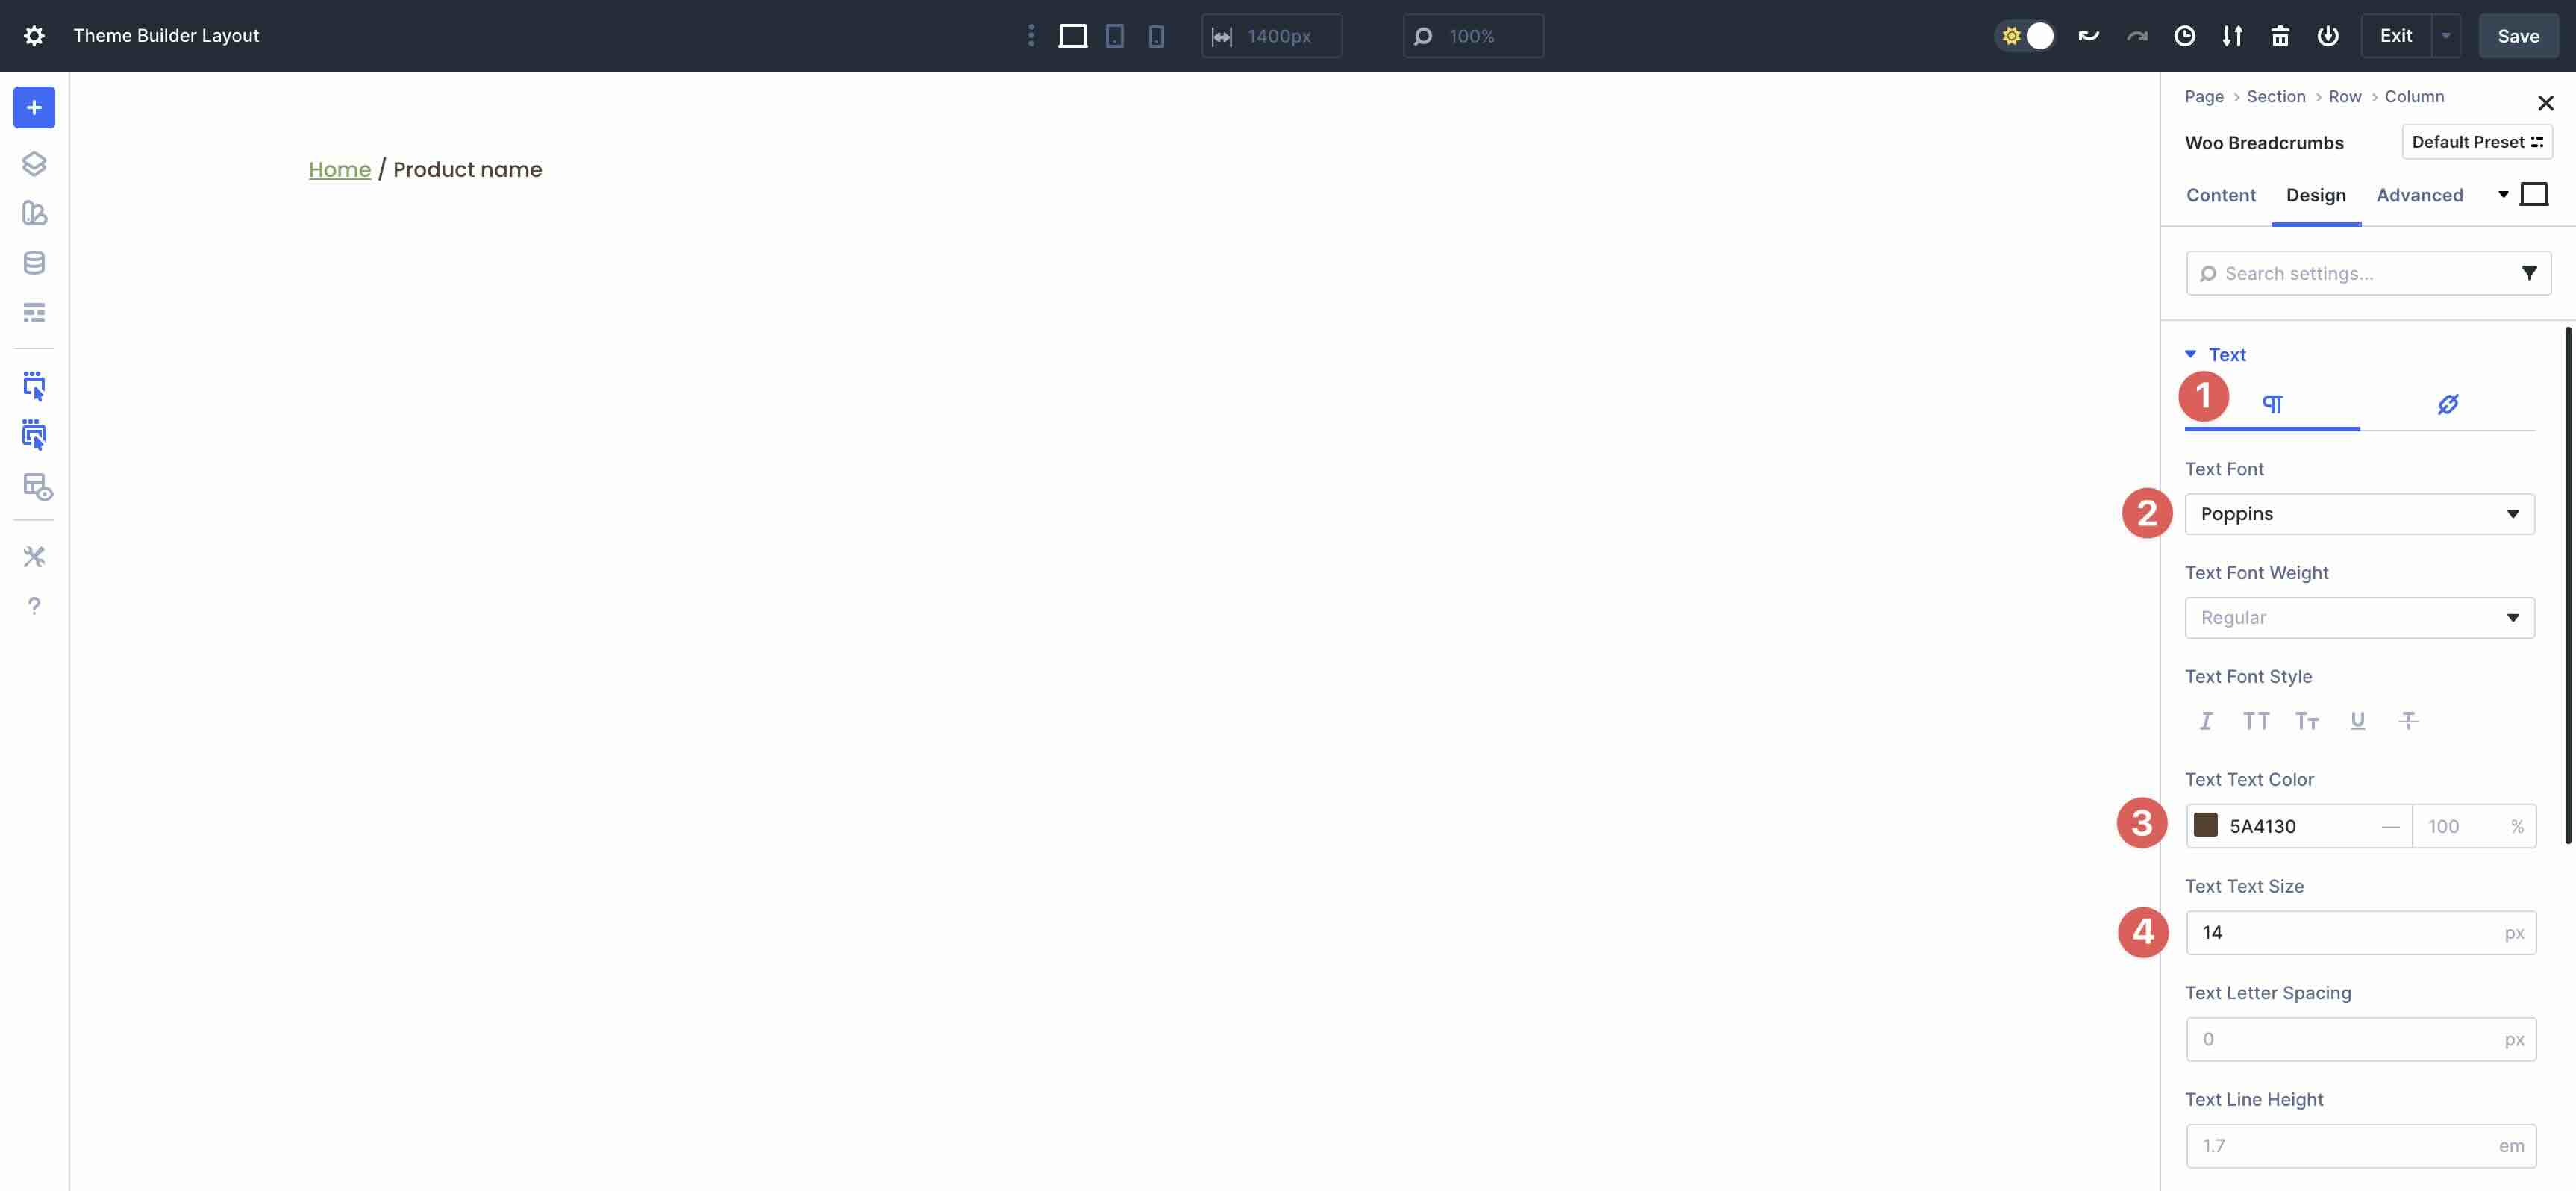
Upload The Woo Breadcrumbs Module
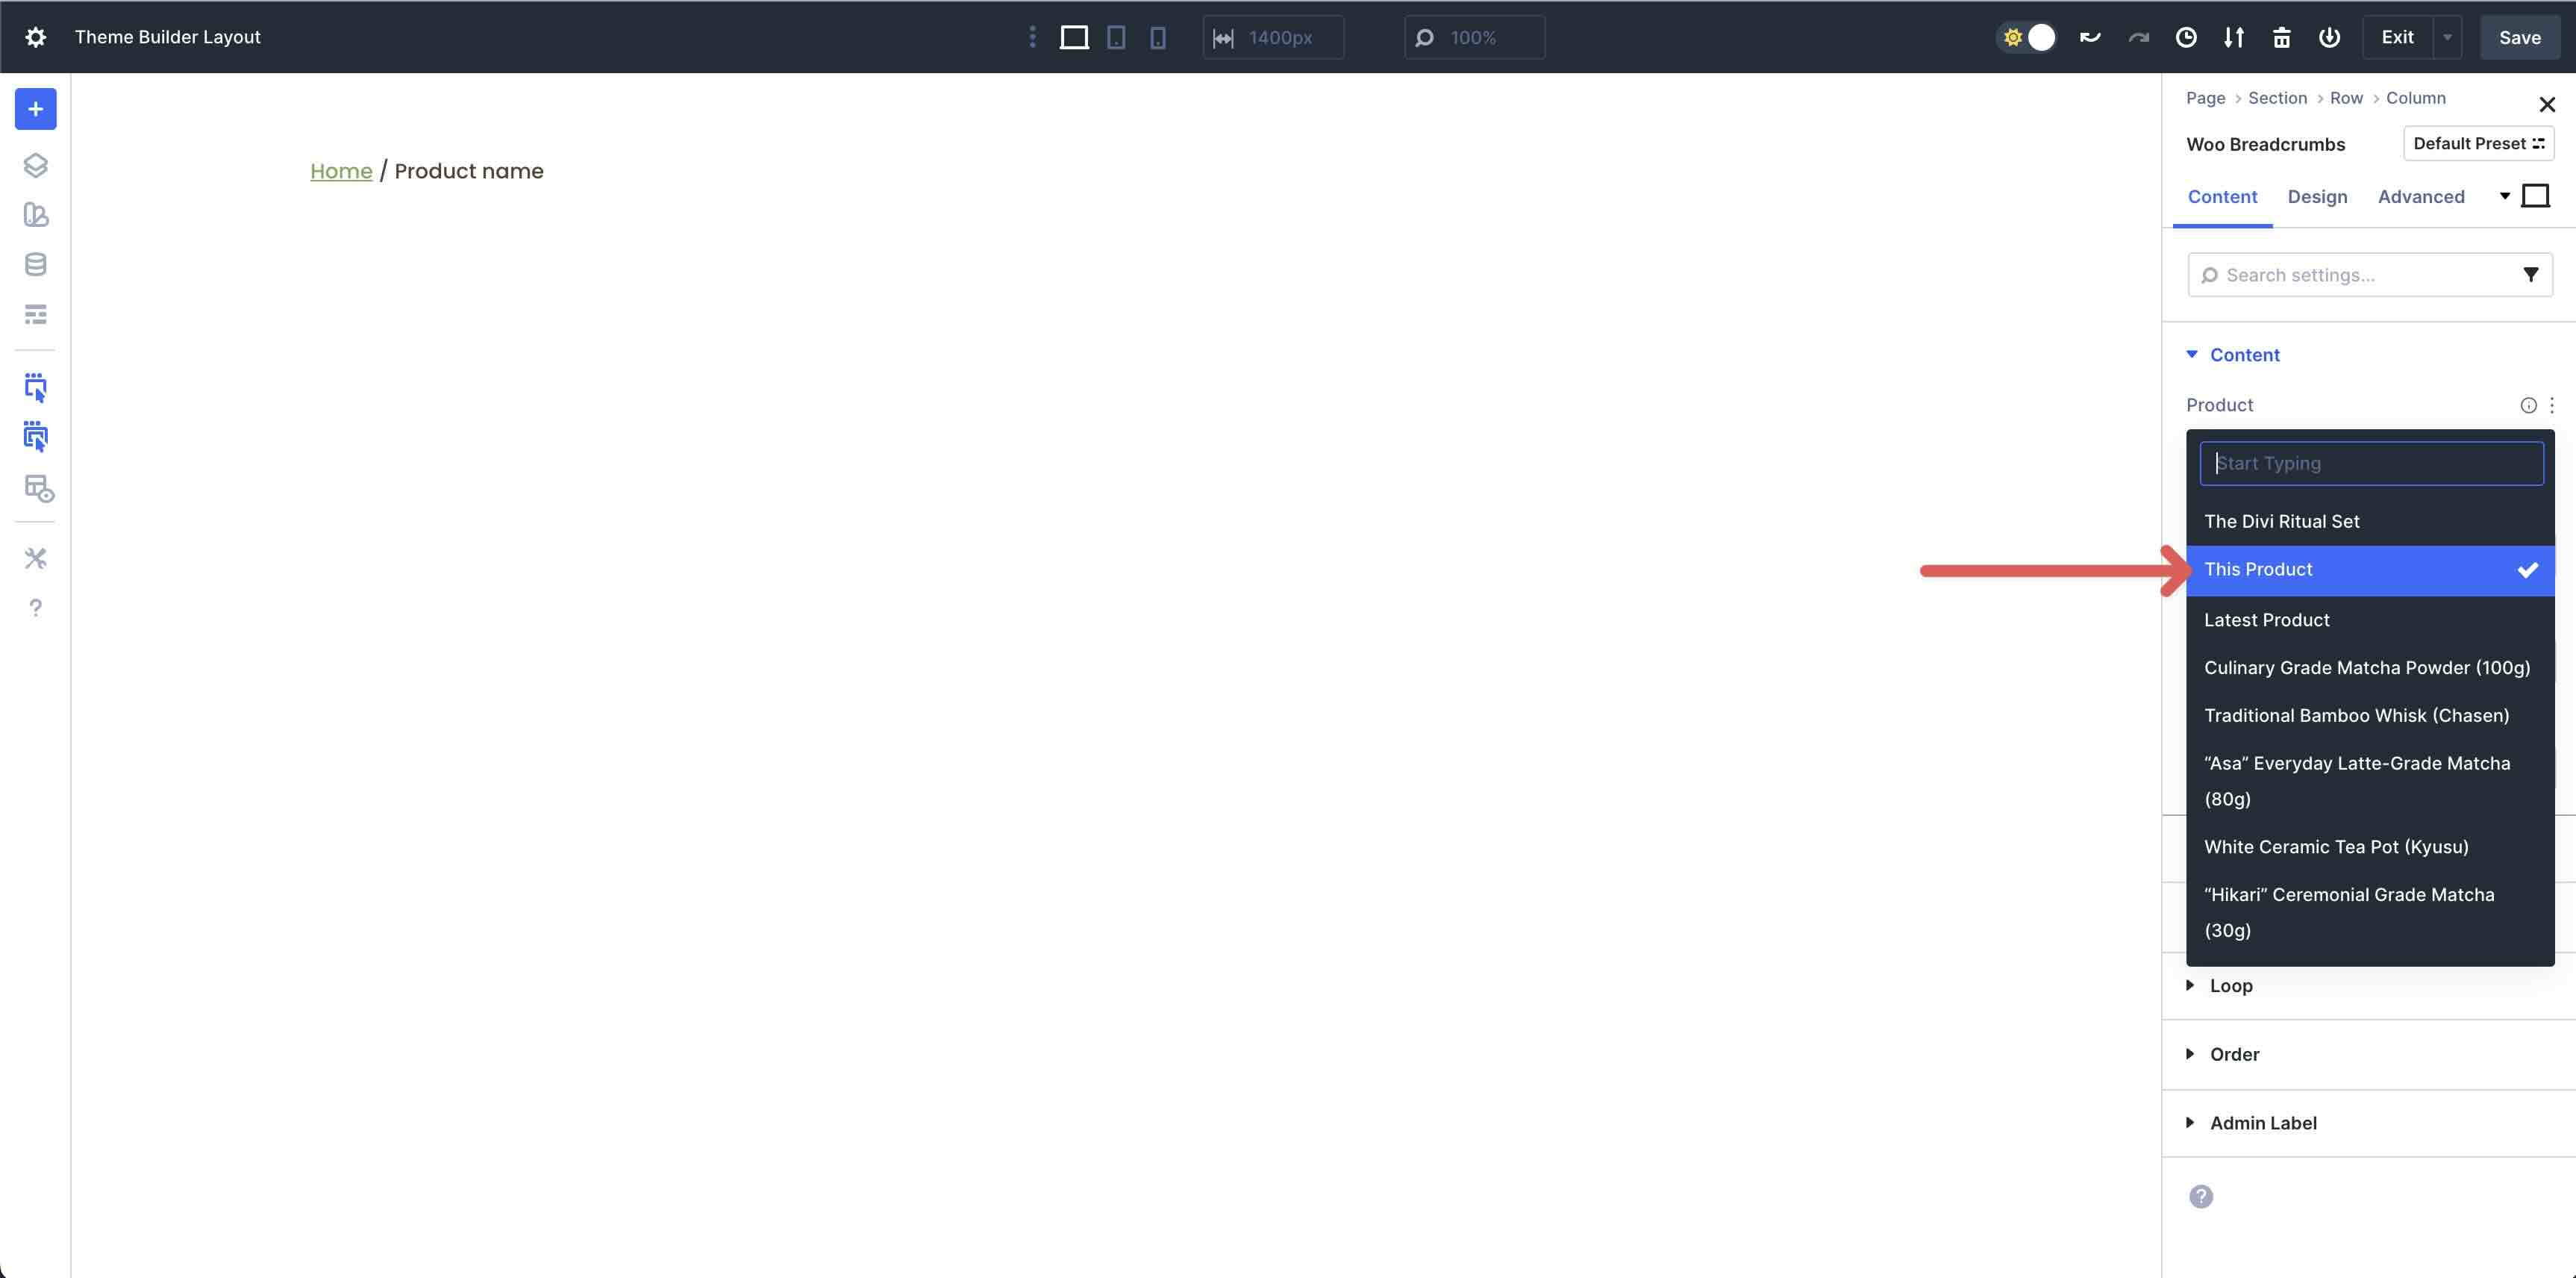
Find the Woo Breadcrumbs module and upload it to the row.
By way of default, This Product will probably be decided on within the Product dropdown menu within the Content material tab. This selection will permit Divi 5 to simply pull content material for every product in each and every class. For this educational, we can make a selection a product to show to show you how to see how the format will glance with a real product in view. As you upload modules to the design, make certain that This Product is at all times decided on.
Click on over to the Design tab and enlarge the Textual content dropdown menu. Ensure that the Paragraph tab is chosen and select Poppins because the Textual content Font, #5a4130 because the Textual content Colour, and 14px because the Textual content Textual content Dimension.
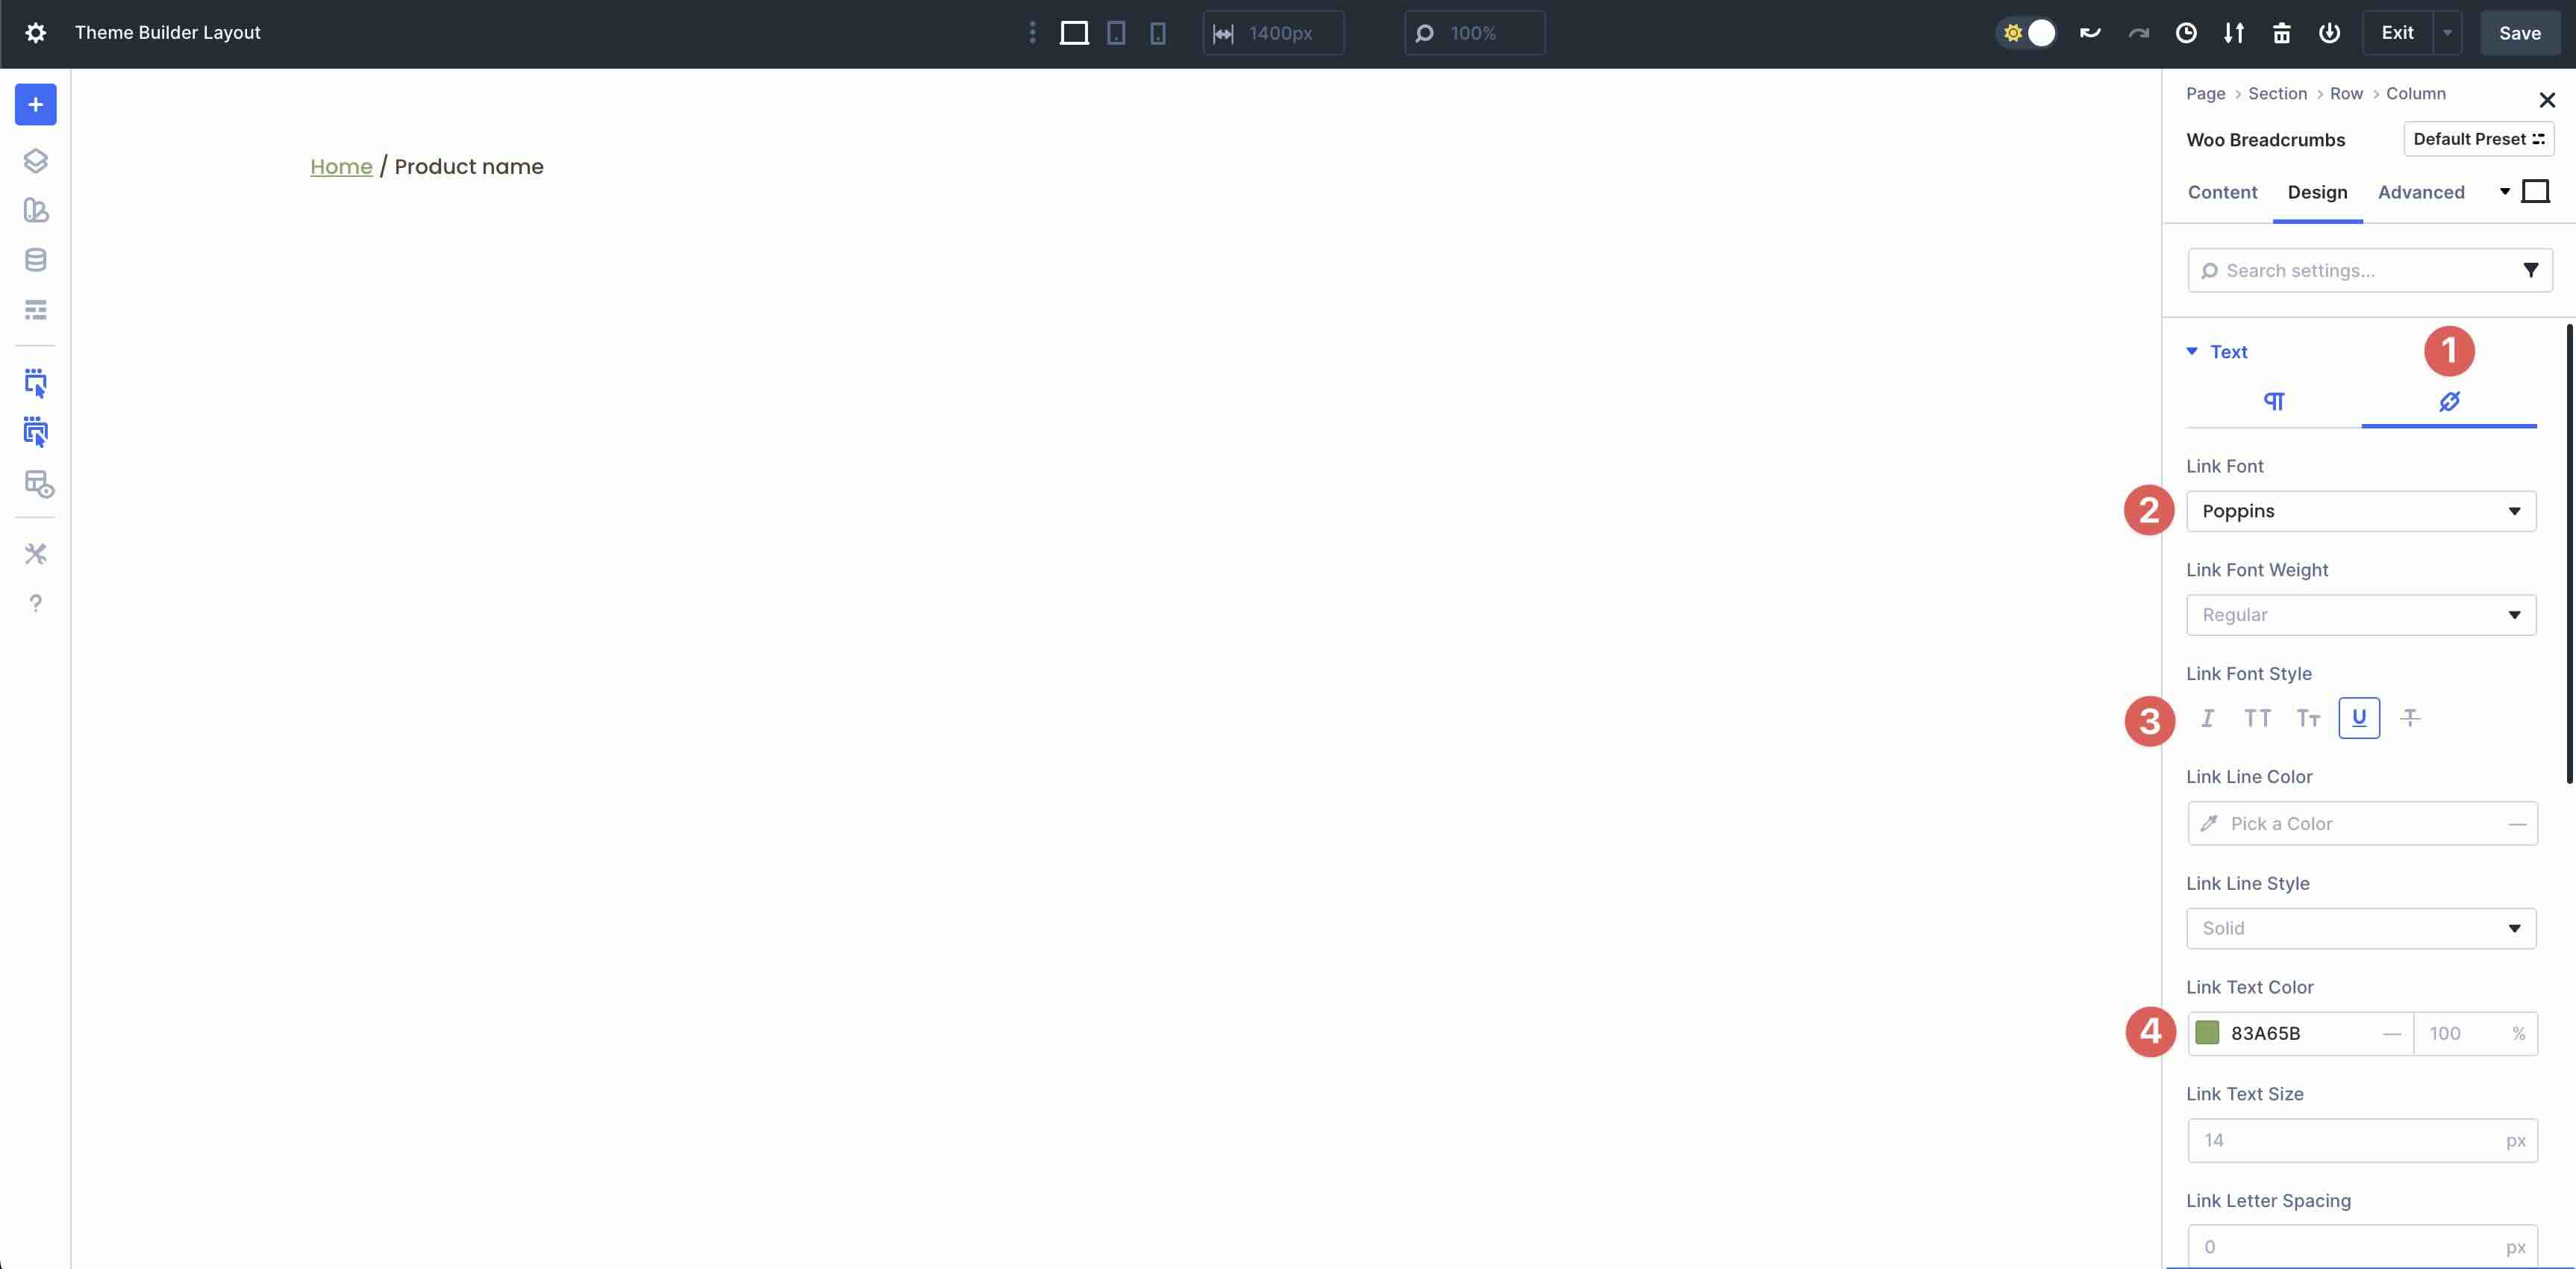
Subsequent, make a selection the Hyperlinks tab within the Textual content menu. Make a choice Poppins because the Hyperlink Font, Underline because the Hyperlink Font Taste, and #83A65B because the Hyperlink Textual content Colour.
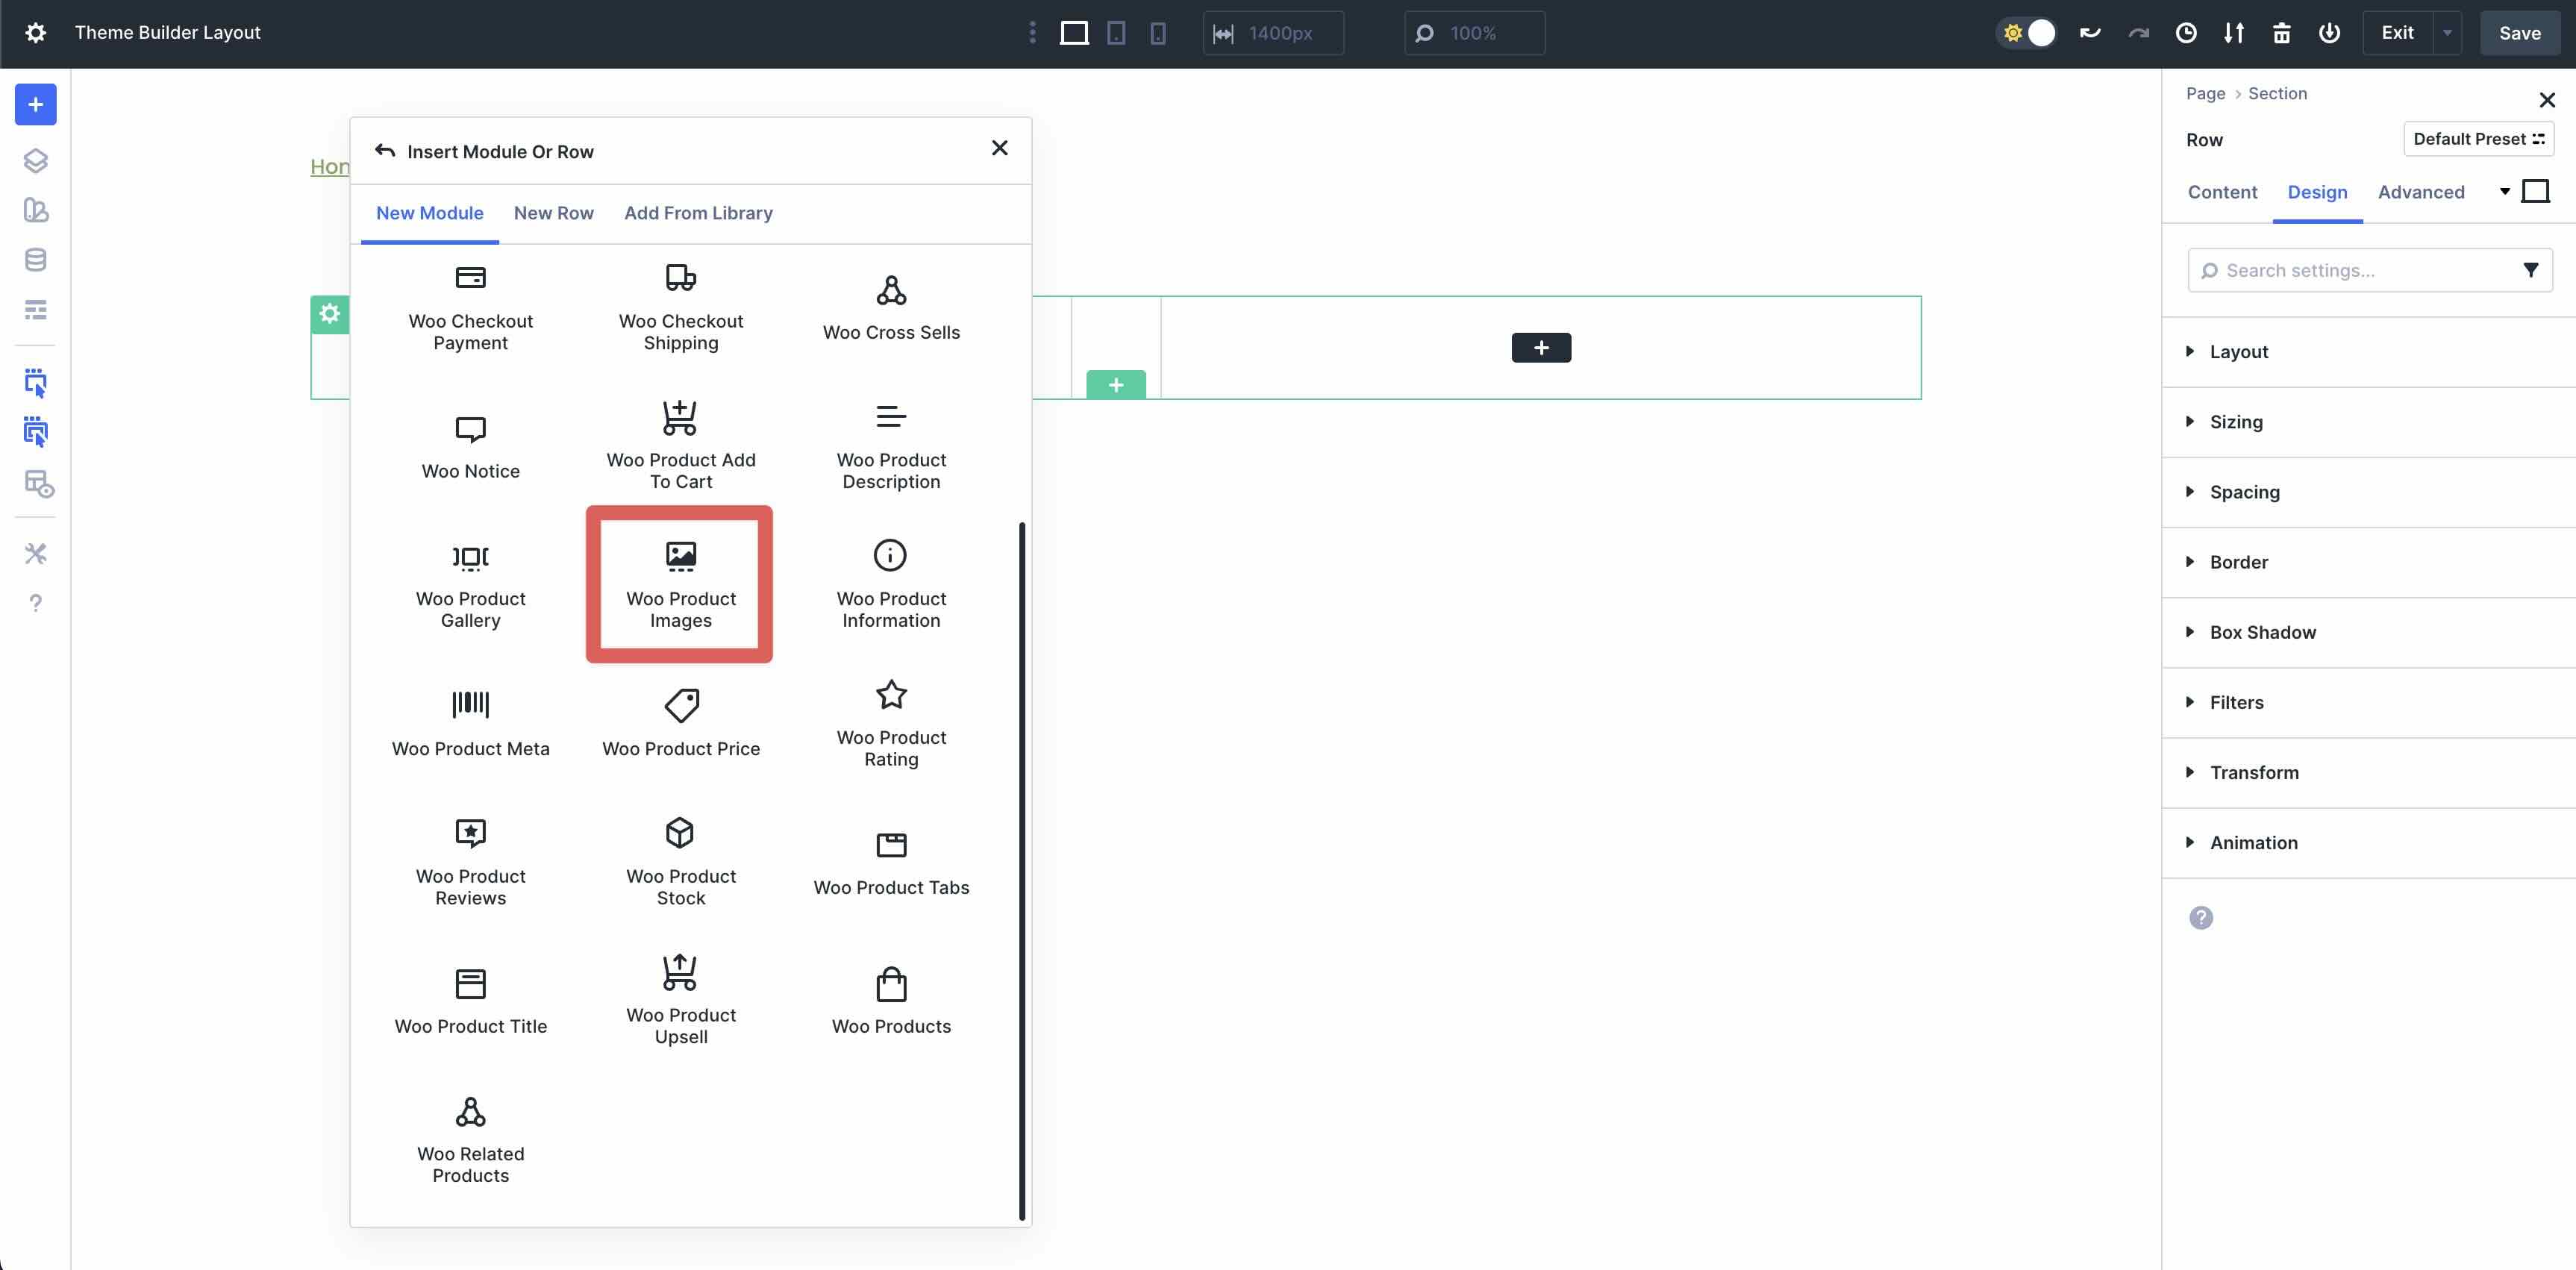
Upload The Woo Product Pictures Module
Subsequent, upload a two-column row at once beneath the primary row within the format. Within the left column, upload the Woo Product Pictures module to the column.
Change to the Design tab. Make bigger the Symbol menu adopted by way of the Border menu. Set the Symbol Border Radius to 20px on each side.
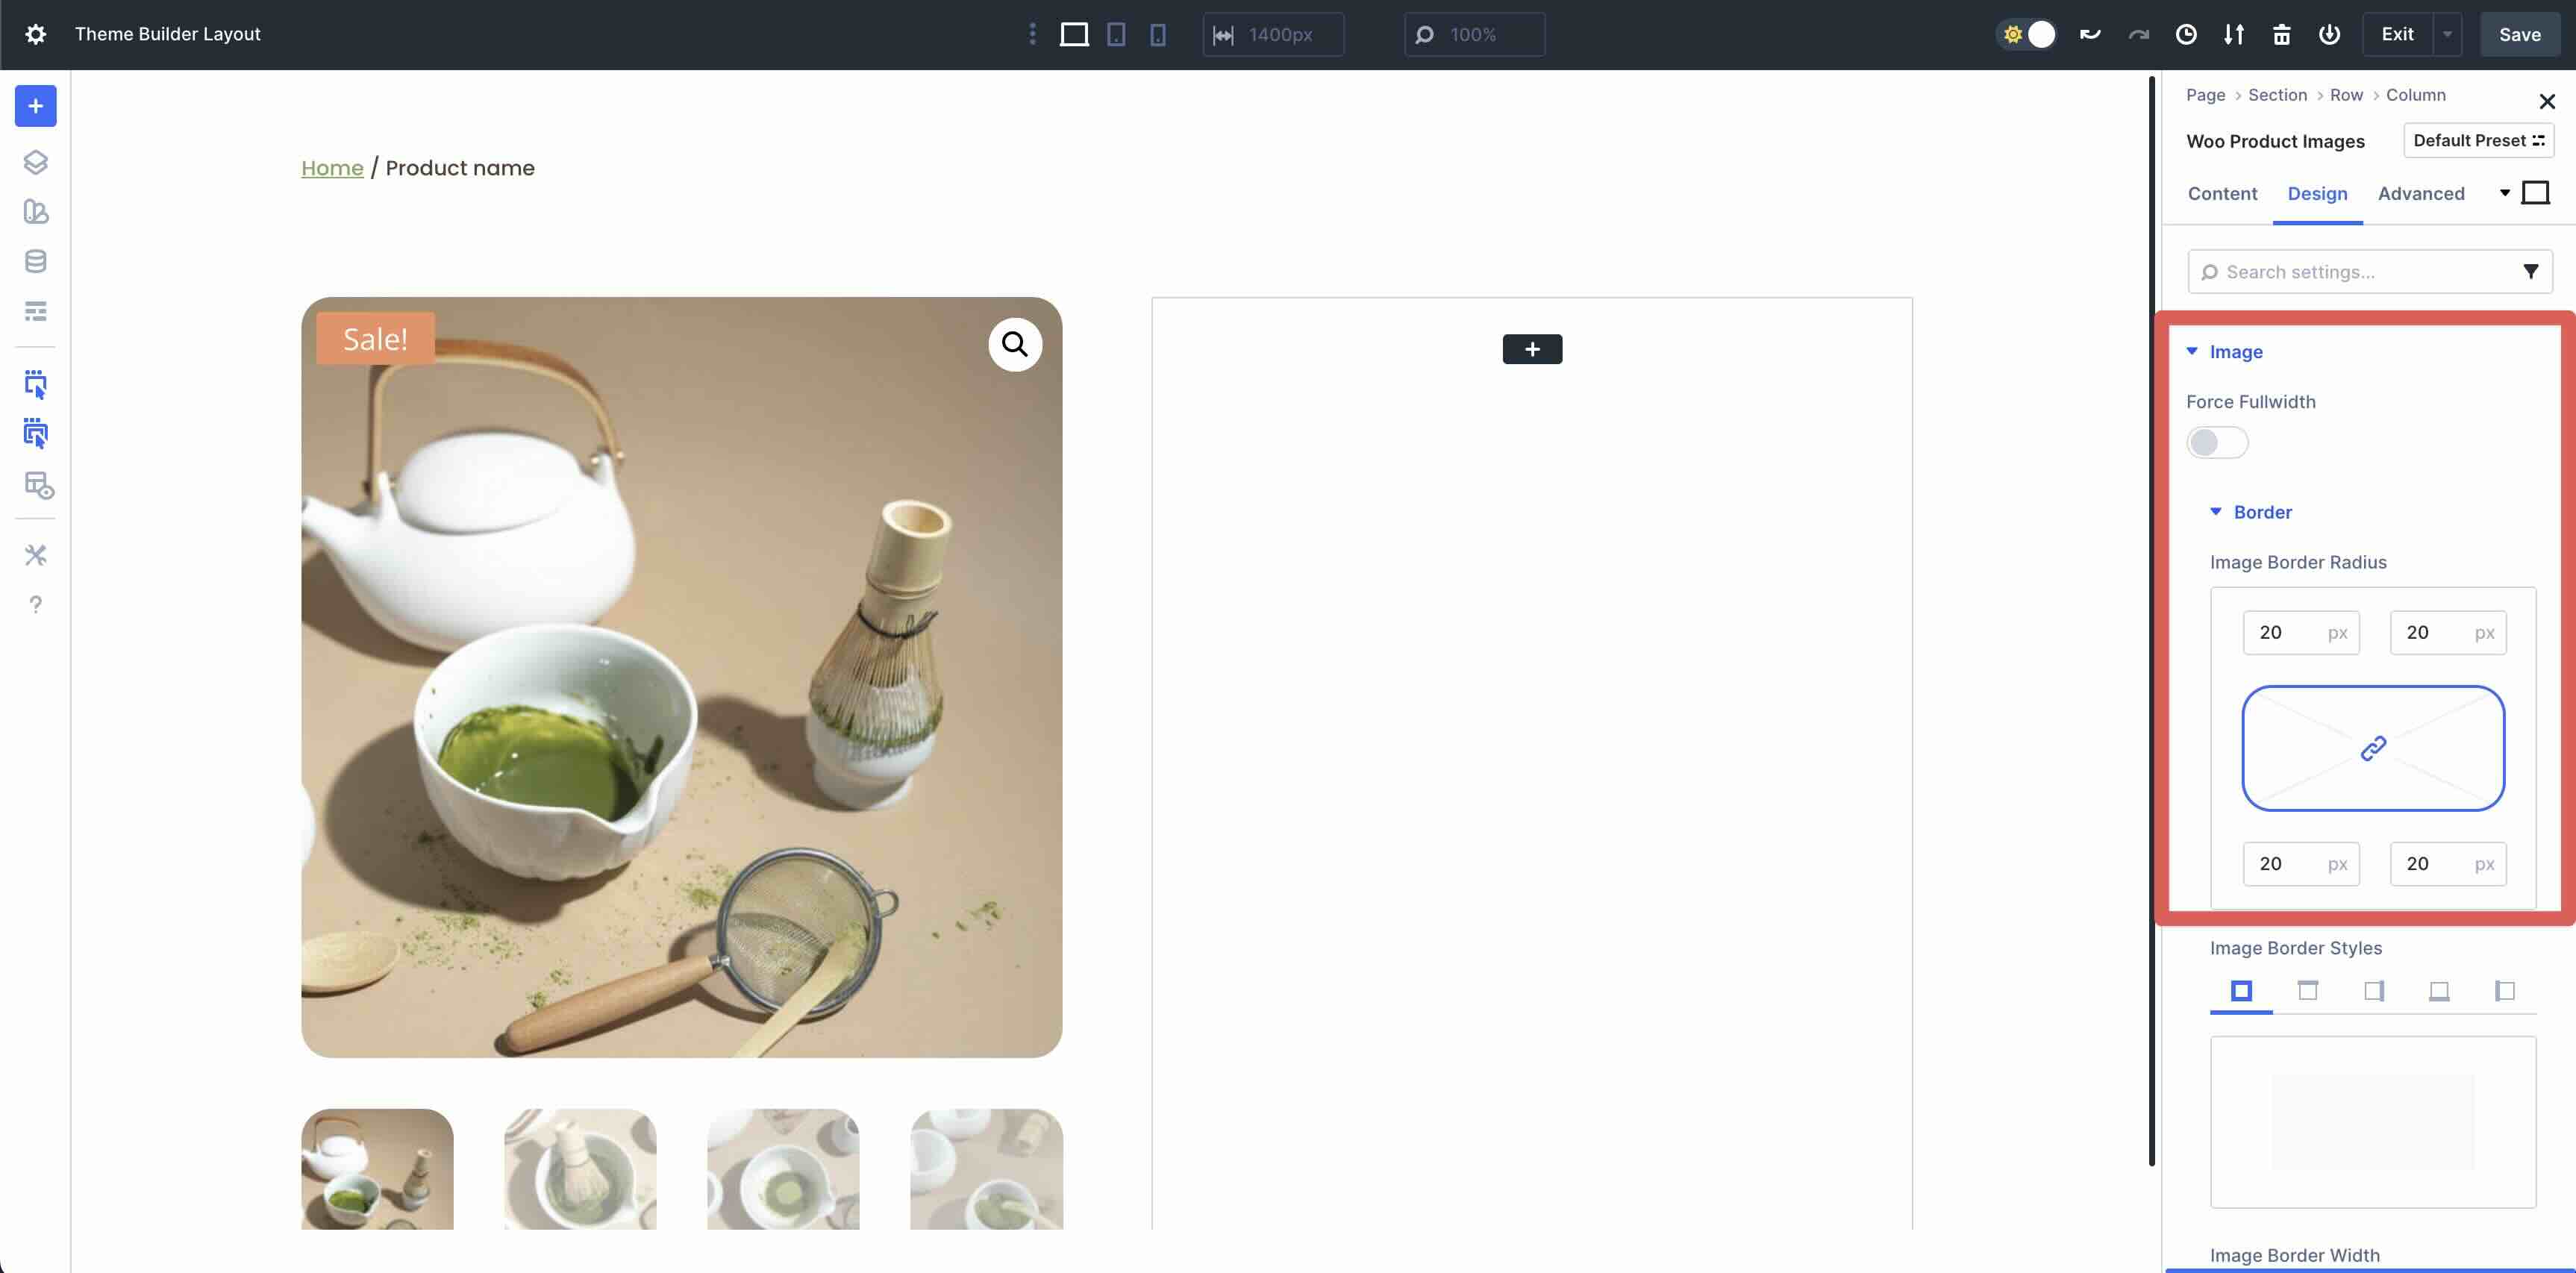
Scroll down to show the Sale Badge menu. Make bigger it and upload #C77347 because the Sale Badge Colour. Within the Textual content menu, make a selection Poppins because the Sale Badge Font, Uppercase for the Sale Badge Font Taste, #ffffff because the Sale Badge Textual content Colour, and 15px because the Sale Badge Textual content Dimension.
![]()
Upload The Woo Product Identify
Upload the Woo Product Identify module in the second one column.

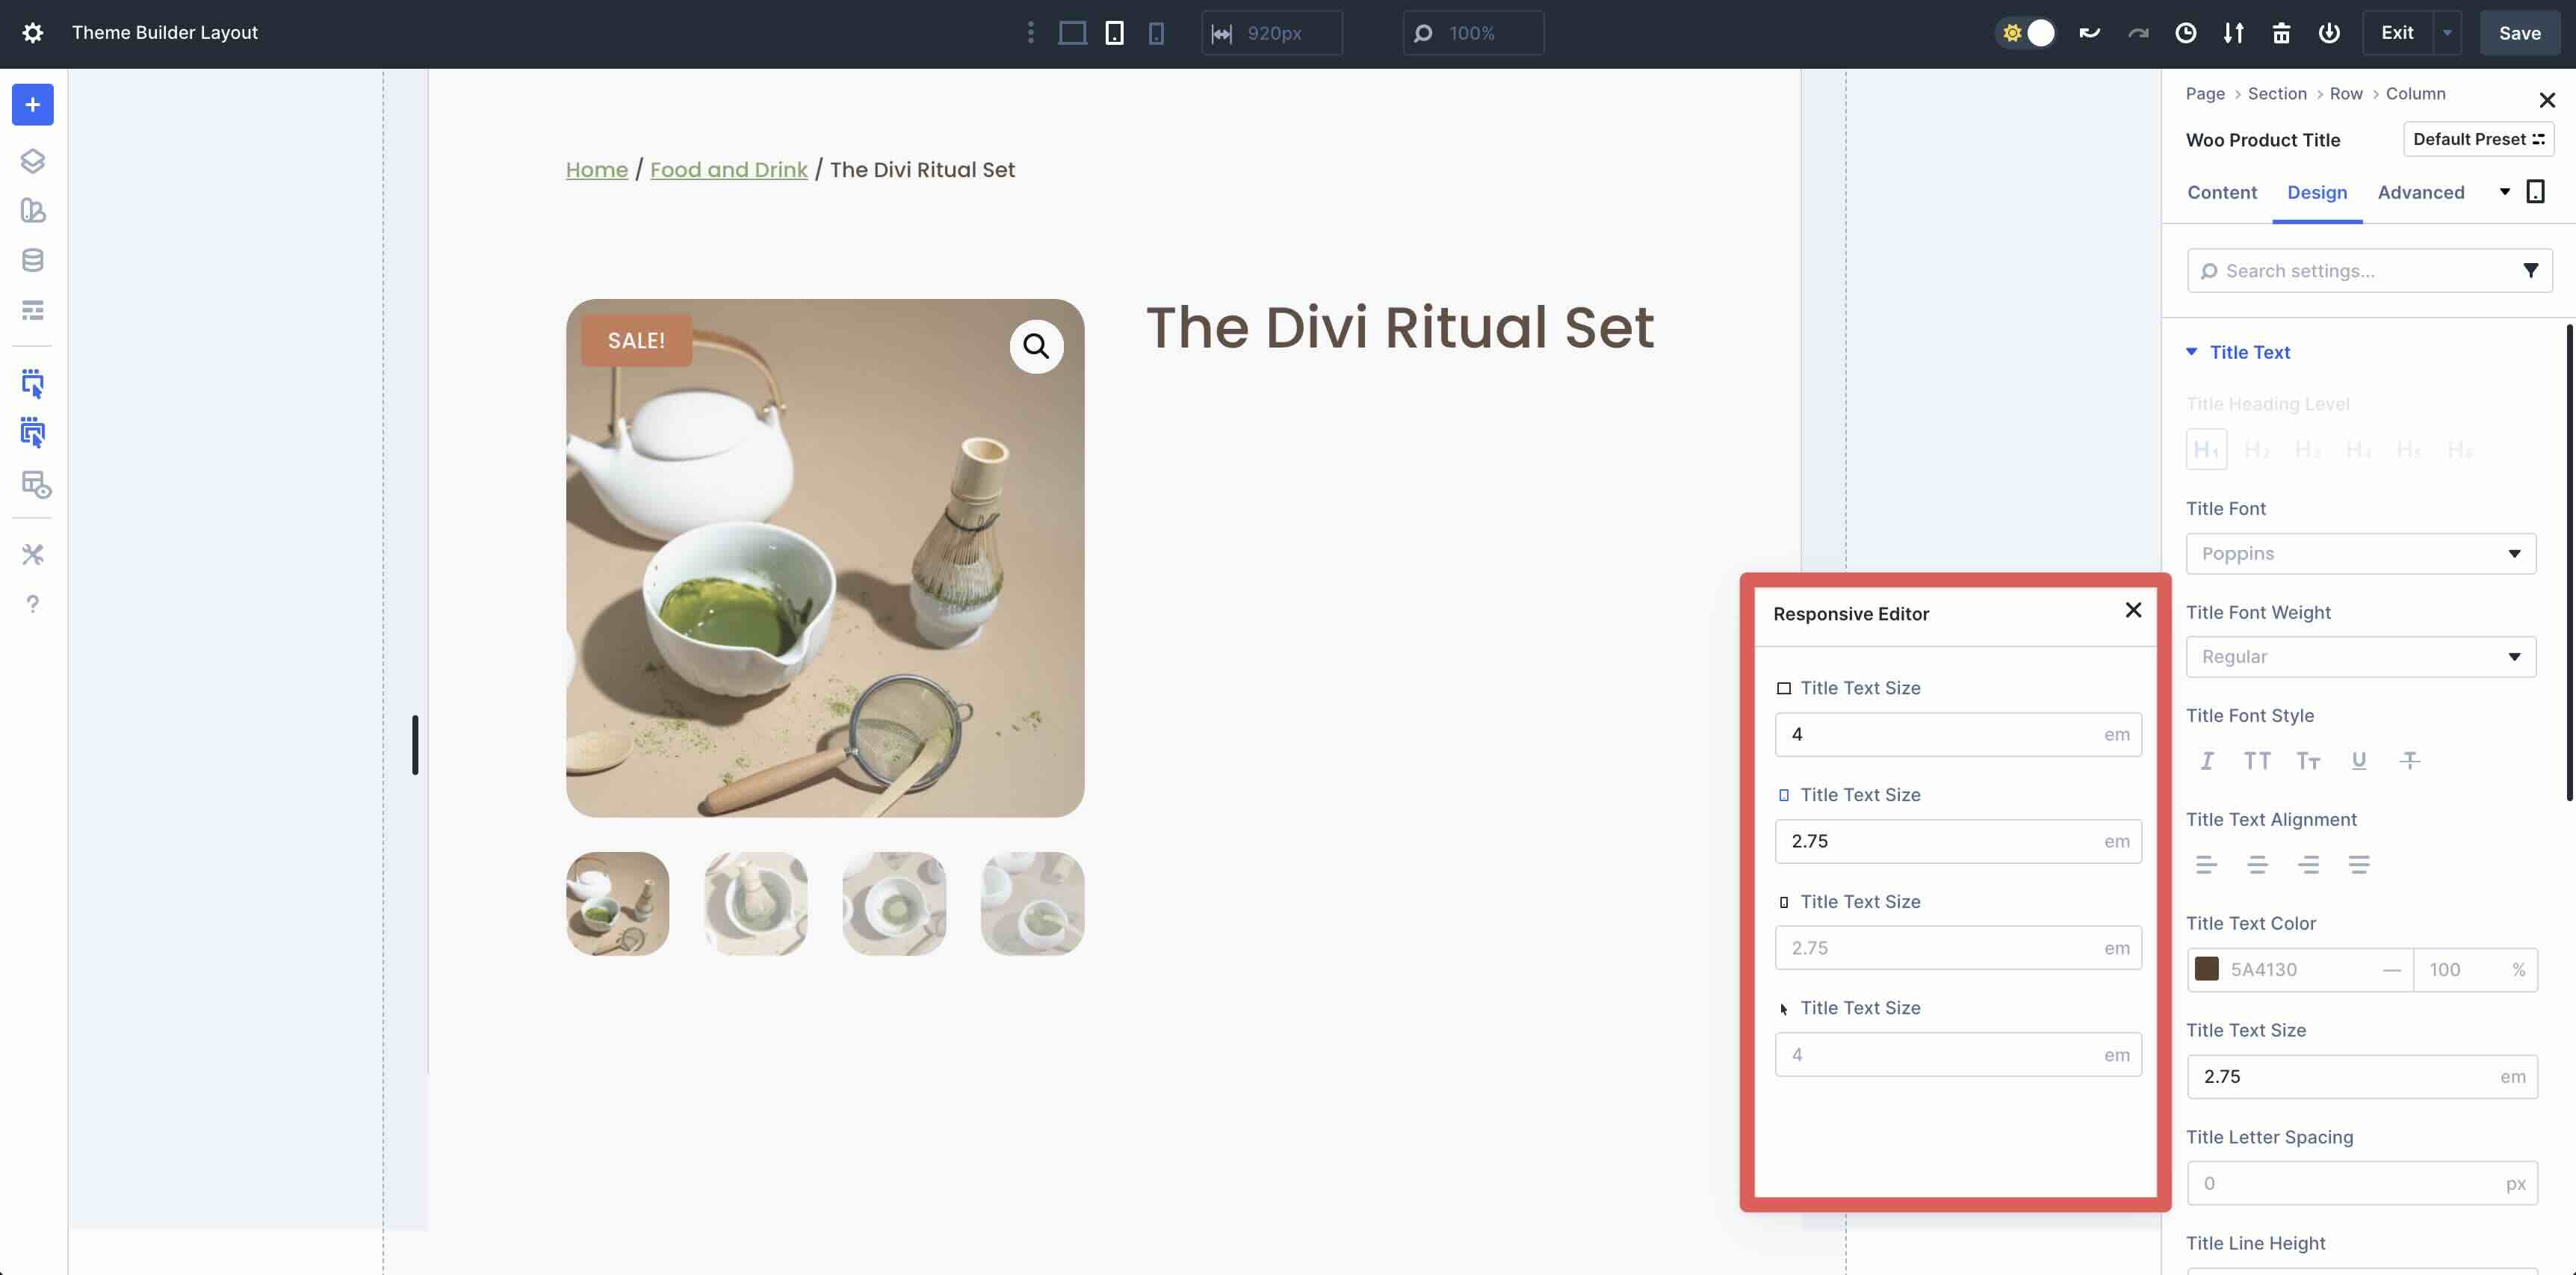
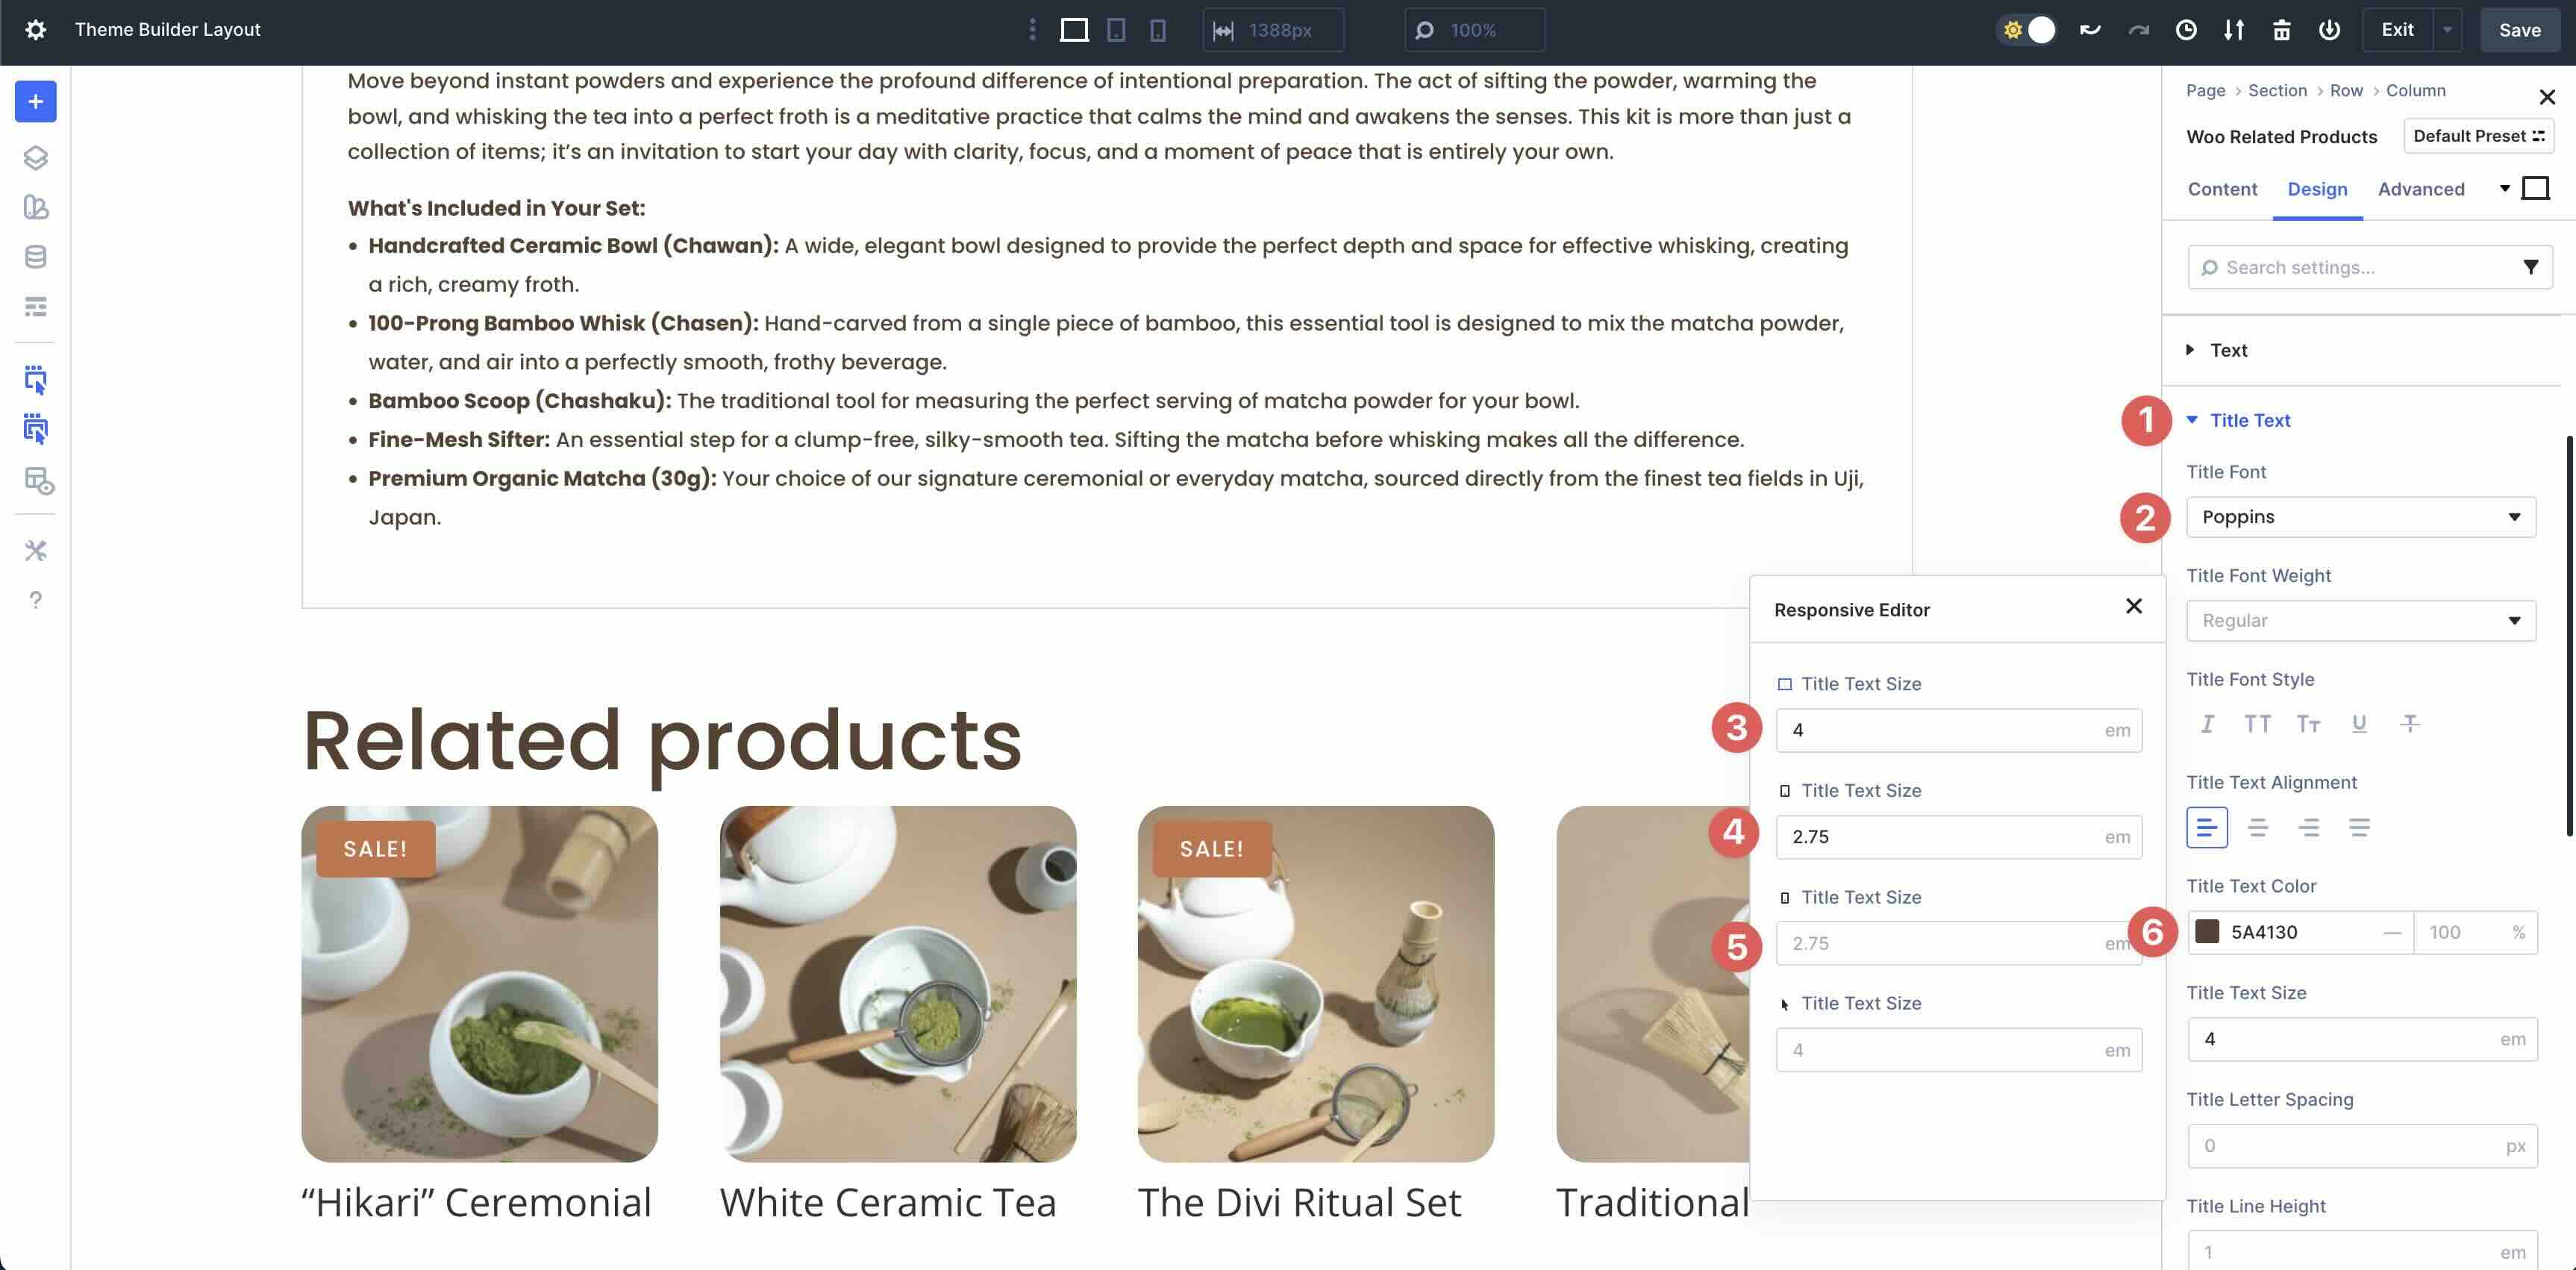
Make a choice the Design tab and enlarge the Identify Textual content menu. Set the Identify Heading Degree to H1, Poppins because the Identify Font, and #5A4130 because the Identify Textual content Colour. Set the Identify Textual content Dimension to 4em.

If you wish to make the format responsive as you cross alongside, you’ll click on the Edit Responsive Values button to make instant adjustments to any module, saving time as you design the web page.
![]()
When the Responsive Editor modal seems, you’ll regulate the values in real-time. Input 2.75em for pill and telephone perspectives.
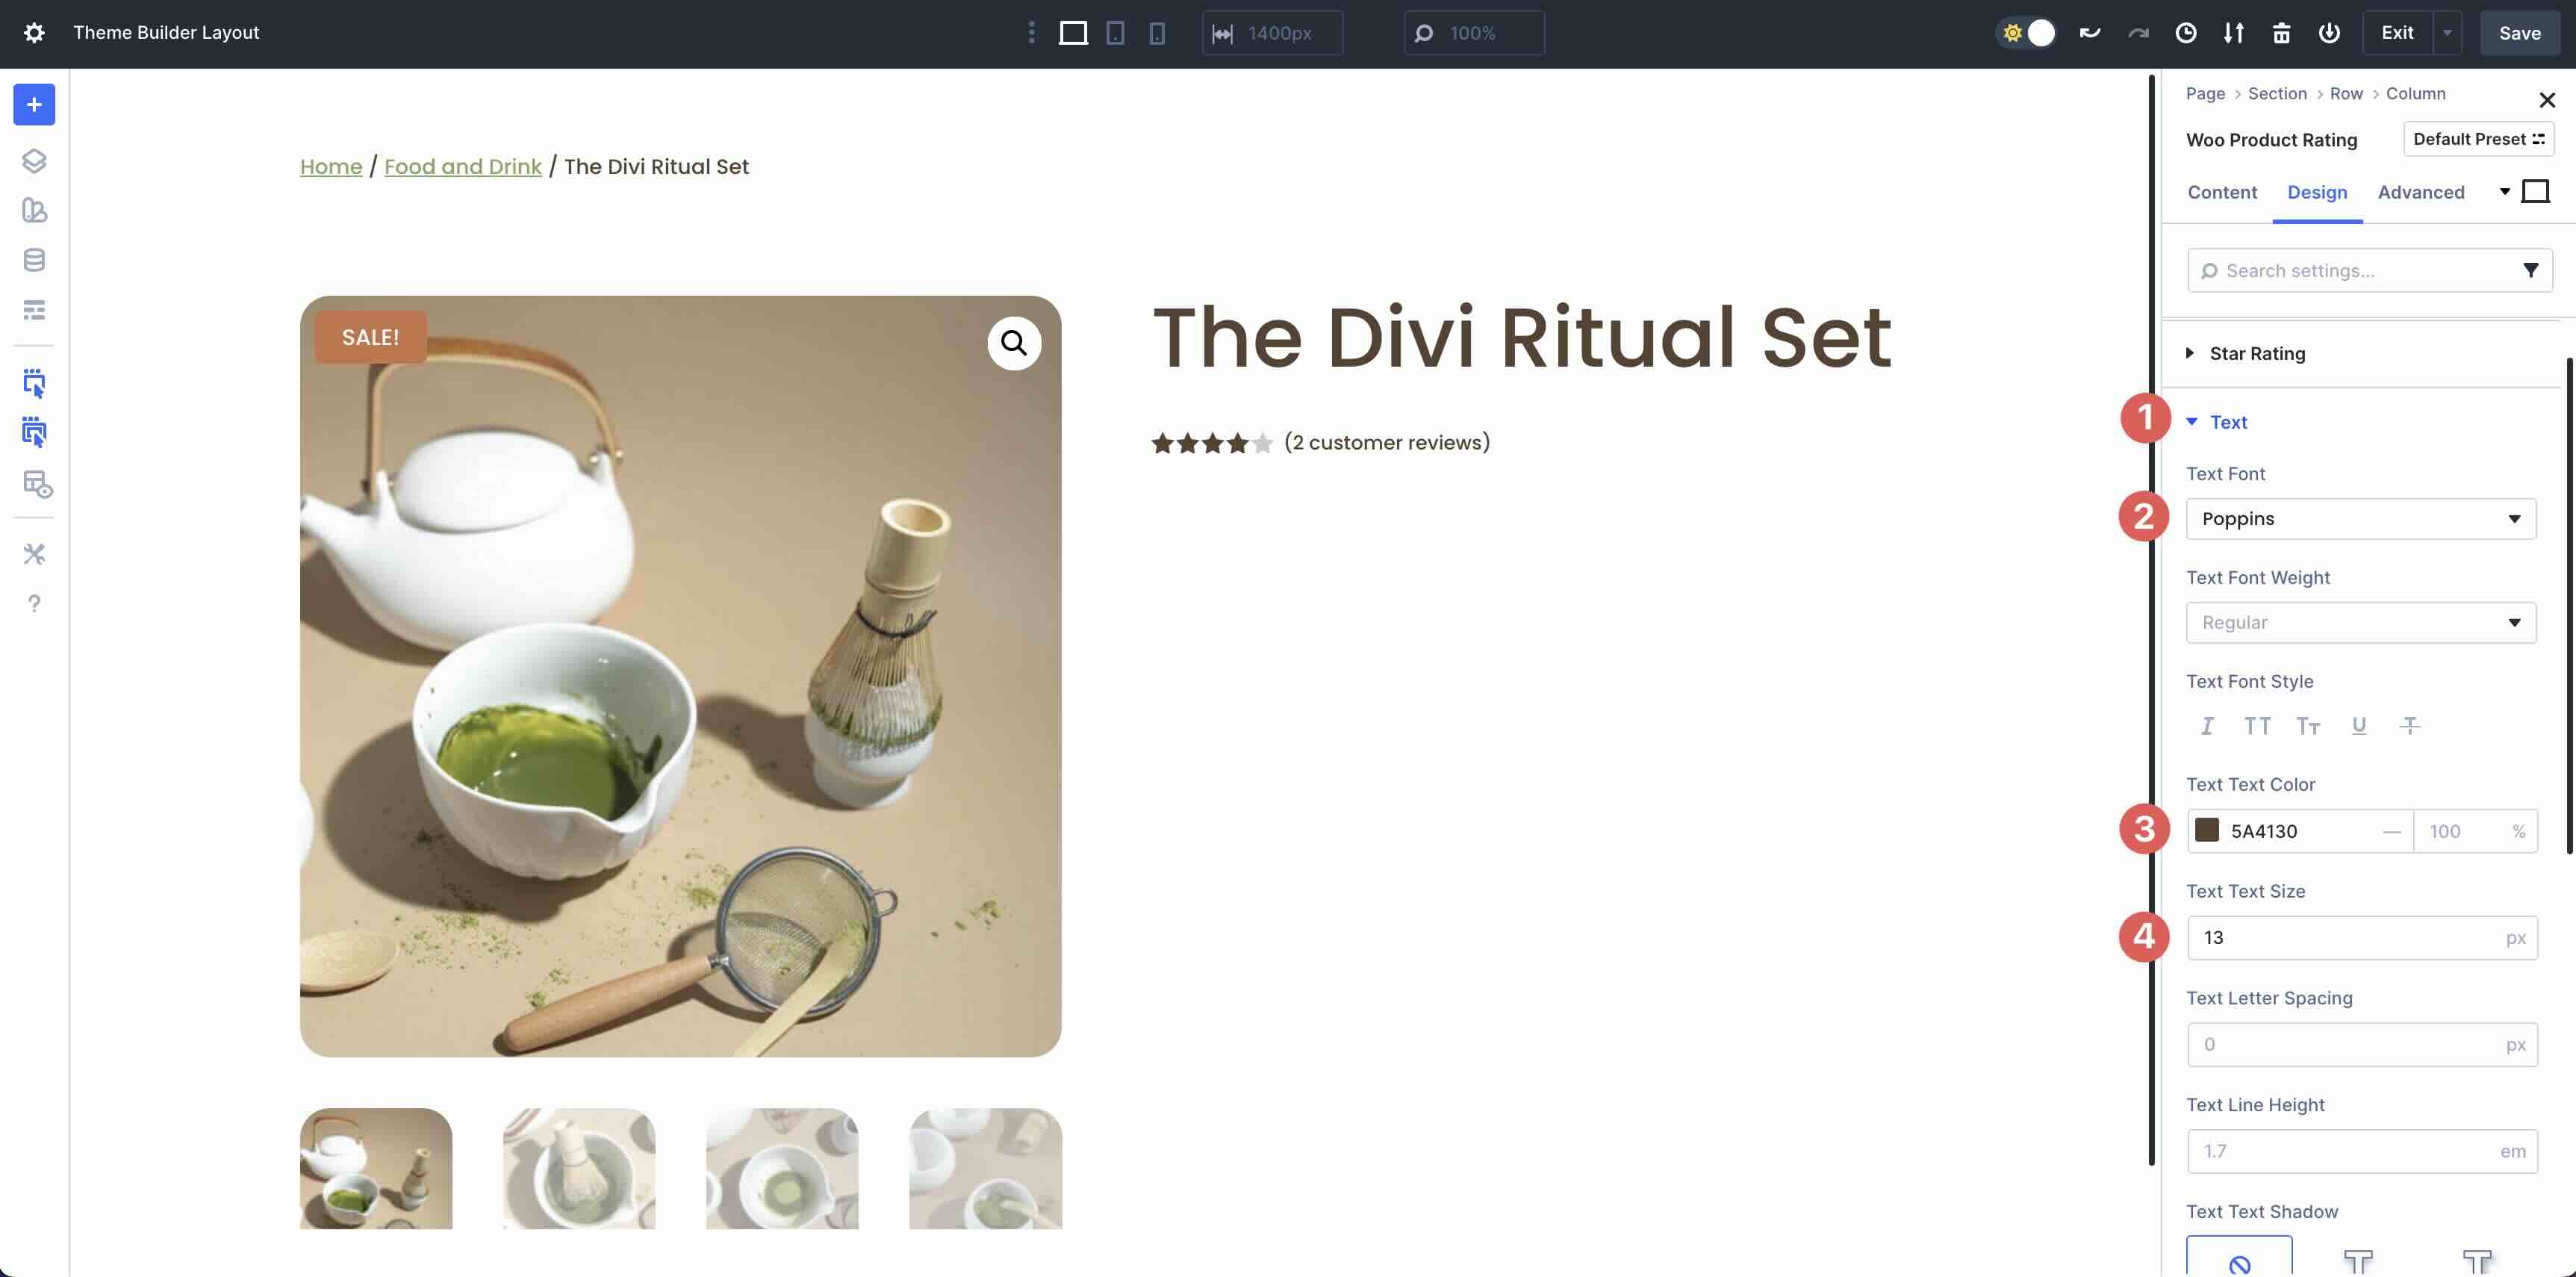
Upload The Woo Product Score Module
Subsequent, upload the Woo Product Score module beneath the Identify in the second one column.

Within the Design tab, enlarge the Celebrity Score menu. Set the Celebrity Score Textual content Alignment to Left, #5A4130 because the Celebrity Score Textual content Colour, 15px because the Celebrity Score Textual content Dimension, and 1px because the Celebrity Score Letter Spacing.

Subsequent, enlarge the Textual content menu. Input Poppins because the Textual content Font, #5A4130 because the Textual content Textual content Colour, and 13px because the Textual content Textual content Dimension.
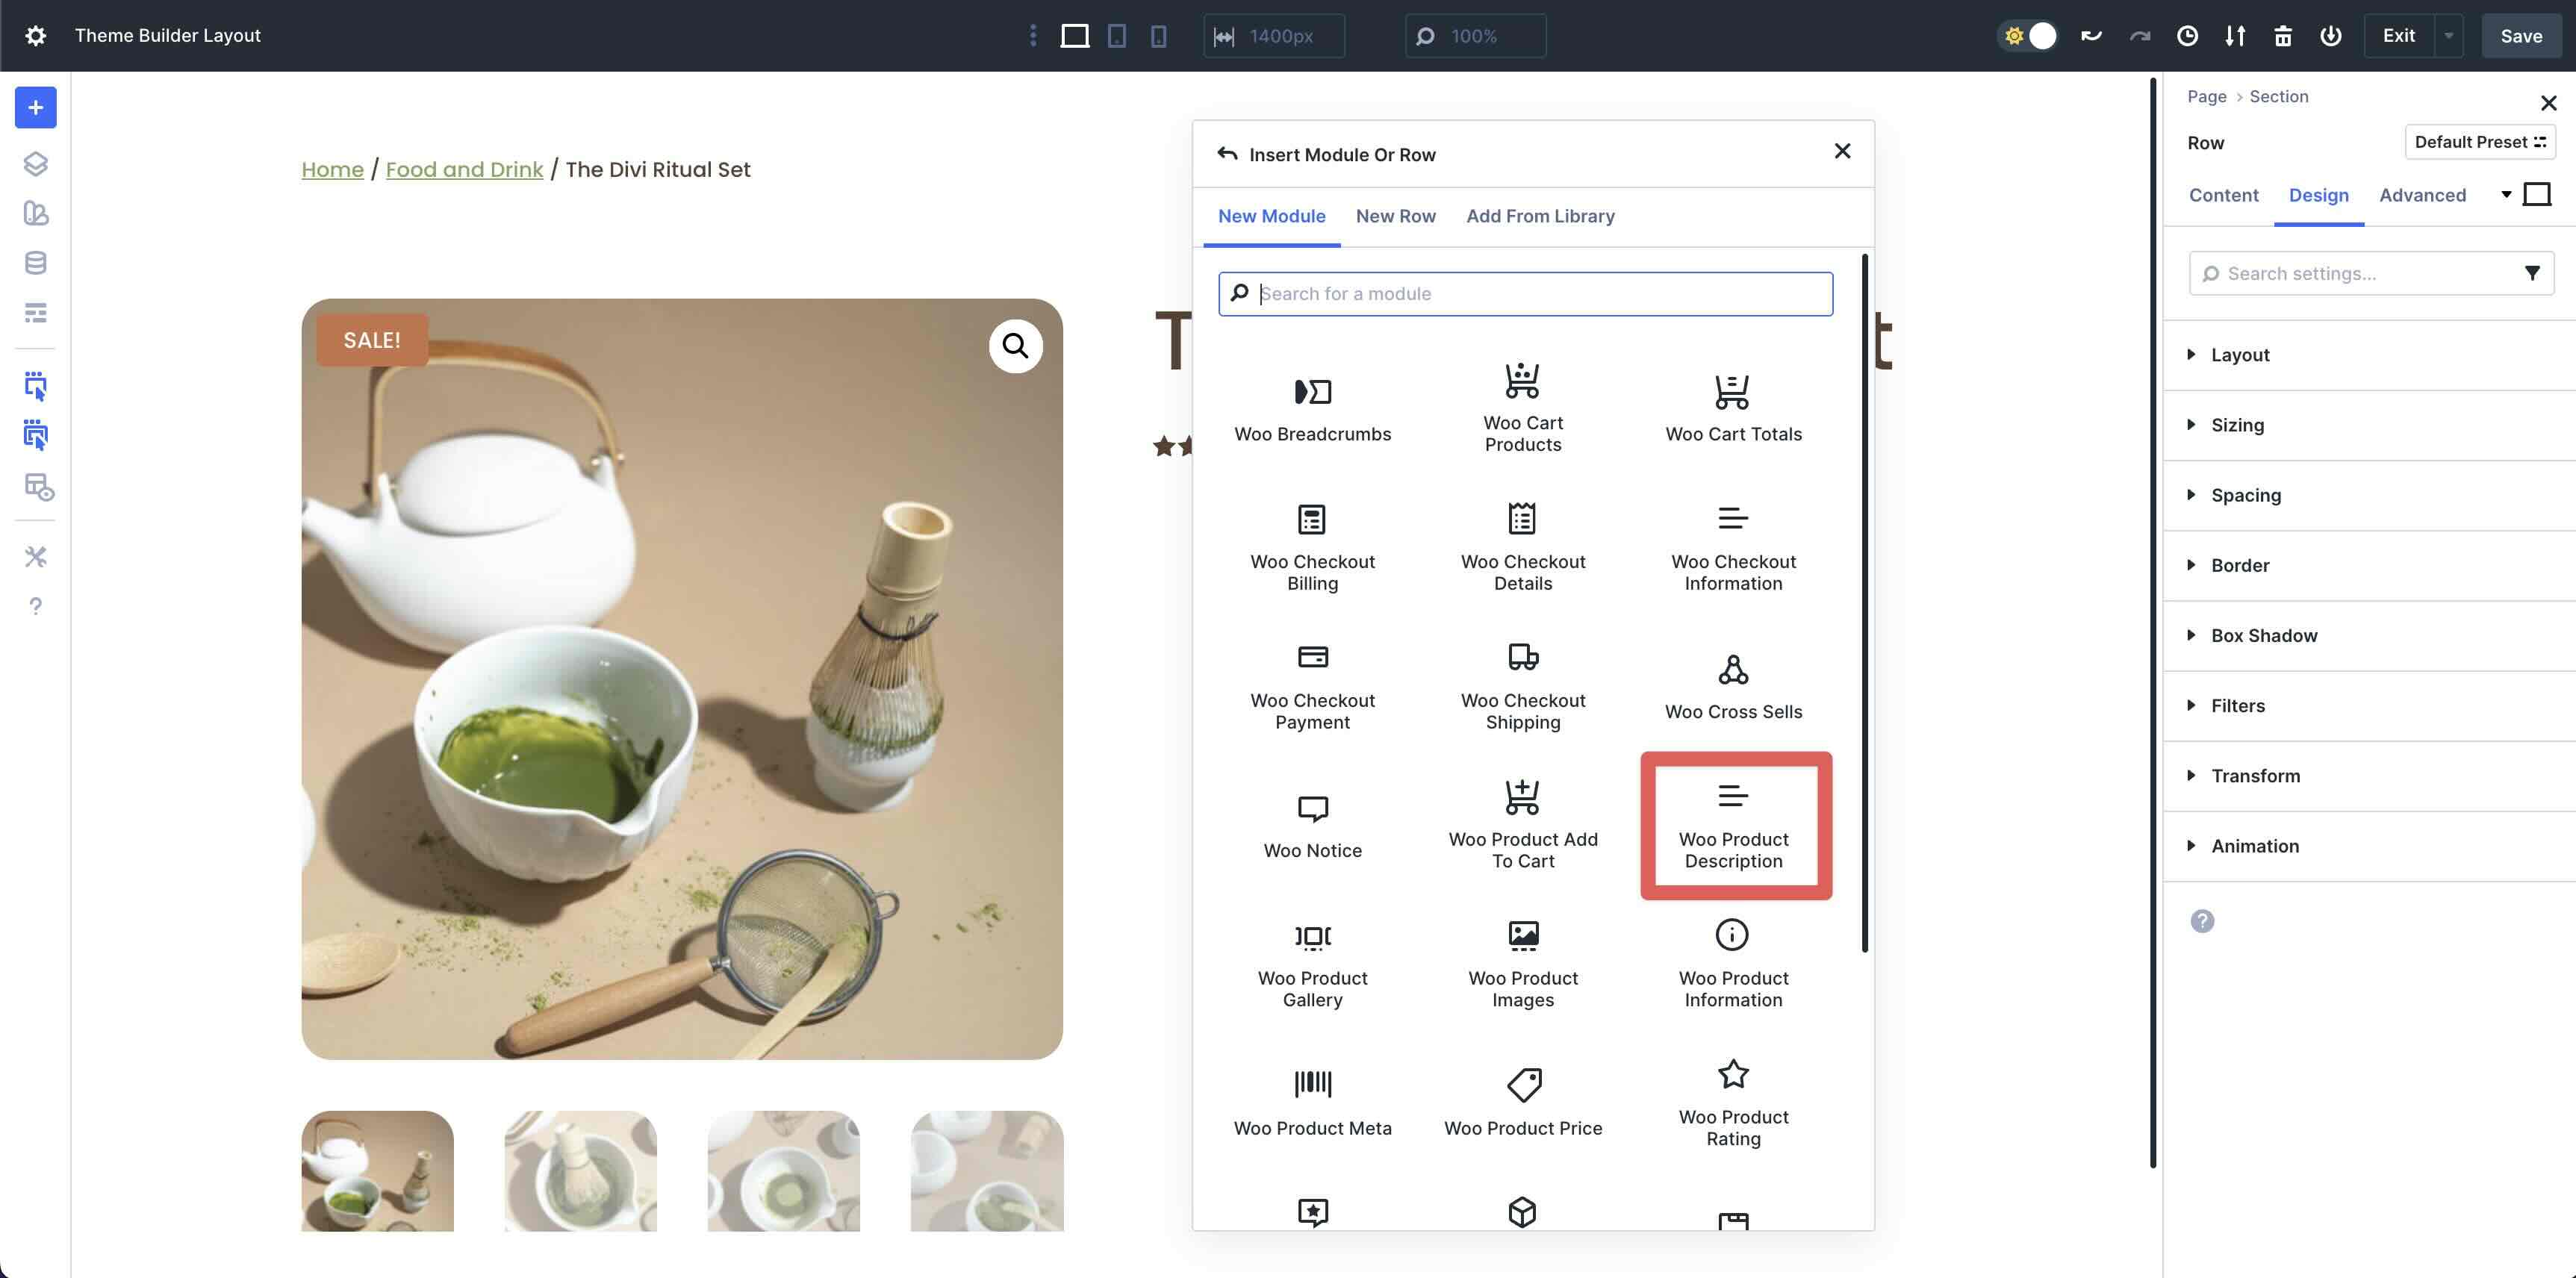
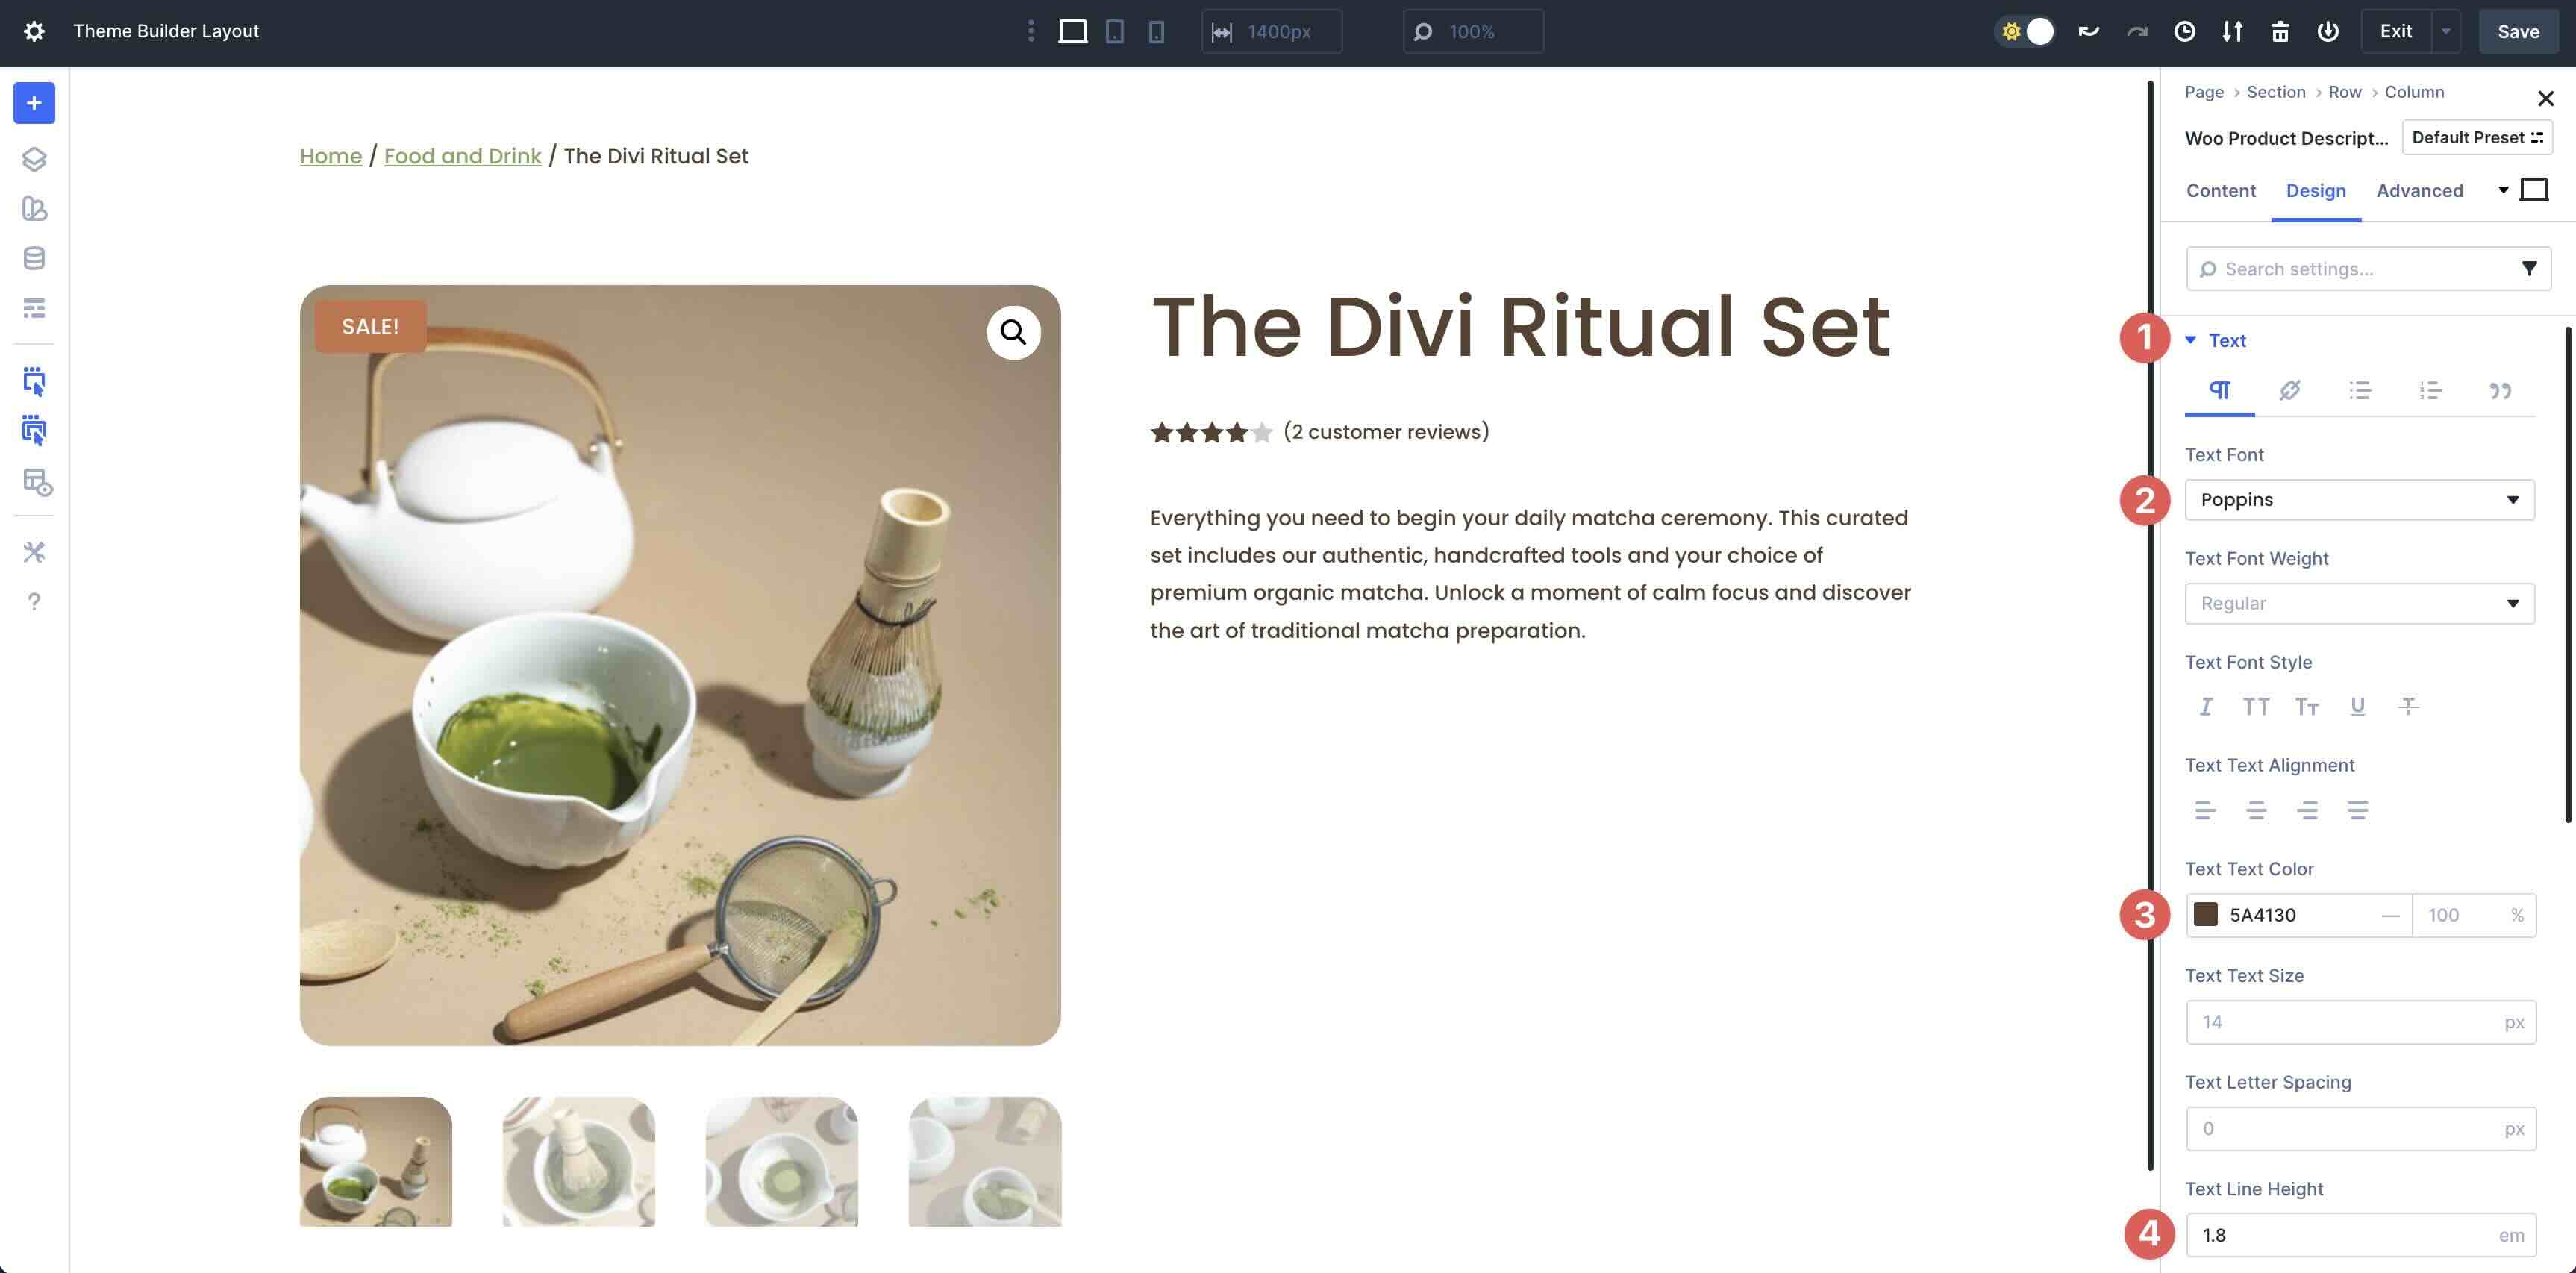
Upload The Woo Product Description Module
Subsequent, upload the Woo Product Description Module to the second one column.
Within the Content material tab, come to a decision whether or not to make use of the Description or Brief Description within the Description Kind box.
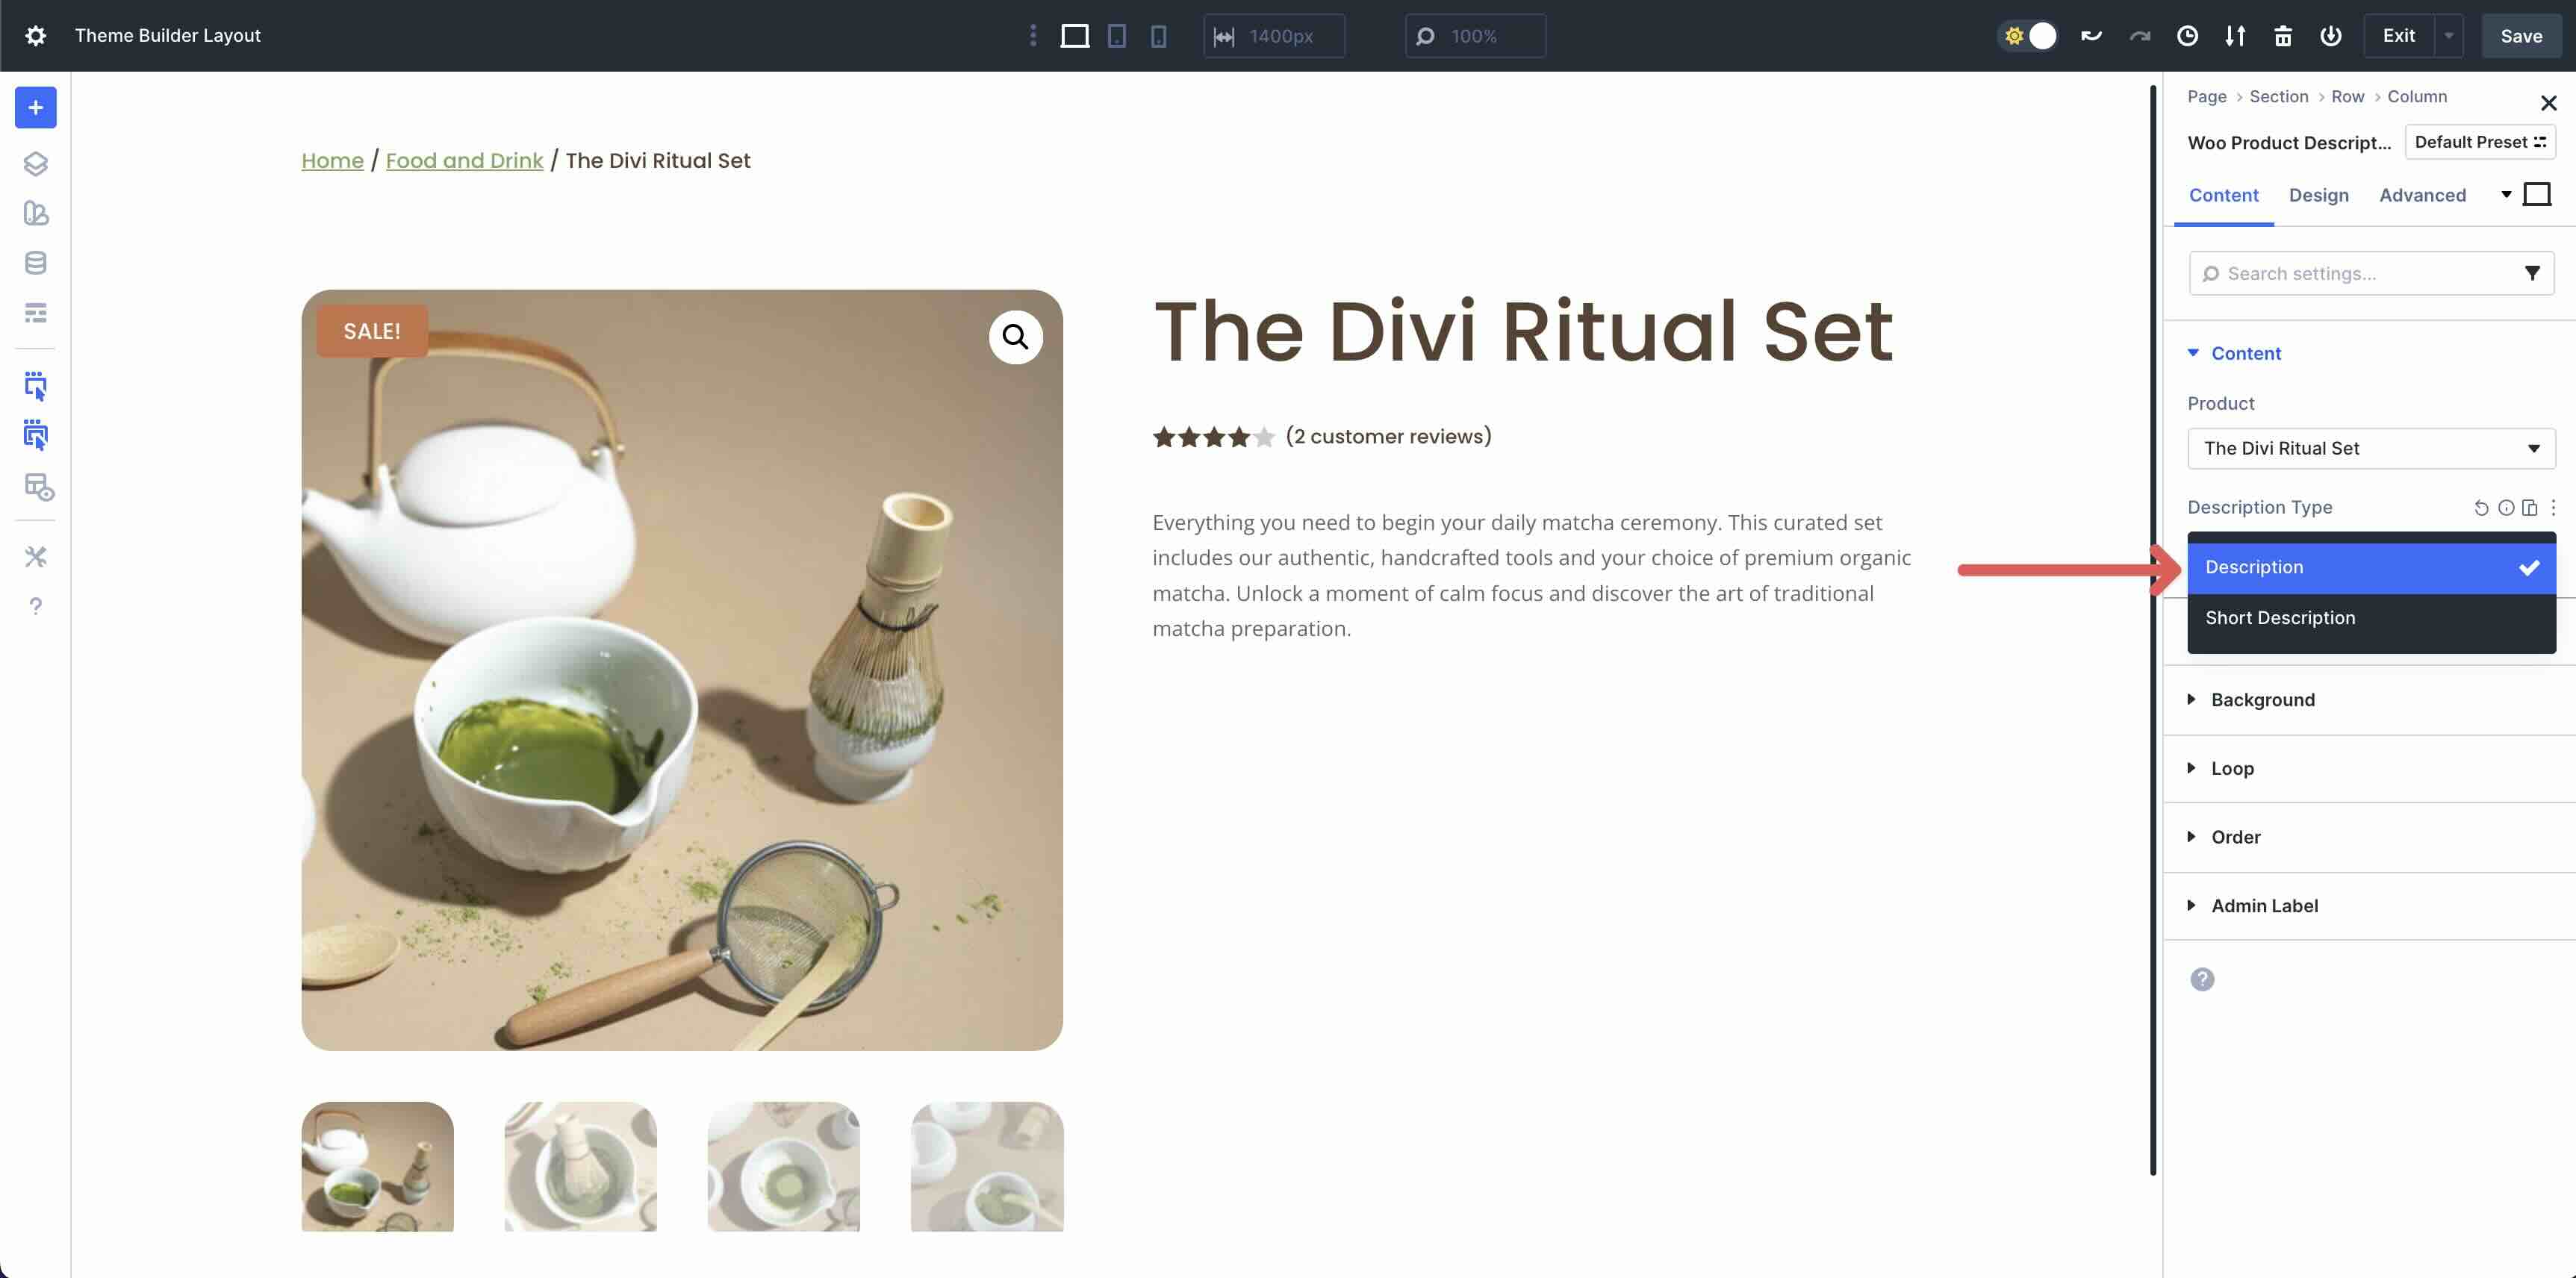
Transfer to the Design tab. Make bigger the Textual content dropdown menu and make a selection Poppins because the Textual content Font, #5A4130 because the Textual content Textual content Colour, and 1.8em because the Textual content Line Peak.
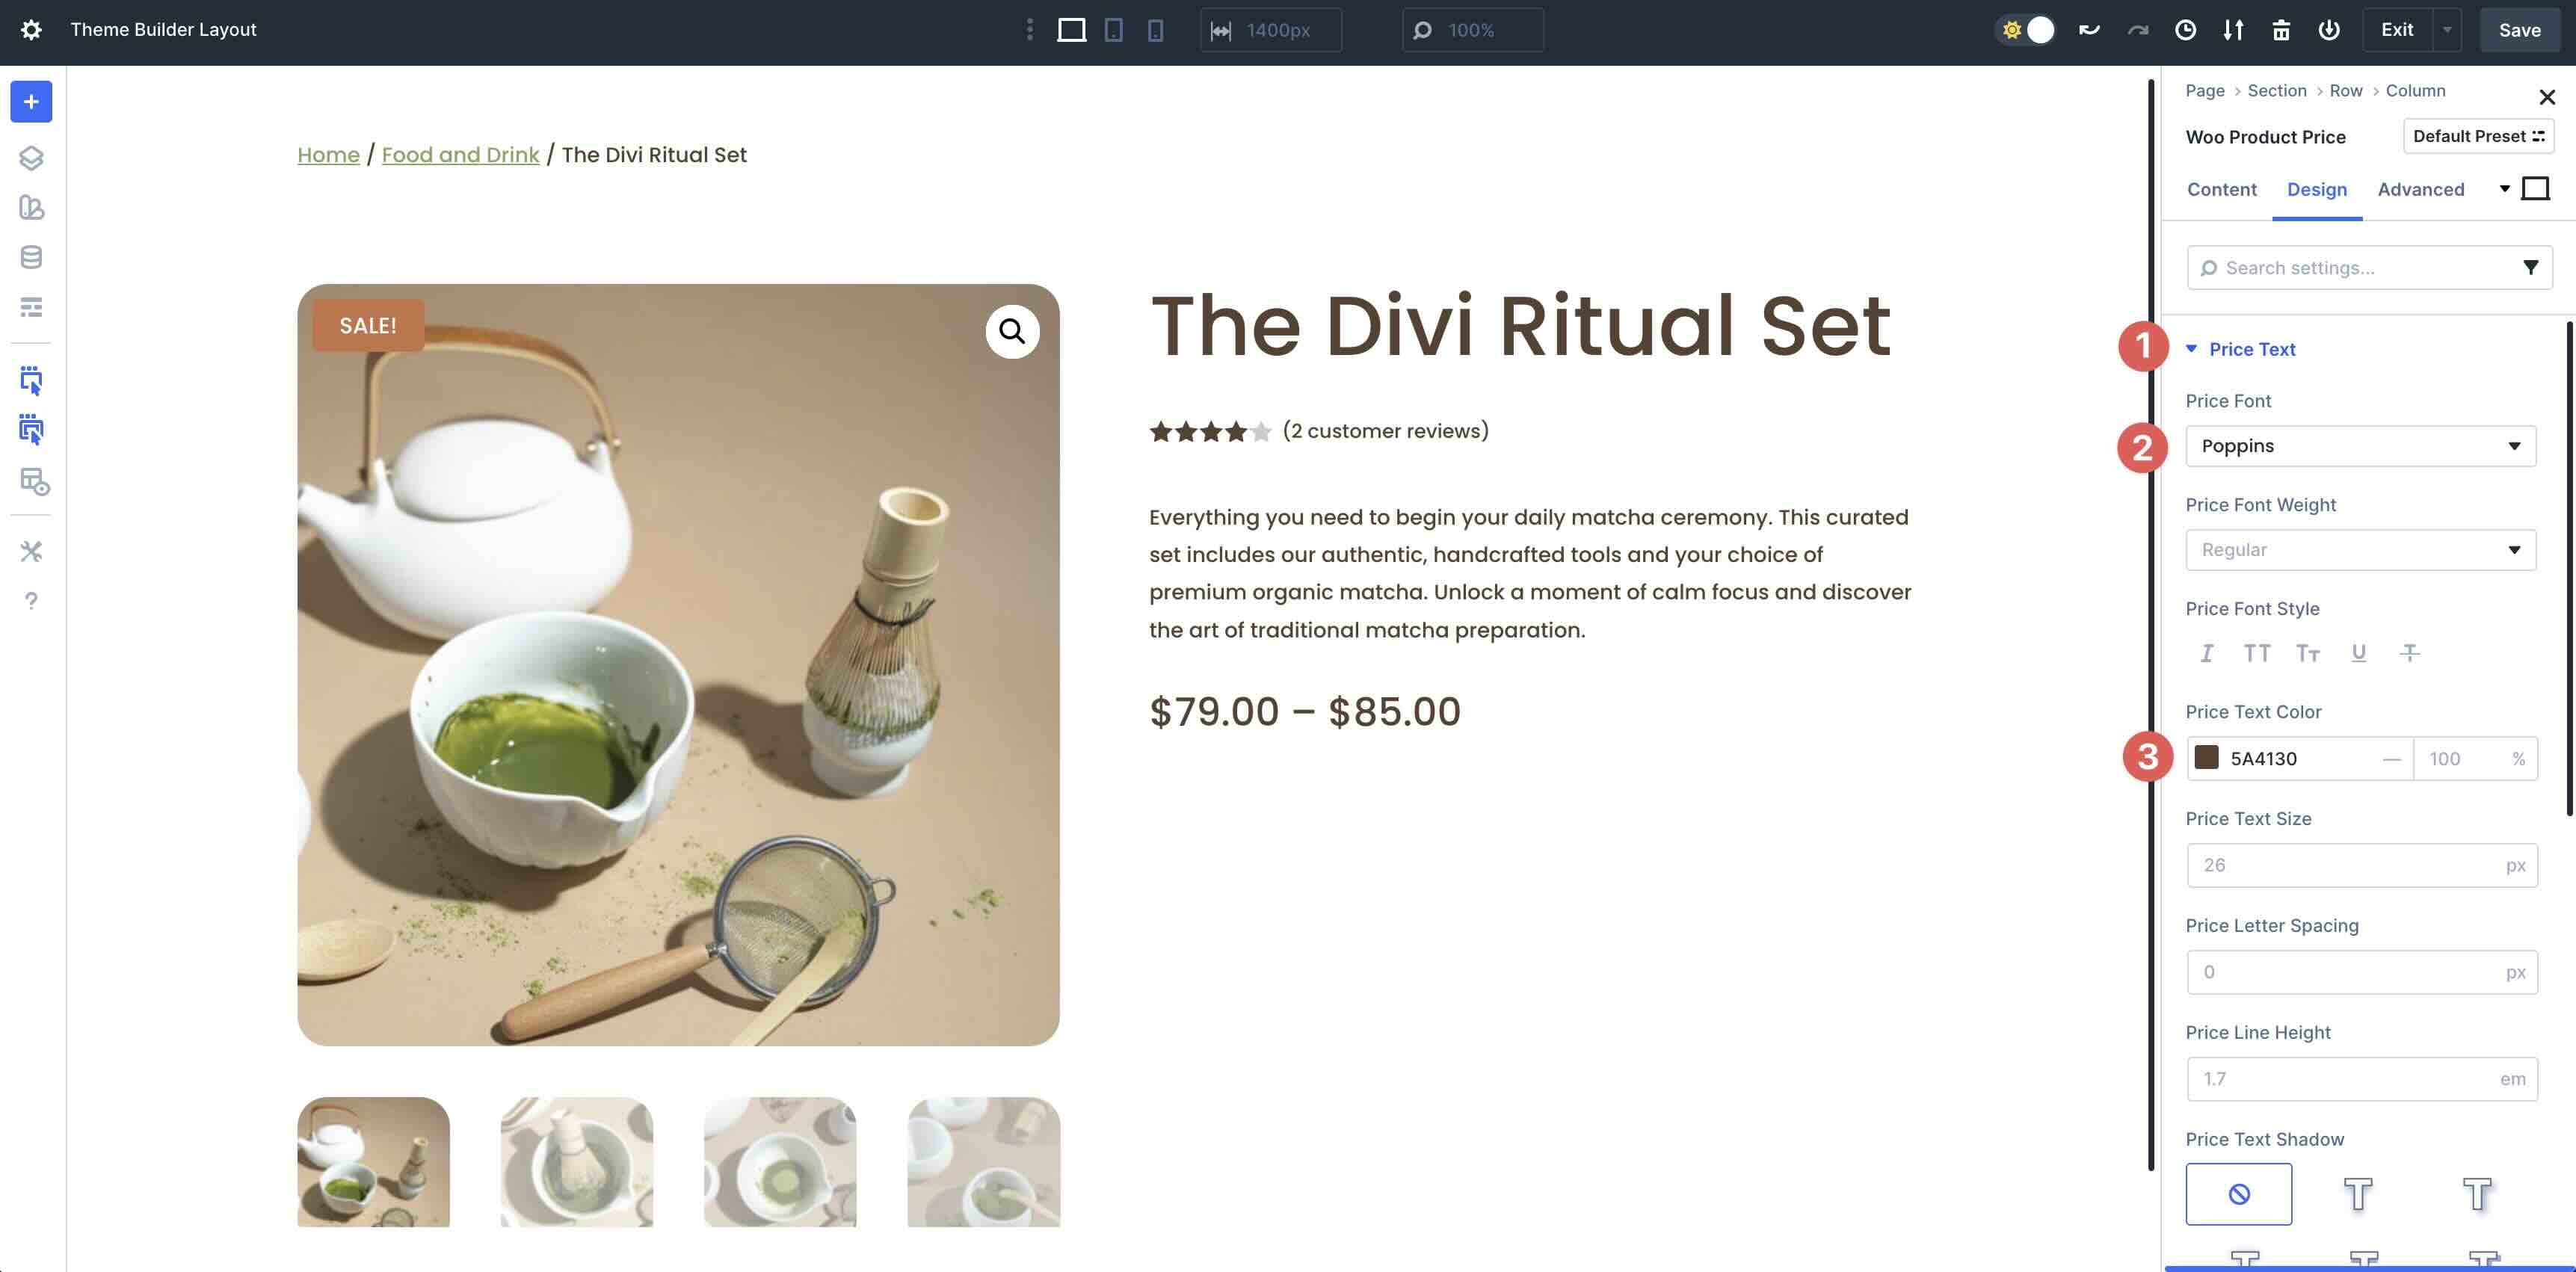
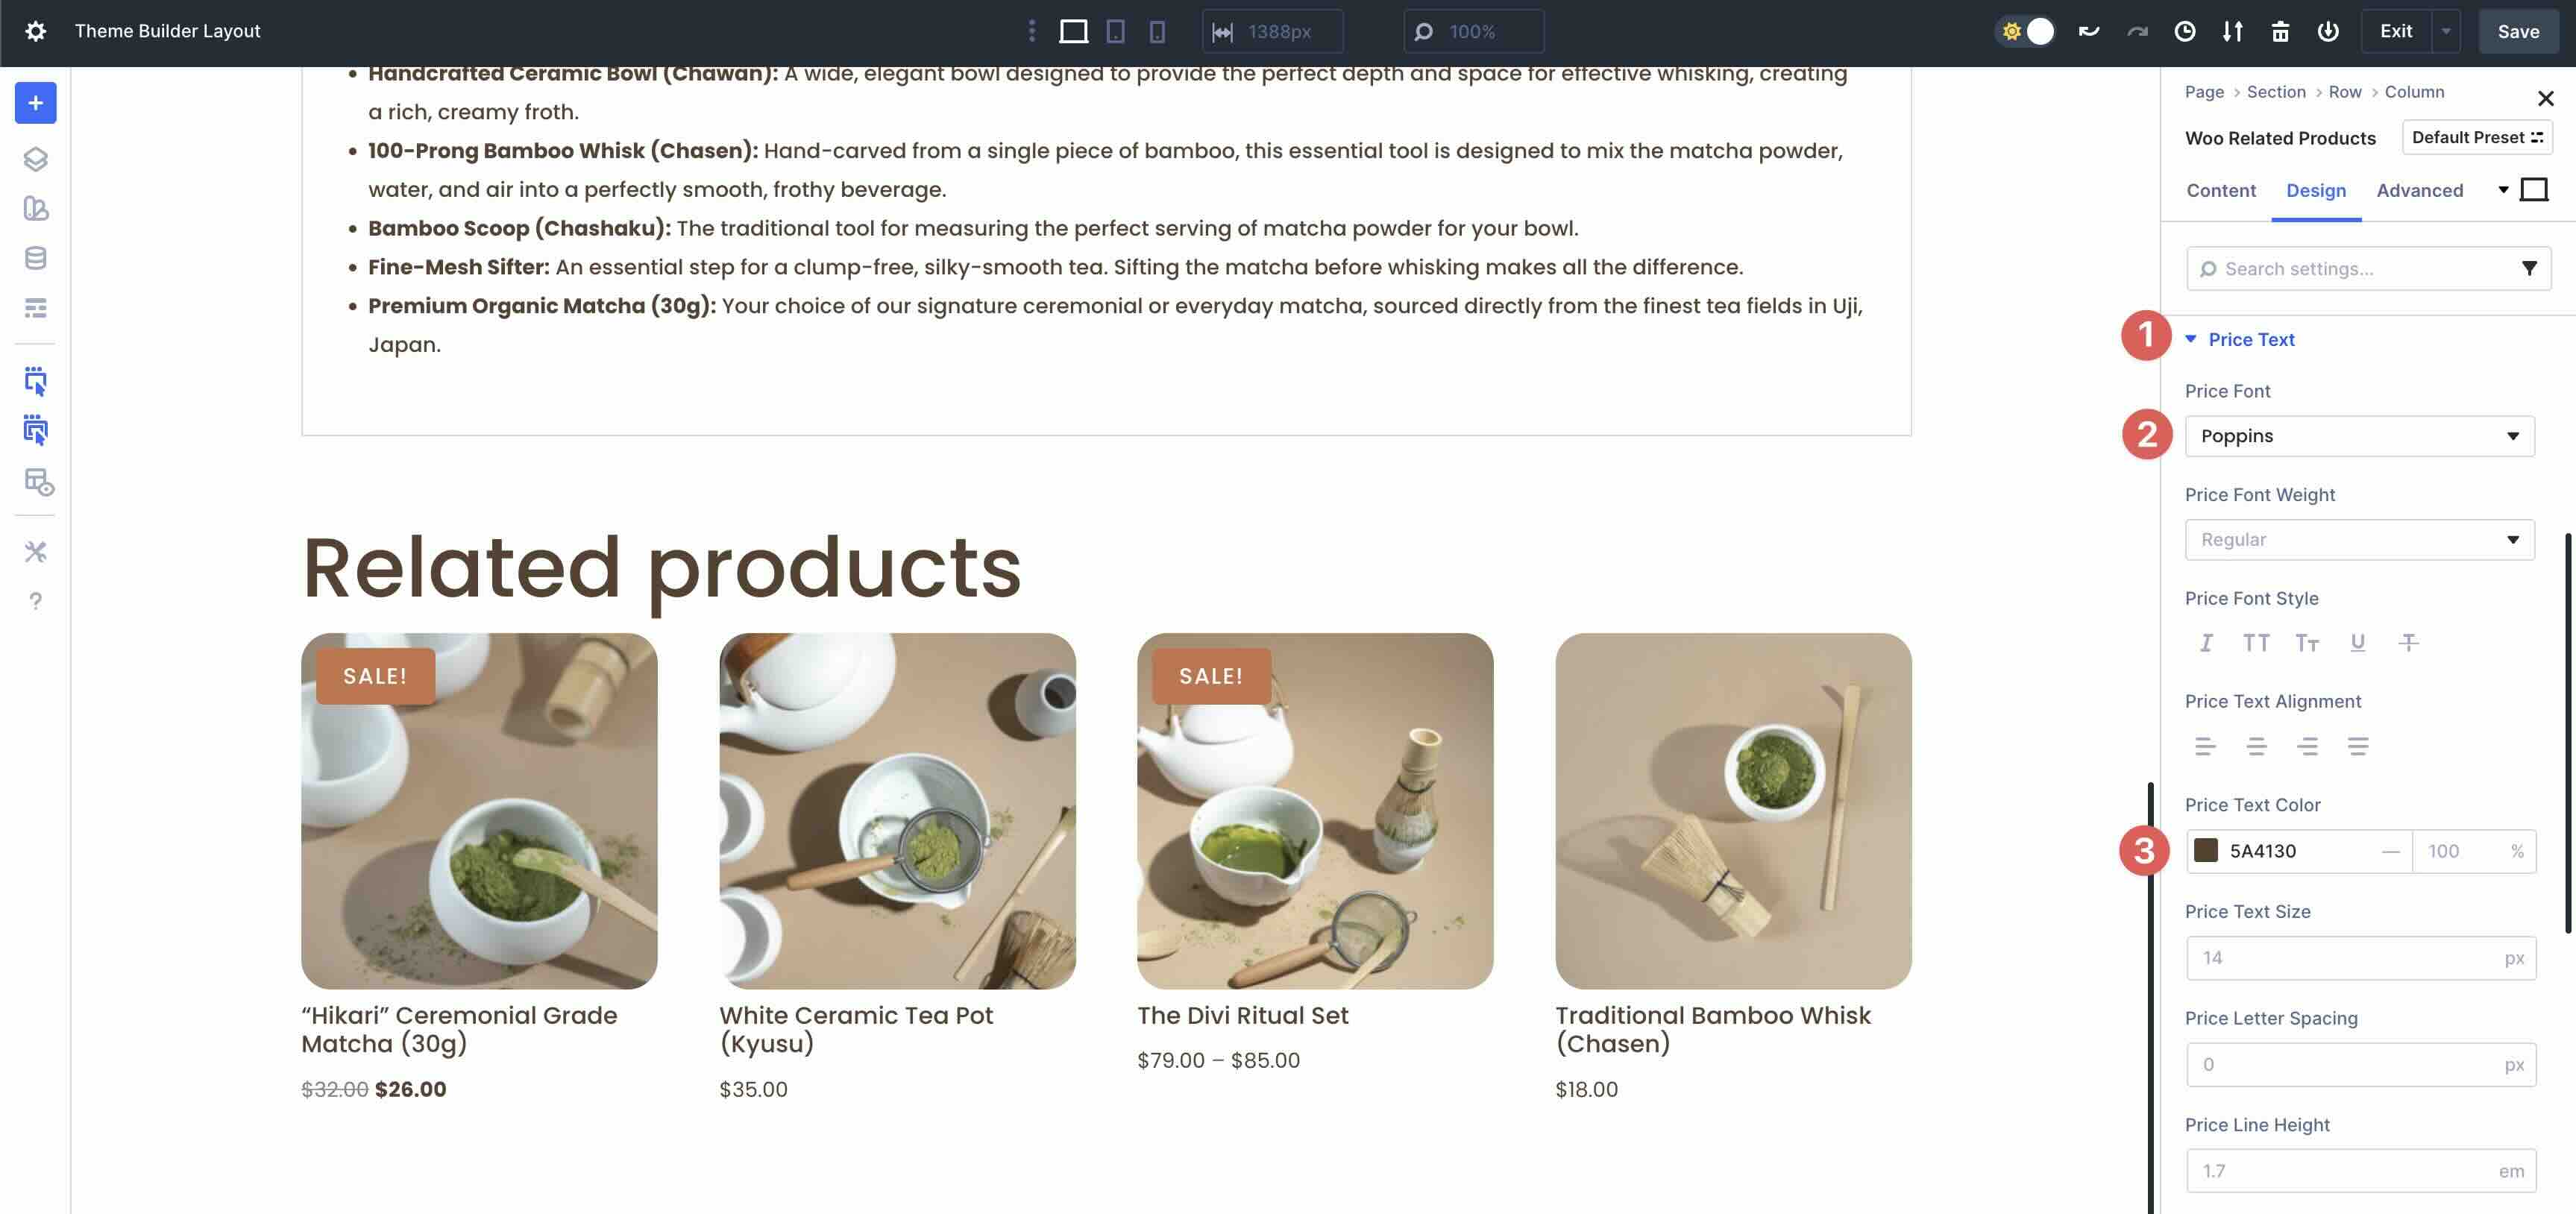
Upload The Woo Product Value Module
Subsequent, we’ll upload the Woo Product Value module to the second one column.
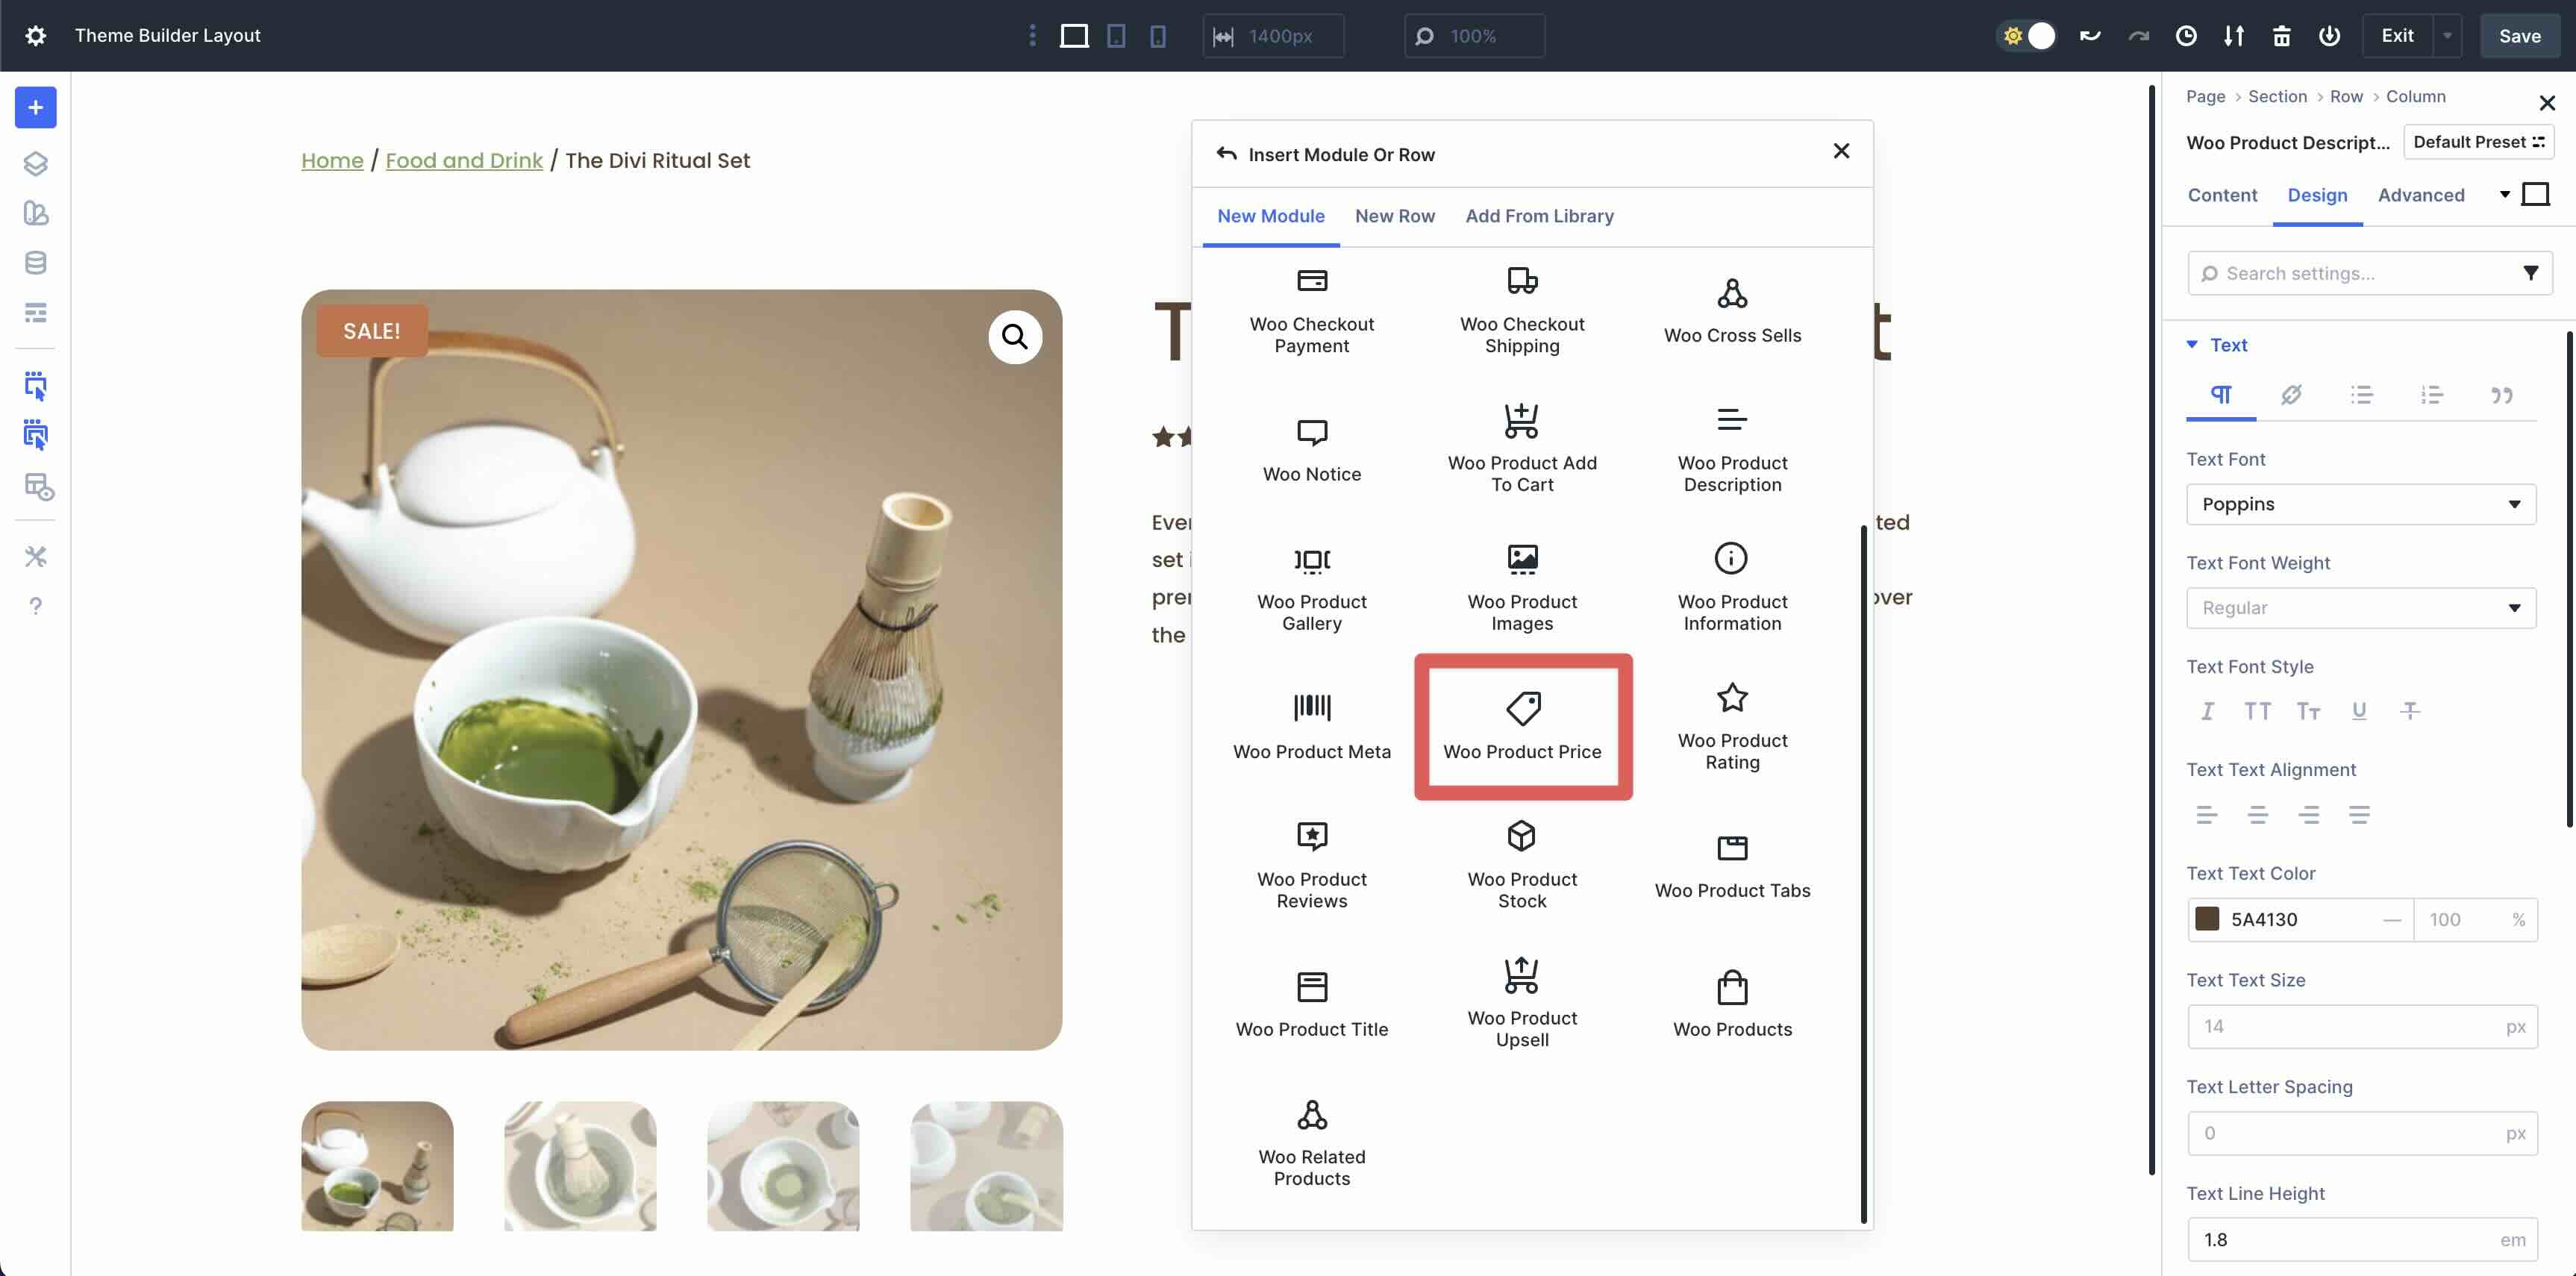
Make bigger the Value Textual content menu. Make a choice Poppins because the Value Font and #5A4130 because the Value Textual content Colour.
Upload The Woo Product Upload To Cart Module
Upload the Woo Product Upload To Cart module.

Within the Design tab, enlarge the Box Labels menu and input Poppins because the Box Labels Font. Within the Box Labels Textual content Colour box, use #5A4130.
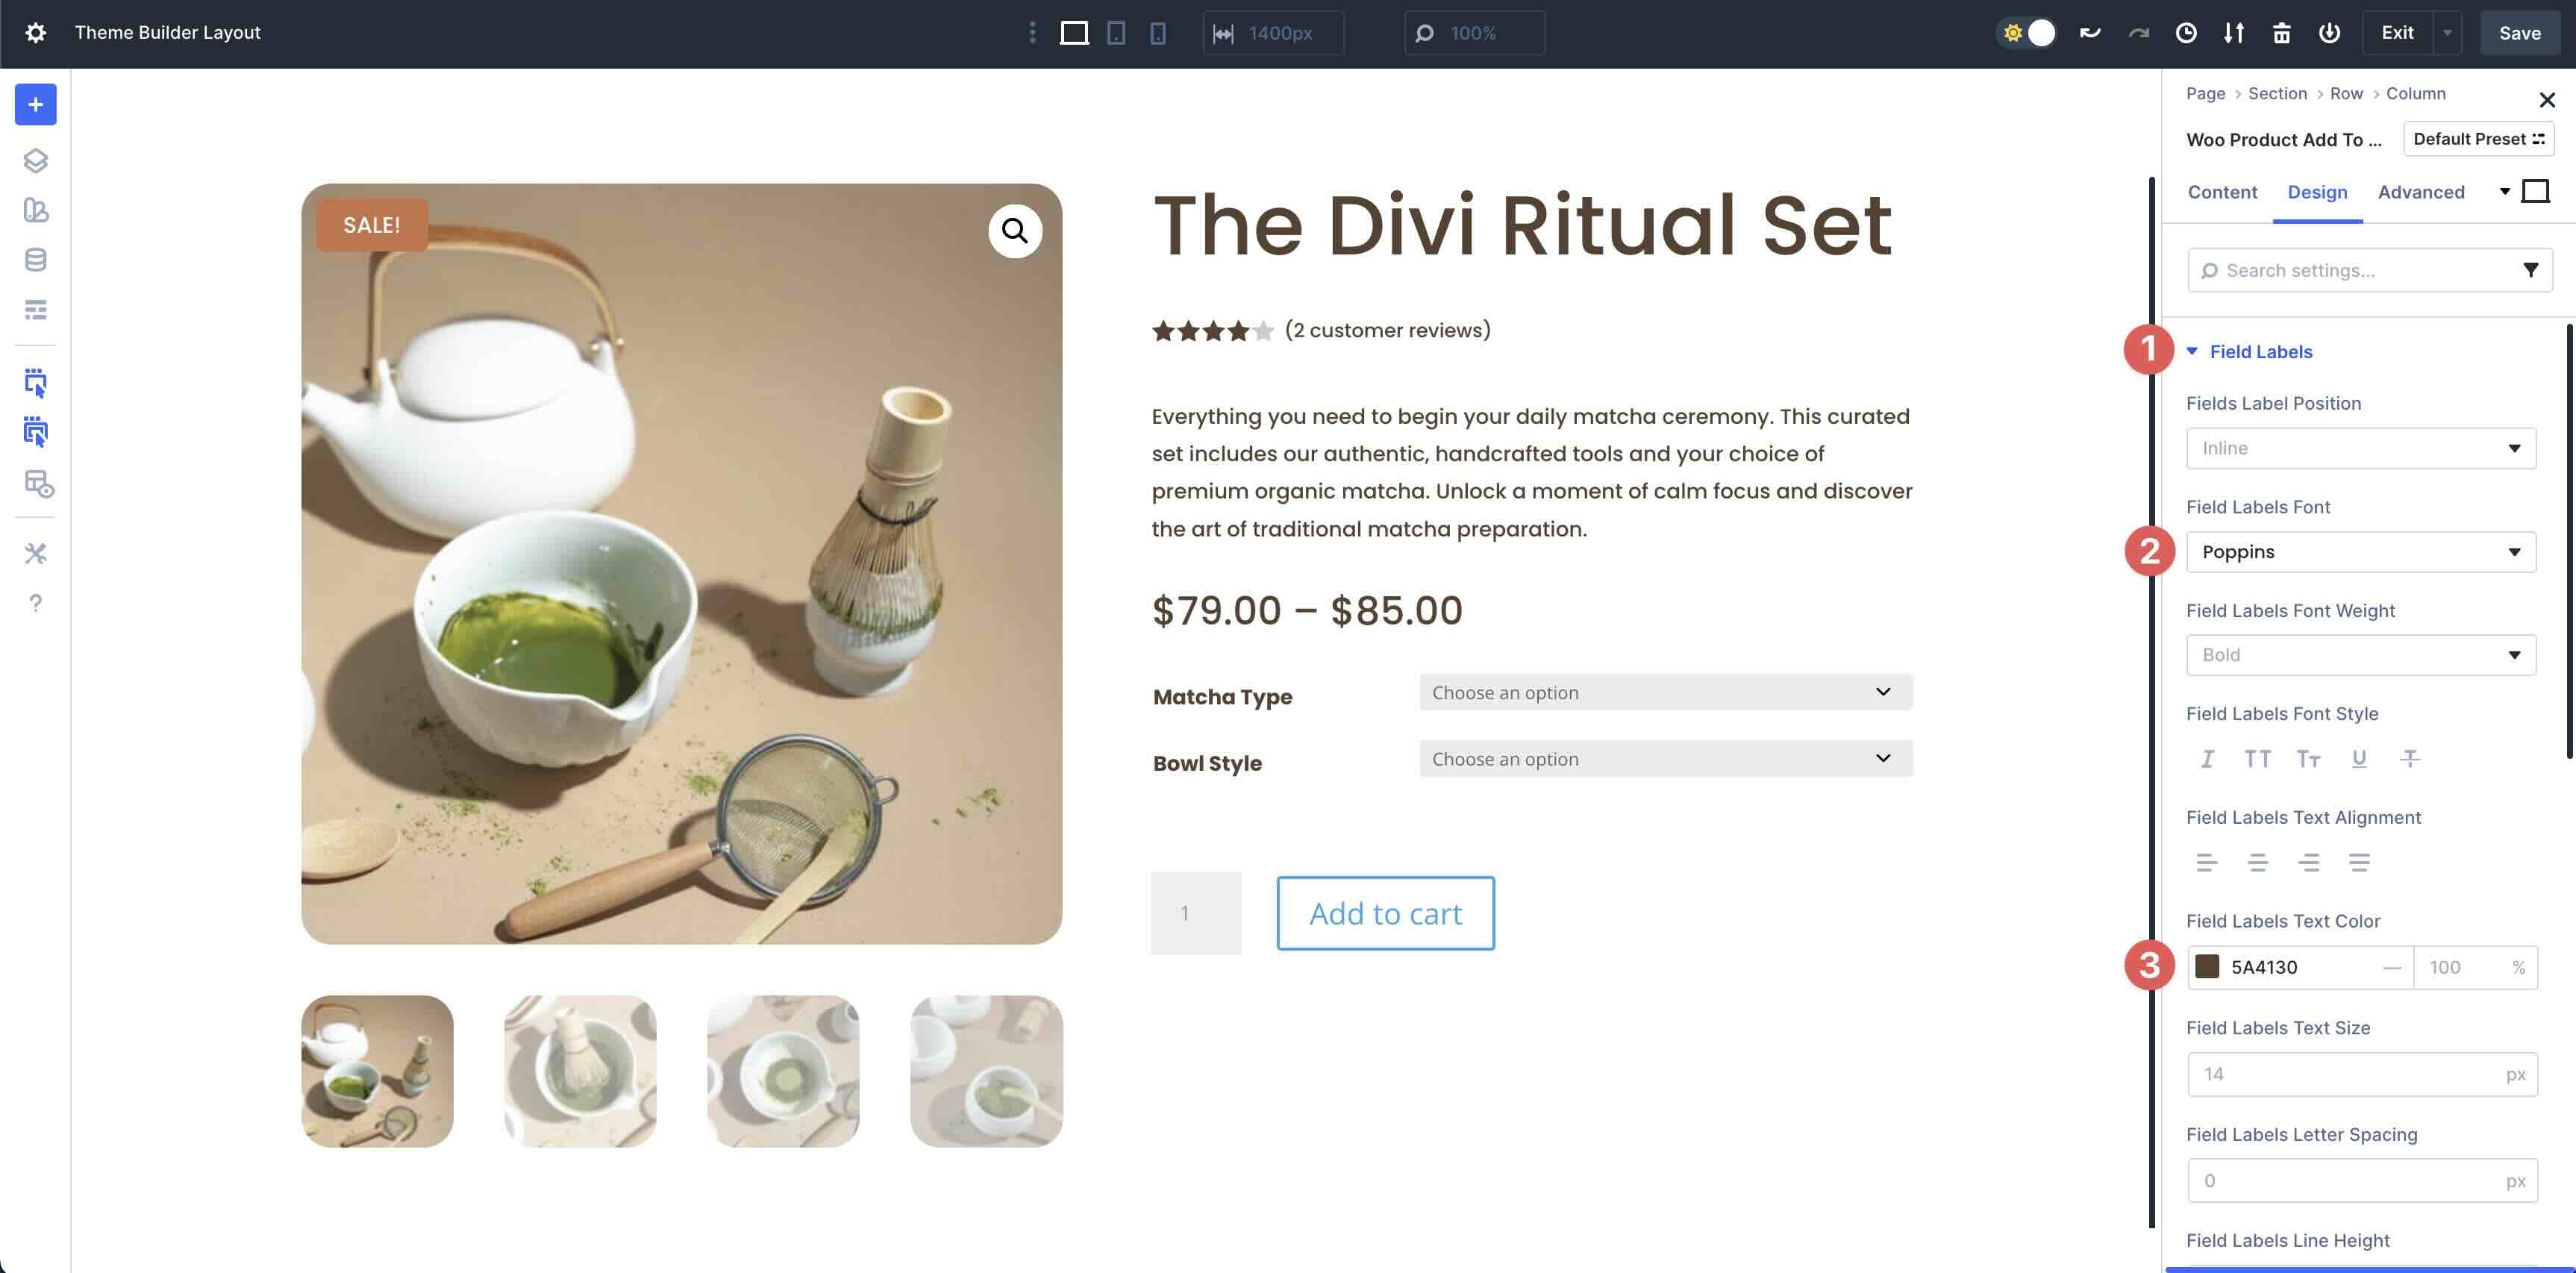
Subsequent, enlarge the Fields menu. Input #5A4130 within the Fields Background Colour and Fields Focal point Background Colour fields. Set the Opacity to 0. Within the Fields Focal point Textual content Colour box, input #5A4130.
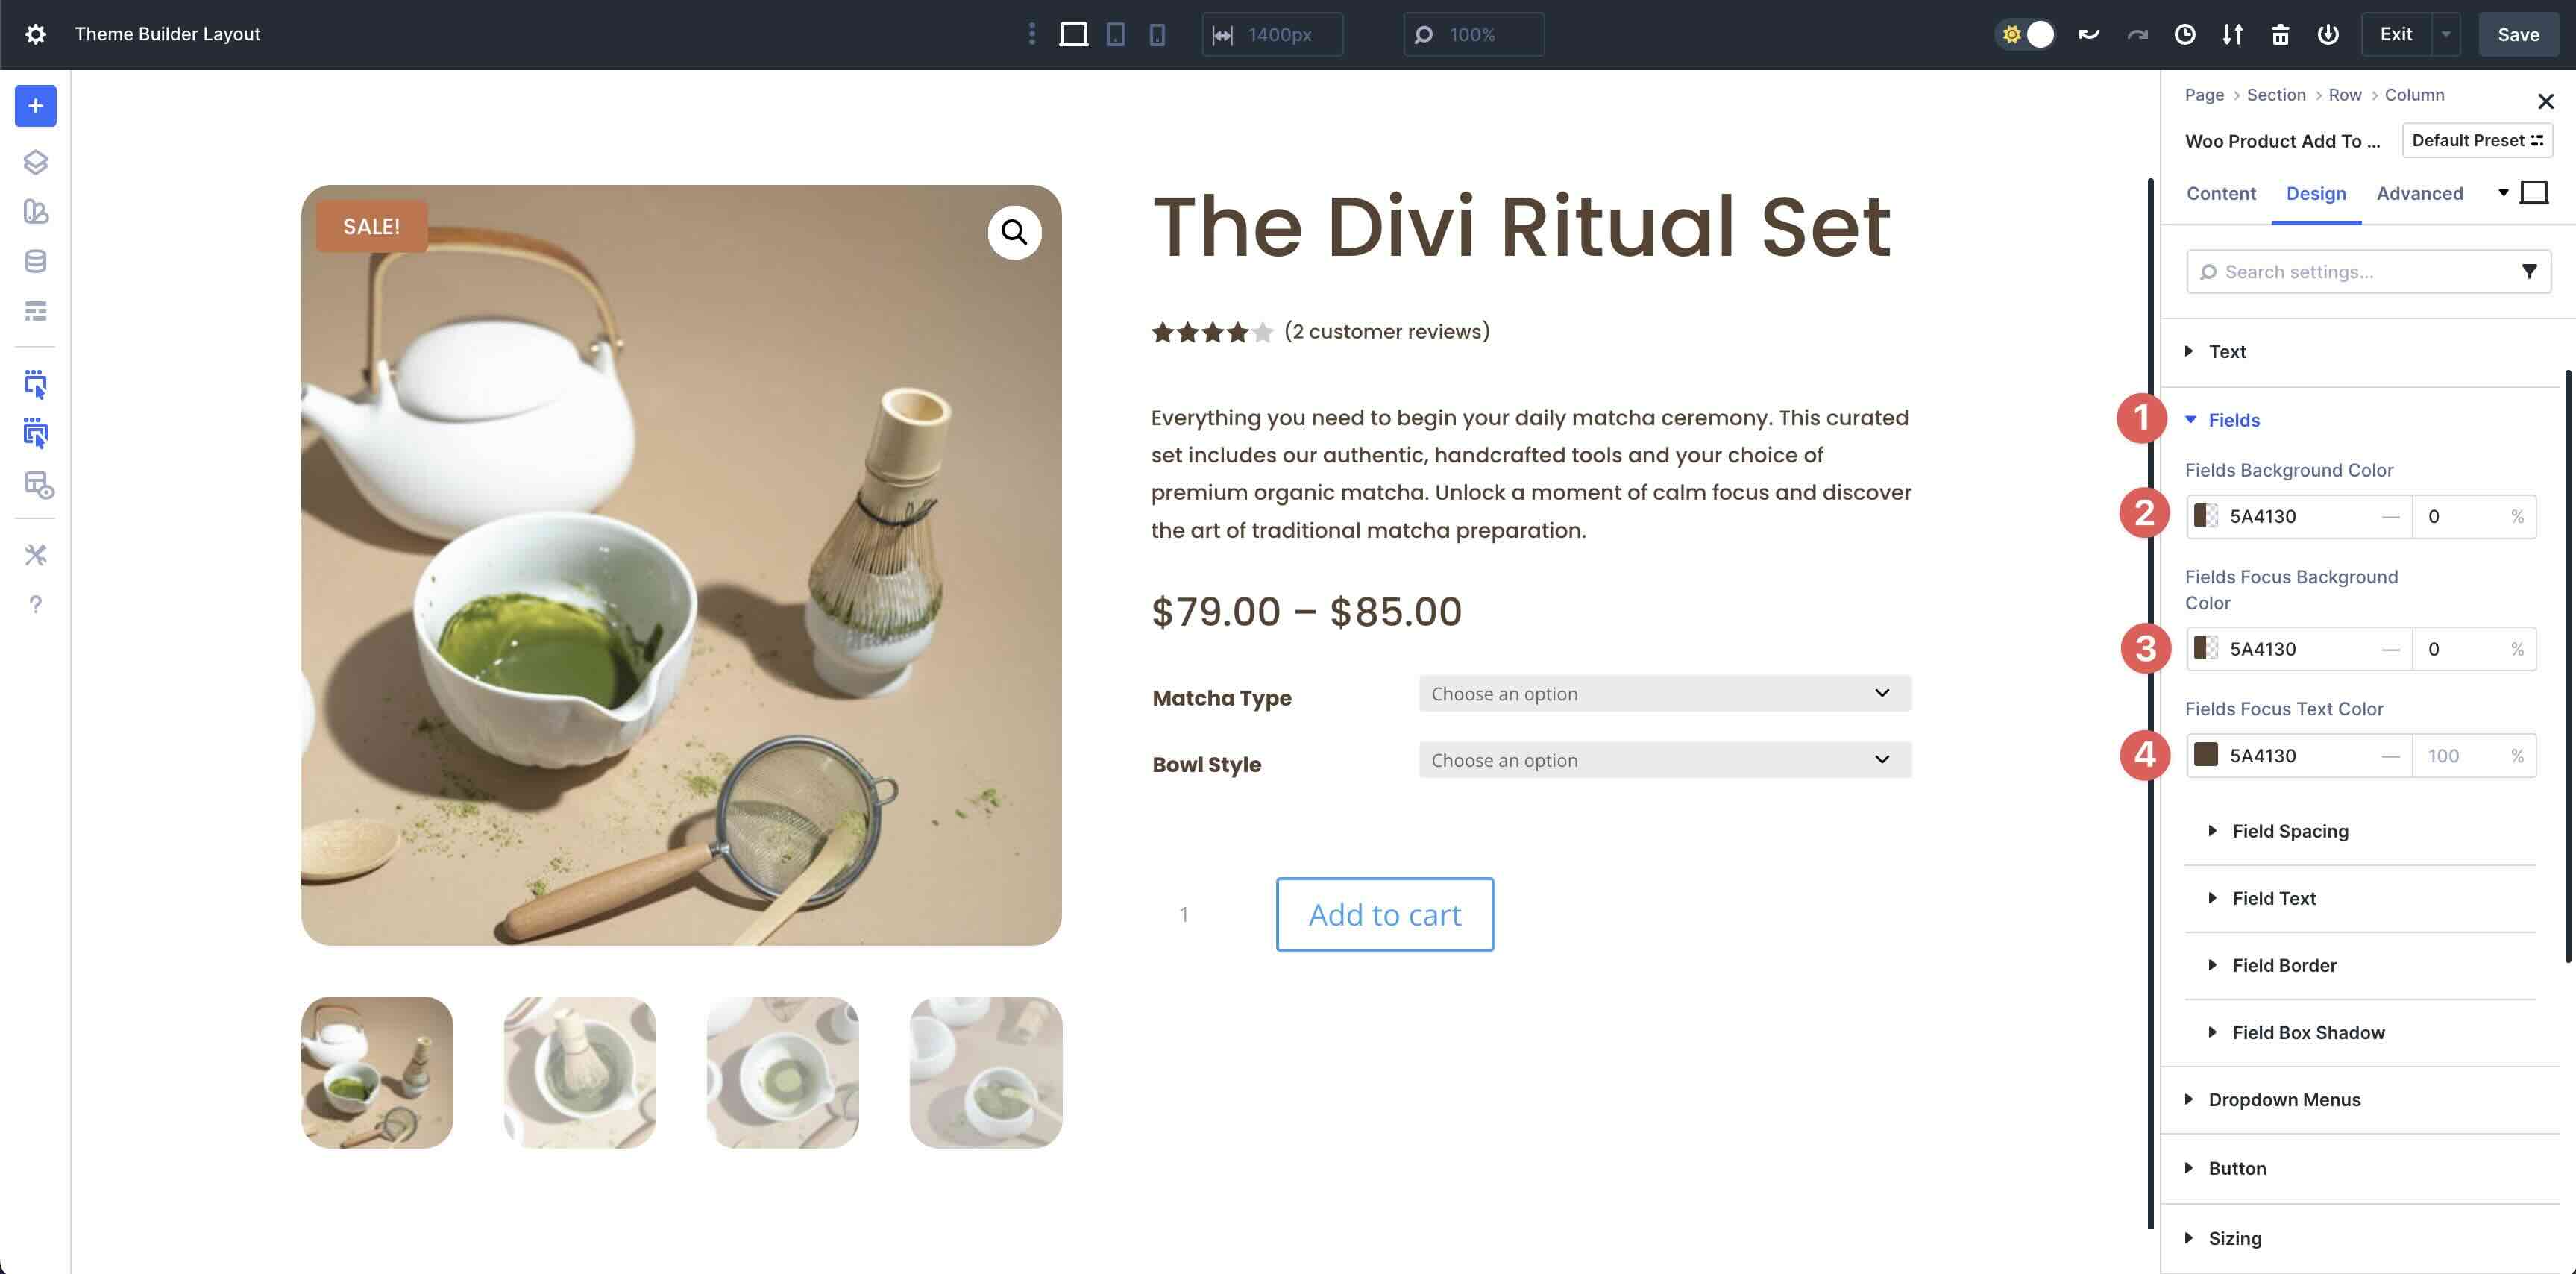
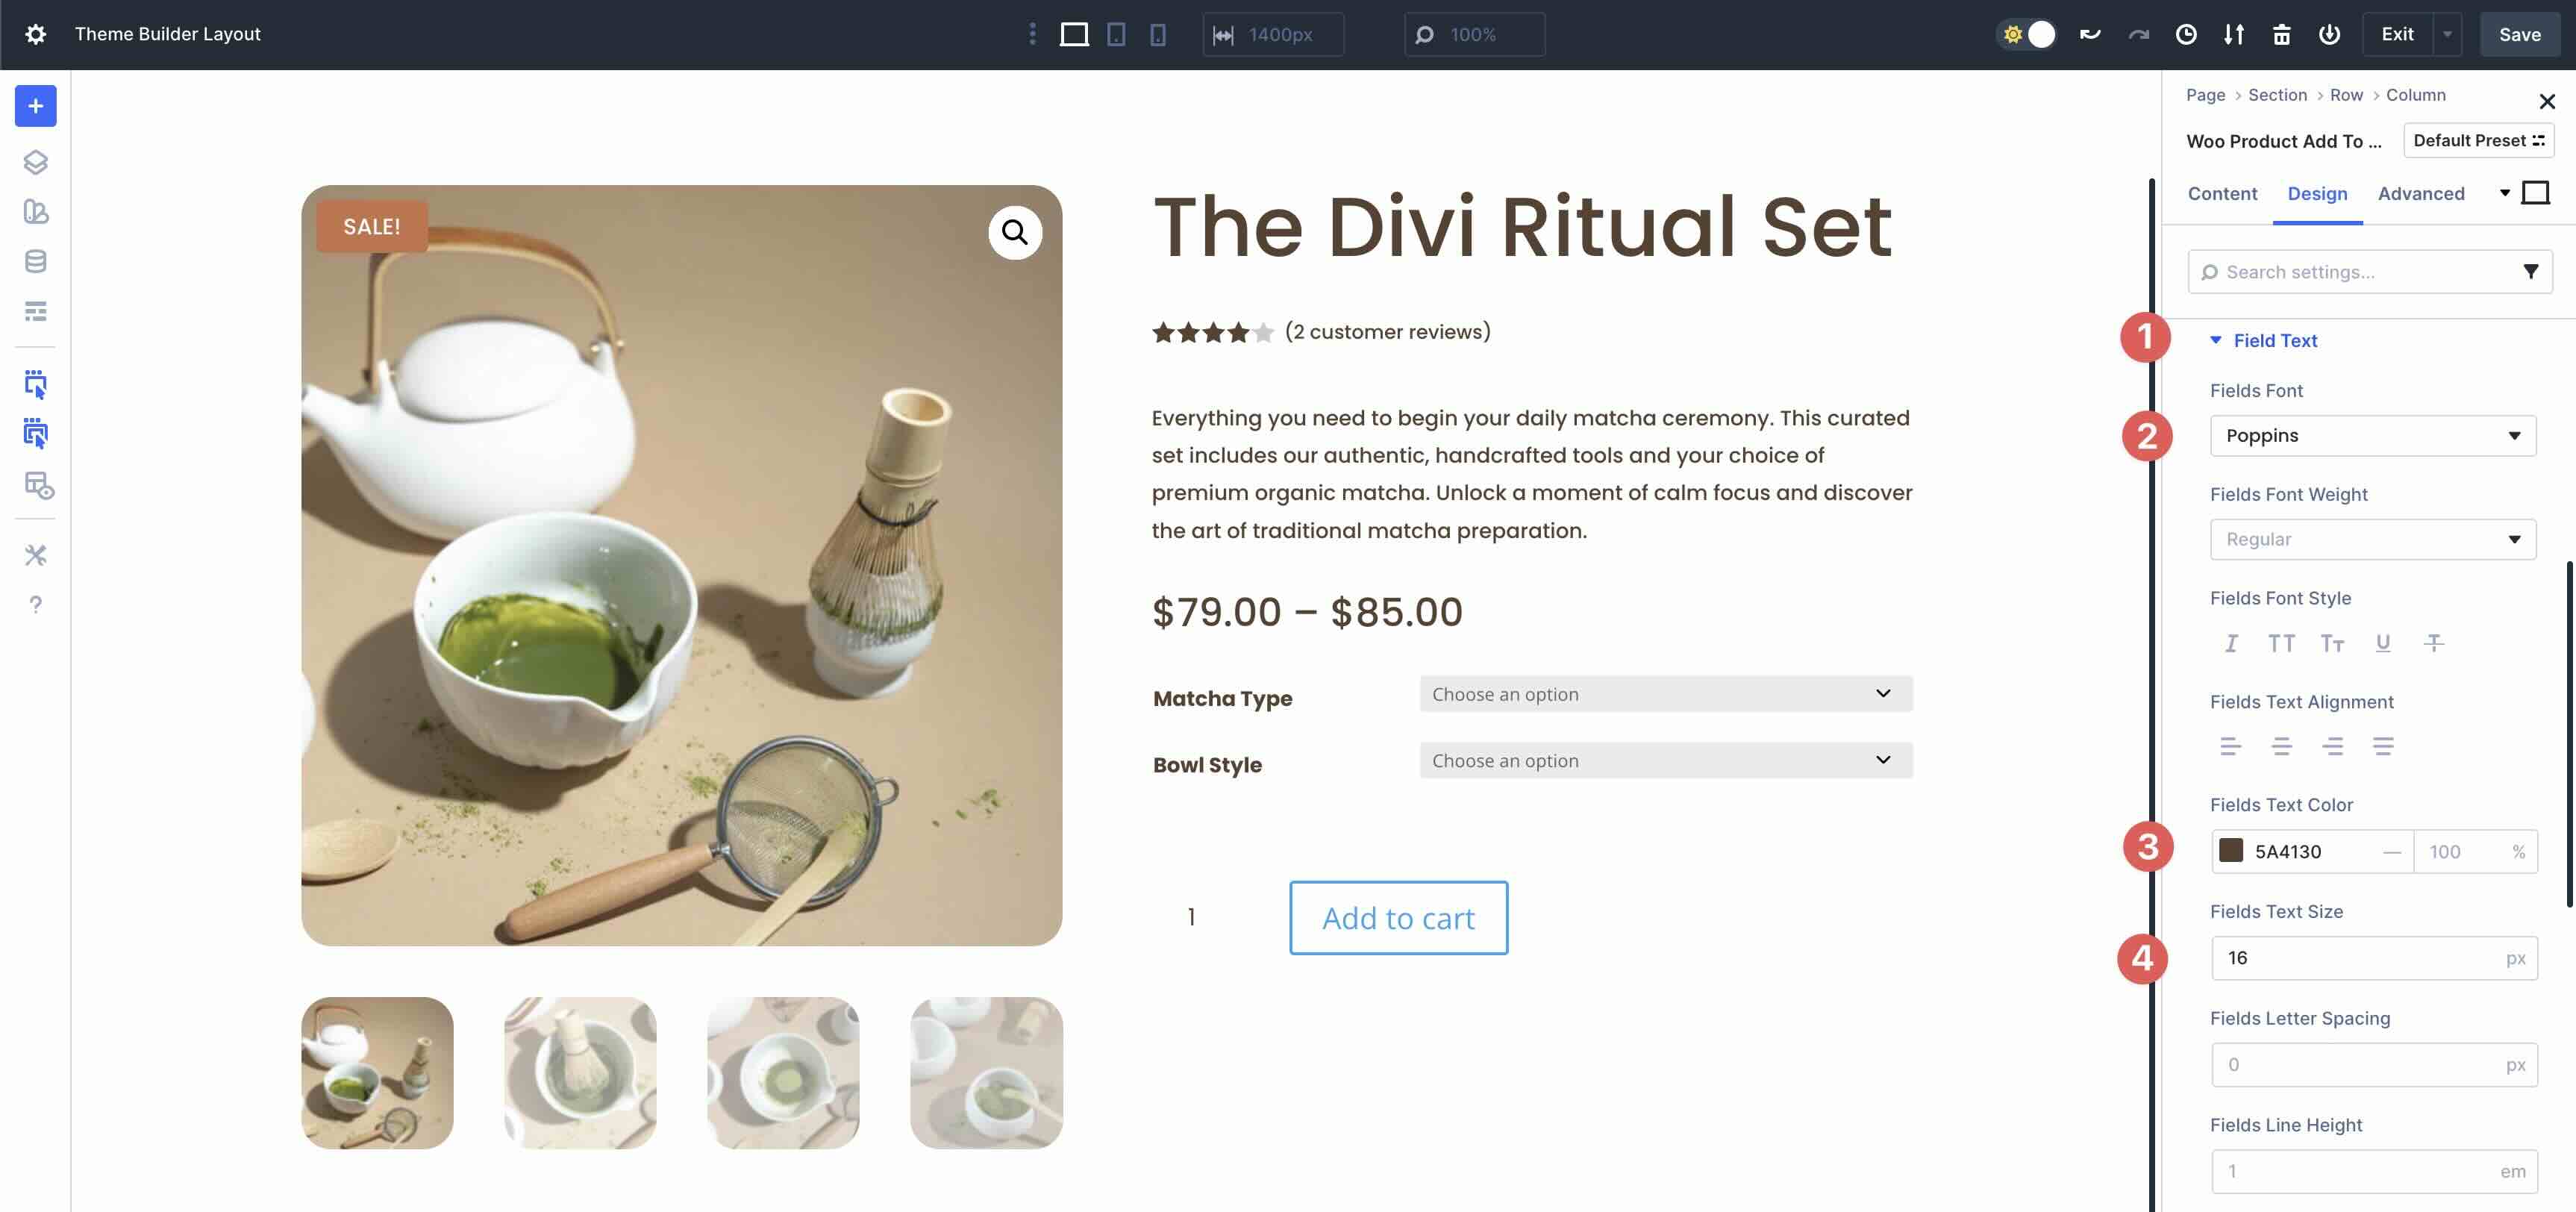
Make bigger the Fields Textual content menu. Input Poppins because the Box Font, #5A4130 because the Fields Textual content Colour, and 16px because the Fields Textual content Dimension.
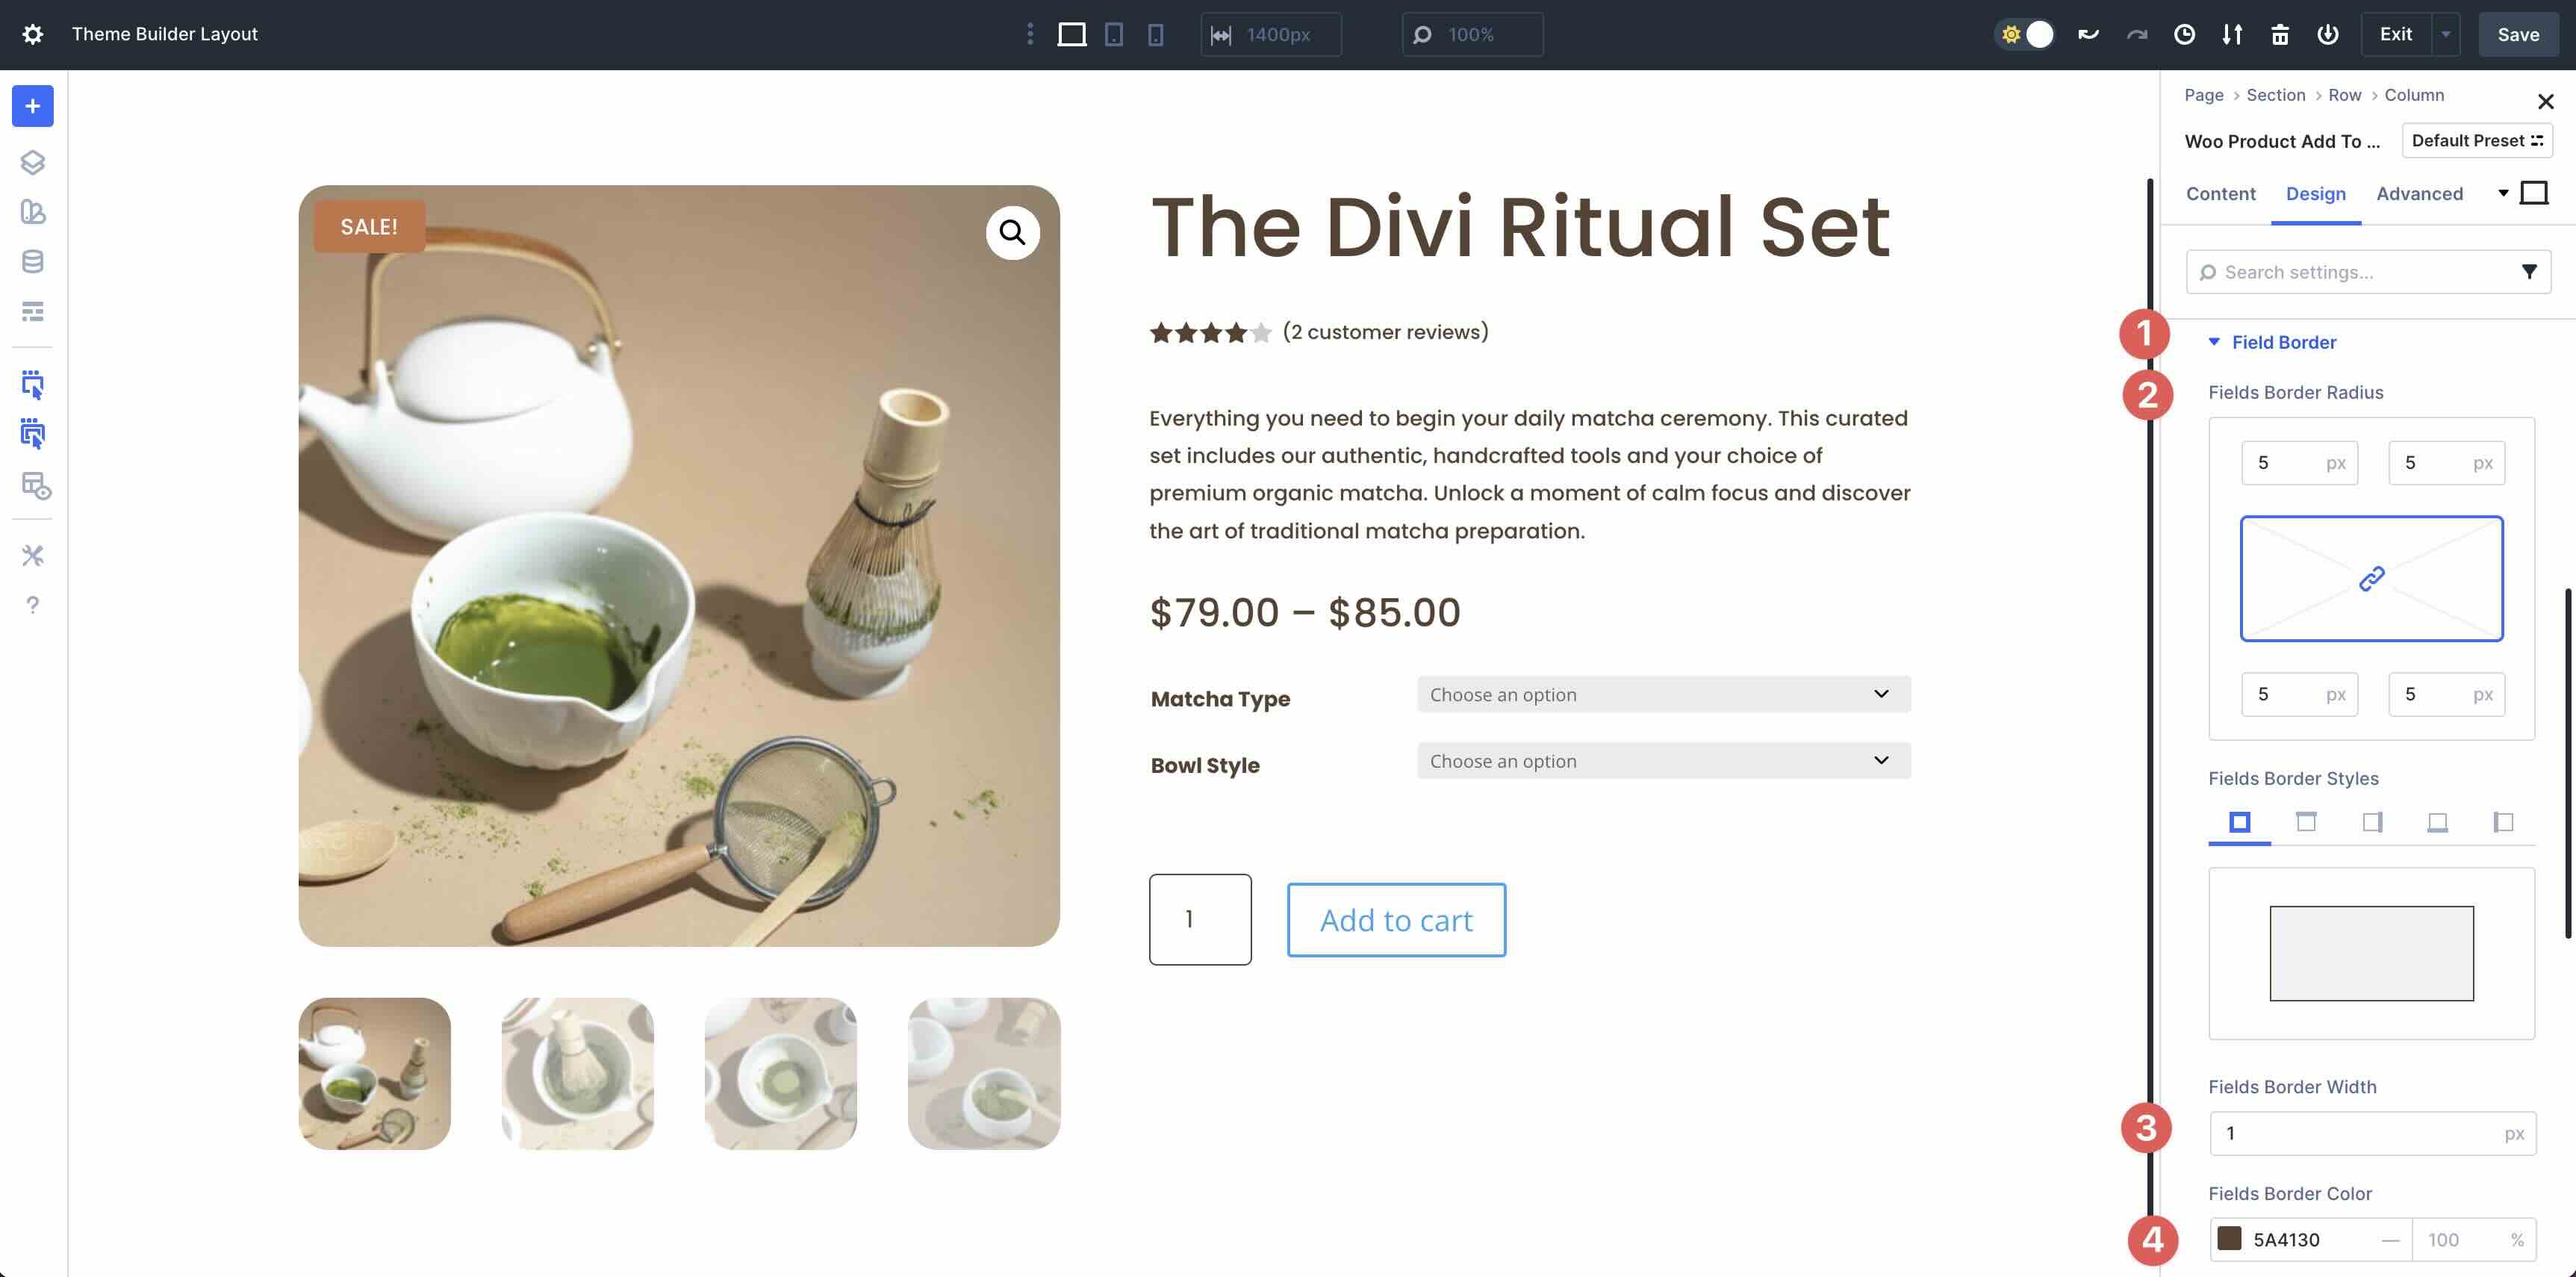
Subsequent, enlarge the Box Border menu. Within the Fields Border Radius settings, input 5px. Upload 1px Box Border Width and set the Fields Border Colour to #5A4130.
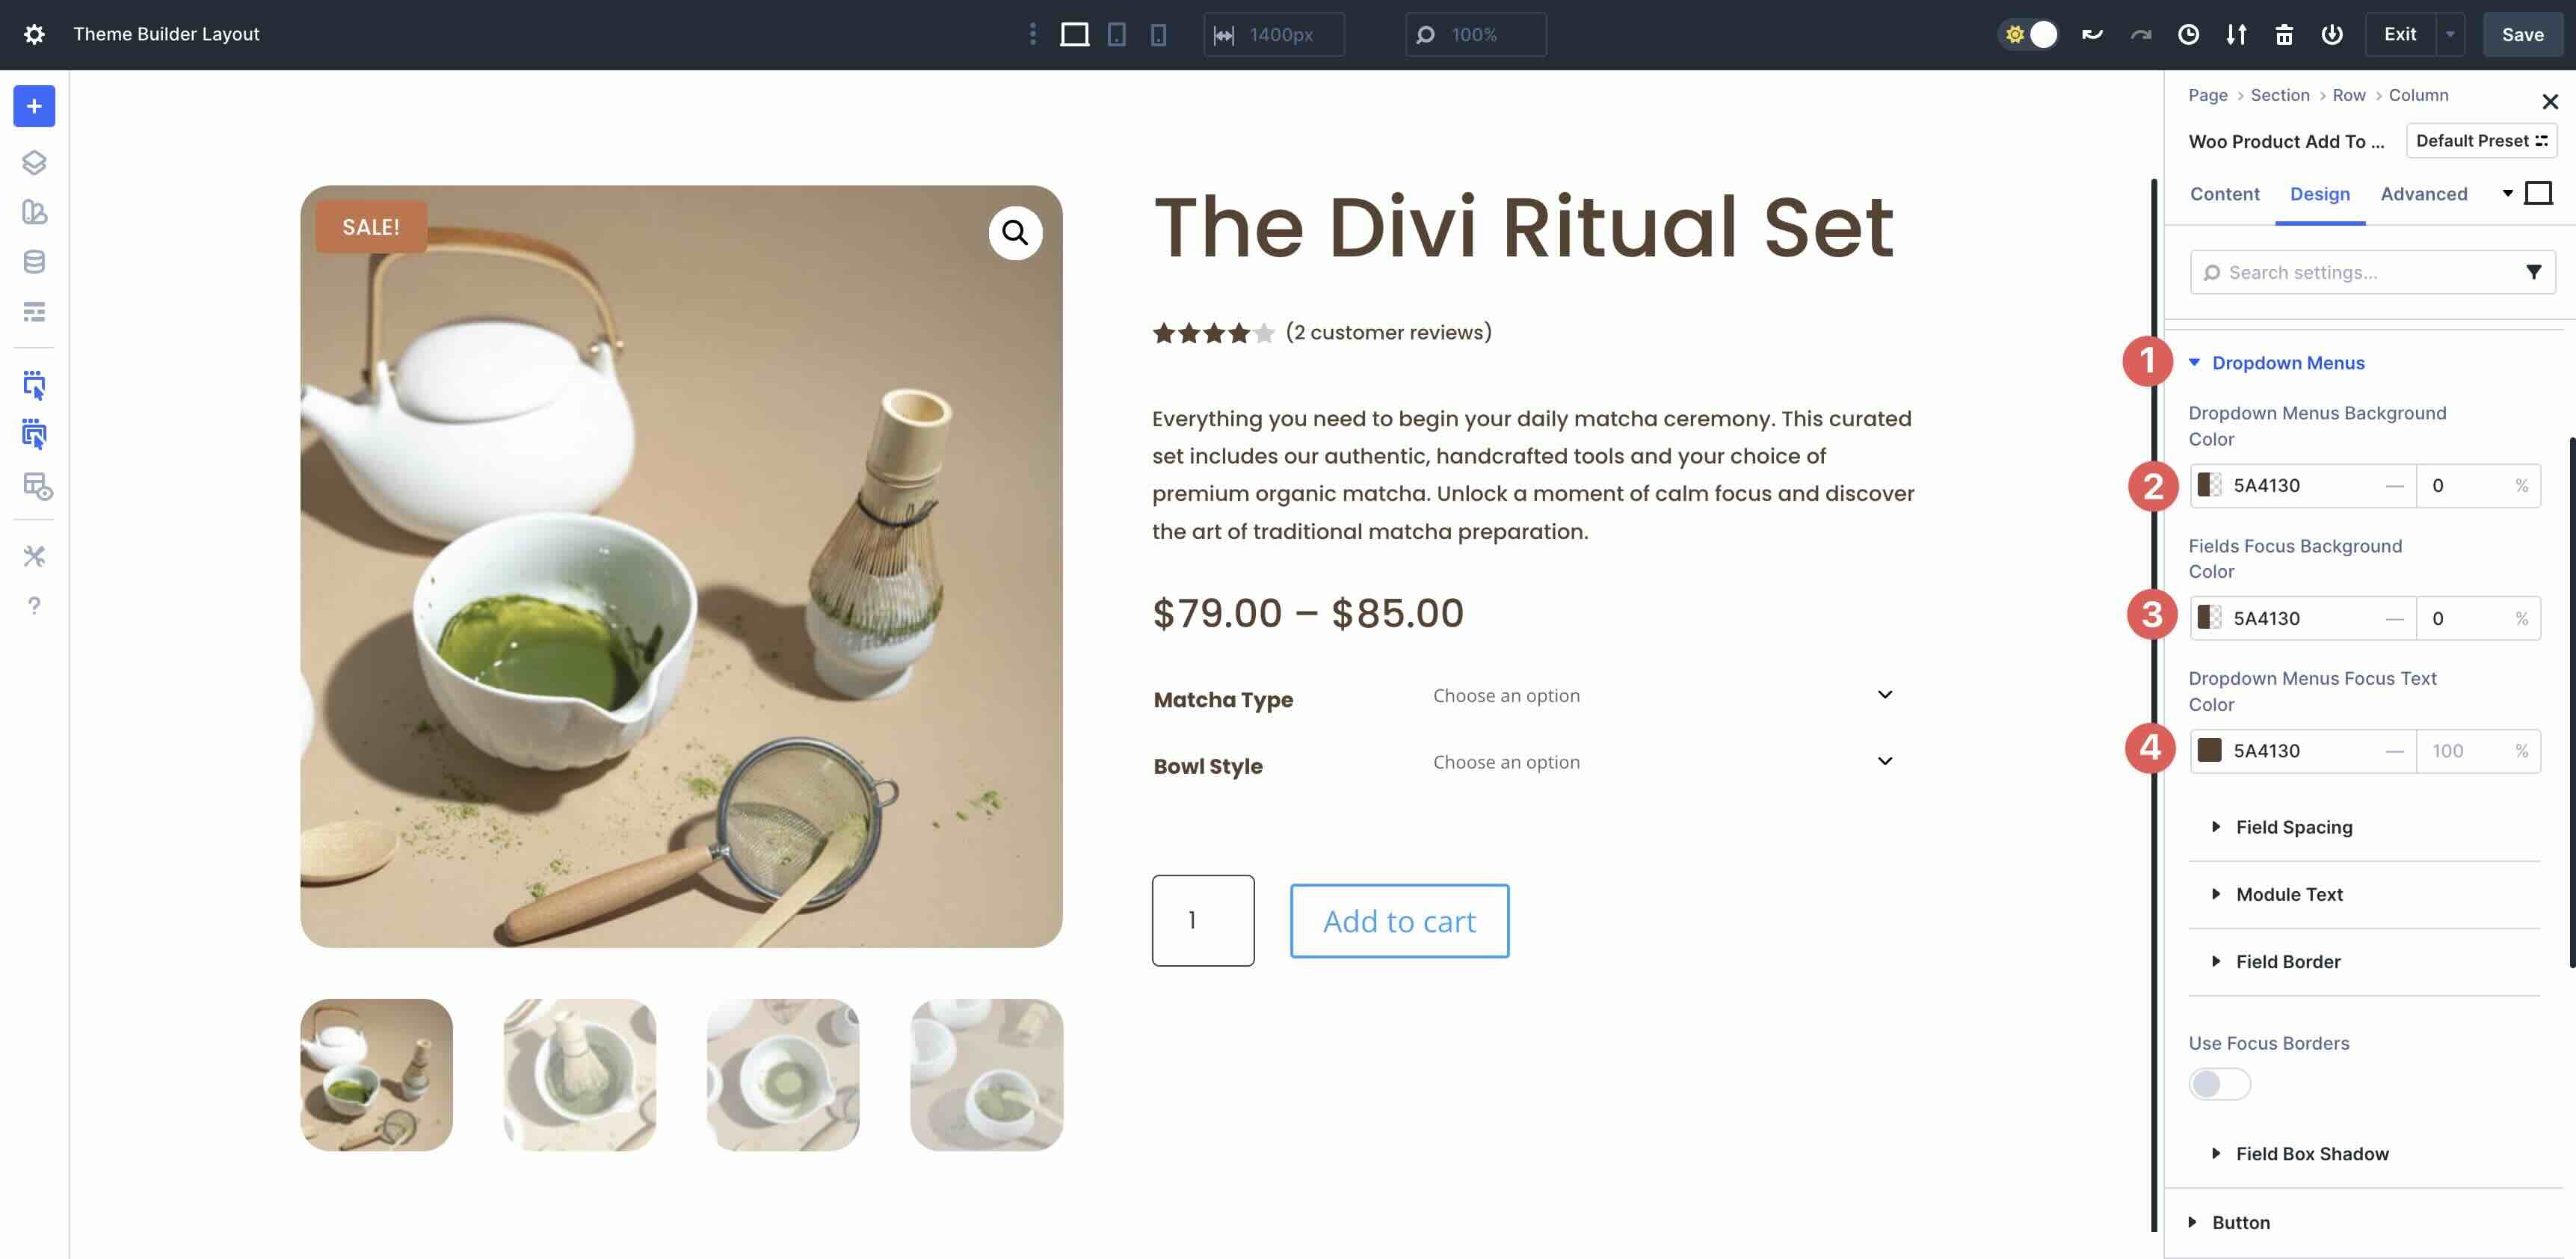
Within the Dropdown Menu settings, set the Dropdown Menus Background Colour and Fields Focal point Background Colour to #5A4130 with an Opacity of 0. Set the Dropdown Menus Focal point Textual content Colour to #5A4130.
Subsequent, enlarge the Box Spacing settings. Set the Dropdown Menu Margin to 5px on each side.
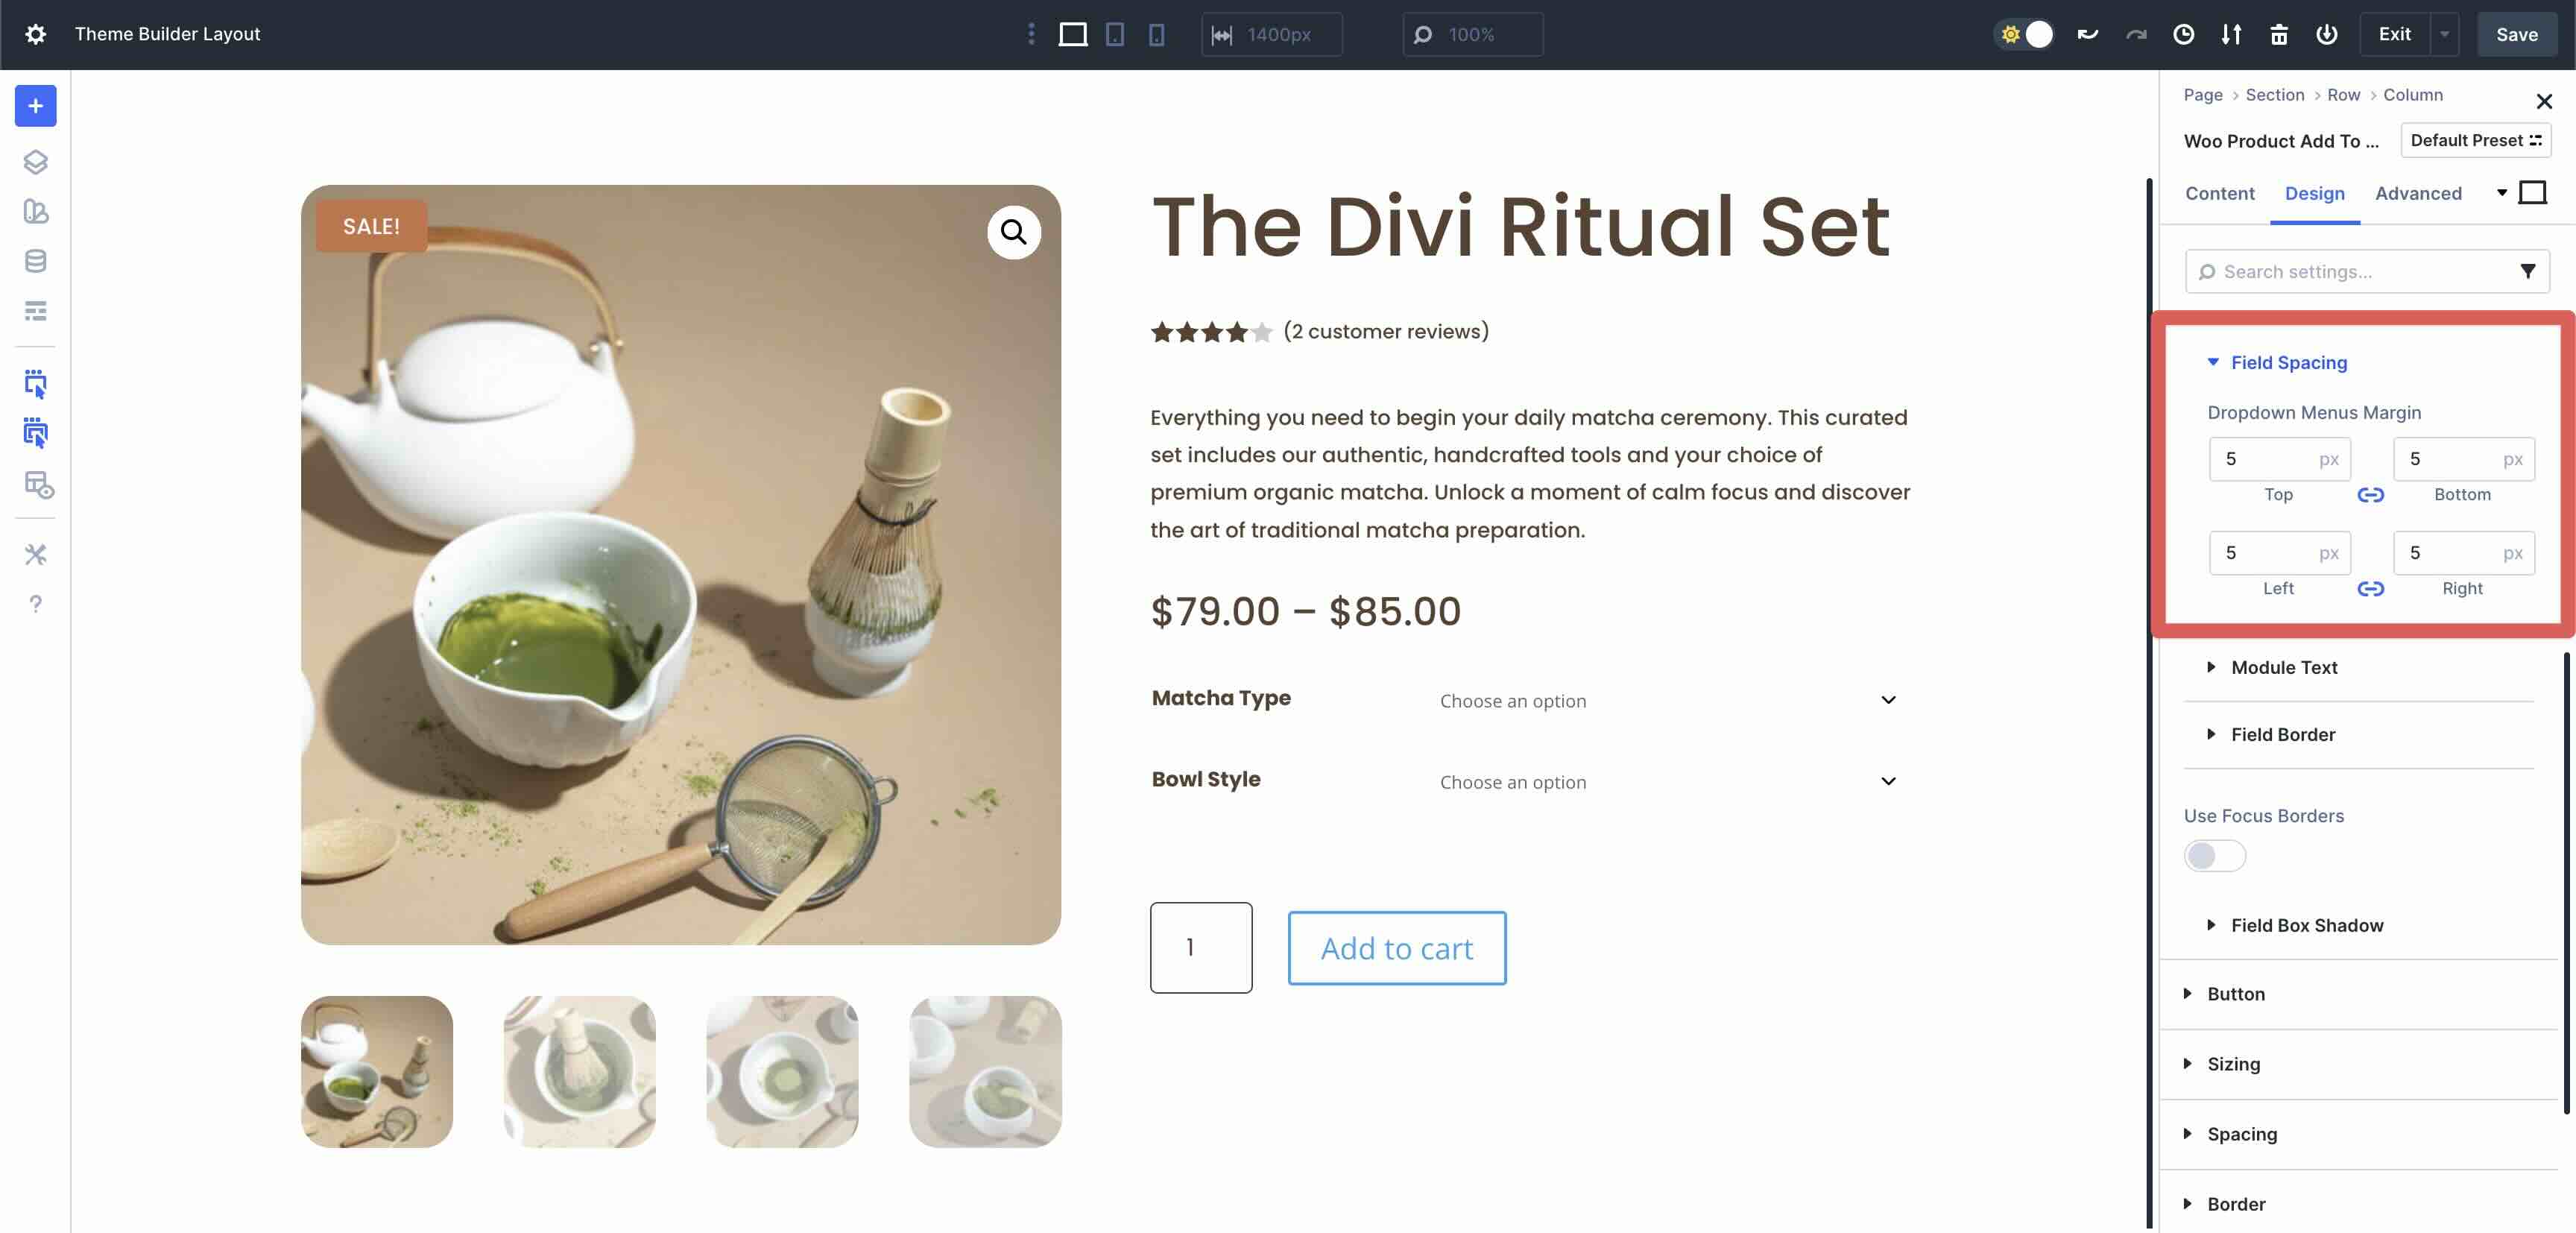
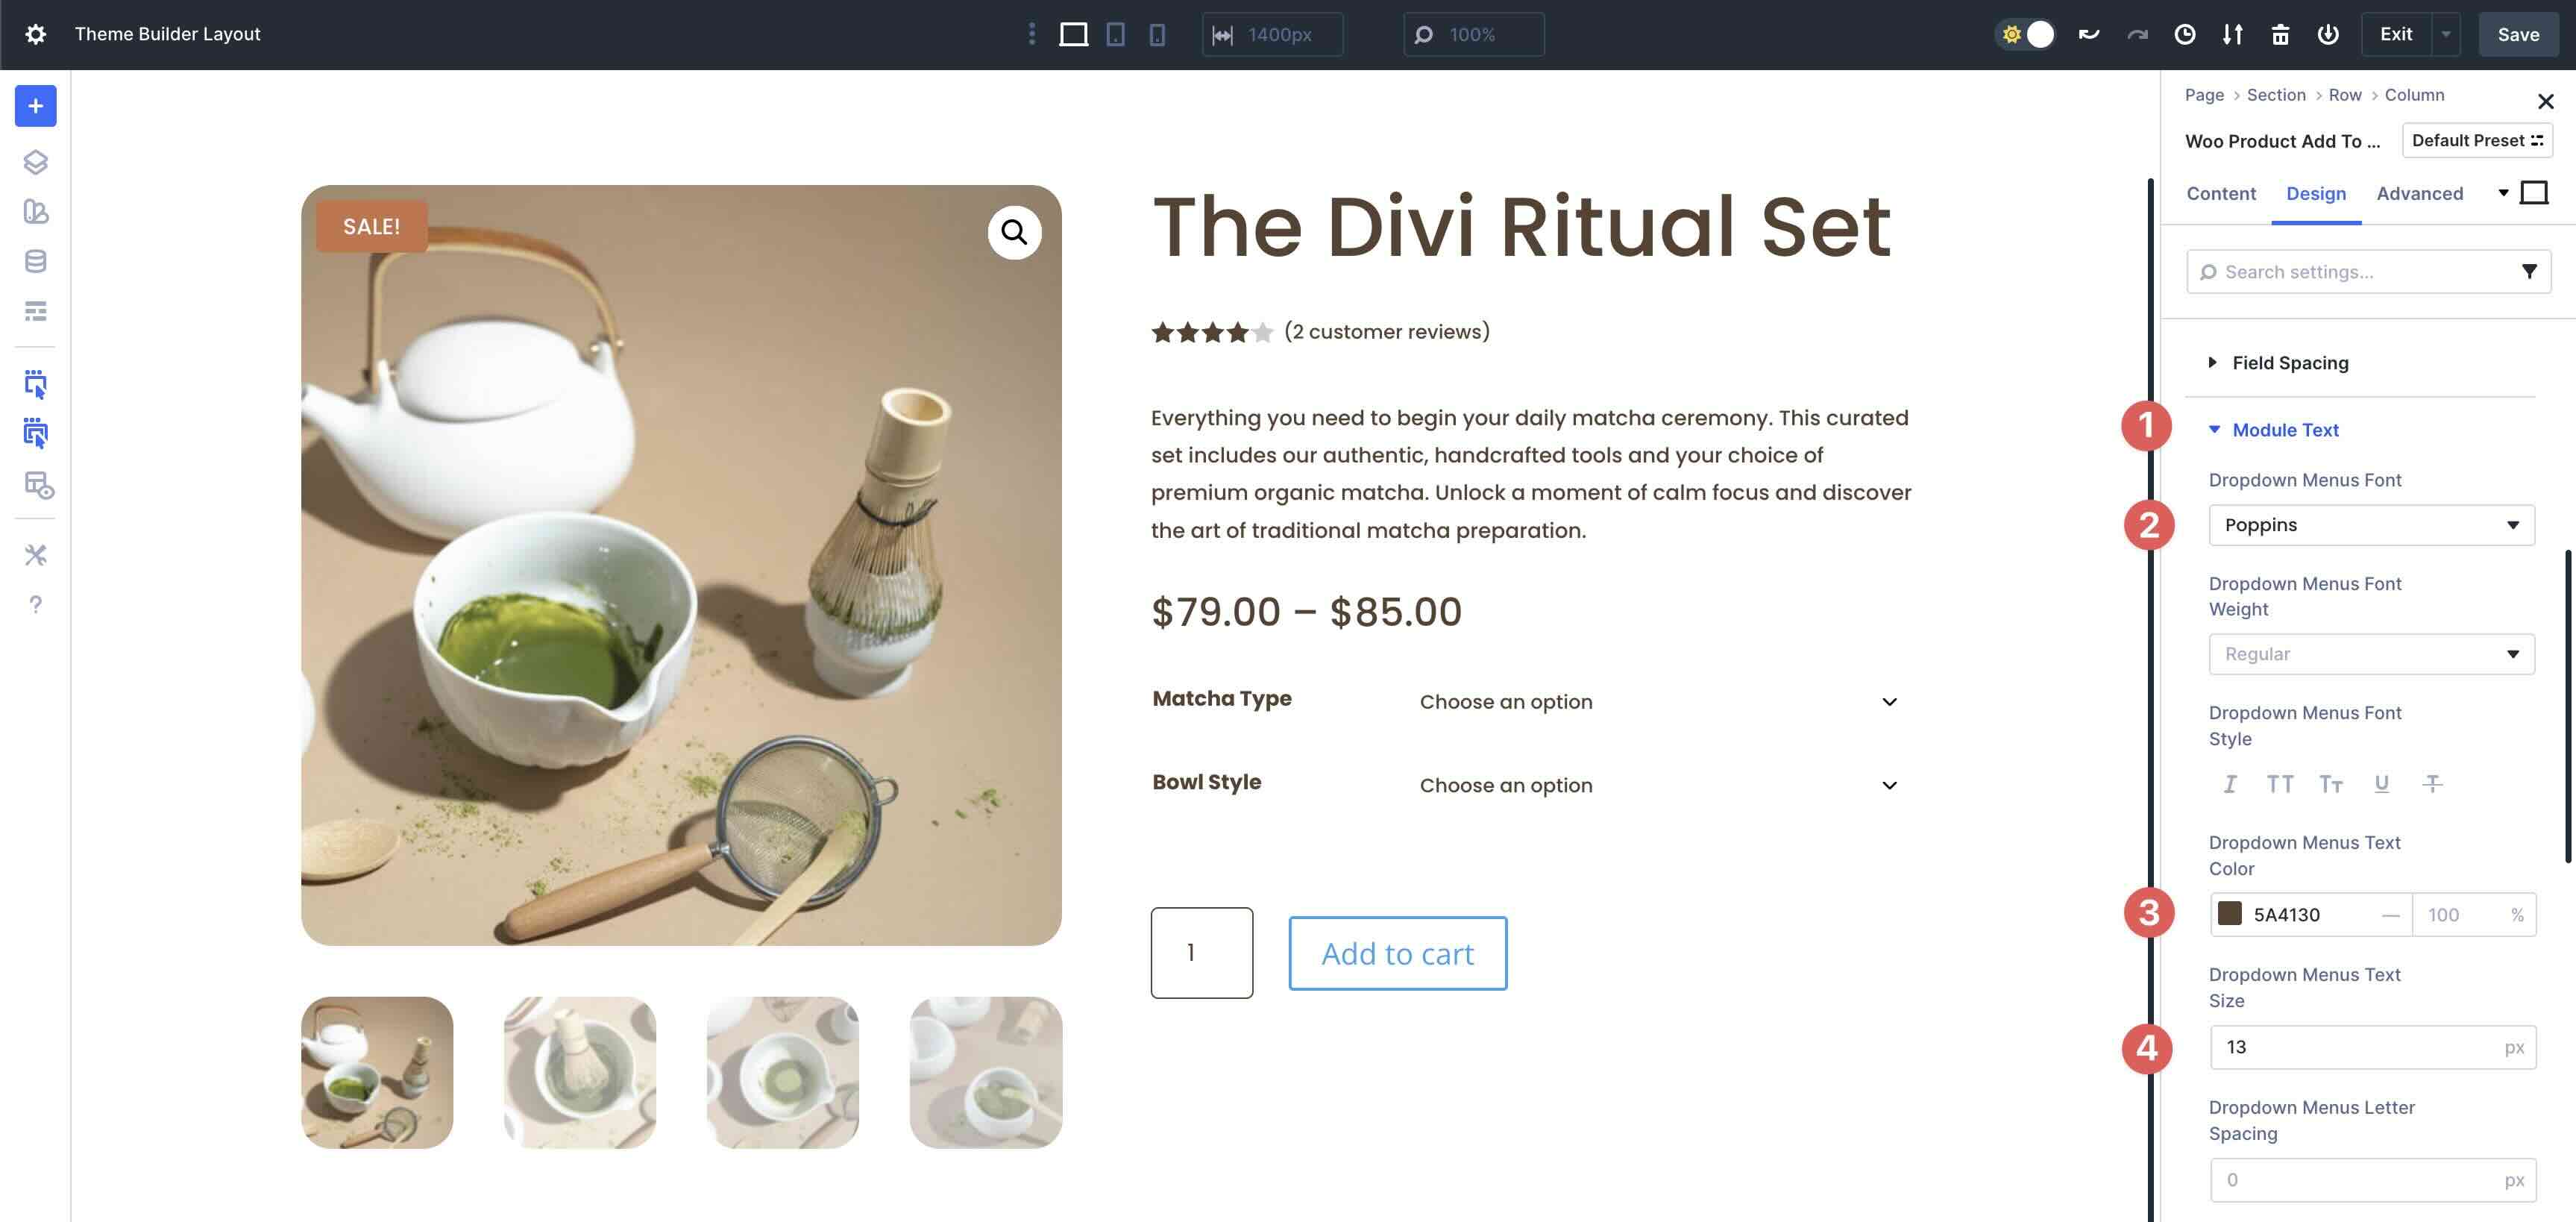
Within the Module Textual content dropdown menu, input Poppins because the Dropdown Menu Font, #5A4130 because the Dropdown Menu Textual content Colour, and 13px because the Dropdown Menu Textual content Dimension.
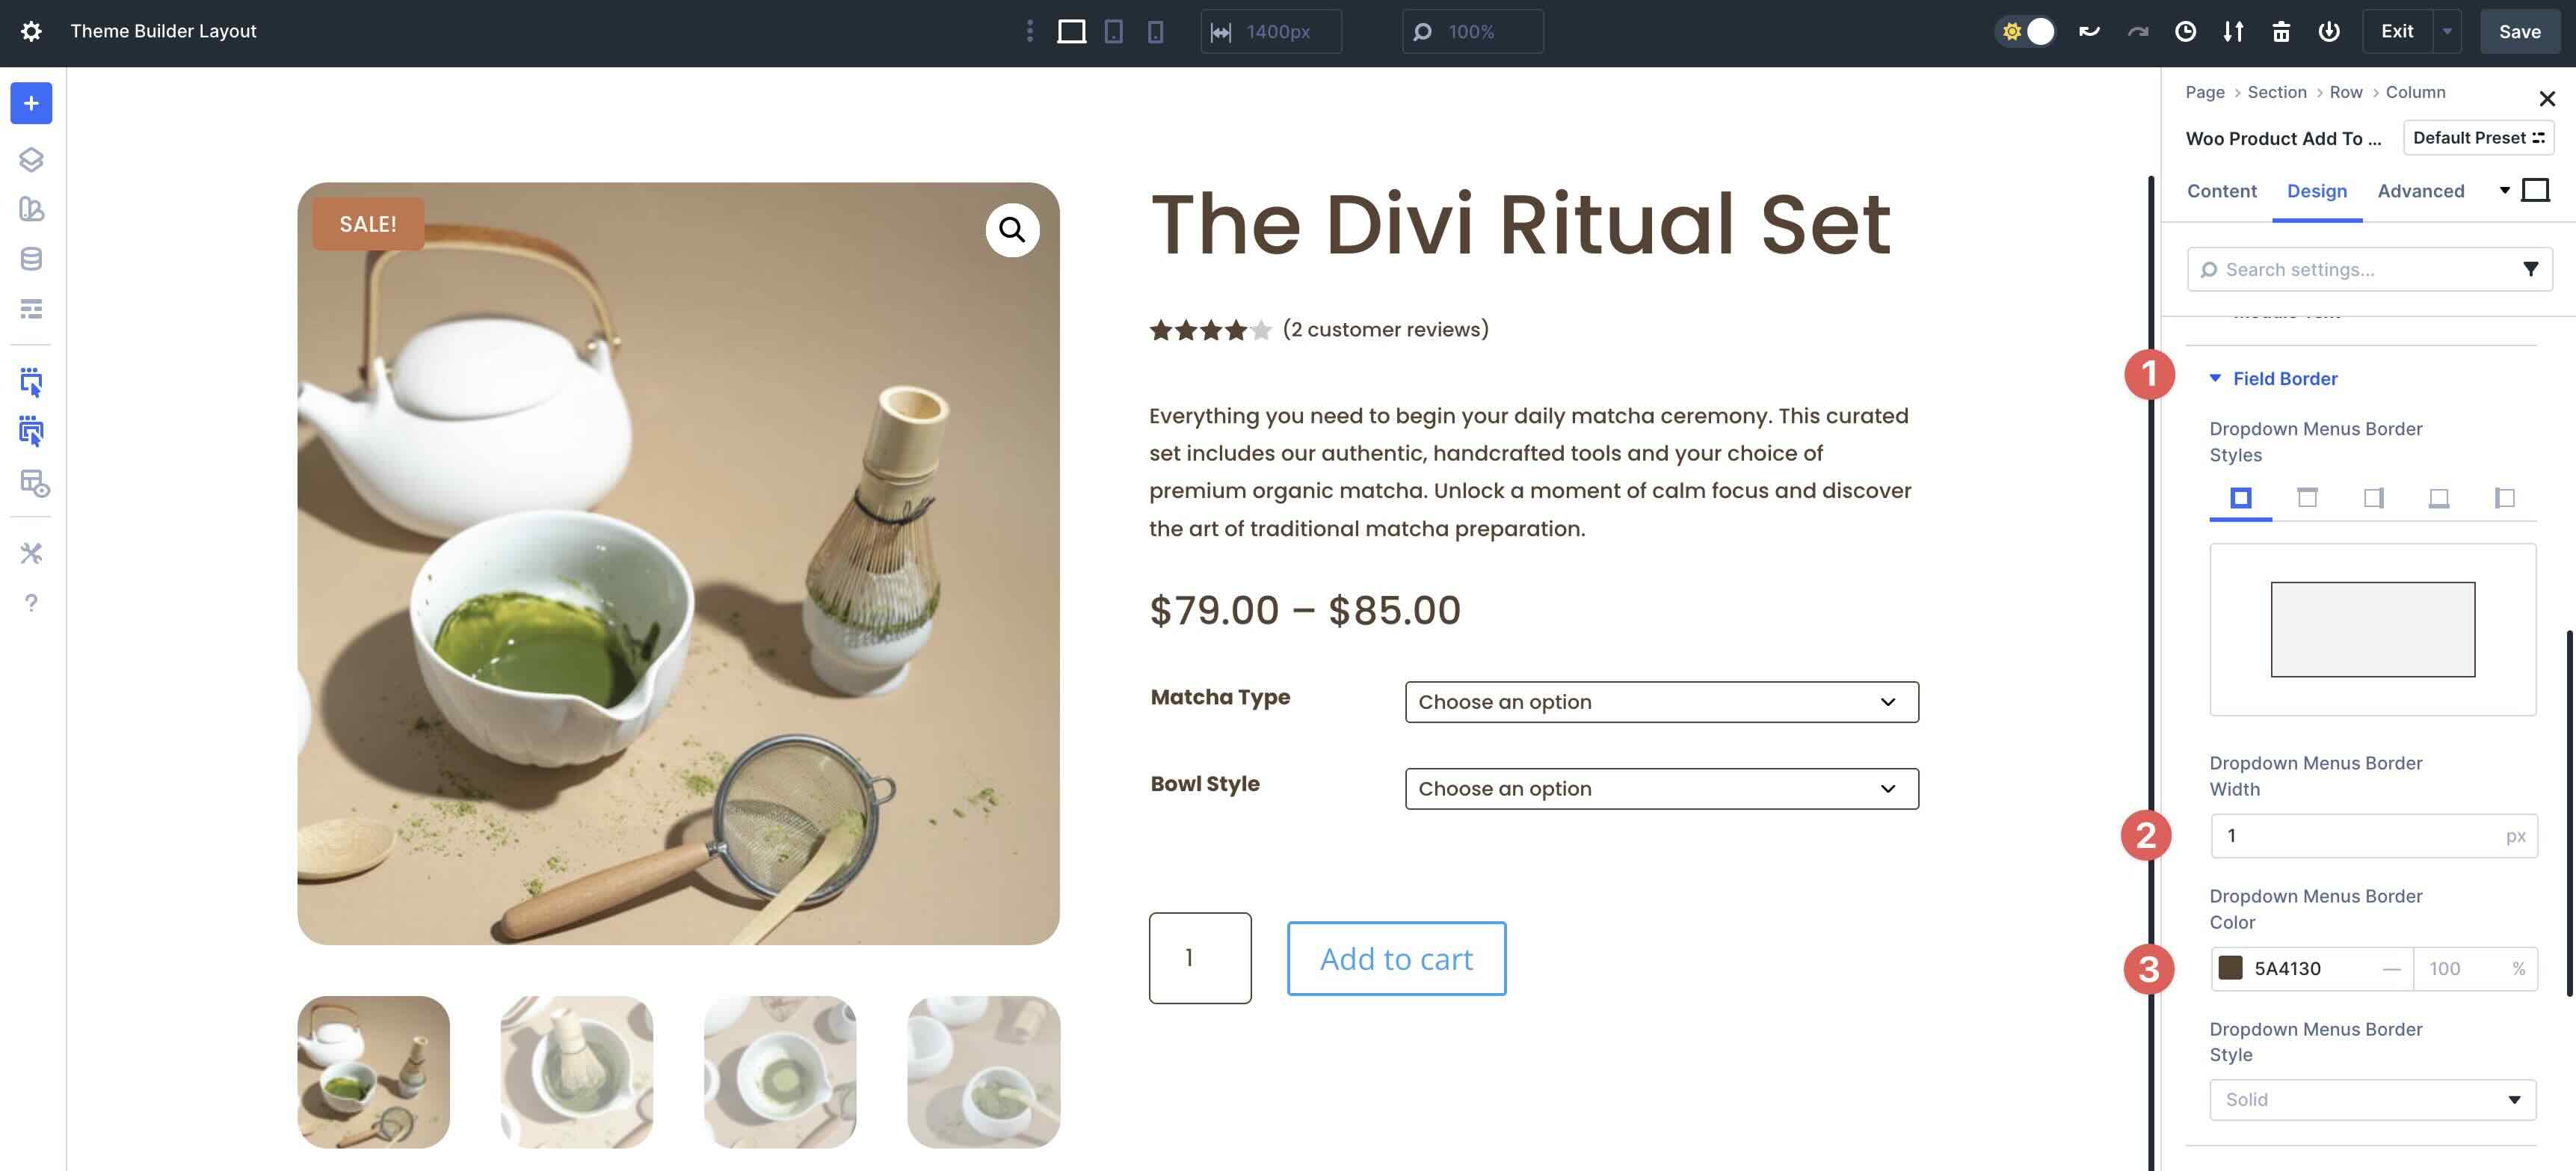
Subsequent, enlarge the Box Border menu. Upload 1px Dropdown Menus Border Width and set the Dropdown Menus Border Colour to #5A4130.
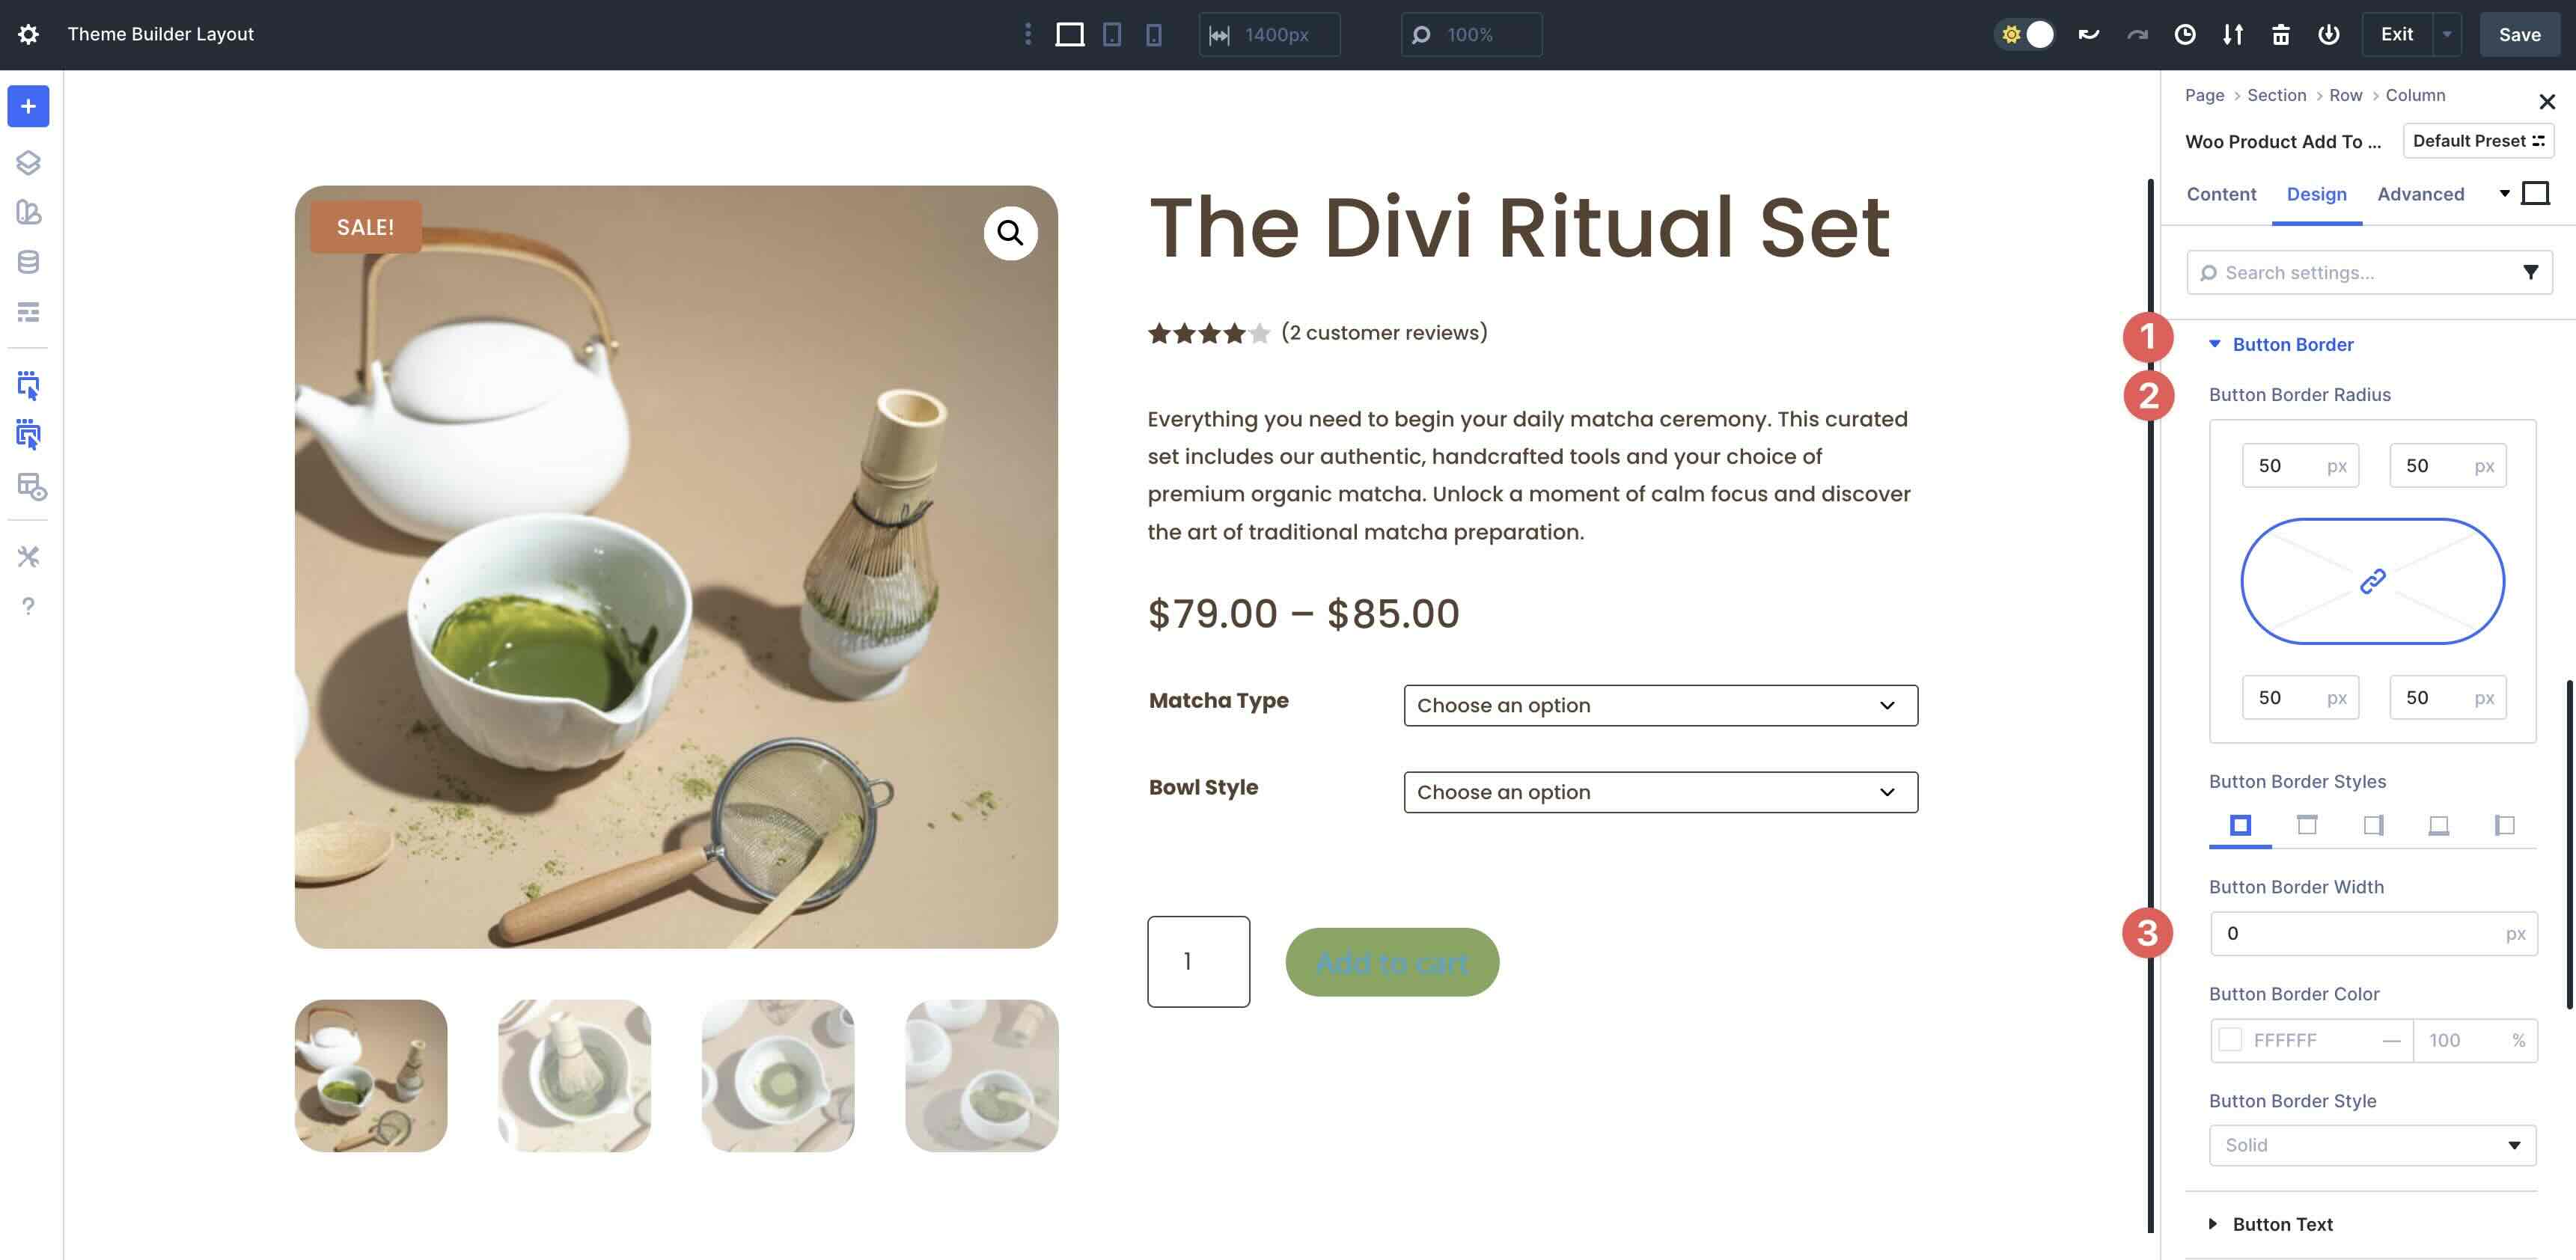
Taste The Button
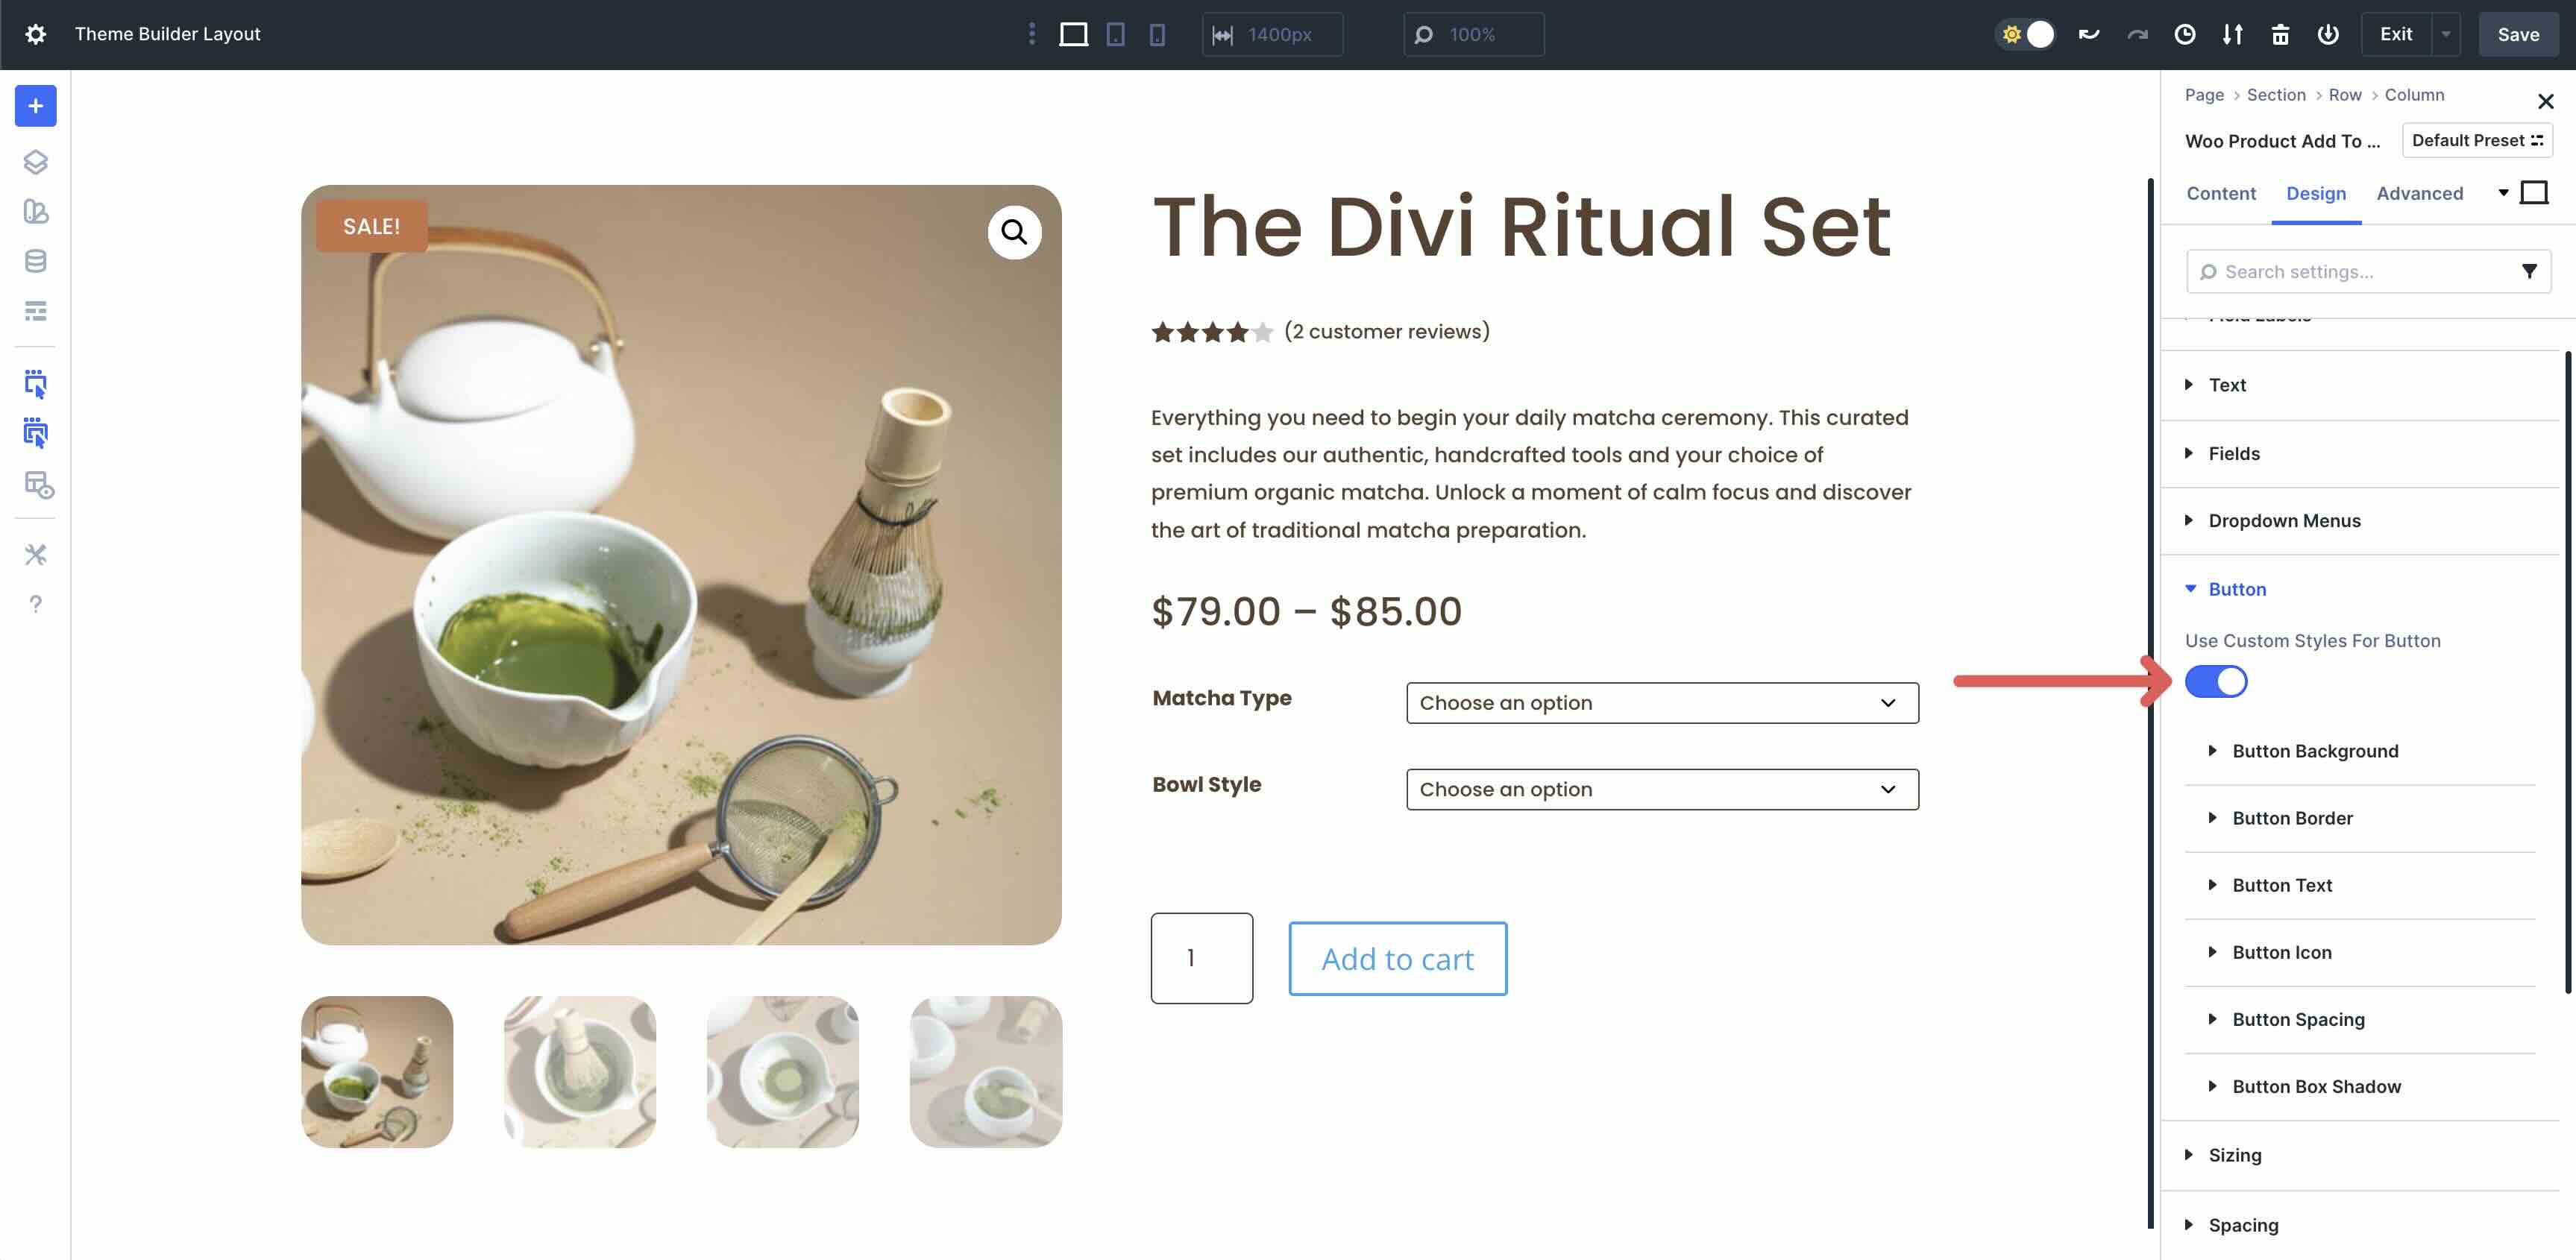
The ultimate step on this module is to taste the Button. Make bigger the Button menu and toggle Use Customized Kinds For Button on.
Make bigger the Button Background settings and assign #83A65B because the Button Background Colour.
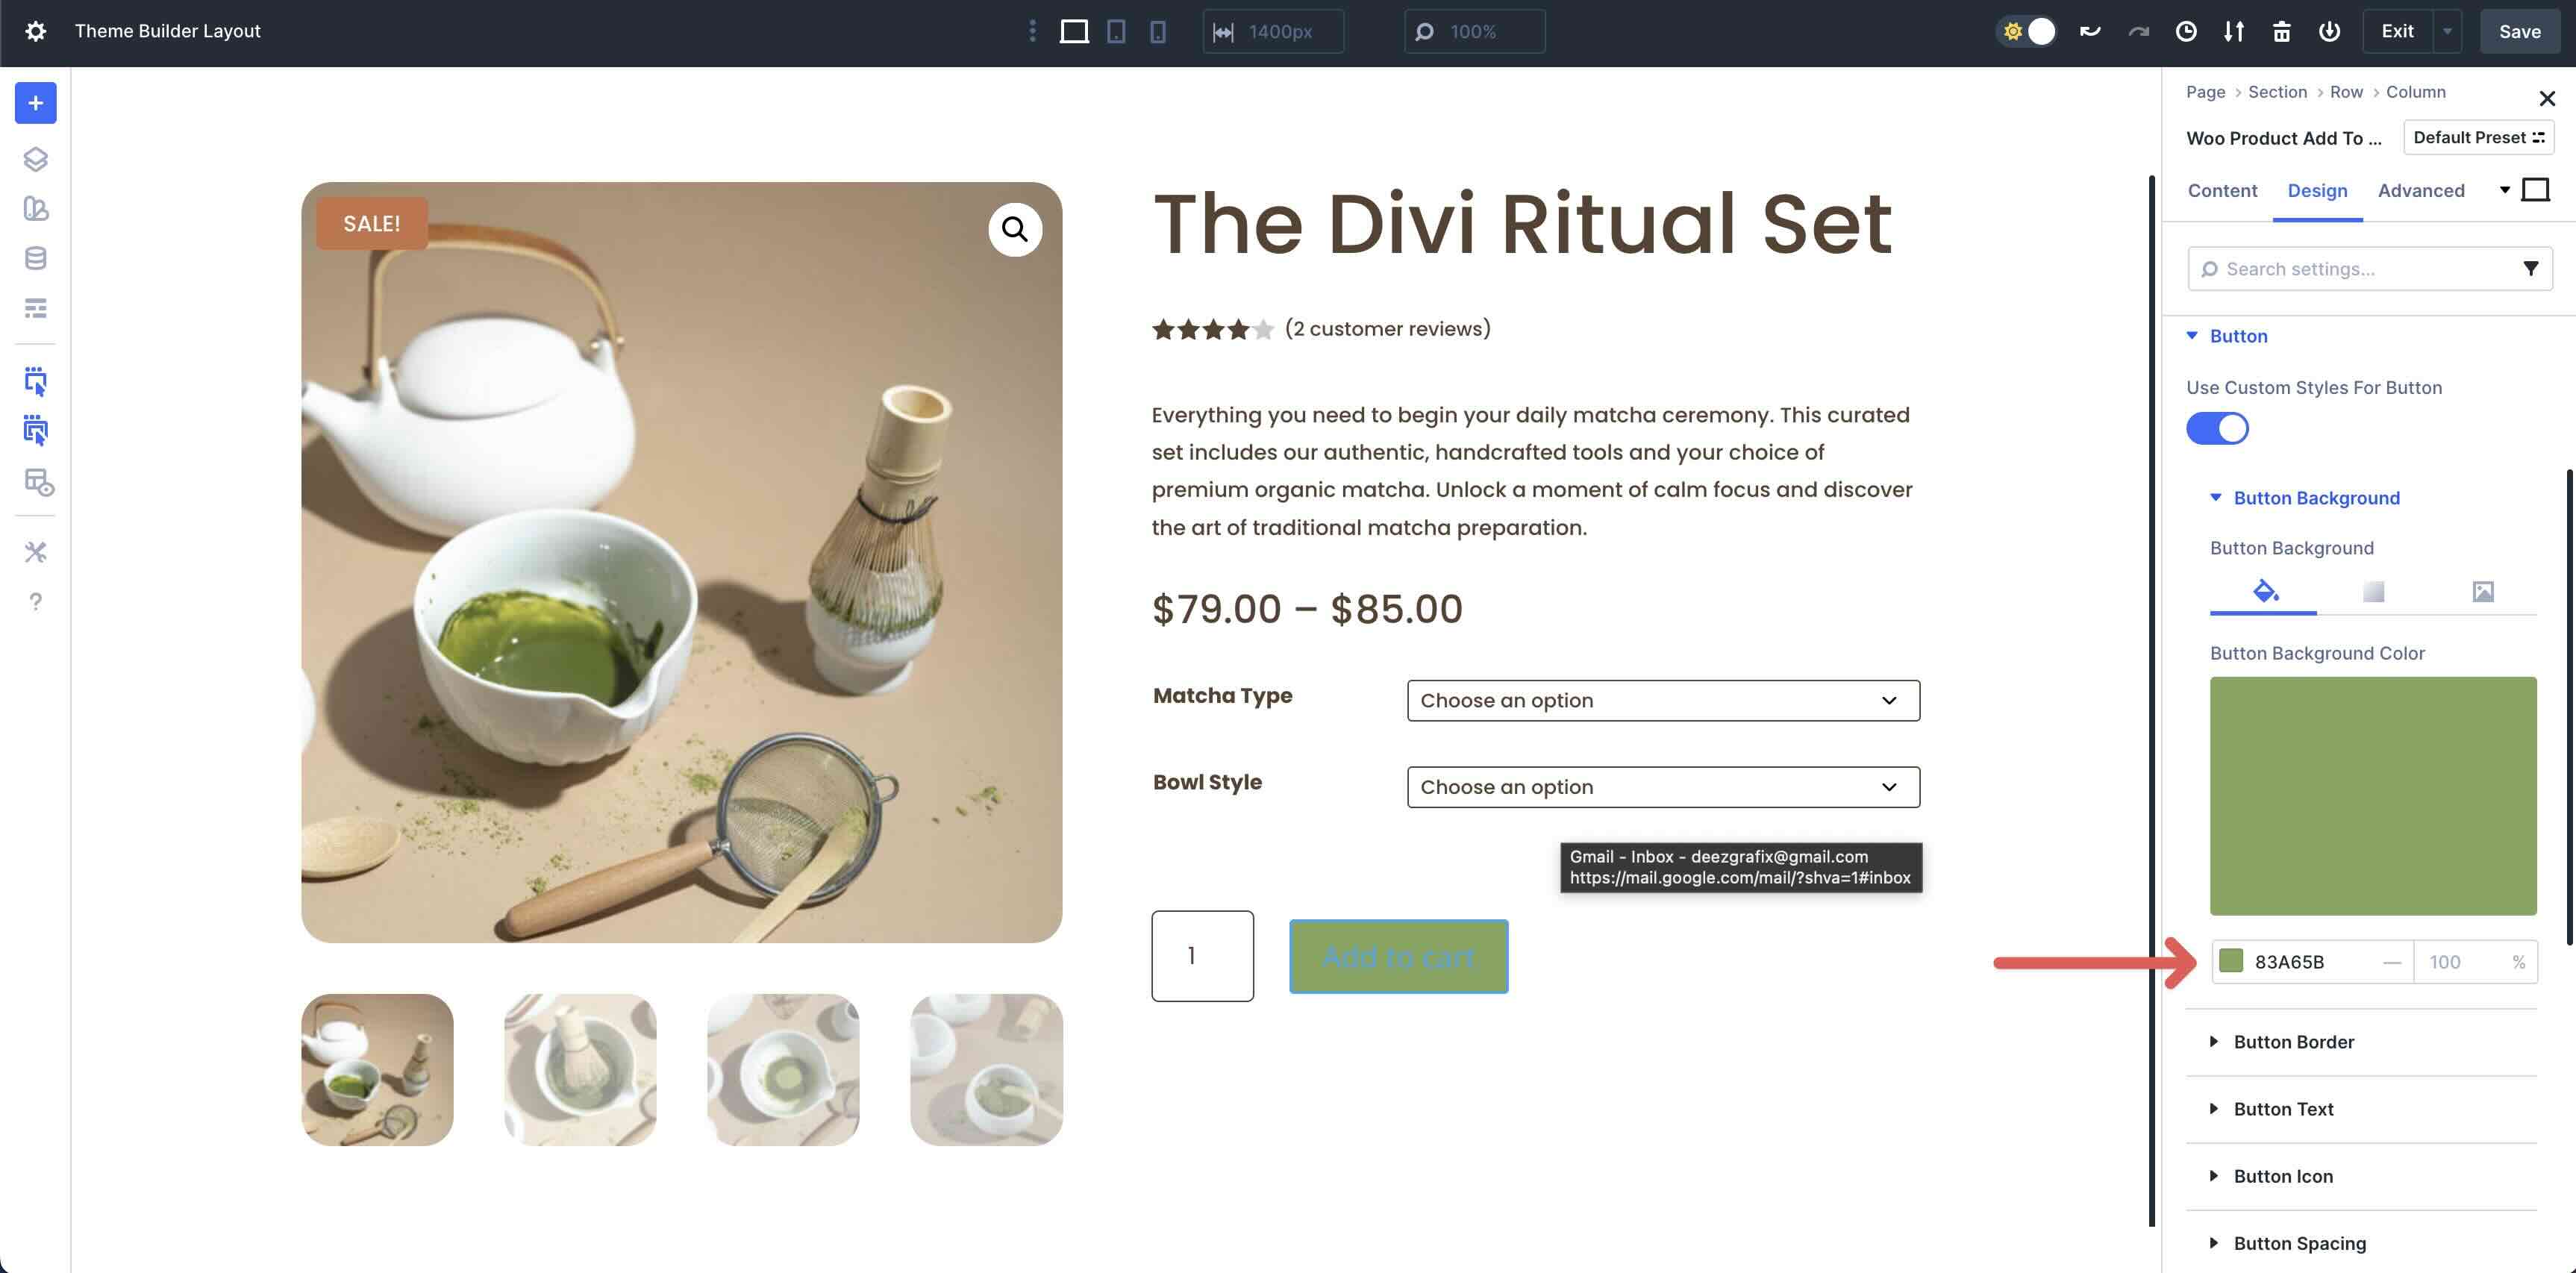
Within the Button Border menu, upload 50px Button Border Radius.
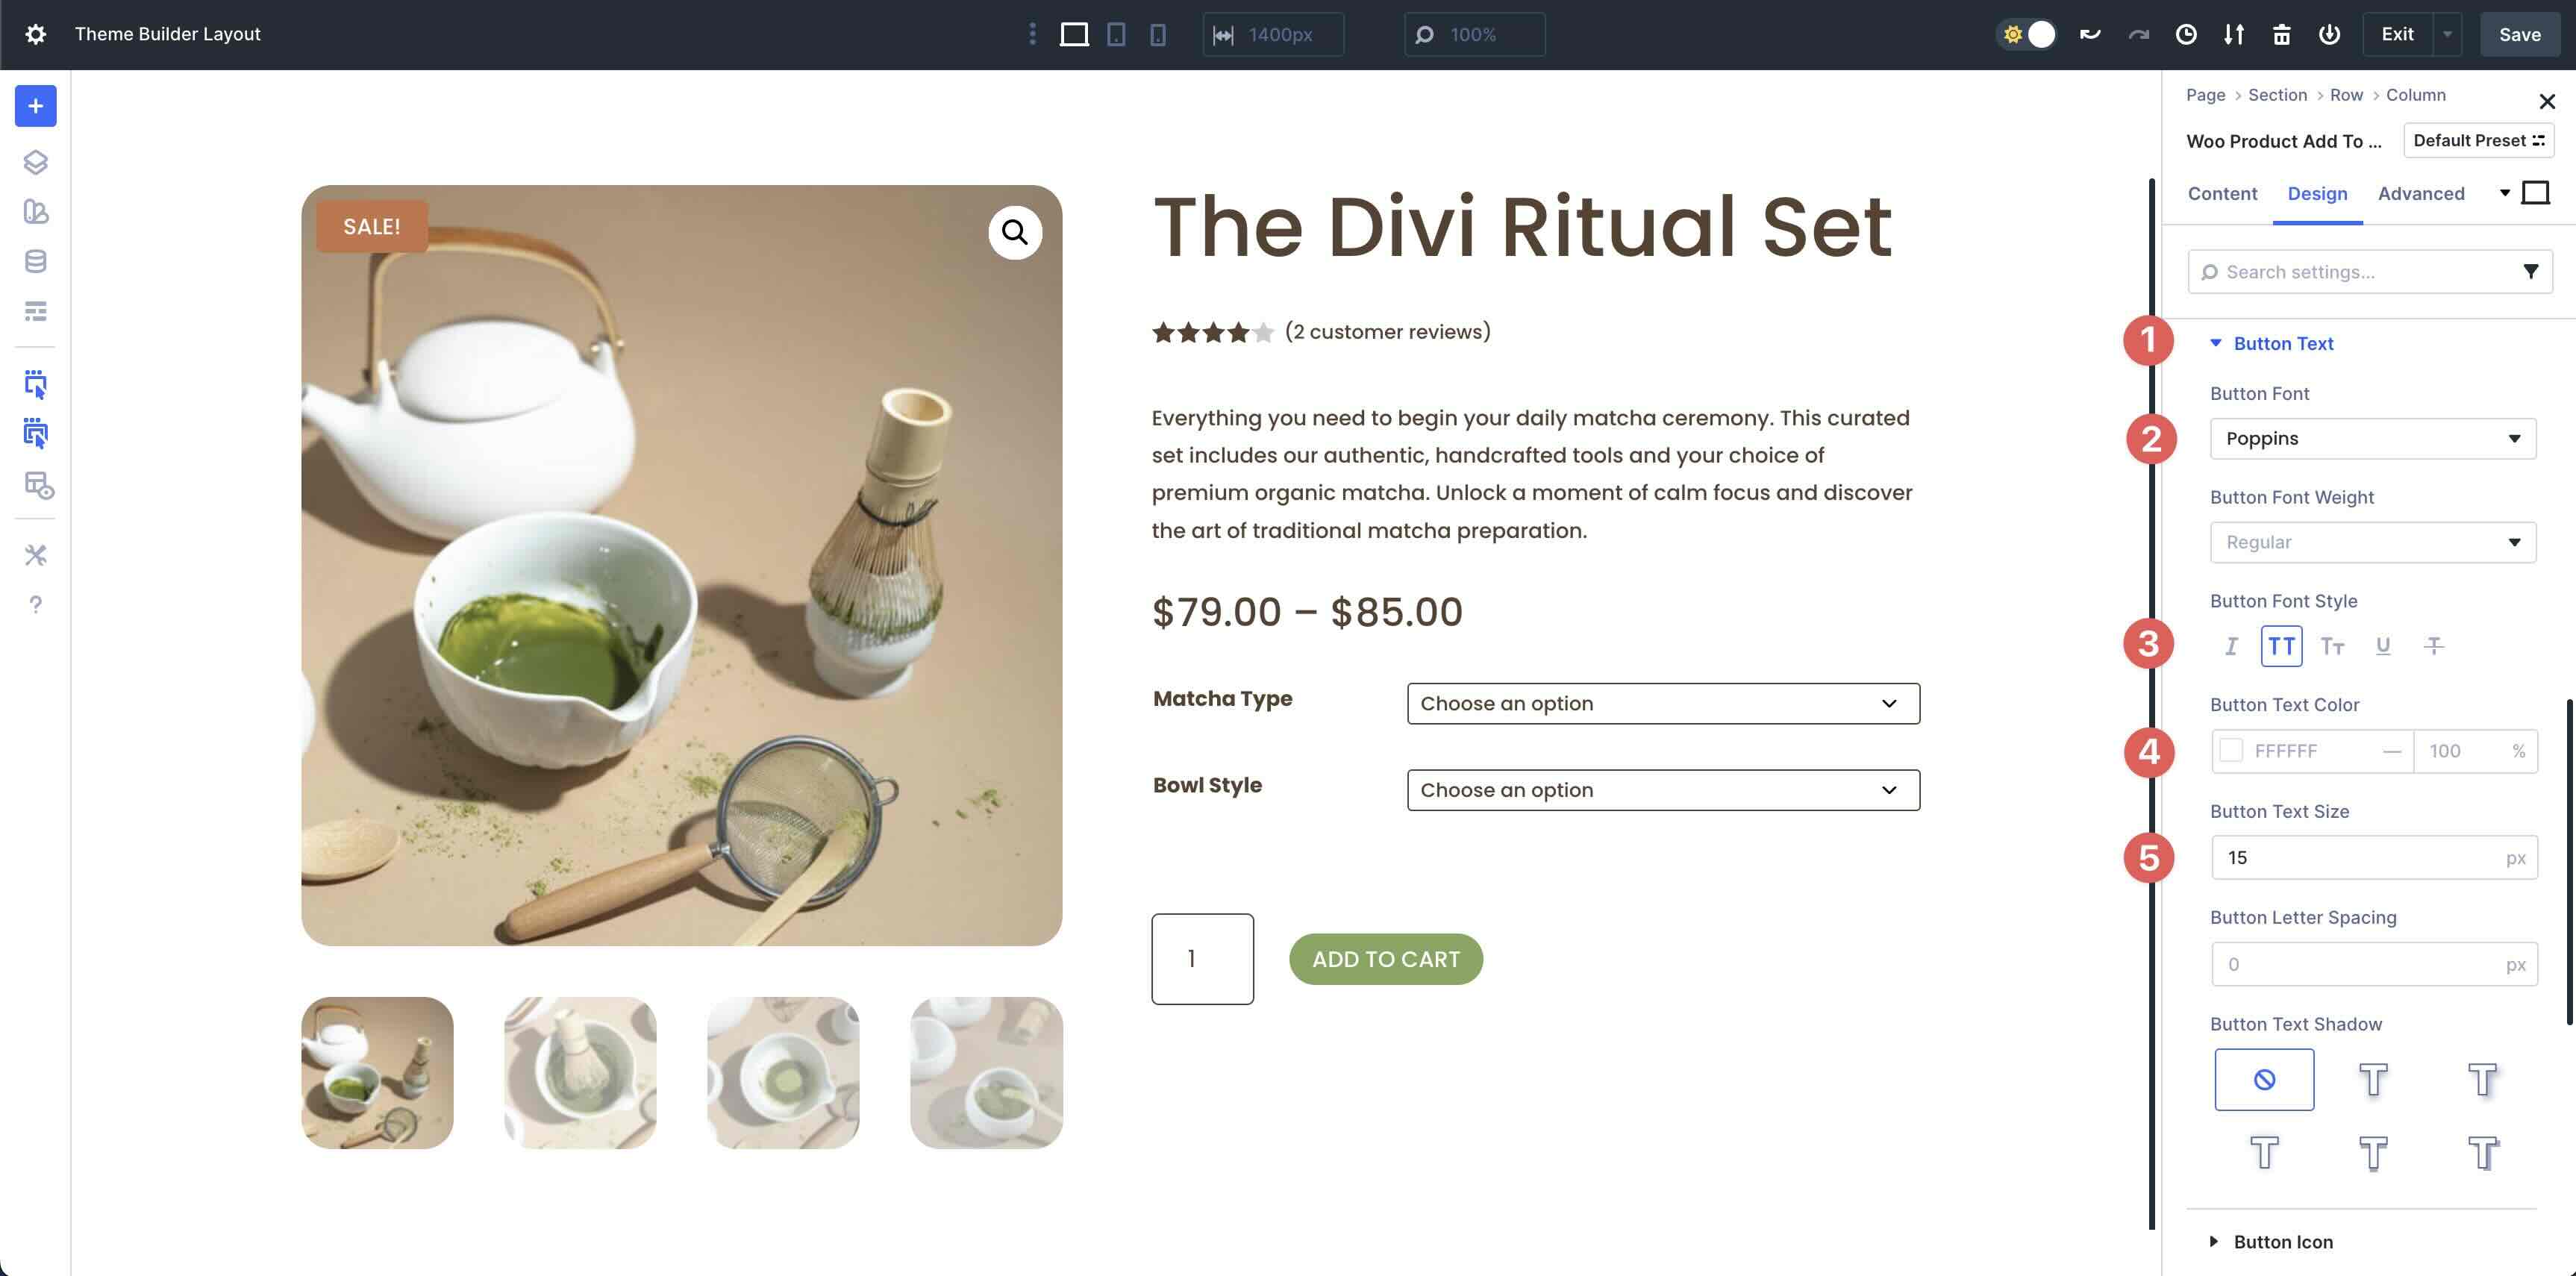
Within the Button Textual content menu, use Poppins because the Button Font, Uppercase within the Button Font Taste, and 15px for the Button Textual content Dimension.
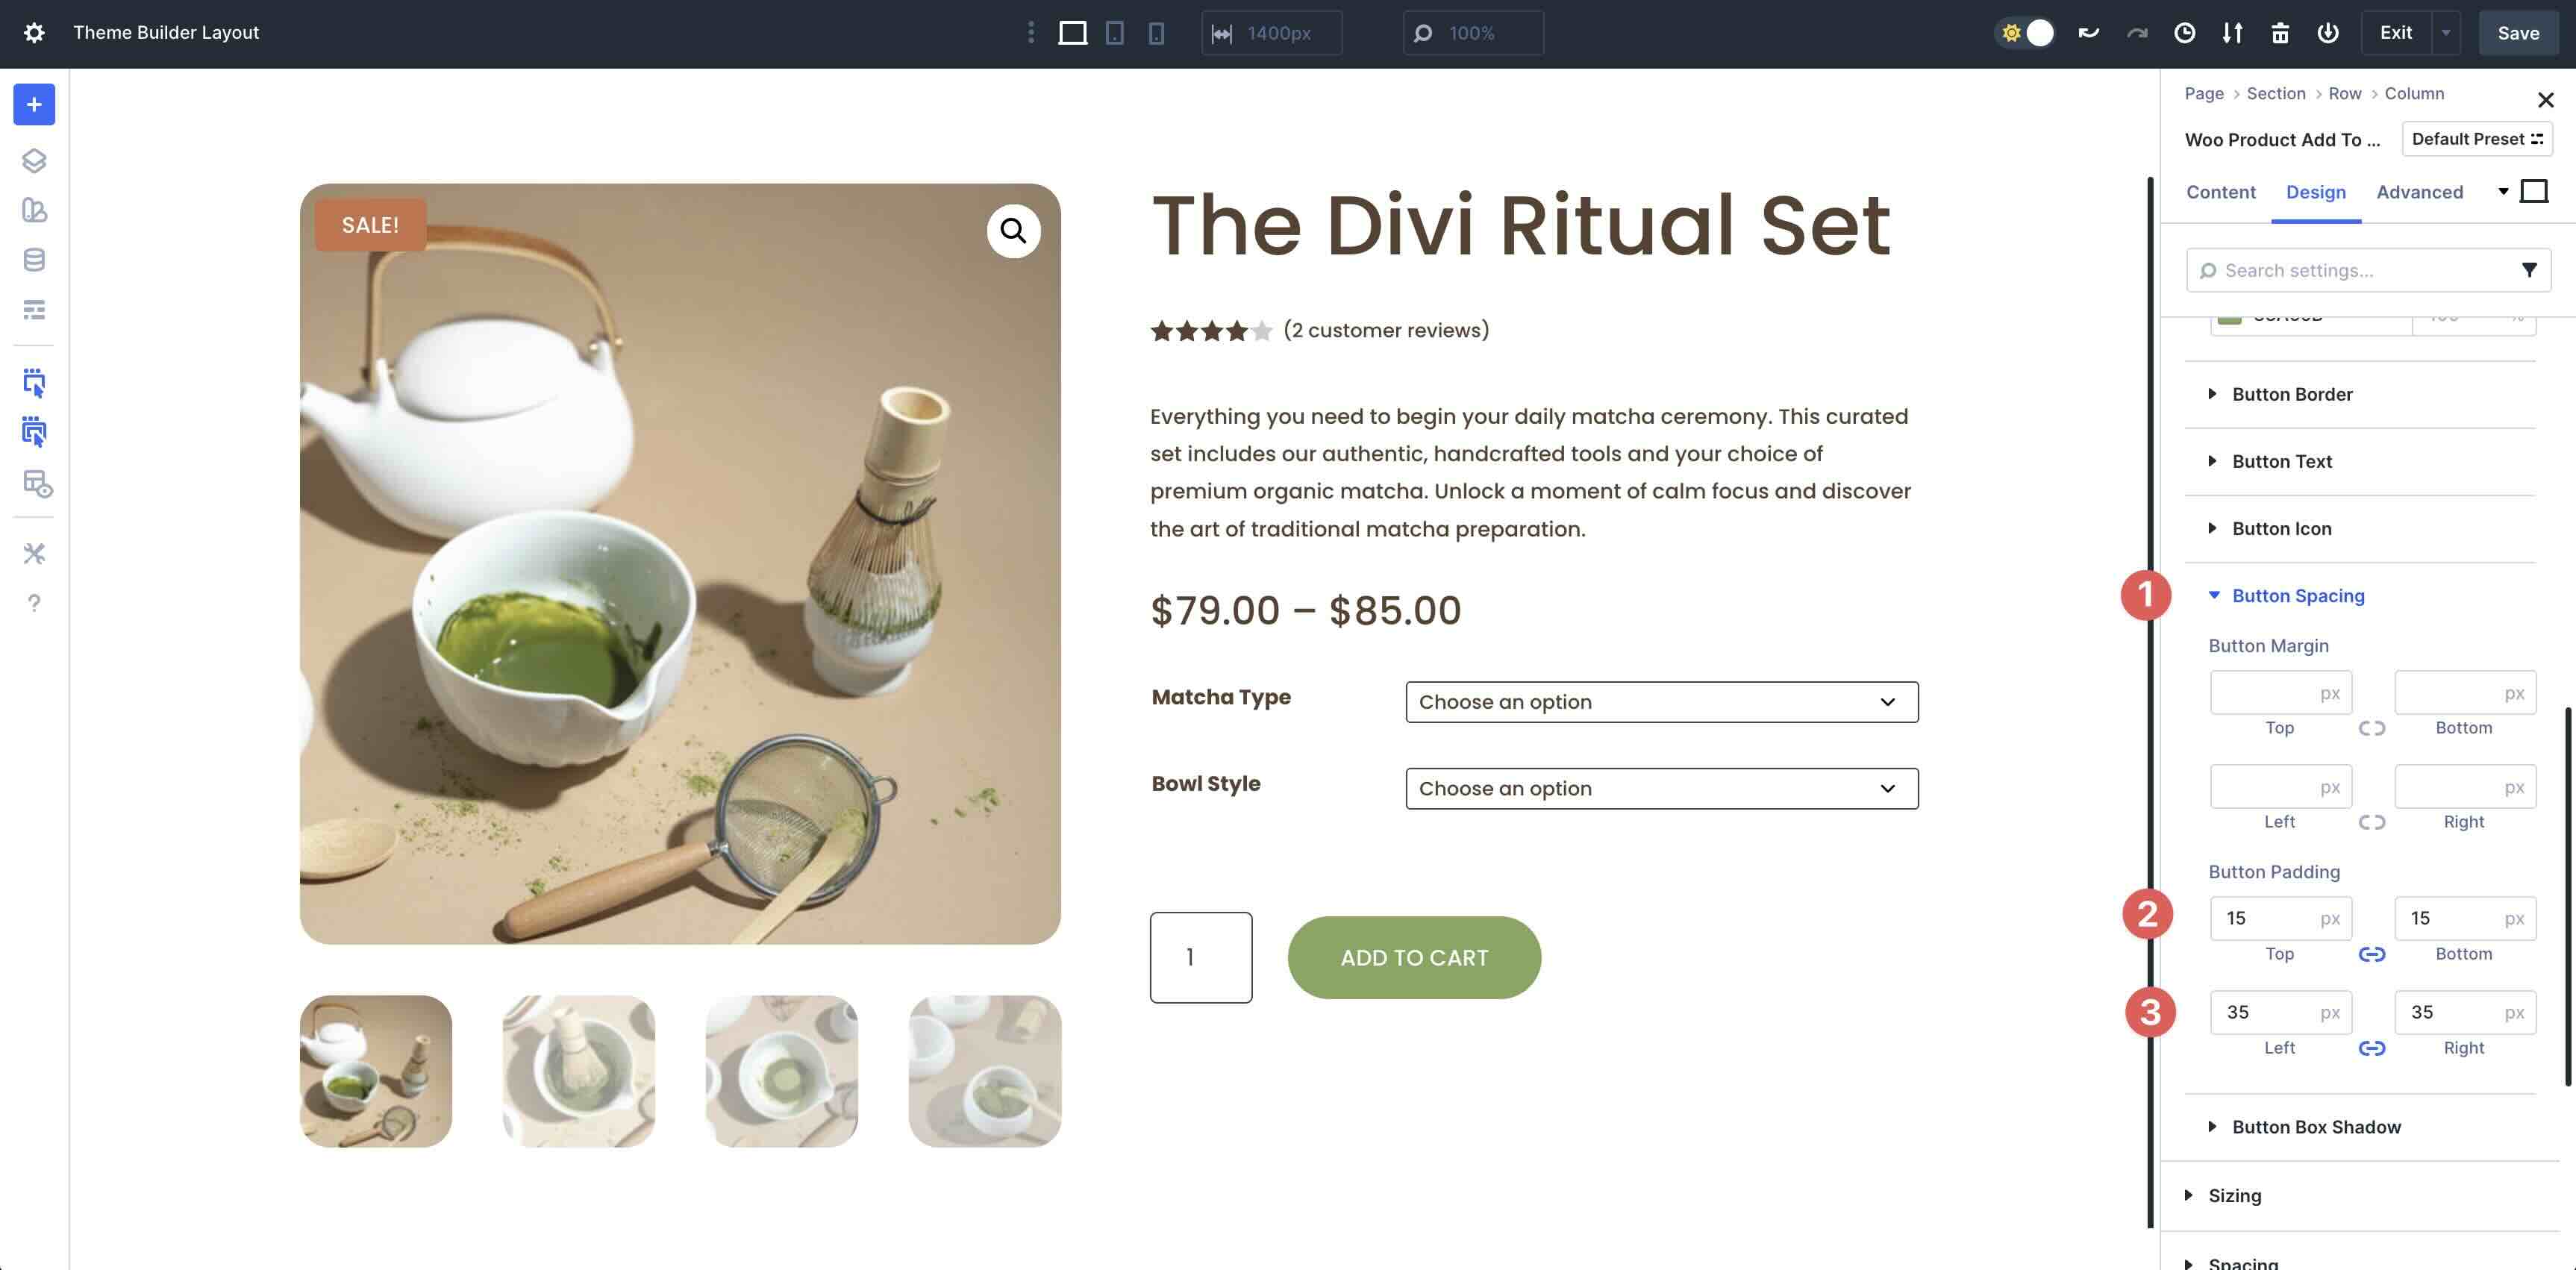
In spite of everything, within the Button Spacing menu, upload 15px Button Padding to the height and backside and 35px for the left and proper.
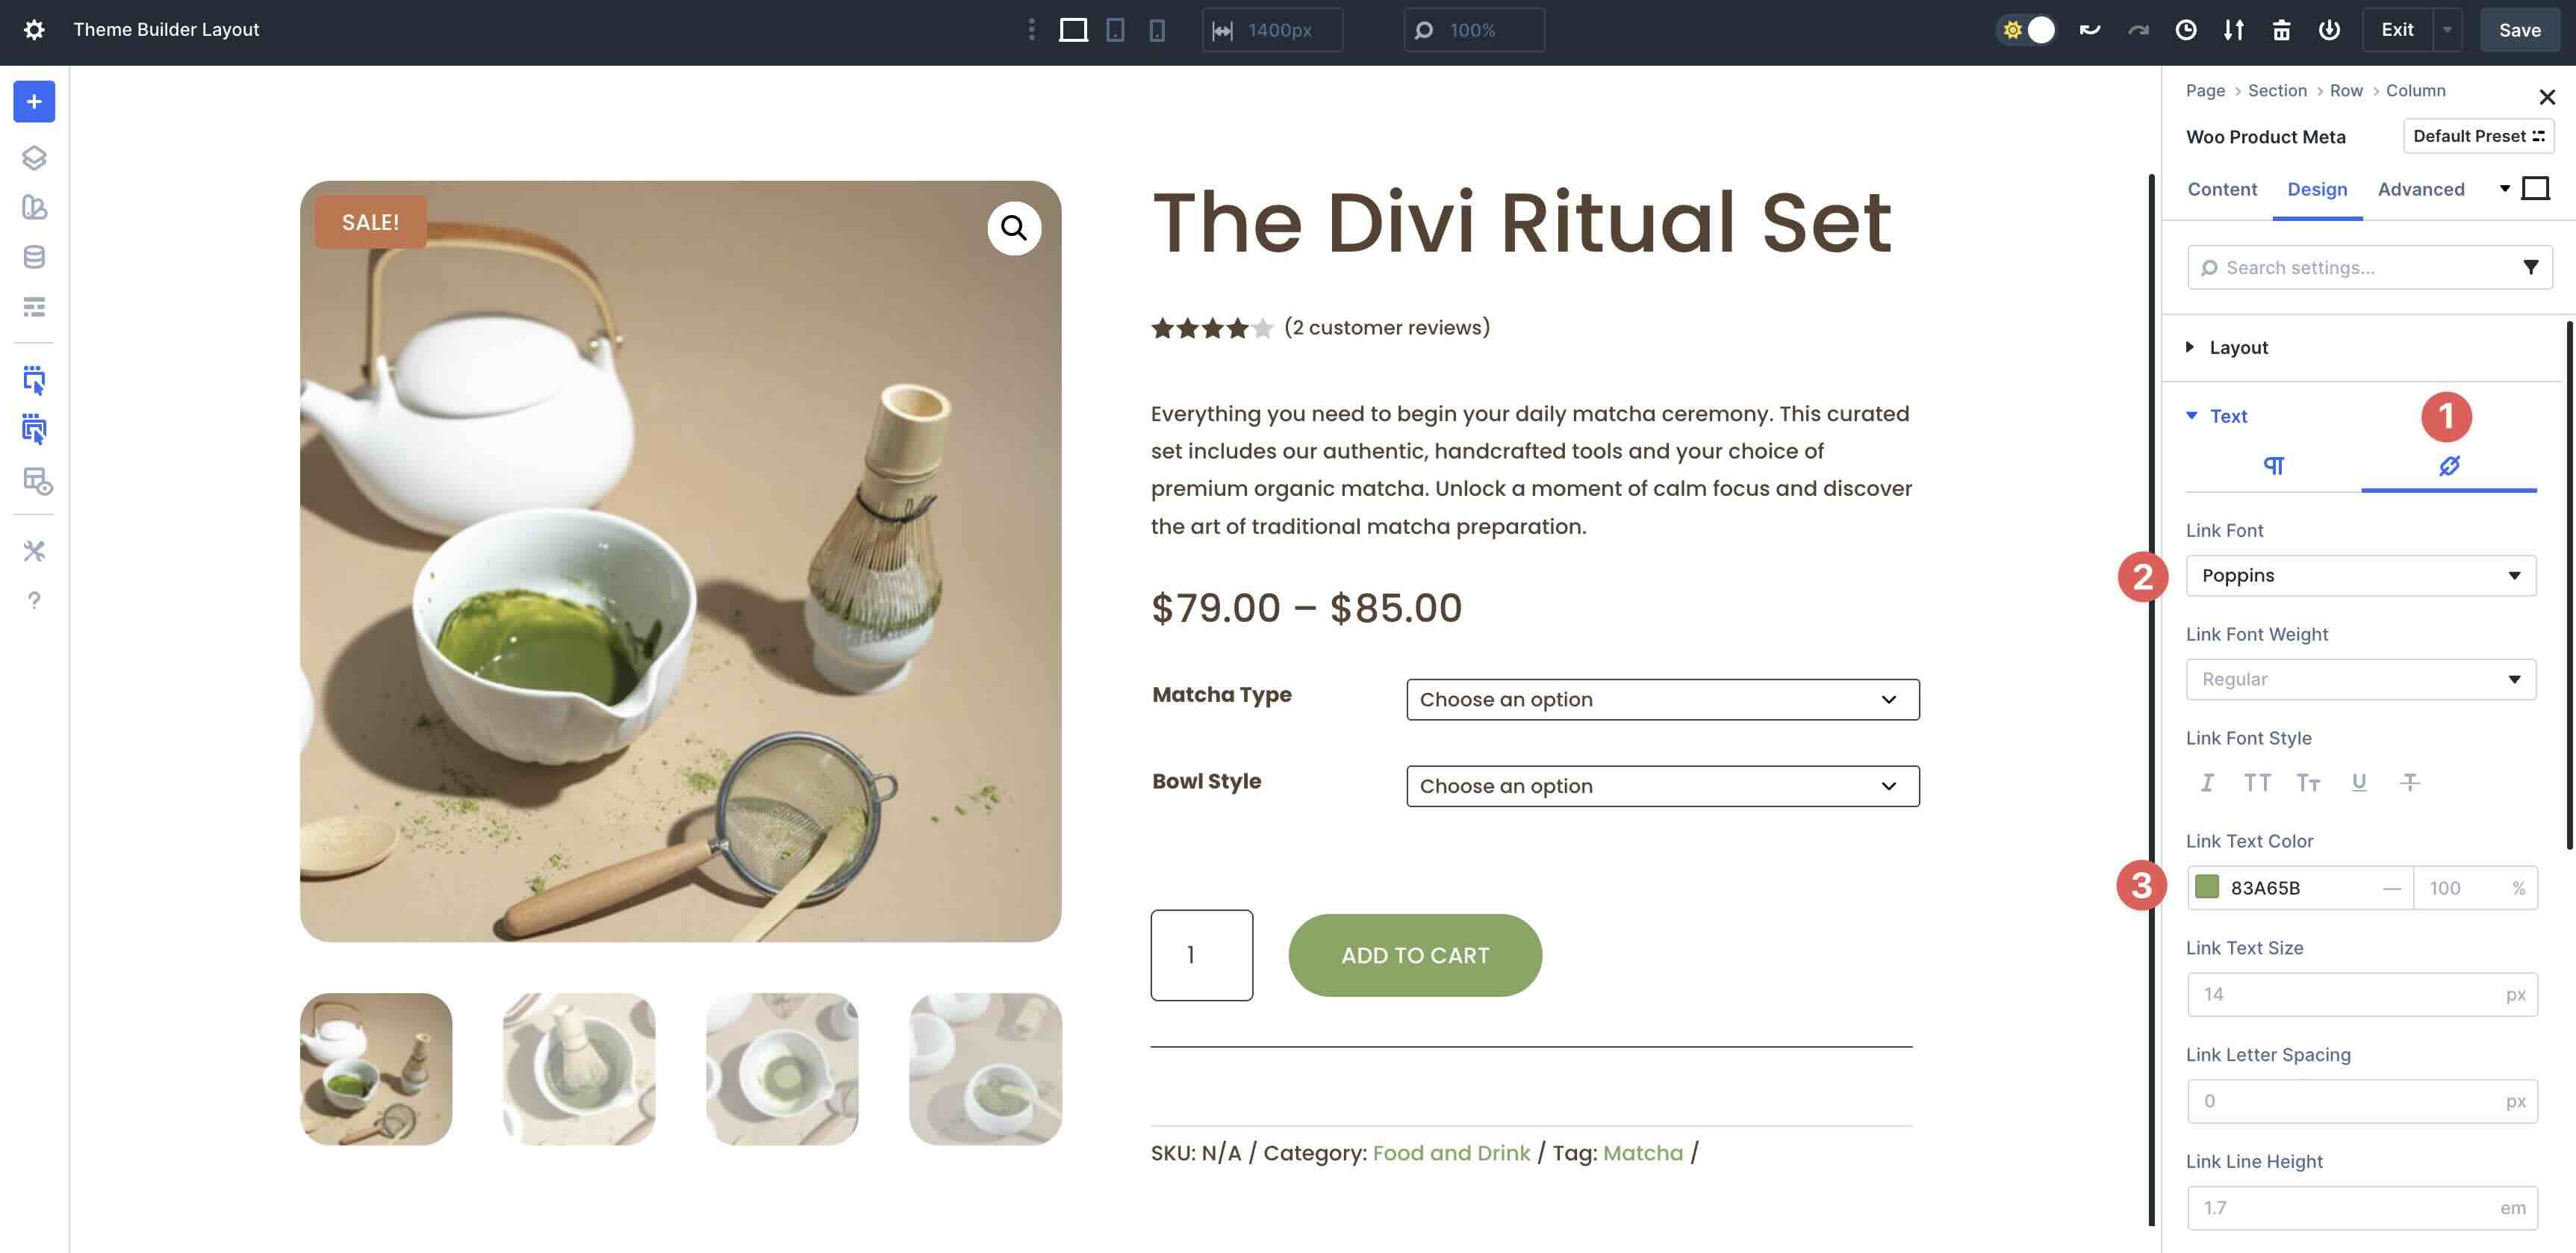
Upload The Woo Product Meta Module
The ultimate module so as to add to the second one column of the row is the Woo Product Meta module.

Within the Design tab, enlarge the Textual content menu. For the Paragraph tab, input Poppins because the Meta Font, Left within the Meta Textual content Alignment box, and #5A4130 within the Meta Textual content Colour box.
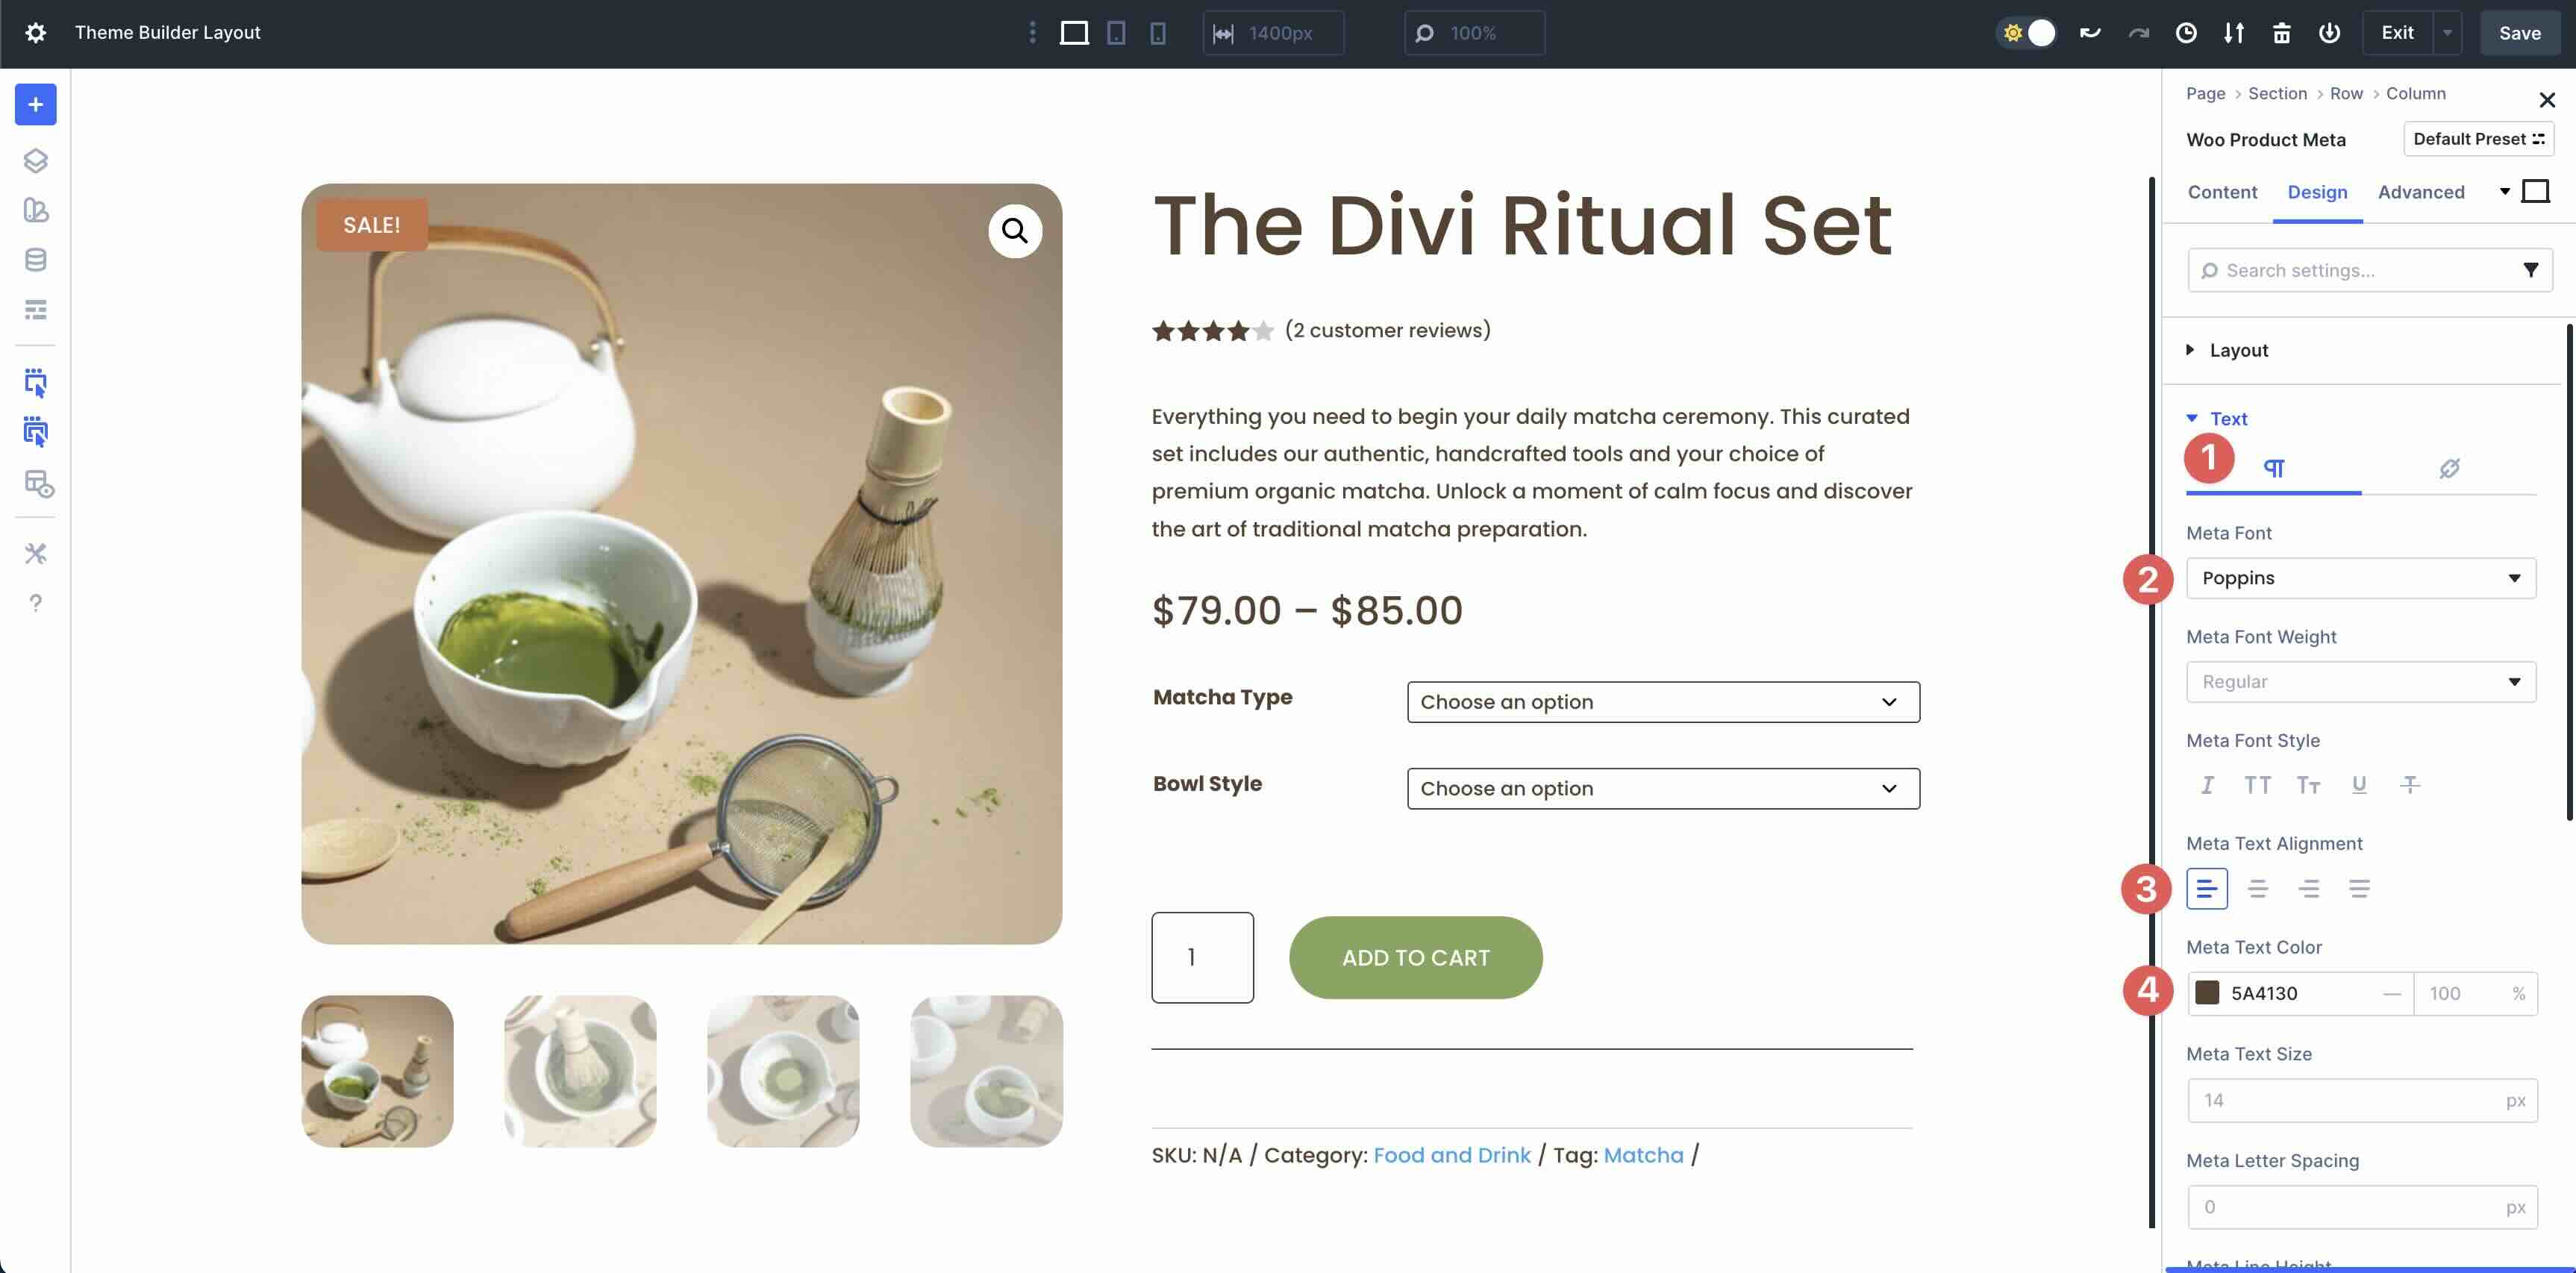
Tab over to Hyperlinks. Make a choice Poppins because the Hyperlink Font and input #83A65B because the Hyperlink Textual content Colour.
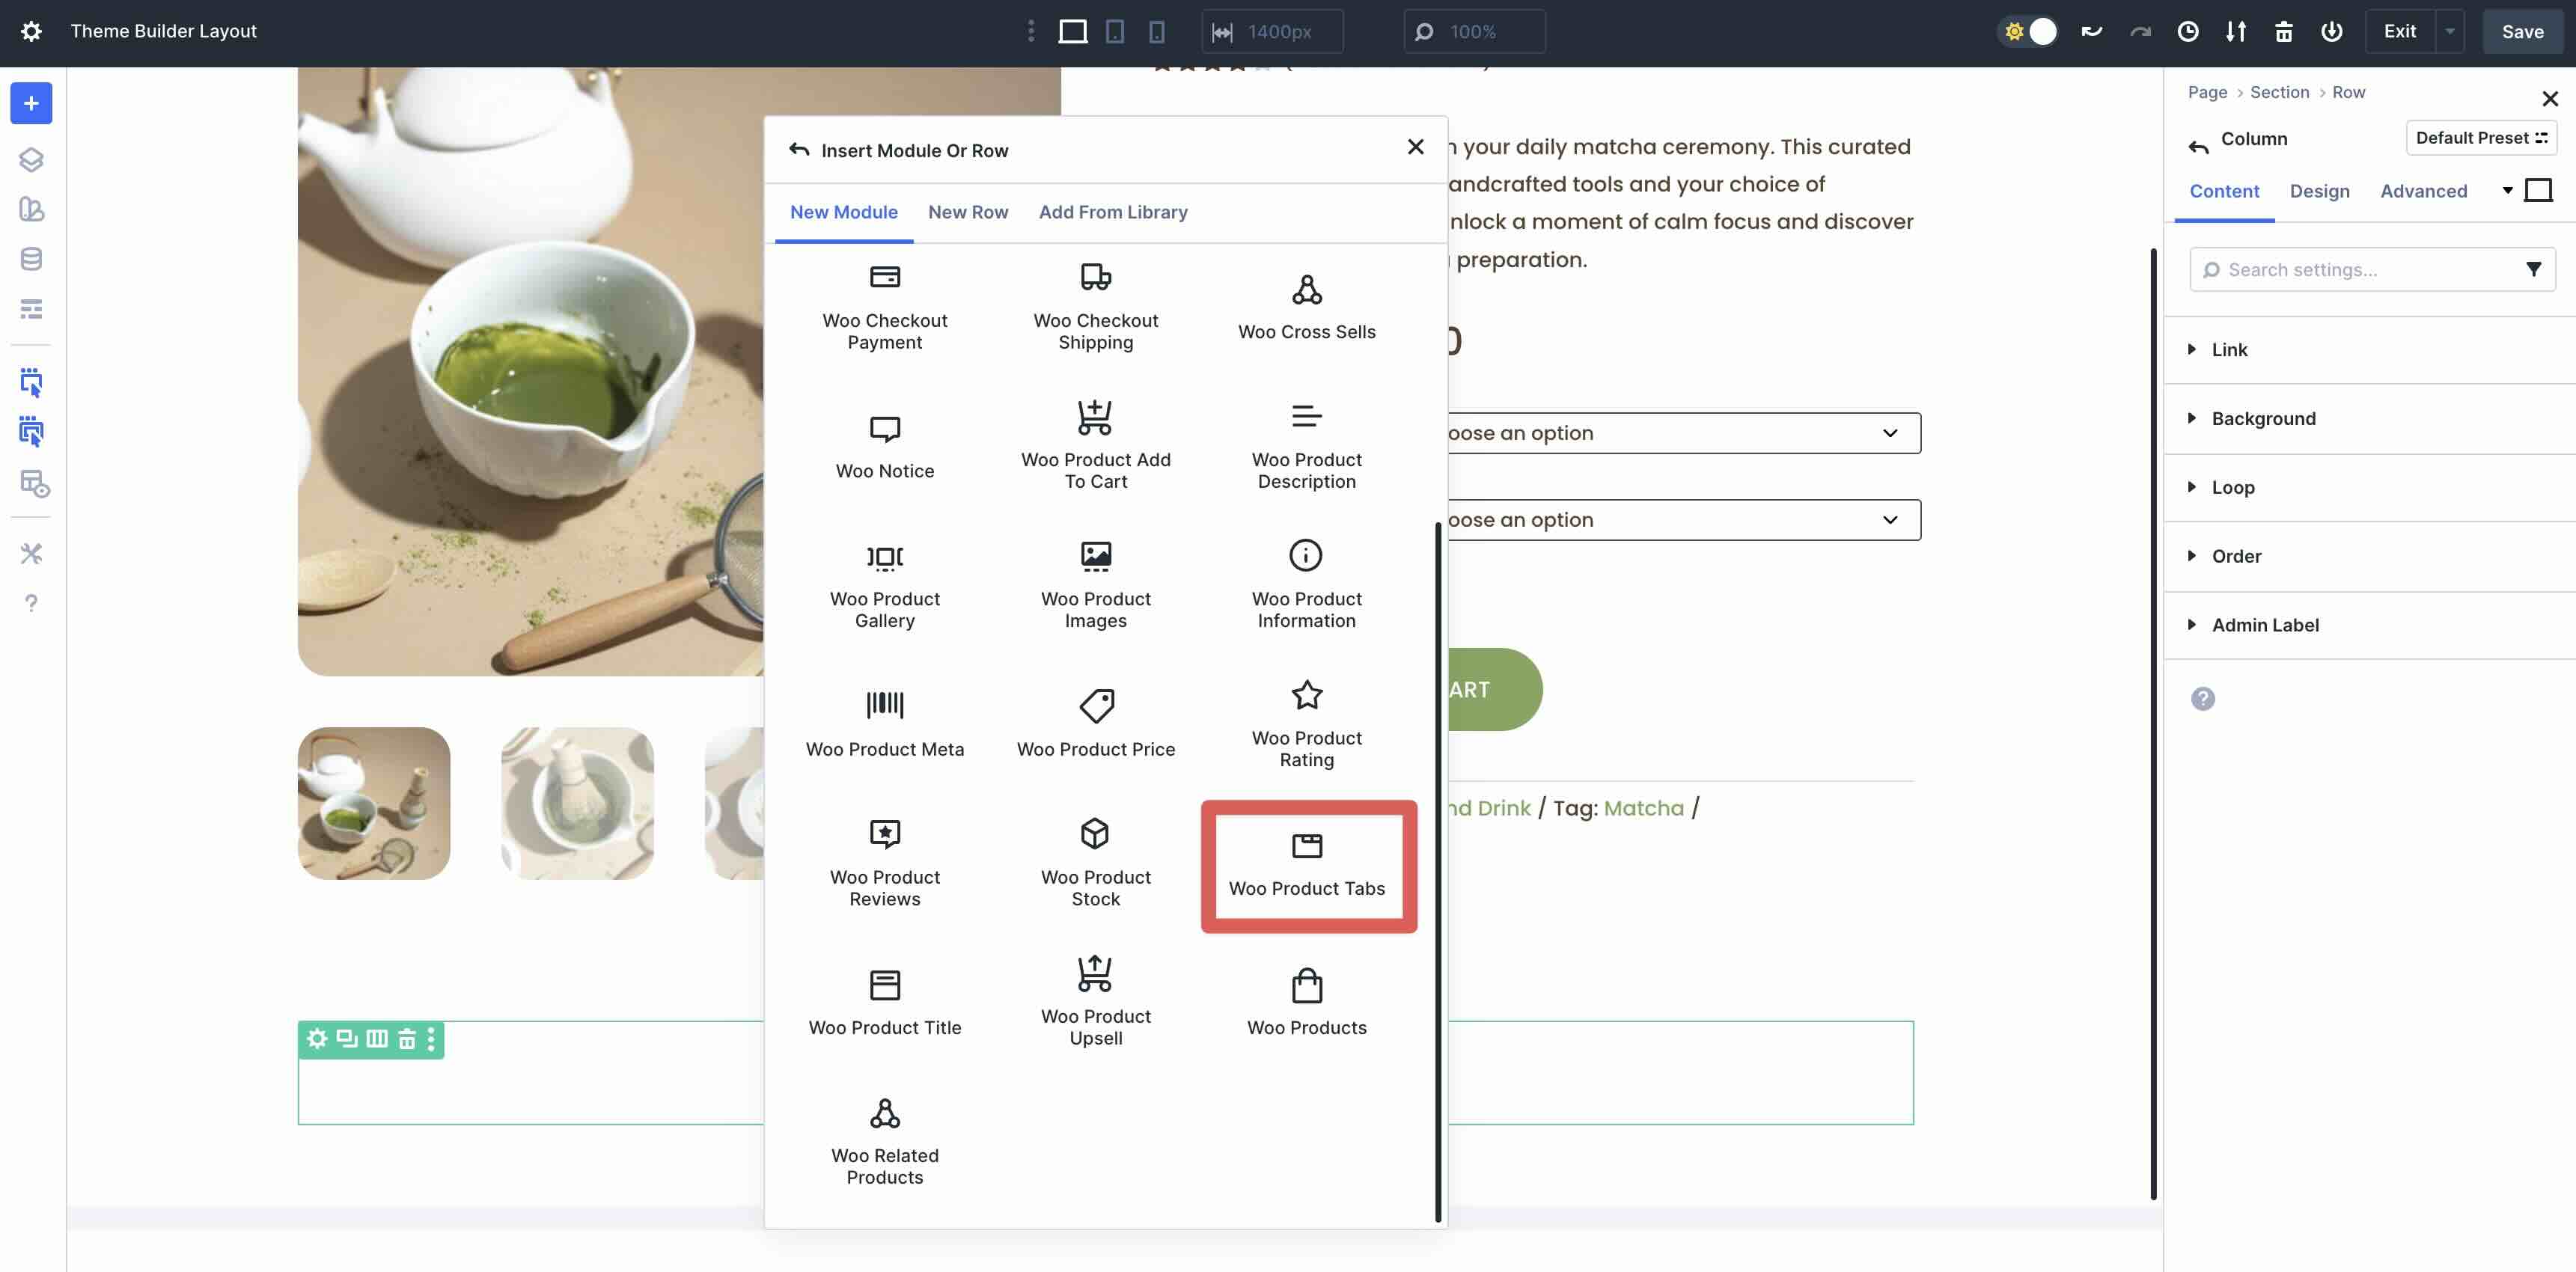
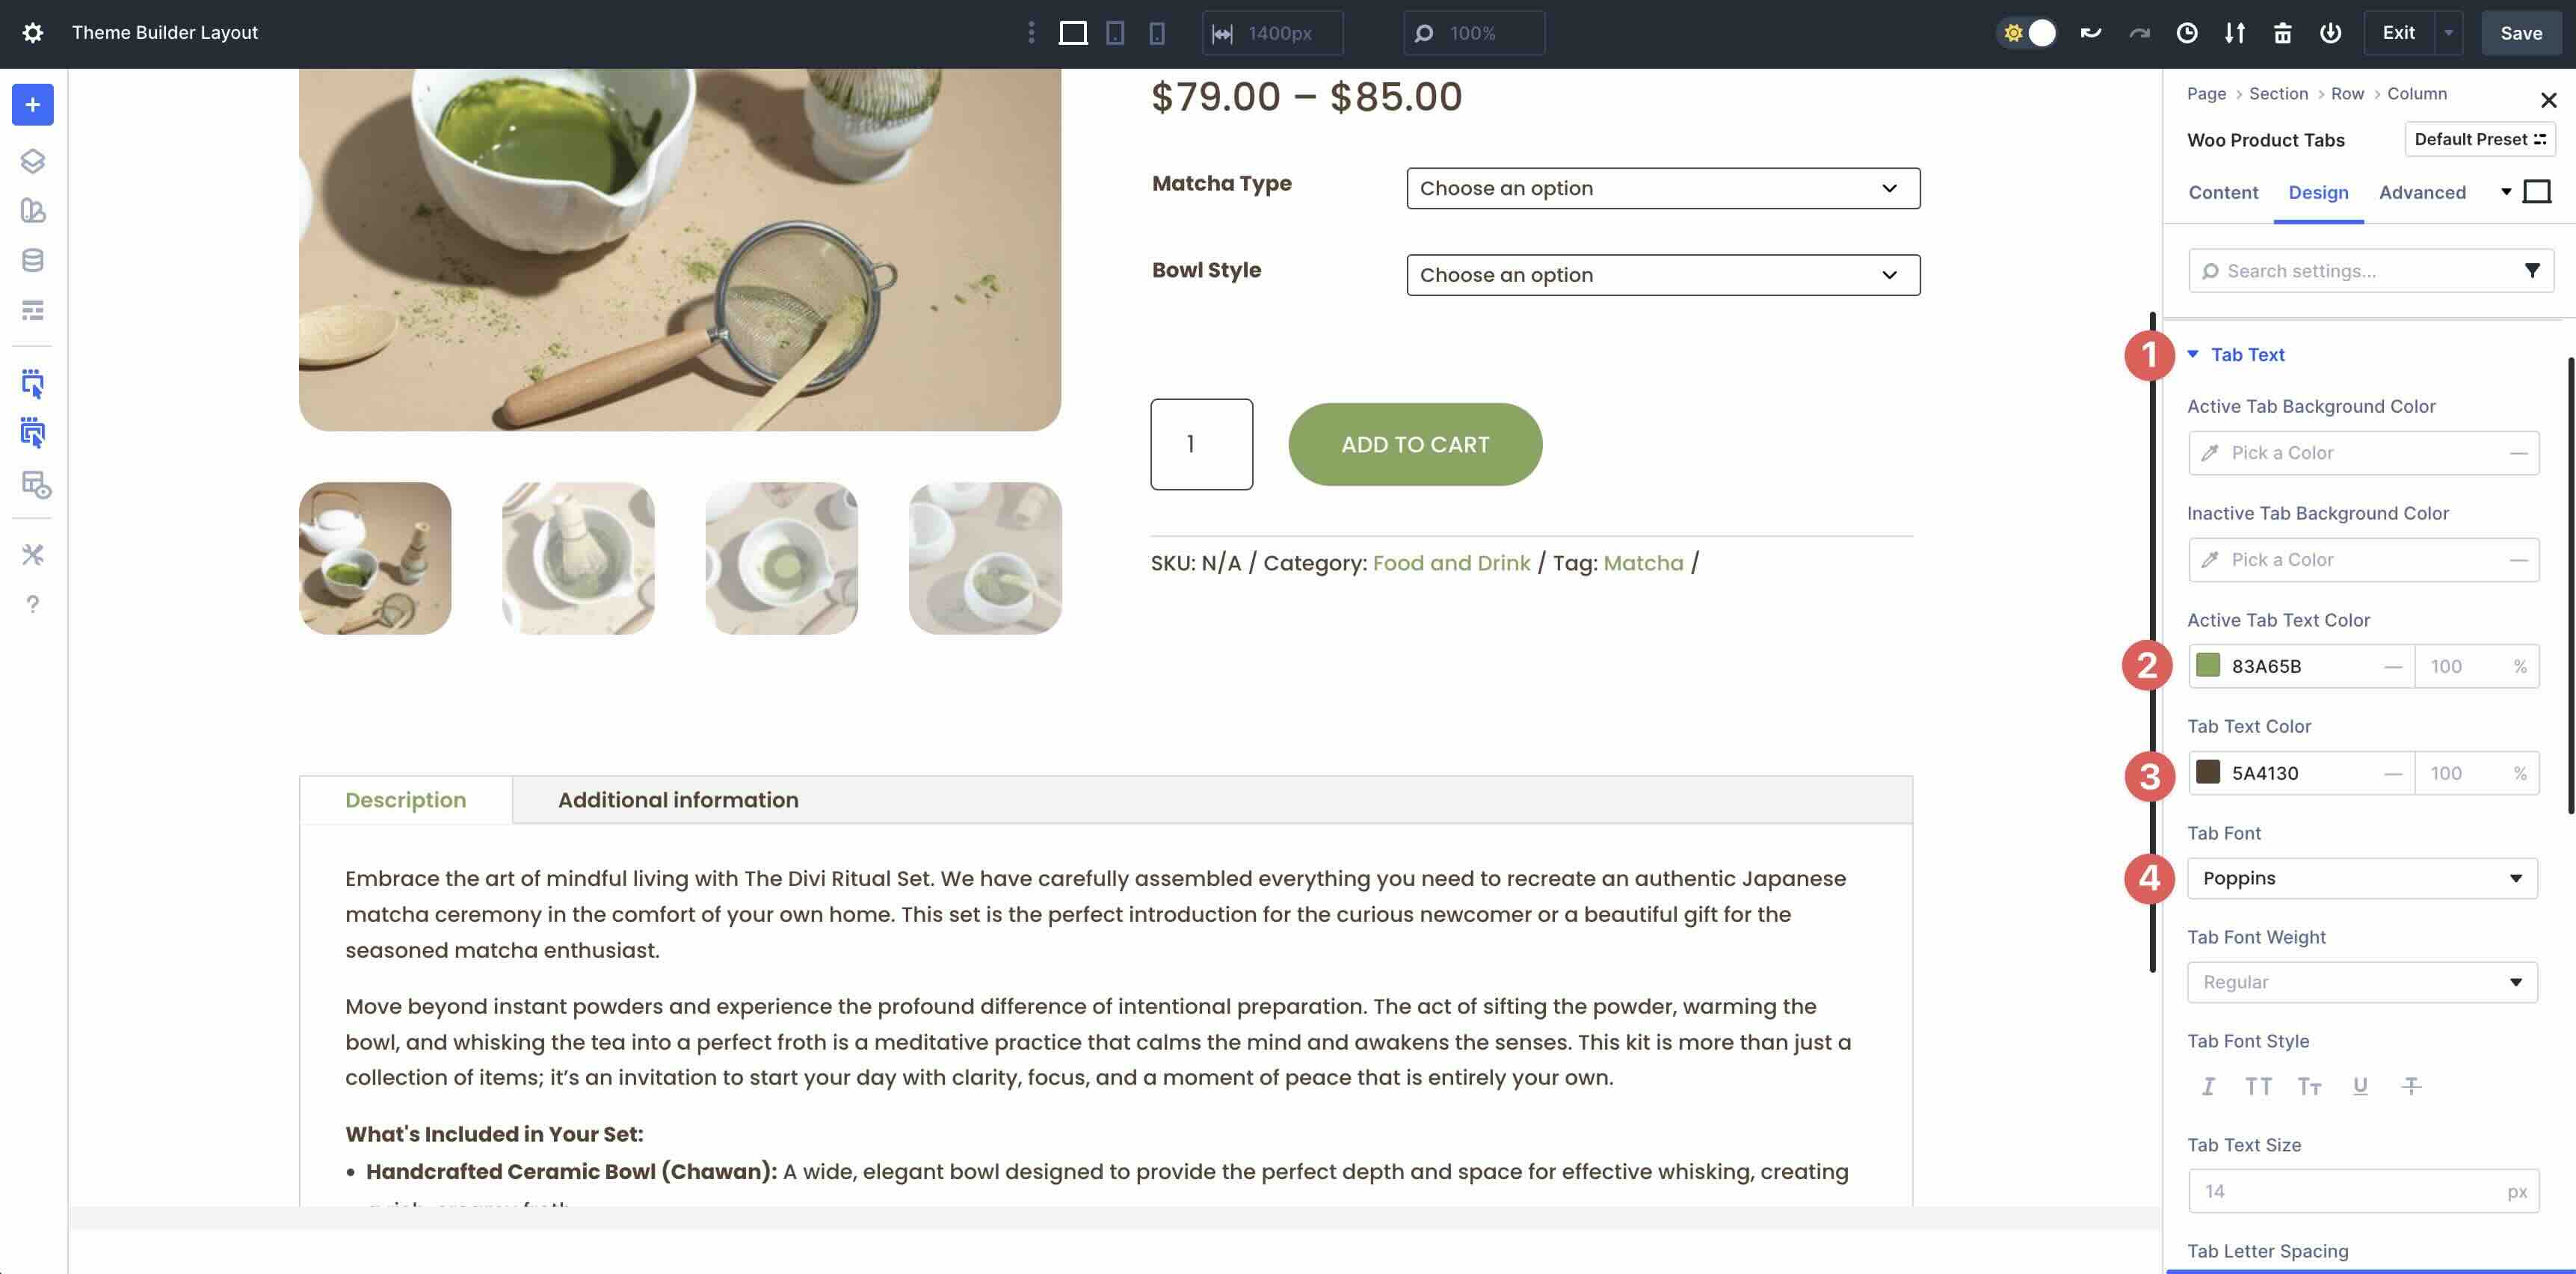
Upload The Woo Product Tabs Module
Upload a brand new single-column row underneath the two-column row that homes our product information. Make a choice the Woo Product Tabs module.
Make bigger the Frame Textual content menu. Input Poppins for the Font and set the Textual content Colour to #5A4130.
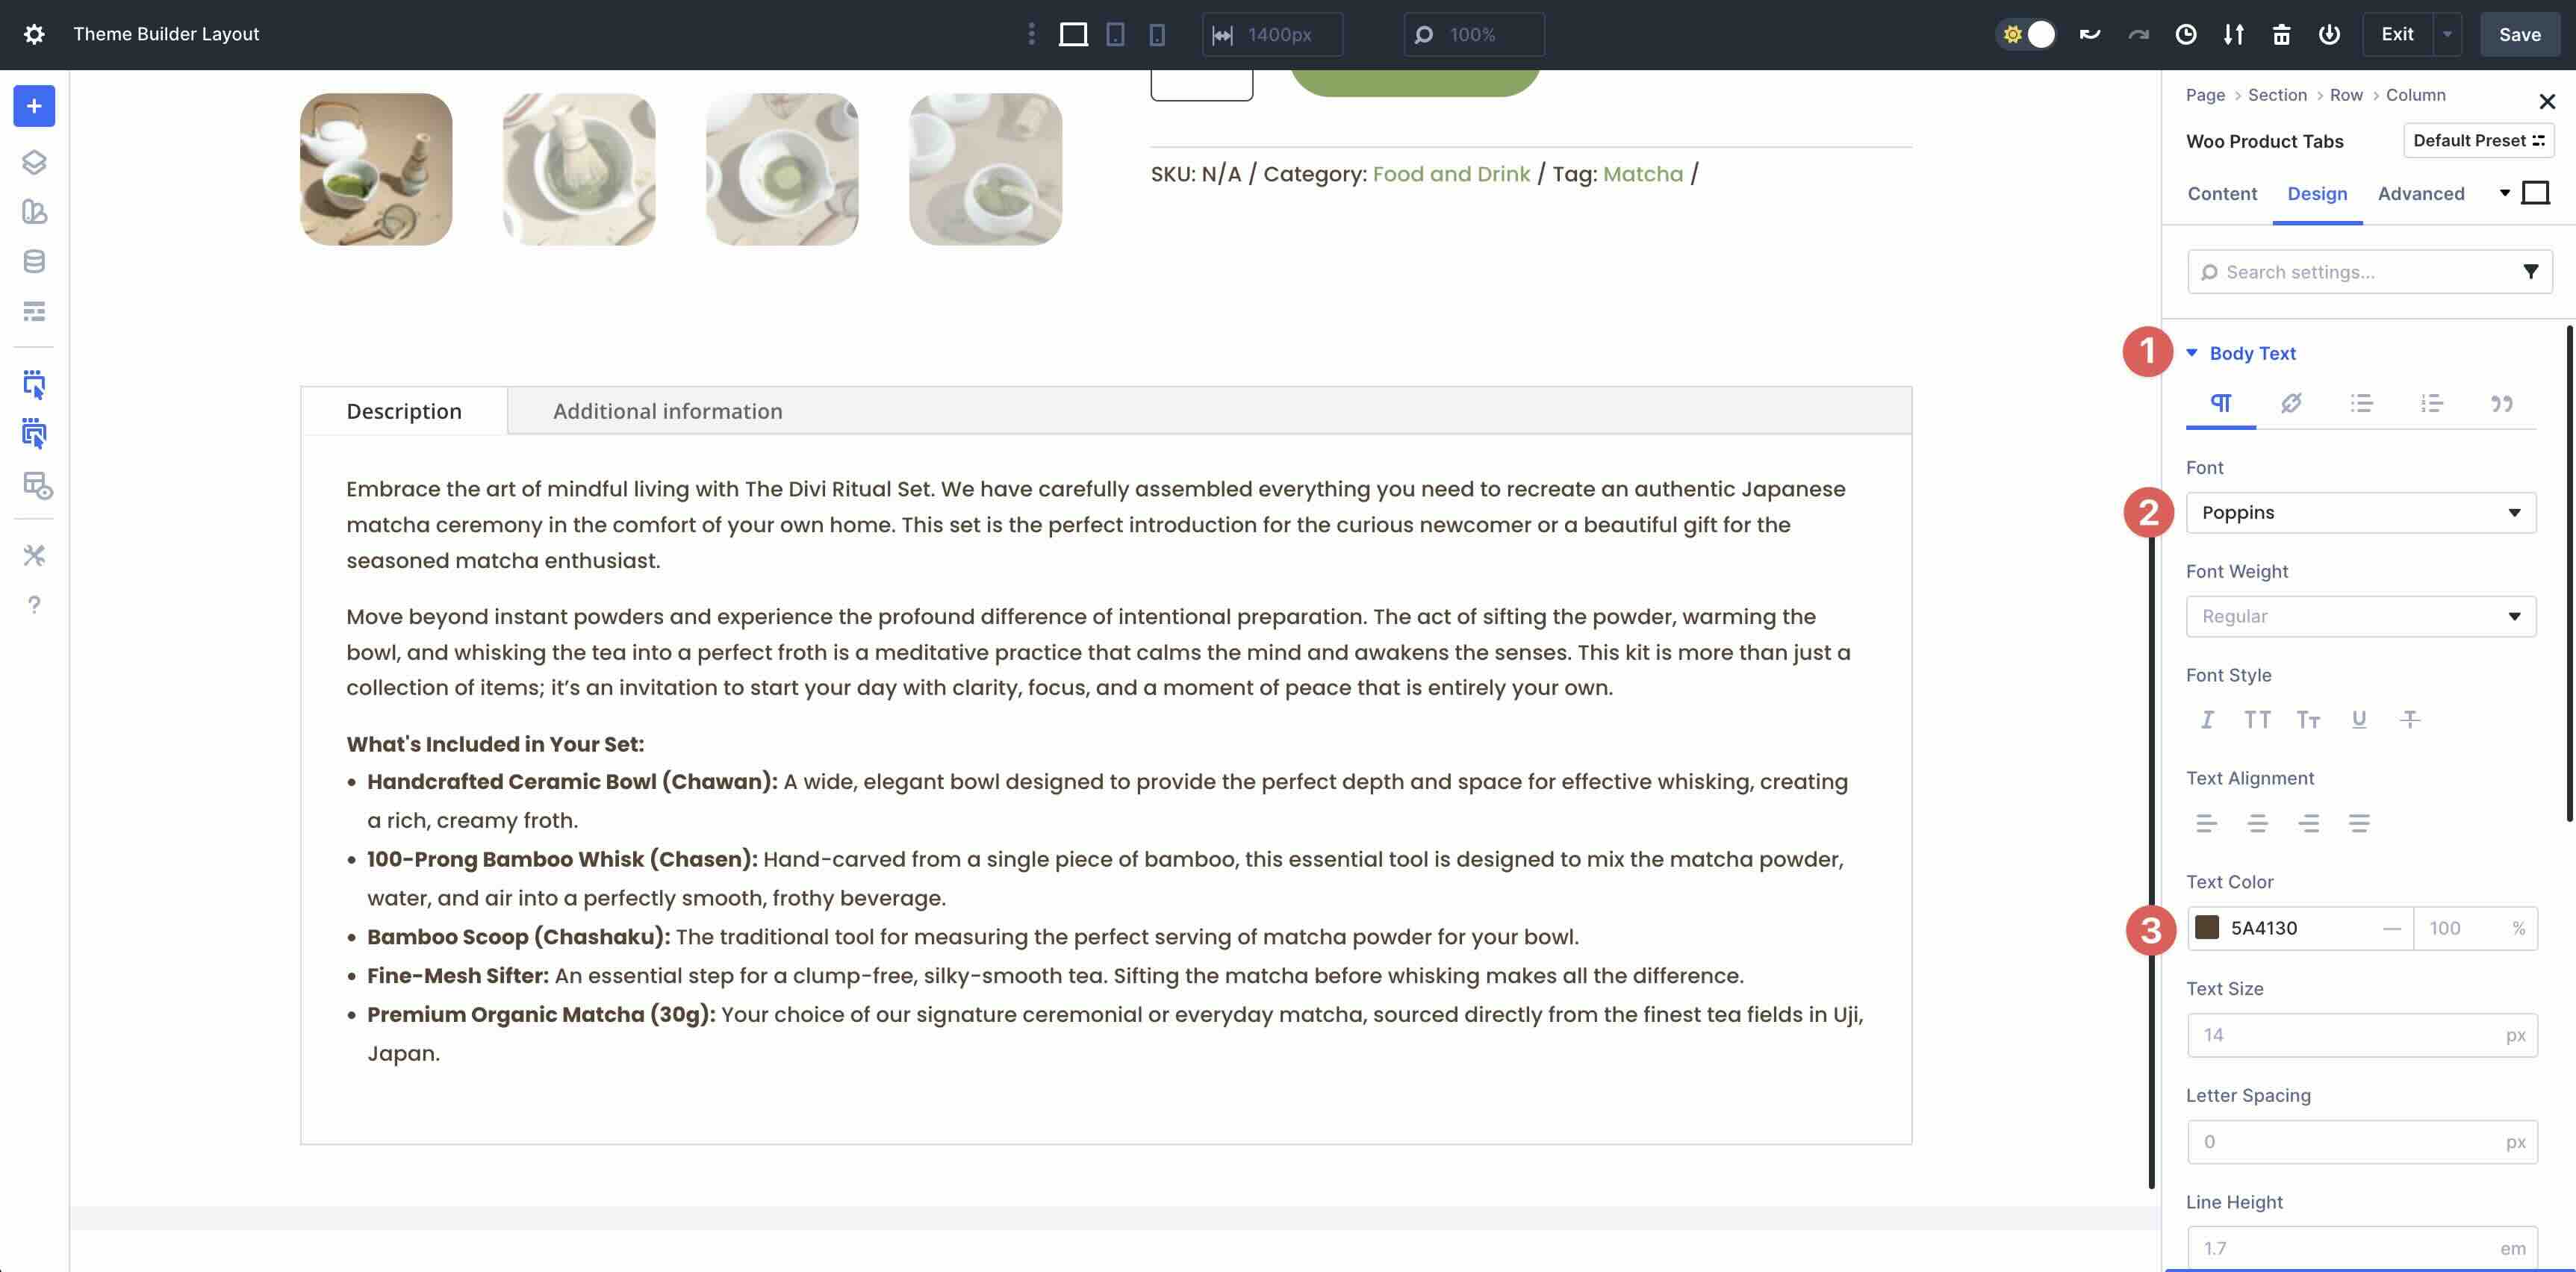
Subsequent, enlarge the Tab Textual content menu. Input #83A65B because the Lively Tab Textual content Colour and #5A4130 because the Tab Textual content Colour. Set the Tab Font to Poppins.
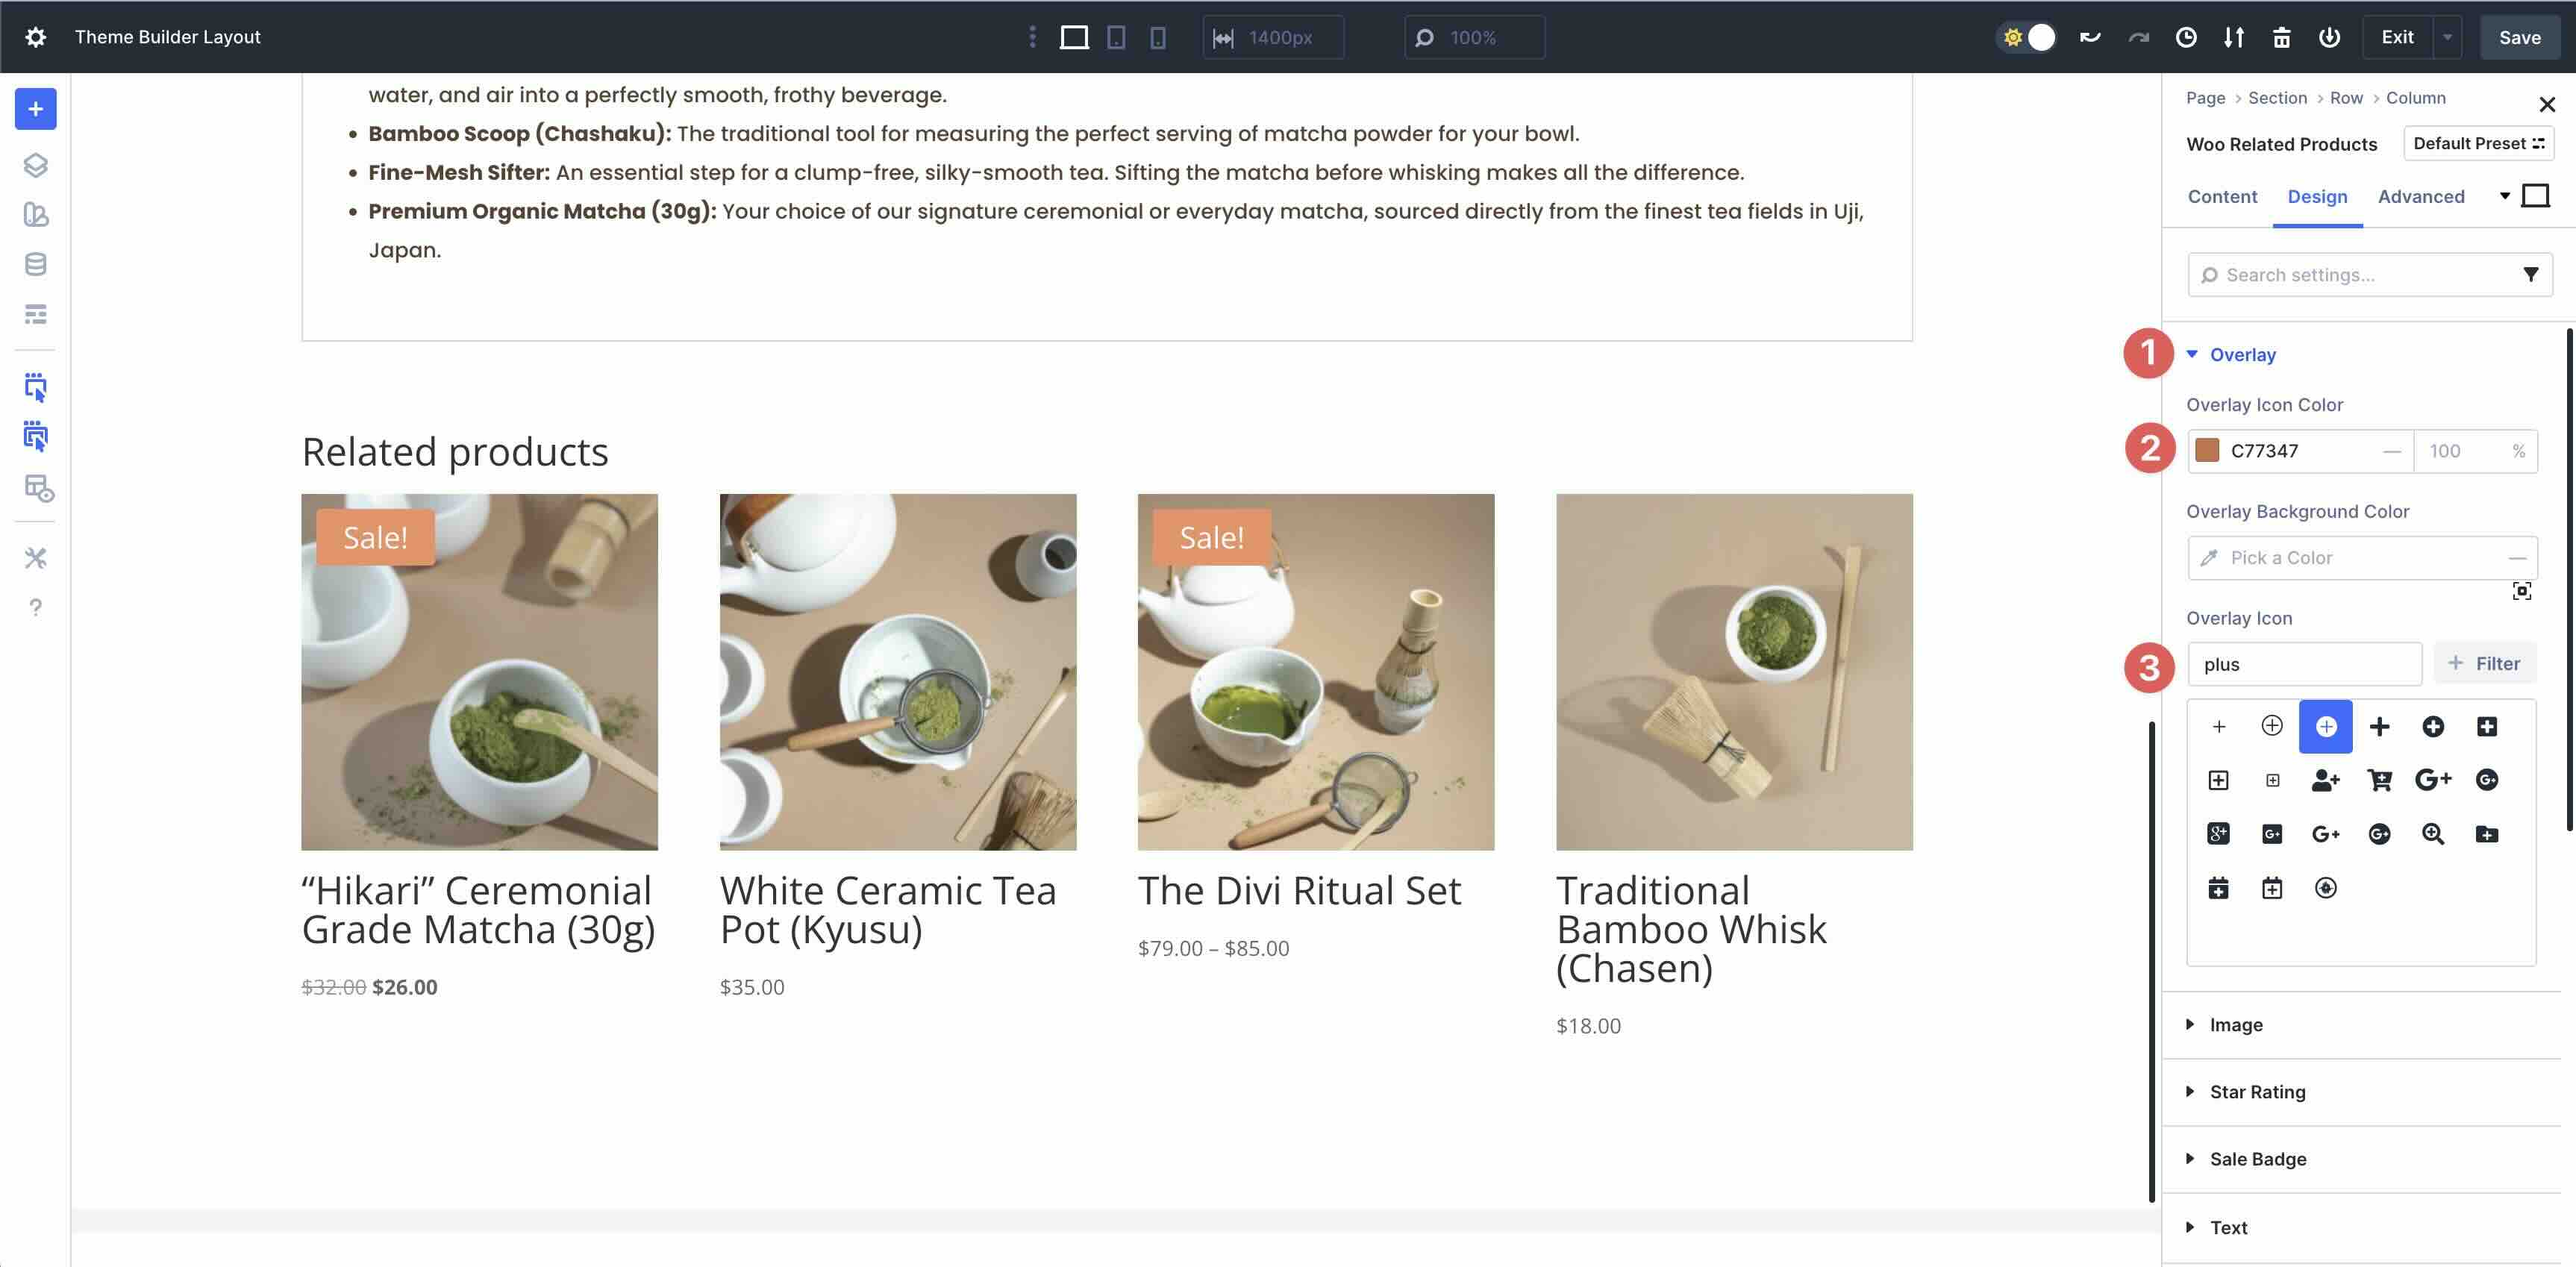
Upload The Woo Similar Merchandise Module
Upload a brand new single-column row. Make a choice and upload the Woo Similar Merchandise module to the web page.

Make bigger the Overlay menu. Upload #C77347 to the Overlay Icon Colour box.
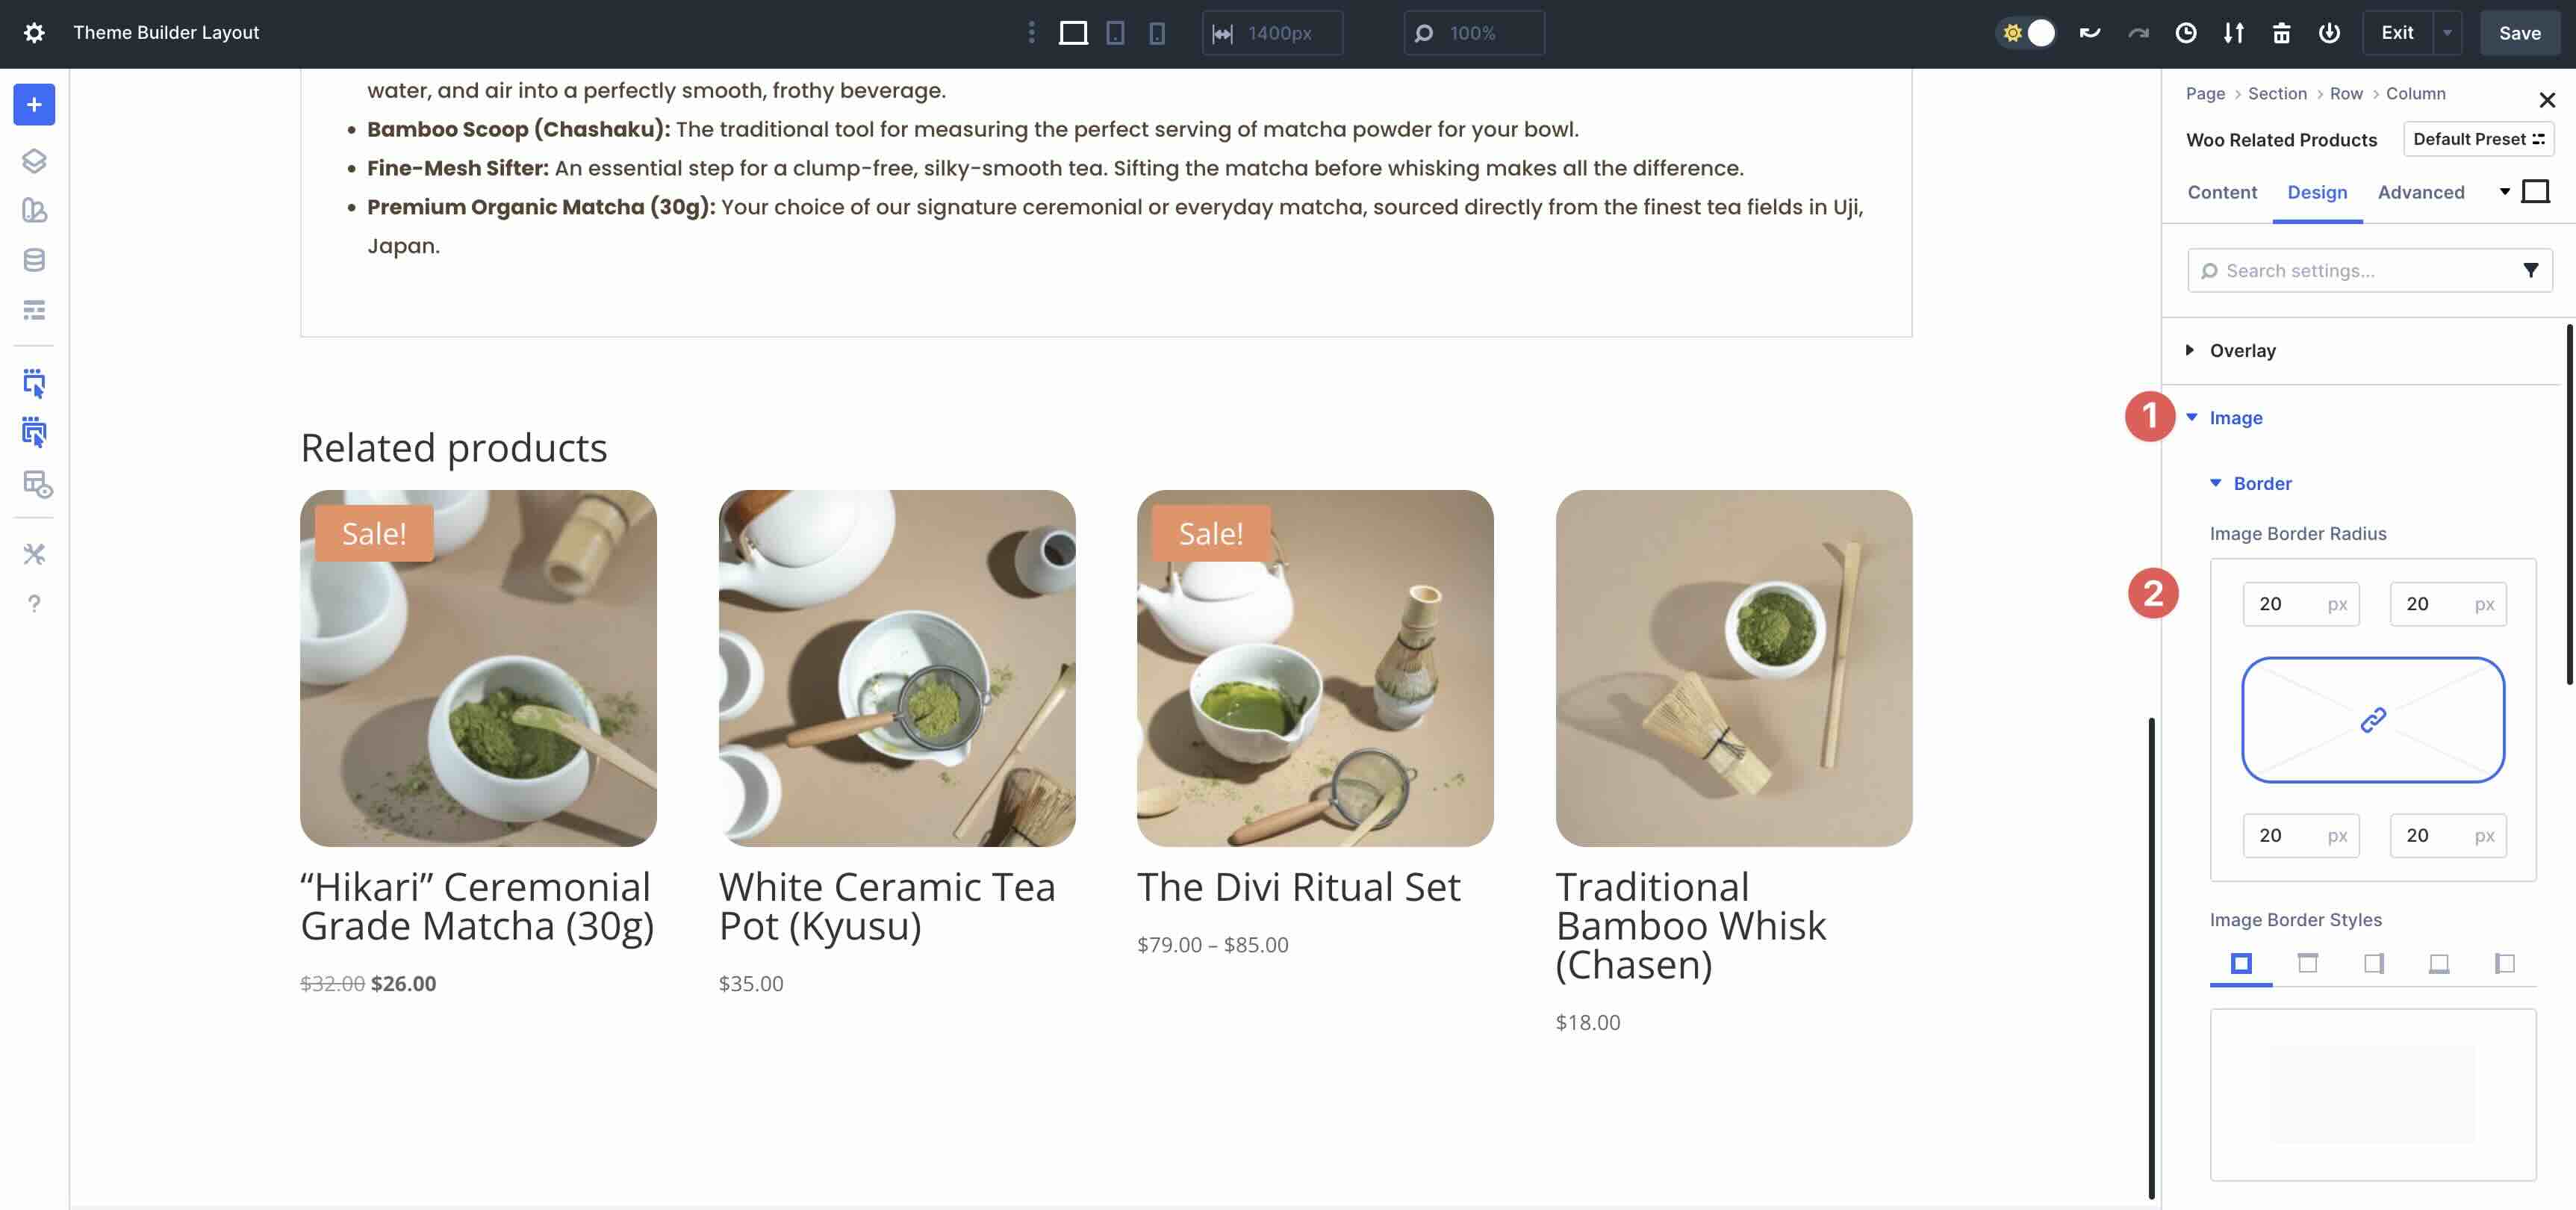
Open the Symbol menu. Within the Border settings, upload 20px Symbol Border Radius to each side.
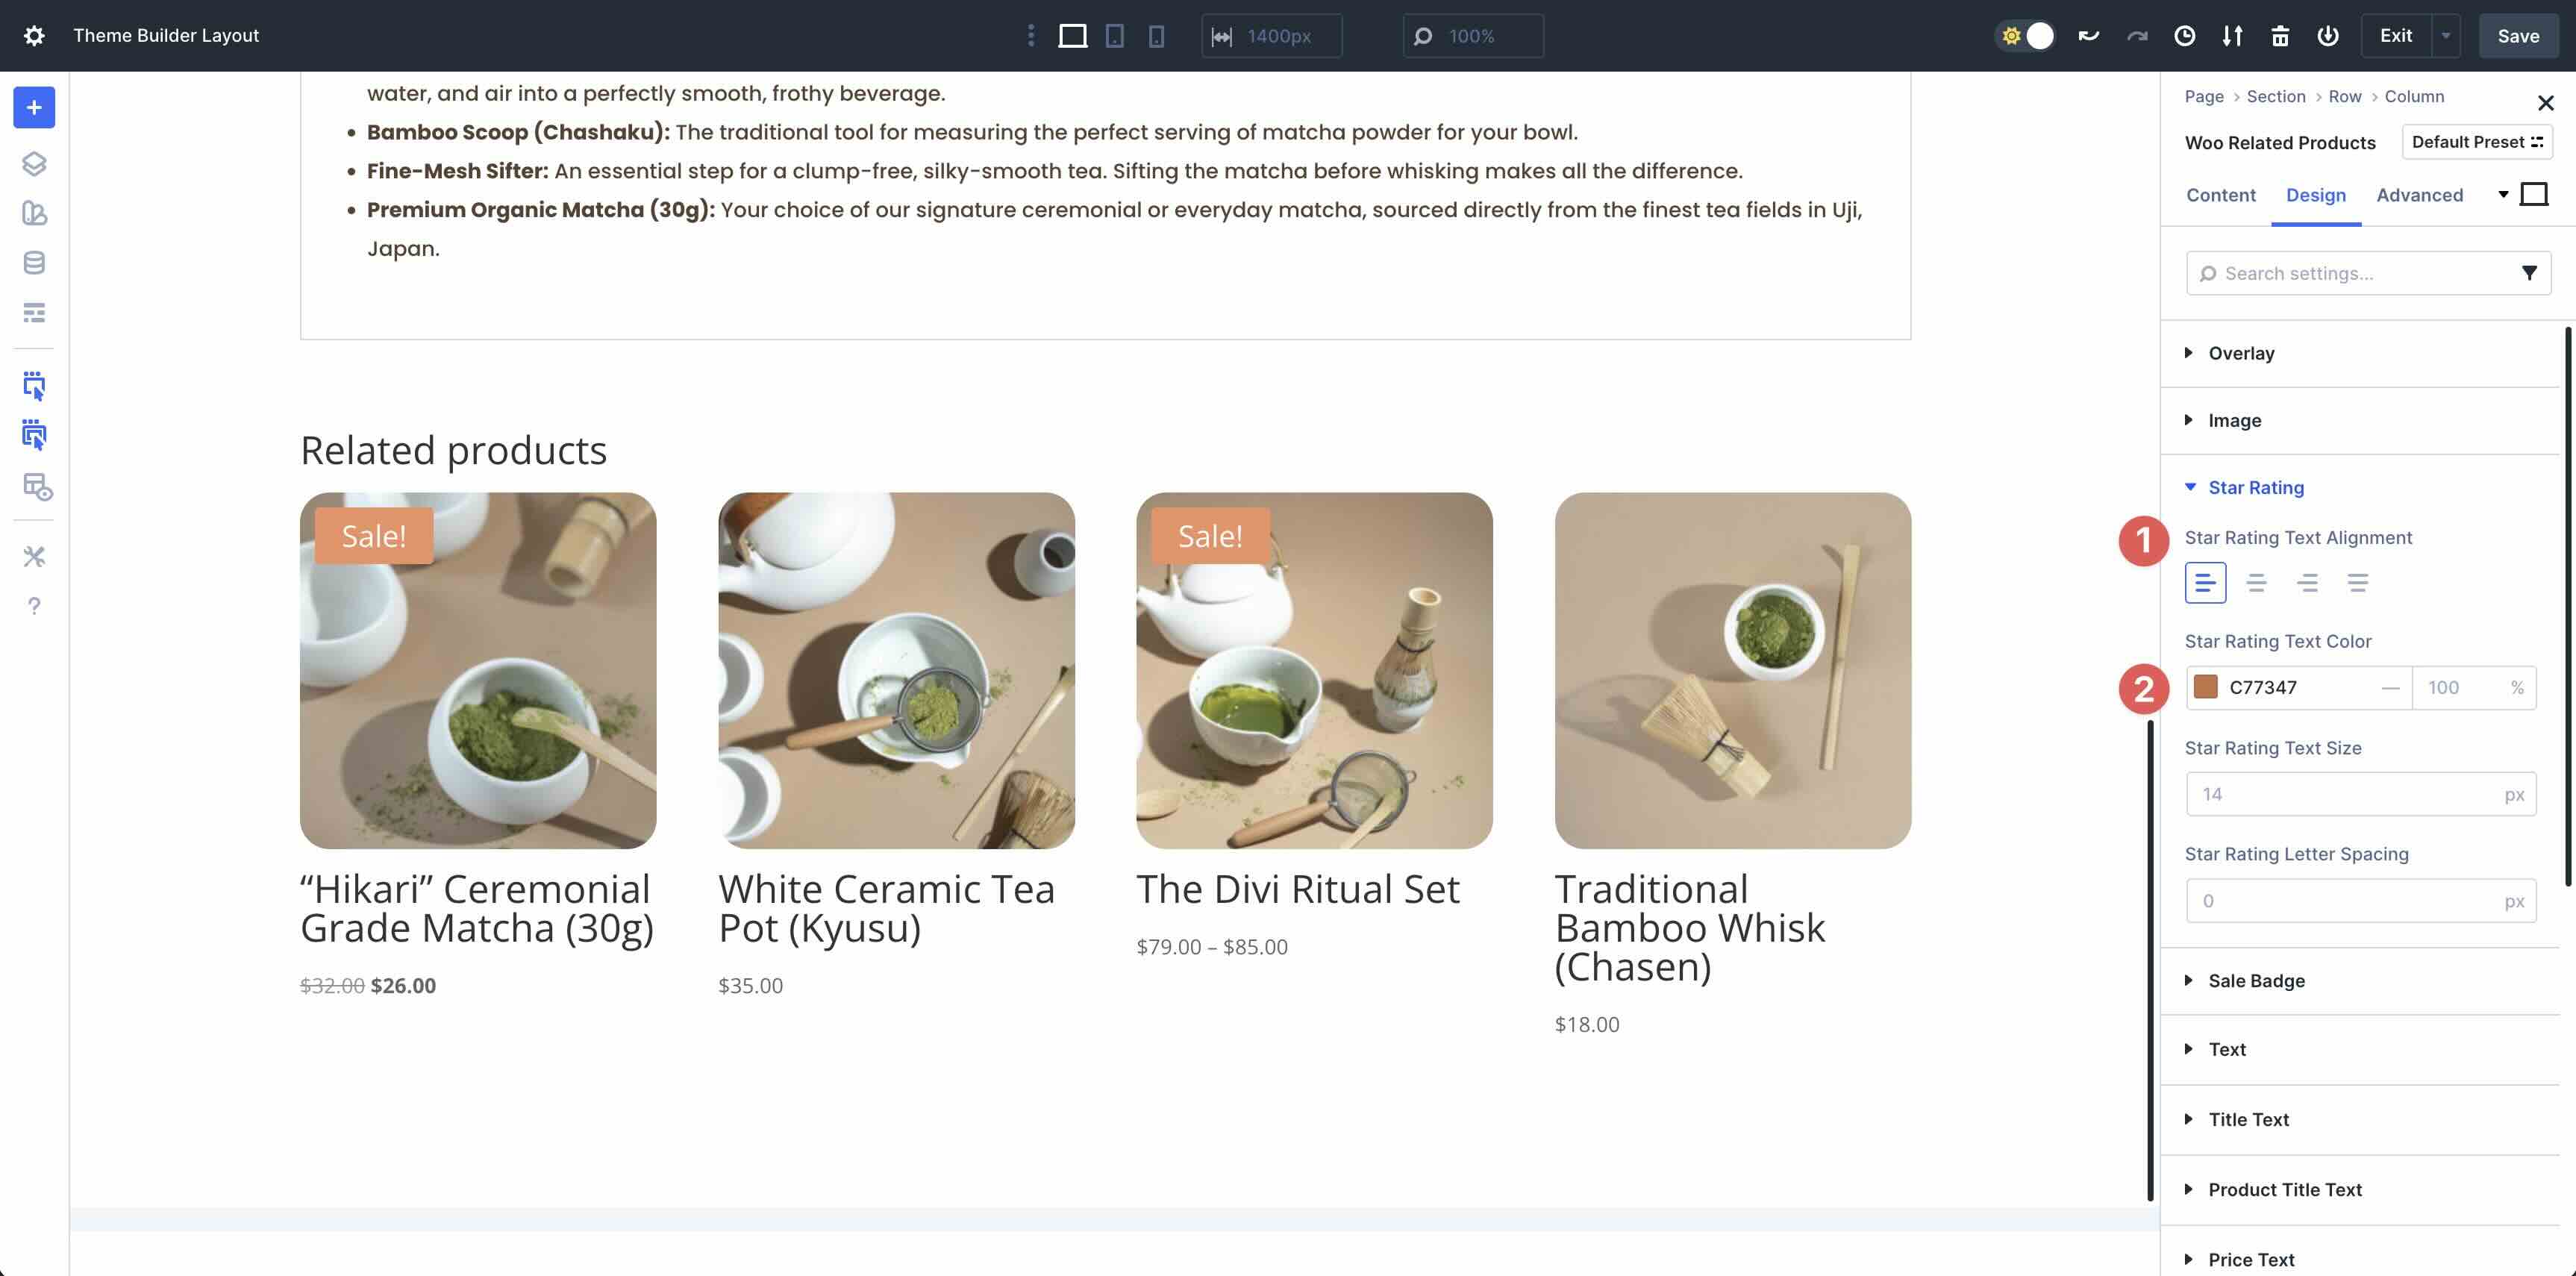
Make a choice and enlarge the Celebrity Score menu. Set the Celebrity Score Textual content Alignment to Left. Use #C77347 for the Celebrity Score Textual content Colour box.
Open the Sale Badge menu. Input #C77347 because the Sale Badge Color. Make bigger the Textual content menu. Make a choice Poppins because the Sale Badge Font, set the Sale Badge Font Taste to Uppercase, the Sale Badge Textual content Colour to #ffffff, the Sale Badge Textual content Dimension to 15px, and the Sale Badge Letter Spacing to 1px.
![]()
Subsequent, open the Identify Textual content menu. Use Poppins because the Identify Font, #5A4130 because the Identify Textual content Colour, and 4em for the Identify Textual content Dimension. Use Divi 5’s Responsive Editor to set the pill and telephone perspectives to 2.75em.
Open the Product Identify Textual content menu. Input Poppins for the Product Identify Font and set the Product Identify Textual content Alignment to Left. Use #5A4130 because the Product Identify Textual content Colour and set the Product Identify Textual content Dimension to 16px. Use 1.2em because the Product Identify Line Peak.

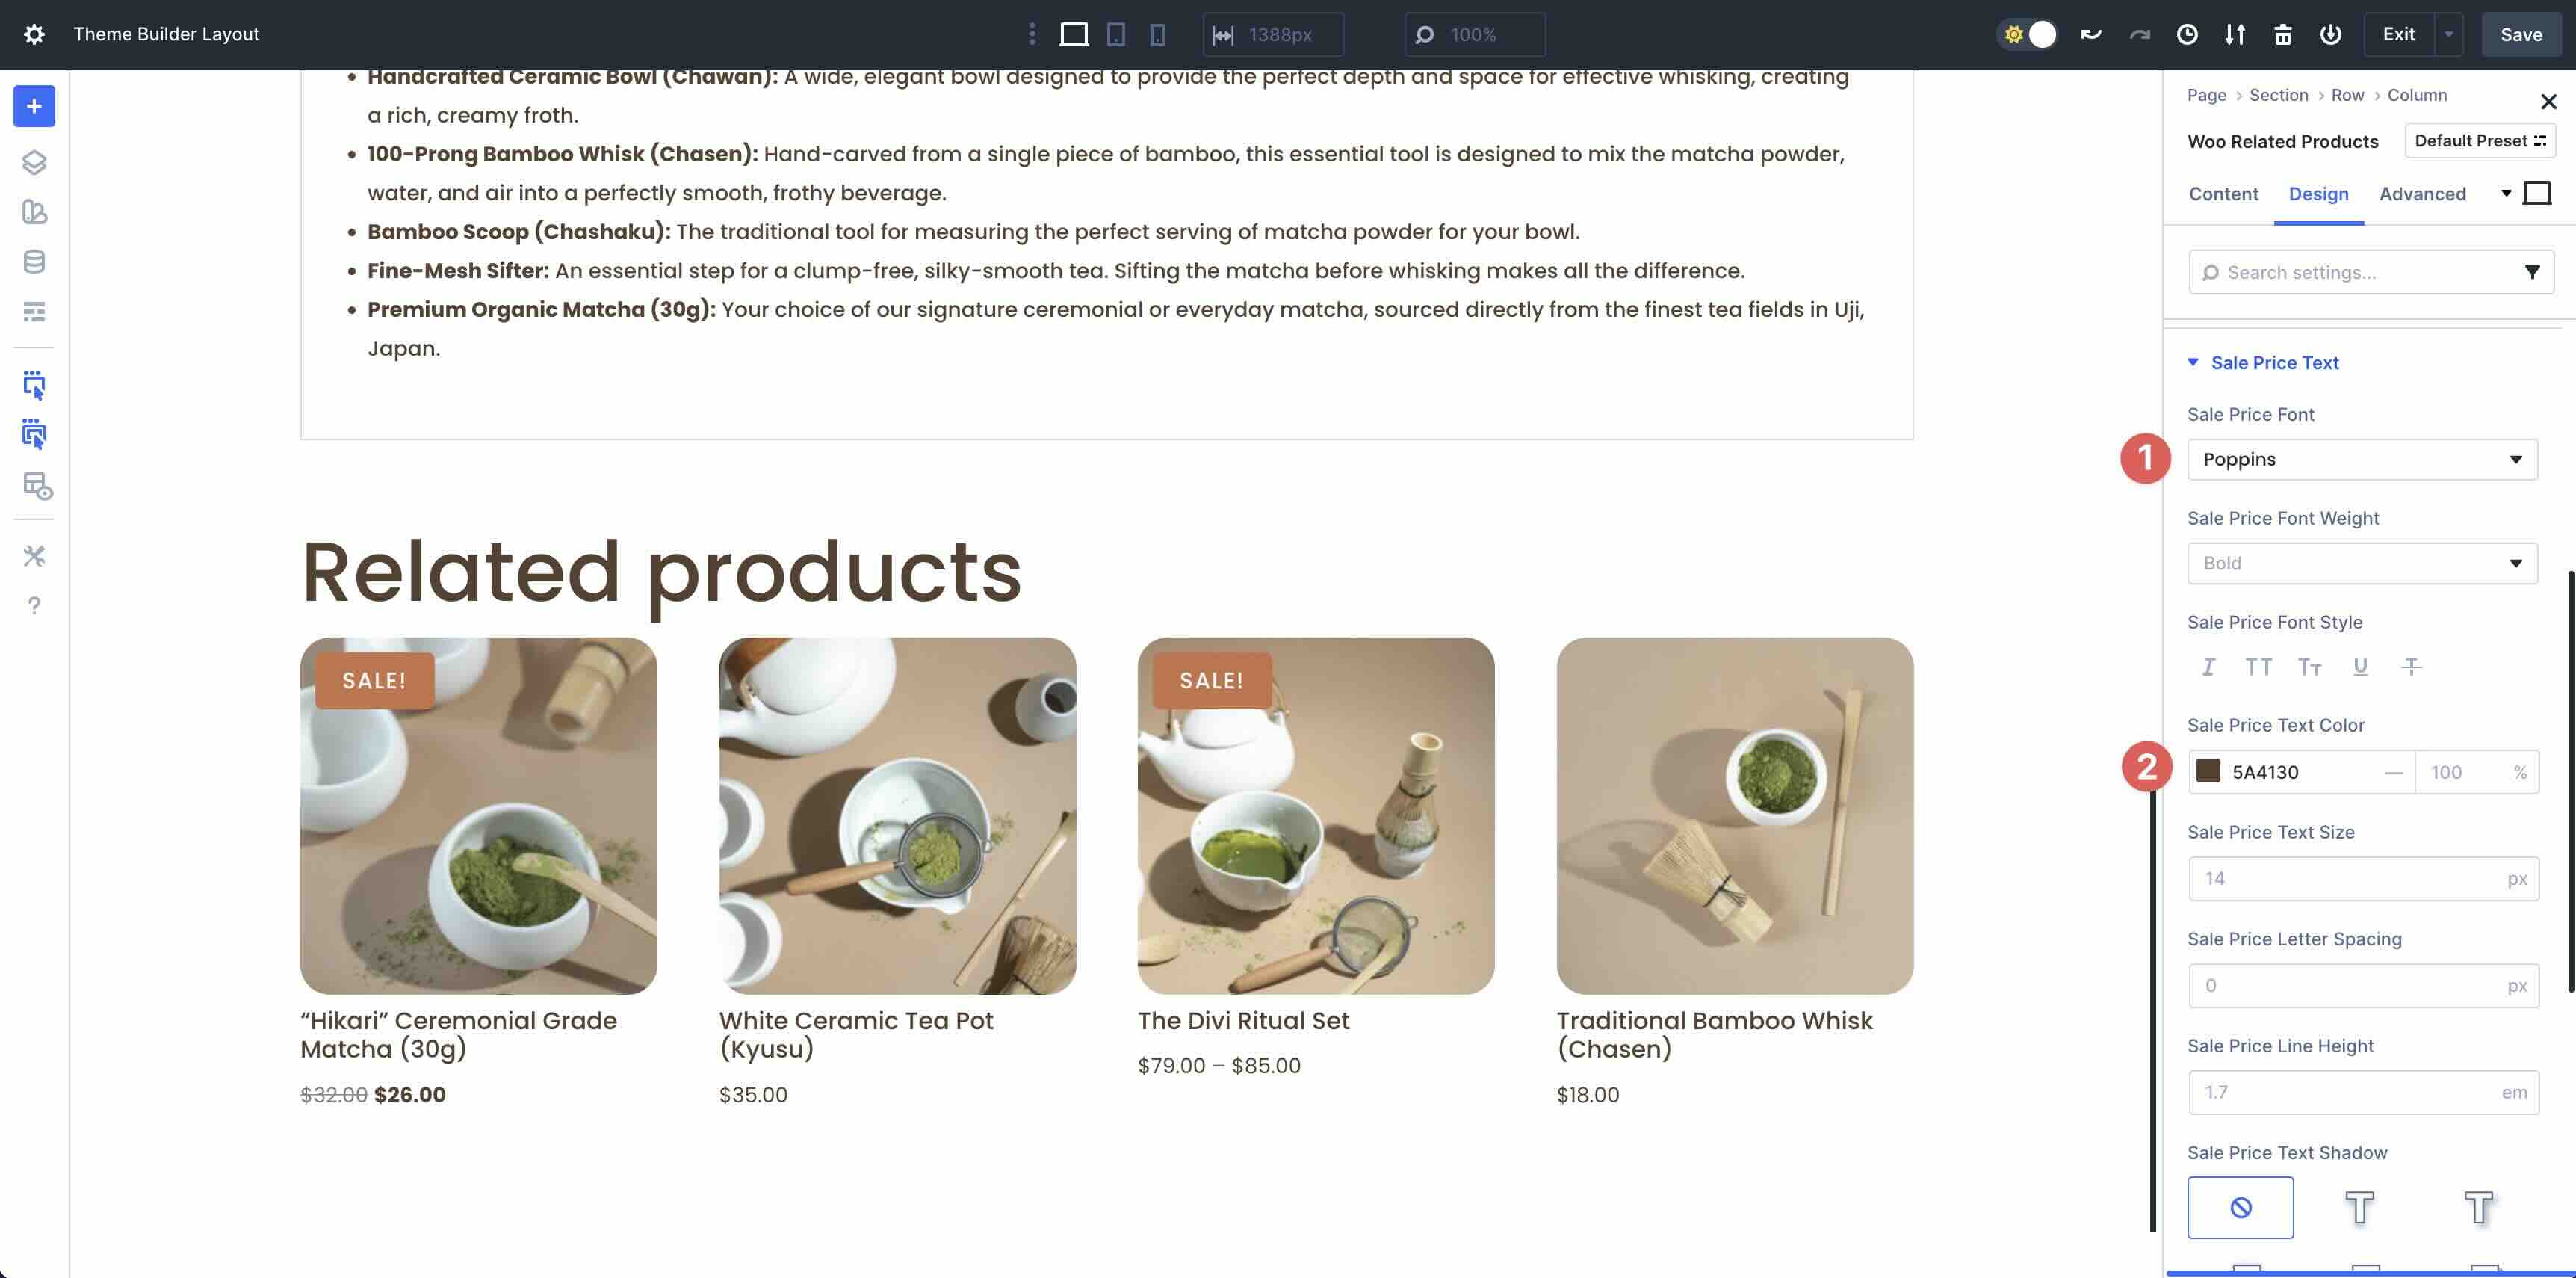
For the Value Textual content menu, input Poppins because the Value Font and use #5A4130 because the Value Textual content Colour.
In spite of everything, open the Sale Value Textual content menu. Use Poppins because the Sale Value Font. Within the Sale Value Textual content Colour box, input #5A4130.
Step 3: Check For Responsiveness
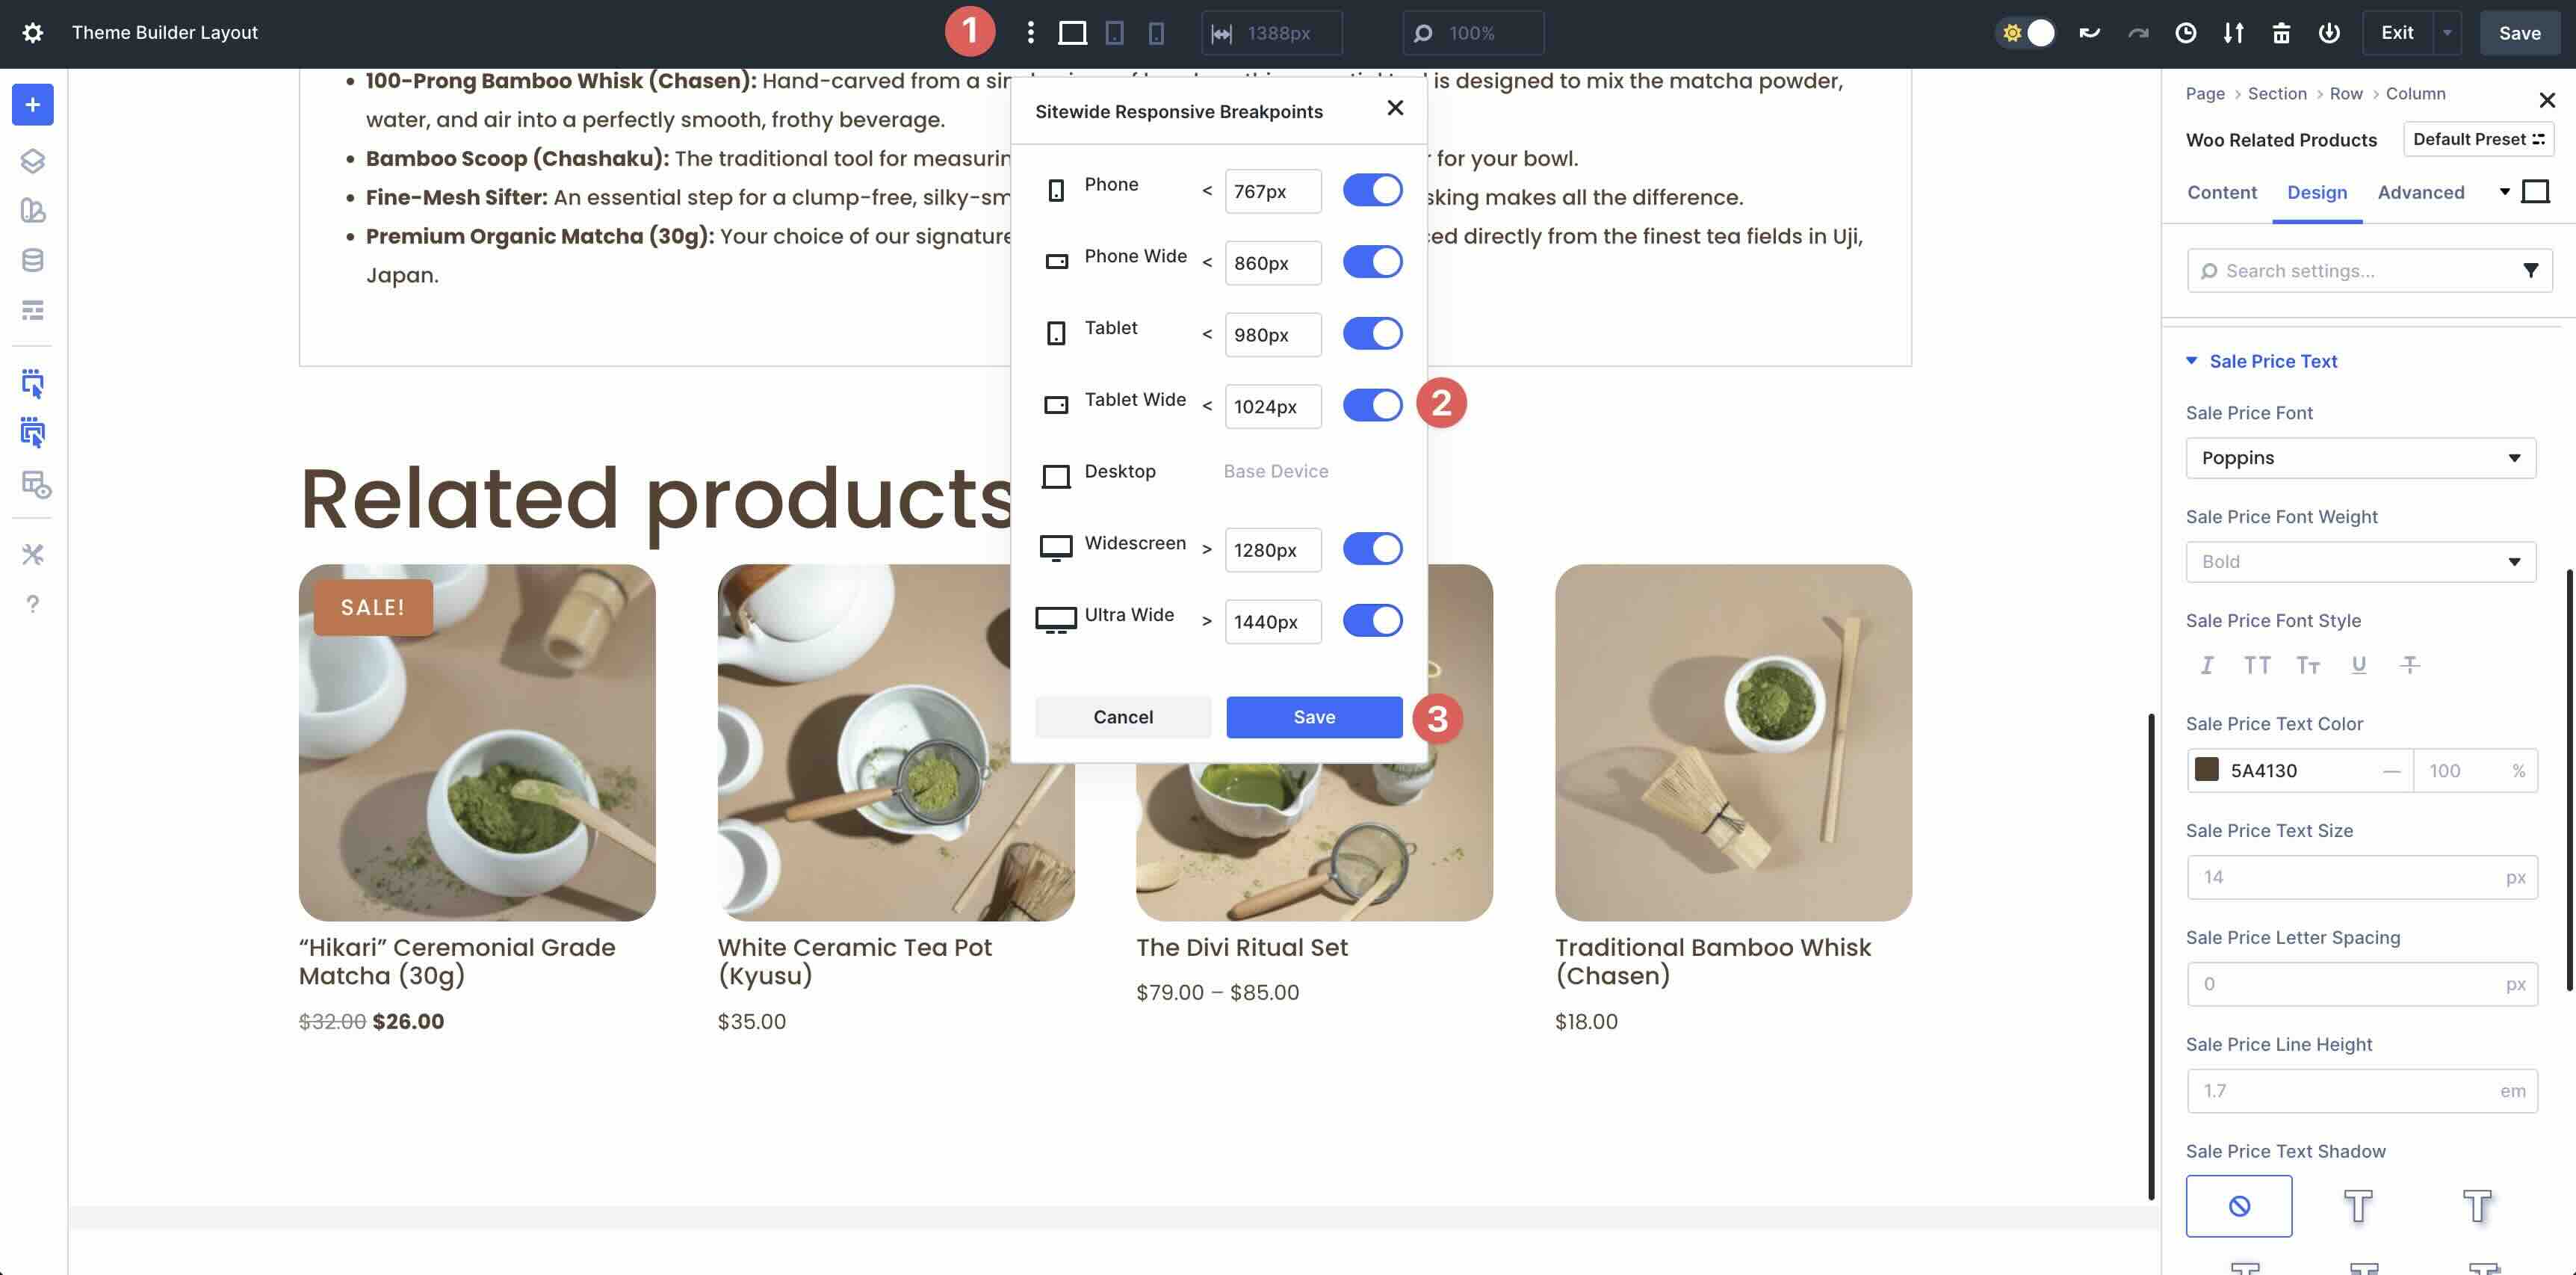
Ahead of saving your product web page, use Divi 5’s Customizable Responsive Breakpoints to navigate thru every display dimension. This guarantees that your format seems to be seamless on each and every software. By way of default, Divi permits 3 breakpoints, however you’ll simply permit all 7 of them by way of clicking the ellipsis menu in Divi’s toolbar on the height of the Builder. Use the toggles to permit the breakpoints you’d like, then click on the Save Button.
As you navigate every breakpoint, you’ll simply alternate your design.
Step 4: Save The Web page
Whenever you’ve made the entire vital refinements, save the product web page within the Theme Builder. Click on the Save Button on the height proper nook of the Builder.
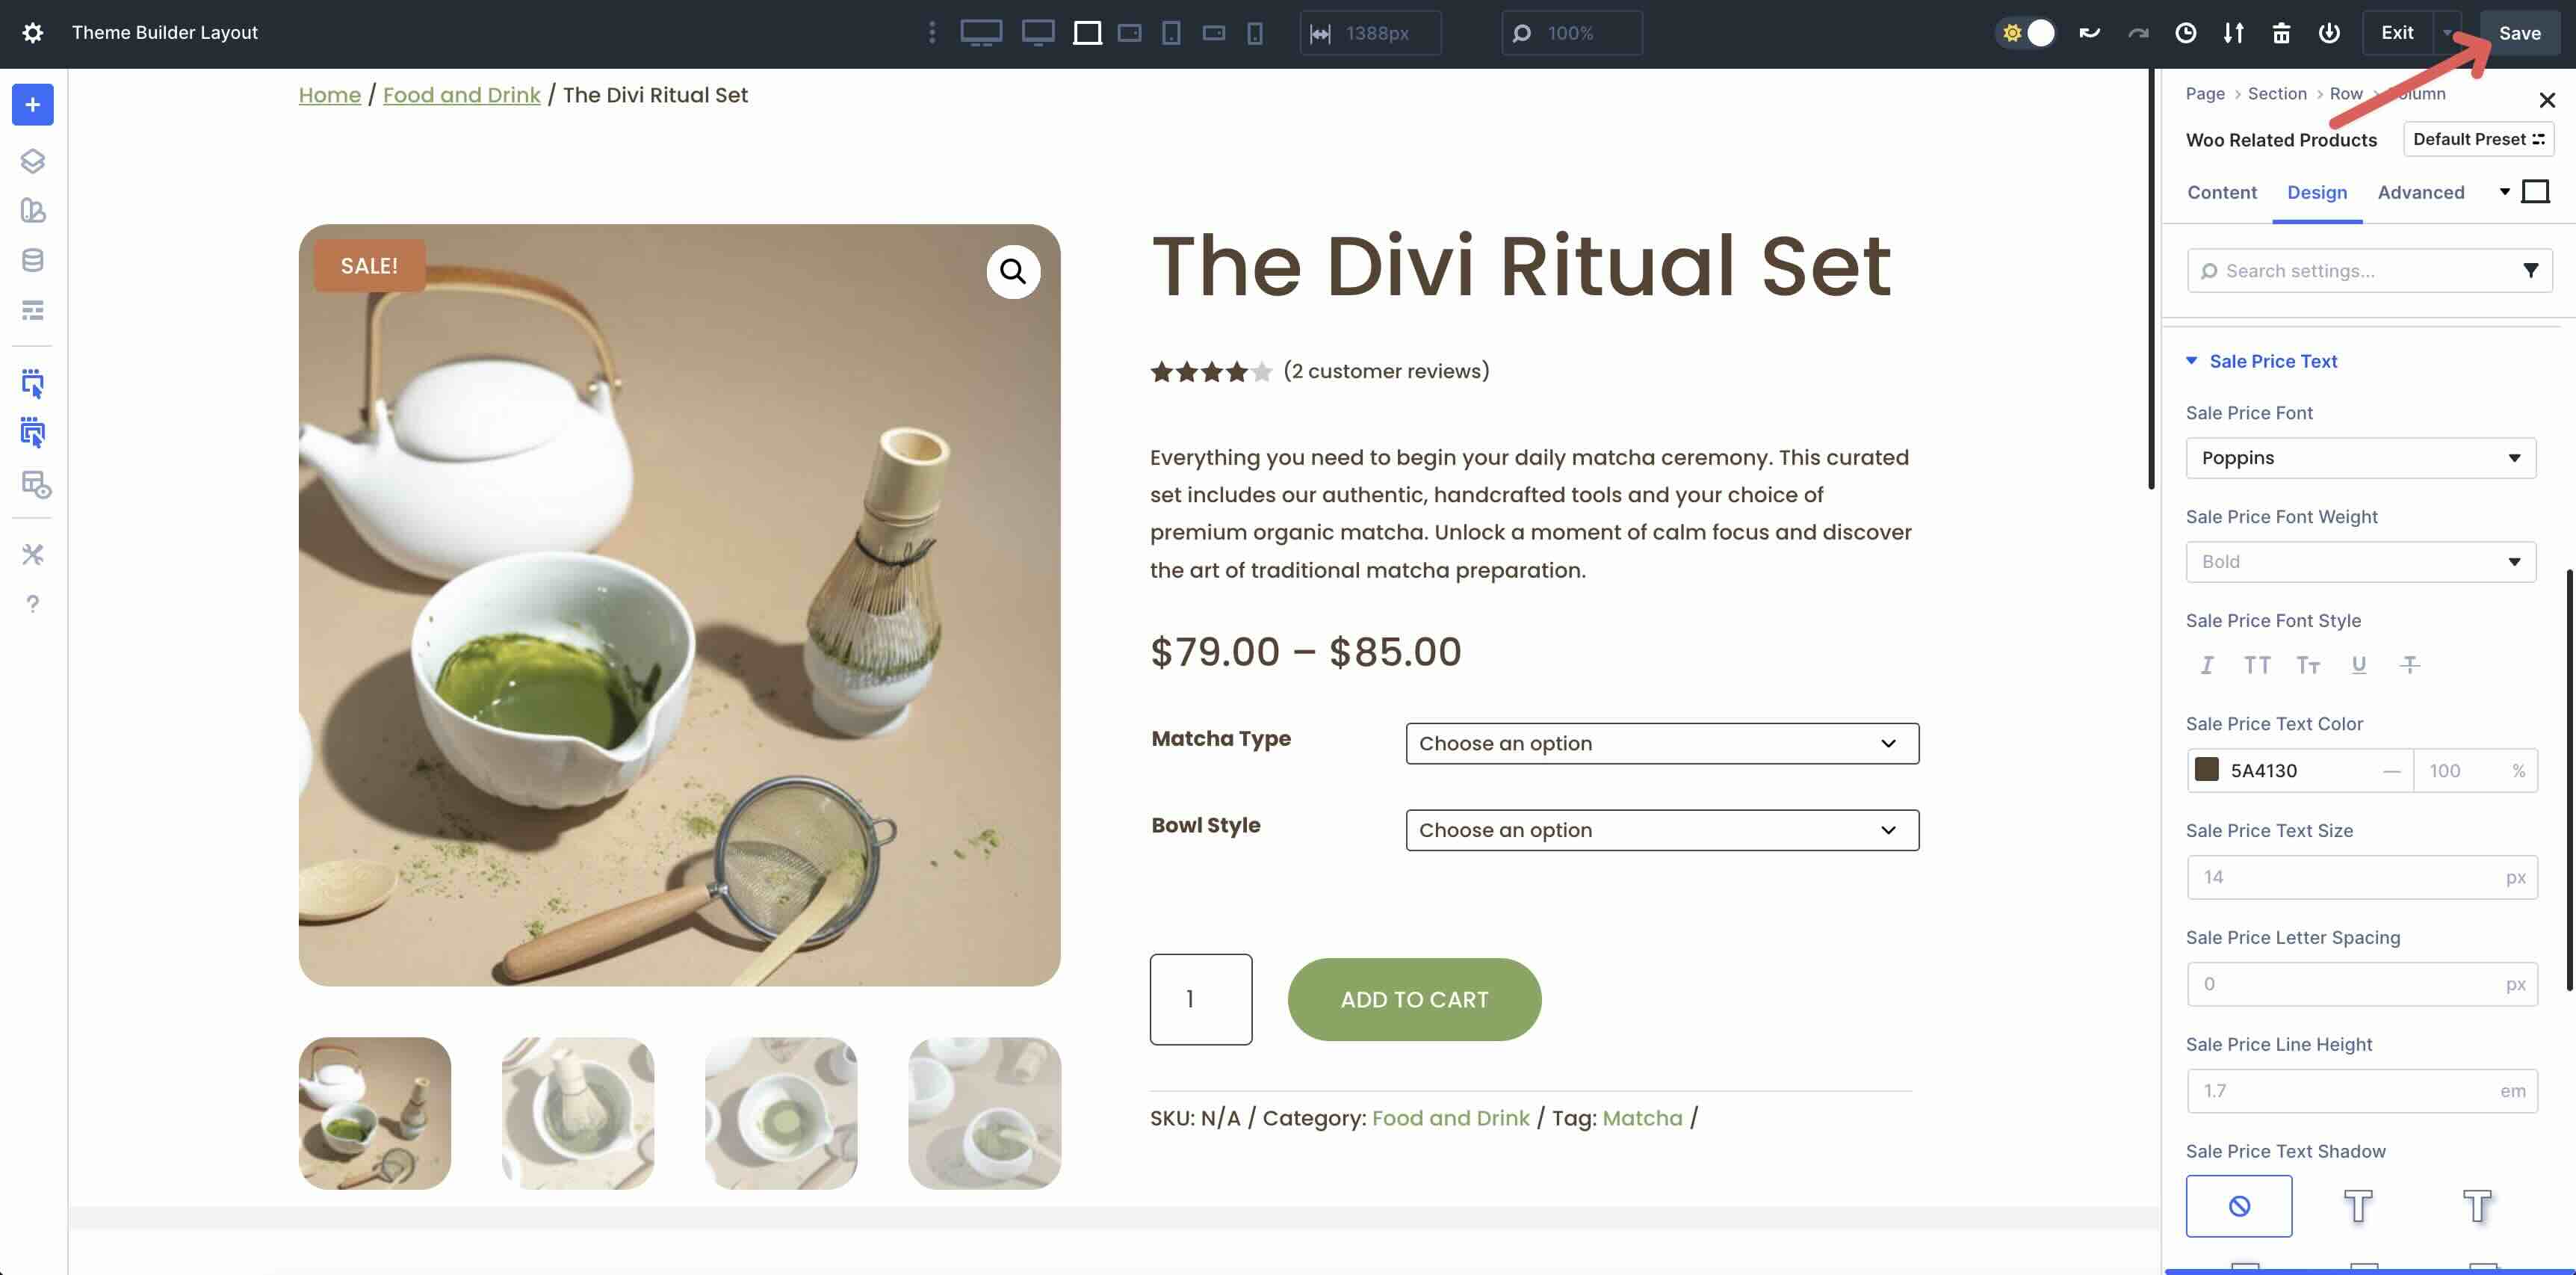
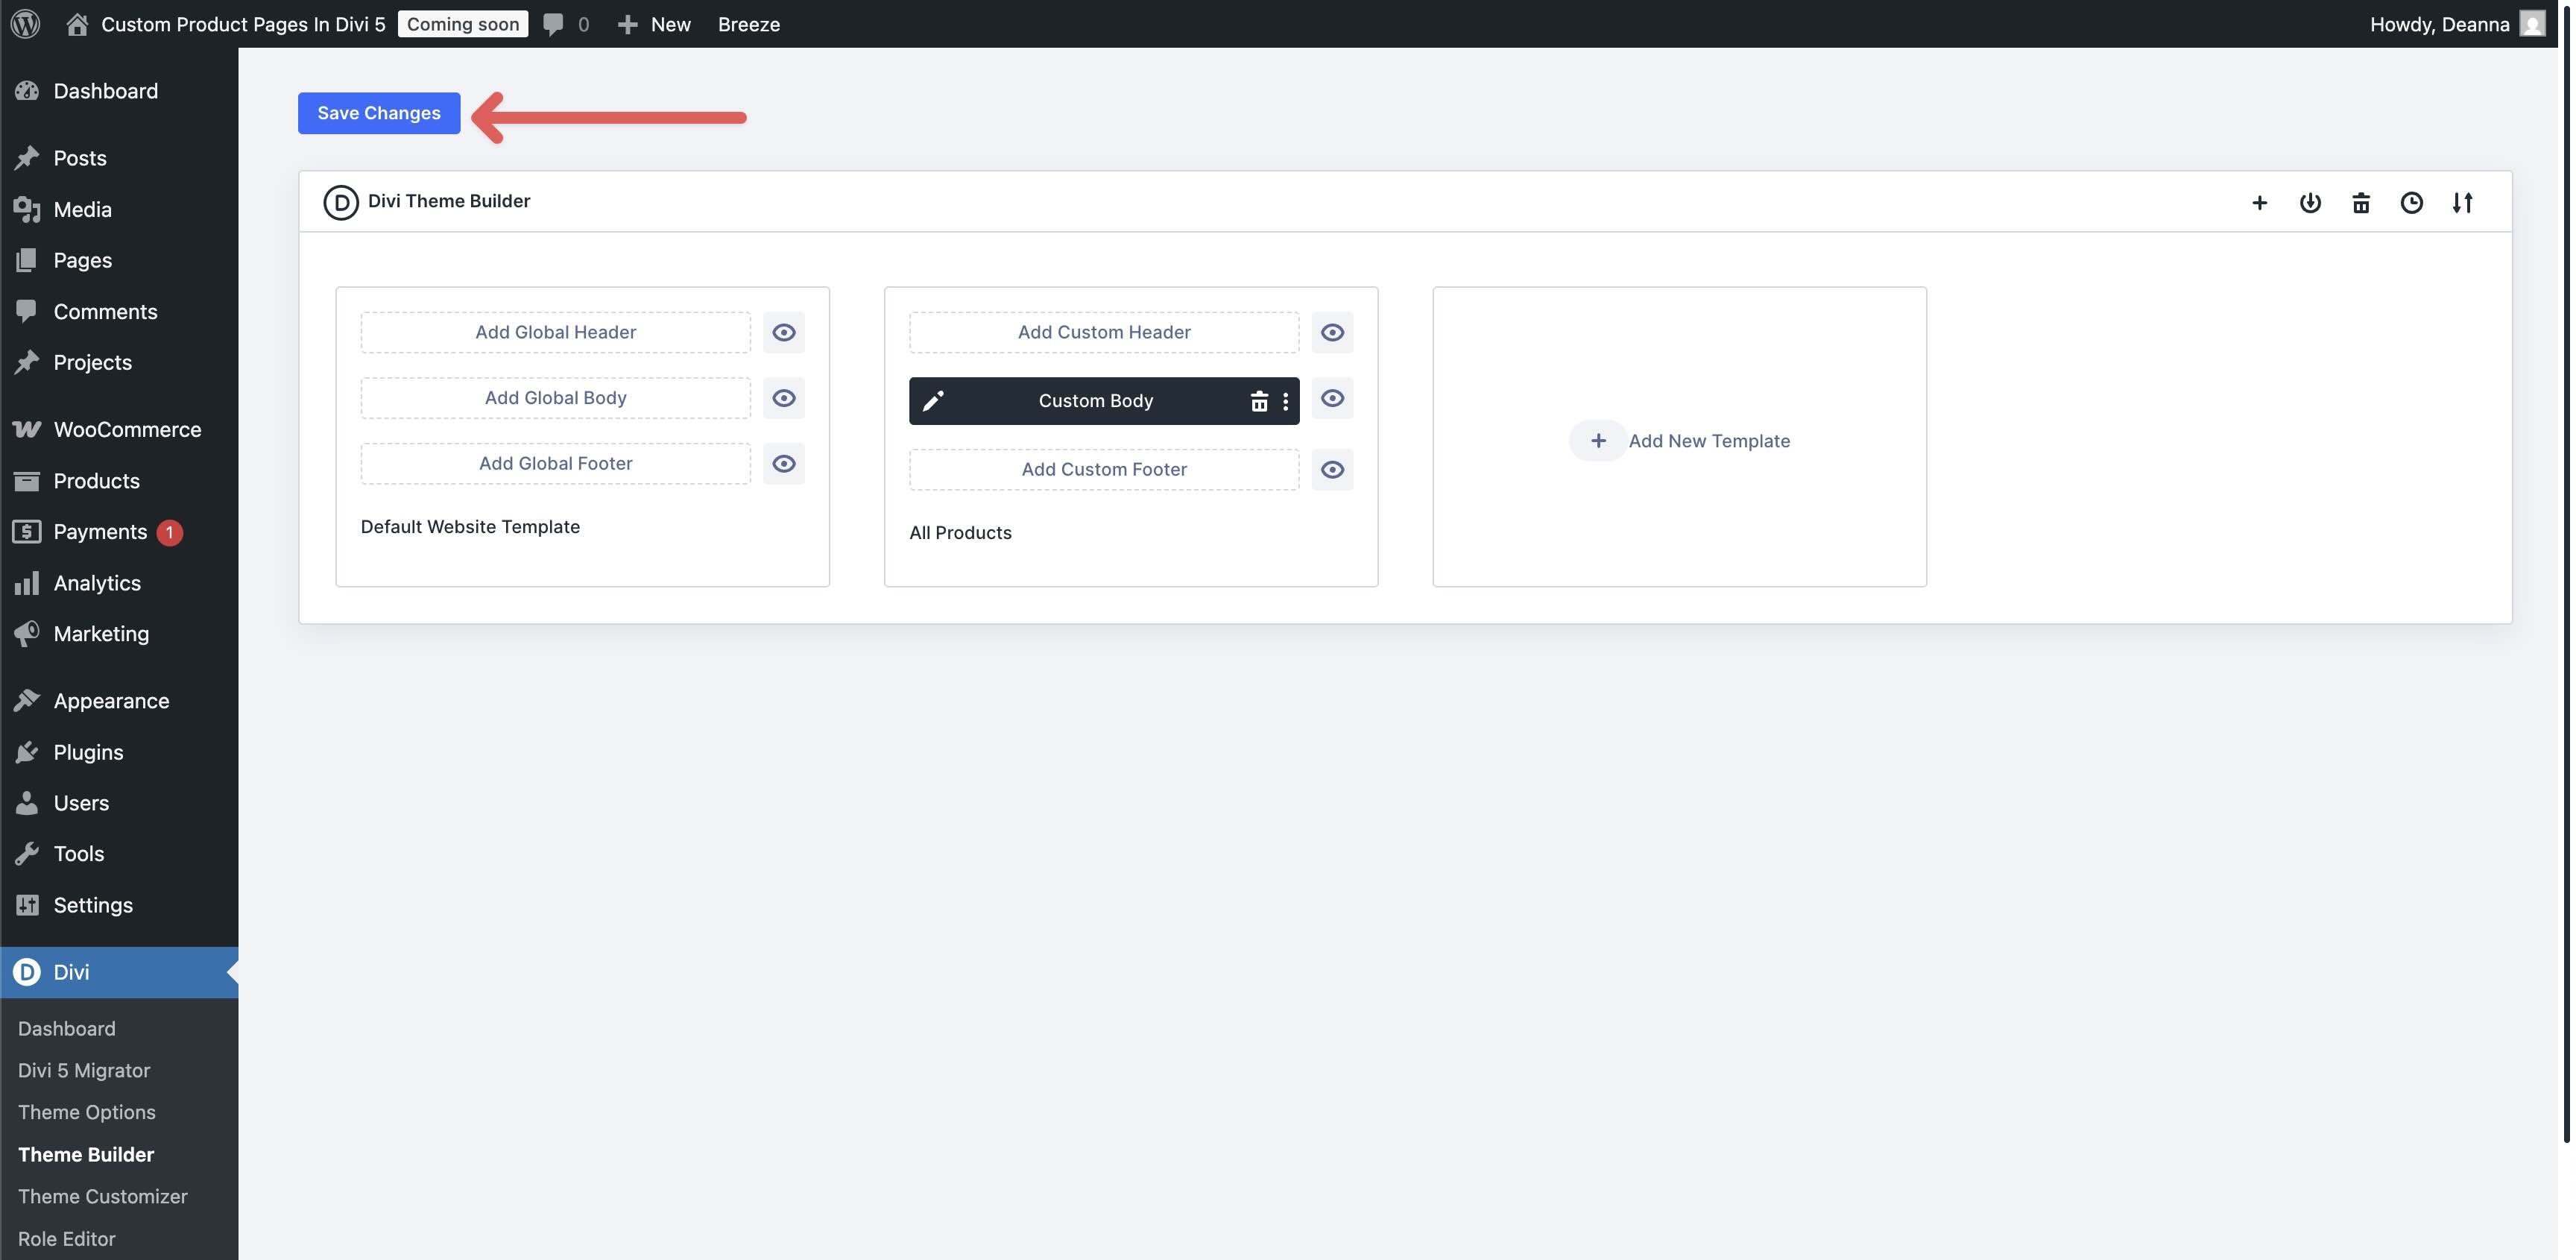
When redirected again to the WordPress dashboard, save the Template by way of clicking the Save Adjustments Button.
That’s it! As you’ll see, developing a sophisticated and efficient product web page template is so easy due to Divi 5’s intuitive Visible Builder and Woo Product modules.
Construct Your Subsequent Ecommerce Website online In Divi 5!
Divi 5‘s Woo Product modules free up ingenious freedom in your ecommerce web site, letting you construct product pages which are as distinctive as your emblem. From navigation to dynamic show modules, those 17 local modules seamlessly combine Woo knowledge with Divi’s Visible Builder for attractive, responsive designs with out the use of third-party plugins. Should you’re in a position to take the next move, obtain the newest model of Divi 5 and experiment with those robust modules.
We’d love to listen to your ideas about those new modules. Please remark underneath or publish on our social media channels.
The publish How To Create Customized Product Pages In Divi 5 (New Woo Modules) gave the impression first on Sublime Subject matters Weblog.
WordPress Web Design