
In trendy device building, microservices have emerged as a pivotal structure, enabling scalability, flexibility, and environment friendly control of advanced techniques.
Microservices are small, unbiased programs that carry out explicit duties, making an allowance for versatile deployment and scaling. This modular way to device design loosens the coupling between elements, bettering flexibility and manageability all the way through building.
The item supplies an outline of microservices, their capability, and their advent the use of Python. It additionally demonstrates deploying your microservices to Kinsta the use of a Dockerfile.
Contents
What Are Microservices?
Microservices are unbiased, self reliant services and products inside of an software, every addressing explicit trade wishes. They keep in touch via light-weight APIs or message agents, forming a complete gadget.
Not like monolithic techniques that scale solely in response to call for, microservices empower scaling particular person high-traffic elements. This structure facilitates simple fault control and have updates, countering monolithic barriers.
There are a number of advantages to the use of microservices, akin to:
- Flexibility and scalability — Decoupling particular person services and products lets you building up the collection of nodes operating an example of a selected provider experiencing excessive site visitors.
- Code modularity — Every provider can use a discrete generation stack, which means you’ll make a choice the most productive building equipment for every one.
On the other hand, some demanding situations accompany microservice architectures:
- Tracking more than one services and products — Tracking particular person services and products in a gadget turns into difficult as circumstances of a selected provider are deployed and dispensed throughout a number of nodes. This issue is particularly obvious right through community disasters or different gadget problems.
- Value — Creating microservice programs can also be considerably costlier than development monolithic techniques because of the prices related to managing more than one services and products. Every provider calls for its personal infrastructure and assets, which will transform expensive — specifically when scaling up the gadget.
How To Design a Microservice The usage of Python
Now that you already know some great benefits of the use of a microservice structure, it’s time to construct one with Python.
For this case, think you wish to have to construct an ecommerce internet software. The web site has a number of elements, together with the product catalog, an inventory of orders, and a fee processing gadget and logs, every of which you want to put into effect as an unbiased provider. Moreover, you want to ascertain a service-to-service conversation solution to switch information between those services and products, akin to HTTP, successfully.
Let’s construct a microservice the use of Python to regulate a product catalog. The microservice will fetch product information from a specified supply and go back the information in JSON structure.
Necessities
To practice this instructional, be sure to have:
- Familiarity with Flask
- Python, Postman Consumer, and Docker Desktop put in to your device
1. Create Your Challenge
- To get began, create a folder on your undertaking referred to as flask-microservice and present listing into the undertaking’s listing.
- Subsequent, run
python3 --versionto substantiate that Python is put in to your pc accurately. - Set up
virtualenvto create an remoted building atmosphere for the Flask microservice through operating the command underneath:pip3 set up virtualenv - Create a digital atmosphere through operating the next:
virtualenv venv - In any case, turn on the digital atmosphere the use of one of the vital following instructions in response to your pc’s working gadget:
# Home windows:
.venvScriptsactivate
# Unix or macOS:
supply venv/bin/turn on
2. Set Up a Flask Server
Within the root listing, create a necessities.txt document and upload those dependencies.
flask
requests
Run the pip3 command to your terminal to put in the dependencies.
pip set up -r necessities.txtSubsequent, create a brand new folder within the root listing and title it services and products. Inside of this folder, create a brand new document, merchandise.py, and upload the code underneath to arrange a Flask server.
import requests
import os
from flask import Flask, jsonify
app = Flask(__name__)
port = int(os.environ.get('PORT', 5000))

@app.course("/")
def house():
    go back "Hi, this can be a Flask Microservice"
if __name__ == "__main__":
    app.run(debug=True, host="0.0.0.0", port=port)
Within the code above, a elementary Flask server is ready up. It initializes a Flask app, defines a unmarried course for the foundation URL ("/"), and when accessed, presentations the message "Hi, this can be a Flask Microservice". The server runs on a specified port, bought from an atmosphere variable or defaults to port 5000, and begins in debugging mode, making it able to deal with incoming requests.
3. Outline the API Endpoints
With the server configured, create an API endpoint for a microservice that fetches product information from a publicly to be had API. Upload this code to the merchandise.py document:
BASE_URL = "https://dummyjson.com"
@app.course('/merchandise', strategies=['GET'])
def get_products():
    reaction = requests.get(f"{BASE_URL}/merchandise")
    if reaction.status_code != 200:
        go back jsonify({'error': reaction.json()['message']}), reaction.status_code
    merchandise = []
    for product in reaction.json()['products']:
        product_data = {
            'identity': product['id'],
            'name': product['title'],
            'emblem': product['brand'],
            'value': product['price'],
            'description': product['description']
        }
        merchandise.append(product_data)
    go back jsonify({'information': merchandise}), 200 if merchandise else 204
The code above creates an /merchandise endpoint within the Flask server. When accessed by way of a GET request, it fetches product information from a dummy API. If a hit, it processes the retrieved information, extracts product main points, and returns the guidelines in a JSON structure. In case of mistakes or no to be had information, it responds with an acceptable error message and standing code.
4. Check the Microservice
At this level, you have got effectively arrange a easy microservice. To start out the provider, spin up the advance server, which is able to get started operating at http://localhost:5000.
flask --app services and products/merchandise runThen you’ll make a GET request to the /merchandise endpoint the use of the Postman consumer, you will have to see a identical reaction to the screenshot underneath.

GET request in Postman.How To Put in force Authentication and Authorization in a Python Microservice
When development microservices, it’s vital to put into effect powerful safety features akin to authentication and authorization. Securing your microservice guarantees that simplest approved customers can get right of entry to and use the provider, protective delicate information and fighting malicious assaults.
One efficient approach for enforcing safe authentication and authorization in microservices is JSON Internet Tokens (JWTs).
JWT is a broadly used open same old that gives a protected and environment friendly method of transmitting authentication data between purchasers and servers. They’re compact, encrypted, and digitally signed tokens you cross along HTTP requests. While you come with a JWT with every request, the server can briefly test a consumer’s id and permissions.
To put into effect JWT authentication within the microservice, do the next:
- Upload Python’s
pyjwtbundle for your necessities.txt document and reinstall the dependencies the use ofpip set up -r necessities.txt. - For the reason that provider doesn’t have a devoted database, create a customers.json document within the root listing of your undertaking to retailer an inventory of approved customers. Paste the code underneath within the document:
[ { "id": 1, "username": "admin", "password": "admin" } ] - Then, to your services and products/merchandise.py document, substitute the import statements with the next:
import requests
from flask import Flask, jsonify, request, make_response
import jwt
from functools import wraps
import json
import os
from jwt.exceptions import DecodeError
You might be uploading those modules to deal with HTTP requests, create a Flask app, set up JSON information, put into effect JWT-based authentication, and deal with exceptions, enabling a variety of options throughout the Flask server.
- Upload the next code underneath the Flask app example advent to generate a secret key that shall be used to signal the JWT tokens.
app.config['SECRET_KEY'] = os.urandom(24) - To make sure JWTs, create a decorator serve as and upload the next code above the API routes to your Flask server code. This decorator serve as will authenticate and validate customers prior to they get right of entry to secure routes.
def token_required(f):
    @wraps(f)
    def adorned(*args, **kwargs):
        token = request.cookies.get('token')
        if now not token:
            go back jsonify({'error': 'Authorization token is lacking'}), 401
        take a look at:
            information = jwt.decode(token, app.config['SECRET_KEY'], algorithms=["HS256"])
            current_user_id = information['user_id']
        with the exception of DecodeError:
            go back jsonify({'error': 'Authorization token is invalid'}), 401
        go back f(current_user_id, *args, **kwargs)
    go back adorned
This decorator serve as exams incoming HTTP requests for a JWT authorization token, which will have to be within the request headers or cookies. If the token is lacking or invalid, the decorator sends an
unauthorized standing codemessage as a reaction.Conversely, if a sound token is provide, the decorator extracts the consumer ID after deciphering it. This procedure safeguards the secure API endpoints through granting get right of entry to simplest to approved customers.
- Outline an API endpoint for consumer authentication the use of the code underneath.
with open('customers.json', 'r') as f:
    customers = json.load(f)
@app.course('/auth', strategies=['POST'])
def authenticate_user():
    if request.headers['Content-Type'] != 'software/json':
        go back jsonify({'error': 'Unsupported Media Kind'}), 415
    username = request.json.get('username')
    password = request.json.get('password')
    for consumer in customers:
        if consumer['username'] == username and consumer['password'] == password:
            token = jwt.encode({'user_id': consumer['id']}, app.config['SECRET_KEY'],set of rules="HS256")
            reaction = make_response(jsonify({'message': 'Authentication a hit'}))
            reaction.set_cookie('token', token)
            go back reaction, 200
    go back jsonify({'error': 'Invalid username or password'}), 401
To authenticate and authorize customers, the
/authAPI endpoint exams the credentials within thePOSTrequest’s JSON payload in opposition to the record of allowed customers. If the credentials are legitimate, it generates a JWT token the use of the consumer’s ID and the app’s secret key and units the token as a cookie within the reaction. Customers can now use this token to make next API requests.After developing the
/authendpoint, use Postman to ship an HTTPPOSTrequest tohttp://localhost:5000/auth. Within the request frame, come with the credentials of the mock admin consumer you created.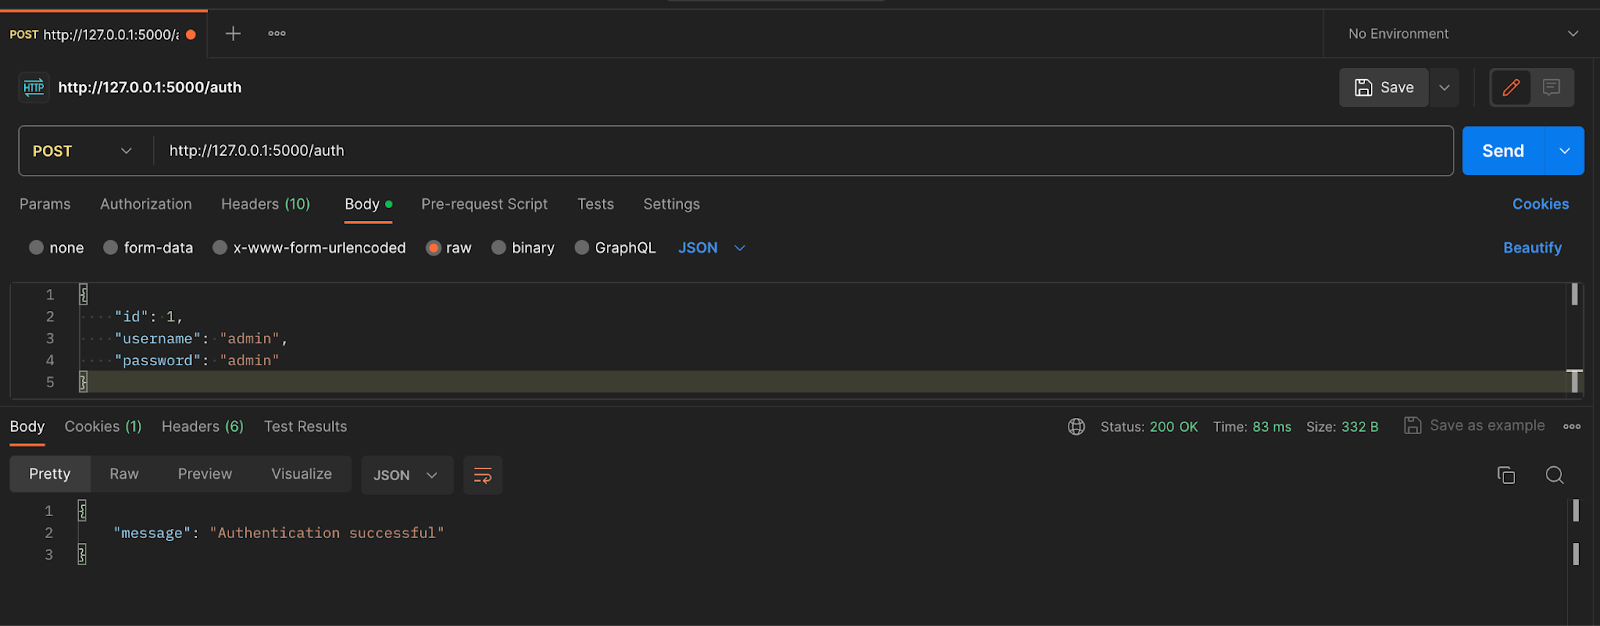
Postman request appearing the request frame. If the request succeeds, the API will generate a JWT token, set it in Postman’s cookies, and ship an authenticated good fortune reaction.
- In any case, replace the
GETAPI endpoint to test for and test the JWT token the use of the code underneath:@app.course('/merchandise', strategies=['GET']) @token_required def get_products(current_user_id): headers = {'Authorization': f'Bearer {request.cookies.get("token")}'} reaction = requests.get(f"{BASE_URL}/merchandise", headers=headers) if reaction.status_code != 200: go back jsonify({'error': reaction.json()['message']}), reaction.status_code merchandise = [] for product in reaction.json()['products']: product_data = { 'identity': product['id'], 'name': product['title'], 'emblem': product['brand'], 'value': product['price'], 'description': product['description'] } merchandise.append(product_data) go back jsonify({'information': merchandise}), 200 if merchandise else 204

How To Containerize Python Microservices With Docker
Docker is a platform that applications programs and their dependencies in an remoted building atmosphere. Packaging microservices in bins streamlines their deployment and control processes in servers as every provider runs and executes independently in its container.
To containerize the microservice, you should create a Docker symbol from a Dockerfile that specifies the dependencies required to run the applying in a container. Create a Dockerfile within the root listing of your undertaking and upload those directions:
FROM python:3.9-alpine
WORKDIR /app
COPY necessities.txt ./
RUN pip set up -r necessities.txt
COPY . .
EXPOSE 5000
CMD ["python", "./services/products.py"]
Sooner than development the picture, overview those instructions:
FROM— Instructs Docker which base symbol to make use of. A base symbol is a pre-built example containing the device and dependencies to run the Flask software in a container.WORKDIR— Units the required listing throughout the container because the running listing.COPY necessities.txt ./— Copies the dependencies within the necessities.txt document into the container’s necessities.txt document.RUN— Runs the required command to put in the dependencies the picture calls for.COPY . .— Copies all of the recordsdata from the undertaking’s root listing to the running listing throughout the container.EXPOSE— Specifies the port the place the container will pay attention for requests. On the other hand, Docker doesn’t put up the port to the host device.CMD— Specifies the default command to execute when the container begins.
Subsequent, upload a .dockerignore document within the root listing of your undertaking to specify the recordsdata that the Docker symbol will have to exclude. Restricting the picture contents will cut back its ultimate dimension and related construct time.
/venv
/services and products/__pycache__/
.gitignore
Now, run the command underneath to construct the Docker symbol:
docker construct -t flask-microservice .In any case, as soon as the picture builds, you’ll run the microservice in a Docker container the use of the next command:
docker run -p 5000:5000 flask-microserviceThis command will get started a Docker container operating the microservice and disclose port 5000 at the container to port 5000 at the host device, permitting you to make HTTP requests out of your internet browser or Postman the use of the URL http://localhost:5000.
Deploy Python Microservices With Kinsta
Kinsta provides controlled webhosting answers for internet programs and databases — you’ll seamlessly deploy and set up your Python microservices and backend APIs in a manufacturing atmosphere.
Practice those steps to configure your Flask microservice for deployment with MyKinsta:
- First, create a brand new Procfile within the root listing and upload the code underneath. It specifies the command to run the Flask microservice on Kinsta’s Gunicorn WSGI HTTP Server for Python programs.
internet: gunicorn services and products.wsgi - To your necessities.txt document, upload the Gunicorn dependency:
gunicorn==20.1.* - Subsequent, create a brand new services and products/wsgi.py document and upload the code underneath.
from services and products.merchandise import app as software if __name__ == "__main__": software.run() - Create a .gitignore document within the undertaking root folder and upload the next:
services and products/__pycache__ venv - In any case, create a brand new repository on GitHub and push your undertaking recordsdata.
As soon as your repo is able, practice those steps to deploy the Flask microservice to Kinsta:
- Log in or create an account to view your MyKinsta dashboard.
- Authorize Kinsta along with your Git supplier (Bitbucket, GitHub, or GitLab).
- Click on Packages at the left sidebar, then click on Upload software.
- At the dashboard, click on on Upload Provider, and make a selection Utility.
- Choose the repository and the department you want to deploy from.
- Assign a singular title for your app and make a choice a information heart location.
- To configure the Construct atmosphere, make a selection the choice to make use of a Dockerfile to construct the container symbol.
- Give you the trail for your Dockerfile and the context.
- In any case, overview different data and click on Create software.
Check the Microservice
As soon as the deployment procedure is a hit, click on the equipped URL to check the microservice through making HTTP requests in Postman. Make a GET request to the foundation endpoint.

GET request to the microservice’s product endpoint.To authenticate and generate a JWT token, ship a POST request to the /auth API endpoint, passing the admin credentials within the frame of the request.

POST request to microservice auth endpoint.Finally, after effectively getting authenticated, make a GET request to the /merchandise endpoint to fetch information.

GET request to a microservice merchandise endpoint.Abstract
As programs develop in dimension and complexity, adopting structure patterns that let device techniques to scale with out straining to be had assets is a very powerful.
Microservices structure provides scalability, building flexibility, and maintainability, making it more straightforward so that you can set up advanced programs.
Kinsta simplifies the method of webhosting your microservices. It lets you without problems use your most popular database and with ease host each your software and database via a unified dashboard.
The publish How To Construct and Deploy Microservices With Python seemed first on Kinsta®.
WP Hosting