Each week, we give you new and loose Divi format packs which you’ll use in your subsequent mission. For one of the vital format packs, we additionally proportion a use case that’ll assist you to take your website online to the following stage.
This week, as a part of our ongoing Divi design initiative, we’re going to turn you methods to create locked content material nook popups with Divi and the Resort Layout Pack. The idea that of a locked content material optin shape is understated. Other folks have to go into their electronic mail cope with and once they do, hidden content material will divulge. You’ll be able to use this hidden content material to proportion a cut price code for example. To make all of this occur, we’re going to make use of the Bloom plugin and upload the locked content material optin shape shortcode to a Textual content Module which we’ll taste as a popup. The Textual content Module may even come with an animation with an animation extend to make the Textual content Module seem as though this can be a popup.
Let’s get to it!
Contents
- 1 Preview
- 2 Set up the Bloom Plugin
- 3 Setup Bloom Optin Shape
- 4 Create Design with Divi
- 5 Preview
- 6 Ultimate Ideas
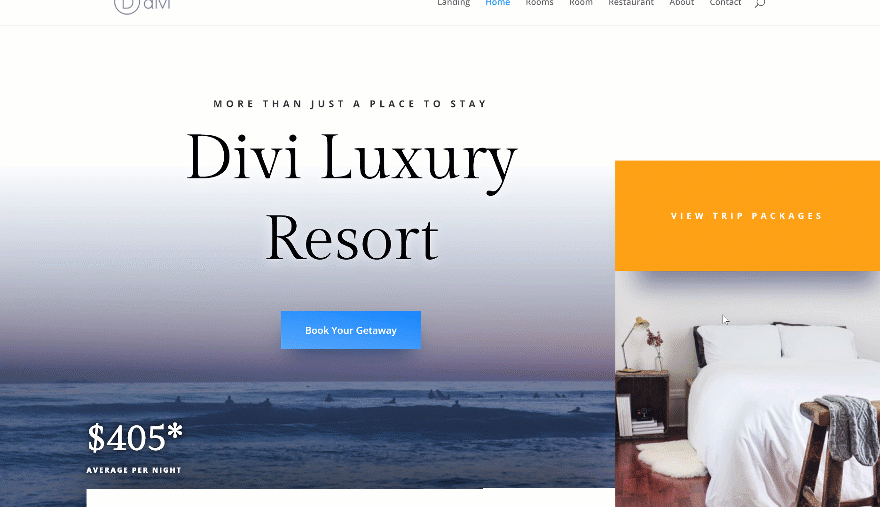
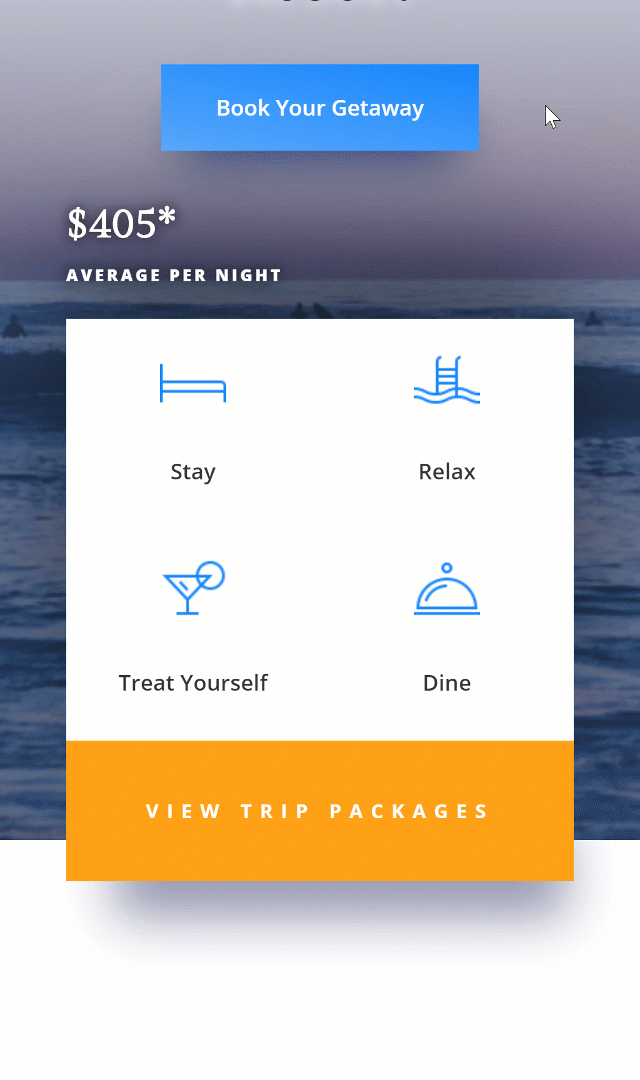
Preview
Prior to we dive into the educational, let’s take a handy guide a rough have a look at the result throughout other display sizes.
Desktop
Cellular
Set up the Bloom Plugin
Obtain Bloom
The very first thing it is very important do is obtain the Bloom plugin. For those who’re already an Sublime Topics member, you’ll to find the plugin via going to the contributors house. There, you’ll have the ability to obtain the zipped document. For those who’re now not an Sublime Topics member but, you’ll want to purchase a membership first.

Add & Set up Bloom
Whenever you’ve downloaded Bloom, you’ll cross forward and add it in your WordPress website online via going to Plugins > Upload New and clicking on ‘Add Plugin’ on the most sensible of the web page.

Then, add the zipped document and click on on ‘Set up Now’.

Don’t disregard to turn on the plugin as soon as it’s uploaded as smartly.

Setup Bloom Optin Shape
Upload New Locked Content material Shape
We will now get started developing the locked content material shape which we’ll, later in this put up, use in our Divi design! Pass in your WordPress Dashboard > Bloom > Optin Paperwork and create a brand new optin shape.

Proceed via deciding on the ‘Locked Content material’ optin kind and continue to the setup settings.

Setup Settings
Whenever you’re within the setup settings, it is very important give your new optin shape a reputation. You’ll additionally want to choose an electronic mail supplier of your selection and input the authentication main points.

Design Settings
The next move is designing the shape. Later at the put up, we’re going to make use of the optin shape shortcode in a Textual content Module which we’ll taste, so we don’t want too many settings being carried out to the optin shape itself. Be sure to go away the optin identify and optin message content material packing containers empty. Trade the picture orientation as smartly.
- Symbol Orientation: No Symbol

Scroll down the web page and make some further adjustments to the optin styling and shape setup.
- Background Colour: #ffffff
- Shape Orientation: Shape on Backside

We’re additionally converting across the shape styling settings.
- Shape Box Orientation: Stacked Shape Fields
- Shape Background Colour: #f4f4f4
- Button Colour: #ffffff
- Button Textual content Colour: Darkish
- Make a selection Shape Edge Taste: 2d Possibility

Create Design with Divi
Upload New Row
Column Construction
We will now transfer over to the Divi Builder! Pass forward and create a brand new web page the use of the Resort Layout Pack‘s homepage. As soon as the format is uploaded, proceed via including a brand new row on the most sensible of the second one segment the use of the next column construction:

Sizing
With out including any modules but, open the row settings and make some adjustments to the sizing settings.
- Make This Row Fullwidth: Sure
- Use Customized Gutter Width: Sure
- Gutter Width: 1

Spacing
Pass to the spacing settings subsequent and upload ‘0px’ to the highest and backside padding of the row. This will likely prohibit the distance this is being taken up via the brand new row we’ve added.
- Best Padding: 0px
- Backside Padding: 0px

Upload Textual content Module
Upload H3 Content material
The one module we want to create the locked content material nook popup is a Textual content Module. Upload an H3 identify of your option to the content material field.

Upload Locked Content material Optin Shape Shortcode
Then, return to the Bloom plugin and duplicate the shortcode of the optin shape you’ve created within the earlier a part of this instructional.

Upload no matter content material you wish to have to look after other folks fill out the optin shape. Within the instance beneath, you’ll realize that we’re sharing a chit code, however you’ll proportion any roughly knowledge you wish to have.

Background Colour
Pass to the background settings of the module subsequent and upload an absolutely white background colour.
- Background Colour: #ffffff

Textual content Settings
Transfer directly to the design tab and alter the textual content settings subsequent.
- Textual content Font: Open Sans
- Textual content Colour: #0f87ff
- Textual content Measurement: 15px

H3 Textual content Settings
Trade the font that’s getting used in your H3 replica too.
- Heading 3 Font: Gilda Show

Spacing
And to provide the module a form, we’re going so as to add some customized margin and padding values. We’re additionally editing all of those values to make the design fit no matter display dimension your guests are the use of.
- Best Margin: -17vw
- Left Margin: 65vw (Desktop), 37vw (Pill), 3vw (Telephone)
- Proper Margin: 0px
- Best Padding: 5vw (Desktop), 11vw (Pill), 13vw (Telephone)
- Backside Padding: 5vw, 11vw (Pill), 13vw (Telephone)
- Left Padding: 6vw (Desktop), 11vw (Pill), 16vw (Telephone)
- Proper Padding: 6vw (Desktop), 11vw (Pill), 16vw (Telephone)

Border
Proceed via going to the border settings of the Textual content Module and upload ‘500vw’ to every one of the vital corners, excluding for the ground proper one.

Field Shadow
Upload a field shadow subsequent to make the Textual content Module pop.
- Field Shadow Blur Energy: 150px
- Shadow Colour: rgba(0,0,0,0.3)

Animation
Finally, we’re additionally including an animation that is going from proper to left to create the popup impact.
- Animation Repeat: As soon as
- Animation Path: Left
- Animation Period: 500ms
- Animation Lengthen: 1000ms
- Animation Depth: 16%

Clone Row
Whenever you’re executed developing the primary locked content material nook popup, you’ll cross forward and clone all of the row.

Position the replica row proper right here:

Take away Phase Backside Padding
Take away the ground padding of the segment you’ve positioned the row in.
- Backside Padding: 0px

Trade Textual content Module Spacing Settings
Then, open the Textual content Module’s settings and alter the customized margin values.
- Left Margin: 0vw
- Proper Margin: 65vw (Desktop), 37vw (Pill), 3vw (Telephone)

Trade Textual content Module Rounded Corners
Be sure to trade the rounded corners too. We’re the use of ‘500vw’ for every one of the vital corners excluding for the ground left one.

Trade Textual content Module Animation Settings
Remaining however now not least, trade the animation route to proper and also you’re executed!
- Animation Path: Proper

Preview
Now that we’ve long past via all of the steps, let’s take a last have a look at the result throughout other display sizes!
Desktop
Cellular
Ultimate Ideas
On this put up, we’ve proven you methods to create locked content material nook popups with Divi, the Bloom plugin and the Resort Layout Pack. You’ll be able to use this method to persuade other folks to turn out to be a part of your electronic mail checklist via providing a chit code which seems when they’ve stuffed out the shape. This instructional is a part of our ongoing Divi design initiative, the place we attempt to put one thing further into your design toolbox every week. You probably have any questions or tips, remember to go away a remark within the remark segment beneath!
The put up How to Create Locked Content Corner Popups with Divi gave the impression first on Elegant Themes Blog.
WordPress Web Design