Figuring out make any Divi web page part sticky (or fastened) is a kind of at hand talents that internet designers can use in quite a lot of tactics. In case you’re now not acquainted with the time period “sticky”, it merely refers to a component on a internet web page that continues to be “fastened” because the person scrolls down the web page. A well-liked instance of a sticky part is a hard and fast navigation menu. Divi has a hard and fast (or sticky) navigation capability to be had by means of default. So when the person scrolls down the web page, a hard and fast model of the menu stays caught on the most sensible of the web page because the person scrolls. However sticky components can be utilized for absolutely anything and it’s an effective way to name consideration on your desired name to motion on any given web page.
On this instructional, I’m going to turn you a very easy strategy to make any part in your web page sticky by means of the usage of the plugin known as Sticky Menu (or Anything!) on Scroll. All it takes is a couple of moments to configure the plugin settings. Then all you want to do is upload a customized CSS ID on your part. It’s that simple.
Let’s get into it!
Contents
- 1 What You Want for This Educational
- 2 Configuring the Plugin Settings
- 3 Creating a Divi Web page Component Sticky
- 3.1 Easy methods to Make a Column Sticky
- 3.2 Easy methods to Make a Module Sticky To make a unmarried module sticky, it is very important make an adjustment in Divi to ensure your part has the proper z-index in order that it sits on most sensible of alternative components during the web page when scrolling. As I discussed previous, Divi assigns a a z-index of two to all sections. And the plugin applies the z-index of 99998 to the sticky part. However since a module can’t be ordered (or listed) above its dad or mum part (the segment), the module will nonetheless sit down at the back of different modules at the web page. To mend this, we want to be certain and provides the segment protecting our sticky module a z-index of 99998 manually. As an example this, I’m going to make use of the similar Accountant Weblog web page format we used previous. Ahead of we upload our CSS ID to a module, first, we want to take out the CSS ID (sticky) we set for column 2. After which take out the CSS ID (forestall) we set for the segment under it. After that, open the Social Media Observe module settings and upload the CSS ID “sticky” to the module. In case you view the are living web page, you’re going to understand the sticky part is hidden when overlapping the opposite modules within the sections under as you scroll. To mend this, open up the segment settings for the segment containing the social media apply module sticky part. Then upload the next customized CSS to the Major Component: z-index: 99998; Now test the are living web page. Realize how the social media icons will keep on with the highest of the web page (54px from the highest), just below the fastened nav after which keep above the opposite modules as you scroll. Creating a Phase Sticky
- 4 Hover Results Might Motive Sticky Components to Glitch
- 5 Simplest One Sticky Component In keeping with Web page
- 6 Ultimate Ideas
What You Want for This Educational
For this instructional you’re going to want the next:
- Divi Theme
- The Sticky Menu (or Anything!) on Scroll plugin
- The Accountant Weblog Web page Format (to be had from throughout the Divi Builder)
Configuring the Plugin Settings
After you have the Sticky Menu (or The rest!) on Scroll plugin put in and activated in your Divi theme, make your strategy to the WordPress dashboard and navigate to Settings > Sticky Menu (or The rest!).
Underneath the Elementary Settings tab, replace the choices as follows:
First, it is very important upload a singular identifier on your sticky part. This is a CSS ID or Elegance. We will be able to then upload this identifier to our part in Divi later. To make it simple to bear in mind I’m going so as to add the CSS ID “#sticky”.
Sticky Component: #sticky
Then you want so as to add the pixel worth for the gap between the highest of the web page and the sticky part. Since Divi’s fastened navigation bar is 54px in peak by means of default, we need to upload no less than 54px for this selection in order that our sticky part doesn’t overlap the fastened nav.
Area between most sensible of web page and sticky part: 54 pixels
Additionally it is a good suggestion to disable the sticky part on cell. To try this we want to configure the plugin not to stick the part when the display is smaller than 980px.
Don’t stick part when display smaller than: 980 pixels

Save your settings after which pass over to the Complicated Settings tab and replace the next:
For the z-index possibility, we need to be certain our part is stacked on most sensible of all different components at the web page, particularly if we plan on our part overlapping different components on scroll. To ensure this occurs, give set the z-index to 99998.
Z-index: 99998
To come up with an concept of the way components are ordered in Divi, sections have a z-index of two, columns have a z-index of 9, and the header/navigation bar has a z-index of 99999. So principally, we’re short of our sticky part to be 1 quantity not up to the z-index for the header navigation. This may occasionally be certain the sticky part sits above the whole thing else at the web page however the nav. This may occasionally turn out to be useful each time you might be sought after to forestall your part and push it up the web page so the sticky part received’t sit down on most sensible of the nav as you scroll (seems messy and damaged).
Subsequent, we will upload a “push up” part identifier. You’ll be able to recall to mind this as a stopper for our sticky part. That is usually a footer part. Mainly, this identifies the part that can forestall the sticky part when scrolling down the web page, permitting the sticky part to be driven up with the remainder of the web page. For this case, I’m going to set the identifier with the CSS ID “#forestall”.
Push-up part: #forestall

Save settings.
Now we’re provided with the facility we want to make a sticky part!
Creating a Divi Web page Component Sticky
To turn you make a Divi part sticky, I’m going to make use of Divi’s Accountant Weblog Web page from the Accountant Format Pack. To get began, create a brand new web page, give your web page a name, and deploy the Visible Builder. Then make a selection the choice “Make a choice a Premade Format”. From the weight from library popup, make a selection the Accountant Format Pack and select the Weblog web page.

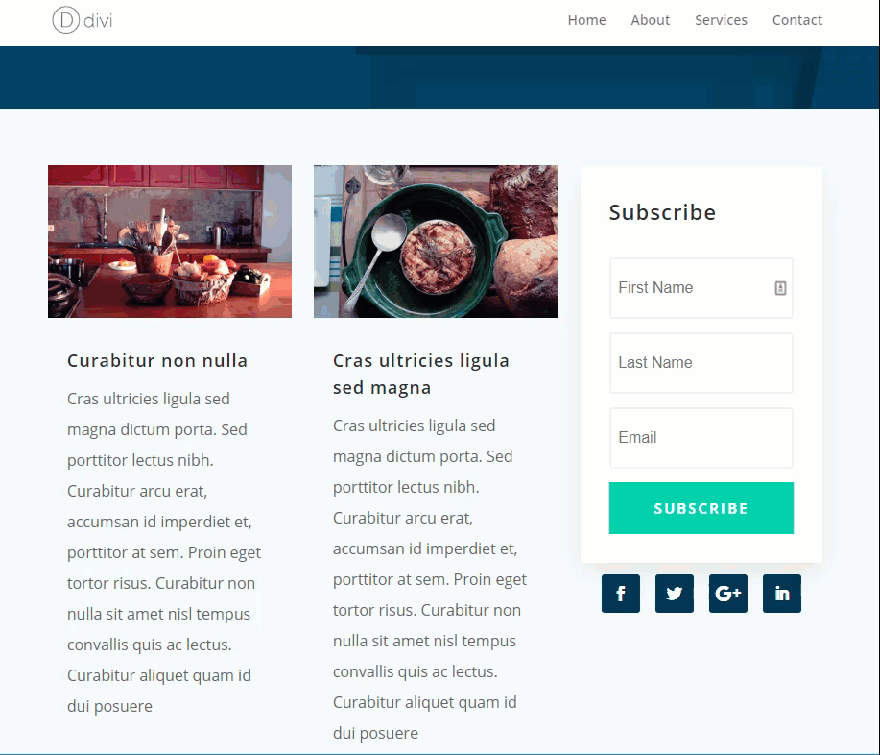
This web page includes a electronic mail subscription optin shape in the suitable sidebar of a strong point segment. So as to draw extra consideration to this type, we will purpose it to transform sticky as soon as the person scrolls down the web page. Then we will make the part forestall (or push up) each time it reaches the following segment at the web page in order that it doesn’t overlap.
Easy methods to Make a Column Sticky
At this level, regardless that, we want to come to a decision what particular part we need to make sticky. Lets simply make the Electronic mail Choice module sticky, however that wouldn’t account for the Social Media Observe module at once under the shape, which we need to make sticky as smartly. And, we will give either one of the ones modules the similar identifier as a result of they might each transform sticky on the similar place inflicting overlap. The easiest way to do that is to make all the column(column 2) sticky.
To make column 2 sticky, open the row settings of the row containing the column we need to goal. Then, beneath the Complicated tab, upload the CSS ID “sticky”. This corresponds to the sticky part distinctive identifier we added in our plugin settings.
CSS ID: sticky
(NOTE: Don’t put the hashtag (or pound) image earlier than the ID right here. Additionally, be sure you upload it to the CSS ID and now not the CSS Elegance)

Save settings and preview the are living model of the web page. In case you scroll down, you’re going to understand that column 2 (with each modules) will transform sticky after they transform 54px from the highest of the window and keep at that place because the you still scroll.
Preventing the Sticky Component at a Phase
As you’ll be able to see, the part continues to stay sticky in order that it overlaps the content material of the opposite sections under. To forestall this from going down, we will use our “push up” identifier (#forestall) we added within the plugin settings.
To forestall the sticky part at the segment under, we want to open the segment settings and upload the CSS ID “forestall”.
CSS ID: forestall

Now pass preview the are living model of the web page. Realize how the sticky part stops on the segment you recognized.
Beautiful cool proper?