In search of an inventive option to show pictures to your web site? You should definitely stay on studying as a result of, on this submit, we’ll display you the way to create a scroll gallery mockup the use of Divi’s integrated choices best. Concretely, we’re going to show a bit right into a mockup and feature all of the rows within the segment be a part of the mockup. Whenever you get the method, you’ll have the ability to function any more or less content material you wish to have in a cellular mockup and upload interplay on your pages very quickly.
Let’s get to it!
Contents
- 1 Preview
- 2 Obtain the Scroll Gallery Mockup Design for FREE
- 3 Obtain For Loose
- 4 You could have effectively subscribed. Please take a look at your e-mail deal with to verify your subscription and get get entry to to loose weekly Divi structure packs!
- 5 Let’s Get started Recreating!
- 6 Preview
- 7 Ultimate Ideas
Preview
Ahead of we dive into the academic, let’s take a snappy have a look at the end result throughout other display screen sizes.
Desktop
Cell

Obtain the Scroll Gallery Mockup Design for FREE
To put your fingers at the loose scroll gallery mockup design, you are going to first want to obtain it the use of the button underneath. To achieve get entry to to the obtain it is very important subscribe to our Divi Day by day e-mail record via the use of the shape underneath. As a brand new subscriber, you are going to obtain much more Divi goodness and a loose Divi Structure pack each Monday! Should you’re already at the record, merely input your e-mail deal with underneath and click on obtain. You’ll now not be “resubscribed” or obtain further emails.
@media best display screen and ( max-width: 767px ) {.et_bloom .et_bloom_optin_1 .carrot_edge.et_bloom_form_right .et_bloom_form_content:prior to, .et_bloom .et_bloom_optin_1 .carrot_edge.et_bloom_form_left .et_bloom_form_content:prior to { border-top-color: #ffffff !essential; border-left-color: clear !essential; }
}.et_bloom .et_bloom_optin_1 .et_bloom_form_content button { background-color: #f92c8b !essential; } .et_bloom .et_bloom_optin_1 .et_bloom_form_content .et_bloom_fields i { shade: #f92c8b !essential; } .et_bloom .et_bloom_optin_1 .et_bloom_form_content .et_bloom_custom_field_radio i:prior to { background: #f92c8b !essential; } .et_bloom .et_bloom_optin_1 .et_bloom_border_solid { border-color: #f7f9fb !essential } .et_bloom .et_bloom_optin_1 .et_bloom_form_content button { background-color: #f92c8b !essential; } .et_bloom .et_bloom_optin_1 .et_bloom_form_container h2, .et_bloom .et_bloom_optin_1 .et_bloom_form_container h2 span, .et_bloom .et_bloom_optin_1 .et_bloom_form_container h2 sturdy { font-family: “Open Sans”, Helvetica, Arial, Lucida, sans-serif; }.et_bloom .et_bloom_optin_1 .et_bloom_form_container p, .et_bloom .et_bloom_optin_1 .et_bloom_form_container p span, .et_bloom .et_bloom_optin_1 .et_bloom_form_container p sturdy, .et_bloom .et_bloom_optin_1 .et_bloom_form_container shape enter, .et_bloom .et_bloom_optin_1 .et_bloom_form_container shape button span { font-family: “Open Sans”, Helvetica, Arial, Lucida, sans-serif; } p.et_bloom_popup_input { padding-bottom: 0 !essential;}

Obtain For Loose
Sign up for the Divi Newlsetter and we will be able to e-mail you a duplicate of without equal Divi Touchdown Web page Structure Pack, plus lots of different superb and loose Divi sources, guidelines and tips. Apply alongside and you are going to be a Divi grasp very quickly. If you’re already subscribed merely kind on your e-mail deal with underneath and click on obtain to get entry to the structure pack.
You could have effectively subscribed. Please take a look at your e-mail deal with to verify your subscription and get get entry to to loose weekly Divi structure packs!
Let’s Get started Recreating!
Upload New Segment
Sizing
Get started via developing a brand new web page or opening an present one and upload an ordinary segment to it. Open the segment settings and alter the width and max width within the sizing settings.
- Width: 25vw (Desktop), 60vw (Pill), 80vw (Telephone)
- Max Width: 25vw (Desktop), 60vw (Pill), 80vw (Telephone)

Spacing
Then, pass to the spacing settings, take away all default peak and backside padding and upload some peak and backside margin to make space.
- Most sensible Margin: 9vw
- Backside: 9vw
- Most sensible Padding: 0px
- Backside Padding: 0px

Border
Proceed via going to the border settings of the segment and create the form of a cellular mockup via including ’30px’ to each and every some of the corners.

Field Shadow
Upload a refined field shadow to permit the form to come back via.
- Field Shadow Blur Energy: 100px
- Shadow Colour: rgba(0,0,0,0.18)

Upload Row #1
Column Construction
Proceed via including the primary row to the segment the use of the next column construction:

Background Colour
With out including any modules but, open the row settings and alter the background shade.
- Background Colour: #ffffff

Sizing
Then, pass to the sizing settings and make allowance the row to absorb all of the width of the segment.
- Use Customized Gutter Width: Sure
- Gutter Width: 1
- Width: 100%
- Max Width: 100%

Spacing
Take away the default peak and backside padding subsequent.
- Most sensible Padding: 0px
- Backside Padding: 0px

Field Shadow
And upload a field shadow as neatly.
- Field Shadow Blur Energy: 80px
- Shadow Colour: rgba(0,0,0,0.92)

Z Index
Final however now not least, we’re going to verify the row (and particularly its field shadow) overlaps the row that comes subsequent via expanding the Z index within the visibility settings.
- Z Index: 99

Upload Textual content Module to Column
Upload H2 Content material
The one module we’d like on this row is a Textual content Module with some H2 content material.

H2 Textual content Settings
Whenever you’ve added the H2 reproduction, pass to the H2 textual content settings and make some adjustments.
- Heading 2 Font: Abril Fatface
- Heading 2 Textual content Alignment: Middle
- Heading 2 Textual content Colour: #000000
- Heading 2 Textual content Measurement: 1.5vw (Desktop), 3.5vw (Pill), 5vw (Telephone)

Spacing
Upload some customized peak and backside margin subsequent.
- Most sensible Margin: 1.5vw (Desktop & Pill), 3.5vw (Telephone)
- Backside Margin: 1.5vw (Desktop & Pill), 3.5vw (Telephone)

Upload Row #2
Column Construction
Directly to the second one row! Right here, we’re the use of the next column construction:

Sizing
With out including any modules but, open the row settings and make allowance the row to absorb all of the width of the segment. We’re additionally editing the peak and max top to create a vertical scrolling impact within the upcoming steps.
- Use Customized Gutter Width: Sure
- Gutter Width: 1
- Width: 100%
- Max Width: 100%
- Peak: 38vw (Desktop), 100vw (Pill), 120vw (Telephone)
- Max Peak: 38vw (Desktop), 100vw (Pill), 120vw (Telephone)

Spacing
Then, pass to the spacing settings and take away all default peak and backside padding.
- Most sensible Padding: 0px
- Backside Padding: 0px

Vertical Overflow
As discussed prior to, we’re making this row vertically scrollable. To try this, we’ll want to trade the vertical overflow within the visibility settings of the row.
- Vertical Overflow: Scroll

Upload Symbol Module to Column
Add Symbol
Move forward and upload a primary Symbol Module to the row and add a picture of your selection. You’ll be able to obtain the photographs we’re the use of all the way through this instructional via going to the Wedding Planner Layout Pack post.

Sizing
You should definitely permit the ‘Pressure Fullwidth’ possibility within the Symbol Module to verify a responsive end result.
- Pressure Fullwidth: Sure

Spacing
Move to the spacing settings subsequent and create some house between this and whichever module comes subsequent via including some backside margin.
- Backside Margin: 1vw

Clone Symbol Module as Many Occasions as You Need
Whenever you’re achieved editing the primary Symbol Module, you’ll be able to clone it as much as as again and again as you wish to have.

Add Other Photographs
In fact, you’ll need to trade the picture in each and every some of the duplicates.

Upload Row #3
Column Construction
Directly to the 3rd and final row! We’re the use of the next column construction:

Background Colour
With out including any modules but, open the row settings and upload a white background shade.
- Background Colour: #ffffff

Sizing
Then, pass to the sizing settings and make allowance the row to absorb all of the width of the segment.
- Use Customized Gutter Width: Sure
- Gutter Width: 1
- Width: 100%
- Max Width: 100%

Spacing
Upload some customized peak and backside padding values subsequent.
- Most sensible Padding: 2.1vw (Desktop), 3.5vw (Pill), 5vw (Telephone)
- Backside Padding: 2.1vw (Desktop), 3.5vw (Pill), 5vw (Telephone)

Field Shadow
And upload a field shadow to create intensity.
- Field Shadow Blur Energy: 80px
- Shadow Colour: rgba(0,0,0,0.92)

Z Index
To ensure this row (and particularly its field shadow) overlap the former row, we’re going to extend the Z index.
- Z Index: 99

Upload Button Module to Column
Upload Reproduction
The one module we’d like on this row is a Button Module. Upload some reproduction of your selection.

Alignment
Then, pass to the design tab and alter the button alignment.
- Button Alignment: Middle

Button Settings
Alter the button settings as neatly.
- Use Customized Kinds for Button: Sure
- Button Textual content Measurement: 1vw (Desktop), 2.5vw (Pill), 3.5vw (Telephone)
- Button Textual content Colour: #ffffff
- Button Background Colour: #000000
- Button Border Width: 1px
- Button Font: Abril Fatface


Spacing
And create the form you wish to have the use of customized padding values.
- Most sensible Padding: 0.5vw (Desktop), 1vw (Pill), 2vw (Telephone)
- Backside Padding: 0.5vw (Desktop), 1vw (Pill), 2vw (Telephone)
- Left Padding: 3vw (Desktop), 7vw (Pill), 9vw (Telephone)
- Proper Padding: 3vw (Desktop), 7vw (Pill), 9vw (Telephone)

Taste Scrollbar
Upload CSS ID to Row #2
It’s as much as you whether or not or now not you wish to have to taste the scrollbar. Should you do, open the second one row and upload a CSS elegance to it.
- CSS Elegance: image-scrollbar

Open Web page Settings
Then, open the row settings.

Taste Scrollbar The usage of CSS
And upload the next traces of CSS code to the Customized CSS field within the complex tab:
.image-scrollbar::-webkit-scrollbar {
width: 10px;
}
.image-scrollbar::-webkit-scrollbar-track {
background: #f1f1f1;
}
.image-scrollbar::-webkit-scrollbar-thumb {
background: #000000;
}

Preview
Now that we’ve long past via all of the steps, let’s take a last have a look at the end result throughout other display screen sizes.
Desktop
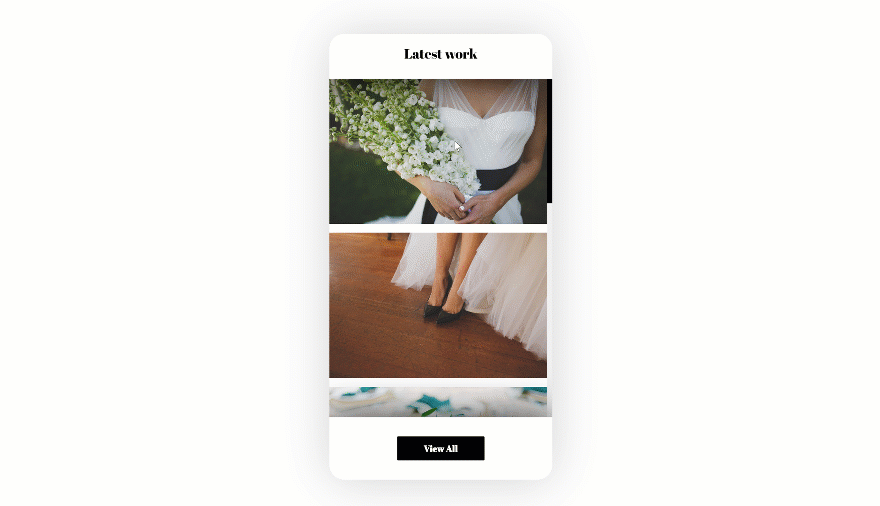
Cell
Ultimate Ideas
On this submit, we’ve proven you the way to create a ravishing scroll gallery mockup with Divi’s integrated choices best. Initially of this submit, you had been additionally ready to obtain the structure JSON without spending a dime and apply it to any web site you’re running on. If in case you have any questions or ideas, be sure you depart a remark within the remark segment underneath!
Should you’re keen to be told extra about Divi and get extra Divi freebies, be sure you subscribe to our email newsletter and YouTube channel so that you’ll at all times be some of the first other people to grasp and get advantages from this loose content material.
The submit How to Create a Scroll Gallery Mockup with Divi’s New Overflow Options seemed first on Elegant Themes Blog.
WordPress Web Design