Many of us whinge in regards to the hurdles of having began with construction Gutenberg blocks and apps. The training curve is steep, principally because of the trouble of putting in and configuring the advance surroundings. As well as, a forged wisdom of JavaScript, Node.js, React, and Redux are must-have components for this rather complicated recipe.
The professional WordPress Block Editor Handbook supplies builders with an incredible quantity of knowledge, however it's possible you'll to find your self misplaced in that sea of main points.
And it’s value bringing up what Matías Ventura, lead architect of the Gutenberg venture, reported in his interview with WP Tavern:
Whilst there are people that may be told it temporarily, it’s nonetheless a large barrier for other people. I feel there are a number of layers to this; documentation might be an order of magnitude higher in each group and presentation. I'm hoping we will be able to do much more there.
With that during thoughts, we’ve made up our minds to supply a step by step academic geared toward serving to our readers get began with Gutenberg block building.
Sound attention-grabbing? Let’s dive in!
Contents
- 1 Gutenberg Block Building Must haves
- 2 What Is a Gutenberg Block?
- 3 Environment Up Your WordPress Building Surroundings
- 4 A Walkthrough of the Starter Block Scaffolding
- 5 The Venture: Development Your First Gutenberg Block
- 6 Signal Up For the E-newsletter
- 6.1 Need to know the way we higher our visitors over 1000%?
- 6.2 The use of Constructed-In Elements: The RichText Part
- 6.3 Information
- 6.4 Vital
- 6.5 Including Controls to the Block Toolbar
- 6.6 Customizing The Block Settings Sidebar
- 6.7 Including and Customizing an Exterior Hyperlink
- 6.8 Including More than one Block Types
- 6.9 Nesting Gutenberg Blocks With the InnerBlocks Part
- 6.10 Further Enhancements
- 7 Abstract
Gutenberg Block Building Must haves
For this academic, the one required talents are a just right wisdom of WordPress plugin building and a minimum of a basic understanding of HTML, CSS, JavaScript, and React.
Will this be an formidable venture? You guess it'll be!
It wasn’t simple to search out the proper compromise between completeness and straightforwardness or come to a decision which subjects to incorporate and which to go away out.
Confidently, intermediate and complex readers will forgive us for no longer delving deeply into sure ideas akin to React state, Redux store, high order components, and so forth. Those subjects require further house and a focus and are more than likely too complex for starting block building (except you’re a React developer).
For a similar reason why, we received’t be protecting one of the vital extra complex subjects associated with Gutenberg block building, akin to dynamic blocks and meta boxes.
With the information you’ll acquire via the top of this newsletter, you’ll be capable of get started having a laugh and being productive immediately.
If you get going with block construction, you’ll be poised to fortify your talents additional and construct much more complex Gutenberg blocks by yourself.
Starting with Gutenberg block development can be intimidating at first…

What Is a Gutenberg Block?
Because it used to be first launched in December 2018, the block editor has been a great deal advanced in all sides: extra powerful APIs, a extra complex person interface, advanced usability, a ton of recent blocks, the first implementations of Full Site Editing, and a lot more.
Briefly, even though Gutenberg remains to be underneath heavy building, it has come some distance — and as of late, the block editor is a full-fledged candidate as a competent, practical web page and website builder.
From a developer’s viewpoint, Gutenberg is a React-based Single Page Application (SPA) that permits WordPress customers to create, edit, and delete content material in WordPress. On the other hand, this will have to no longer make you recall to mind an enhanced edition of the traditional content editor.
We wish to make this transparent:
In Gutenberg, the content material is split into blocks, that are “bricks” that customers can use to create posts and pages or their complete web pages.
However what technically is a block?
We love WordPress’ definition:
“Block” is the summary time period used to explain gadgets of markup that, composed in combination, shape the content material or structure of a webpage. The theory combines ideas of what in WordPress as of late we succeed in with shortcodes, customized HTML, and embed discovery right into a unmarried constant API and person enjoy.
Titles, paragraphs, columns, photographs, galleries, and the entire components that make up the editor’s interface, from sidebar panels to dam toolbar controls, are React parts.
So, what are React parts? W3Schools supplies the following definition:
Elements are impartial and reusable bits of code. They serve the similar function as JavaScript purposes, however paintings in isolation and go back HTML by means of a
render()serve as.
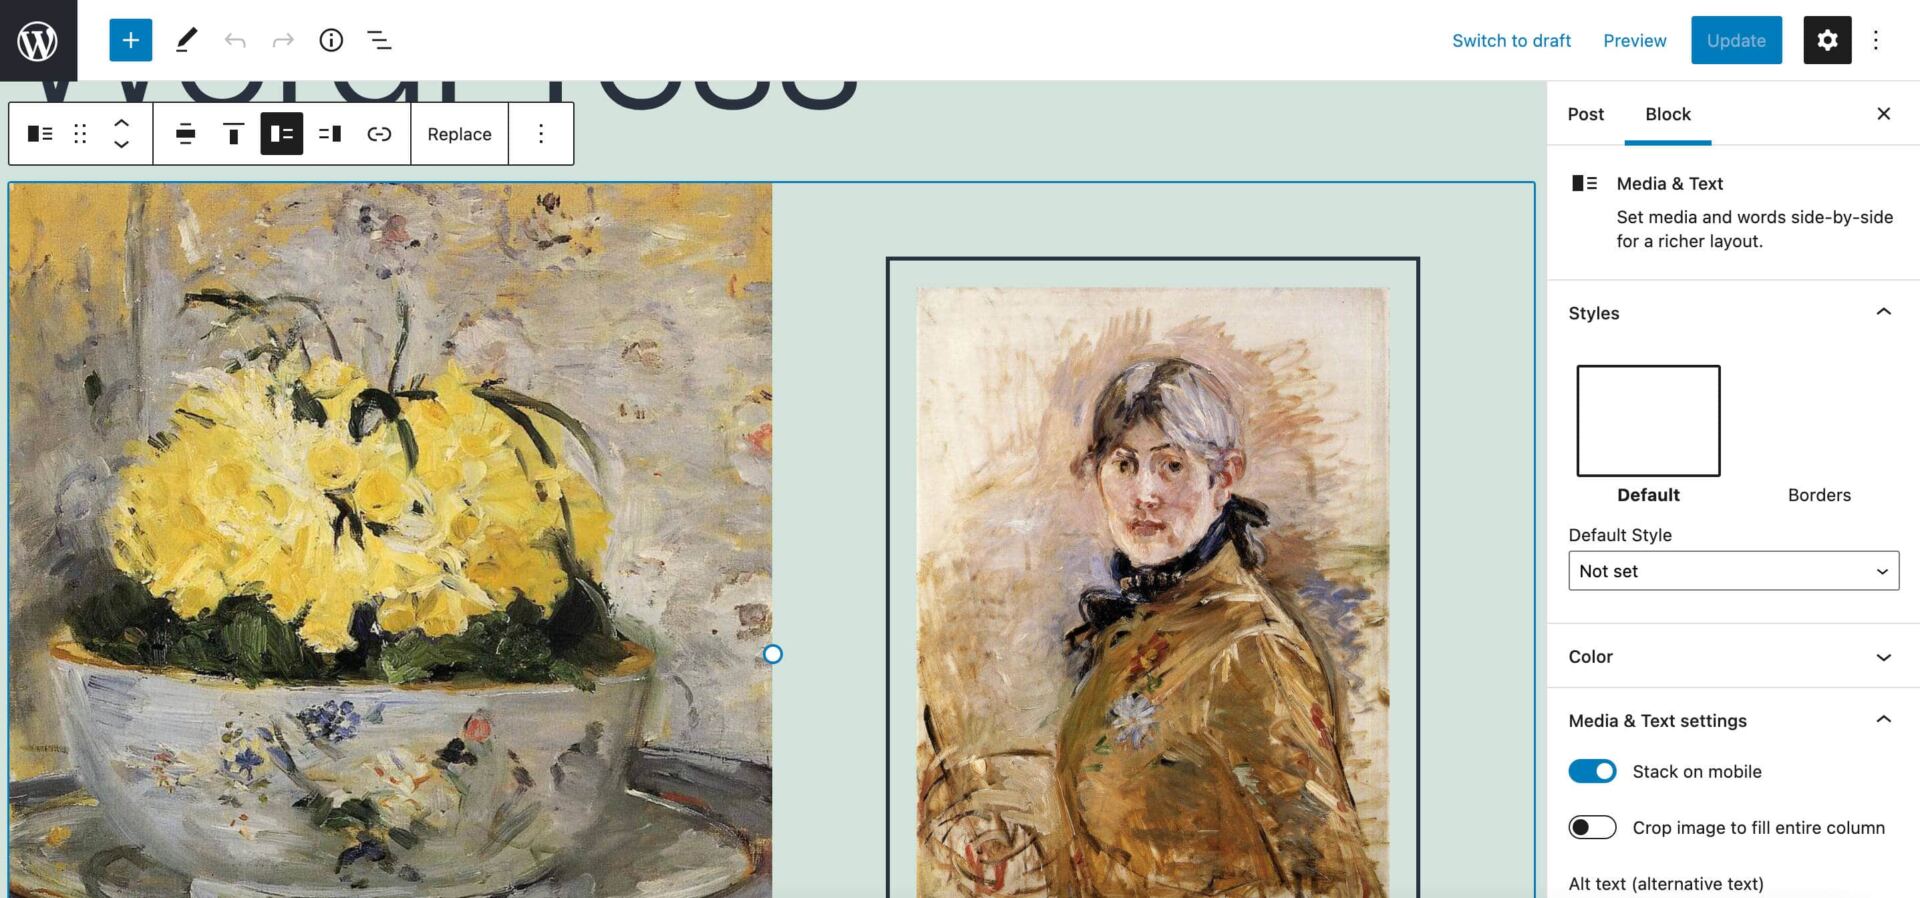
Operating with Gutenberg blocks in WordPress 5.8.
Whilst the modifying enjoy delivered via Gutenberg is new in comparison to the vintage WordPress editor, the way in which WordPress shops your items of content material within the database doesn’t exchange in any respect. That’s as a result of Gutenberg is an software that works inside WordPress however doesn’t exchange the way in which the CMS works at its core.
Posts (and this contains posts, pages, and customized submit sorts) created with Gutenberg are nonetheless saved within the wp_posts desk, precisely as with the vintage editor.
However in a submit created with Gutenberg, you’ll to find further bits of knowledge within the desk that constitute a elementary distinction between posts created by means of the Vintage Editor vs Gutenberg.
Those items of knowledge seem like HTML feedback, and they've a selected serve as: delimiting blocks:
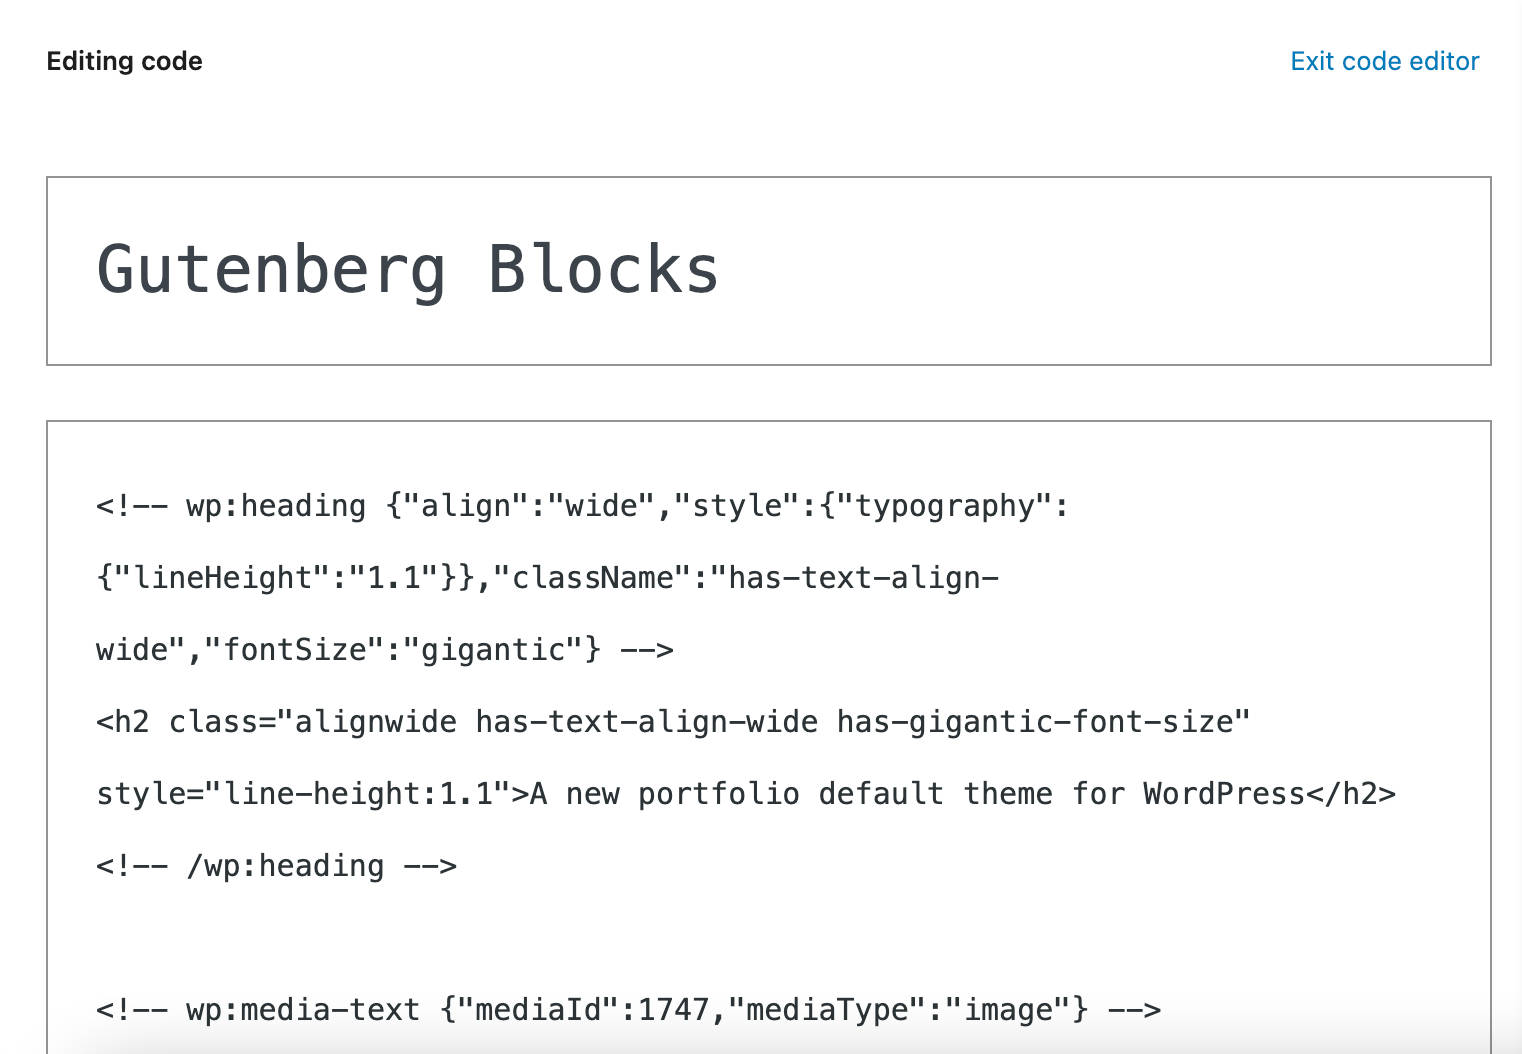
A weblog submit in Code editor view.
Block delimiters inform WordPress what block is to be rendered at the display. In addition they supply values for block homes in a JSON object. The ones props dictate the way in which the block will have to be rendered at the display:
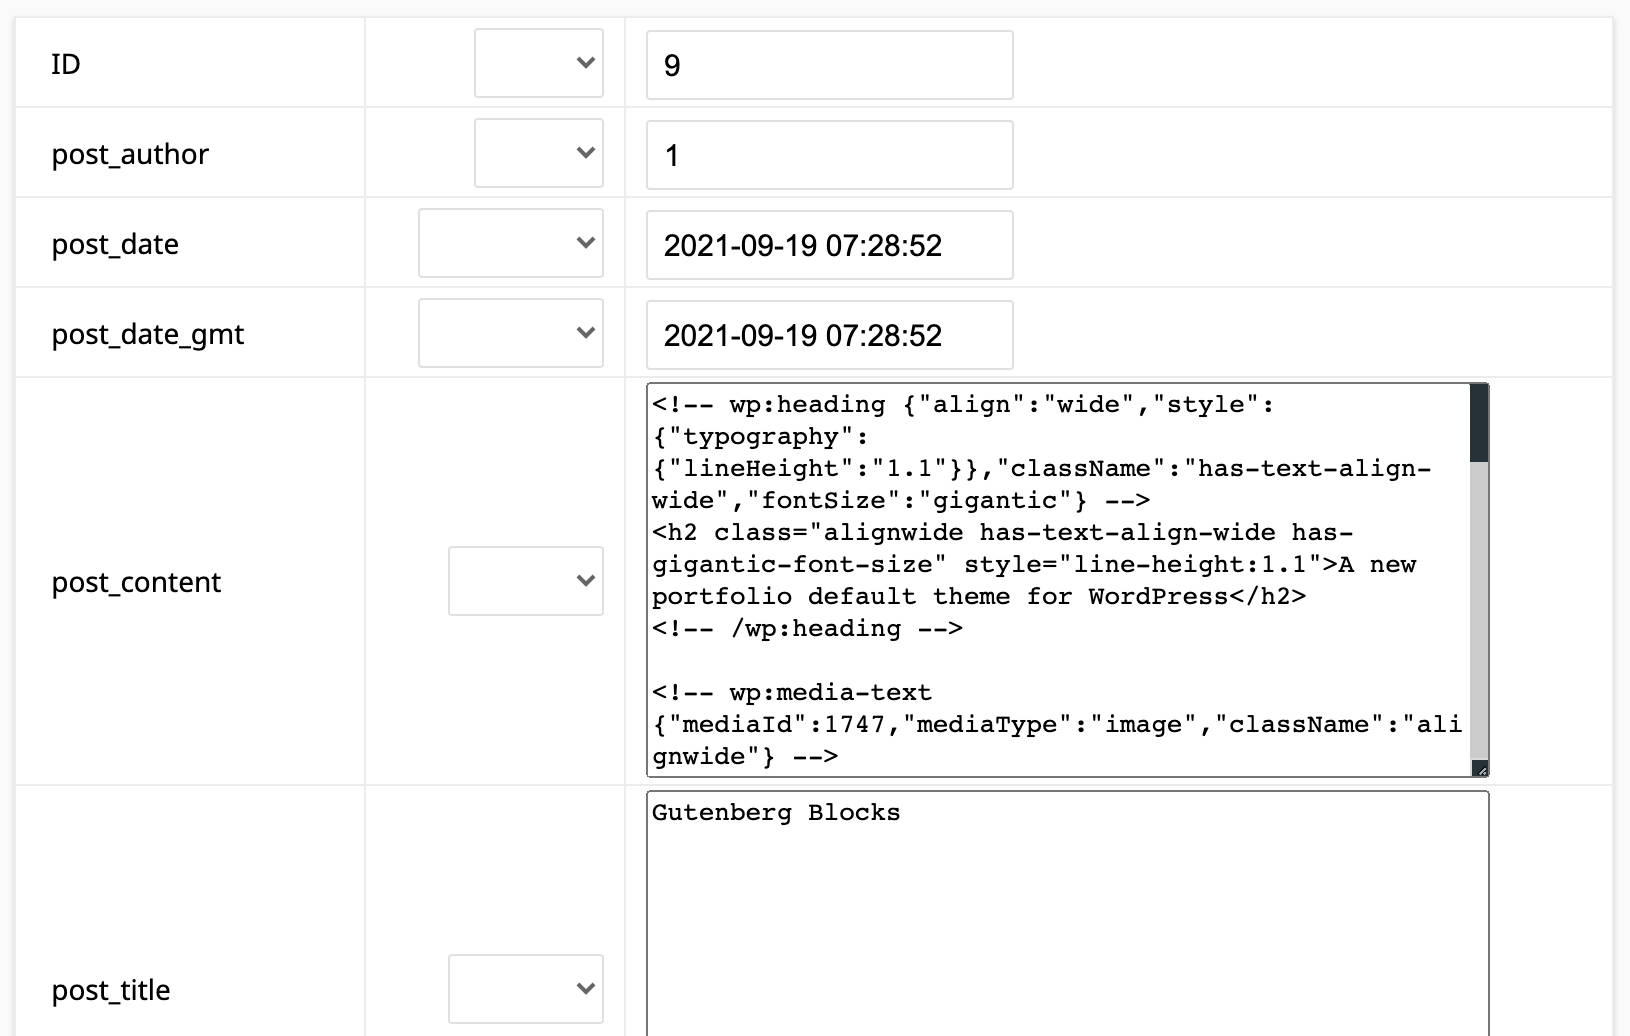
A weblog submit saved within the wp_posts desk.
Environment Up Your WordPress Building Surroundings
Putting in place a contemporary JavaScript building surroundings calls for a forged wisdom of complex applied sciences akin to Webpack, React and JSX, Babel, ESLint, and so on.
Intimidated? Don’t be! The WordPress group has already come to the rescue via offering robust instruments that mean you can keep away from a messy handbook configuration procedure.
To stay issues easy, we received’t quilt transpiling on this article (which we nonetheless suggest familiarizing your self with whenever you’ve discovered the fundamentals of block building). As a substitute, we’ll introduce two choice instruments you'll use to temporarily and simply arrange a contemporary JavaScript building surroundings in short time. It’s as much as you to make a choice the only you to find maximum handy in your venture.
Putting in place a JavaScript building surroundings to construct Gutenberg blocks is a three-step procedure:
Let’s get began.
1. Set up Node.js and npm
Prior to putting in your building surroundings and registering your first block, you’ll wish to set up Node.js and the Node bundle supervisor (npm).
You'll be able to install Node.js and npm in several different ways. However first, it's possible you'll wish to take a look at if the instrument is already put in for your system.
To try this, release the terminal and run the next command:
node -vIf the result's command no longer discovered, then Node.js isn't put in for your pc, and you'll continue with the set up.
For this newsletter, we’ve selected the very best set up possibility, which is the Node Installer. All you want to do is obtain the edition corresponding on your running device and release the set up wizard:
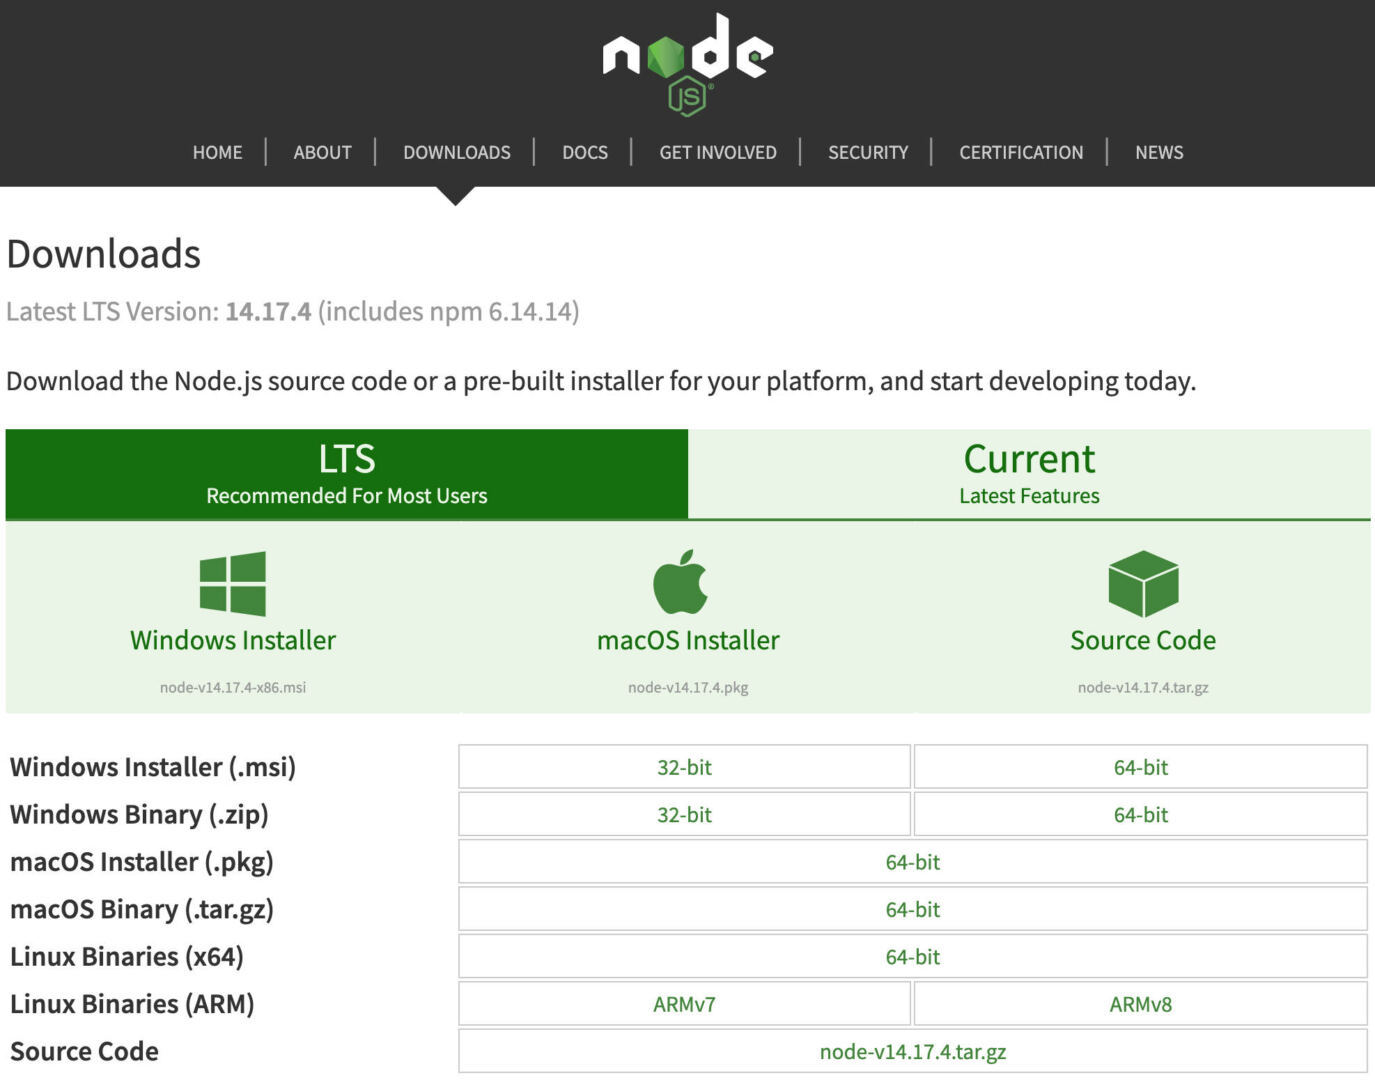
Node.js Downloads web page.
If you’ve put in Node.js, run the command node -v for your terminal once more. You'll be able to additionally run the npm -v command to substantiate that you've got the npm bundle to be had.
You’re now provided with the next instruments:
- The
npxNode.js bundle runner (see docs). This lets you run annpmcommand with out putting in it first. - The
npmNode.js bundle supervisor (see docs). That is used to put in dependencies and run scripts.
Your next step is to put in the advance surroundings.
2. Set Up Your Building Surroundings
After you have the newest variations of Node.js and npm for your native system, you’ll desire a building surroundings for WordPress.
You'll be able to both use a neighborhood building surroundings like DevKinsta or use the professional WordPress software. Let’s take a peek at each choices.
Possibility 1: Native Building Surroundings (DevKinsta)
With only some clicks, you'll install WordPress locally the usage of DevKinsta, our fashionable native WordPress building software. Or you should go for a special native building software, akin to MAMP or XAMPP:

Create a brand new WordPress website online in DevKinsta.
Possibility 2: wp-env
You'll be able to additionally go for the professional wp-env tool, which gives a neighborhood WordPress dev surroundings you'll release without delay from the command line. Noah Alen defines it as follows:
Native WordPress environments are actually so simple as working a unmarried command.
wp-envis a 0 config software for painless native WordPress environments. It supplies choices over choices in order that customers can temporarily spin up WordPress with out losing time. Certainly, the objective is to make those environments simply available to all — whether or not you’re a developer, fashion designer, supervisor, or somebody else.
If making a decision to present it a take a look at, putting in wp-env calls for minimum effort. Simply practice those steps:
Step 1: Verify Docker and Node.js Set up
To satisfy the technical necessities, you’ll first wish to have each Docker and Node.js put in for your pc. That’s as a result of wp-env creates a Docker example working a WordPress website online. Any adjustments made to the code are straight away mirrored within the WordPress example.
Step 2: Set up @wordpress/env from the Command Line
With Docker and Node.js working for your pc, you'll transfer on and set up the WordPress development environment.
You'll be able to set up wp-env both globally or in the neighborhood. To do it globally, you’ll wish to run the next command from throughout the plugins listing (extra in this within the “Vital” realize field beneath):
npm set up -g @wordpress/envLet’s wreck that down:
npm set upinstalls the package.-gappended to the command installs the specified package globally.@wordpress/envis the package you’re going to install.
To substantiate that wp-env has been effectively put in, run the next command:
wp-env --versionYou will have to see the present wp-env edition, this means that you'll now release the surroundings the usage of the next command from your plugin’s folder:
wp-env get startedYou'll be able to get right of entry to the WordPress dashboard the usage of the next cope with:
- http://localhost:8888/wp-admin/
The default credentials are as follows:
- Username:
admin - Password:
password
Set Up Your Block Plugin
Now you want a starter block plugin to construct upon. However as an alternative of manually making a building block plugin with all essential information and folders, you'll merely run a dev-tool offering all information and configurations you want to get began with block building.
Once more, you've gotten a few choices to make a choice from. Let’s check out every.
Possibility 1: Environment Up a Block Plugin With @wordpress/create-block
@wordpress/create-block is the professional 0 configuration software for growing Gutenberg blocks:
Create Block is an formally supported technique to create blocks for registering a block for a WordPress plugin. It provides a contemporary construct setup with out a configuration. It generates PHP, JS, CSS code, and the whole lot else you want to start out the venture.
It's in large part impressed via create-react-app. Main kudos to @gaearon, the entire Fb workforce, and the React group.
As soon as your native surroundings is up and working, you'll arrange a starter block via merely working the npx @wordpress/create-block command, and it'll supply the entire information and folders you want to create the plugin scaffolding and sign up a brand new block.
Let’s run a check to peer the way it works.
Out of your Command Line software, navigate to the /wp-content/plugins/ listing and run the next command:
npx @wordpress/create-block my-first-blockWhen requested to substantiate, input y to continue:

Making a block with @wordpress/create-block.
The method takes few moments. When it’s entire, you will have to get the next reaction:
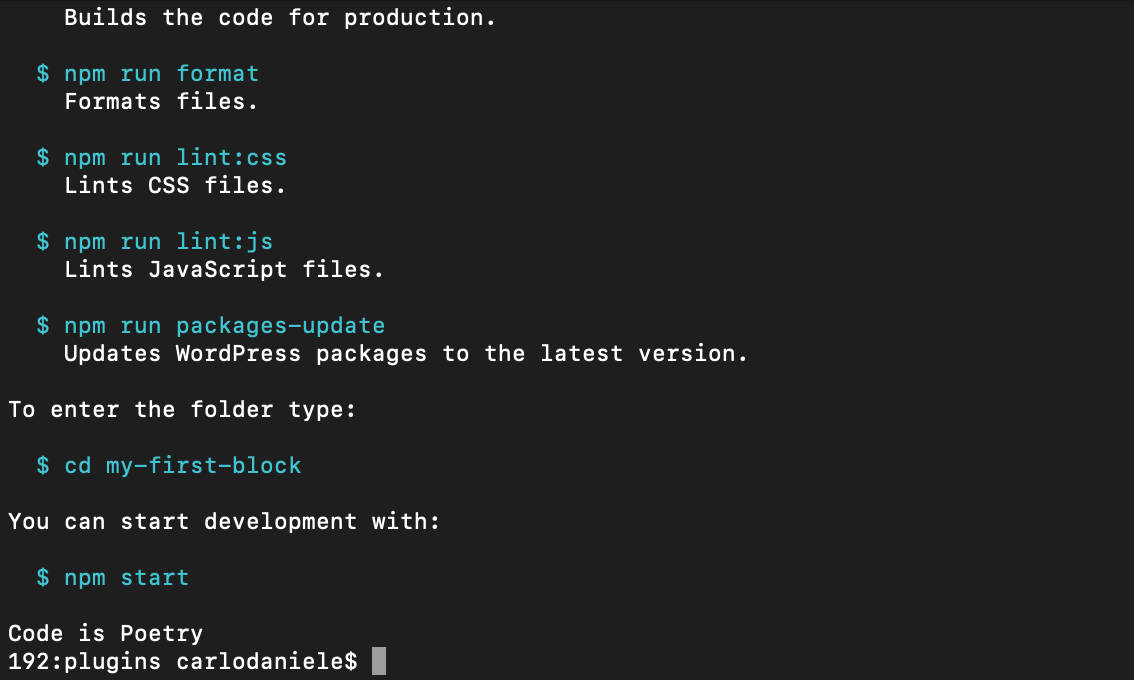
The block plugin has been created.
And that’s it!
Now release your WordPress building surroundings and move to the Plugins display within the WordPress dashboard. A brand new plugin named “My First Block” will have to were added on your plugin record:

The block plugin has been effectively put in.
Turn on the plugin if wanted, create a brand new weblog submit, scroll down the block inserter to the Widgets segment, and make a selection your new block:
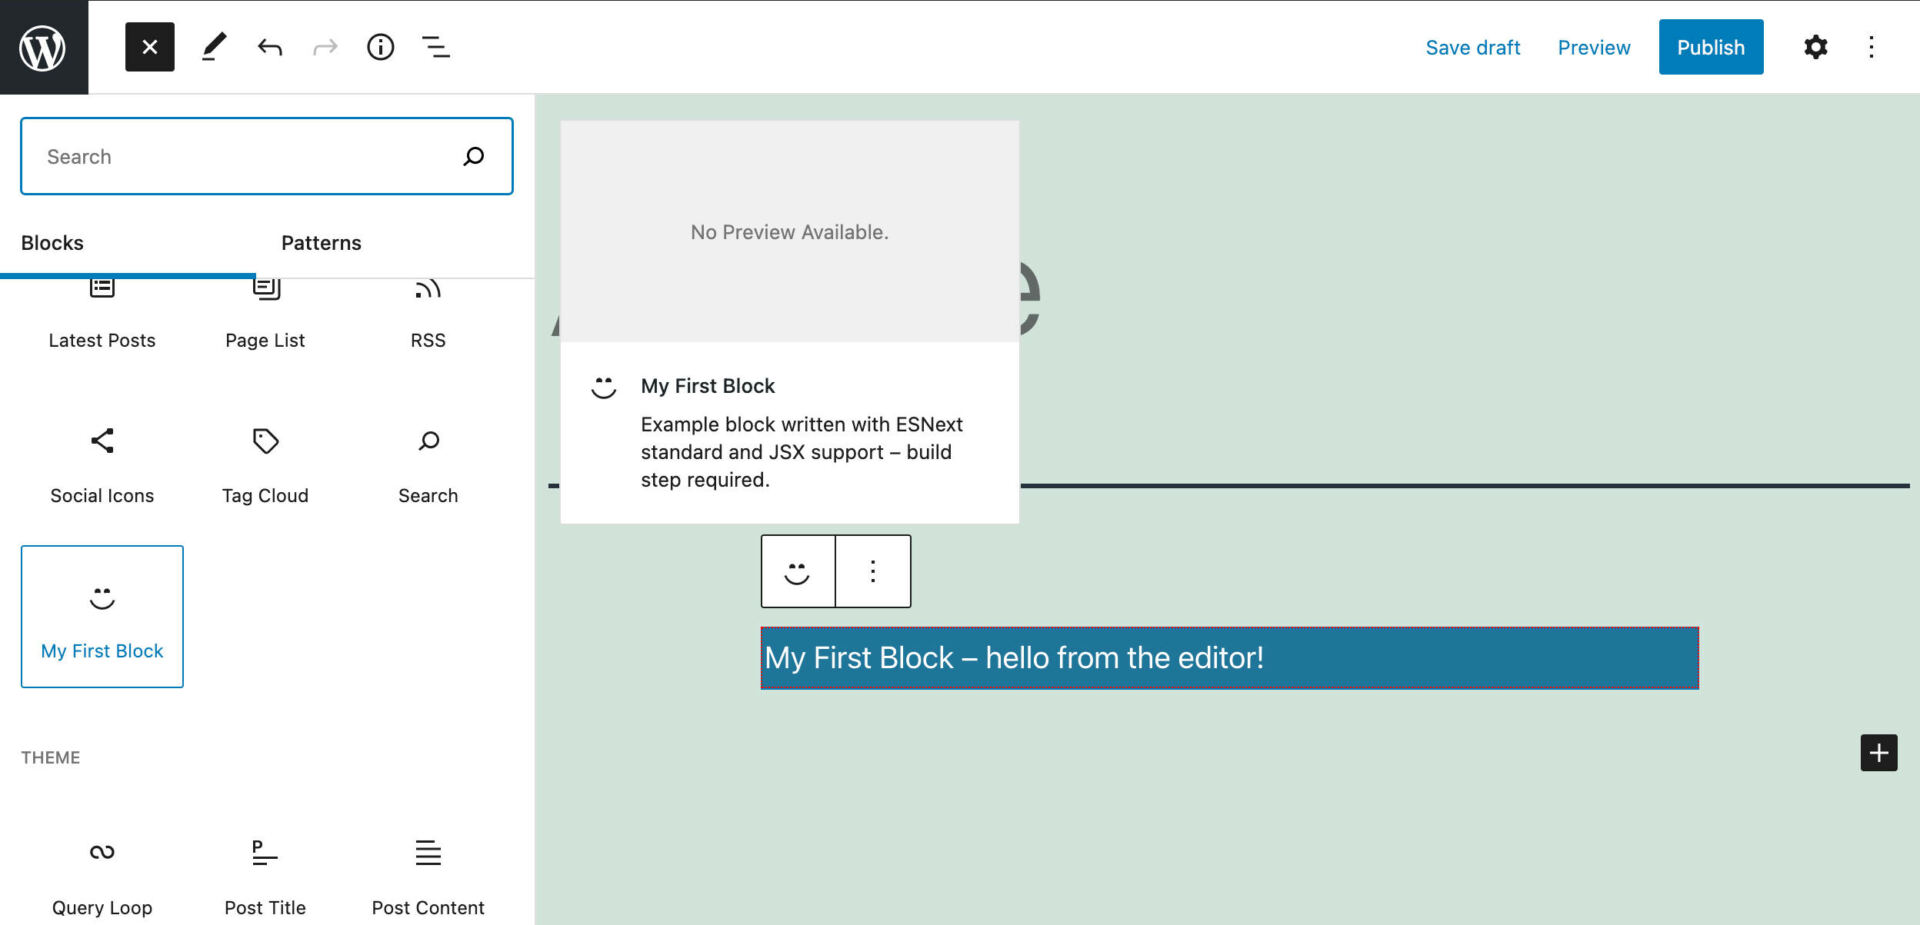
An instance block created with @wordpress/create-block.
Now return to the terminal and alter the present listing to my-first-block:
cd my-first-blockThen run the next command:
npm get startedThis allows you to run the plugin in building mode. To create the manufacturing code, you can use the next command:
npm run constructPossibility 2: Environment Up a Block Plugin With create-guten-block
create-guten-block is a third-party building software for construction Gutenberg blocks:
create-guten-blockis 0 configuration dev-toolkit (#0CJS) to broaden WordPress Gutenberg blocks in an issue of mins with out configuring React, webpack, ES6/7/8/Subsequent, ESLint, Babel, and so on.
Similar to the professional create-block software, create-guten-block is in accordance with create-react-app and help you generate your first block plugin with out a bother.
The toolkit supplies the whole lot you want to create a contemporary WordPress plugin, including the following:
- React, JSX, and ES6 syntax make stronger.
- webpack dev/manufacturing construct procedure at the back of the scene.
- Language extras past ES6 like the article unfold operator.
- Auto-prefixed CSS, so that you don’t want -webkit or different prefixes.
- A construct script to package deal JS, CSS, and photographs for manufacturing with source-maps.
- Trouble-free updates for the above instruments with a unmarried dependency cgb-scripts.
Observe the next caveat:
The tradeoff is that those instruments are preconfigured to paintings in a selected method. In case your venture wishes extra customization, you'll “eject” and customise it, however then it is important to take care of this configuration.
After you have a neighborhood WordPress website online available, release your Command Line software, navigate to the /wp-content/plugins folder of your set up, and run the next command:
npx create-guten-block my-first-blockYou’ll have to attend a minute or two whilst the venture construction is created and dependencies downloaded:
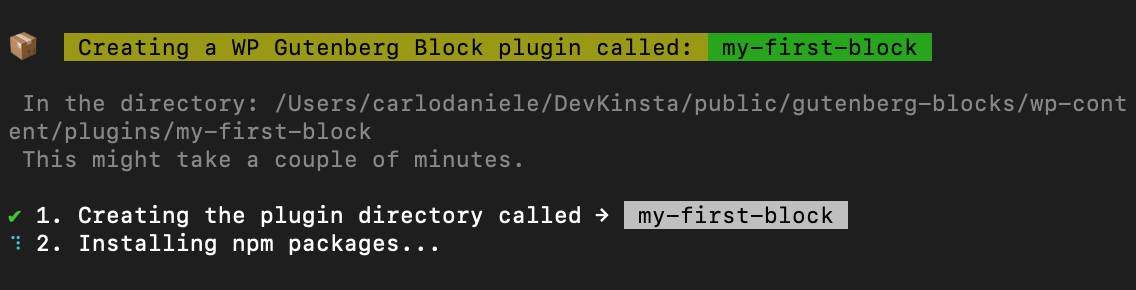
Making a Gutenberg block with create-guten-block.
When the method is entire, you will have to see the next display:

Gutenberg block effectively created with create-guten-block.
This subsequent symbol presentations the venture construction with the terminal working in Visual Studio Code:

The block plugin in Visible Studio Code.
Now return on your WordPress dashboard. A brand new merchandise will have to be indexed within the Plugins display — it’s the my-first-block plugin:

The Plugins display with a brand new plugin created with create-guten-block.
Turn on the plugin and return to the terminal. Trade the present listing to my-first-block, then run npm get started:
cd my-first-block
npm get started
You will have to get the next reaction:

npm began.
Once more, this allows you to run the plugin in building mode. To create the manufacturing code, you can use:
npm run constructTurn on the plugin and create a brand new submit or web page, then browse your blocks and make a selection your emblem new Gutenberg block:
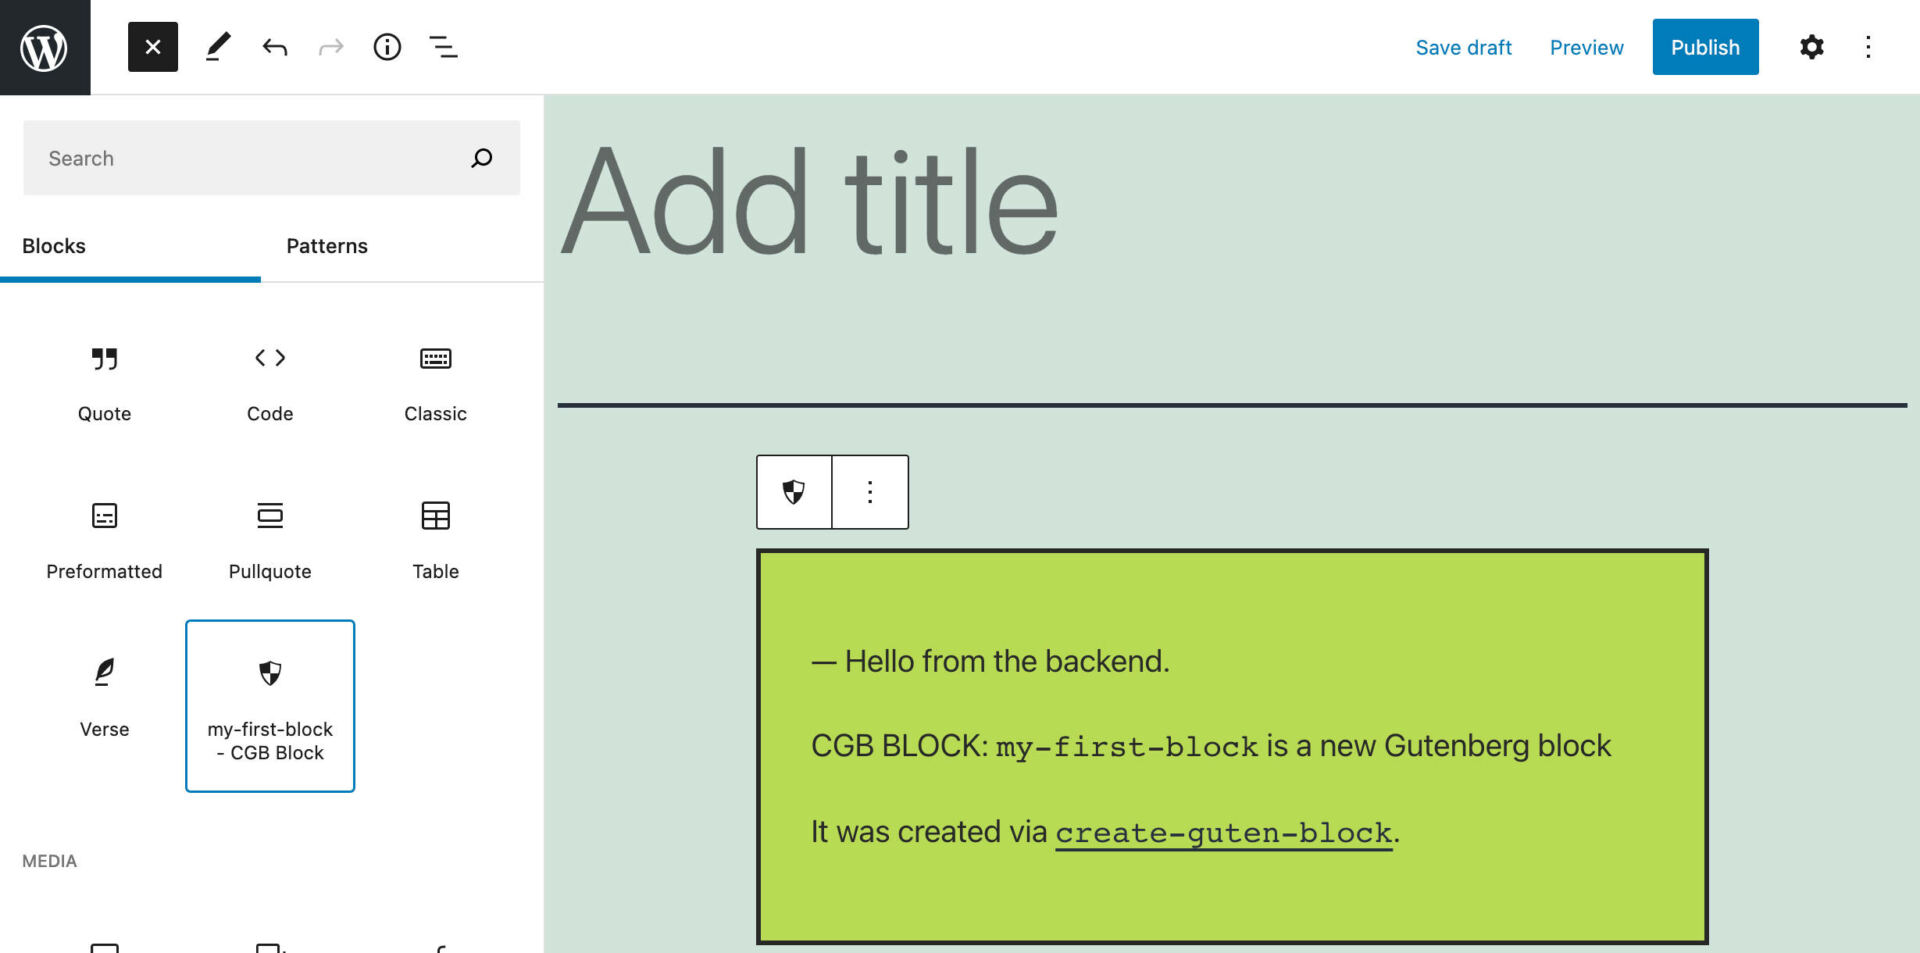
A brand new block created with create-guten-block.
For a closer evaluate or in case of mistakes, seek advice from the documentation provided by Ahmad Awais.
A Walkthrough of the Starter Block Scaffolding
Whichever of the 2 dev-tools — create-block or create-guten-block — you go for, you currently have a block scaffolding you'll use as a place to begin to construct a block plugin.
However what precisely is block scaffolding?
Block scaffolding is a shorthand time period that describes the supporting listing construction you want for WordPress to acknowledge a block. Most often that listing contains information like index.php, index.js, genre.css, and others — which in flip hang calls like
register_block_type.
We opted for the professional Create Block dev-tool, as it’s used in the Block Editor Handbook. However even though you’d come to a decision to head with a third-party software like create-guten-block, your enjoy received’t be too other.
With that stated, let’s dive deeper into the create-block tool.
A Nearer Take a look at the Create Block Dev-Instrument
As we discussed above, Create Block is the professional command-line software to create Gutenberg blocks. Working @wordpress/create-block for your terminal generates the PHP, JS, and SCSS information and code had to sign up a brand new block variety:
npx @wordpress/create-block [options] [slug][slug](not obligatory) — used to assign the block slug and set up the plugin[options](not obligatory) — to be had choices
Through default, an ESNext template is assigned. Which means you’ll get the next version of JavaScript, with the addition of the JSX syntax.
When you forget the block call, the command runs in interactive mode, enabling you to customise a number of choices ahead of producing the information:
npx @wordpress/create-block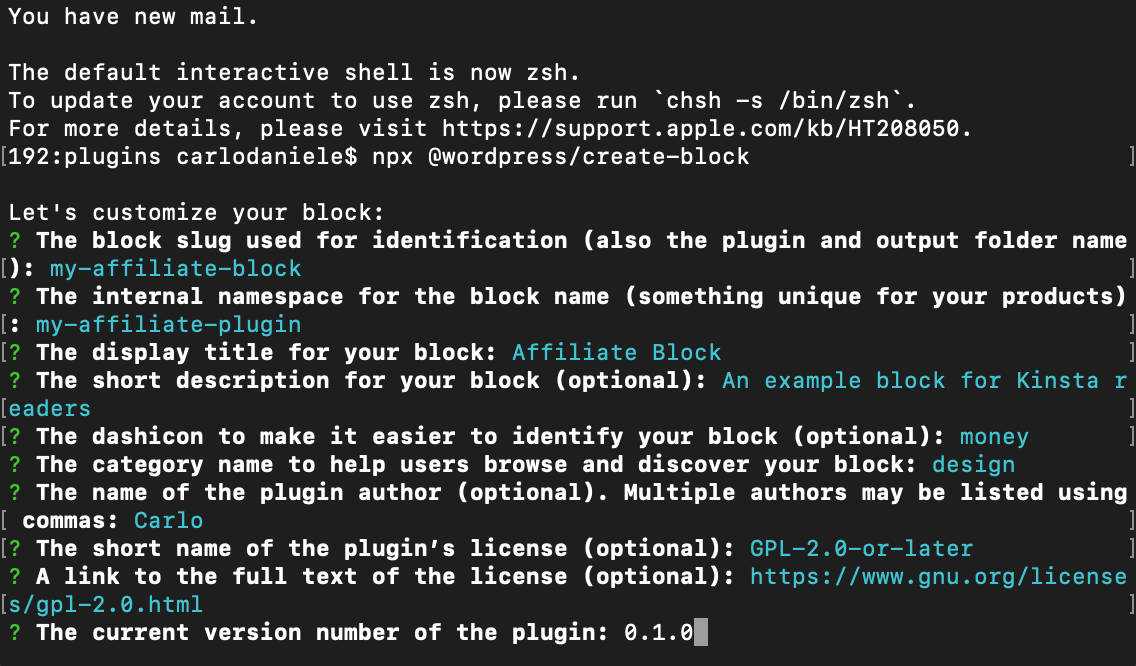
Working create-block in interactive mode.
The picture beneath presentations the record construction of a block plugin created with the professional Create Block software:
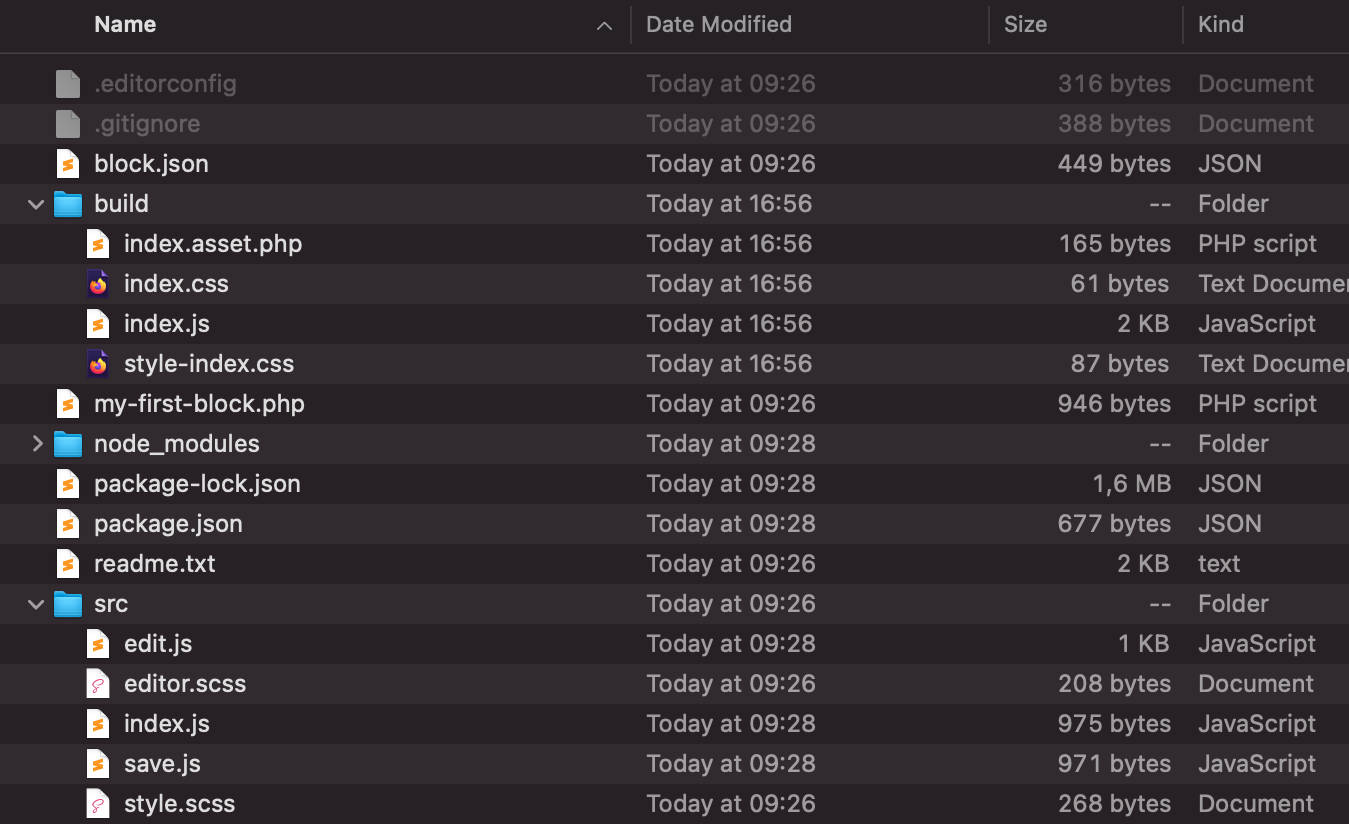
Information and folders of a block plugin created with @wordpress/create-block.
With that stated, let’s undergo the principle information and folders of our new block plugin.
The Plugin Document
With the principle plugin record you register the block on the server:
/**
 * Plugin Title: My First Block
 * Description: Instance block written with ESNext same old and JSX make stronger – construct step required.
 * Calls for a minimum of: 5.8
 * Calls for PHP: 7.0
 * Model: 0.1.0
 * Creator: The WordPress Participants
 * License: GPL-2.0-or-later
 * License URI: https://www.gnu.org/licenses/gpl-2.0.html
 * Textual content Area: my-first-block
 *
 * @bundle create-block
 */
/**
 * Registers the block the usage of the metadata loaded from the `block.json` record.
 * In the back of the scenes, it registers additionally all property so they are able to be enqueued
 * throughout the block editor within the corresponding context.
 *
 * @see https://developer.wordpress.org/block-editor/tutorials/block-tutorial/writing-your-first-block-type/
 */
serve as create_block_my_first_block_block_init() {
	register_block_type( __DIR__ );
}
add_action( 'init', 'create_block_my_first_block_block_init' );
The register_block_type serve as registers a block type on the server the usage of the metadata saved within the block.json record.
The serve as takes two parameters:
- The block variety call together with namespace, or a trail to the folder the place the block.json record is positioned, or an entire
WP_Block_Typeobject - An array of block variety arguments
Within the code above, the block variety argument is supplied via the __DIR__ magic constant. That signifies that the block.json record is living in the similar folder because the plugin’s record.
The bundle.json Document
The package.json file defines JavaScript homes and scripts in your venture. That is the place you'll set up your venture dependencies.
To raised perceive what this record is supposed for, open it along with your favorite code editor:
{
	"call": "my-first-block",
	"edition": "0.1.0",
	"description": "Instance block written with ESNext same old and JSX make stronger – construct step required.",
	"writer": "The WordPress Participants",
	"license": "GPL-2.0-or-later",
	"primary": "construct/index.js",
	"scripts": {
		"construct": "wp-scripts construct",
		"layout": "wp-scripts layout",
		"lint:css": "wp-scripts lint-style",
		"lint:js": "wp-scripts lint-js",
		"get started": "wp-scripts get started",
		"packages-update": "wp-scripts packages-update"
	},
	"dependencies": {
		"@wordpress/block-editor": "^7.0.1",
		"@wordpress/blocks": "^11.0.1",
		"@wordpress/i18n": "^4.2.1"
	},
	"devDependencies": {
		"@wordpress/scripts": "^18.0.0"
	}
}
The scripts property is a dictionary containing commands which are run at more than a few occasions within the lifecycle of a package the usage of npm run [cmd].
On this article, we’ll be the usage of the following commands:
npm run construct— create a (compressed) manufacturing constructnpm run get started— create an (uncompressed) building construct
dependencies and devDependencies are two gadgets mapping a package name to a version. dependencies are required in manufacturing, whilst devDependences are simplest wanted for native building (read more).
The one default dev dependency is the @wordpress/scripts bundle, which is defined as “a choice of reusable scripts adapted for WordPress building.”
The block.json Document
Beginning with WordPress 5.8, the block.json metadata file is the canonical way to register block types.
Having a block.json record supplies a number of advantages, together with improved performance and higher visibility at the WordPress Plugins Directory:
From a efficiency viewpoint, when topics make stronger lazy loading property, blocks registered with block.json could have their asset enqueuing optimized out of the field. The frontend CSS and JavaScript property indexed within the
genreorscripthomes will simplest be enqueued when the block is provide at the web page, leading to diminished web page sizes.
Working the @wordpress/create-block command generates the next block.json record:
{
	"apiVersion": 2,
	"call": "create-block/my-first-block",
	"edition": "0.1.0",
	"name": "My First Block",
	"class": "widgets",
	"icon": "smiley",
	"description": "Instance block written with ESNext same old and JSX make stronger – construct step required.",
	"helps": {
		"html": false
	},
	"textdomain": "my-first-block",
	"editorScript": "record:./construct/index.js",
	"editorStyle": "record:./construct/index.css",
	"genre": "record:./construct/style-index.css"
}
Right here’s the total record of default properties:
apiVersion— the edition of the API utilized by the block (present edition is two)call— a singular identifier for a block together with a namespaceedition— the present edition of a blockname— a show name for a blockclass— a block classicon— a Dashicon slug or a customized SVG icondescription— a brief description visual within the block inspectorhelps— a suite of choices to keep watch over options used within the editortextdomain— the plugin text-domaineditorScript— editor script definitioneditorStyle— editor genre definitiongenre— supplies choice types for a block
Along with the homes indexed above, you'll (and more than likely will) outline an attributes object offering details about knowledge saved via your block. To your block.json you'll set any choice of attributes in key/price pairs, the place the hot button is the characteristic call and the price is is the characteristic definition.
Check out the next instance of characteristic definitions:
"attributes": {
	"content material": {
		"variety": "array",
		"supply": "kids",
		"selector": "p"
	},
	"align": {
		"variety": "string",
		"default": "none"
	},
	"hyperlink": {
		"variety": "string",
		"default": "https://kinsta.com"
	}
},
We’ll dive deeper into the block.json record later in the article, however you might also wish to take a look at the Block Editor Guide for extra detailed details about block.json metadata and attributes.
The src Folder
The src folder is the place the advance occurs. In that folder, you’ll to find the next information:
- index.js
- edit.js
- save.js
- editor.scss
- genre.scss
index.js
The index.js record is your start line. Right here you'll import dependencies and sign up the block variety at the server:
import { registerBlockType } from '@wordpress/blocks';
import './genre.scss';
import Edit from './edit';
import save from './save';

registerBlockType('create-block/my-first-block', {
	edit: Edit,
	save,
});
The primary commentary imports the registerBlockType serve as from the @wordpress/blocks package. The next import statements import the stylesheet at the side of the Edit and save purposes.
The registerBlockType serve as registers the component on the client. The serve as takes two parameters: a block call namespace/block-name (the similar as registered at the server) and a block configuration object.
The Edit serve as supplies the block interface as rendered within the block editor, whilst the save serve as supplies the construction that will probably be serialized and stored into the database (read more).
edit.js
edit.js is the place you’ll construct the block admin interface:
import { __ } from '@wordpress/i18n';
import { useBlockProps } from '@wordpress/block-editor';
import './editor.scss';

export default serve as Edit() {
	go back (

			{__('My First Block – hi from the editor!', 'my-first-block')}

	);
}
First, it imports the __ serve as from the @wordpress/i18n bundle (this bundle incorporates a JavaScript edition of the interpretation purposes), the useBlockProps React hook, and the editor.scss record.
Following that, it exports the React part (learn extra about import and export statements).
save.js
The save.js record is the place we construct the block construction to be stored into the database:
import { __ } from '@wordpress/i18n';
import { useBlockProps } from '@wordpress/block-editor';

export default serve as save() {
	go back (

			{__(
				'My First Block – hi from the stored content material!',
				'my-first-block'
			)}

	);
}
editor.scss and magnificence.scss
Except for the scripts, two SASS information live within the src folders. The editor.scss record incorporates the types implemented to the block within the editor’s context, whilst the genre.scss record incorporates the types of the block for show within the frontend. We’ll dive deeper into those information in the second one a part of this information.
The node_modules and construct Folders
The node_modules folder incorporates node modules and their dependencies. We received’t dive deeper into node applications as it's past the scope of this newsletter, however you'll learn extra in this article on where npm installs the packages.
The construct folder incorporates the JS and CSS information because of the construct procedure. You'll be able to dive deeper into the construct procedure in ESNext syntax and JavaScript Build Setup guides.
The Venture: Development Your First Gutenberg Block
It’s time to get our arms grimy. This segment will educate you find out how to create a plugin offering a CTA block named Associate Block.
The block will consist of 2 columns, with a picture at the left and a textual content paragraph at the proper. A button with a customizable hyperlink will probably be positioned beneath the textual content:

The block variety you'll discover ways to construct on this information.
That is only a easy instance, nevertheless it lets in us to hide the fundamentals of Gutenberg block building. If you get a transparent working out of the fundamentals, you'll move forward and create increasingly more complicated Gutenberg blocks with the assistance of the Block Editor Handbook and another of the huge assets to be had available in the market.
Assuming that you've got the newest edition of WordPress working for your native building surroundings, right here’s what you’re going to be informed from right here on:
- How to Set Up the Starter Block Plugin
- block.json at Work
- Using Built-In Components: The RichText Component
- Adding Controls to the Block Toolbar
- Customizing The Block Settings Sidebar
- Adding and Customizing an External Link
- Adding Multiple Block Styles
- Nesting Blocks With the InnerBlocks Component
- Additional Improvements
Able… set… move!
The way to Set Up the Starter Block Plugin
Release your command-line software and navigate to the /wp-content/plugins folder:
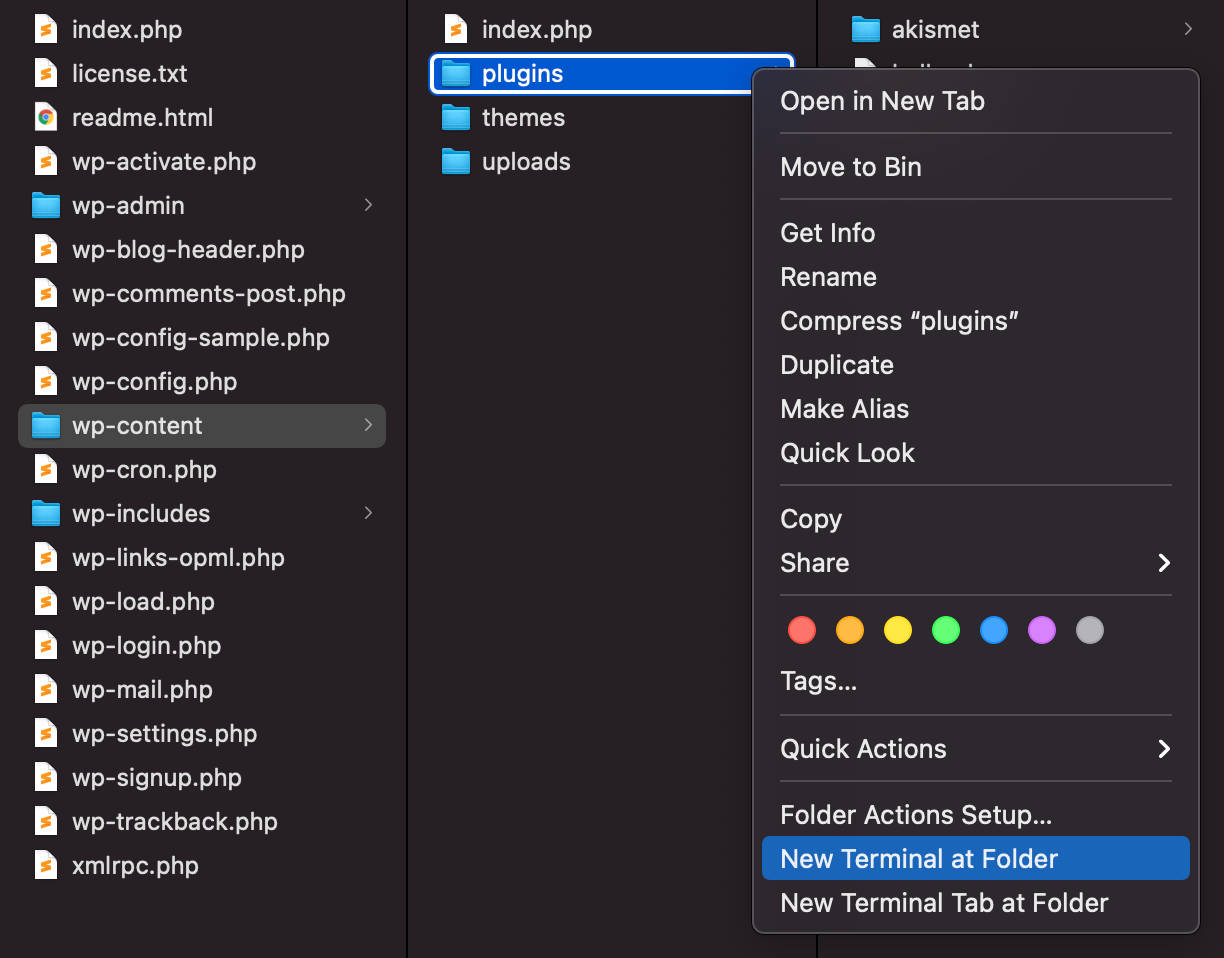
New terminal at folder in Mac OS.
Now, run the next command:
npx @wordpress/create-blockThis command generates the PHP, SCSS, and JS information for registering a block in interactive mode, permitting you so as to add the essential knowledge in your block simply. For our instance we’ll use the next main points:
- Block slug: my-affiliate-block
- Interior namespace: my-affiliate-plugin
- Block show name: Associate block
- Brief block description: An instance block for Kinsta readers
- Dashicon: cash
- Class call: design
- Plugin writer: your call
- License: –
- Hyperlink to the license textual content: –
- Present plugin edition: 0.1.0
Putting in the plugin and all dependencies takes a few mins. When the method is entire, you’ll see the next reaction:
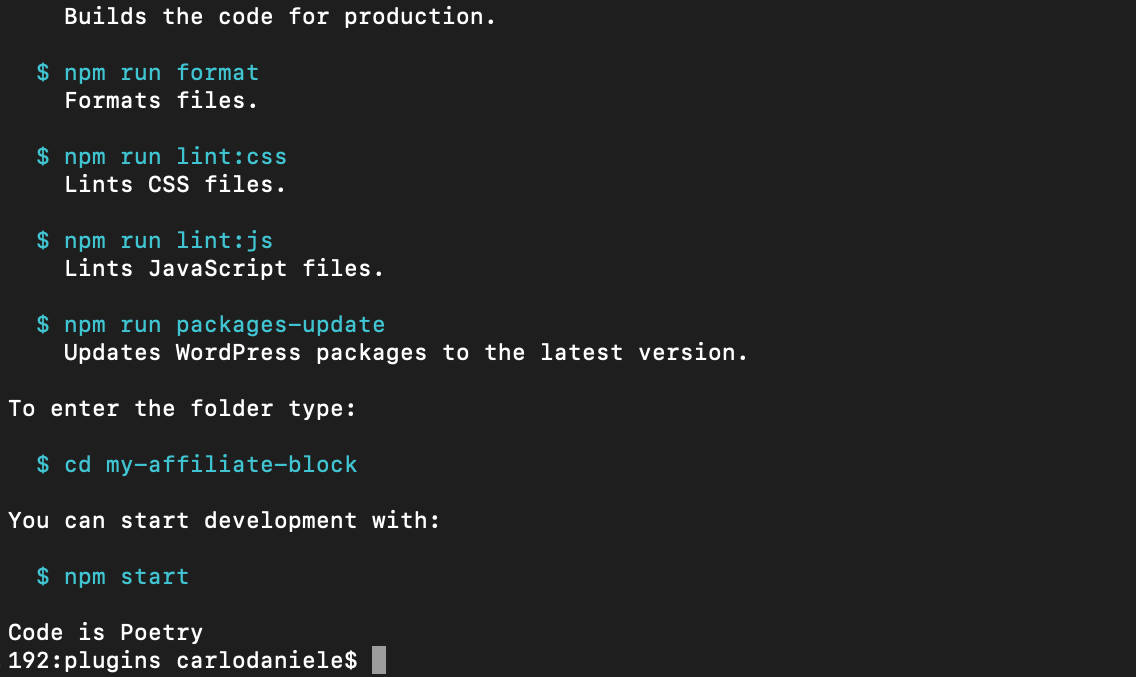
The Associate block has been put in and registered for building.
Now, run the next command from the /wp-content/plugins folder:
cd my-affiliate-block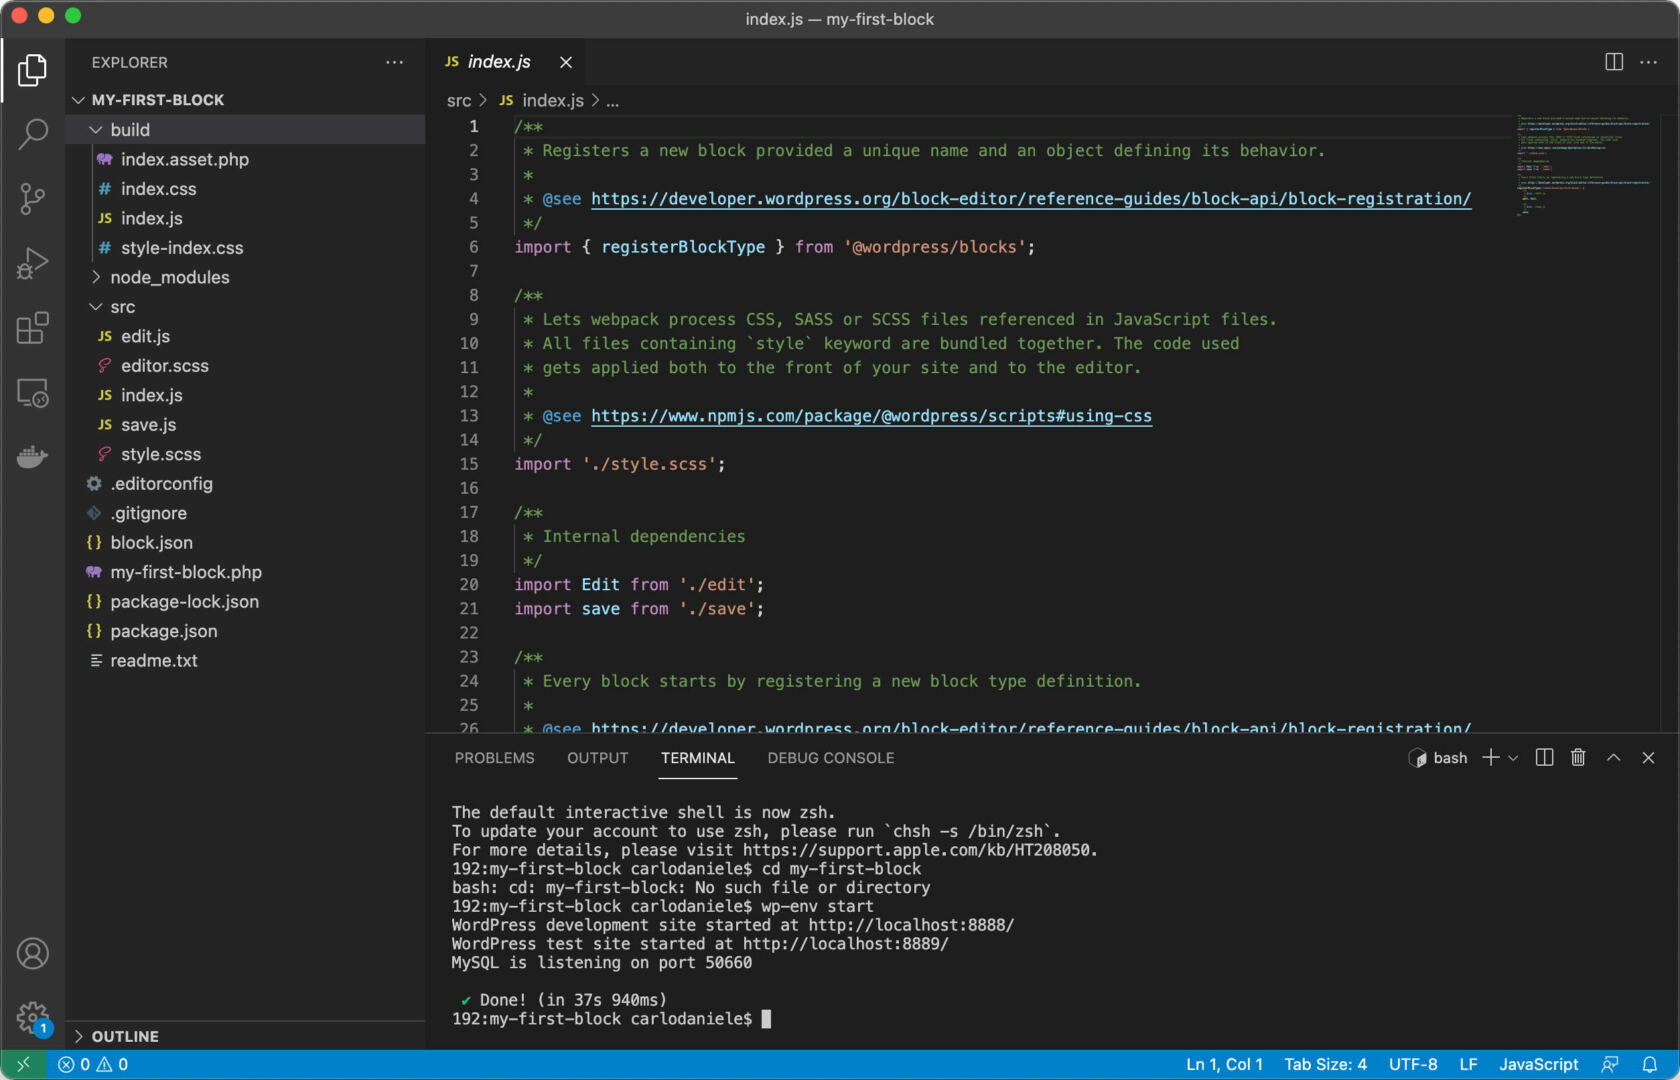
Working instructions from Visible Studio Code Terminal.
In the end, from inside your plugin’s folder (my-affiliate-block in our instance), you'll get started building with:
npm get startedNow open the Plugins display to search out and turn on the Associate Block plugin:
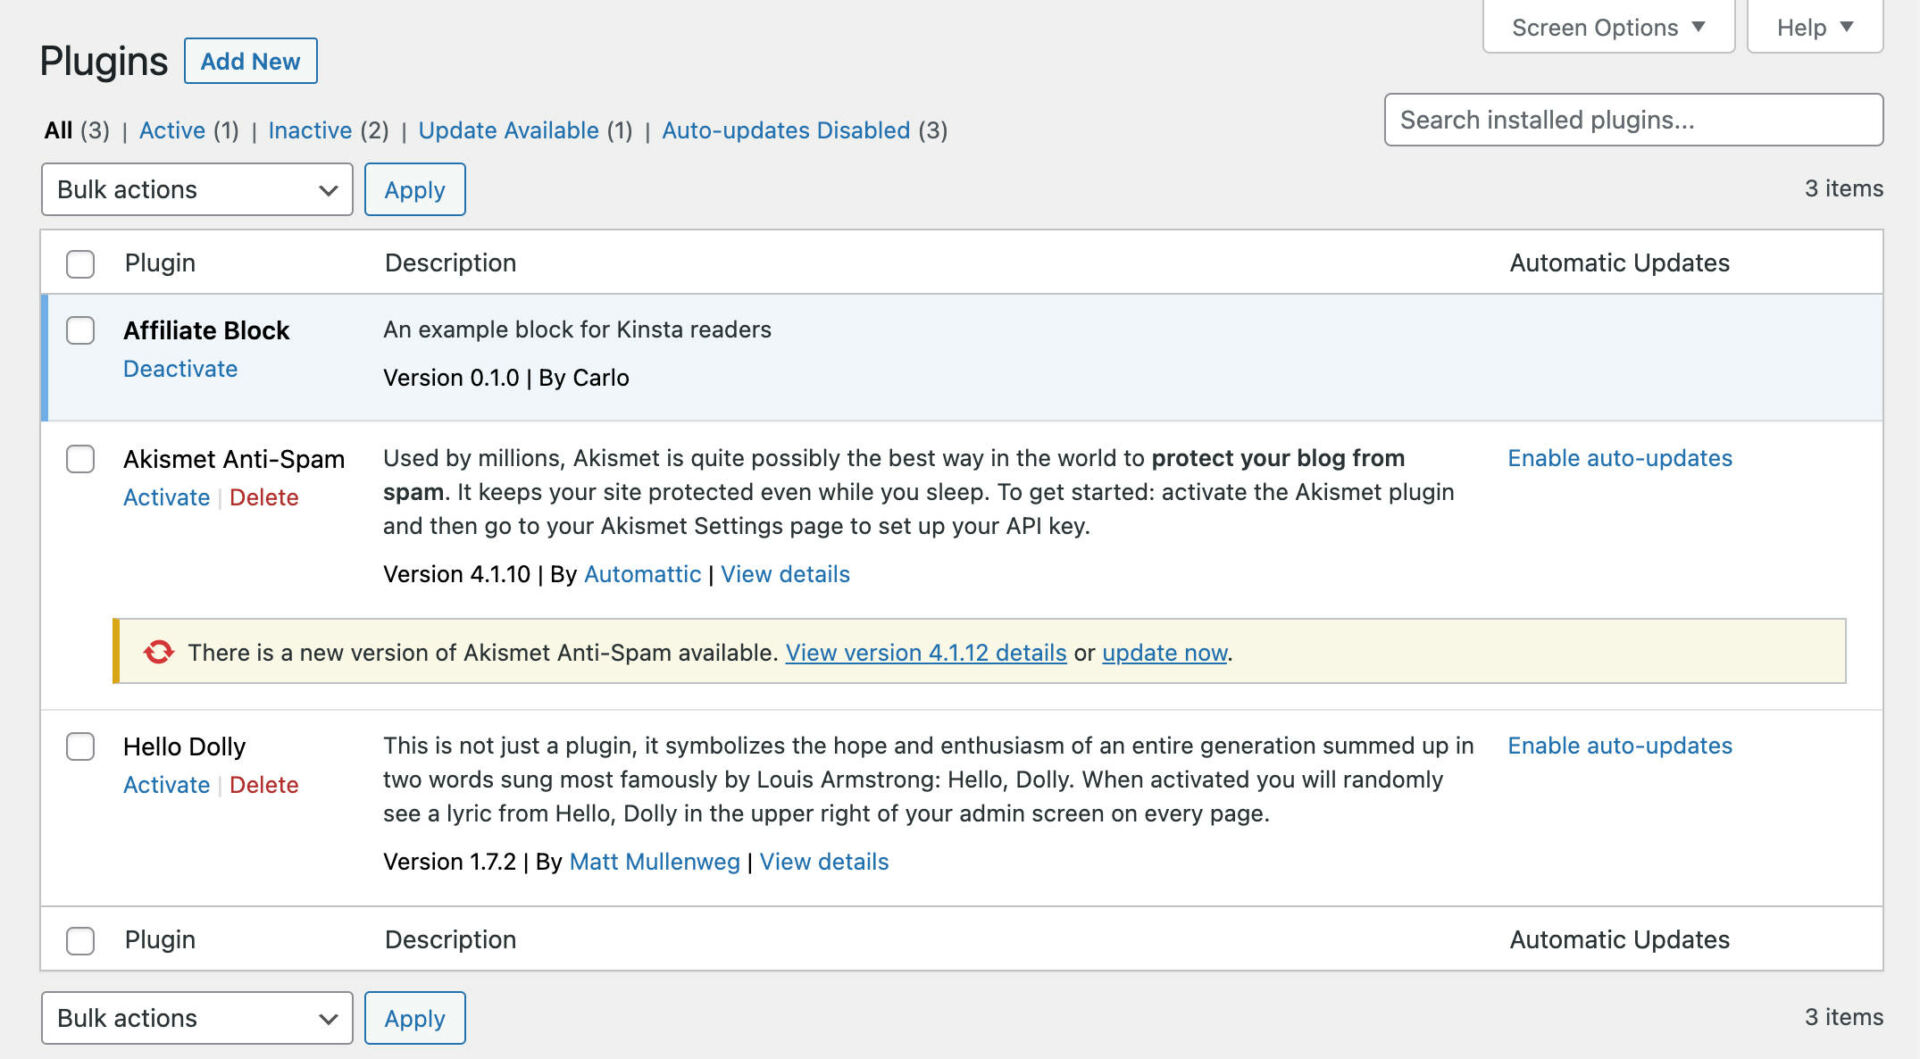
Associate Block plugin.
Create a brand new submit, open the block inserter, and scroll all the way down to the Design class. Click on so as to add the Associate Block:
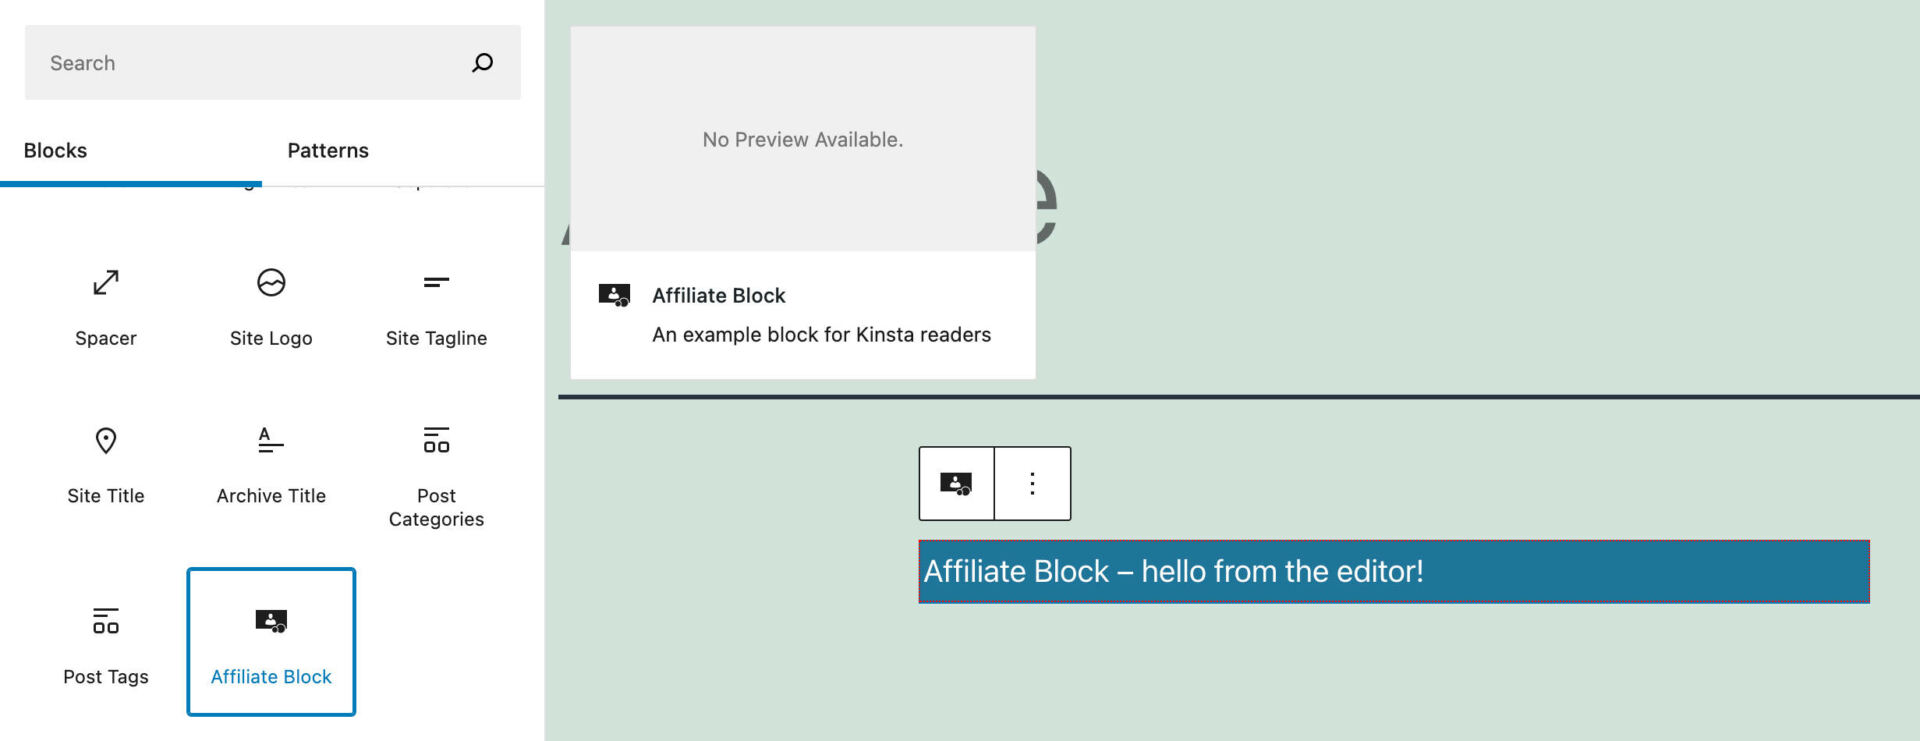
A starter block constructed with @wordpress/create-block.
block.json at Paintings
As we discussed previous, the server-side block registration takes position in the principle .php record. On the other hand, we received’t outline settings within the .php record. As a substitute, we’ll be the usage of the block.json record.
So, open block.json once more and take a more in-depth take a look at the default settings:
{
	"apiVersion": 2,
	"call": "my-affiliate-plugin/my-affiliate-block",
	"edition": "0.1.0",
	"name": "Associate Block",
	"class": "design",
	"icon": "cash",
	"description": "An instance block for Kinsta readers",
	"helps": {
		"html": false
	},
	"textdomain": "my-affiliate-block",
	"editorScript": "record:./construct/index.js",
	"editorStyle": "record:./construct/index.css",
	"genre": "record:./construct/style-index.css"
}
Scripts and Types
editorScript, editorStyle, and genre homes give you the relative paths to frontend and backend scripts and types.
You don’t need to manually sign up the scripts and types outlined right here as a result of those are routinely registered and enqueued via WordPress. To turn out that, release the browser inspector and open the Community tab:
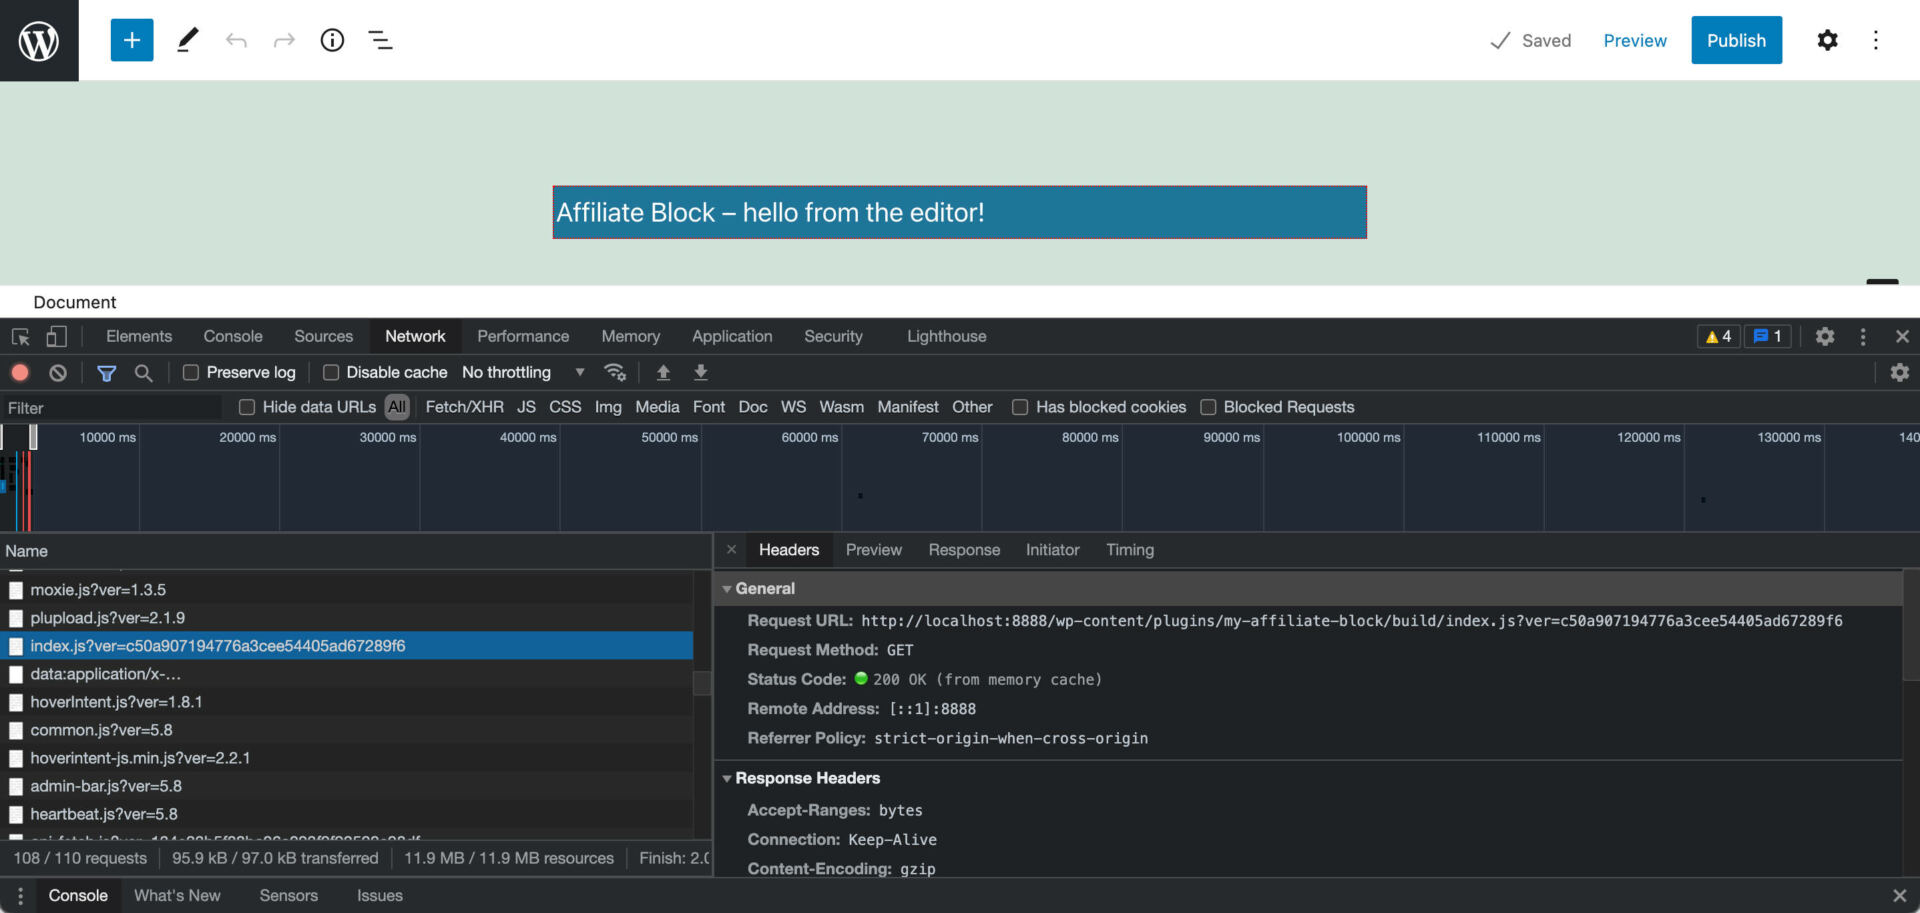
Analyzing assets in Chrome DevTools.
As you'll see from the picture above, our index.js script dwelling within the construct folder has been frequently enqueued with no need so as to add any PHP code.
UI Labels
The name and description homes give you the labels had to establish the block within the editor:

Block call and outline within the block sidebar.
Key phrases
As we discussed previous, you'll correctly configure your block settings the usage of properties and attributes. As an example, you'll upload a number of key phrases to lend a hand customers seek blocks:
{ "key phrases": [ "kinsta", "affiliate", "money" ] }When you now enter “kinsta”, “associate” or “cash” within the fast inserter, the editor will counsel you the Associate block:
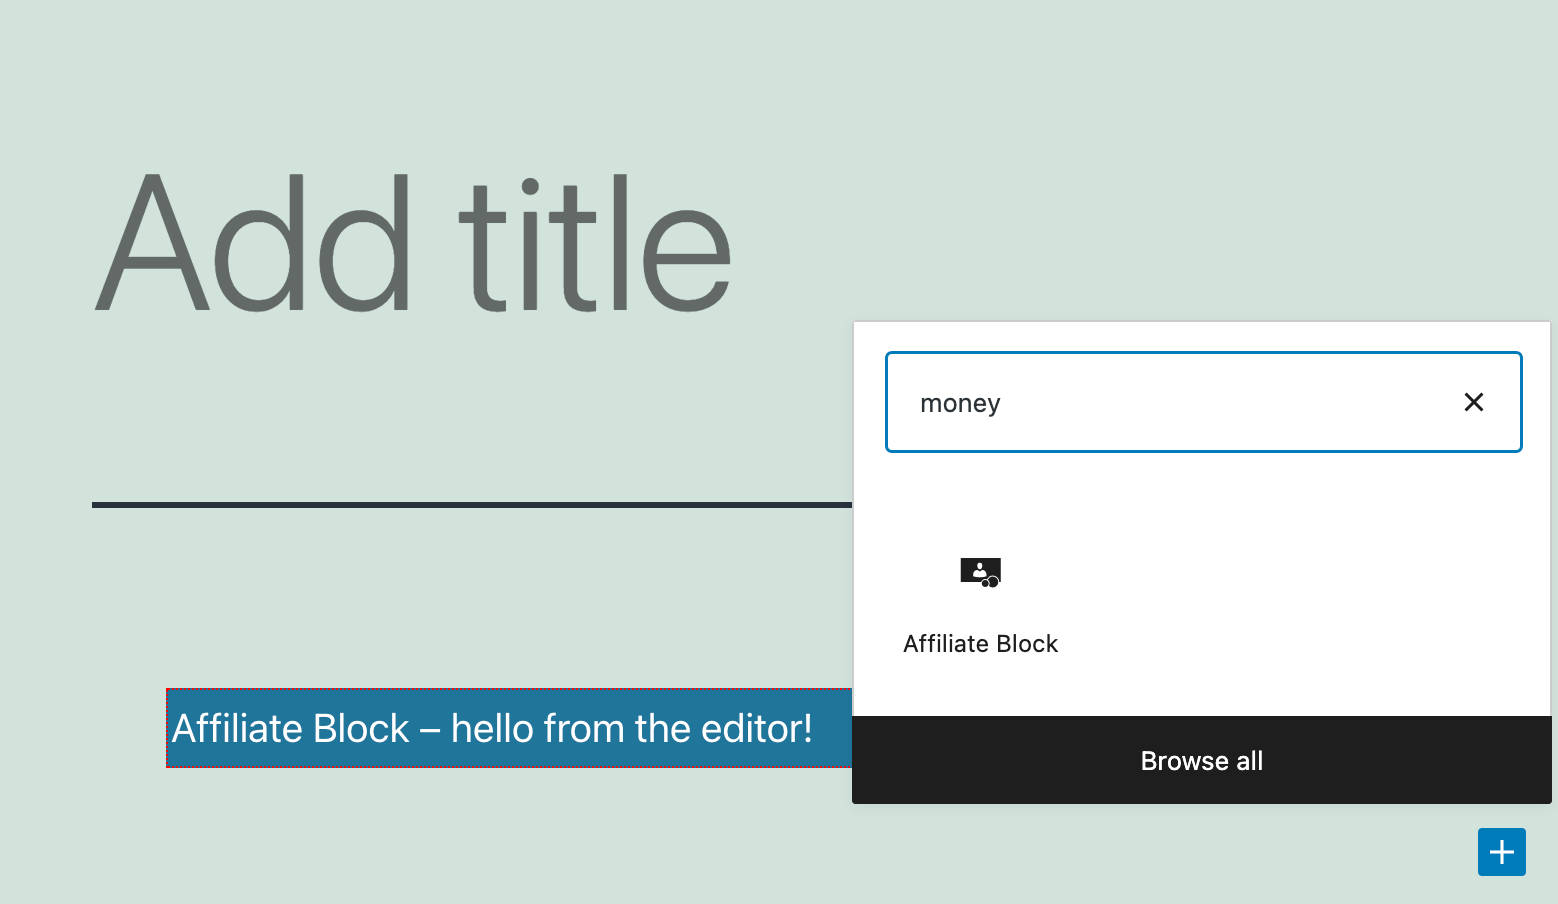
In search of a block the usage of a key phrase within the fast inserter.
Localization
In case you are questioning how the localization of the strings within the JSON record occurs, here's the answer:
In JavaScript, you'll use now
registerBlockTypeFromMetadatameans from@wordpress/blocksbundle to sign up a block variety the usage of the metadata loaded from block.json record. All localized homes get routinely wrapped in_x(from@wordpress/i18nbundle) serve as calls very similar to the way it works in PHP withregister_block_type_from_metadata. The one requirement is to set thetextdomainassets within the block.json record.
Right here we're the usage of the registerBlockType serve as as an alternative of registerBlockTypeFromMetadata, because the latter has been deprecated since Gutenberg 10.7, however the mechanism is identical.
The use of Constructed-In Elements: The RichText Part
The weather that make up a Gutenberg block are React parts, and you'll get right of entry to those parts by means of the wp world variable. As an example, attempt to variety wp.editor into your browser’s console. This will provide you with the total record of the parts integrated within the wp.editor module.
Scroll throughout the record and wager what parts are supposed for via their names.
In a similar fashion, you'll take a look at the record of parts integrated within the wp.parts module:
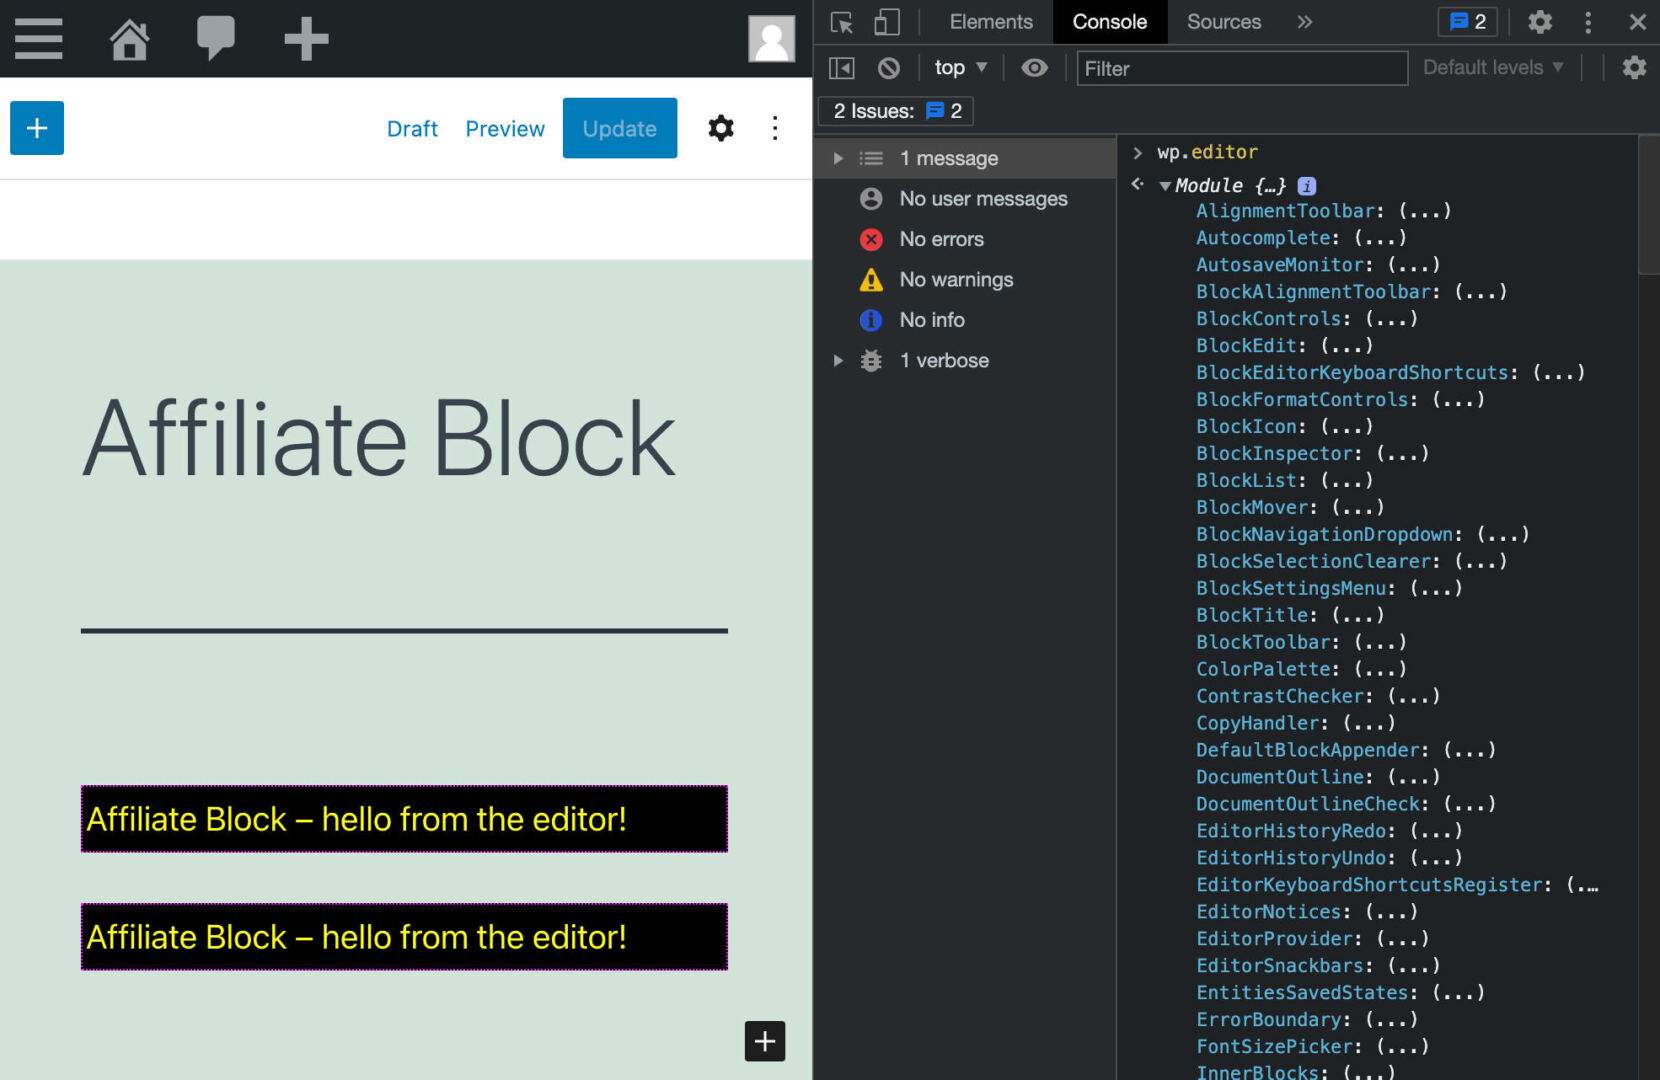
WP Editor parts.
Now return to the edit.js record and take a more in-depth take a look at the script:
import { __ } from '@wordpress/i18n';
import { useBlockProps } from '@wordpress/block-editor';
import './editor.scss';

export default serve as Edit() {
	go back (

			{__('My First Block – hi from the editor!', 'my-first-block')}

	);
}
This code generates a static block with easy, non-editable textual content. However we will be able to exchange issues simply:
The starter block within the code editor.
To make the textual content editable you’ll have to switch the present tag with an element that makes the input content editable. For that, Gutenberg supplies the integrated RichText component.
Including a integrated part on your block is a 5 step procedure:
- Import the required components from a WordPress package
- Include the corresponding elements into your JSX code
- Define the necessary attributes in the block.json file
- Define event handlers
- Save data
Step 1: Import the Required Elements from a WordPress Bundle
Now open the edit.js record and alter the next import commentary:
import { useBlockProps } from '@wordpress/block-editor';…to:
import { useBlockProps, RichText } from '@wordpress/block-editor';This manner, you’re uploading the useBlockProps serve as and RichText part from the @wordpress/block-editor bundle.
useBlockProps
The useBlockProps React hook marks the block’s wrapper element:
When the usage of API edition 2, you should use the brand new
useBlockPropshook within the block’seditserve as to mark the block’s wrapper component. The hook will insert attributes and match handlers had to allow block conduct. Any attributes you want to go to the block component should be handed thruuseBlockPropsand the returned price be unfold onto the component.
To place issues merely, useBlockProps routinely assign attributes and categories to the wrapper component (the p component in our instance):
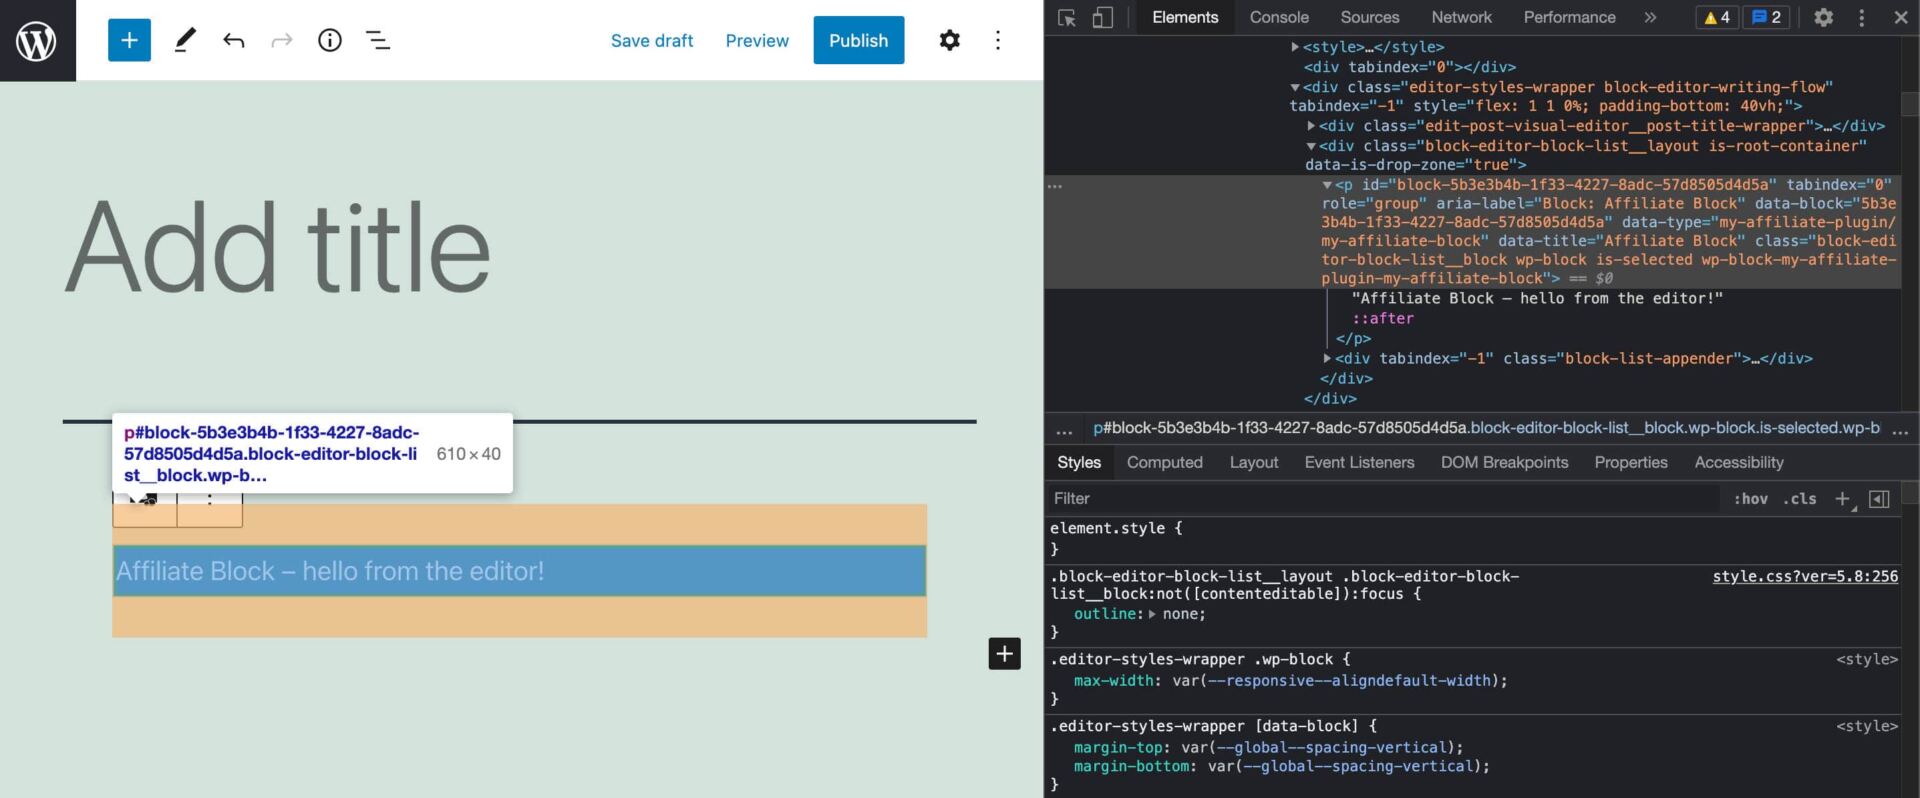
Parts and categories generated via useBlockProps.
When you take away useBlockProps from the wrapper component, you’d have a easy textual content string with out a get right of entry to to dam capability and magnificence:
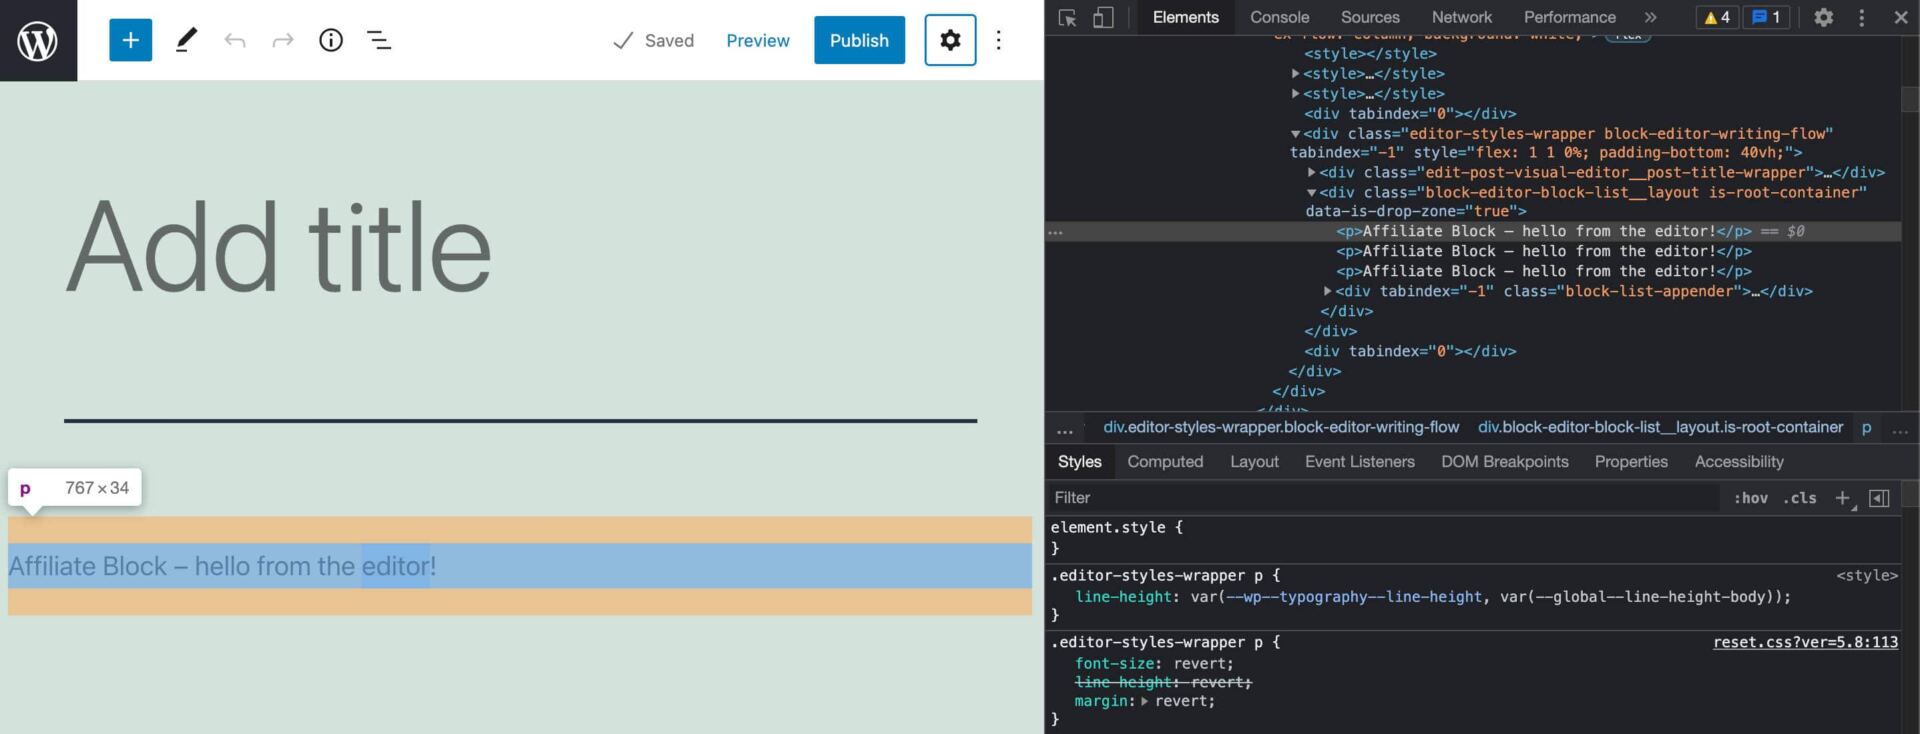
The similar block with out useBlockProps.
As we’ll explain later, you'll additionally go to useBlockProps an object of homes to customise the output.
RichText
The RichText part supplies a contenteditable enter, permitting customers to edit and layout the content material.
You’ll to find the part documented on GitHub at gutenberg/packages/block-editor/src/components/rich-text/README.md.
Step 2: Come with the Corresponding Parts Into Your JSX Code
...
const blockProps = useBlockProps();
go back (
Let’s remark at the code line via line:
tagName— the tag call of the editable HTML componentonChange— serve as known as when the component’s content material adjustmentsallowedFormats— an array of allowed codecs. Through default, all codecs are allowedprice— the HTML string to make editableplaceholder— placeholder textual content to turn when the component is empty
Step 3: Outline the Essential Attributes within the block.json Document
Attributes supply details about the information saved via a block, akin to wealthy content material, background colour, URLs, and so on.
You'll be able to set an arbitrary choice of attributes inside an attributes object in key/price pairs, the place the hot button is the characteristic call and the price is the characteristic definition.
Now open the block.json record and upload the next attributes prop:
"attributes": {
	"content material": {
		"variety": "string",
		"supply": "html",
		"selector": "p"
	}
},
The content material characteristic lets in to retailer the textual content typed via the person within the editable box:
varietysignifies the kind of knowledge saved via the characteristic. The kind is needed except you outline anenumassets.supplydefines how the characteristic price is extracted from the submit content material. In our instance, it’s the HTML content material. Observe that if you happen to don’t supply a supply assets, knowledge are saved within the block delimiter (read more).selectoris an HTML tag or another selector, akin to a category call or an identification characteristic.
We can go the Edit serve as an object of homes. So, return to the edit.js record and make the next exchange:
export default serve as Edit( { attributes, setAttributes } ) { ... }Step 4: Outline Match Handlers
The RichText component has an onChange characteristic, offering a serve as to name when the component’s content material adjustments.
Let’s outline that serve as and spot the entire edit.js script:
import { __ } from '@wordpress/i18n';
import { useBlockProps, RichText } from '@wordpress/block-editor';
import './editor.scss';
export default serve as Edit( { attributes, setAttributes } ) {
const blockProps = useBlockProps();
const onChangeContent = ( newContent ) => {
setAttributes( { content material: newContent } )
}
go back (
Now save the record and run npm run get started for your terminal window. Then, return on your WordPress dashboard, create a brand new submit or web page and upload your Associate block:
The output of the RichText part within the Block Editor.
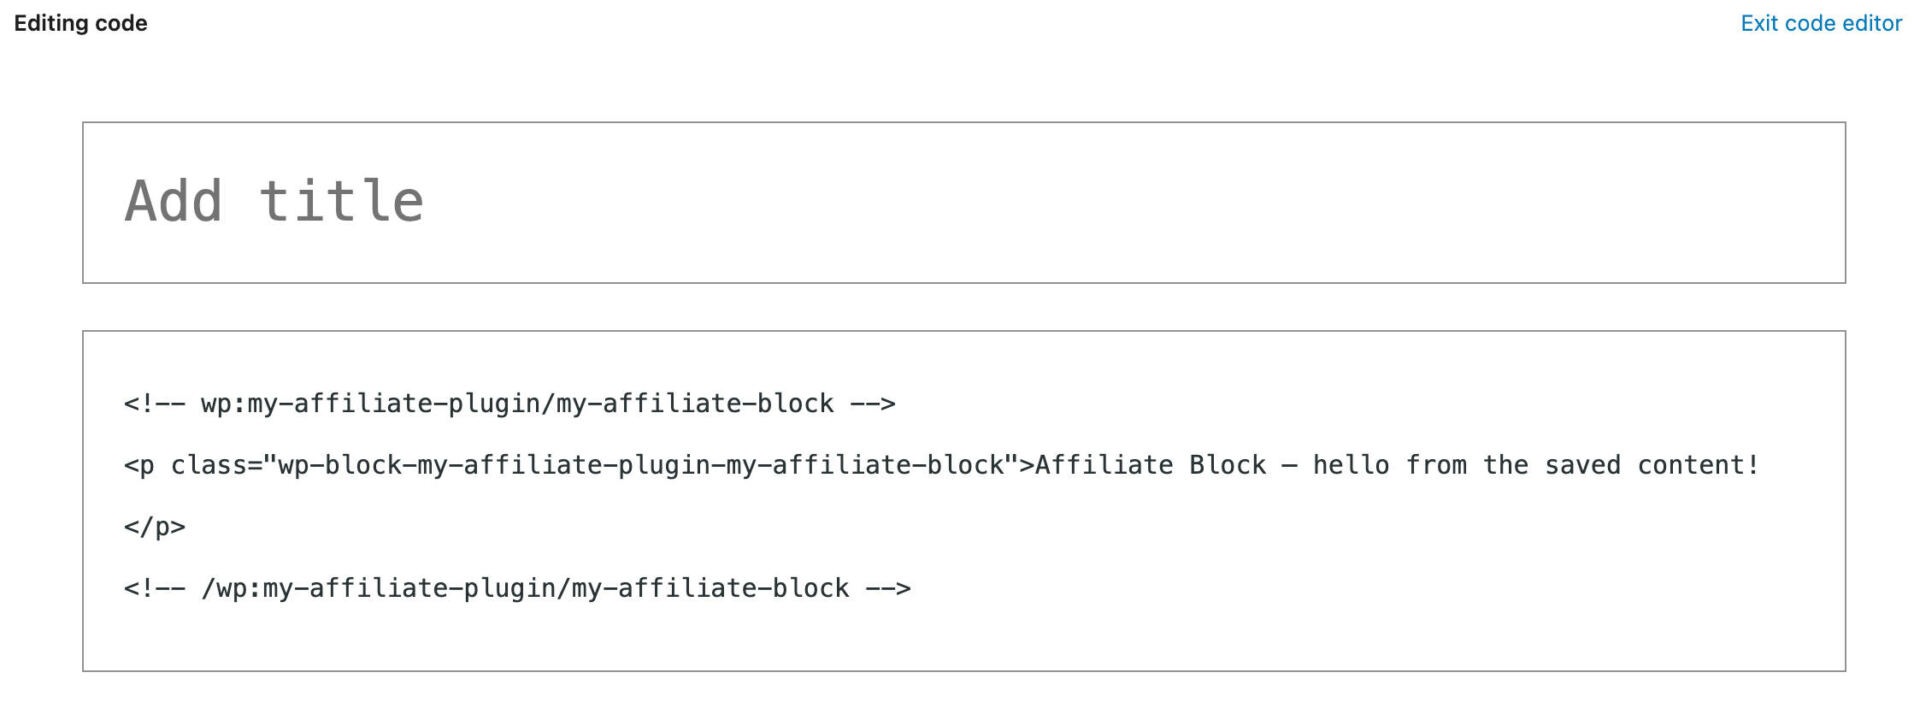
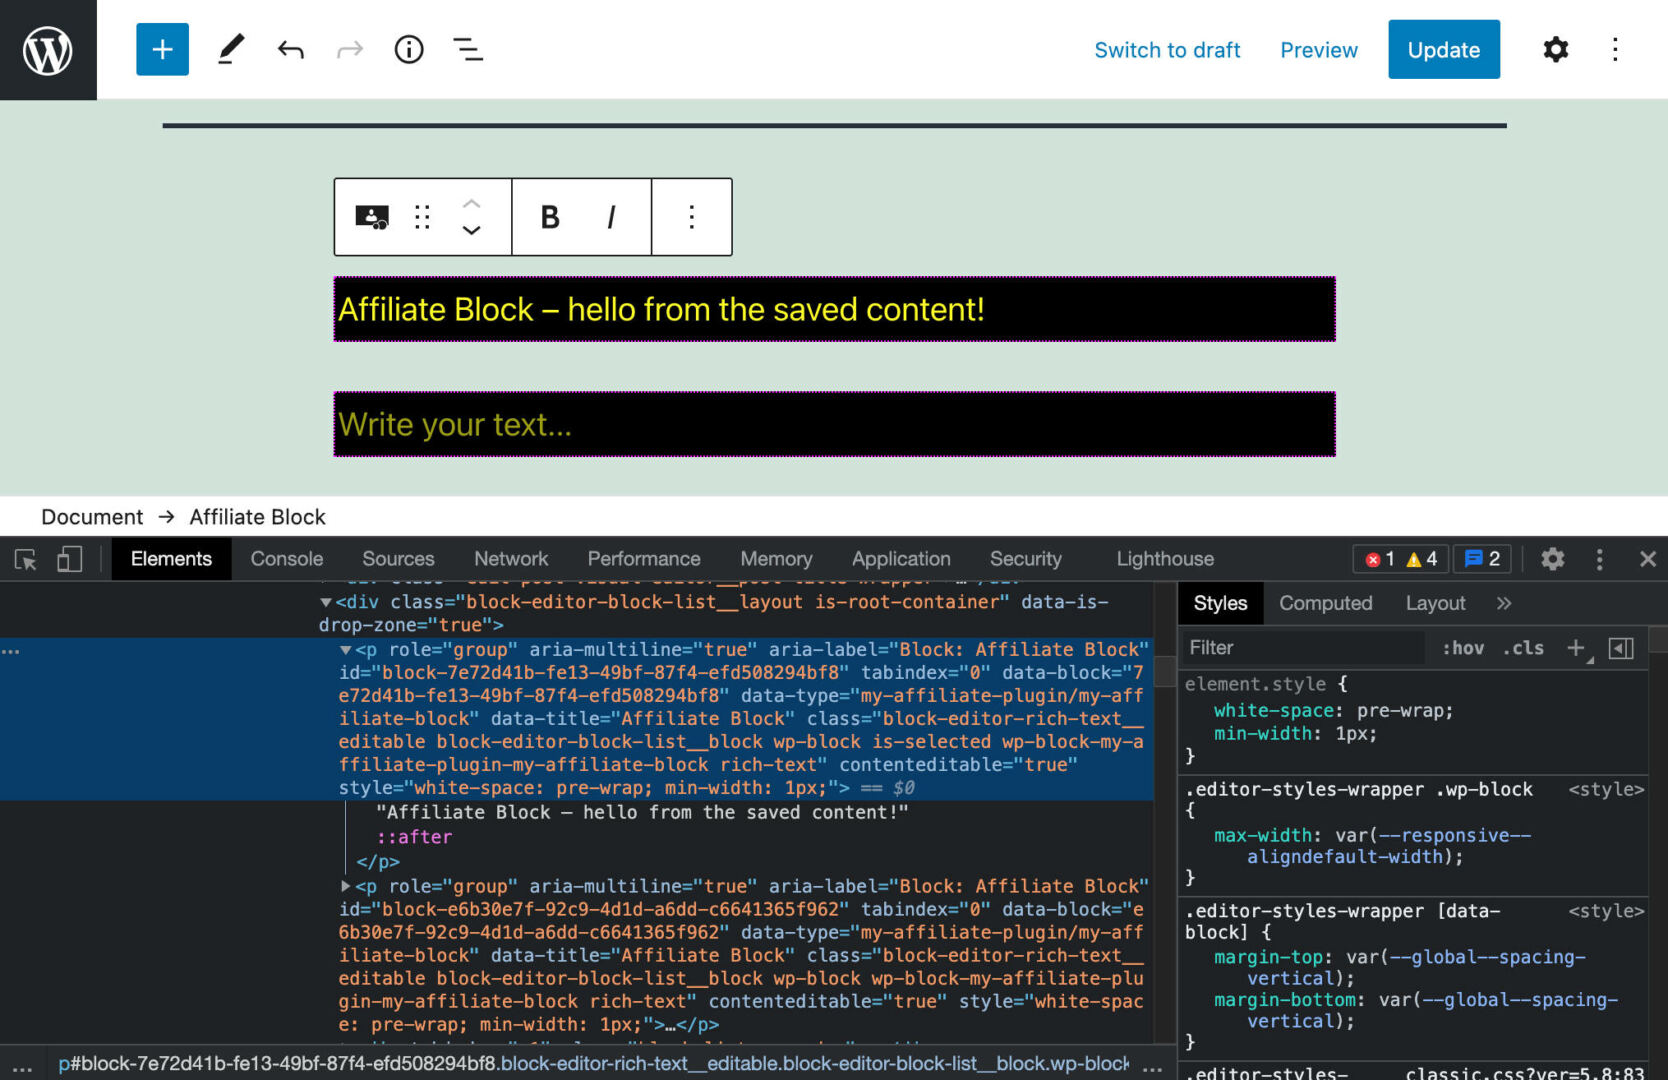
Upload some textual content and turn to Code view. Here's what your code will have to seem like:
That is my first editable Gutenberg block 🤓
When you now save the web page and take a look at the frontend consequence, you can be a bit of disillusioned as a result of your adjustments don't have an effect on the website. That’s as a result of you must adjust the save.js record to retailer person enter within the database when the submit is stored.
Step 5: Save Information
Now open the save.js record and alter the script as follows:
import { __ } from '@wordpress/i18n';
import { useBlockProps, RichText } from '@wordpress/block-editor';
export default serve as save( { attributes } ) {
const blockProps = useBlockProps.save();
go back (
That’s what we're doing right here:
- Import the
RichTextpart from theblock-editorbundle. - Cross a number of homes thru an object argument to the
saveserve as (on this instance, we're simplest passing theattributesproperty) - Go back the content material of the
RichTextpart
You'll be able to learn extra in regards to the RichText part within the Block Editor Handbook and to find the full list of props on Github.
Now let’s take it a step additional. Within the subsequent segment, you’ll learn to upload controls to the block toolbar.
Including Controls to the Block Toolbar
The block toolbar incorporates a suite of controls permitting customers to govern parts of block content material. For every toolbar keep watch over, you’ll discover a part:

The core paragraph block toolbar.
As an example, you should upload a textual content alignment keep watch over in your block. All you want to do is import two parts from the @wordpress/block-editor bundle.
We’ll undergo the similar steps as the former instance:
- Import Required Elements From WordPress Programs
- Come with the Corresponding Parts Into Your JSX Code
- Outline the Essential Attributes within the block.json Document
- Outline Match Handlers
- Save Information
Step 1: Import BlockControls and AlignmentControl Elements from @wordpress/block-editor
So as to add an alignment keep watch over to the block toolbar, you want two parts:
Uninterested in subpar point 1 WordPress internet hosting make stronger with out the solutions? Check out our world-class make stronger workforce! Check out our plans
BlockControlsrenders a dynamic toolbar of controls (undocumented).AlignmentControlrenders a dropdown menu that shows alignment choices for the chosen block (read more)
Open the edit.js record and edit the import commentary as proven beneath:
import {
	useBlockProps,
	RichText,
	AlignmentControl,
	BlockControls
} from '@wordpress/block-editor';
Step 2: Upload BlockControls and AlignmentControl Parts
Cross to the Edit serve as and insert the
export default serve as Edit( { attributes, setAttributes } ) {
const blockProps = useBlockProps();
go back (
<>
Within the code above, <> and are the fast syntax for stating React fragments, that are how we go back more than one components in React.
On this instance, AlignmentControl has two attributes:
pricesupplies the present price for the componentonChangesupplies an event handler to run when the price adjustments
We've additionally outlined further attributes for the RichText component (take a look at the full list of attributes with examples)
Step 3: Outline the align Characteristic in block.json
Now move to the block.json record and upload the align characteristic:
"align": {
	"variety": "string",
	"default": "none"
}
Return to the terminal, prevent the present procedure with ^C and get started the script once more with npm run get started. Then return to the block editor, refresh the web page and make a selection the block. You will have to see the block toolbar with an alignment keep watch over:
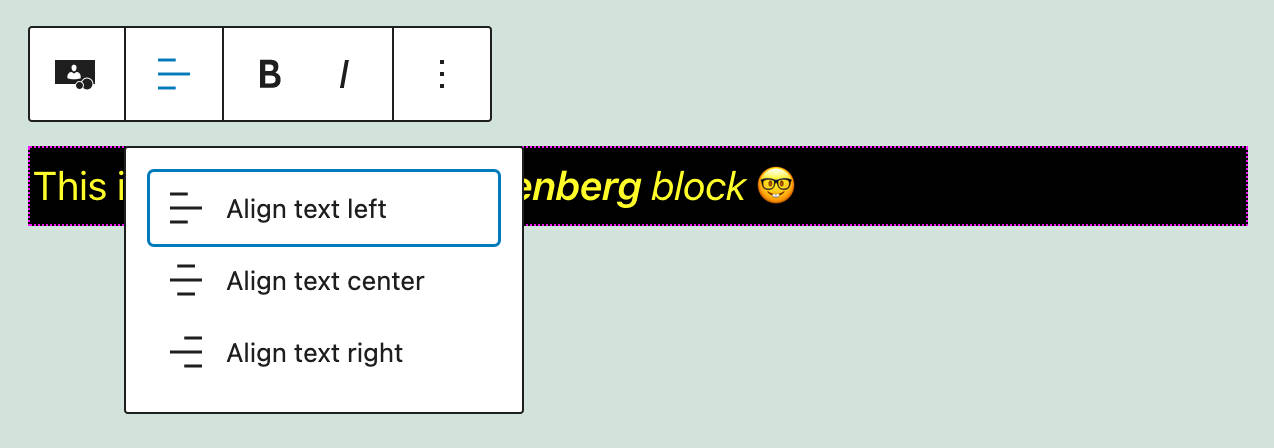
The Alignment Toolbar has been effectively added.
Now, if you happen to attempt to layout the block content material the usage of the brand new alignment controls, you’ll see that not anything occurs. That’s as a result of we haven’t outlined the development handler but.
Step 4: Outline the Match Handlers
Now outline onChangeAlign:
const onChangeAlign = ( newAlign ) => {
	setAttributes( {
		align: newAlign === undefined ? 'none' : newAlign,
	} )
}
If newAlign is undefined, then we set newAlign to none. Another way, we use newAlign.
Our edit.js script will have to be entire (for now):
export default serve as Edit( { attributes, setAttributes } ) {
const blockProps = useBlockProps();
const onChangeContent = ( newContent ) => {
setAttributes( { content material: newContent } )
}
const onChangeAlign = ( newAlign ) => {
setAttributes( {
align: newAlign === undefined ? 'none' : newAlign,
} )
}
go back (
<>
Now you'll return to the editor and align the block content material.
We wish to adjust the save serve as to retailer block content material and attributes within the database.
Step 5: Save Information
Open save.js and alter the save serve as as follows:
export default serve as save( { attributes } ) {
const blockProps = useBlockProps.save();
go back (
In the end, to make the code extra readable, you'll extract the person homes from the characteristic object the usage of the destructuring assignment syntax:
export default serve as save( { attributes } ) {
const blockProps = useBlockProps.save();
const { content material, align } = attributes;
go back (
Save the record, restart the method and go back to the editor in Code editor mode. The code will have to glance one thing like this:
That is my first editable Gutenberg block 🤓
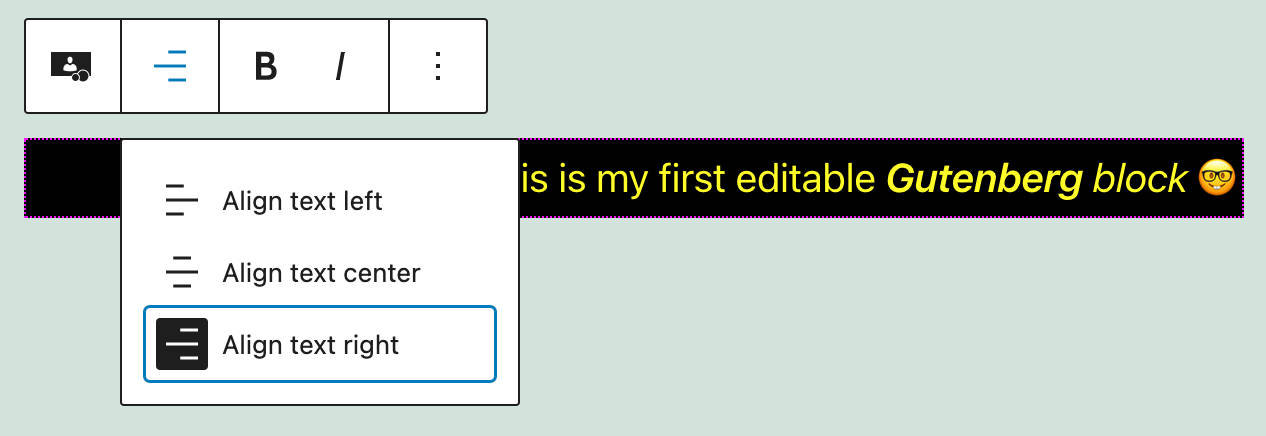
Align textual content proper.
Ant that’s it! You've gotten simply added an alignment keep watch over to the block toolbar 
You'll be able to learn extra about block toolbar controls within the Block Editor Guide.
Customizing The Block Settings Sidebar
You'll be able to additionally upload controls to the block Settings Sidebar (and even create a brand new sidebar in your software).
The API supplies an InspectorControls component for that.
The Block Editor Guide explains how to use the Settings Sidebar:
The Settings Sidebar is used to show less-often-used settings or settings that require extra display house. The Settings Sidebar will have to be used for block-level settings simplest.
If in case you have settings that have an effect on simplest decided on content material inside of a block (instance: the “daring” surroundings for decided on textual content inside of a paragraph): don't position it within the Settings Sidebar. The Settings Sidebar is displayed even if modifying a block in HTML mode, so it will have to simplest comprise block-level settings.
Once more:
- Import Required Elements From WordPress Programs
- Come with the Corresponding Parts Into Your JSX Code
- Outline the Essential Attributes within the block.json Document
- Outline Match Handlers
- Save Information
Step 1. Import InspectorControls and PanelColorSettings Elements from @wordpress/block-editor
You'll be able to upload a number of controls to permit customers to customise particular sides of the block. As an example, you'll supply a colour keep watch over panel. To take action, it is important to import the InspectorControls and PanelColorSettings parts from the block-editor module:
import {
	useBlockProps,
	RichText,
	AlignmentControl,
	BlockControls,
	InspectorControls,
	PanelColorSettings
} from '@wordpress/block-editor';
Step 2: Come with the Corresponding Parts Into Your JSX code
Now you'll upload the corresponding components to the JSX returned via the Edit serve as:
export default serve as Edit( { attributes, setAttributes } ) {
const blockProps = useBlockProps();
const onChangeContent = ( newContent ) => {
setAttributes( { content material: newContent } )
}
const onChangeAlign = ( newAlign ) => {
setAttributes( {
align: newAlign === undefined ? 'none' : newAlign,
} )
}
go back (
<>
Observe that we have got additionally up to date the genre characteristic of the RichText component:
Step 3: Outline the Essential Attributes in block.json
Now outline the backgroundColor and textColor attributes within the block.json record:
"attributes": {
	"content material": {
		"variety": "string",
		"supply": "html",
		"selector": "p"
	},
	"align": {
		"variety": "string",
		"default": "none"
	},
	"backgroundColor": {
		"variety": "string"
	},
	"textColor": {
		"variety": "string"
	}
},
Step 4: Outline the Match Handlers
Now you want to outline two purposes to replace backgroundColor and textColor on person enter:
const onChangeBackgroundColor = ( newBackgroundColor ) => {
	setAttributes( { backgroundColor: newBackgroundColor } )
}
const onChangeTextColor = ( newTextColor ) => {
	setAttributes( { textColor: newTextColor } )
}
Step 5: Save Information
One ultimate step: Open the save.js record and alter the script as follows:
export default serve as save( { attributes } ) {
const blockProps = useBlockProps.save();
const { content material, align, backgroundColor, textColor } = attributes;
go back (
Now prevent the method (^C) and run npm run get started once more. Refresh the web page, delete any example of your block and upload it once more on your submit:

A customized block with a Colour Settings panel.
Make your adjustments, save the submit, and think about it within the frontend. The adjustments you made within the block editor will have to be mirrored at the entrance website.
Including and Customizing an Exterior Hyperlink
On this segment, you’ll upload new parts on your block variety:
- An
ExternalLinkpart permitting customers so as to add a customizable hyperlink to the Associate block - A number of sidebar controls permitting customers to customise hyperlink settings
Step 1. Import Elements from @wordpress/parts
Now you want to import a number of parts from @wordpress/parts. Open your edit.js record and upload the next import commentary:
import {
	TextControl,
	PanelBody,
	PanelRow,
	ToggleControl,
	ExternalLink
} from '@wordpress/parts';PanelBodyprovides a collapsible container to the Settings Sidebar.PaneRowproduces a generic container for sidebar controls.TextControlsupplies a textual content enter keep watch over.ToggleControlsupplies a toggle enabling customers to allow/disable a selected possibilityExternalLinkis an easy part so as to add an exterior hyperlink.
Step 2. Come with the Corresponding Parts Into Your JSX Code
You'll first upload the ExternalLink component on the similar point of RichText in a div container:
{ linkLabel }
The ExternalLink part isn't documented, so we referred to the component itself to get the record of to be had attributes. Right here we’re the usage of href, className, and rel attributes.
Through default, the rel characteristic price is ready to noopener noreferrer. Our code will upload the nofollow keyword to the rel characteristic of the ensuing a tag when the toggle keep watch over is on.
Now you'll upload hyperlink settings to the block sidebar.
First, you’ll upload a PanelBody component inside of InspectorControls on the similar point as PanelColorSettings:
...
Right here’s what we’re doing with this:
- The
namecharacteristic supplies the panel name. initialOpenunits whether or not or no longer the panel is first of all open.
Subsequent, we’ll upload two PanelRow components inside of PanelBody, and a TextControl component inside of every PanelRow:
The code above will have to now glance lovely easy. The 2 textual content controls permit customers to set hyperlink label and URL.
We’ll additionally upload an extra PanelRow with a ToggleControl to modify on/off a selected possibility, akin to whether or not to incorporate an characteristic or no longer:
Step 3: Outline the Essential Attributes in block.json
Now outline the affiliateLink, linkLabel, and hasLinkNofollow attributes within the block.json record:
"affiliateLink": {
	"variety": "string",
	"default": ""
},
"linkLabel": {
	"variety": "string",
	"default": "Test it out!"
},
"hasLinkNofollow": {
	"variety": "boolean",
	"default": false
}
Not anything extra so as to add right here! Let’s transfer directly to defining the event handling functions.
Step 4: Outline the Match Handlers
Get again to the edit.js record and upload the next purposes:
const onChangeAffiliateLink = ( newAffiliateLink ) => {
	setAttributes( { affiliateLink: newAffiliateLink === undefined ? '' : newAffiliateLink } )
}

const onChangeLinkLabel = ( newLinkLabel ) => {
	setAttributes( { linkLabel: newLinkLabel === undefined ? '' : newLinkLabel } )
}

const toggleNofollow = () => {
	setAttributes( { hasLinkNofollow: ! hasLinkNofollow } )
}
Those purposes replace the corresponding characteristic values on person enter.
Step 5: Save Information
Closing, we need to replace the save serve as in save.js:
export default serve as save( { attributes } ) {
const { align, content material, backgroundColor, textColor, affiliateLink, linkLabel, hasLinkNofollow } = attributes;
const blockProps = useBlockProps.save();
go back (
);
}Observe that right here we've got used a typical a component as an alternative of ExternalLink:
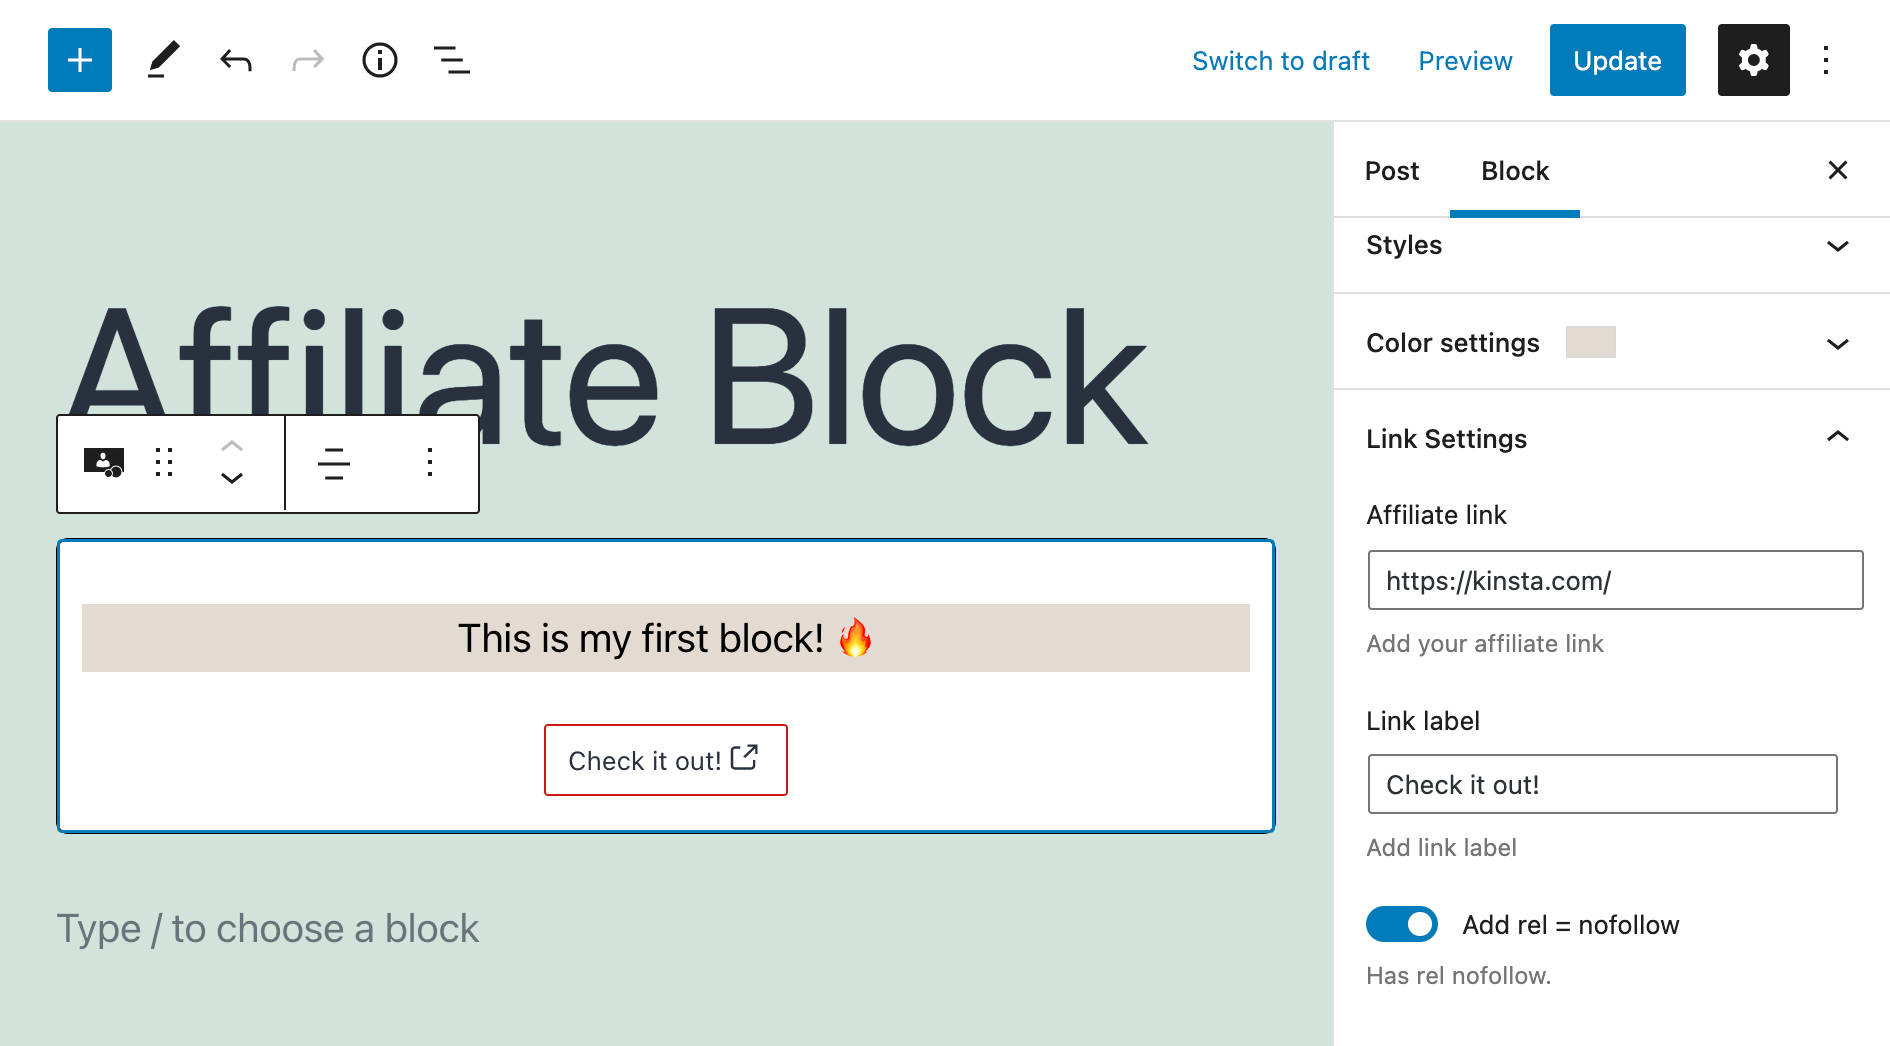
Associate block hyperlink settings.
Now save knowledge and restart your surroundings.
Including More than one Block Types
In a prior segment, you discovered find out how to upload a block toolbar keep watch over permitting customers to align the person enter. We will be able to upload extra genre controls to the block toolbar, however we will be able to additionally supply a suite of predefined block types the person can make a choice from with a unmarried click on.
For this function, we’re going to make use of an invaluable characteristic of the Block API: Block Styles.
All you want to do is outline the block.json types assets and claim the corresponding types for your stylesheets.
As an example, you'll upload the next array of types:
"types": [
	{
		"name": "default",
		"label": "Default",
		"isDefault": true
	},
	{
		"name": "border",
		"label": "Border"
	}
],
With this, you’ve simply added a default genre and an extra genre known as border. Now return to the block editor:
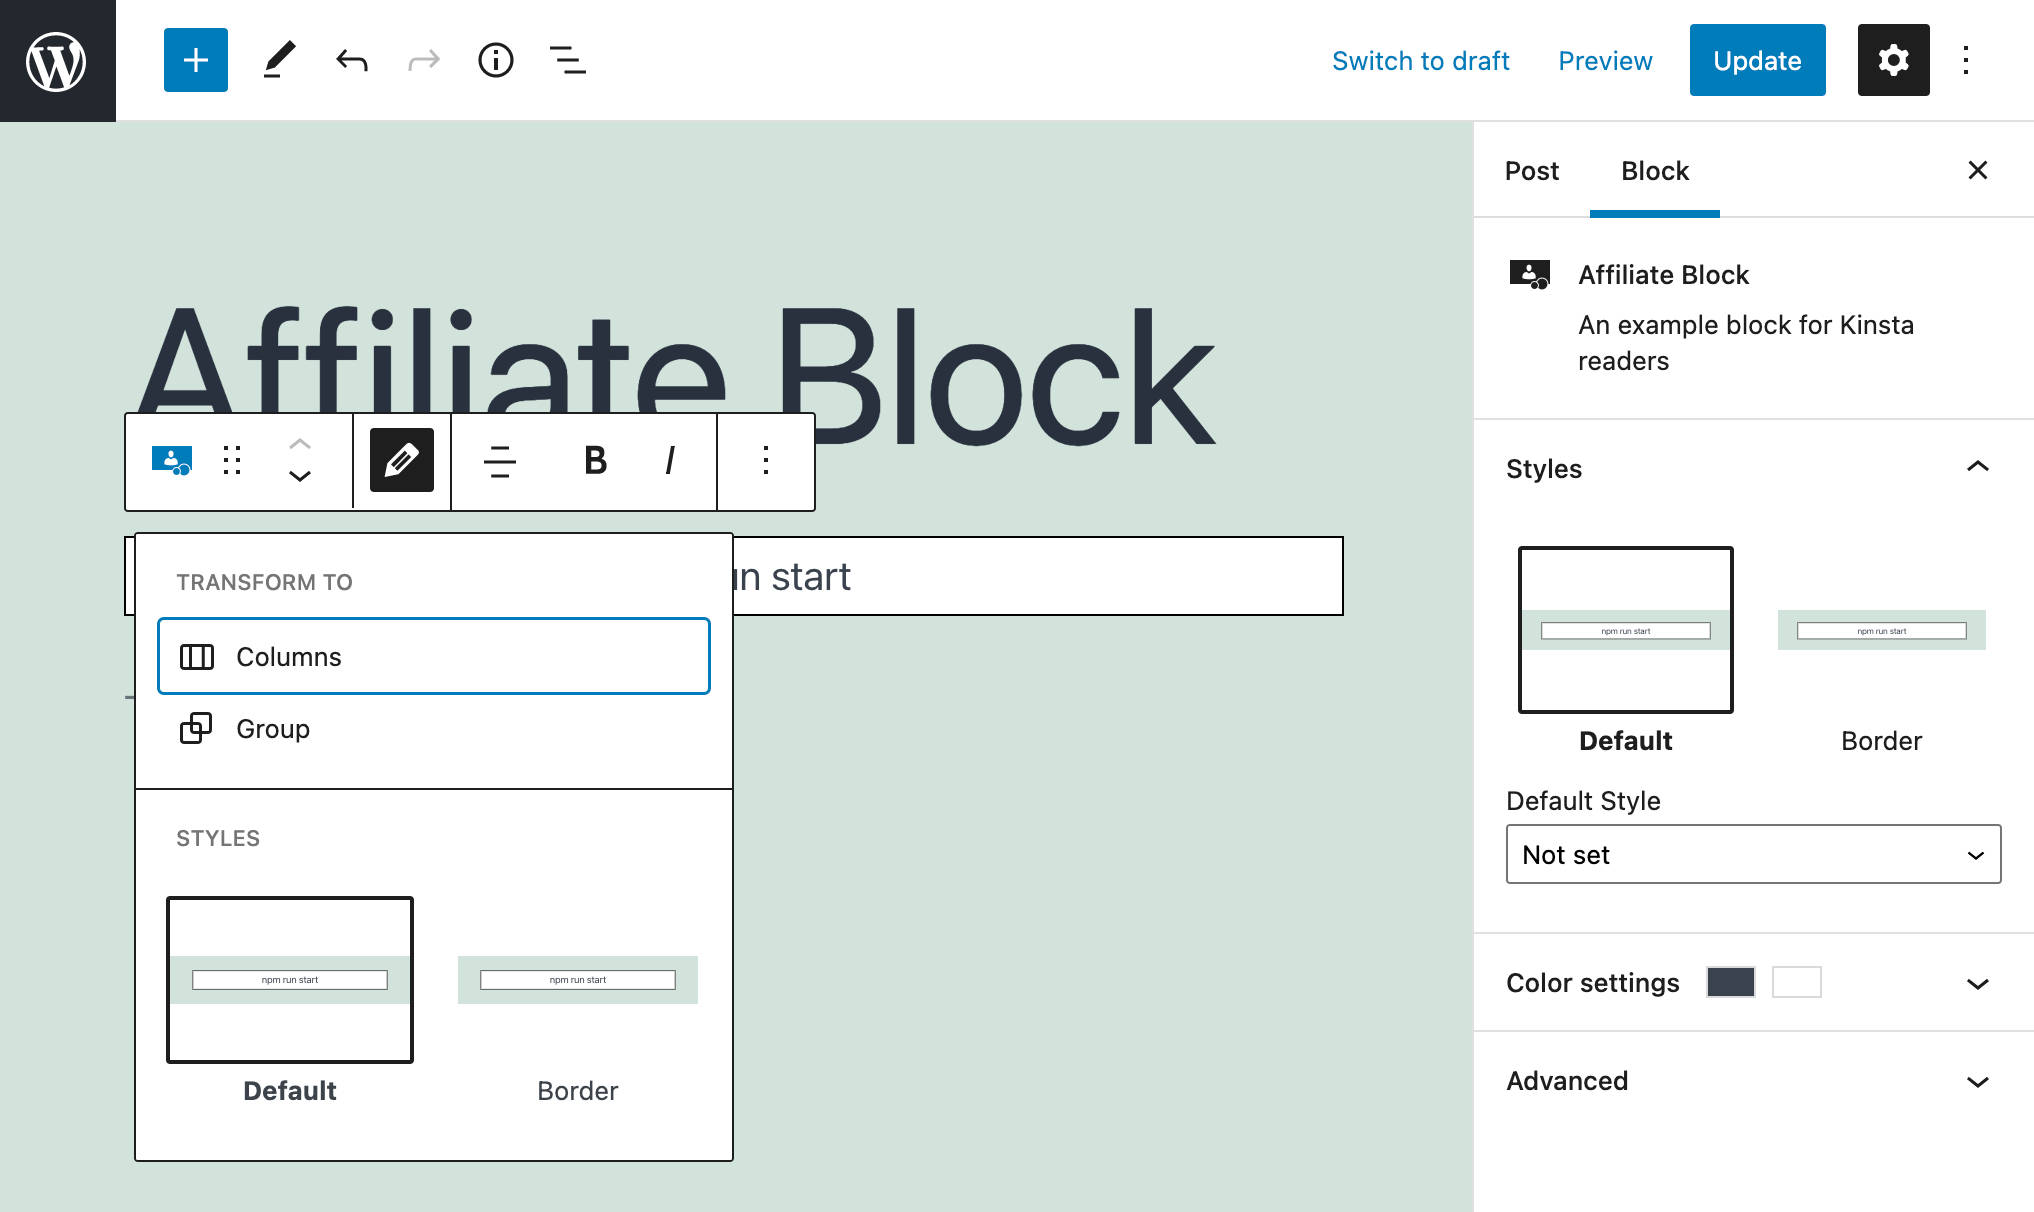
Two predefined block types.
The types will probably be to be had to the person via clicking at the block switcher after which searching for the Types panel within the Block Settings Sidebar.
Make a choice a method and take a look at the categories implemented to the p component. Proper-click at the block and Check out. A brand new category has been added with a reputation structured as follows:
is-style-{style-name}When you checked the “Border” genre, then an is-style-border category will probably be added to the p component. When you checked the “Default” genre, then an is-style-default category will probably be added as an alternative.
Now you simplest need to claim the CSS homes. Open the editor.scss record and exchange the present types with the next:
.wp-block-my-affiliate-plugin-my-affiliate-block {
	padding: 2px;
	&.is-style-default{
		border: 0;
	}
	&.is-style-border{
		border: 1px forged #000;
	}
}
Now you'll do the similar with genre.scss:
.wp-block-my-affiliate-plugin-my-affiliate-block {
	&.is-style-default{
		border: 0;
	}
	&.is-style-border{
		border: 1px forged #000;
	}
}
Forestall the method (^C) and run npm run get started once more.
And that’s it! Refresh the web page, and feature a laugh along with your new block types:
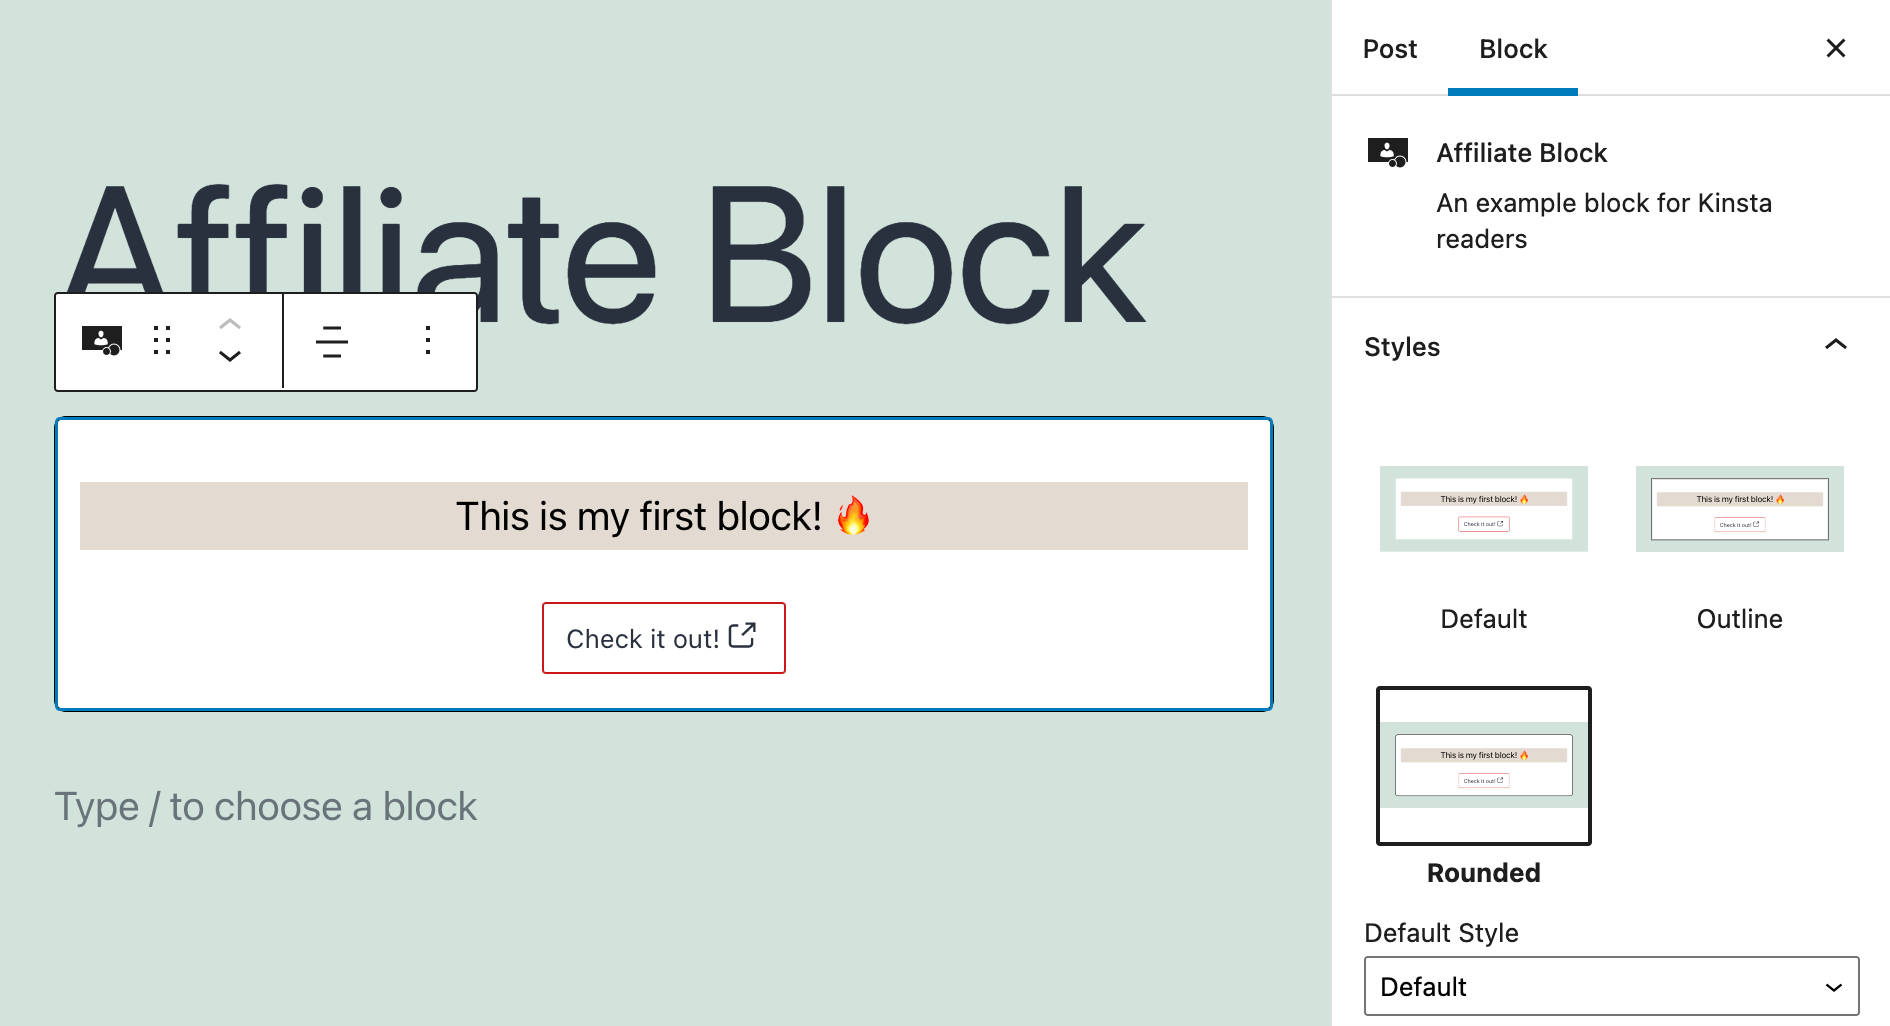
Associate block types.
Nesting Gutenberg Blocks With the InnerBlocks Part
Even though totally practical, our Associate Block remains to be no longer very interesting. To make it extra attractive for the target market, shall we upload a picture.
This will upload a layer of complexity to our block, however thankfully, you don’t wish to reinvent the wheel as a result of Gutenberg supplies a selected part you'll use to create a construction of nested blocks.
The InnerBlocks part is defined as follows:
InnerBlocksexports a couple of parts which can be utilized in block implementations to allow nested block content material.
First, you’ll wish to create a brand new .js record within the src folder. In our instance, we’ll name this record container.js.
Now you’ll wish to import the brand new useful resource into the index.js record:
import './container';Return to container.js and import the essential parts:
import { registerBlockType } from "@wordpress/blocks";
import { __ } from "@wordpress/i18n";
import {
	useBlockProps,
	InnerBlocks
} from "@wordpress/block-editor";
Your next step is defining a template offering the construction inside of which the blocks will probably be positioned. Within the following instance, we outline a template consisting of 2 columns containing a core Symbol block and our customized Associate block:
const TEMPLATE = [ [ 'core/columns', { backgroundColor: 'yellow', verticalAlignment: 'center' }, [
	[ 'core/column', { templateLock: 'all' }, [
		[ 'core/image' ],
	] ],
	[ 'core/column', { templateLock: 'all' }, [
		[ 'my-affiliate-plugin/my-affiliate-block', { placeholder: 'Enter side content...' } ],
	] ],
] ] ];
The template is structured as an array of blockTypes (block call and not obligatory attributes).
Within the code above, we used a number of attributes to configure the Columns and Column blocks. In particular, the templateLock: 'all' characteristic locks Column blocks in order that the person received’t upload, reorder or delete present blocks. templateLock can take one of the most following values:
all—InnerBlocksis locked, and no blocks will also be added, reordered, or got rid of.insert— Blocks can simplest be reordered or got rid of.false— The template isn't locked.
The template is then assigned to the InnerBlocks component:
To stop any compatibility factor, we additionally added a templateLock characteristic to the InnerBlocks part (see additionally factor #17262 and pull #26128).
This is our ultimate container.js record:
import { registerBlockType } from "@wordpress/blocks";
import { __ } from "@wordpress/i18n";
import { useBlockProps, InnerBlocks } from "@wordpress/block-editor";
const TEMPLATE = [ [ 'core/columns', { backgroundColor: 'yellow', verticalAlignment: 'center' }, [
[ 'core/column', { templateLock: 'all' }, [
[ 'core/image' ],
] ],
[ 'core/column', { templateLock: 'all' }, [
[ 'my-affiliate-plugin/my-affiliate-block', { placeholder: 'Enter side content...' } ],
] ],
] ] ];
registerBlockType('my-affiliate-plugin/my-affiliate-container-block', {
name: __( 'Container', 'my-affiliate-block' ),
class: 'design',
edit( { className } ) {
go back(
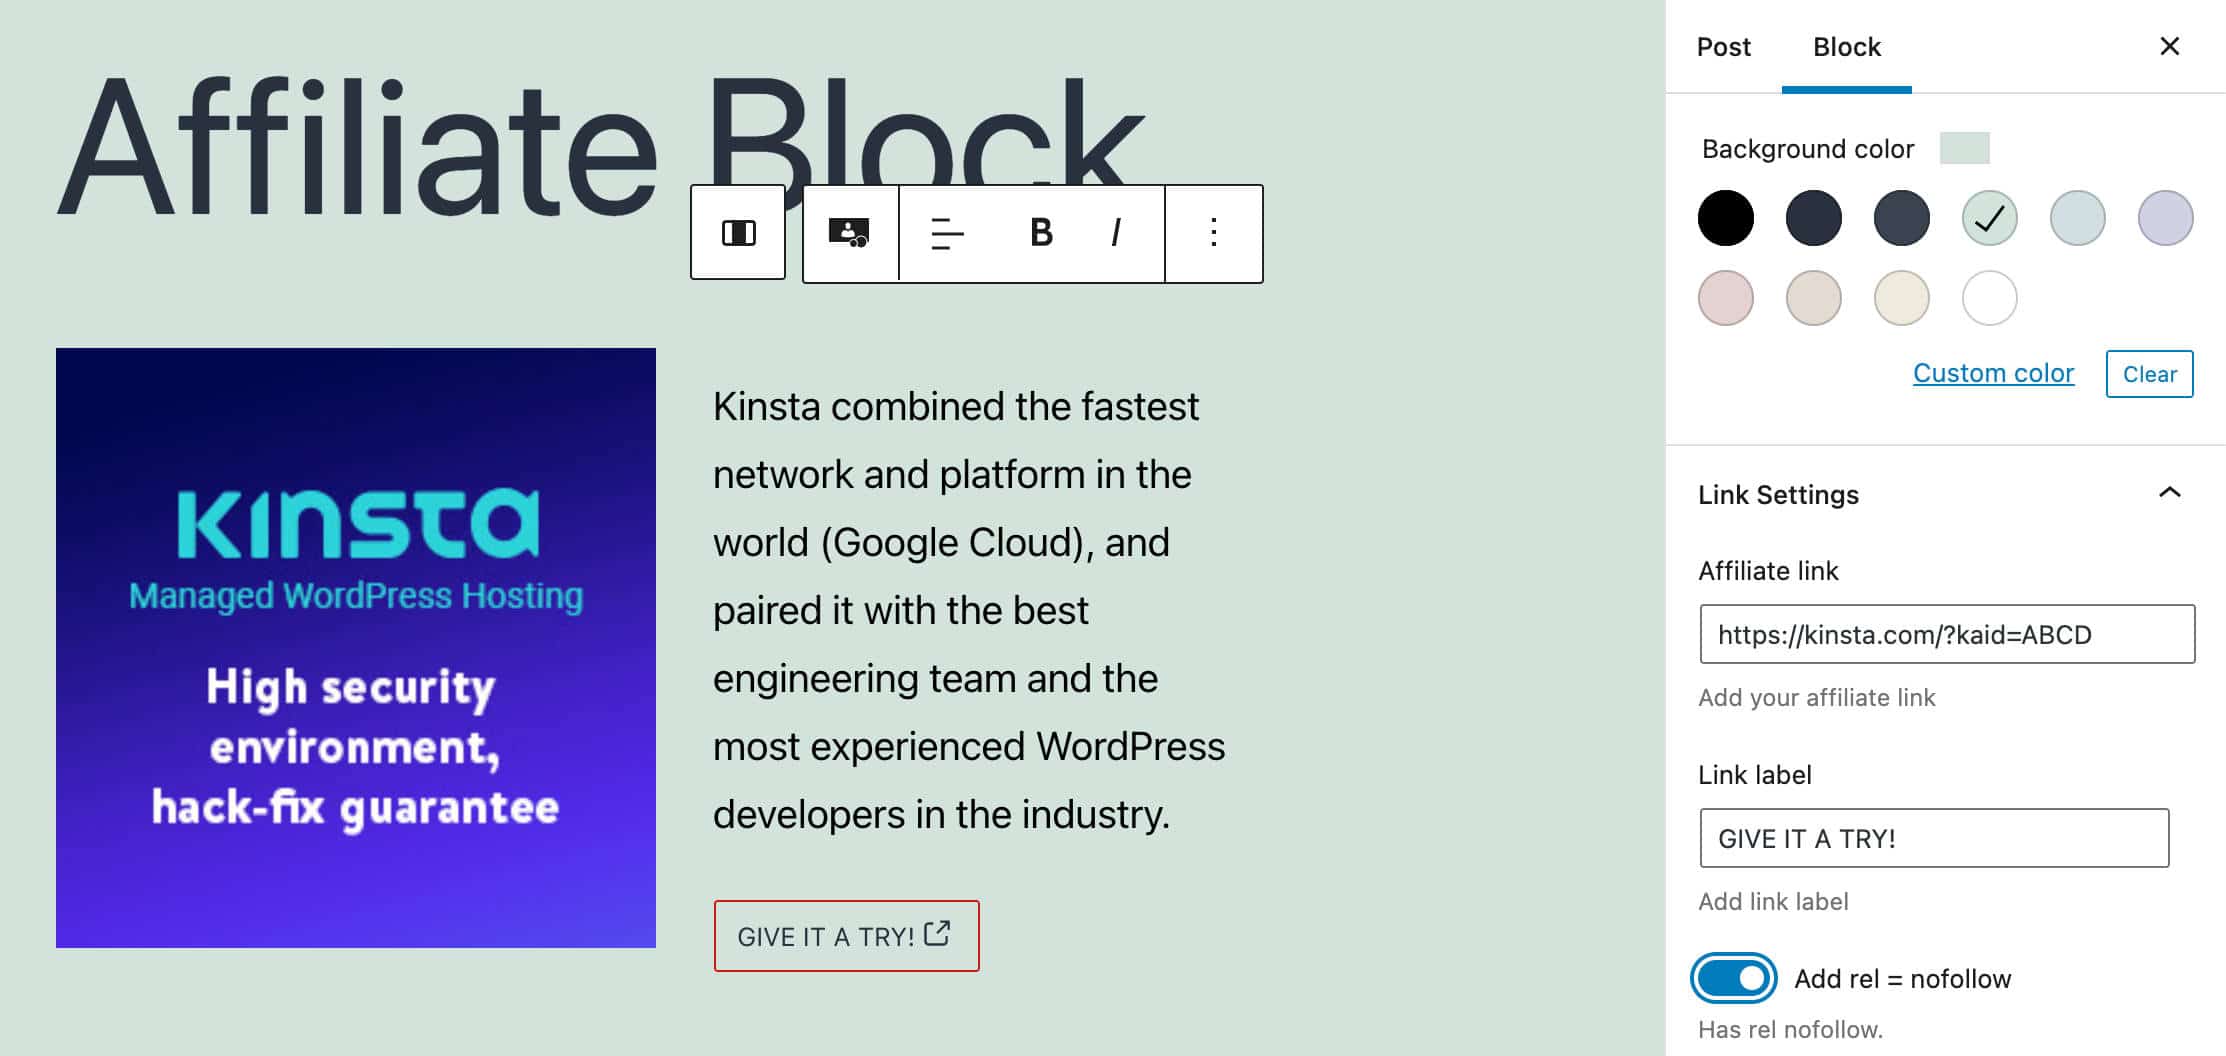
The nested Associate block within the editor.
Further Enhancements
Our block is totally practical, however shall we fortify it a bit of with some small adjustments.
We assigned the backgroundColor characteristic to the paragraph generated via the RichText part. On the other hand, we would possibly like to assign the background colour to the container div:
So, exchange the edit.js record and save.js divs as follows:
...
This may occasionally permit the person to switch the background of all the block.
Then again, a extra related exchange comes to the useBlockProps means. Within the unique code, we outlined the consistent blockProps as follows:
const blockProps = useBlockProps();However we will be able to use the useBlockProps extra successfully passing a set of properties. As an example, we will be able to import classnames from the classnames module and set the wrapper category call accordingly.
Within the following instance, we assign a category call in accordance with the price of the align characteristic (edit.js):
import classnames from 'classnames';

...

export default serve as Edit( { attributes, setAttributes } ) {
	...
	const blockProps = useBlockProps( {
		className: classnames( {
			[ `has-text-align-${ align }` ]: align,
		} )
	} );
	...
}
We’ll do the similar exchange within the save.js record:
import classnames from 'classnames';

...

export default serve as save( { attributes } ) {
	...
	const blockProps = useBlockProps.save({
		className: classnames( {
			[ `has-text-align-${ align }` ]: align,
		} )
	});
	...
}
And that’s a wrap! You'll be able to now run the build for production.
If you're looking for an in-depth guide to getting started with Gutenberg block development, this massive guide is for you. Check it out and start building your Gutenberg blocks today!

Abstract
And right here we're, on the finish of this unbelievable adventure! We began with the configuration of the advance surroundings and ended up growing an entire block variety.
As we discussed within the advent, a forged wisdom of Node.js, Webpack, Babel, and React is very important for growing complex Gutenberg blocks and positioning your self available in the market as a certified Gutenberg developer.
However you don’t wish to have established React enjoy to start out having a laugh with block building, regardless that. Block building may just provide you with motivation and objectives to realize more and more vast talents within the applied sciences at the back of Gutenberg blocks.
This information, subsequently, is some distance from being entire. It’s simply an advent to all kinds of subjects that can assist you get began construction your first actual Gutenberg blocks.
Because of this, we suggest you deepen your wisdom via moderately studying on-line documentation and guides. A number of the many assets to be had available in the market, we suggest the next:
- Official Create a Block Tutorial for inexperienced persons
- Official Block Tutorial for intermediate builders
- Dynamic Blocks
- Meta Boxes
- Creating a Sidebar for Your Plugin
When you’re simply beginning with WordPress building, it's possible you'll wish to perceive the elemental ideas of frontend building. Here's a fast record of assets that can will let you get began:
- How to Install WordPress Locally (loose e book)
- The Real Value of Managed WordPress Hosting (loose e book)
- What Is JavaScript?
- HTML vs HTML5
- How to Edit CSS in WordPress
- What Is PHP?
- The WordPress Hooks Bootcamp: How to Use Actions, Filters, and Custom Hooks
And needless to say your entire code of the examples of this information is available on Gist.
Now it’s your flip: Have you ever advanced any Gutenberg blocks? What are the principle difficulties you've gotten skilled thus far? Tell us about your enjoy within the feedback!
The submit Building Custom Gutenberg Blocks: The Definitive Block Development Tutorial seemed first on Kinsta®.
WP Hosting