Swiping thru content material is one thing nearly everybody does each day. It has principally grow to be 2d nature so it is going with out announcing that including it on your site can lend a hand make stronger the entire consumer enjoy. On this submit, we’ll display you the way to create never-ending horizontal swipe playing cards which might be principally curious about cellular and pill gadgets, the place contact is concerned. Even though this can be a mobile-first instructional, the end result will paintings nice on desktop as smartly. Folks can use the scrollbar that’ll be incorporated or ‘swipe’ left and proper the usage of their touchpad.
Let’s get to it!
Contents
- 1 Preview
- 2 Way
- 3 Recreate Instance #1
- 3.1 Upload New Phase
- 3.2 Upload New Row
- 3.3 Upload CTA Module to Column 1
- 3.4 Clone CTA Module as Many Instances as You Need
- 3.4.1 Trade Gradient Background & Background Symbol of Reproduction 1
- 3.4.2 Trade Gradient Background & Background Symbol of Reproduction 2
- 3.4.3 Trade Gradient Background & Background Symbol of Reproduction 3
- 3.4.4 Trade Gradient Background & Background Symbol of Reproduction 4
- 3.4.5 Trade Gradient Background & Background Symbol of Reproduction 5
- 3.4.6 Alter Column CSS to Collection of Modules
- 3.5 Styling the Scrollbar
- 4 Recreate Instance #2
- 5 Preview
- 6 Ultimate Ideas
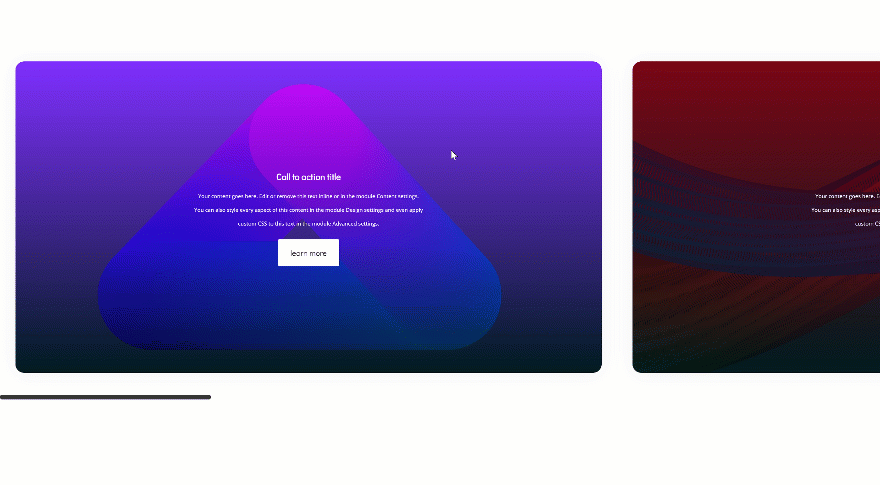
Preview
Sooner than we dive into the educational, let’s take a handy guide a rough have a look at the end result on other display sizes.
Instance 1: One-Column Row
Desktop
Cellular
Instance 2: Two-Column Row + A couple of Modules in ‘Swipe Column’
Desktop
Cellular
Way
- To create this gorgeous impact, we’ll want to turn into a complete vertical column right into a horizontal swipe/scroll grid mechanism the usage of only a few CSS code traces
- The use of a vertical column for this mechanism (and turning it right into a horizontal grid) will can help you upload as many swiping playing cards as you wish to have, you get to decide what number of columns there get to be
- In different phrases; you’ll upload modules downwards and the swipe/scroll mechanism will position hem in a horizontal column
- For the primary instance, we’ll use a one-column row
- This may increasingly permit the swipe mechanism to take in all the width of the display
- The second one instance, then again, turns simplest certainly one of two columns right into a swipe/scroll mechanism and leaves the opposite column in its static state
- We’ll additionally display you the way to upload a couple of modules to a ‘column’ of the swipe/scroll mechanism
- As soon as you already know the way, you’ll have the ability to actually create any more or less design you wish to have and feature it’s a part of the swipe/scroll mechanism that you’ll be able to see within the GIFs above
- You’ll to find all the fluid background photographs that we’ll use via going to the ‘Download 10 FREE Fluid Section Background Images for Divi‘ submit
Recreate Instance #1
Upload New Phase
Let’s get started developing the primary instance! Upload a brand new phase to the web page you’re running on.

Upload New Row
Column Construction
Then, upload a row with one column. We’re going to show this whole column right into a swipe/scroll mechanism.

Sizing
With out including any modules but, open the row settings and move to the sizing settings. Right here, we’re going to take away the entire area between the phase, row, and column. In different phrases, the column will take in all the width of the display.
- Make This Row Fullwidth: Sure
- Use Customized Gutter Width: Sure
- Gutter Width: 1

Column CSS Code
As discussed ahead of, we’re turning the column itself right into a swipe/scroll grid mechanism. To do this, we’ll want 3 traces of customized CSS code, which you’ll be able to to find under. Pass forward and upload those to the Column Primary Part within the complex tab of the row.
overflow-x: scroll;
show: grid;
grid-template-columns: repeat(6, 70%);
The primary line of CSS code allows scrolling/swiping. The second one line turns the column right into a horizontal grid. And the 3rd line of CSS code defines the grid. We’re principally announcing that we would like 6 columns that’ll each and every have a width of 70%. Relying at the selection of swiping playing cards you wish to have to turn up within the swipe/scroll mechanism, you’ll have to change the values. So, say for example you wish to have 10 other swipe playing cards to be a part of the mechanism and you wish to have to extend the width of each and every column to 90%, you’ll have to make use of the next line of CSS code as a substitute:
grid-template-columns: repeat(10, 90%);

Upload CTA Module to Column 1
Upload Content material
When you’re finished enhancing the row settings, move forward and upload a CTA Module to the column. Upload some content material of your selection.

Hyperlink
You’ll additionally want to upload a button hyperlink URL to have the button display up within the module.

Gradient Background
Proceed via including a gradient background.
- Colour 1: #802bff
- Colour 2: #001519

Background Symbol
Within the way phase of this submit, we discussed that we’ll use the fluid background photographs that you’ll be able to obtain totally free via going to this post. When you’ve downloaded the fluid background photographs, seek for the ‘fluid-style-2.png‘ symbol record and add it to the background symbol tab. Alter the background symbol settings accordingly:
- Background Symbol Measurement: Are compatible
- Background Symbol Place: Heart
- Background Symbol Repeat: No Repeat
- Background Symbol Mix: Overlay

Textual content Settings
Transfer directly to the design tab and ensure the next textual content settings observe:
- Textual content Orientation: Heart
- Textual content Colour: Mild

Identify Textual content Settings
Alter the name textual content settings subsequent.
- Identify Font: Didact Gothic
- Identify Font Weight: Daring
- Identify Textual content Measurement: 1vw (Desktop), 2.5vw (Pill), 4vw (Telephone)
- Identify Line Top: 1.9em

Frame Textual content Settings
At the side of the frame textual content settings.
- Frame Font: Open Sans
- Frame Textual content Measurement: 0.6vw (Desktop), 1.3vw (Pill), 2.5vw (Telephone)
- Frame Line Top: 2.6em (Desktop & Pill), 2.1em (Telephone)

Button Settings
We’re converting the illusion of the button on this module as smartly.
- Use Customized Types for Button: Sure
- Button Textual content Measurement: 0.9vw (Desktop), 2.1vw (Pill), 3.5vw (Telephone)
- Button Textual content Colour: #000000
- Button Background Colour: #ffffff
- Button Border Width: 10px
- Button Border Colour: #ffffff
- Button Font: Didact Gothic


Sizing
It’s additionally vital to moderately lower the width of the CTA Module within the sizing settings. This may increasingly be sure that there’ll all the time be an opening between this module and whichever module comes subsequent within the swipe/scroll mechanism.
- Width: 95%
- Module Alignment: Heart

Spacing
After all, we would like the whole lot to appear nice throughout all other display sizes. That’s why we’ll upload more than a few customized padding values within the spacing settings.
- Most sensible Margin: 50px
- Backside Margin: 50px
- Most sensible Padding: 12vw (Desktop), 5vw (Pill), 14vw (Telephone)
- Backside Padding: 12vw (Desktop), 5vw (Pill), 14vw (Telephone)
- Left Padding: 20vw (Desktop), 3vw (Pill), 8vw (Telephone)
- Proper Padding: 20vw (Desktop), 3vw (Pill), 8vw (Telephone)

Border
Remaining however no longer least, we’re additionally including ’20px’ to each and every one of the crucial corners of the module.

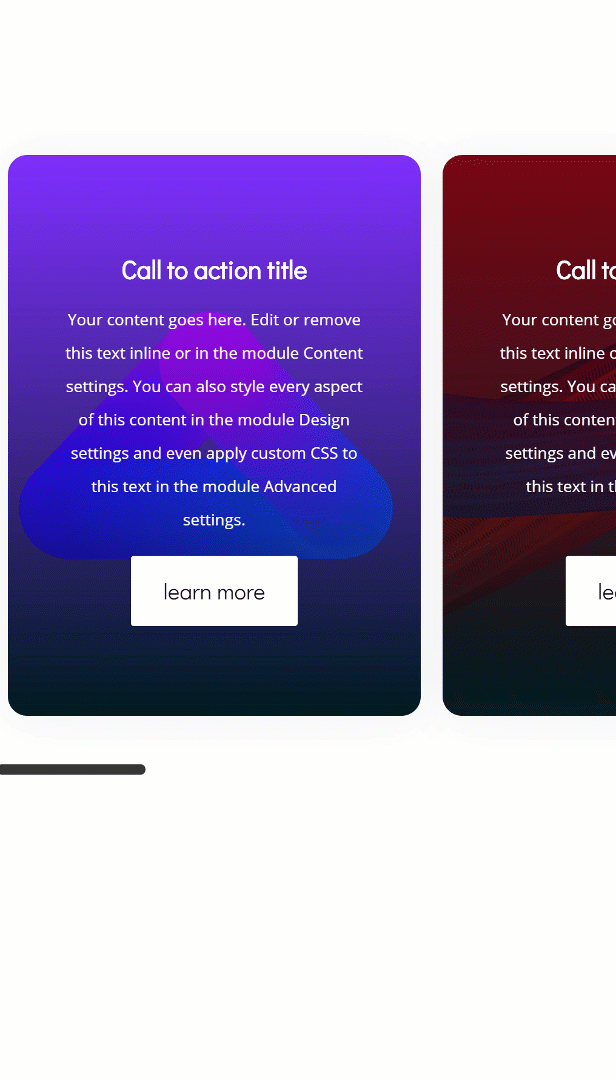
Clone CTA Module as Many Instances as You Need
When you’re finished customizing the CTA Module, you’ll be able to move forward and clone the module as much as as again and again as you wish to have.


Trade Gradient Background & Background Symbol of Reproduction 1
Trade the gradient background of the primary reproduction.
- Colour 1: #7a010d
- Colour 2: #001519

And use the ‘fluid-style-9.png‘ background symbol as a substitute.
- Background Symbol Measurement: Quilt
- Background Symbol Place: Heart
- Background Symbol Repeat: No Repeat
- Background Symbol Mix: Overlay

Trade Gradient Background & Background Symbol of Reproduction 2
Trade the gradient background of the second one reproduction subsequent.
- Colour 1: #26ccff
- Colour 2: #001519

Add the ‘fluid-style-10a.png’ symbol record because the background symbol.
- Background Symbol Measurement: Are compatible
- Background Symbol Place: Most sensible Left
- Background Symbol Repeat: No Repeat
- Background Symbol Mix: Overlay

Trade Gradient Background & Background Symbol of Reproduction 3
Trade the gradient background of the 3rd reproduction.
- Colour 1: #ff21b8
- Colour 2: #001519

Add the ‘fluid-style-6.png‘ background symbol.
- Background Symbol Measurement: Are compatible
- Background Symbol Place: Heart
- Background Symbol Repeat: No Repeat
- Background Symbol Mix: Overlay

Trade Gradient Background & Background Symbol of Reproduction 4
Trade the gradient background of the fourth reproduction.
- Colour 1: #4400aa
- Colour 2: #001519

Use ‘fluid-style-4.png‘ because the background symbol.
- Background Symbol Measurement: Are compatible
- Background Symbol Place: Heart
- Background Symbol Repeat: No Repeat
- Background Symbol Mix: Overlay

Trade Gradient Background & Background Symbol of Reproduction 5
Trade the gradient background of the remaining reproduction.
- Colour 1: #ff2626
- Colour 2: #001519

Use ‘fluid-style-7.png‘ because the background symbol.
- Background Symbol Measurement: Are compatible
- Background Symbol Place: Most sensible Proper
- Background Symbol Repeat: No Repeat
- Background Symbol Mix: Overlay

Alter Column CSS to Collection of Modules
We’ve discussed this ahead of however once more, be sure that the CSS code suits the selection of modules you’ve for your column.

Styling the Scrollbar
Upload CSS Magnificence to Column
You’ll additionally genre the scrollbar that incorporates this swipe/scroll grid mechanism. Upload the next CSS elegance on your column:
- Column CSS Magnificence: swipe-scrollbar

Upload Customized CSS to Web page Settings
Then, open the web page settings, move to the complex tab and upload the next customized CSS code:
.swipe-scrollbar::-webkit-scrollbar {
width: 10px;
}
.swipe-scrollbar::-webkit-scrollbar-track {
background: #fff;
}
.swipe-scrollbar::-webkit-scrollbar-thumb {
background: #333;
border-radius: 50px;
}


Recreate Instance #2
Clone Earlier Phase
Directly to the following instance! Clone the phase you’ve created within the earlier a part of this submit.

Trade CTA Spacing Settings
Then, trade the spacing settings of the primary CTA Module.
- Most sensible Margin: 50px
- Backside Margin: 50px
- Most sensible Padding: 5vw (Desktop & Pill), 14vw (Telephone)
- Backside Padding: 5vw (Desktop & Pill), 14vw (Telephone)
- Left Padding: 4vw (Desktop), 3vw (Pill), 8vw (Telephone)
- Proper Padding: 4vw (Desktop), 3vw (Pill), 8vw (Telephone)

Lengthen Spacing Settings to All Modules in Column
Lengthen those new spacing settings via proper clicking and clicking on ‘Lengthen Spacing Types.

- To: All Name To Movements
- Right through: This Column

Trade Column Construction
Proceed via converting the column construction of the row.

Transfer Modules to 2nd Column
And position each and every one of the crucial modules in the second one column as a substitute.

Transfer CSS to 2nd Column & Trade Values
Since we’ve moved the modules from one column to the opposite, we’ll additionally want to do the similar factor for the CSS code. Upload the CSS elegance to column 2 as a substitute.
- Column 2 CSS Magnificence: swipe-scrollbar

Position the CSS code traces in Column 2 Primary Part. We’re additionally converting the width of each and every column into ‘80%’.
overflow-x: scroll;
show: grid;
grid-template-columns: repeat(6, 80%);

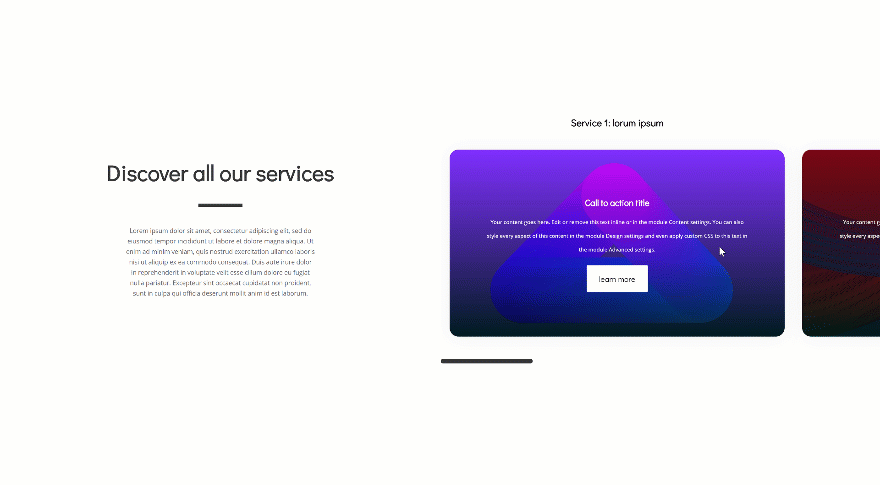
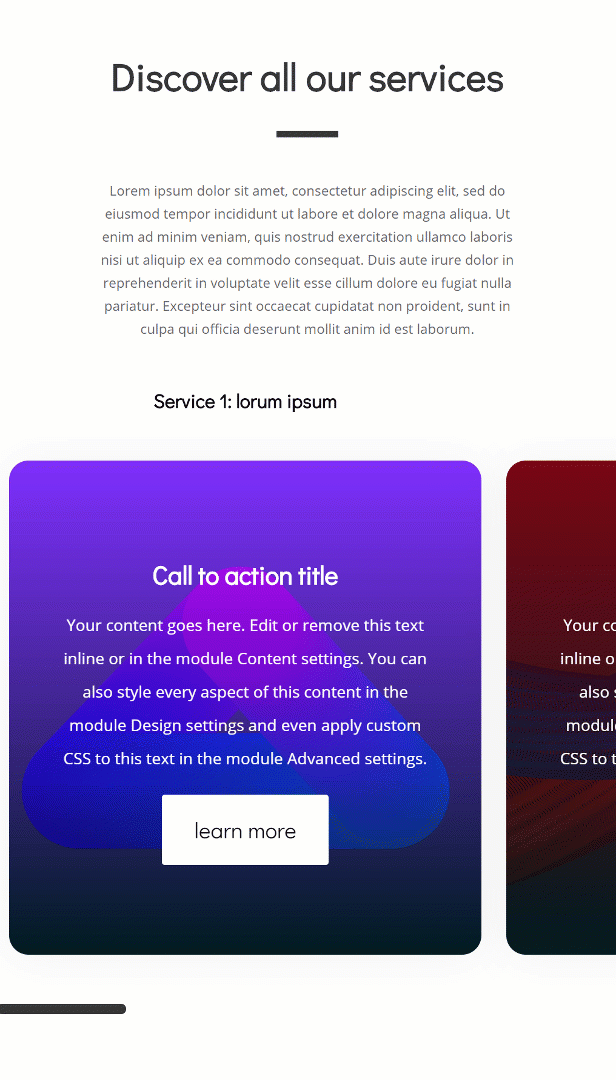
Upload Identify Textual content Module to Column 1
Upload Content material
Proceed via including a brand new Textual content Module to the primary column. Upload some H2 content material of your selection.

Heading Textual content Settings
Pass to the design tab and adjust the H2 textual content settings.
- Heading 2 Font: Didact Gothic
- Heading 2 Font Weight: Daring
- Heading 2 Textual content Alignment: Heart
- Heading 2 Textual content Measurement: 2.5vw (Desktop), 5vw (Pill), 6vw (Telephone)

Spacing
Upload some customized most sensible margin as smartly.
- Most sensible Margin: 100px

Upload Divider Module to Column 1
Visibility
The following module we’d like in column 1 is a Divider Module. Make sure that the ‘Display Divider’ possibility is enabled.
- Display Divider: Sure

Colour
Trade the divider colour subsequent.
- Colour: #333333

Sizing
At the side of the sizing settings.
- Divider Weight: 7px
- Top: 0px
- Width: 10%
- Module Alignment: Heart

Spacing
Whole the Divider Module via including some customized most sensible margin throughout other display sizes.
- Most sensible Margin: 1.8vw (Desktop), 2.5vw (Pill), 4vw (Telephone)

Upload Frame Textual content Module to Column 1
Upload Content material
The following and remaining module we’d like within the first column is an outline Textual content Module. Upload some content material of selection.

Textual content Settings
Proceed via converting the textual content settings within the design tab.
- Textual content Font: Open Sans
- Textual content Measurement: 0.7vw (Desktop), 1.6vw (Pill), 2.3vw (Telephone)

Sizing
Alter the sizing settings too.
- Width: 43% (Desktop), 68% (Pill), 70% (Telephone)
- Module Alignment: Heart

Spacing
And upload some customized most sensible and backside margin.
- Most sensible Margin: 50px
- Backside Margin: 50px

Transfer over to Wireframe View
When you’re finished enhancing the entire modules in column 1, move forward and turn over to wireframe view.

Upload Textual content Module to Most sensible of Column 2
Right here, we’re going so as to add a Textual content Module to the highest of the second one column. The CSS code we’ve added has helped us create 6 other columns. Which means that if you wish to have two other modules to seem in each and every any such 6 columns, you’ll want to have 12 modules in general. The module placement occurs horizontally, so the primary 5 modules you’ve in column 2 will seem subsequent to one another. Then, the mechanism will transfer to any other row and upload the remainder 6 modules.

Upload Content material
Open the brand new Textual content Module you’ve added on the most sensible of the second one column and upload some content material of selection.

Textual content Settings
Then, move to the design tab and adjust the textual content settings.
- Textual content Font: Didact Gothic
- Textual content Font Weight: Daring
- Textual content Colour: #000000
- Textual content Measurement: 1.1vw (Desktop), 3vw (Pill), 3.5vw (Telephone)

Clone Textual content Module 5x
Pass forward and clone this Textual content Module 5 occasions. Now, you’ll have 6 other Textual content Modules, this equals the selection of CTA modules now we have as smartly. So for those who’re the usage of 10 CTA Modules as a substitute, you’ll want to upload 10 Textual content Modules (or every other modules) to steadiness the column construction.

Trade Content material of Duplicates
Trade the content material of each and every one of the crucial duplicates to compare with the CTA Module that’ll seem under it and also you’re finished!

Preview
Now that we’ve long past thru the entire steps, let’s take a last have a look at the end result on other display sizes.
Instance 1: One-Column Row
Desktop
Cellular
Instance 1: Two-Column Row + A couple of Modules in ‘Swipe Column’
Desktop
Cellular
Ultimate Ideas
On this submit, we’ve proven you the way to create never-ending horizontal swiping playing cards the usage of Divi. Developing those swiping playing cards is not going to simplest will let you upload an additional size on your site, nevertheless it’ll additionally lend a hand guests navigate seamlessly thru the entire content material your site has to provide. You probably have any questions or ideas, be sure you go away a remark within the remark phase under!
The submit Creating Endless Horizontal Swipe Cards for Mobile with Divi gave the impression first on Elegant Themes Blog.
WordPress Web Design