
Horizontal Pricing Tables are an effective way to advertise merchandise with a large number of options. And, with Divi’s new 5 column format, that is unusually simple to do. Then again, as with every format that has 5 or extra columns, the problem comes with making the format responsive in order that it appears to be like just right on cell as smartly. On this educational, I’m going to turn you tips on how to create horizontal pricing tables that glance nice on all gadgets. And, I’ll even display you ways simple it’s to copy your horizontal pricing tables and use new design options like “in finding and change” to briefly trade the colour scheme of each and every of your tables in a couple of clicks.
Let’s get began.
Contents
- 1 Sneak Peek
- 2 Getting Began
- 3 Putting in the 5 Column Row on your Horizontal Pricing Tables
- 4 Filling the Columns with Modules of Content material
- 5 Starter
- 6 Including the Arrow Design and Responsive Column Spacing
- 7 Duplicating the Desk for New Tables and Colour Schemes
- 8 The usage of In finding and Substitute to Take a look at out Fonts
- 9 Ultimate Ideas
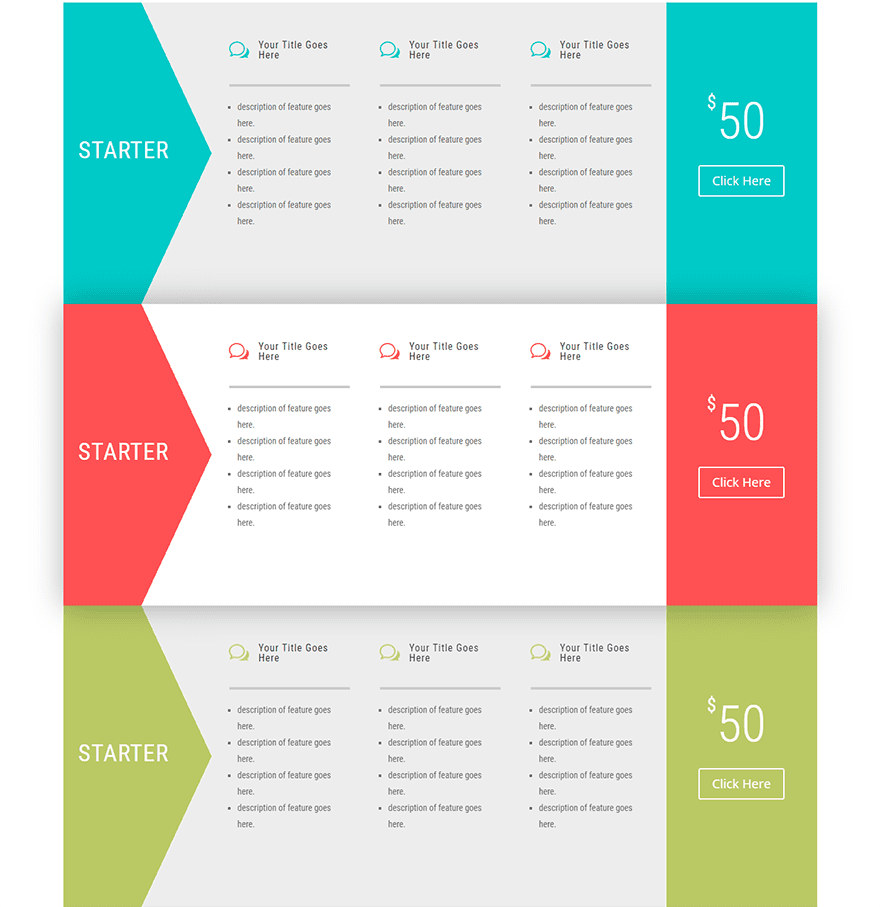
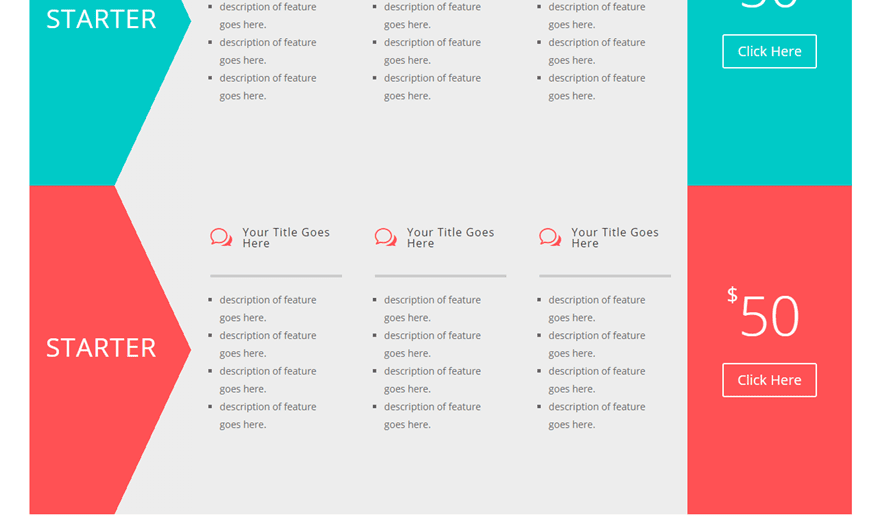
Sneak Peek
Getting Began
For this educational, all you are going to want is Divi. And we will be able to be the use of the Visible Builder. Since we will be able to be development the tables from scratch, it is important to create a brand new web page, deploy the visible builder after which make a choice the choice “Construct Structure from Scratch”.
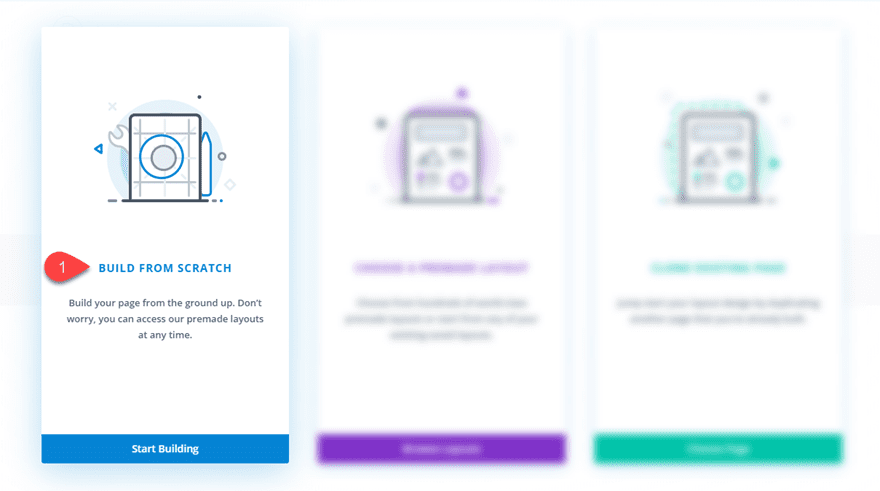
After that, you’re ready to begin. Let’s do it!
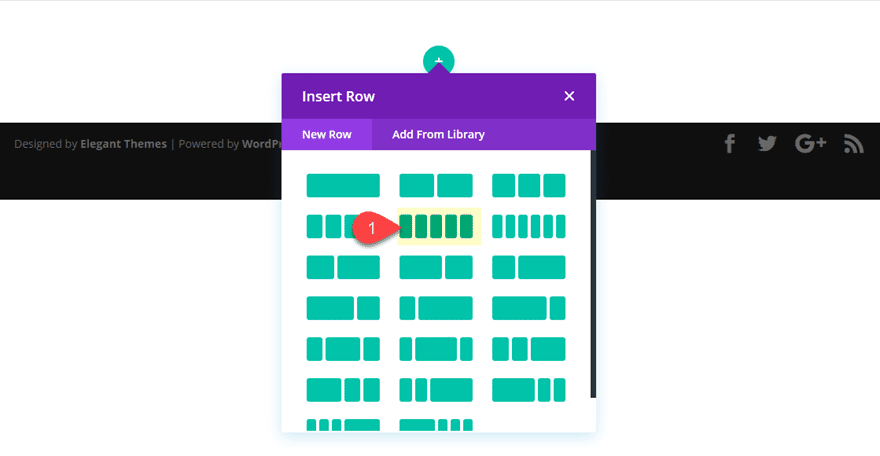
Putting in the 5 Column Row on your Horizontal Pricing Tables
For starters, Let’s give a 5 column format to the segment already looking forward to us within the visible builder.
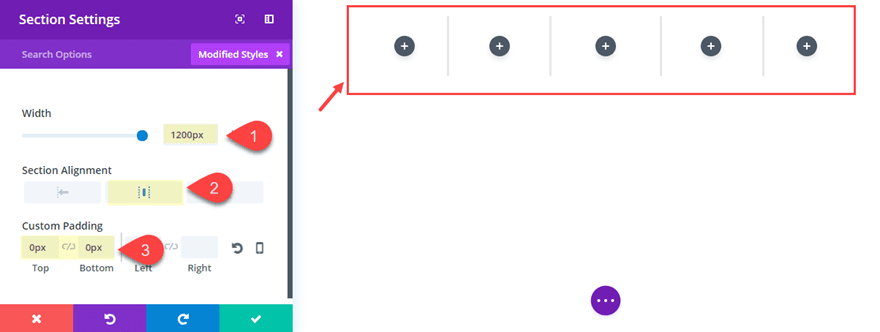
Sooner than we commence including any modules, let’s replace the segment settings to have a customized width with none most sensible or backside padding.
Width: 1200px
Phase Alignment: Middle
Customized Padding: 0px Best, 0px Backside
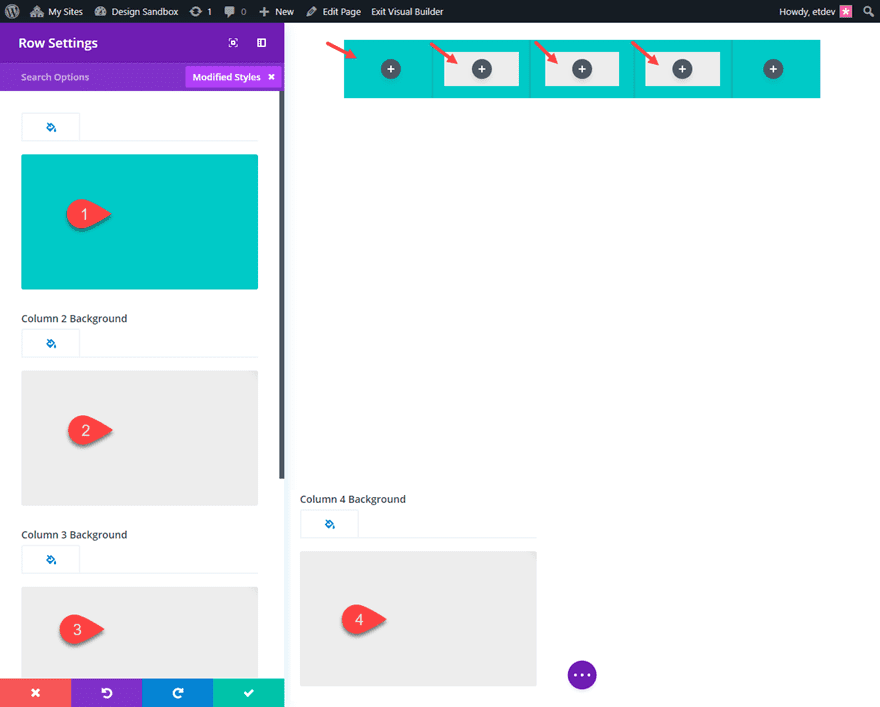
Then move to the row settings to briefly give a background colour in your row and likewise to the 3 center columns as follows:
Background Colour: #00cbc9
Column 2 Background Colour: #00cbc9
Column 3 Background Colour: #eeeeee
Column 4 Background Colour: #eeeeee
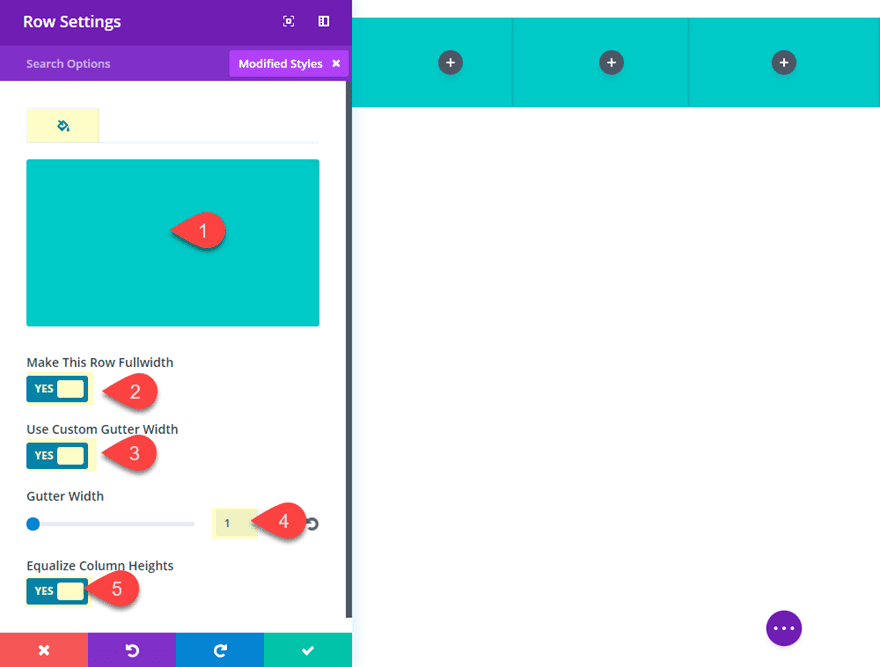
Then replace the sizing as follows:
Make this Row Fullwidth: YES
Gutter Width: 1
Equalize Column Heights: YES
We can wish to come again to the row settings in a little bit to replace spacing, however for now let’s get started including the blurbs to each and every of our columns for content material.
Filling the Columns with Modules of Content material
The Identify of the Product
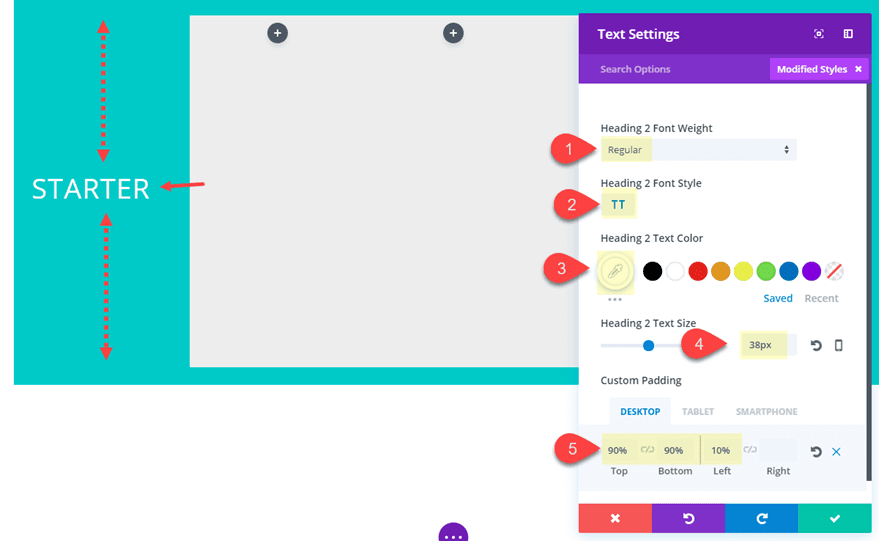
Within the first column, upload a textual content module with the next header within the content material field (underneath the textual content tab):
Starter
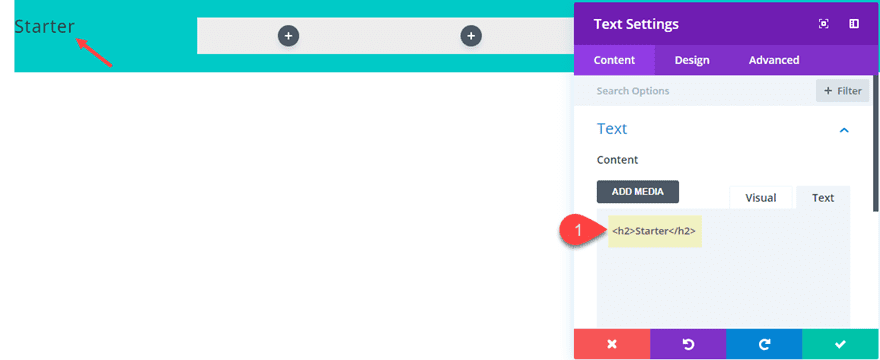
This may occasionally function the spot for the name of your plan or product you might be that includes. On this instance, this could be a “Starter” plan of a few type.
Then replace the next design settings:
Heading 2 Font Taste: TT
Heading 2 Textual content Colour: #ffffff
Heading 2 Textual content Dimension: 38px
Customized Padding (desktop): 90% Best, 90% Backside, 10% left
Customized Padding (pill): 30% Best, 30% Backside
Upload Blurbs for Function Class Headings
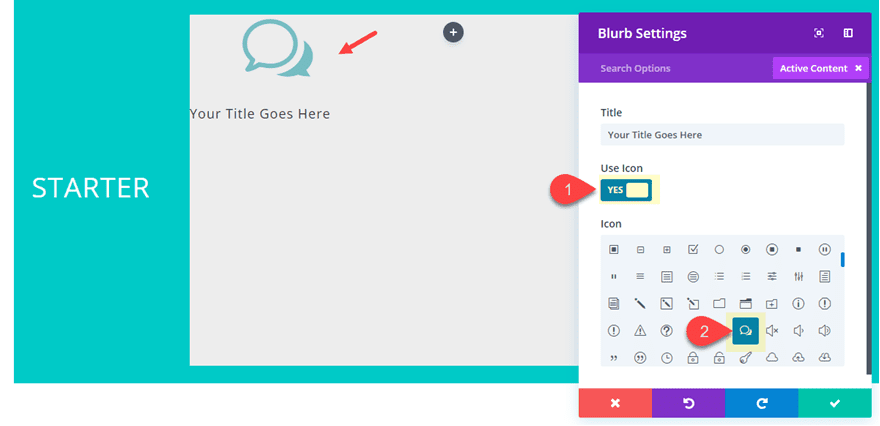
In the second one column, upload a blurb module. Then delete the filler textual content within the content material field and go away the Identify textual content by myself. Then make a selection to make use of an icon as an alternative of a picture and replace the icon with one in all your selection.
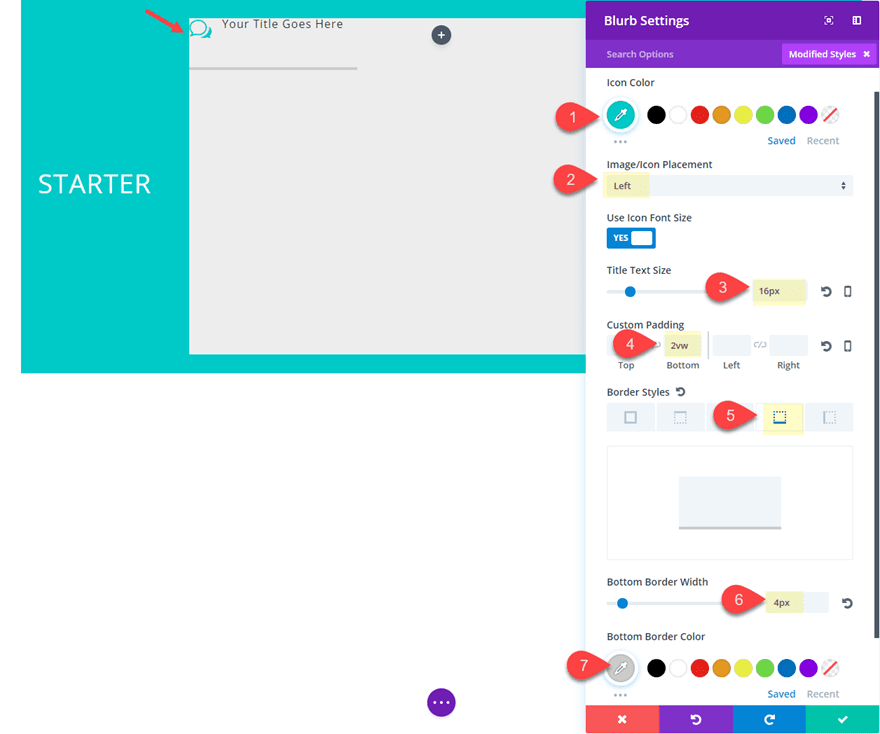
Leap over to the design tab and replace the remainder of the settings as follows:
Icon Colour: #00cbc9
Symbol/Icon Placement: Left
Identify Textual content Dimension: 16px
Customized Padding: 2vw Backside
Backside Row Border Width: 4px
Backside Border Colour: #cccccc
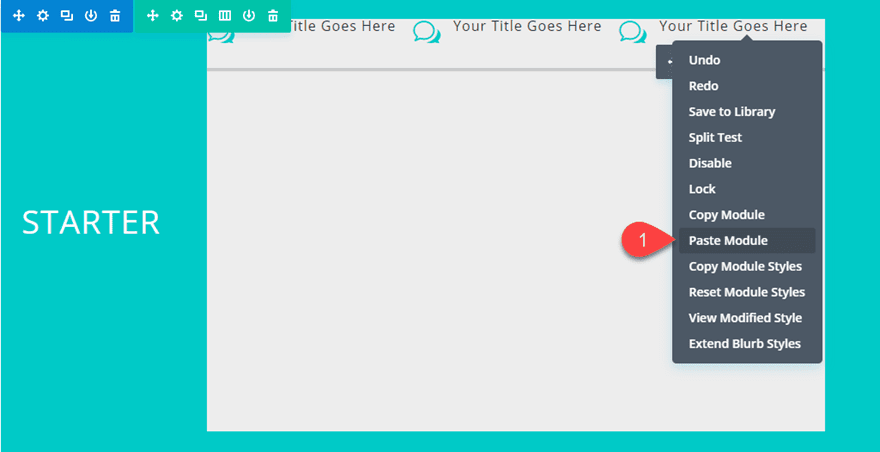
Since this blurb design can be used as a characteristic class name in columns 2, 3, and four, you’ll be able to replica the blurb module and paste it into the second one and 3rd column.
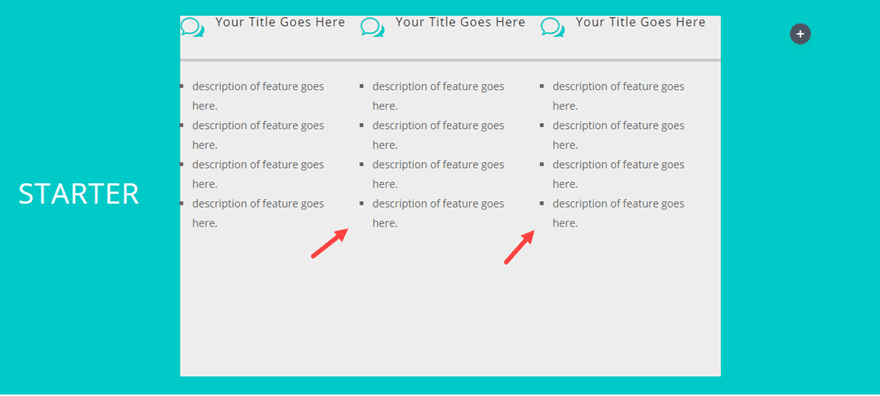
I notice the spacing doesn’t truly glance nice presently. And you can be tempted so as to add some spacing on the module stage, however for this design, I in finding it more uncomplicated to make spacing changes on the column stage (underneath row settings). We can get to that later.
Upload Textual content Modules for a Checklist of Function Descriptions
Subsequent Upload a textual content module underneath the blurb in the second one column. Then upload the next desk html code within the content material field:
- description of characteristic is going right here.
- description of characteristic is going right here.
- description of characteristic is going right here.
- description of characteristic is going right here.
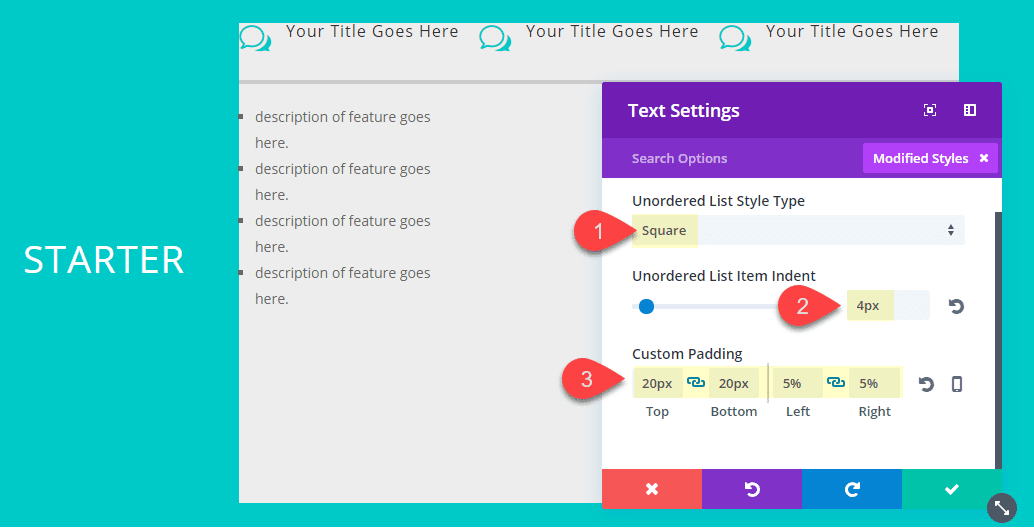
Unordered Checklist Taste Sort: Sq.
Unordered Checklist Merchandise Indent: 4px
Customized Padding: 20px Best, 20px Backside, 5% Left, 5% Proper
Now like we did for the blurbs, move forward and replica the textual content module and paste it underneath each and every of the blurb modules in columns 3 and four.
Including the Worth and Button to the Final Column
Within the ultimate column (Column 5), I’m going to make use of a pricing desk module to get the design of the pricing textual content with the buck signal. That is all we truly want from the pricing tables module so I can be gutting out the remainder of the content material and design components, leaving at the pricing textual content and the buck signal. I may just use the button this is integrated with the pricing tables module, however this was once a little bit tougher to perform a little responsive magic on pill (you are going to see what I imply later). So I can be the use of a button module as smartly.
Cross forward and upload the Pricing tables Module to the 5th column. Delete one of the crucial two tables which might be integrated by means of default by means of clicking the trash can icon at the proper of one in all them.
Then eliminate the background colour by means of including an absolutely clear colour code.
Background Colour: rgba(255,255,255,0)
Then replace the next:
Desk Header Background Colour: rgba(255,255,255,0)
Foreign money & Frequency Textual content Colour: #ffffff
Foreign money & Frequency Textual content Dimension: 30px
Worth Textual content Colour: #ffffff
Border Width: 0px
Customized Margin (pill): -100% Proper
Customized Margin (smartphone): 0% Proper
Customized Padding: 0px Best, 10px Backside, 0px Left, 0px Proper

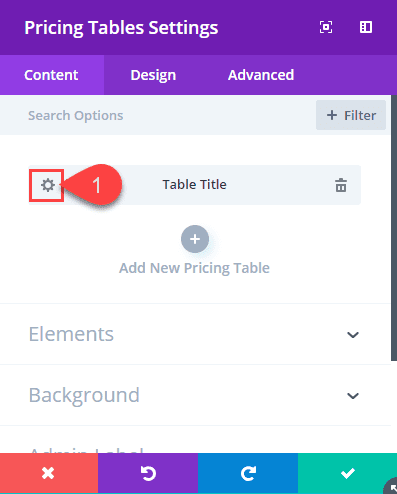
Now move to the person desk settings by means of clicking the equipment icon at the left of the person desk show menu.
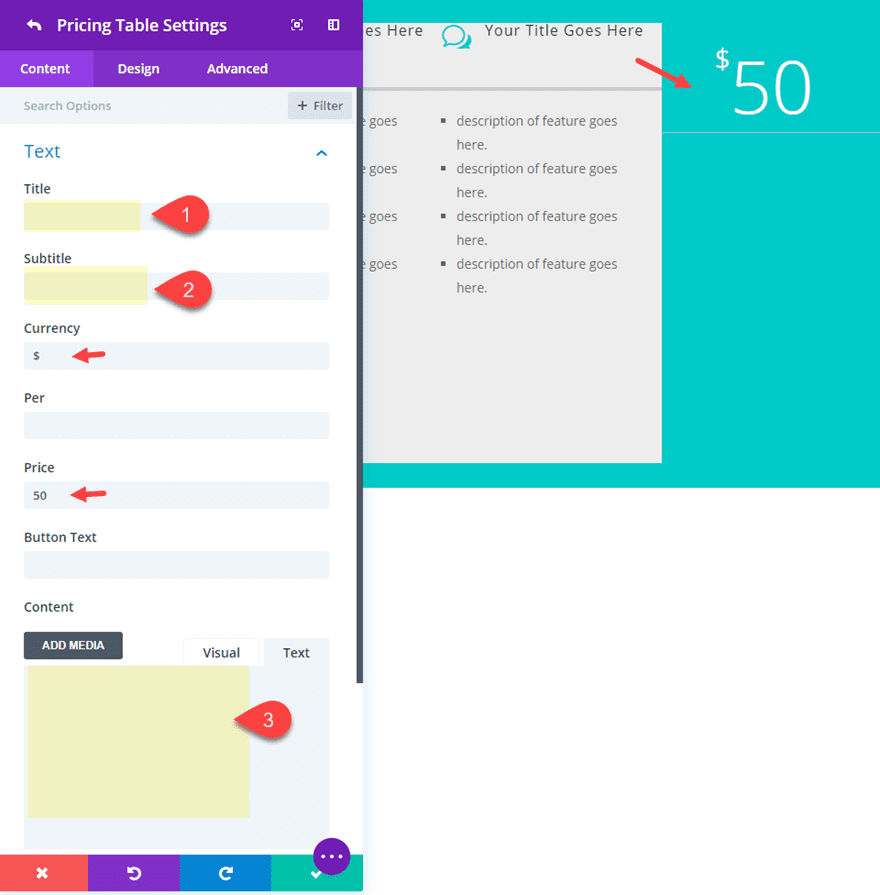
Now delete the default content material for the Identify, Subtitle, and Content material. This may occasionally go away best the Foreign money and Worth Textual content.
Now I do know what you might be pondering at this level. What to do about that border line underneath the cost textual content? Neatly, there’s a small snippet of customized css for that. Cross to the complicated tab and upload the next CSS to the Pricing Best enter field:
Pricing Best:
border: none;
Now this is the way you a success intestine the pricing desk for best the Pricing Textual content and Foreign money image!
For the button, upload a button module underneath the pricing tables module and replace the next:
Button Alignment: Middle
Textual content Colour: Mild
Customized Margin (pill): -100% Proper
Customized Margin (smartphone): 0% Proper

The customized margin will fit the margin we added to the pricing tables module with a view to get a fullwidth module on pill. For the reason that 5 column format on pill will put the 5th column at the left aspect of a two column format, pulling the module over by means of -100% to the suitable will power the module to the fullwidth of the row.

Including the Arrow Design and Responsive Column Spacing
Including the Arrow by means of layering Gradients
To create the arrow design impact within the first column we will be able to be layering two gradient backgrounds. The primary gradient background can be added on the column stage. We can upload the following one later on the module stage.
So as to add the gradient background, move to the row settings and upload the next:
Column 1 Gradient Background Left colour: rgba(255,255,255,0)
Column 1 Gradient Background Proper colour: #eeeeee (this will have to fit the background colour of column 2)
Gradient Route: -245deg
Get started Place: 75%
Finish Place: 0%
![]()
Save settings and soar over to the textual content module settings in column one. That is the place we will be able to upload the second one layer of background gradient to finish the arrow. Replace the next:
Column 1 Gradient Background Left colour: #eeeeee
Column 1 Gradient Background Proper colour: rgba(255,255,255,0)
Gradient Route: 245deg
Get started Place: 25%
Finish Place: 0%
Understand that the values are similarly reverse each and every different. For instance, the colour order has modified, the 245deg modified from unfavorable to sure, and the 75% is now 25% (the variation). That is the way you get the edges of the arrow level to be completely symmetrical.
![]()
Spacing the Row and Columns
Return to the row settings and let’s alter the spacing of our Row and Columns by means of updating the next:
Customized Padding: 0px Best, 0px backside, 0px Left, 0px Proper
Customized 2 Padding: 5% Best, 5% backside, 2% Left, 2% Proper
Customized 3 Padding: 5% Best, 5% backside, 2% Left, 2% Proper
Customized 4 Padding: 5% Best, 5% backside, 2% Left, 2% Proper
Customized 5 Padding: 10% Best, 10% backside
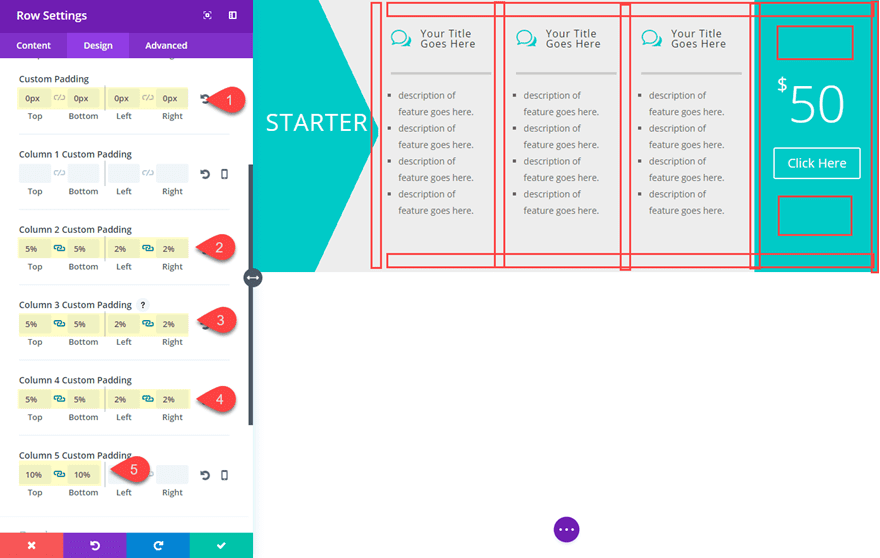
You will be questioning why I didn’t simply use a 2 gutter width and be carried out with it. Neatly, that’s as a result of I sought after to maximise the distance throughout the columns containing textual content up to conceivable to support clarity on all gadgets. Each and every little little bit of area we will be able to save issues. This is the reason the margins between columns are created with left and proper padding percentages.
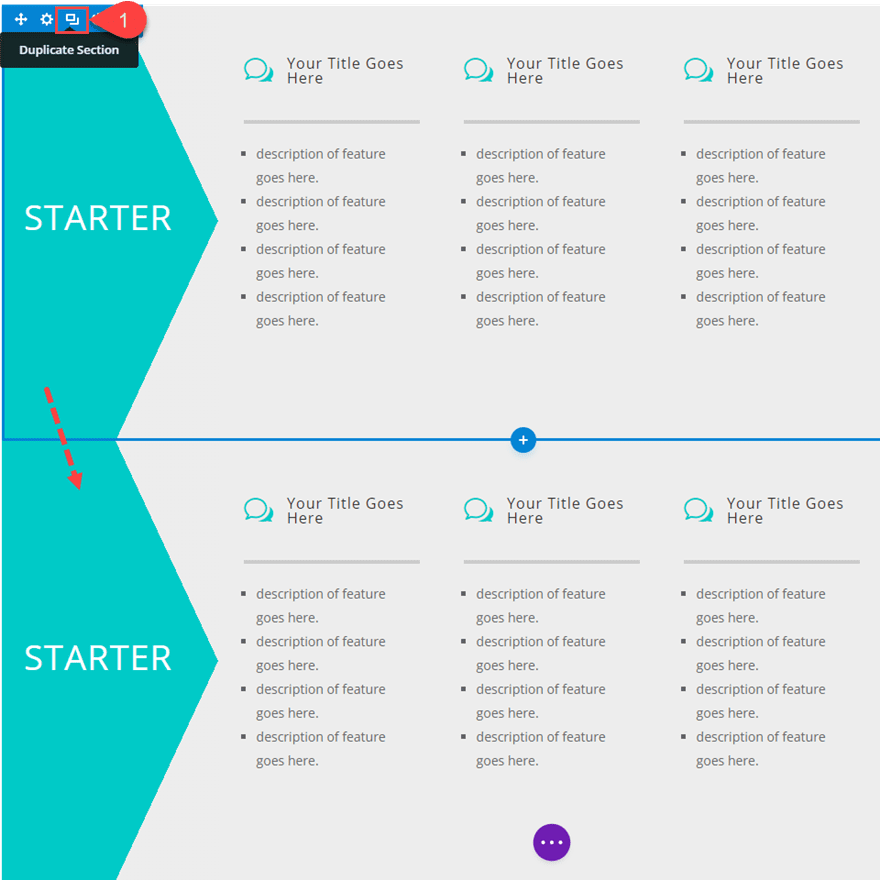
Duplicating the Desk for New Tables and Colour Schemes
Clearly, it would be best to have a couple of horizontal pricing tables for customers to match. To create the second one pricing desk, reproduction all the segment containing the primary desk you created.
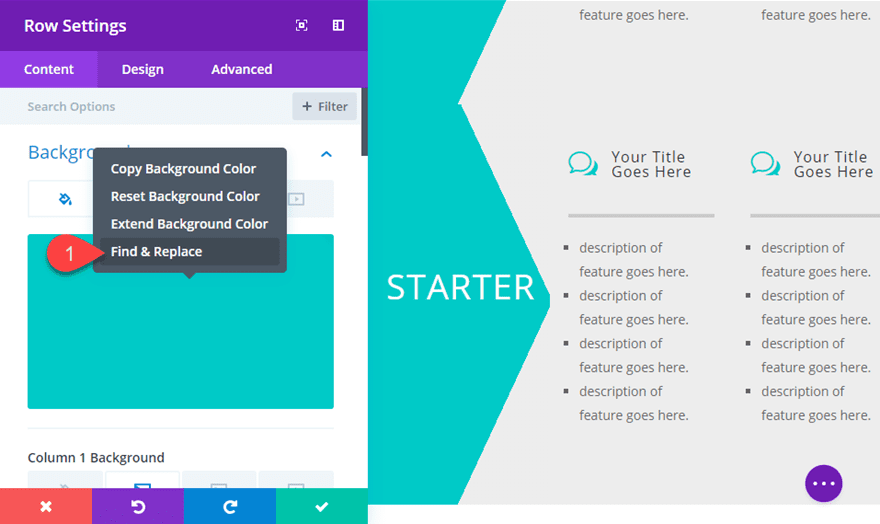
Then open the Row settings and hover over the background colour and click on in finding and change.
Beneath “Inside” make a selection “This Phase”.
Beneath “Substitute Width”, upload the colour: #f84f51
Then test the field to Substitute All of the values discovered within the segment (no longer simply background colour).
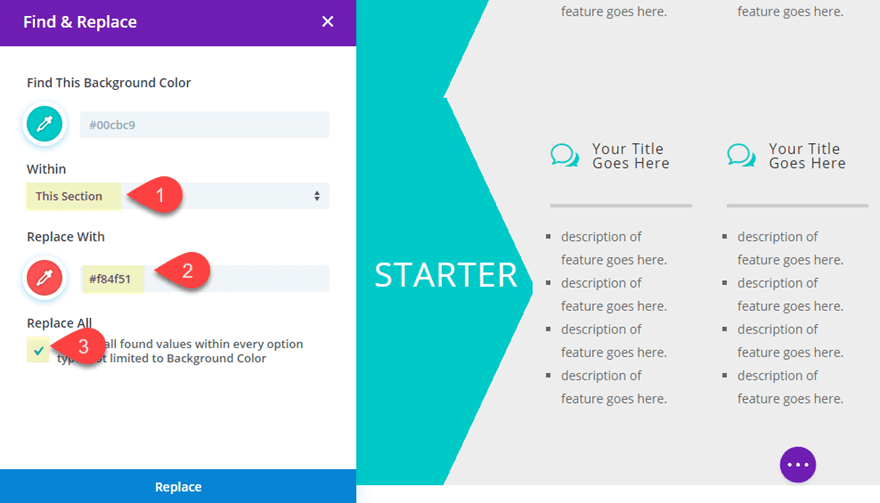
Then click on Substitute and watch the magic occur. This can be a fast and simple strategy to trade the entire circumstances of the former colour with a brand new colour.
Don’t put out of your mind to save lots of the row settings earlier than go out to save lots of the adjustments.
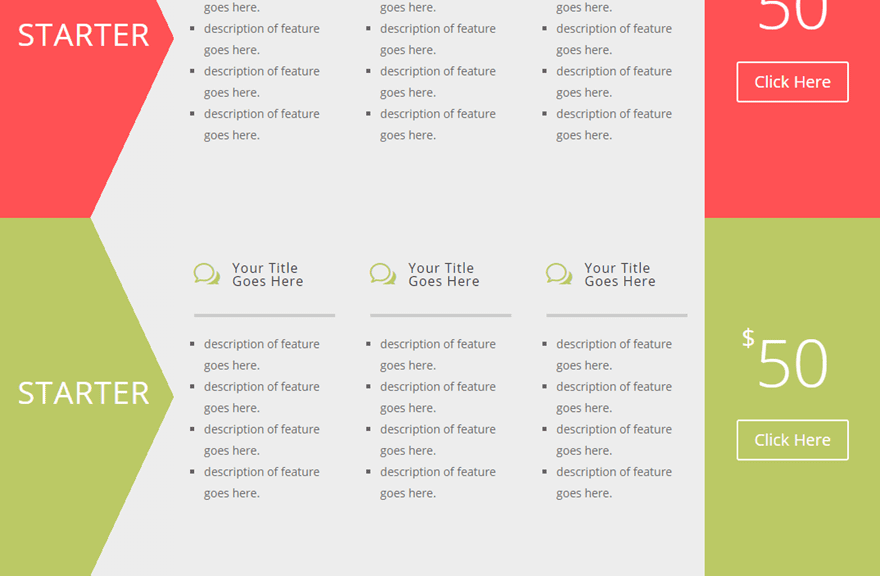
Now you may have a brand new desk with a brand new colour scheme.
Repeat this procedure once more so as to add some other desk with the colour: #bdc958
Creating a Featured Desk
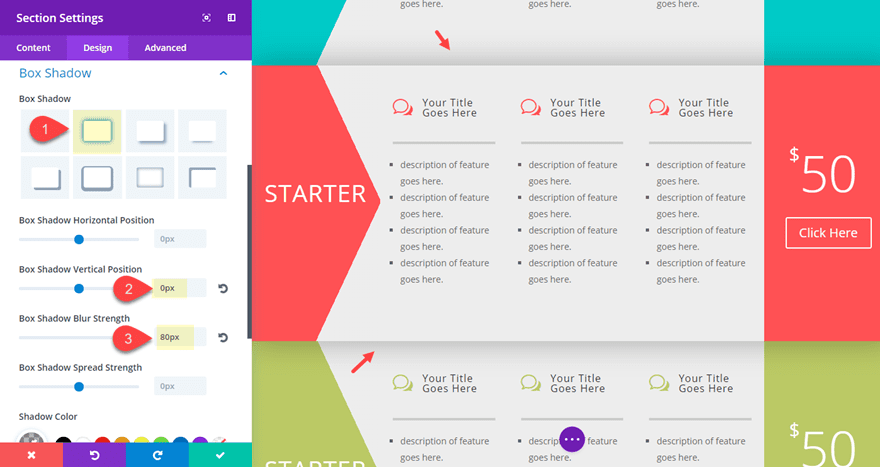
With a view to make one in all your tables glance featured and stand out a little bit, you’ll be able to upload a field shadow to the segment keeping the desk in addition to trade the grey colour used for column backgrounds and gradients to a pleasant white colour.
To try this, move to the segment settings for the second one segment (the center one) and replace the next:
Field Shadow: see screenshot
Field Shadow Vertical Place: 0px
Field Shadow Blur Power: 80px
To interchange the grey background colour, move to the row settings and in finding the column 2 background colour (#eeeeee). Proper click on on it and click on “in finding and change”. The replace the next:
Beneath “Inside” make a selection “This Phase”.
Beneath “Substitute Width”, upload the colour: #ffffff
Then test the field to Substitute All of the values discovered within the segment (no longer simply background colour).
Then click on “Substitute”.
The usage of In finding and Substitute to Take a look at out Fonts
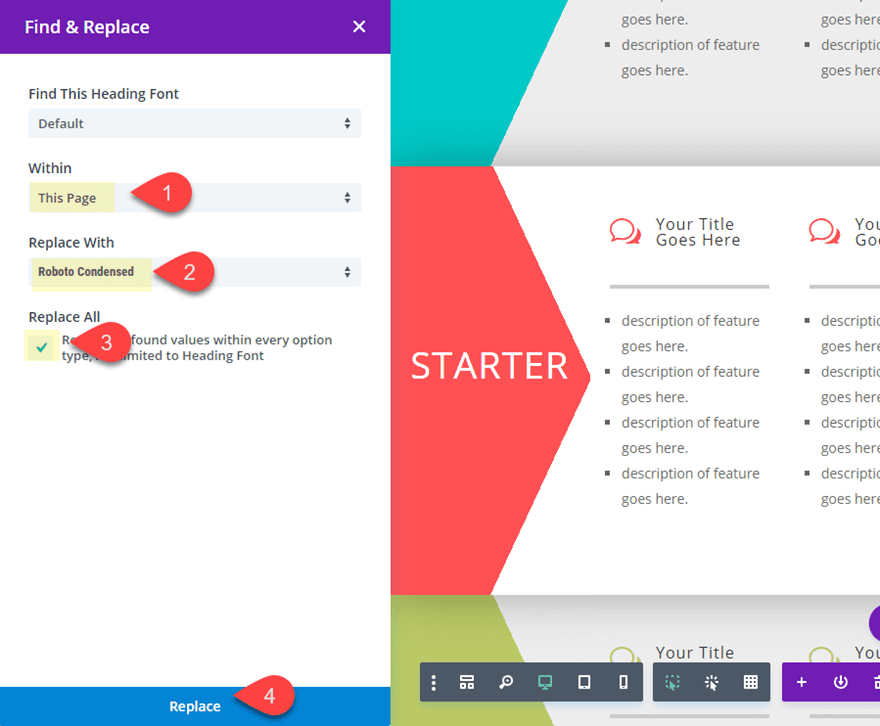
If you wish to use a unique font all over your desk, you’ll be able to simply take a look at out other ones by means of the use of the “In finding and Substitute” characteristic. I purposefully left the default font for all modules to make this procedure a easy one. To modify the font for all of your web page of tables, all you wish to have to do is open the settings of the textual content module within the first column of any desk segment (it in reality may also be any module the use of the default font in your web page). Then proper click on at the Heading 2 Font getting used and make a choice “In finding and Substitute”. Then replace the next:
Beneath “Inside” stay “This Web page”.
Beneath “Substitute Width”, make a choice a font (I’m the use of Roboto Condensed).
Then test the field to Substitute All of the values discovered within the segment (or it is advisable to no longer test it to exchange all h2 fonts).
Then click on “Substitute”.
Now the entire fonts were modified all over all the web page.
That’s it! Now the horizontal pricing tables are entire.
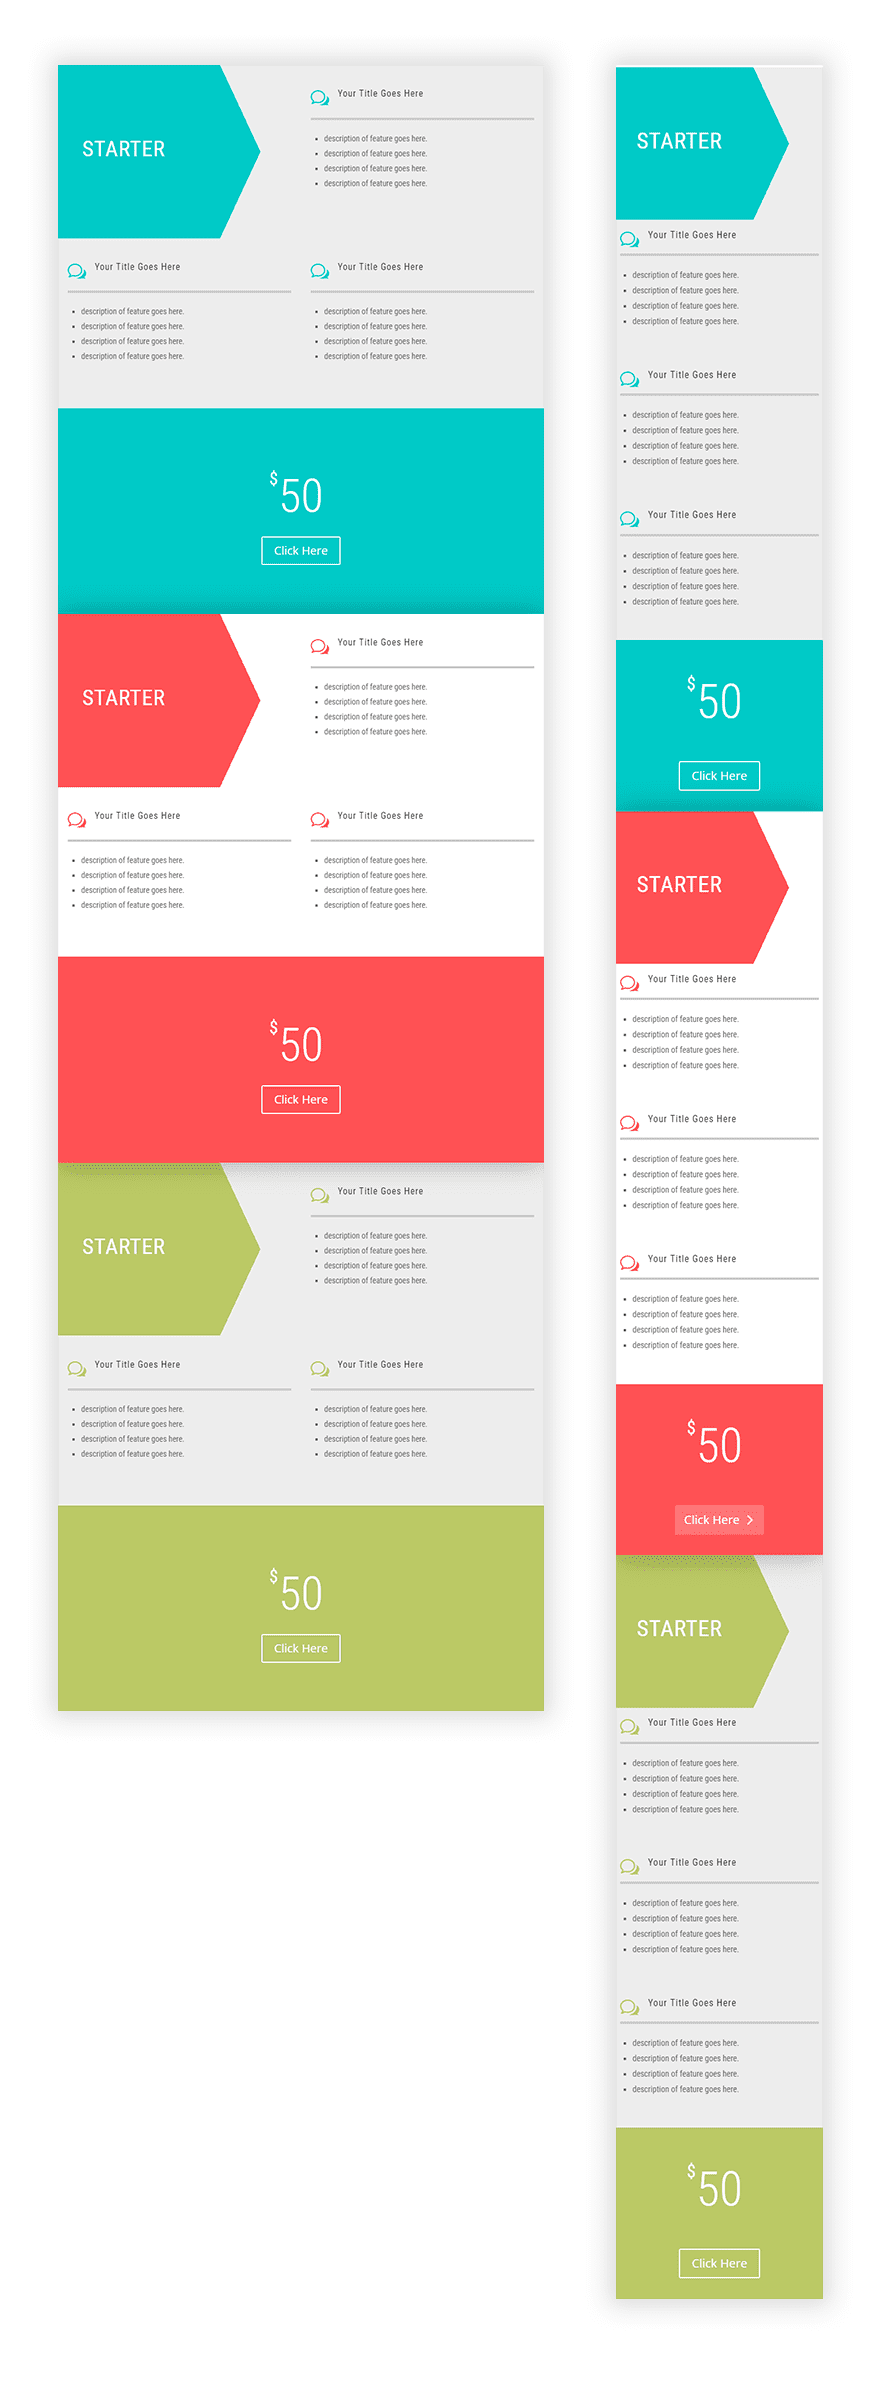
Let’s take a look at the end result.
The 5 column adjustment on pill and smartphone works superbly as smartly.
Ultimate Ideas
Divi’s 5 column format, along side the tough design options to be had within the Visible Builder, can help you make some stunning horizontal pricing tables. And adjusting the colours and fonts all over the use of In finding and Substitute is a smart time saver, bettering the design procedure the entire extra. I’m hoping that you just in finding the academic each informative and inspirational.
I stay up for listening to from you within the feedback.
Cheers!
The publish How to Create Horizontal Pricing Tables with Divi seemed first on Elegant Themes Blog.
WordPress Web Design