
Ever attempted to create a relations tree in your web site, however didn’t precisely understand how to way it? Neatly, in as of late’s Divi educational, we’re going to turn you precisely how to do this. On peak of making the relations tree, we’re additionally ensuring it stays responsive throughout all display screen sizes. When you’re accomplished developing the relations tree, you’ll at all times be capable of alter the pictures, textual content and design in keeping with your personal choice and make it able to move are living! Wish to get began with this relations tree design in an instant? You’ll be capable of obtain the JSON document without cost and upload it to any web site you’re developing!
Let’s get to it.
Contents
- 1 Preview
- 2 Obtain the Circle of relatives Tree Structure for FREE
- 3 Obtain For Loose
- 4 You could have effectively subscribed. Please test your electronic mail deal with to substantiate your subscription and get get entry to to unfastened weekly Divi structure packs!
- 5 Positioning Circle of relatives Participants
- 6 Connecting Circle of relatives Participants The use of Symbol Modules
- 7 Preview
- 8 Ultimate Ideas
Preview
Ahead of we dive into the academic, let’s take a snappy take a look at the end result throughout other display screen sizes.
Desktop

Cell

Obtain the Circle of relatives Tree Structure for FREE
To put your palms at the unfastened relations tree structure, you’ll first want to obtain it the use of the button under. To achieve get entry to to the obtain it is important to subscribe to our Divi Day-to-day electronic mail checklist by way of the use of the shape under. As a brand new subscriber, you’ll obtain much more Divi goodness and a unfastened Divi Structure pack each and every Monday! For those who’re already at the checklist, merely input your electronic mail deal with under and click on obtain. You’ll no longer be “resubscribed” or obtain further emails.
@media simplest display screen and ( max-width: 767px ) {.et_bloom .et_bloom_optin_1 .carrot_edge.et_bloom_form_right .et_bloom_form_content:ahead of, .et_bloom .et_bloom_optin_1 .carrot_edge.et_bloom_form_left .et_bloom_form_content:ahead of { border-top-color: #ffffff !vital; border-left-color: clear !vital; }
}.et_bloom .et_bloom_optin_1 .et_bloom_form_content button { background-color: #f92c8b !vital; } .et_bloom .et_bloom_optin_1 .et_bloom_form_content .et_bloom_fields i { shade: #f92c8b !vital; } .et_bloom .et_bloom_optin_1 .et_bloom_form_content .et_bloom_custom_field_radio i:ahead of { background: #f92c8b !vital; } .et_bloom .et_bloom_optin_1 .et_bloom_border_solid { border-color: #f7f9fb !vital } .et_bloom .et_bloom_optin_1 .et_bloom_form_content button { background-color: #f92c8b !vital; } .et_bloom .et_bloom_optin_1 .et_bloom_form_container h2, .et_bloom .et_bloom_optin_1 .et_bloom_form_container h2 span, .et_bloom .et_bloom_optin_1 .et_bloom_form_container h2 robust { font-family: “Open Sans”, Helvetica, Arial, Lucida, sans-serif; }.et_bloom .et_bloom_optin_1 .et_bloom_form_container p, .et_bloom .et_bloom_optin_1 .et_bloom_form_container p span, .et_bloom .et_bloom_optin_1 .et_bloom_form_container p robust, .et_bloom .et_bloom_optin_1 .et_bloom_form_container shape enter, .et_bloom .et_bloom_optin_1 .et_bloom_form_container shape button span { font-family: “Open Sans”, Helvetica, Arial, Lucida, sans-serif; } p.et_bloom_popup_input { padding-bottom: 0 !vital;}

Obtain For Loose
Sign up for the Divi Newlsetter and we can electronic mail you a replica of without equal Divi Touchdown Web page Structure Pack, plus lots of different wonderful and unfastened Divi assets, pointers and methods. Practice alongside and you’ll be a Divi grasp very quickly. If you’re already subscribed merely sort to your electronic mail deal with under and click on obtain to get entry to the structure pack.
You could have effectively subscribed. Please test your electronic mail deal with to substantiate your subscription and get get entry to to unfastened weekly Divi structure packs!
Positioning Circle of relatives Participants
Upload New Segment
Spacing
Let’s get started developing! The very first thing we want to do is upload a brand new common phase to the web page we’re running on. Open the phase settings and upload some customized peak and backside padding the use of viewport width.
- Most sensible Padding: 8vw
- Backside Padding: 8vw

Upload Row #1
Column Construction
Proceed by way of including the primary row on your phase the use of the next column construction:

Sizing
With out including any modules but, open the row settings and make allowance the row to absorb all of the width of the phase and display screen.
- Use Customized Gutter Width: Sure
- Gutter Width: 1
- Width: 100%
- Max Width: 100%

Spacing
So as to add whitespace to the left and the suitable facet of the row on desktop, we’ll upload some customized left and proper padding the use of the viewport width unit.
- Most sensible Padding: 0px
- Backside Padding: 0px
- Left Padding: 15vw (Desktop), 0vw (Pill & Telephone)
- Proper Padding: 15vw (Desktop), 0vw (Pill & Telephone)

Upload Symbol Module to Column
Add Symbol
Time to start out including modules! The primary one we want is an Symbol Module. Add a picture with a width and top of ‘180px’.

Alignment
Then, cross to the design tab and alter the picture alignment.
- Symbol Alignment: Middle

Sizing
Adjust the sizing settings subsequent.
- Width: 49%
- Module Alignment: Middle

Border
And switch the picture right into a circle by way of including a top worth to every one of the most corners within the border settings. We’re the use of ’20vw’ however you’ll use any top quantity you wish to have.

Upload Textual content Module to Column
Upload Content material
Directly to the following module, which is a Textual content Module. Upload the relations member’s identify right here.

Background Colour
Then, cross to the background settings and alter the background shade into white.
- Background Colour: #ffffff

Textual content Settings
Adjust the textual content settings subsequent. If you wish to create any other feel and appear for the relations tree, be happy to mess around with those settings.
- Textual content Font: Open Sans
- Textual content Colour: #000000
- Textual content Dimension: 0.8vw (Desktop), 1.2vw (Pill), 1.9vw (Telephone)
- Textual content Line Top: 0.4em
- Textual content Orientation: Middle

Spacing
Transfer directly to the spacing settings and upload some customized margin and padding values. Those values will lend a hand us form the Textual content Module and make it fairly overlap the Symbol Module.
- Most sensible Margin: -0.5vw
- Left Margin: 1vw
- Proper Margin: 1vw
- Most sensible Padding: 2vw (Desktop), 4vw (Pill), 5vw (Telephone)
- Backside Padding: 2vw (Desktop), 4vw (Pill), 5vw (Telephone)

Border
Transfer directly to the border settings and upload a peak border as smartly.
- Most sensible Border Width: 5px
- Most sensible Border Colour: #000000

Field Shadow
In conjunction with a Field Shadow to create intensity at the web page.
- Field Shadow Vertical Place: 10px
- Field Shadow Blur Power: 50px
- Shadow Colour: rgba(0,0,0,0.17)

Z Index
To ensure the Textual content Module stays on peak of the Symbol Module, we’ll build up the Z index within the visibility settings of the Textual content Module.
- Z index: 2

Clone Row 3 Instances
When you’re accomplished developing the primary row and editing all of the modules in it, you’ll cross forward and clone the row thrice. This will likely lend a hand us save time within the upcoming steps of the academic. Each and every this kind of rows shall be used to create a special degree within the relations tree.

Customise Row #1
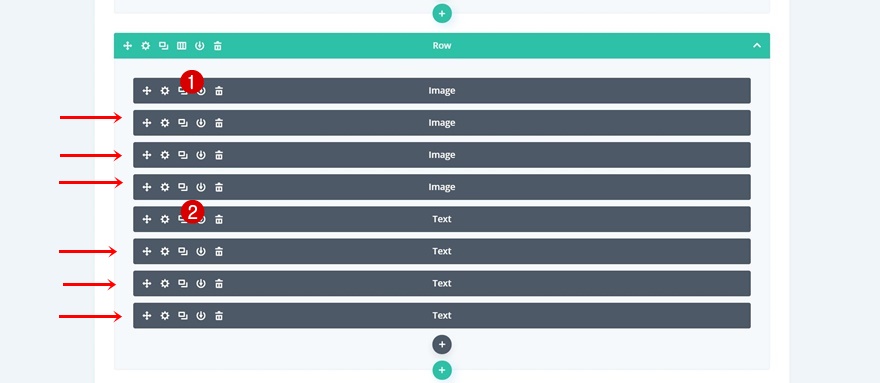
Clone Each Modules 7 Instances
Let’s get started customizing the primary degree of the relations tree! Transfer over to wireframe mode and clone the 2 modules to your row 7 instances. When you’re accomplished, the backend of your row must seem like this:

Column Primary Part CSS
We’re turning all of the column right into a grid. In overall, there must be 16 modules to your column. We’re going to put those 16 modules into 8 grid columns. Which means every one of the most 8 grid columns will include 2 modules; one Symbol Module and one Textual content Module. Open the row settings of the primary row and upload the next strains of CSS code to the column major component:
show: grid;
grid-template-columns: repeat(8, 12.5%);

Customise Row #2
Clone Each Modules 3 Instances
Directly to the second one row! Right here, we’re going to clone each modules three times.

Column Primary Part
We’re turning the column right into a grid with 4 grid columns by way of including the next strains of CSS code to the column major component of the row:
show: grid;
grid-template-columns: repeat(4, 25%);
The explanation why we’re the use of this way, as an alternative of simply opting for an present row column construction with 4 columns, is that we wish the entirety to stay 100% responsive on smaller display screen sizes.

Customise Row #3
Clone Each Modules
Directly to the 3rd row! Clone every the modules as soon as.

Column Primary Part
Then, upload the next strains of CSS code to the column major component:
show: grid;
grid-template-columns: repeat(2, 50%);

Customise Row #4
Row Spacing
Directly to the following and closing row! Right here, the one factor we want to do is alter the row padding values.
- Most sensible Padding: 0px
- Backside Padding: 0px
- Left Padding: 31vw
- Proper Padding: 31vw

Connecting Circle of relatives Participants The use of Symbol Modules
Upload Row #1
Column Construction
Now that we’ve got covered up all of the members of the family, we will be able to get started connecting them! To try this, upload a brand new row in between the primary and 2d row.

Sizing
With out including any modules but, open the row settings and alter the sizing values.
- Width: 100%
- Max Width: 100%

Spacing
Move to the spacing settings subsequent and upload some customized padding values.
- Most sensible Padding: 0px
- Backside Padding: 0px
- Left Padding: 15vw (Desktop), 0vw (Pill & Telephone)
- Proper Padding: 15vw (Desktop), 0vw (Pill & Telephone)

Upload Symbol Module to Column
Add Representation
Then, upload an Symbol Module and add the representation which you’ll to find within the folder you’ve downloaded initially of this put up.

Sizing
Move to the sizing settings of the Symbol Module and allow the ‘Power Fullwidth’ choice.
- Power Fullwidth: Sure

Spacing
You should definitely disable the ‘Display House Beneath the Symbol’ choice within the spacing settings.
- Display House Beneath The Symbol: No

Clone Row Two times & Trade Their Place
When you’re accomplished editing the row and the Symbol Module in it, cross forward and clone it two times. Position the duplicates accordingly:

Customise Row #1
Clone Symbol Module 3 Instances
Return to the primary row and clone the module three times.

Column Primary Part
Position those Symbol Modules in a grid with 4 grid columns by way of including the next strains of CSS code to the column major component of the row:
show: grid;
grid-template-columns: repeat(4, 25%);

Customise Row #2
Clone Symbol Module
Transfer directly to the second one row and clone the Symbol Module as soon as.

Column Primary Part
Position each modules in a grid with two grid columns by way of including the next strains of CSS code to the column major component of the row:
show: grid;
grid-template-columns: repeat(2, 50%);

Customise Row #3
Trade Spacing
Directly to the following and closing replica. Right here, the one factor you’ll want to do is alternate the customized padding values and also you’re accomplished!
- Most sensible Padding: 0px
- Backside Padding: 0px
- Left Padding: 27vw
- Proper Padding: 27vw

Preview
Now that we’ve long past thru all of the steps, let’s take a last take a look at the end result throughout other display screen sizes.
Desktop
Cell
Ultimate Ideas
On this put up, we’ve proven you the way to create a contemporary relations tree with Divi! The relations tree we’ve recreated appears to be like nice throughout all display screen sizes. Firstly of this educational, you have been additionally in a position to obtain the JSON document without cost and get began with it in an instant. In case you have any query or ideas, be sure you go away a remark within the remark phase under!
The put up How to Create a Family Tree with Divi’s Transform Settings gave the impression first on Elegant Themes Blog.
WordPress Web Design