
Microinteractions are an effective way to give a boost to consumer revel in as they have interaction along with your web site. Slight animations of icons, buttons, or pictures can cue the consumer to do so in a amusing and functional means. There are numerous microinteractions you’ll be able to come with for your web site, however a just right rule of thumb is to stay them “micro”. You don’t need to overdo it.
Nowadays I’m going to turn you some easy microinteractions you’ll be able to upload in your Divi site the use of the Divi Builder and Customized CSS (no jquery). I’ll be targeting the ones components that customers generally have interaction with – buttons, icons, pictures.
Let’s get began.
Contents
- 1 Sneak Peek
- 2 What You Wish to Get Began
- 3 Obtain the Recordsdata for Simple Get admission to
- 4 #1 Scaling Pictures on Hover
- 5 #2 Bouncing Scroll Down Icon
- 6 #3 Rotating Icons on Hover
- 7 #4 Sliding Button Icons to Display and Disguise Button Textual content
- 8 #5 three-D Symbol Viewpoint Rotation
- 9 #6 Button Slider Microinteraction
- 10 FREE Obtain: Get the Premade Structure and CSS document for This Instructional
- 11 Obtain For Loose
- 12 You’ve got effectively subscribed. Please test your e-mail cope with to substantiate your subscription and get get admission to to loose weekly Divi format packs!
- 13 Ultimate Ideas
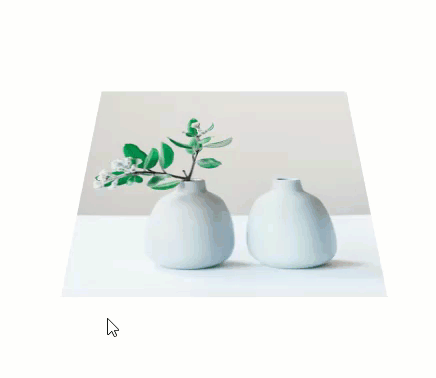
Sneak Peek
Here’s a fast have a look at the microinteractions we will be able to be development on this instructional.
#1 Scaling Pictures on Hover
Start Building Microinteraction #1
#2 Bouncing Scroll Down Icon
Start Building Microinteraction #2
#3 Rotating Blurb and Button Icons on Hover
Start Building Microinteraction #3
#4 Sliding Button Icons to Display and Disguise Button Textual content
Start Building Microinteraction #4
#5 three-D Symbol Viewpoint Rotation

Start Building Microinteraction #5
#6 Button Slider Microinteraction
Start Building Microinteraction #6
What You Wish to Get Began
To get began, all you actually want is Divi. We can be our examples from scratch the use of the Divi Builder at the entrance finish.
Obtain the Recordsdata for Simple Get admission to
I’ve incorporated a obtain on the backside of this text for the ones of you who need to have a case in point of those microinteractions up a working for your site the short and simple means. That means you’ll be able to have a case in point as you practice at the side of the educational.
#1 Scaling Pictures on Hover
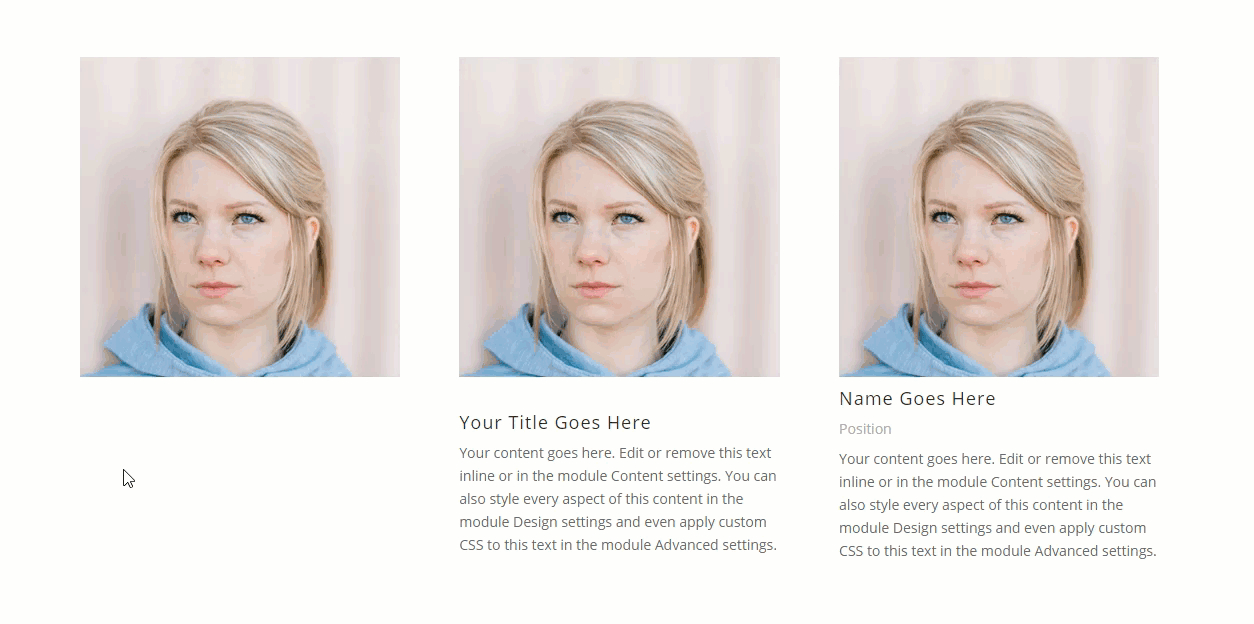
Scaling refers to adjusting the scale of a component. So if we would have liked to make a picture better on hover (for instance), all we want to do is upload a bit CSS snippet to scale our picture by way of a definite proportion. This permits us to create a small however efficient microinteraction when a consumer hovers over a picture. Let me display you the way you’ll be able to observe this to 3 fashionable Divi modules that use pictures – the picture module, the blurb module, and the individual module.
Pass forward and create a brand new phase with a 3 column row so we will be able to upload each and every of our examples to each and every column.
Scaling an Symbol on Hover the use of the Symbol Module
So as to add the scaling picture microinteraction to a picture the use of the picture module, first upload a picture module to the primary column.

Then upload a picture to the module of your selection.
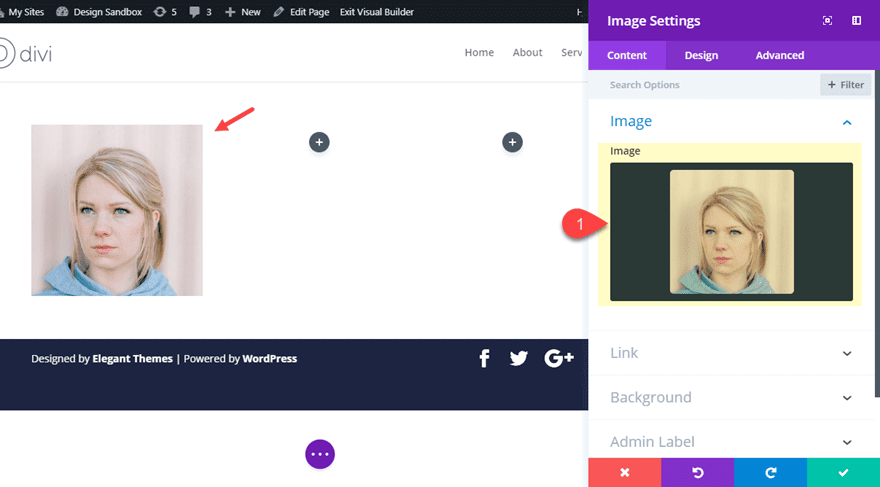
Subsequent, upload the next CSS magnificence beneath the complex tab on your picture settings:
CSS magnificence: scale-image
This permits us to focus on this particular module when including our customized CSS to the web page settings. So as to add the CSS had to scale the picture, open the web page settings and upload the next customized CSS:
/**This scales the picture within the picture module with the CSS magnificence "scale-image" **/
.scale-image {
  overflow:hidden;
}
.scale-image img{
 transition: all 0.2s;
}
.scale-image:hover img {
  turn out to be: scale(1.3)
}
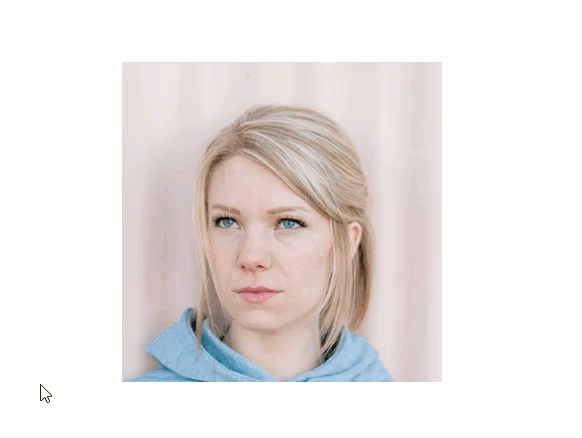
Now take a look at the outcome.
Scaling an Blurb Module Symbol on Hover
So as to add the similar impact to a picture in a blurb module, first upload a blurb module to the second one column.
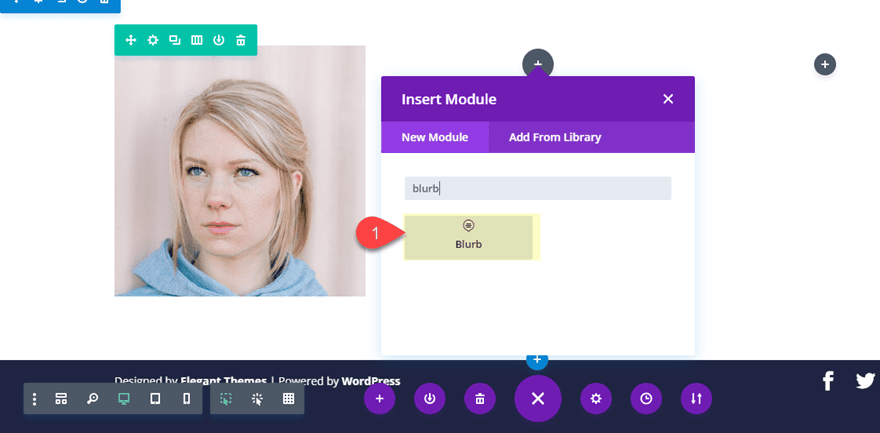
Then upload a picture of your option to the blurb module.
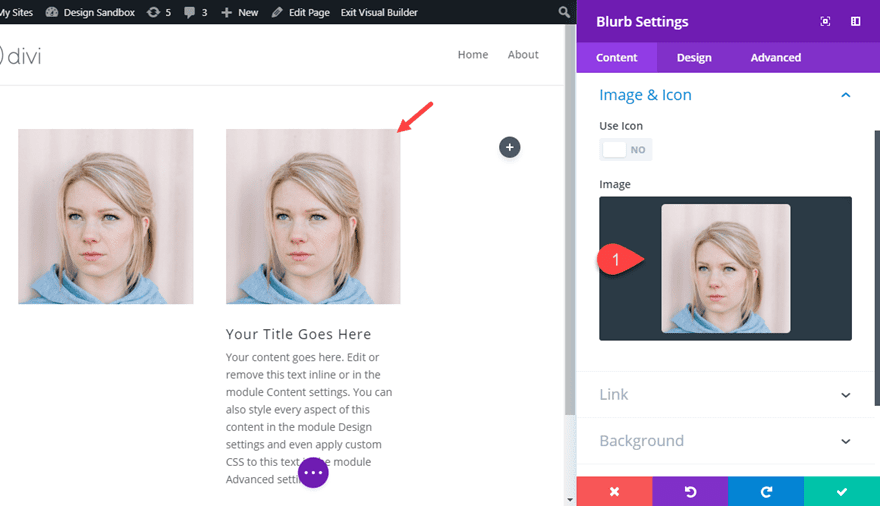
Then upload the next CSS magnificence to the blurb module.
CSS Elegance: scale-blurb-image
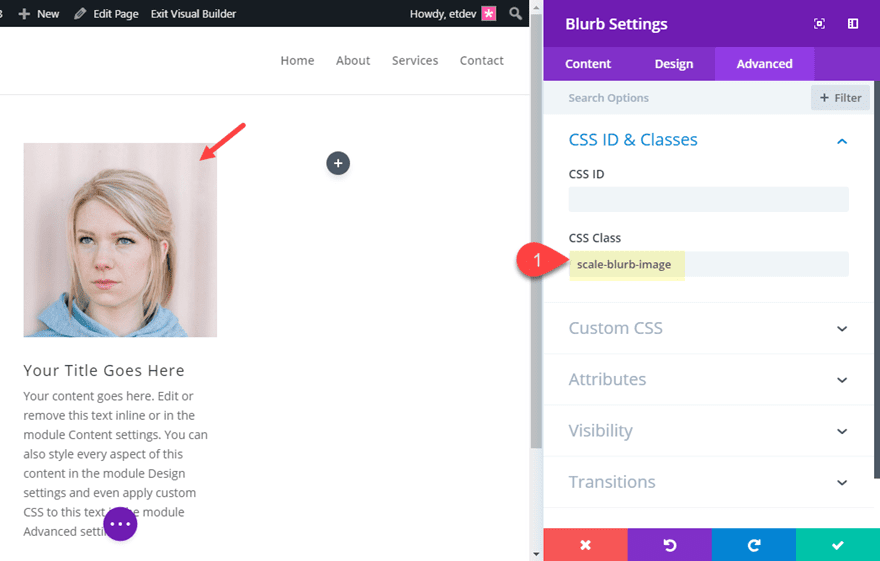
With this CSS magnificence in position we will be able to now upload our customized CSS that goals the blurb picture. Open the web page settings and upload the next Customized CSS:
/**This scales the picture within the bl module with the CSS magnificence "scale-blurb-image" **/

.scale-blurb-image .et_pb_main_blurb_image {
  overflow:hidden;
}
.scale-blurb-image .et_pb_main_blurb_image img {
  transition: all 0.2s;
}
.scale-blurb-image .et_pb_main_blurb_image:hover img {
  turn out to be: scale(1.3);
}
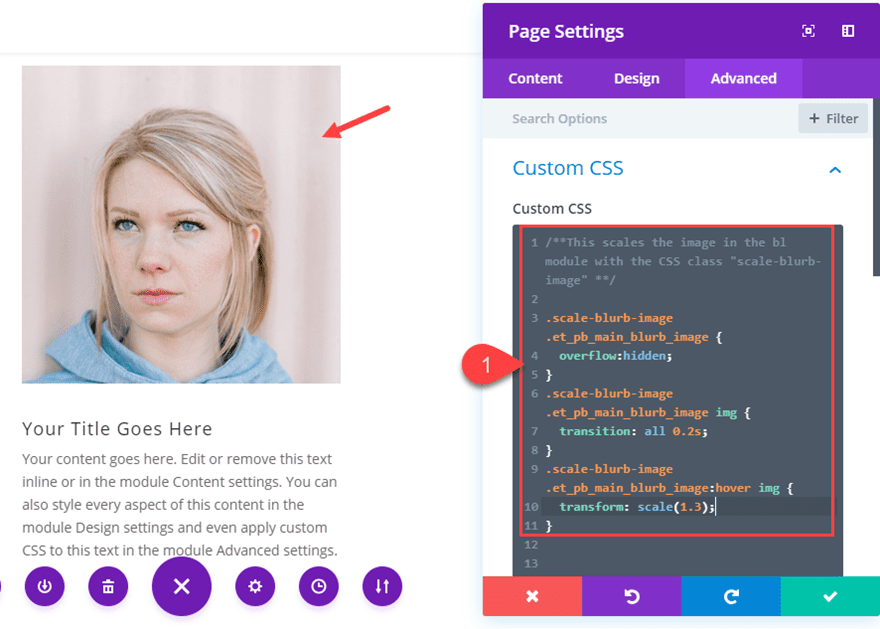
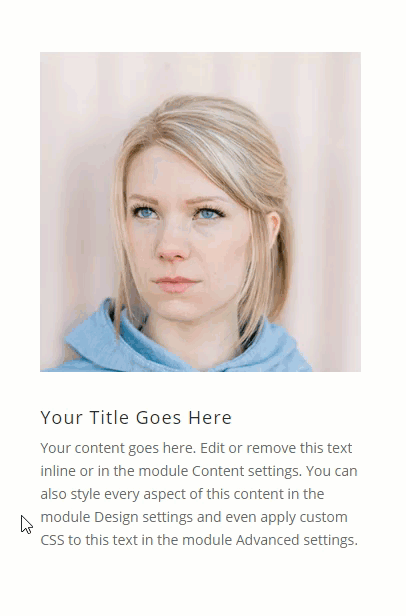
This is the outcome.
Scaling a Particular person Module Symbol on Hover
To scale an user module picture on hover, upload an individual module to the 3rd column and upload an add a picture of your selection the module.

Then upload the next CSS Elegance to the individual module.
CSS Elegance: scale-person-image
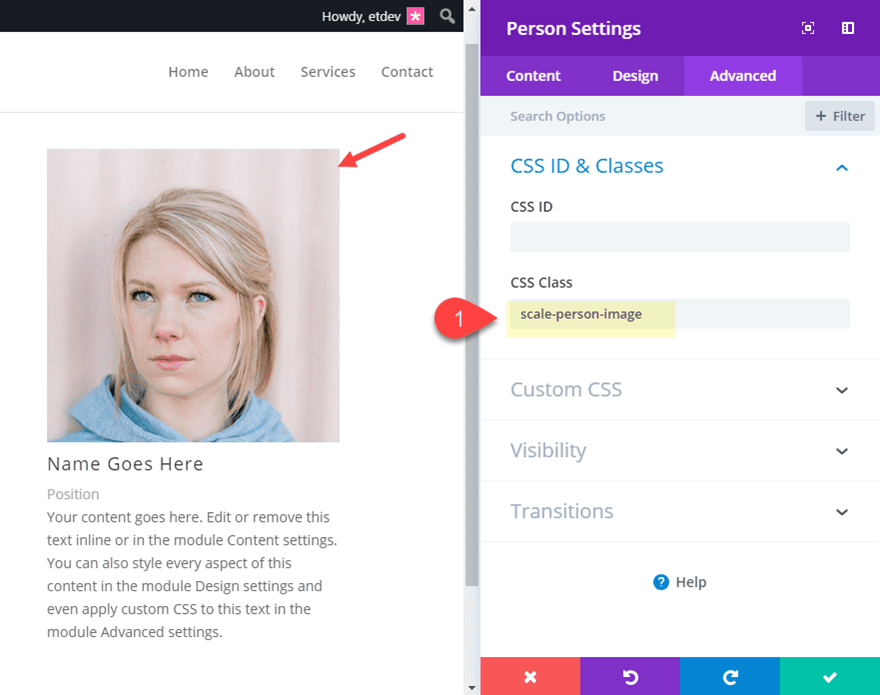
Now open web page settings and upload the next Customized CSS.
/**This scales the picture within the user module with the CSS magnificence "scale-person-image" **/

.scale-person-image .et_pb_team_member_image {
  overflow:hidden;
}
.scale-person-image img {
  transition: all 0.2s;
}
.scale-person-image img:hover {
  turn out to be: scale(1.3);
}
Take a look at the results of all 3 modules with the scaling picture microinteraction.
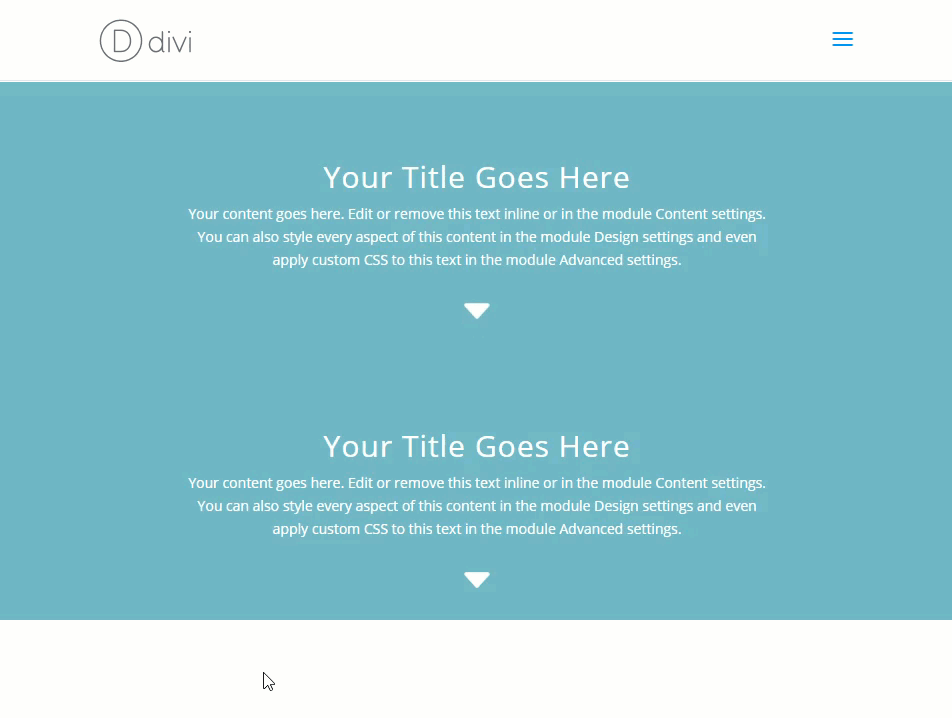
#2 Bouncing Scroll Down Icon
This subsequent microinteraction provides a bouncing animation to the scroll down icon inbuilt to the fullwidth header module. This a refined technique to additional tell the customer that there’s extra information additional down the web page. And you’ll be able to make a selection to have this bouncing impact by way of default or on hover.
Right here’s find out how to do it.
First upload a brand new fullwidth phase with a fullwidth header module.
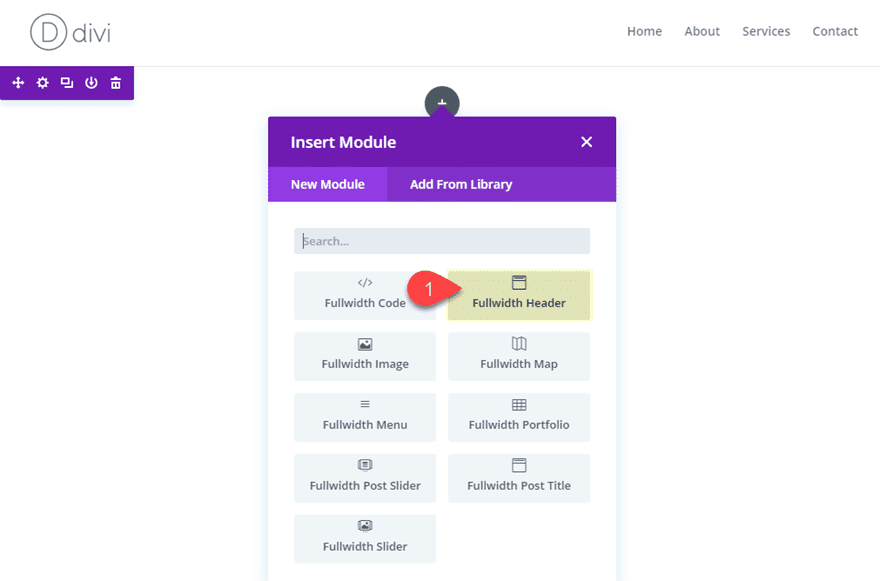
Then replace the next:
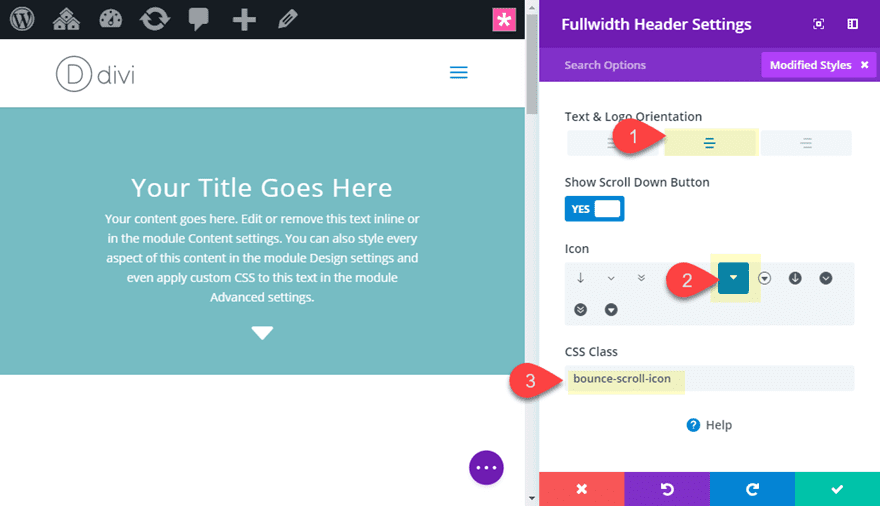
Textual content & Emblem Orientation: Middle
Display Scroll Down Button: YES
Icon: [select icon of choice]
Then upload the next CSS Elegance:
CSS Elegance: bounce-scroll-icon
This magnificence will permit us to focus on the scroll icon with css to animate the icon by way of default on web page load.
Then reproduction the fullwidth header module and replace the CSS Elegance to the next:
CSS Elegance: bounce-scroll-icon-hover
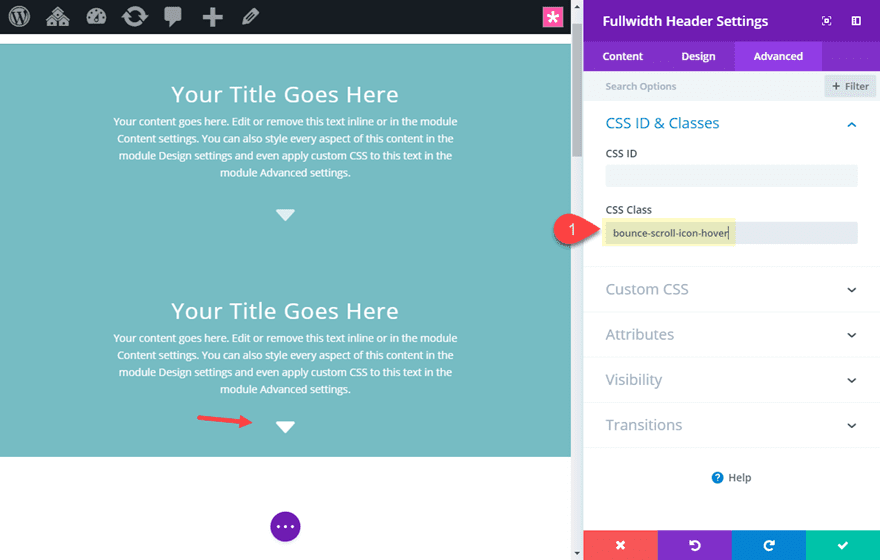
This magnificence will permit us to focus on the scroll icon with css to animate the icon on hover.
Then open the web page settings and upload the next Customized CSS to turn on the bouncing animation for our two examples.
.bounce-scroll-icon-hover .et-pb-icon {
  place: absolute;
  peak:-10px;
  left:0;
  proper:0;
}
.bounce-scroll-icon-hover .et-pb-icon:hover {
  animation-duration: 2s;
  animation-name: leap;
  animation-iteration-count: limitless;
  animation-timing-function: linear;
  transition: all .2s;
}

.bounce-scroll-icon .et-pb-icon {
  place: absolute;
  peak:-10px;
  left:0;
  proper:0;
  animation-duration: 2s;
  animation-name: leap;
  animation-iteration-count: limitless;
  animation-timing-function: linear;
  transition: all .2s;
}
.bounce-scroll-icon .et-pb-icon:hover {
  animation-name: none;
}

@keyframes leap {
      0%   {peak: -10px; opacity: 1;}
    50%  {peak: 15px; opacity:0;}
    100% {peak: -10px;opacity:1;}
}
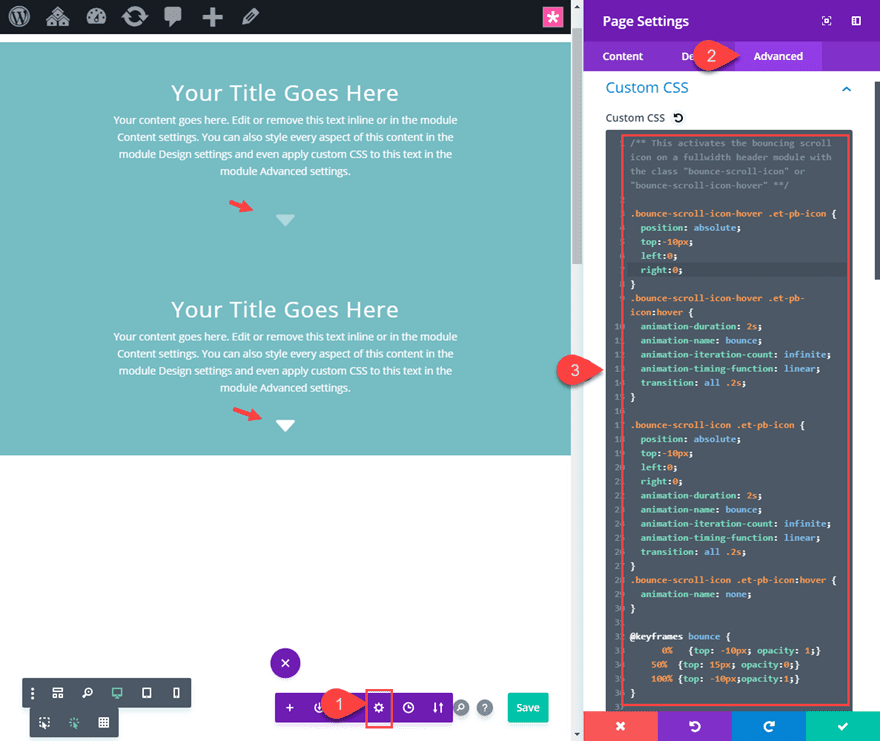
Take a look at the results of the 2 examples. The highest header scroll icon will animate by way of default and the ground header scroll icon will animate on hover.
#3 Rotating Icons on Hover
Including a slight rotation to an icon may also be an efficient microinteraction to have interaction customers to click on a component. Because the two hottest Divi modules that experience integrated icons are the button module and the blurb module, I assumed I might display you find out how to upload rotation to these icons on hover.
Rotating a Button Icon on Hover
Divi already comes with a useful microinteraction for button icons by way of default. When soaring over the button, the button icon seems and strikes to the correct indicating that by way of clicking the button you are going to be redirected to every other web page. However, for those who sought after to get a little extra ingenious with it, you’ll be able to rotate the icon for an absolutely new microinteraction.
To rotate a button icon on hover, first upload a brand new phase with a one-column row. Then upload a button module to the row.
Then replace the button settings as follows:
Use Customized Kinds for button: YES
Most effective Display Icon On Hover for Button: NO
Button Icon: [choose icon of choice]
Then upload the next CSS Elegance:
CSS Elegance: rotate-button-icon

With our icon and CSS Elegance in position, all we want to do is upload the next customized CSS to web page settings:
/** This rotates the button icon on hover for the button module with the CSS magnificence "rotate-button-icon" **/
.rotate-button-icon:after {
turn out to be: rotate(-90deg);
}

.rotate-button-icon:hover:after {
turn out to be: rotate(0deg);
}
This may increasingly rotate the icon counter-clockwise by way of 90 levels to start with after which again to 0 levels on hover.
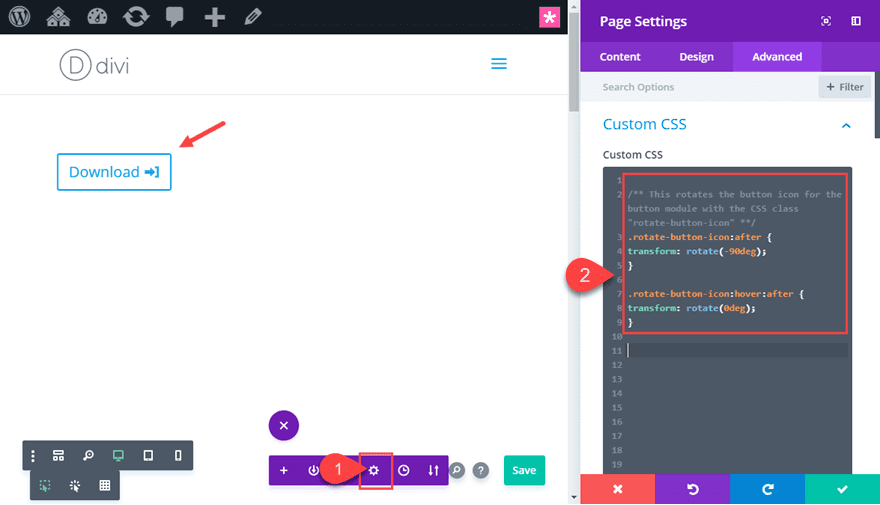
This is the outcome.
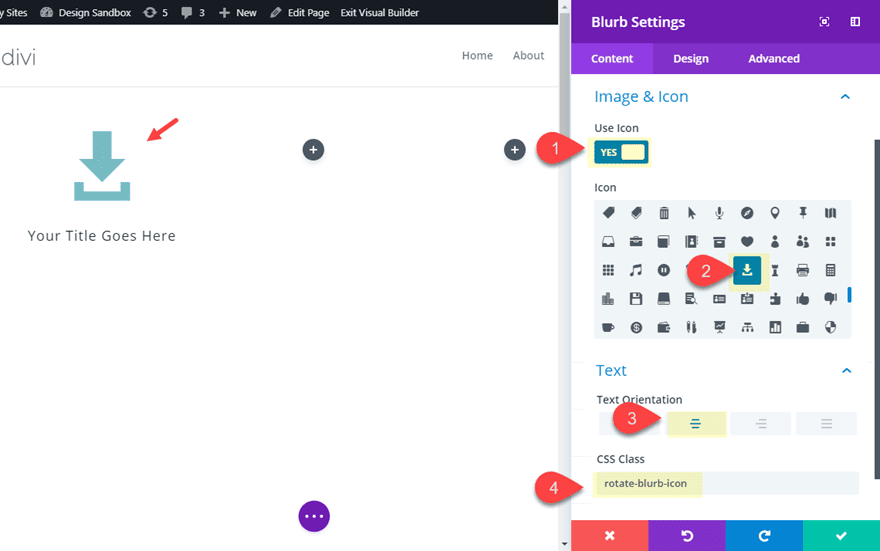
Rotating a Blurb Module Icon
To rotate a blurb module icon, let’s first create a brand new phase with a three-column row. Then upload a blurb module to the column 1 and replace the next blurb settings.
Use Icon: YES
Icon: [add icon of choice]
Textual content Orientation: middle
CSS Elegance: rotate-blurb-icon
Now upload the next Customized CSS to web page settings:
/** This rotates a blurb icon with the css magnificence "rotate-blurb-icon" **/

.rotate-blurb-icon .et-pb-icon {
  transition:  0.2s ease-out;
  turn out to be: rotateZ(-90deg);
}

.rotate-blurb-icon .et_pb_blurb_content:hover .et-pb-icon {
  turn out to be: rotateZ(0deg);
}
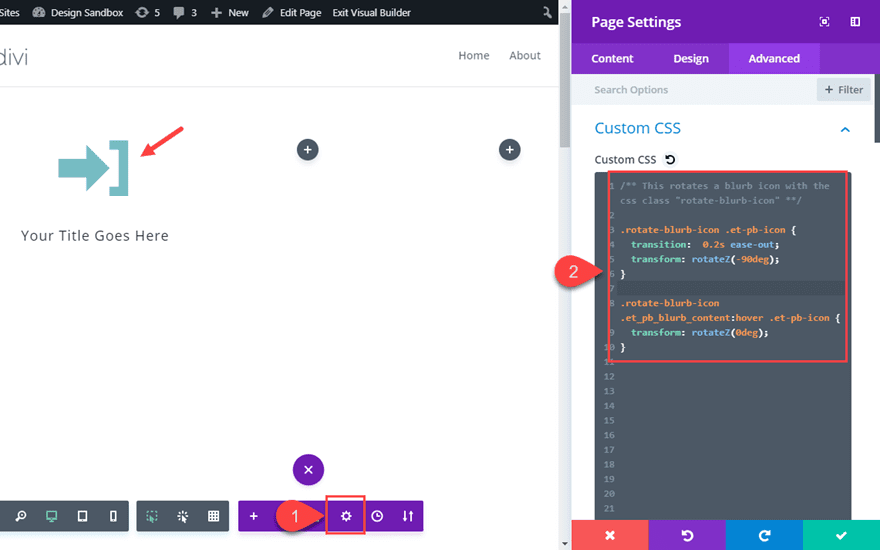
This is the outcome.
This additionally works with the icon positioned at the left of the identify. All you want to do is replace the blurb settings as follows:
Symbol/Icon Placement: Left
Identify Line Top: 1.7em
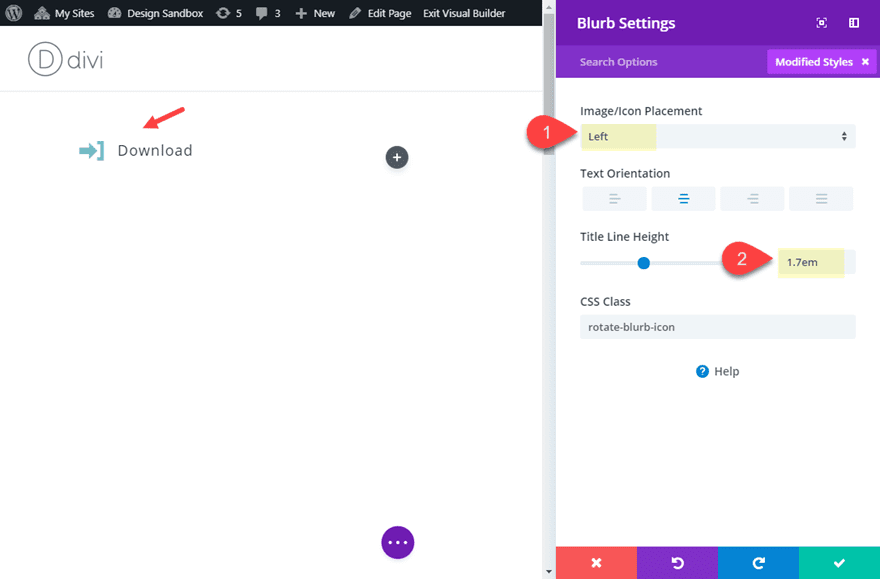
Take a look at the outcome.
#4 Sliding Button Icons to Display and Disguise Button Textual content
Button Textual content to Icon on Hover
This microinteraction presentations button textual content with an icon by way of default after which strikes the icon to hide the textual content on hover.
Right here’s find out how to do it.
Upload a brand new phase with a one-column row. Then upload a button module to the row and replace the next button settings:
Use Customized Kinds for Button: YES
Button Background Colour: #0c71c3
Button border width: 0px
Button Icon Colour: #ffffff
CSS Elegance: button-text-to-icon
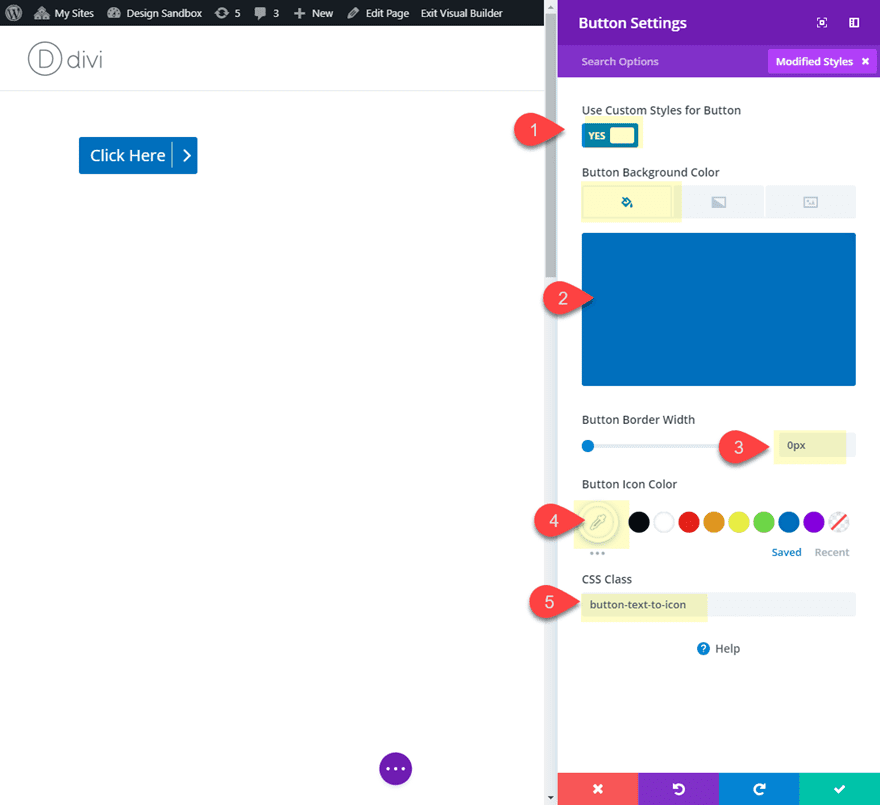
Now upload the next customized CSS to web page settings:
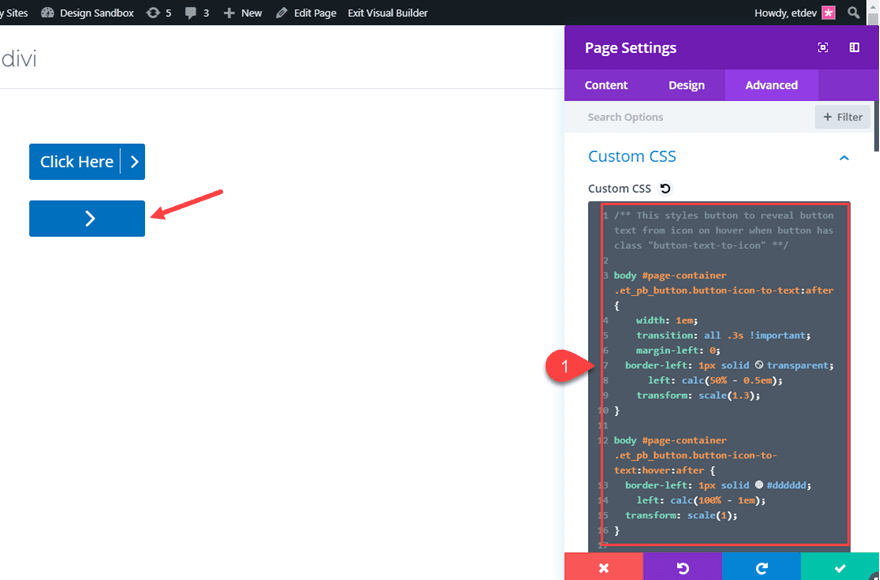
/** This types button to hide button textual content with icon on hover when button has magnificence "button-text-to-icon" **/

frame #page-container .et_pb_button.button-text-to-icon:after {
  width: 1em;
  transition: all .3s !vital;
  margin-left: 0;
  border-left: 1px forged #dddddd;
  left: calc(100% - 1em);
}

frame #page-container .et_pb_button.button-text-to-icon:hover:after {
  border-left: 1px forged clear;
  left: calc(50% - 0.5em);
  turn out to be: scale(1.3);
}

frame #page-container .et_pb_button:hover:after {
    shade: #ffffff;
    margin-left: 0px;
    left: 0;
    width: 100%;
    text-align: middle;
    turn out to be: scale(1.5);
}
Now take a look at the outcome.
Button Icon to Textual content on Hover
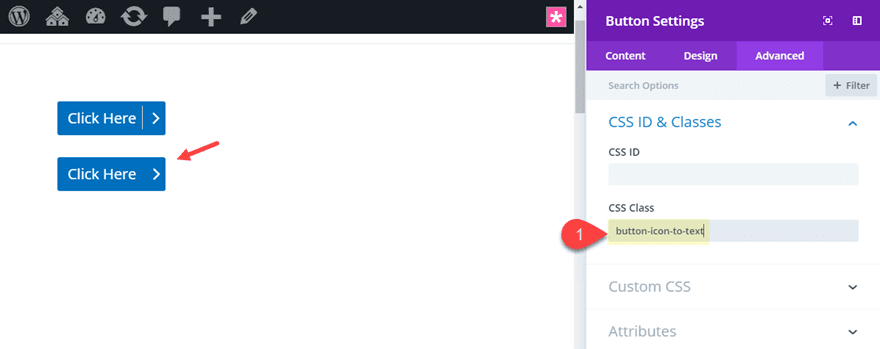
You’ll additionally create the other impact of revealing the button Icon to start with after which sliding the icon over to show the button textual content. To do that, reproduction the button module and replace the next button settings:
Button Textual content Colour(default): #0c71c3
Button Textual content Colour(hover): #ffffff
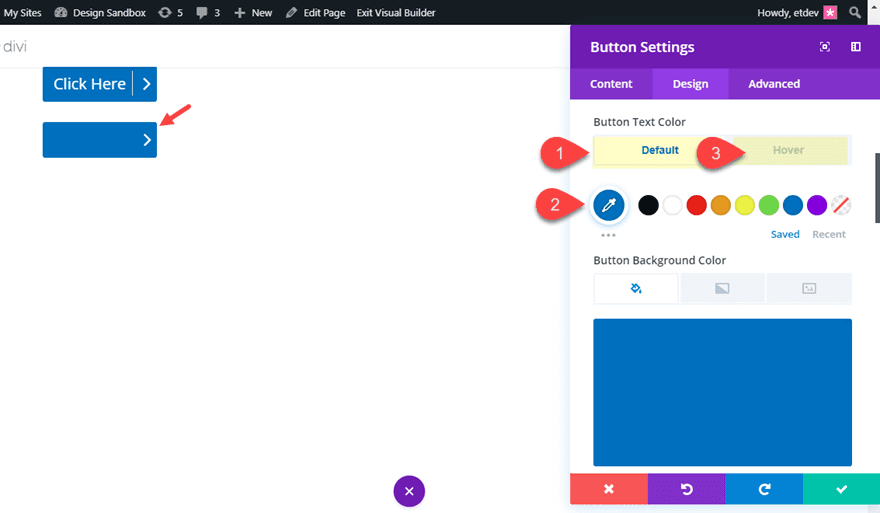
Then substitute the CSS Elegance with the next:
CSS Elegance: button-icon-to-text
Then upload the next customized CSS to web page settings:
/** This types button to show button textual content from icon on hover when button has magnificence "button-text-to-icon" **/

frame #page-container .et_pb_button.button-icon-to-text:after {
    width: 1em;
    transition: all .3s !vital;
    margin-left: 0;
  border-left: 1px forged clear;
      left: calc(50% - 0.5em);
    turn out to be: scale(1.3);
}

frame #page-container .et_pb_button.button-icon-to-text:hover:after {
  border-left: 1px forged #dddddd;
    left: calc(100% - 1em);
  turn out to be: scale(1);
}
Now take a look at the outcome.
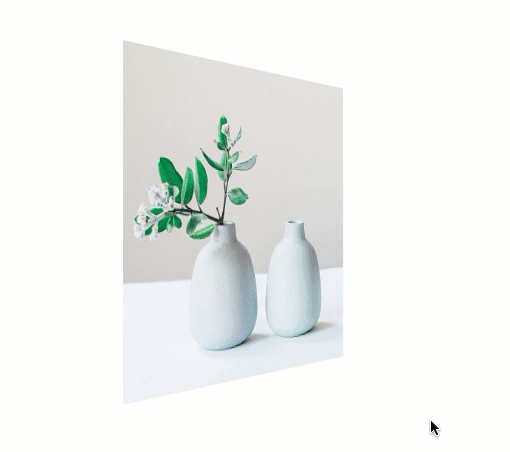
#5 three-D Symbol Viewpoint Rotation
This microinteraction begins with a picture module picture styled with three-D picture viewpoint and rotation by way of default. Then on hover, the picture hotels to a standard show of the picture.
Right here’s find out how to do it.
First, create a brand new phase with a three-column row. Then upload a picture module to column 1 and upload a picture to the picture module of your selection.
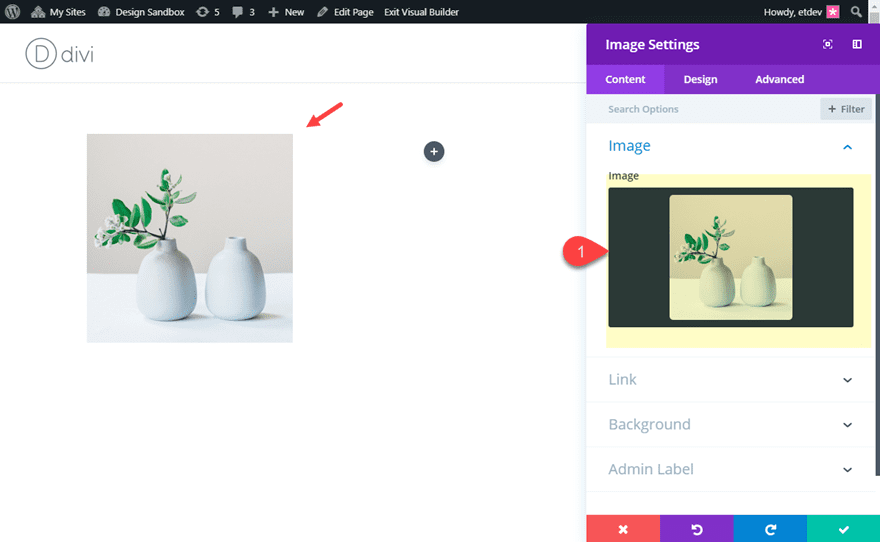
For this impact, we will be able to upload our Customized CSS at once to the module. Pass to the complex tab and upload the next Customized CSS beneath the Primary Component:
Primary Component CSS (default):
turn out to be: viewpoint(700px) rotateY(45deg);
transition: all .2s;
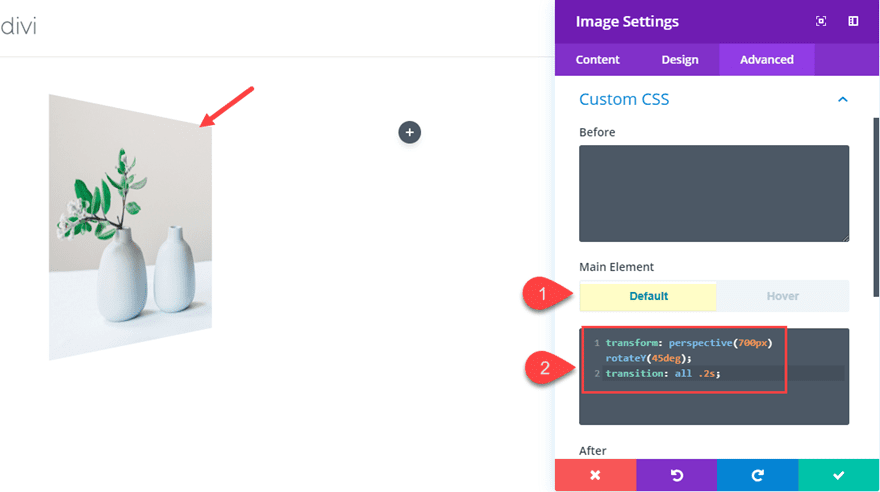
This css is doing two issues to our picture the use of the Develop into CSS Assets. First, it provides a viewpoint of 700px which is the quantity of distance between the picture and the viewpoint of the consumer when viewing the web page. The CSS additionally provides rotation to the picture. The rotateY(45deg) rotates the picture at the Y axis 45 levels (clockwise). And with viewpoint in position, the picture now has a three-d look.
Primary Component CSS (hover):
turn out to be: viewpoint(700px) rotateY(0deg);
This takes out the rotation of the picture on hover in order that it appears commonplace so the customers can get a greater have a look at the picture.

Now let’s take a look at the outcome.
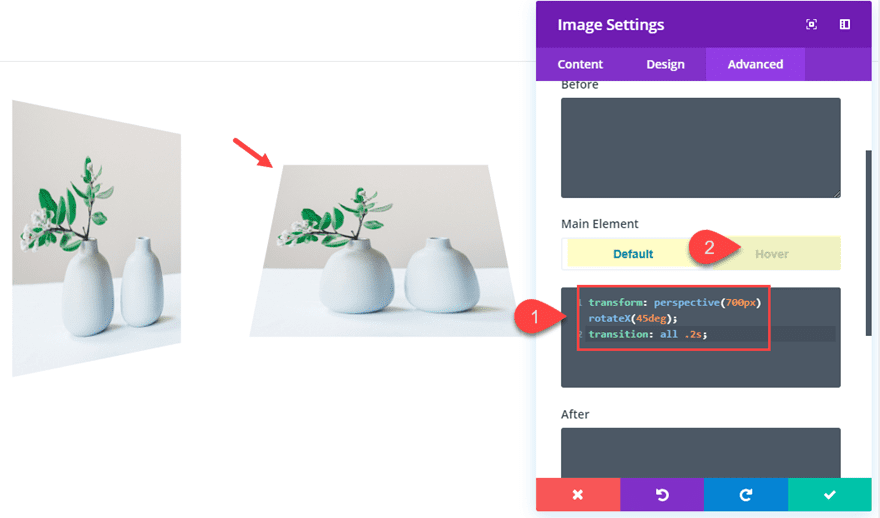
Let’s do a few extra examples of this microinteraction. Pass forward and replica the picture module and paste it in column 2 and column 3. Within the reproduction picture module in column 2, replace the customized CSS as follows:
Primary Component CSS (default):
turn out to be: viewpoint(700px) rotateX(45deg);
transition: all .2s;
Primary Component CSS (hover):
turn out to be: viewpoint(700px) rotateX(0deg);
Understand the one distinction this is the letter “X” after “rotate”. This tells the picture to rotate at the x axis at 45 levels. Then we take set the stage price to 0 on hover to deliver it again to commonplace.
This is the outcome.
Within the reproduction picture module in column 3, replace the Customized CSS as follows:
Primary Component CSS (default):
turn out to be: viewpoint(700px) rotateY(-45deg);
transition: all .2s;
Primary Component CSS (hover):
turn out to be: viewpoint(700px) rotateY(0deg);
Understand the one distinction between this CSS and the CSS used within the picture in column 1 is the “-45deg” price. This rotates the picture at the Y axis counter-clockwise.
This is ultimate results of all 3 picture microinteractions the use of viewpoint and rotation.
Don’t put out of your mind so as to add much more inbuilt hover results and designs the use of the integrated atmosphere of the picture module. For instance, this may be a great spot so as to add field shadow impact as neatly.
#6 Button Slider Microinteraction
For this final microinteraction, we’re going to create a button slider that displays more information (in truth an absolutely new button) on hover. The elemental concept is to offer your column a customized top after which stack two button modules throughout the column. The highest button can be what the consumer sees by way of default, however the second one button would be the button with “additional information” that the consumer will see when soaring over the button.
Right here’s find out how to create it.
This button will span the overall width of the row column so it really works highest for those who upload your button to a row with a column that doesn’t get too broad. For this case, I’m going to make use of a one-column row after which set a max-width to my row in order that the button doesn’t get too broad on massive browsers.
Create a brand new phase with a one-column row. Then upload a button module to the row and replace the next button settings:
Button Textual content: “Obtain”
Button Alignment: middle
Use Customized Kinds for Button: YES
Button Textual content Colour: #ffffff
Button Background Colour: #0c71c3
Button Border Width: 0px
Button Border Radius: 0px
Button Icon: see screenshot
Button Icon Colour: #ffffff
Button Icon Placement: Left
Most effective Display Icon On Hover for Button: NO
Customized Margin: 0px backside
Subsequent, reproduction the button you simply created in order that the reproduction stacks slightly under the button you simply created. Then replace the reproduction button settings as follows:
Button Textual content: MP3(3.5 mb)
Button Textual content Colour: #0c71c3
Button Background Colour: #ffffff
Button Icon: see screenshot
Button Icon Colour: #0c71c3

Prior to we pass directly to taste our row, we want to upload a CSS magnificence to the highest button. Open the highest button settings and upload the next CSS magnificence:
CSS Elegance: top-button
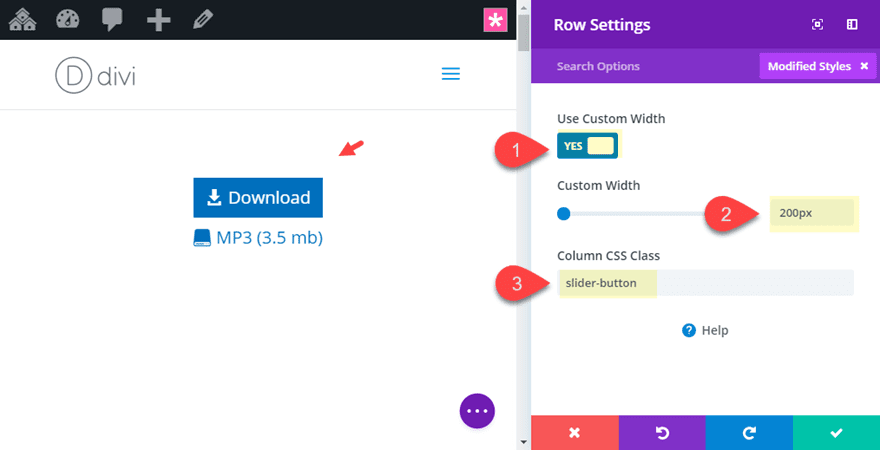
Now that each buttons are in position, let’s replace the row settings with a customized width that may function the max-width of our buttons and a column CSS magnificence for our Customized CSS we will be able to be including to web page settings. Open the row settings and replace the next:
Customized Width: 200px
Column CSS Elegance: slider-button
Make sure you upload the CSS magnificence to the column and now not the row.
Now we’re in a position so as to add the customized CSS. Open the web page settings and upload the next CSS:
/** This types the slider button **/

.slider-button {
  top: 50px;
  overflow:hidden;
  border:2px forged #0c71c3;
}

.slider-button .et_pb_button {
  show:block;
  margin: 0 !vital;
}

.slider-button:hover .top-button {
  margin-top: -48px !vital;
}
This CSS will handiest paintings with the button on the default length. It is because we need to give the column a hard and fast top with a view to conceal the second one button till hover. At this time the column top (with the category “slider-button”) is given a top of 50px. This accounts for the 2px border given to the column as neatly. On hover, the highest button (with the category “top-button” is moved up out of view with a peak margin of -48px (the peak of the button minus one of the crucial 2px borders). However, for those who trade the font-size or padding of the buttons, it is very important modify the peak of the slider-button magnificence at the side of the highest button margin accordingly.
This is the overall consequence.
Don’t put out of your mind that you’ll be able to taste the buttons with other textual content/knowledge and icons to your personal use. This can be a nice technique to teach customers with more information in a singular name to motion.
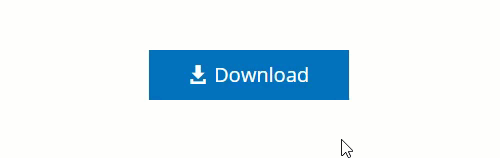
FREE Obtain: Get the Premade Structure and CSS document for This Instructional
If you wish to get a leap get started on what those microinteractions will seem like for your site, you’ll be able to obtain the zip document beneath. If you obtain the zip document, find the document for your arduous force. It’ll be referred to as “microinteraction-examples.zip”. While you unzip the document, you are going to see two recordsdata. The document named “microinteraction-examples.json” is the Divi format. It’ll want to be uploaded in your Divi Library. You’ll do that out of your WordPress Dashboard by way of navigating to Divi > Divi Library after which clicking the import button on the peak of the web page. The document named “microinteractions.css” accommodates the Customized CSS used within the instructional. This CSS will want to be copied into the web page settings customized CSS or into the Theme Customizer Further CSS field. You’ll additionally use Divi’s drag and drop characteristic to tug the microinteractions.css document at once into the Divi Builder as soon as your format has been loaded. This may increasingly mechanically upload the css in your web page settings.
@media handiest display and ( max-width: 767px ) {.et_bloom .et_bloom_optin_1 .carrot_edge.et_bloom_form_right .et_bloom_form_content:earlier than, .et_bloom .et_bloom_optin_1 .carrot_edge.et_bloom_form_left .et_bloom_form_content:earlier than { border-top-color: #ffffff !vital; border-left-color: clear !vital; }
}.et_bloom .et_bloom_optin_1 .et_bloom_form_content button { background-color: #f92c8b !vital; } .et_bloom .et_bloom_optin_1 .et_bloom_form_content .et_bloom_fields i { shade: #f92c8b !vital; } .et_bloom .et_bloom_optin_1 .et_bloom_form_content .et_bloom_custom_field_radio i:earlier than { background: #f92c8b !vital; } .et_bloom .et_bloom_optin_1 .et_bloom_border_solid { border-color: #f7f9fb !vital } .et_bloom .et_bloom_optin_1 .et_bloom_form_content button { background-color: #f92c8b !vital; } .et_bloom .et_bloom_optin_1 .et_bloom_form_container h2, .et_bloom .et_bloom_optin_1 .et_bloom_form_container h2 span, .et_bloom .et_bloom_optin_1 .et_bloom_form_container h2 sturdy { font-family: “Open Sans”, Helvetica, Arial, Lucida, sans-serif; }.et_bloom .et_bloom_optin_1 .et_bloom_form_container p, .et_bloom .et_bloom_optin_1 .et_bloom_form_container p span, .et_bloom .et_bloom_optin_1 .et_bloom_form_container p sturdy, .et_bloom .et_bloom_optin_1 .et_bloom_form_container shape enter, .et_bloom .et_bloom_optin_1 .et_bloom_form_container shape button span { font-family: “Open Sans”, Helvetica, Arial, Lucida, sans-serif; } p.et_bloom_popup_input { padding-bottom: 0 !vital;}

Obtain For Loose
Sign up for the Divi Newlsetter and we will be able to e-mail you a replica of without equal Divi Touchdown Web page Structure Pack, plus lots of alternative superb and loose Divi sources, guidelines and tips. Apply alongside and you are going to be a Divi grasp very quickly. In case you are already subscribed merely kind on your e-mail cope with beneath and click on obtain to get admission to the format pack.
You’ve got effectively subscribed. Please test your e-mail cope with to substantiate your subscription and get get admission to to loose weekly Divi format packs!
Ultimate Ideas
I’m hoping you in finding those microinteractions helpful. They’re easy to make use of with Divi (the use of handiest CSS) all over your web site. For sake of time and straightforwardness, I used the fundamental default types of modules, however be at liberty to regulate design choices as wanted for extra ingenious types. Additionally, don’t hesitate to regulate the CSS for those examples to suit your wishes or get a hold of one thing totally new.
I sit up for listening to from you within the feedback.
Cheers!
The submit 6 Microinteractions That Will Make Your Divi Site More Enjoyable (Tutorial + Free Download) gave the impression first on Elegant Themes Blog.
WordPress Web Design