Settling on which taste you wish to have your website online to observe may also be time-consuming. No longer a wonder should you believe all of the design types you’ll be able to observe. The manner you select will probably be a illustration of the entirety your website online stands for and also you maximum unquestionably need it to compare design developments in 2018. On this put up sequence, we’re going to discover a couple of of the preferred and handsome ones available in the market:
- Blank & Summary
- Minimum
- Flat
- Daring & Colourful
For every probably the most design types, we’re going to move over a couple of Divi ways that can make attaining that form of design so much more straightforward. We’ll get started off with the blank and summary design taste. We’ll proportion 8 ways you’ll be able to observe on your design parts the usage of Divi’s visible builder and afterwards, we’ll create two shocking examples from scratch!
Let’s get to it!
Contents
- 1 1. Keep away from Colourful Primary Phase Background Colours
- 2 2. Use Refined Row Development Backgrounds As an alternative
- 3 3. Damage the Development with White Module Background Colours
- 4 4. Create Distinction with Font Sizes
- 5 5. Use Letter Spacing for Magnificence
- 6 6. Use Gradient CTAs, Dividers & Empty Sections for Summary Functions
- 7 7. Create Intensity with Refined Field Shadows
- 8 8. Overlap Design Parts with Detrimental Margin
- 9 Preview
- 10 Let’s Get started Growing!
- 10.1 Normal Steps
- 10.2 Instance #1: Further Steps
- 10.3 Instance #2: Further Steps
- 10.3.1 Alternate Spacing of Textual content Module #1
- 10.3.2 Alternate Spacing of Textual content Module #2
- 10.3.3 Alternate Button Textual content Colour
- 10.3.4 Take away Button Gradient Background
- 10.3.5 Upload Button Background Colour
- 10.3.6 Upload New Phase
- 10.3.7 Upload New Row
- 10.3.8 Upload Divider Module
- 11 Preview
- 12 Ultimate Ideas
1. Keep away from Colourful Primary Phase Background Colours
Typically, the time period ‘blank’ way numerous ‘white’ as smartly. That doesn’t imply you must steer clear of colours on the whole, however averting colours in the primary structural parts of your website online (corresponding to sections) can give a contribution so much to giving guests a blank affect.

2. Use Refined Row Development Backgrounds As an alternative
To scale back the white and blank really feel of your segment, you don’t essentially have to concentrate on your segment’s settings. You’ll simply create a refined and summary design the usage of row development background photographs, for example. It is going to handiest quilt the background of your row and can depart sufficient white area to care for that total blank and white feeling. The development background you utilize must include a white background coloration and handiest part of that white background must be coated with patterns. Remember to don’t upload any patterns to borders or corners. This permits your row and segment backgrounds to mix. Additional down this put up, within the section the place we’ll recreate the examples, you’ll be capable to save the development symbol and use it in your personal internet design initiatives!

3. Damage the Development with White Module Background Colours
The design hierarchy Divi comprises (segment → row → column → module) means that you can do the similar factor on your row development background. By means of the usage of a white background coloration for the modules of your selection, you’ll be able to override the row development background that your module takes up. This, together with a white segment background coloration, permits you to make modules and segment backgrounds merge whilst nonetheless retaining the row development background intact for different modules you’re the usage of.

4. Create Distinction with Font Sizes
The usage of a white segment background coloration way you’ll want to search placing parts in different places. One of the vital issues you’ll be able to do to attract consideration is growing distinction in font sizes. The larger the variation in measurement between your subtitle and major identify, for example, the extra your major identify will pop.

5. Use Letter Spacing for Magnificence
Identical to taking part in round with font sizes, the usage of additional letter spacing on other can deliver shocking effects. It is helping to reinforce the distinction between content material you’re sharing with no need to combine a multi-color palette to your design. Like font sizes, it attracts your customer’s consideration however differently than large font sizes do.

6. Use Gradient CTAs, Dividers & Empty Sections for Summary Functions
Otherwise to stability the blank and white design of your website online is by means of the usage of colours in an summary approach. The usage of gradient colours in your calls to motion, dividers and empty sections together with segment dividers are a few of the ones issues that’ll assist you to create shocking effects with out shedding that blank and white issue.


7. Create Intensity with Refined Field Shadows
Together with gradient and summary design parts to your internet design, a blank website online additionally calls for some intensity. No longer the ‘hard-to-miss’ roughly intensity however reasonably the delicate type that is helping you are taking it up a notch upper. Refined field shadows are characterised by means of a top blur energy together with a low unfold energy and a light-colored field shadow coloration that doesn’t draw all an excessive amount of consideration however reasonably empowers the opposite design parts in your website online.

8. Overlap Design Parts with Detrimental Margin
We’ve discussed the usage of gradient design parts corresponding to dividers and empty sections together with segment dividers. Those parts are already stunning however to help in making your design extra complicated (in a good approach) and summary, you’ll be able to simply use a detrimental best margin to make other design parts inside of your segment overlap. You’ll additionally alter this detrimental best margin consistent with how you wish to have it to seem on other display screen sizes, if it is desktop, pill or telephone.

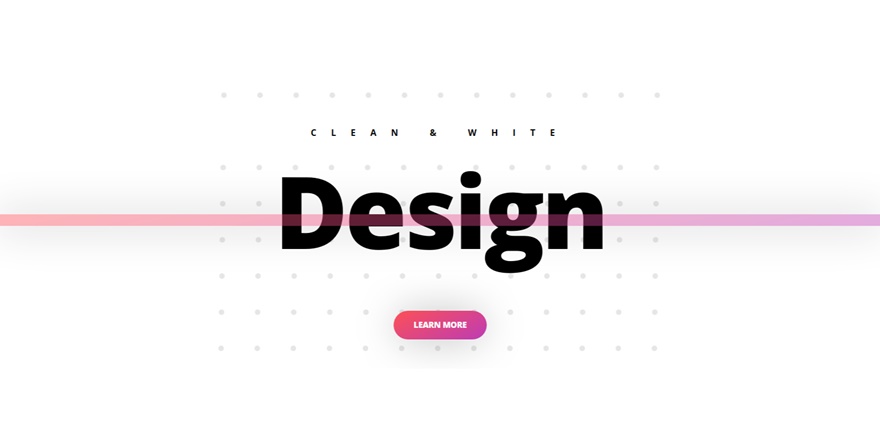
Preview
Now that we’ve long gone thru all of the Divi ways, it’s time to place them into follow. Let’s check out the design we’ll recreate on other display screen sizes whilst retaining the other ways in thoughts.

Let’s Get started Growing!
Normal Steps
Upload New Phase
We’re going to create two other examples. The examples are identical however range in design parts. To ease the method, we’re going to move in the course of the normal steps first and as soon as the ones are carried out, we’ll center of attention on every probably the most examples in my view. Get started by means of opening a brand new web page the usage of Divi’s Visible Builder and upload a brand new usual segment. This segment comprises, by means of default, a white background coloration and that’s the best way we’re going to stay it.
Upload New Row
Column Construction
Subsequent, upload a row on your segment containing one column.

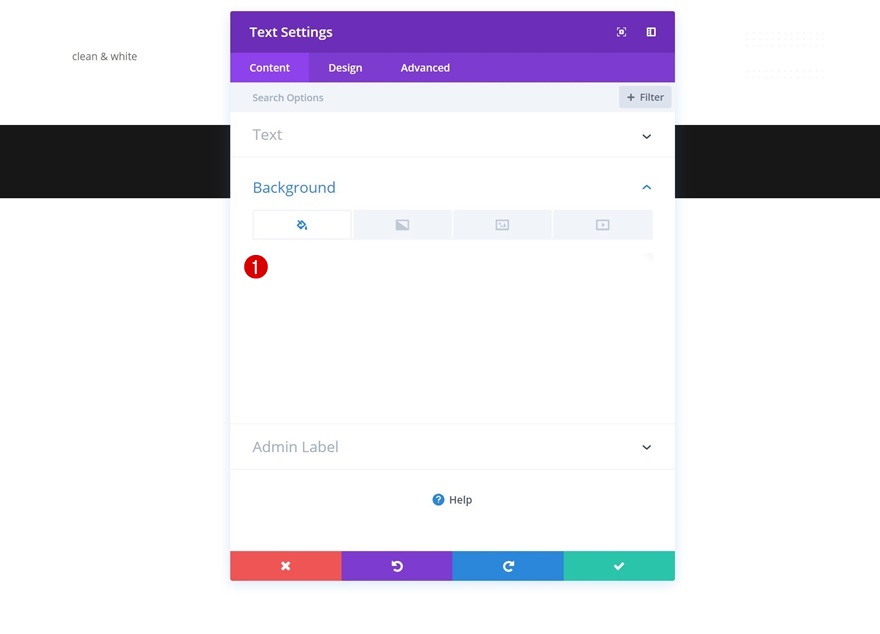
Background Symbol
As discussed in probably the most ways, you’ll be able to simply reinforce the white segment background by means of the usage of a development background in your row. Cross forward and save the picture under, add it and use it along side the next background symbol settings:
- Background Symbol Measurement: Are compatible
- Background Symbol Place: Heart
- Background Symbol Repeat: No Repeat


Sizing
Open the Sizing settings subsequent and allow the ‘Make This Row Fullwidth’ possibility.

Upload Textual content Module #1
Background Colour
Now, let’s get started including modules! We’ll get started with a subtitle and as discussed in method quantity 2, we’re going to wreck the development for this module the usage of a white background coloration.
Textual content Settings
Open your textual content settings subsequent and observe the next adjustments:
- Textual content Font Weight: Daring
- Textual content Font Taste: Uppercase
- Textual content Colour: #000000
- Textual content Measurement: 18px
- Textual content Letter Spacing: 29px (Pill), 25px (Pill), 18px (Telephone)
- Textual content Orientation: Heart


Spacing
To create some area between the start of the development and our Textual content Module, we’re going so as to add ‘100px’ to the highest margin of our Textual content Module.

Upload Textual content Module #2
Textual content Settings
Proper under the former Textual content Module, move forward and upload a brand new one containing the identify you wish to have to show. Open the textual content settings of your module and make the next adjustments:
- Textual content Font Weight: Extremely Daring
- Textual content Colour: #000000
- Textual content Measurement: 200px (Desktop), 130px (Pill), 100px (Telephone)
- Textual content Letter Spacing: -6px
- Textual content Line Top: 1em

Upload Button Module
Button Alignment
The 3rd and final module in our row is a Button Module. After including the replica, move to the Alignment settings and use middle Button Alignment.

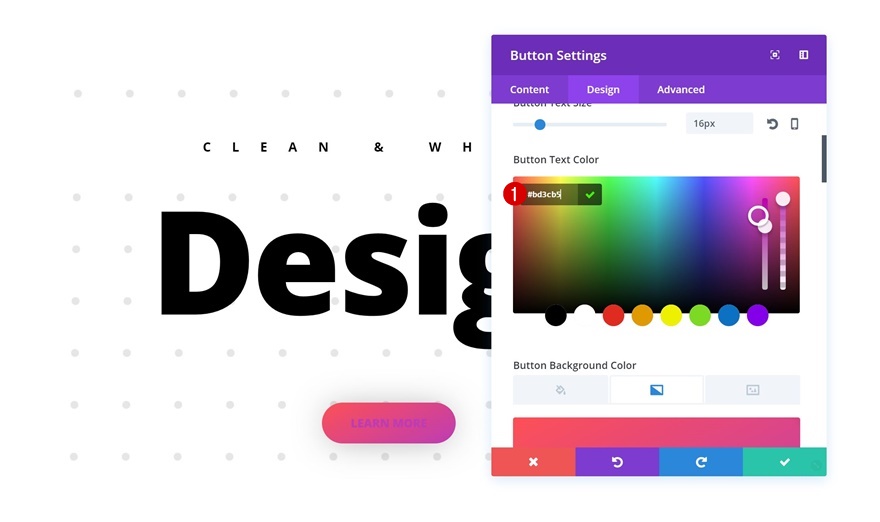
Button Settings
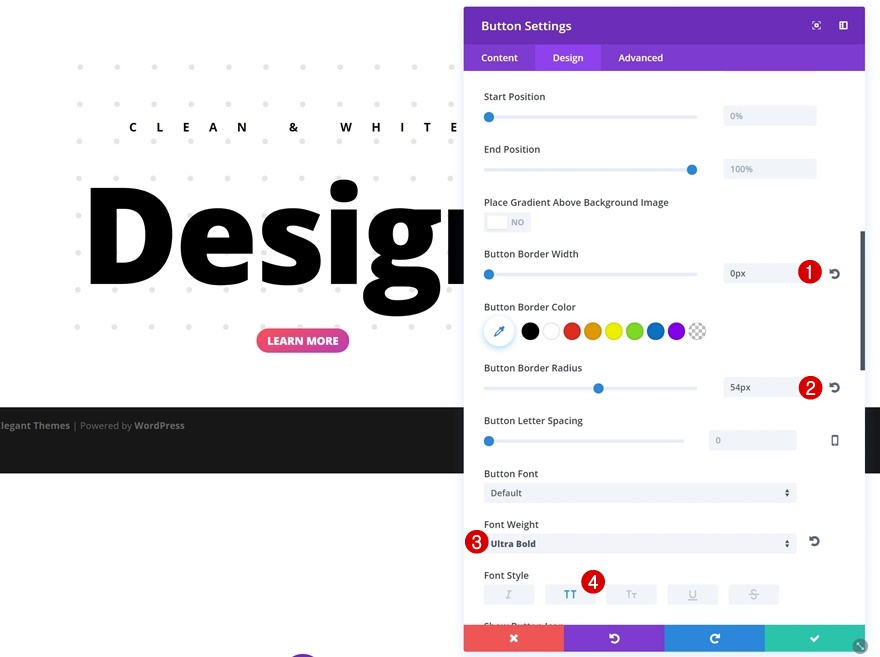
To modify the semblance of your button, open the Button settings and observe the next changes:
- Use Customized Kinds for Button: Sure
- Button Textual content Measurement: 16px
- Button Textual content Colour: #FFFFFF
- Gradient Colour #1: #fd5056
- Gradient Colour #2: #bd3cb5
- Gradient Path: 153deg
- Button Border Width: 0px
- Button Border Radius: 54px
- Font Weight: Extremely Daring
- Font Taste: Uppercase

Spacing
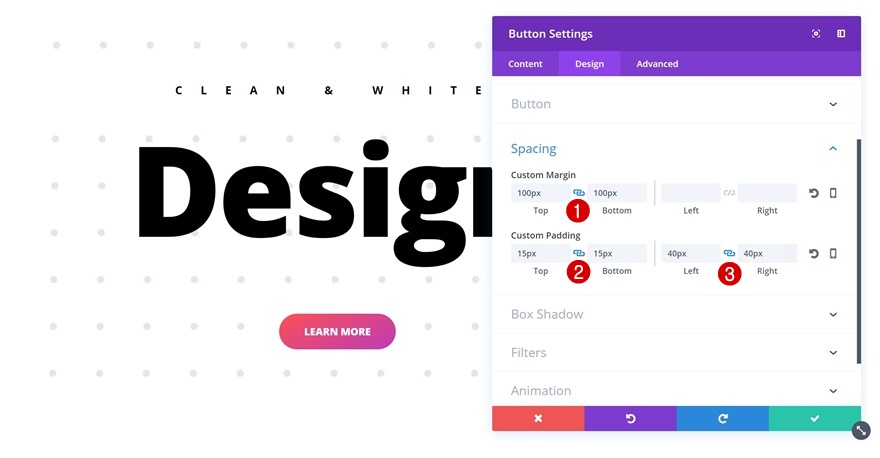
Giving your button sufficient padding is the most important a part of making a readable and engaging CTA. Open the Spacing settings of your button and observe the next customized margin and padding:
- Most sensible & Backside Margin: 100px
- Most sensible & Backside Padding: 15px
- Left & Proper Padding: 40px
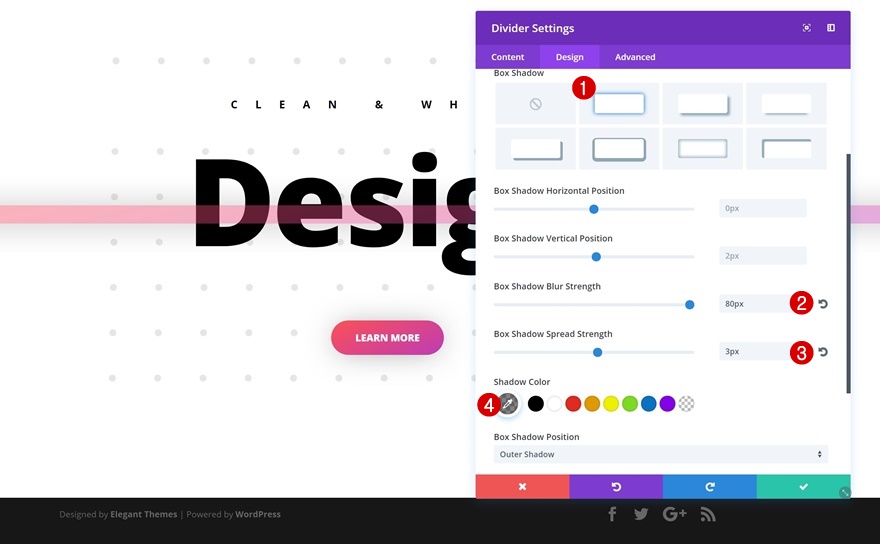
Field Shadow
Final however now not least, we’re going to create intensity (as discussed in method quantity 7) to create an interesting design:
- Field Shadow Blur Power: 80px
- Field Shadow Unfold Power: -7px
- Field Shadow Colour: rgba(0,0,0,0.34)

Instance #1: Further Steps
Upload New Row
Column Construction
Now that we’ve long gone in the course of the normal steps, let’s create the 2 other examples in my view. For the primary instance, get started by means of including a brand new row to the similar segment with the next column construction:

Sizing
Open the settings of your row and make allowance your row modules to take in all of the width of your display screen by means of the usage of the next Sizing settings:
- Make This Row Fullwidth: Sure
- Use Customized Gutter Width: Sure
- Gutter Width: 1

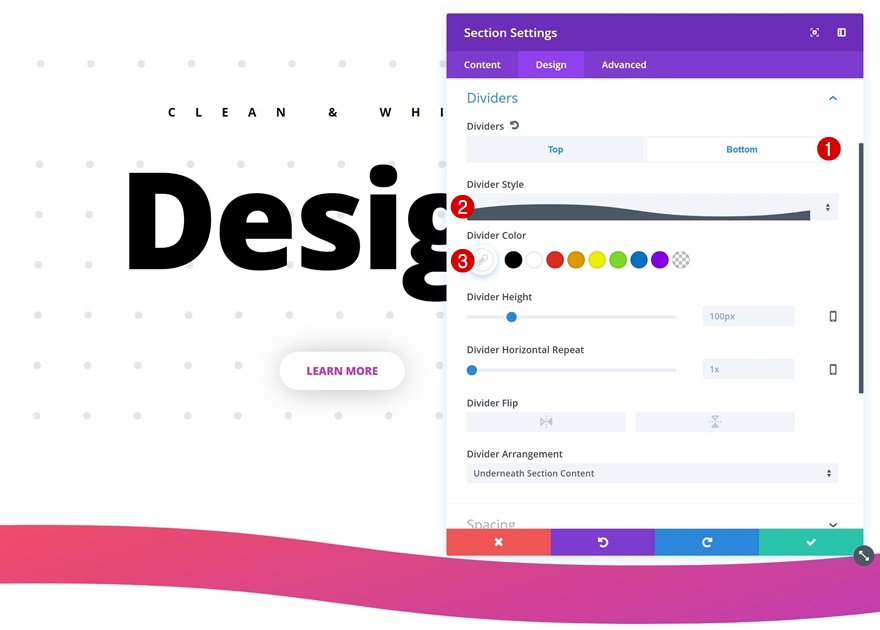
Upload Divider Module
Upload & Cover Divider
Upload a Divider Module on your row and disable the ‘Display Divider’ possibility within the Visibility settings of the Content material tab.


Gradient Background
We’ll use a gradient background for our divider as a substitute:
- Gradient Colour #1: #fd5056
- Gradient Colour #2: #bd3cb5
- Gradient Path: 168deg

Spacing
To make the Divider Module overlap our earlier row and its modules, we’re going to make use of ‘-400px’ for the highest margin.

Opacity
And to make the identify Textual content Module of our earlier row nonetheless display thru, we’re going to regulate the opacity throughout the Filters settings to ‘43%’.

Field Shadow
Final however now not least, we’ll observe a refined field shadow to reinforce the intensity of our design:
- Field Shadow Blur Power: 80px
- Field Shadow Unfold Power: 3px
- Field Shadow Colour: rgba(0,0,0,0.49)
Instance #2: Further Steps

Alternate Spacing of Textual content Module #1
For the second one instance, we’ll want to make some changes to our present modules beginning with the primary Textual content Module. Open its Spacing settings and upload the next customized margin:
- Backside Margin: 150px (Telephone)

Alternate Spacing of Textual content Module #2
Open the second one Textual content Module subsequent, and use the next Spacing settings:
- Backside Margin: 150px (Pill & Telephone)

Alternate Button Textual content Colour
Then, open the Button Module and alter its Textual content Colour into ‘#bd3cb5’.
Take away Button Gradient Background
Cross forward and take away the Gradient Background of your Button Module subsequent.

Upload Button Background Colour
And upload a white background coloration as a substitute.

Upload New Phase
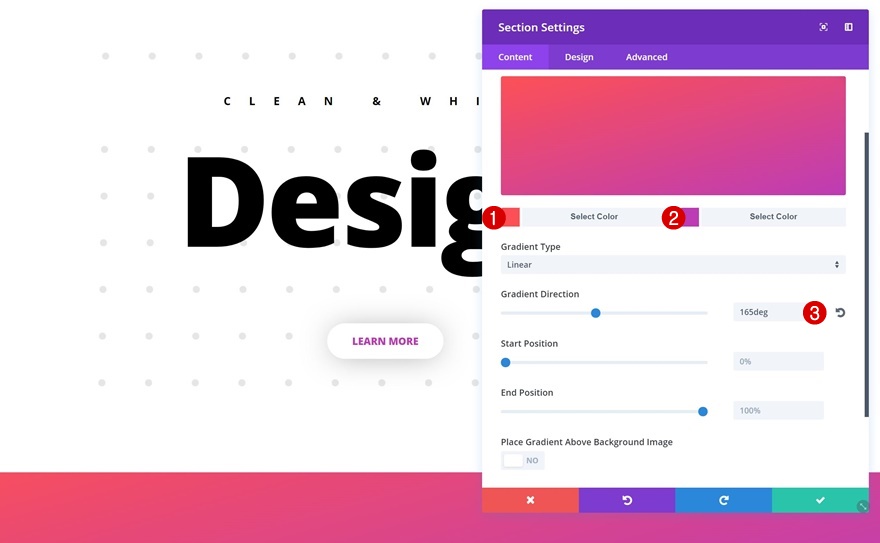
Gradient Background
While you’re carried out enhancing the prevailing modules, you’ll be able to move forward and upload a brand new segment under the prevailing one. Open the settings of your segment and use the next gradient background for it:
- Gradient Colour #1: #fd5056
- Gradient Colour #2: #bd3cb5
- Gradient Path: 165deg

Most sensible Divider
Proceed by means of including a best divider on your segment:
- Divider Taste: In finding in Checklist
- Divider Colour: #ffffff

Backside Divider
Use the similar settings for the ground divider.
Spacing
The very last thing you’ll want to do in your new segment is enhancing its Spacing settings:
- Most sensible Margin: -460px
- Backside Margin: 100px
- Most sensible & Backside Padding: 0px

Upload New Row
Column Construction
Now, to ensure our segment displays up on all display screen sizes, we’re going so as to add a row with an invisible Divider Module to it. Get started by means of including your row first:

Upload Divider Module
Cover Divider
Upload your Divider Module subsequent and be sure to disable the ‘Display Divider’ possibility throughout the Visibility settings and also you’re carried out!

Preview
Now that we’ve long gone thru all of the steps, let’s take a last have a look at the outcome on other display screen sizes.
Ultimate Ideas
On this put up, we’ve proven you some nice ways on how to reach a blank and summary website online taste. That is the primary put up of the sequence on how one can make stunning design types occur the usage of a few of Divi’s best integrated choices. Within the subsequent sequence, we’ll proportion ways on how to reach extra shocking design types. In case you have any questions or ideas, be sure to depart a remark segment under!
The put up 8 Techniques to Achieve Clean & Abstract Designs with Divi seemed first on Elegant Themes Blog.
WordPress Web Design