
Wish to upload a Stripe donate button for your WordPress web site? Stripe makes it easy to accept credit card payments, which is a handy means to your guests to donate for your web site.
Whilst there are many more full-featured donation plugins, we’re simply going to concentrate on developing a very easy Stripe donate button on this publish. To achieve this, we’ll percentage tutorials for 2 other unfastened plugins:
- WP Easy Pay: this plugin is just right if you wish to be offering a fastened donation quantity. However you wish to have to pay if you wish to have your guests in an effort to donate customized quantities. This one is the preferred Stripe bills plugin.
- Stripe Bills: this plugin allows you to settle for customized donation quantities without cost, which would possibly make it extra sexy if you happen to’re on the cheap and need to settle for customized donation quantities out of your guests.
We’ll get started off with a handy guide a rough instructional on create your Stripe account and in finding the API keys that you just’ll want to configure both plugin.
Then, we’ll dig into create a Stripe donate button with WP Easy Pay or Stripe Bills.
- How To Get Your Stripe API Keys
- How To Add A Stripe Donate Button With WP Simple Pay
- How To Add A Stripe Donate Button With Stripe Payments
Contents
How To Get Your Stripe API Keys
Regardless of which of the 2 plugins you select, you’ll want to input your Stripe API keys with a view to create your Stripe donate button.
Those API keys are what attach your WordPress web site to the Stripe cost processing provider. They’re very important, however they’re additionally simple to create with Stripe. So don’t fear!
Moderately than making an attempt to give an explanation for this within the step by step instructions for every plugin, we’ll simply provide an explanation for it as soon as now. That means, you’ll know precisely the place to search out your API keys whilst you configure both plugin.
Step 1: Create A Loose Stripe Account
To get began, you’ll want to join a unfastened Stripe account. There’s no difficult data – you simply want to input your electronic mail, title, and password (although it is very important supply additional info to start out accepting bills for actual).
To do this, head here.
Step 2: In finding API Keys
To search out your API keys, go here.
Be aware of the adaptation between take a look at API keys and are living API keys:
- Check API keys let you safely take a look at your donate button with out sending any actual cost main points.
- Reside API keys are for whilst you in fact need to get started accepting bills for actual.
You’ll toggle between them via clicking the toggle button, and each plugins will come with containers to assist you to input each your take a look at and are living keys, in addition to a surroundings that allows you to transfer between take a look at and are living modes:
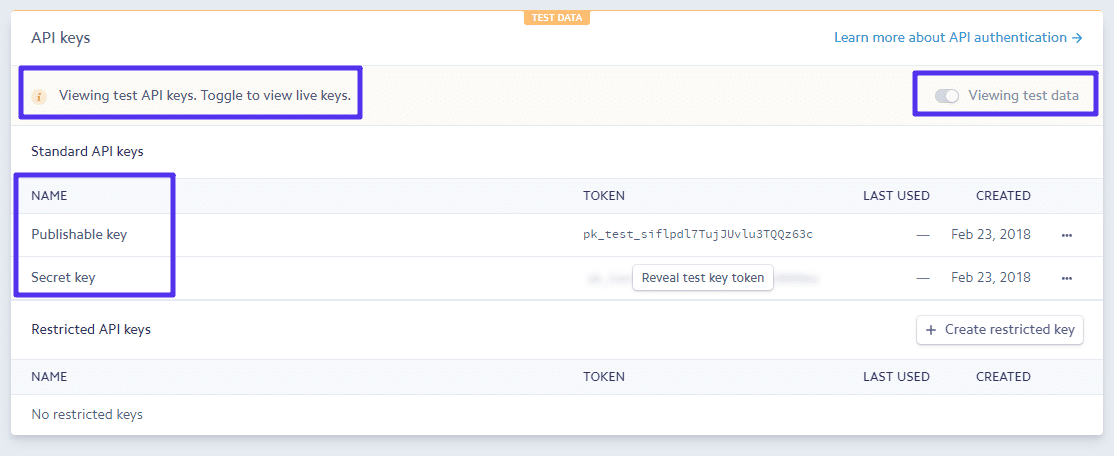
Your Stripe API keys
Stay those keys to hand, since you’ll want them to configure both plugin.
How To Upload A Stripe Donate Button With WP Easy Pay
To get began, set up and turn on the unfastened WP Simple Pay plugin from WordPress.org.
Then, right here’s arrange your donate button…
Step 1: Input API Keys
To get began, cross to Easy Pay Lite → Settings and input your take a look at and are living API keys. Be sure that Check Mode remains Enabled for now:
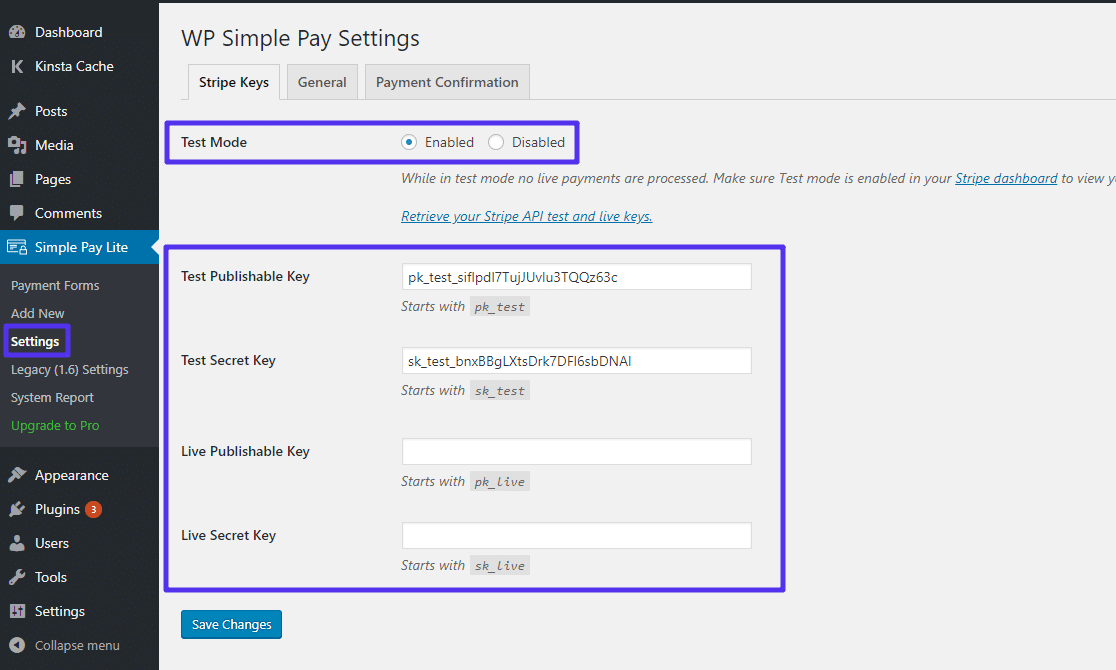
Input API keys and ensure Check Mode is enabled
Step 2: Configure Foreign money (Default Is USD)
Through default, WP Easy Pay makes use of USD because the foreign money to your donate button. If you wish to use a special foreign money, you’ll exchange it via going to the Basic settings tab:
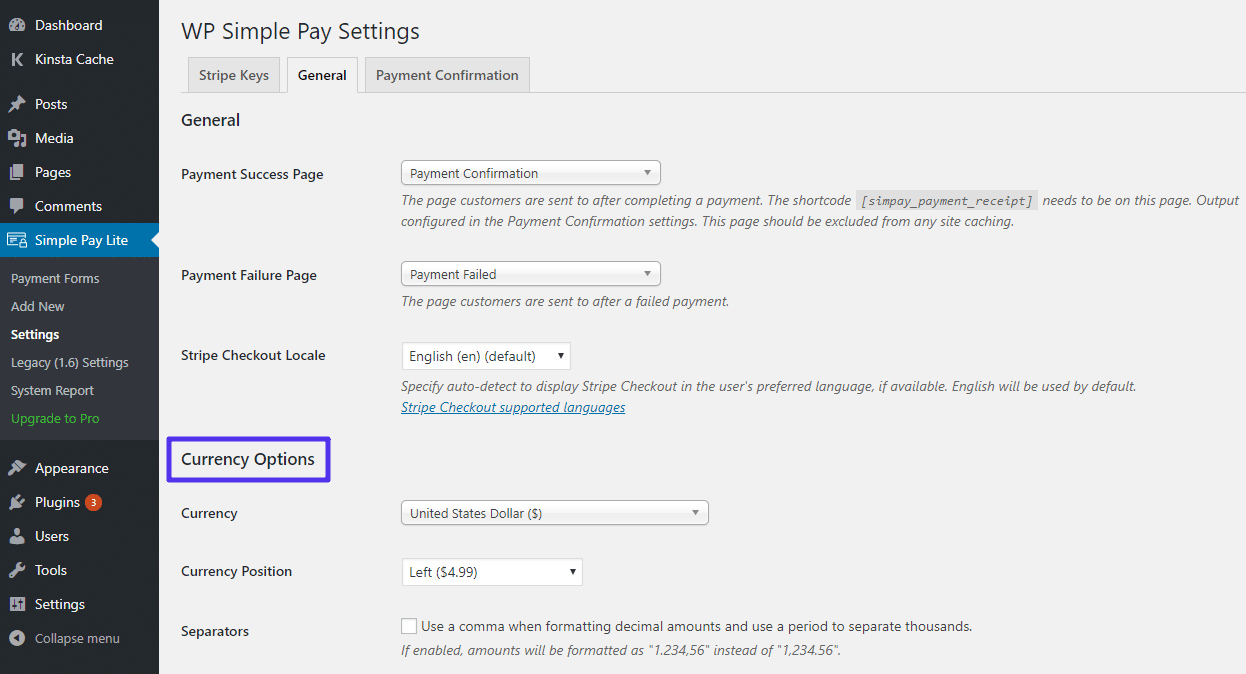
The best way to exchange the foreign money
Step 3: Create New Fee Shape
A Fee Shape is largely a particular donate button that you wish to have to make use of. To create one, cross to Easy Pay Lite → Upload New.
Within the Fee Choices tab, input the quantity that you wish to have guests in an effort to donate (if you wish to have guests in an effort to donate their very own customized quantity, you’ll need the paid version of the plugin):
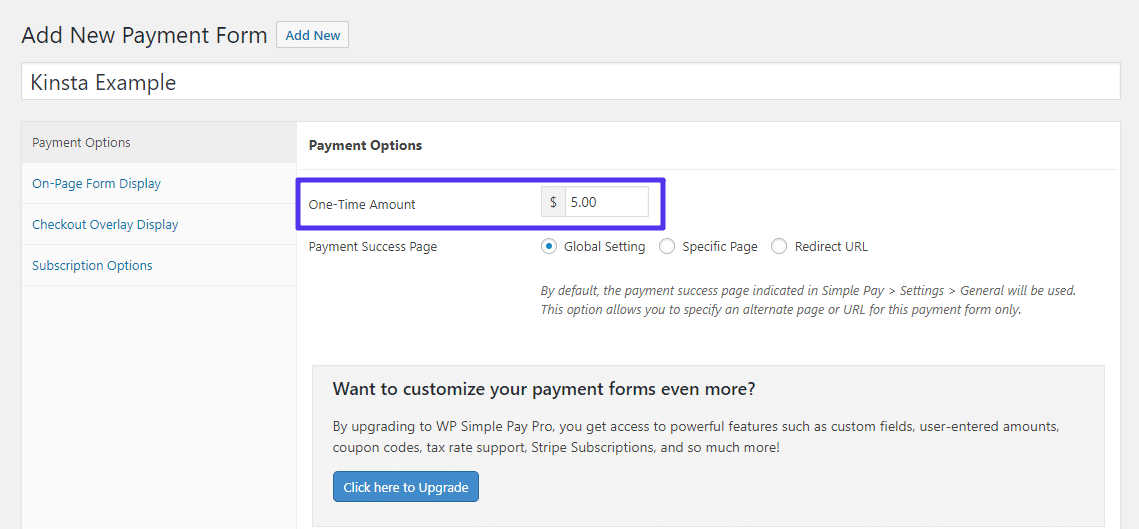
Input the fastened donation quantity
That’s all you technically want to do. However to provide a extra customized shape, you’ll exchange the textual content that shows in your shape within the On-Web page Shape Show and Checkout Overlay Show tabs.
As an example, within the On-Web page Shape Show house, you’ll exchange the textual content in order that the button reads “Donate With Card” as an alternative of “Pay With Card”:

Alternate donate button textual content
If you’re performed, click on Create to post your shape.
To show your shape at the front-end of your web site, you’ll want to upload the shortcode to the publish, web page, or textual content widget the place you wish to have it to show:
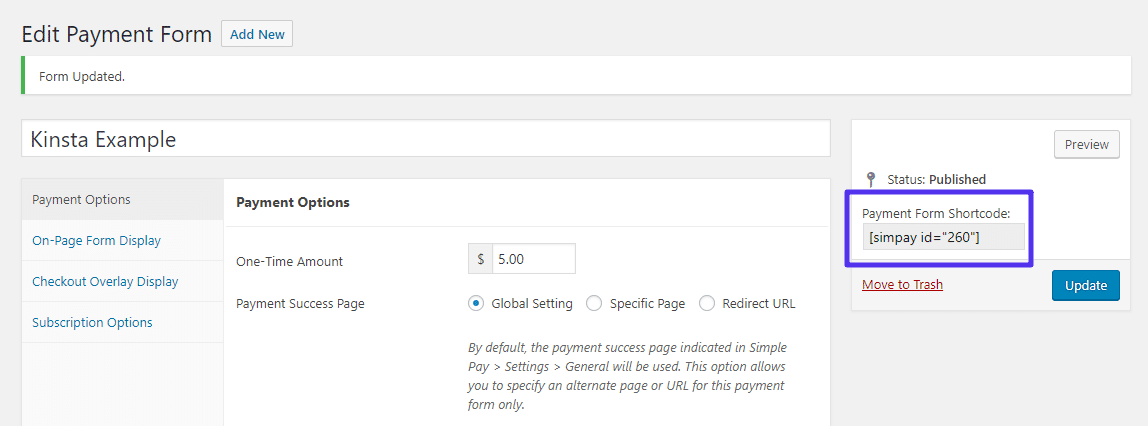
The WP Easy Pay shortcode
Step 4: Check Your Shape Then Permit Reside Mode
As a result of you could have take a look at mode enabled, you’ll take a look at your shape via getting into some test data:
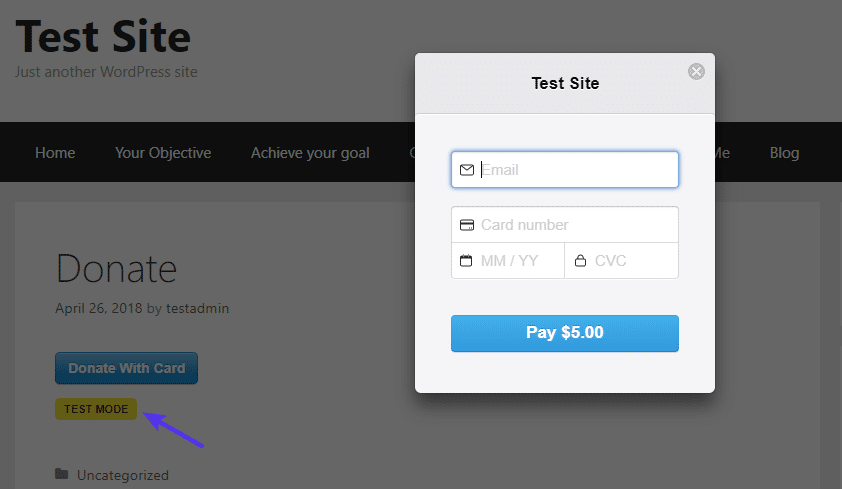
Instance of the donate button
If you’re proud of how the whole thing is functioning, you’ll allow Reside mode to start out accepting actual bills via going to Easy Pay Lite → Settings and disabling Check Mode:
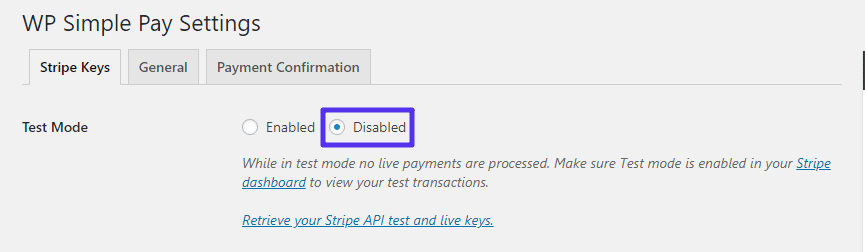
The best way to disable take a look at mode
And if you wish to edit the web page that customers see when they publish a cost, you simply want to edit the Fee Affirmation web page that WP Easy Pay created.
How To Upload A Stripe Donate Button With Stripe Bills
Whilst Stripe Payments isn’t as in style as WP Easy Pay, its merit is that you’ll settle for customized donation quantities with no need to pay for a top rate model.
Sign up for 20,000+ others who get our weekly e-newsletter with insider WordPress pointers!

If you’ve put in and activated it from WordPress.org, right here’s use it…
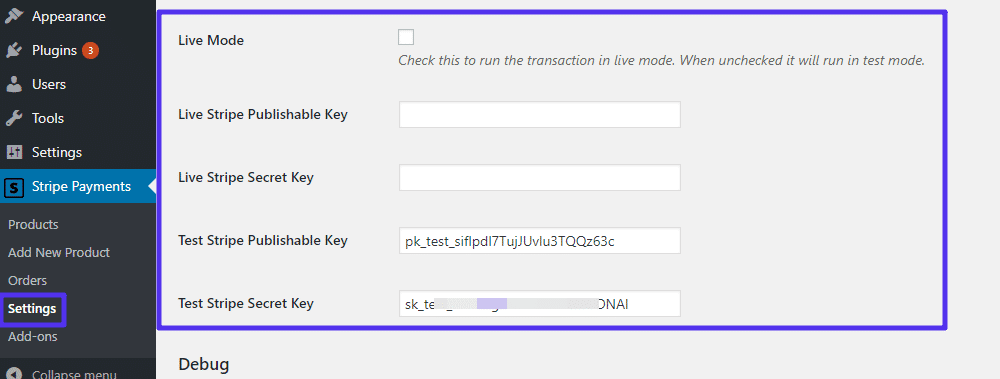
Step 1: Upload API Keys And Configure Elementary Settings
To get began, cross to Stripe Bills → Settings so as to add your API keys:
How to go into your API keys
Be sure that Reside Mode is now not checked for now.
You’ll additionally configure the foreign money to your donate button on this house, in addition to the button textual content. You’ll most probably need to exchange the Button Textual content box to one thing like “Donate”:

Configure foreign money and button textual content
Step 2: Upload A New Product
Subsequent, cross to Stripe Bills → Upload New Product. There are a large number of choices, however maximum of them are useless for a elementary donation button.
The sections that you just will have to configure are:
- Quick Description – this shows at the Stripe Fee window.
- Worth & Foreign money – depart the Worth clean if you wish to have guests in an effort to input a customized quantity.
- Thank You Web page URL – this permits you to redirect customers to a unique thanks web page when they donate.
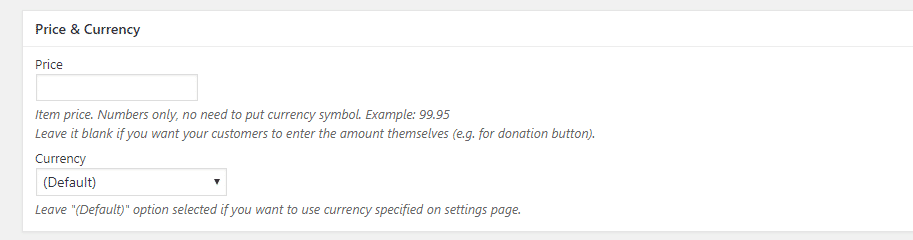
Make a choice fastened or customized donation quantity
If you’ve completed configuring issues, click on Post. Then, replica the shortcode from the ground of the editor and upload it to the publish, web page, or textual content widget the place you wish to have to show your Stripe donate button.
Step 3: Check Donation Button Then Pass Reside
Since you’re nonetheless in take a look at mode, you’ll safely take a look at out your donation button via getting into Stripe’s dummy data:
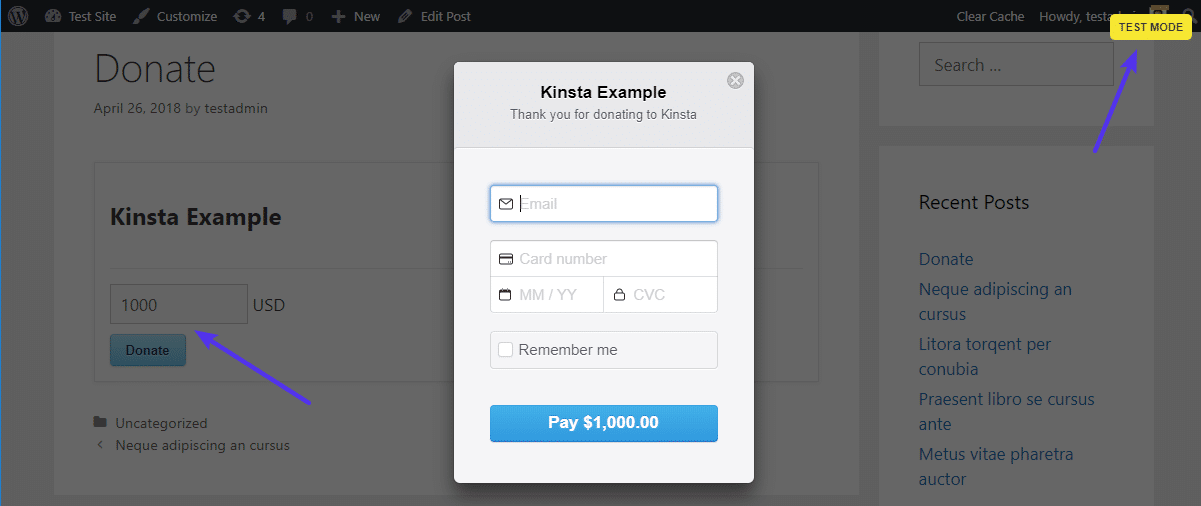
Instance of the customized donation quantity shape
If you’ve verified that the whole thing is operating correctly, you’ll allow actual bills via going to Stripe Bills → Settings and turning on Reside Mode:

The best way to disable take a look at mode
Abstract
Regardless of which plugin you select, including a Stripe donate button for your WordPress web site is somewhat easy and pain-free. Each plugins additionally permit you to create more than one buttons, so you’ll simply create other donate buttons for various makes use of.
In the event you’re now not proud of Stripe after developing your individual button, you’ll additionally imagine accepting donations by the use of PayPal or Bitcoin.
Have some other questions on including a donate button for your WordPress web site? Or want other capability that we didn’t quilt? Go away a remark and we’ll attempt to lend a hand out!
The publish How to Add a Stripe Donate Button in WordPress (2 Free Options) seemed first on Kinsta Managed WordPress Hosting.
WP Hosting