Tabs for sure come in useful for making necessary data to be had in a concise space of your web page. This reduces the desire for the person to scroll via lengthy web page content material. Divi’s tab module is straightforward to make use of and nice for toggling via easy content material on click on.
However on this instructional, I’m going to turn you the best way to convert whole Divi rows into hover tabs. I’ll additionally display you the best way to create each horizontal and vertical tabs as smartly. This will likely free up the facility of Divi to design whole row layouts with more than one modules for every tab content material space. No plugin wanted!
Let’s get began.
Contents
- 1 Sneak Peek
- 2 Obtain the Divi Rows Hover Tabs Structure for FREE
- 3 Obtain For Loose
- 4 You have got effectively subscribed. Please take a look at your electronic mail deal with to substantiate your subscription and get get admission to to unfastened weekly Divi format packs!
- 5 What You Wish to Get Began
- 6 Growing Horizontal Hover Tabs the usage of Divi Rows
- 6.1 Row Background, Padding, and Field Shadow
- 6.2 Including Content material to the Row
- 6.3 Growing the Tab
- 6.4 Segment Peak and Spacing
- 6.5 Growing the 2nd Row of Tab Content material
- 6.6 Including Opacity Clear out Hover Impact for the 2nd Row
- 6.7 Growing the 3rd Row of Tab Content material
- 6.8 Overlapping the Rows with Absolute Positioning
- 6.9 Converting the Order of the Rows on Hover with Z Index
- 6.10 Ultimate Outcome
- 7 Growing Vertical Hover Tabs
- 8 Ultimate Ideas
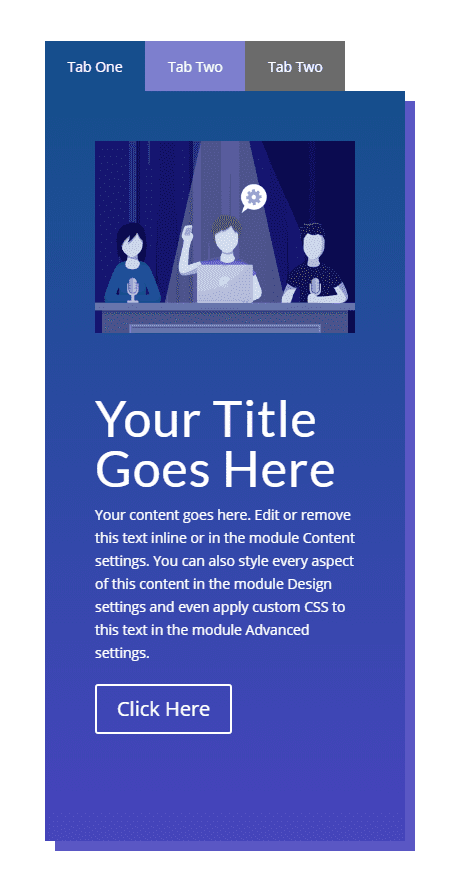
Sneak Peek
Here’s a fast have a look at the horizontal and vertical hover tabs we will be able to construct in combination on this instructional.

Obtain the Divi Rows Hover Tabs Structure for FREE
To put your palms at the designs from this instructional, you’re going to first want to obtain it the usage of the button beneath. To achieve get admission to to the obtain it is important to subscribe to our Divi Day-to-day electronic mail checklist by means of the usage of the shape beneath. As a brand new subscriber, you’re going to obtain much more Divi goodness and a unfastened Divi Structure pack each and every Monday! In case you’re already at the checklist, merely input your electronic mail deal with beneath and click on obtain. You are going to now not be “resubscribed” or obtain additional emails.
@media best display screen and ( max-width: 767px ) {.et_bloom .et_bloom_optin_1 .carrot_edge.et_bloom_form_right .et_bloom_form_content:ahead of, .et_bloom .et_bloom_optin_1 .carrot_edge.et_bloom_form_left .et_bloom_form_content:ahead of { border-top-color: #ffffff !necessary; border-left-color: clear !necessary; }
}.et_bloom .et_bloom_optin_1 .et_bloom_form_content button { background-color: #f92c8b !necessary; } .et_bloom .et_bloom_optin_1 .et_bloom_form_content .et_bloom_fields i { coloration: #f92c8b !necessary; } .et_bloom .et_bloom_optin_1 .et_bloom_form_content .et_bloom_custom_field_radio i:ahead of { background: #f92c8b !necessary; } .et_bloom .et_bloom_optin_1 .et_bloom_border_solid { border-color: #f7f9fb !necessary } .et_bloom .et_bloom_optin_1 .et_bloom_form_content button { background-color: #f92c8b !necessary; } .et_bloom .et_bloom_optin_1 .et_bloom_form_container h2, .et_bloom .et_bloom_optin_1 .et_bloom_form_container h2 span, .et_bloom .et_bloom_optin_1 .et_bloom_form_container h2 robust { font-family: “Open Sans”, Helvetica, Arial, Lucida, sans-serif; }.et_bloom .et_bloom_optin_1 .et_bloom_form_container p, .et_bloom .et_bloom_optin_1 .et_bloom_form_container p span, .et_bloom .et_bloom_optin_1 .et_bloom_form_container p robust, .et_bloom .et_bloom_optin_1 .et_bloom_form_container shape enter, .et_bloom .et_bloom_optin_1 .et_bloom_form_container shape button span { font-family: “Open Sans”, Helvetica, Arial, Lucida, sans-serif; } p.et_bloom_popup_input { padding-bottom: 0 !necessary;}

Obtain For Loose
Sign up for the Divi Newlsetter and we will be able to electronic mail you a replica of without equal Divi Touchdown Web page Structure Pack, plus heaps of alternative superb and unfastened Divi sources, guidelines and methods. Apply alongside and you’re going to be a Divi grasp very quickly. If you’re already subscribed merely sort to your electronic mail deal with beneath and click on obtain to get admission to the format pack.
You have got effectively subscribed. Please take a look at your electronic mail deal with to substantiate your subscription and get get admission to to unfastened weekly Divi format packs!
To import the format for your web page, merely extract the zip document and drag the json document into the Divi Builder.
Let’s get to the academic we could?
What You Wish to Get Began
To get began, it is important to have the next setup:
- The Divi Theme put in and lively
- A brand new web page created to construct from scratch at the entrance finish (visible builder)
- 3 photographs for use for mock content material
After that, you’re going to have a clean canvas to start out construction some hover tabs in Divi.
Growing Horizontal Hover Tabs the usage of Divi Rows
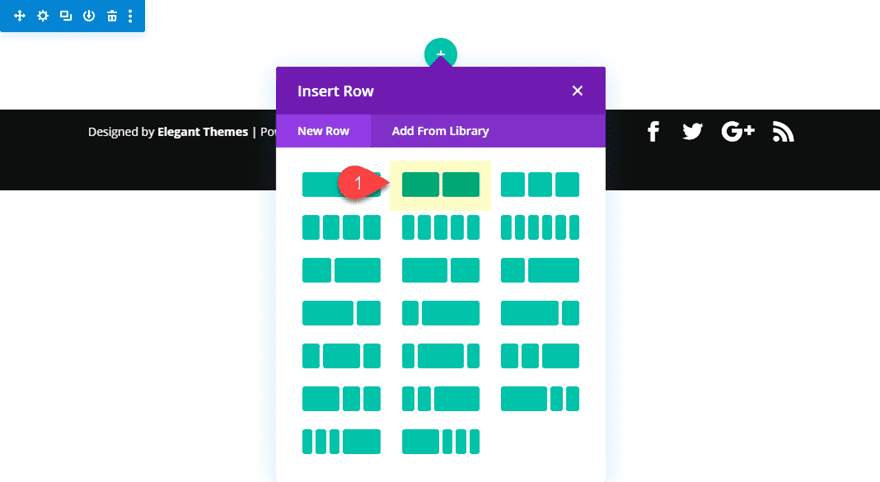
To get began, create a brand new common phase with a two-column row.
Row Background, Padding, and Field Shadow
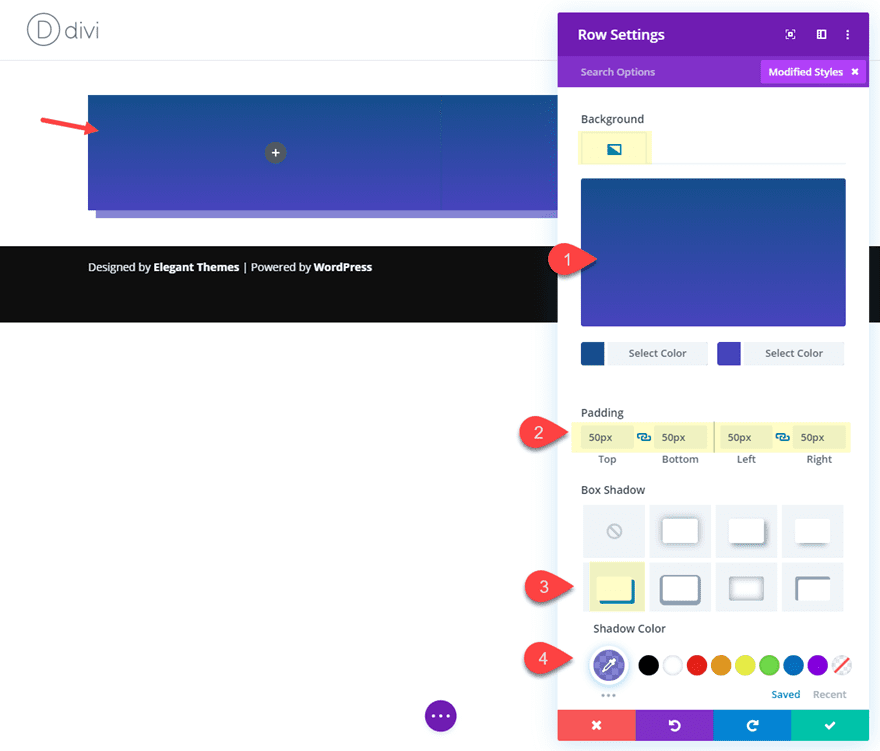
Prior to we upload our modules, let’s customise the row settings a little bit first. We will be able to want to come again to the row later to place it for our tab capability.
Open the row settings and replace the next:
Background Gradient Left Colour: #284f91
Background Gradient Proper Colour: #4646c4
Padding: 50px peak, 50px backside, 50px left, 50px proper
Field Shadow: see screenshot
Field Shadow Colour: rgba(70,70,196,0.66)
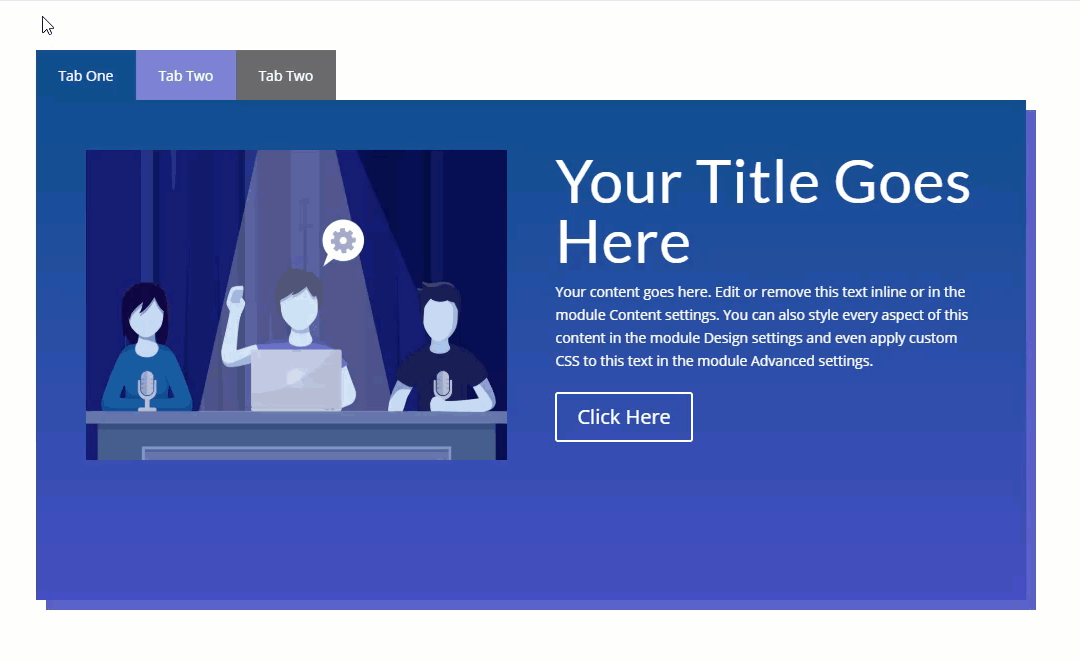
Including Content material to the Row
Now we’re going to upload some mock content material to our row. Remember you’ll be able to upload any mixture of columns and modules to your content material space.
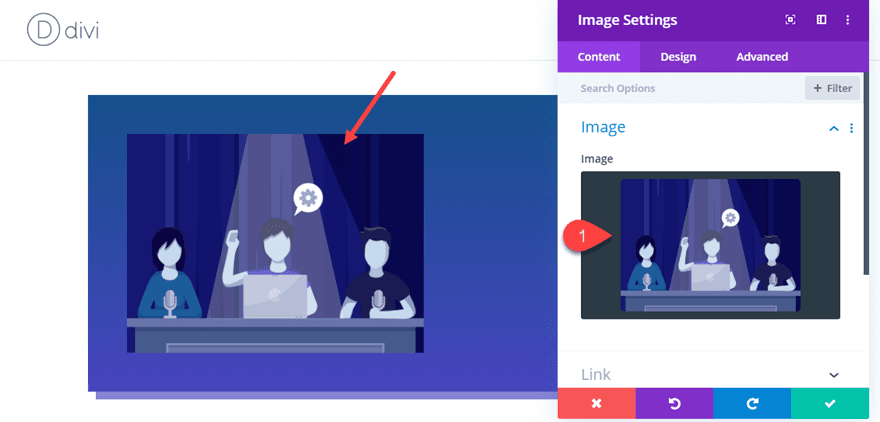
In column 1, upload a picture with a picture module. I’m the usage of one from the Design Conference Layout Pack.
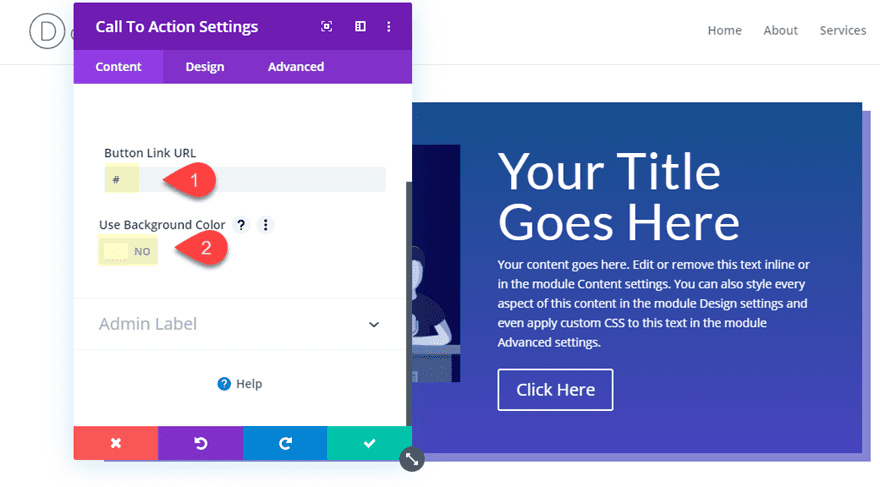
In the suitable column, upload a choice to motion module and replace the next:
Button Hyperlink URL: # (simply to show the button for now)
Use Background Colour: NO
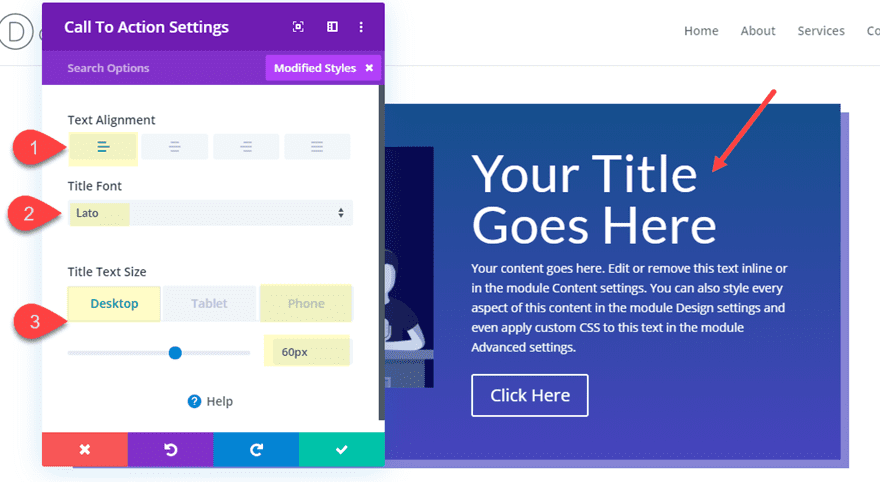
Textual content Alignment: left
Name Font: Lato
Name Textual content Measurement: 60px (desktop), 50px (telephone)
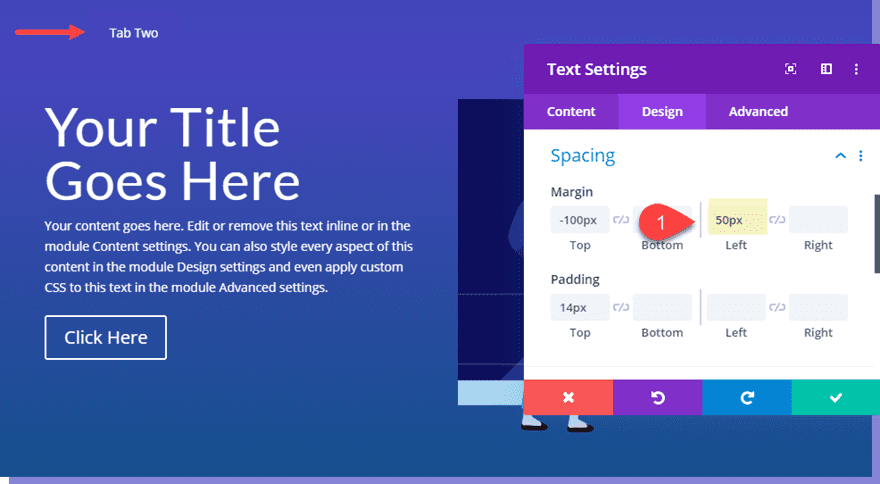
Growing the Tab
To create the true tab customers will hover over to show this row content material, we want to create a textual content module and place it on the peak proper with some customized CSS.
Pass forward and upload a brand new textual content module beneath the picture in column 1 and replace the next:
Content material: “Tab One”
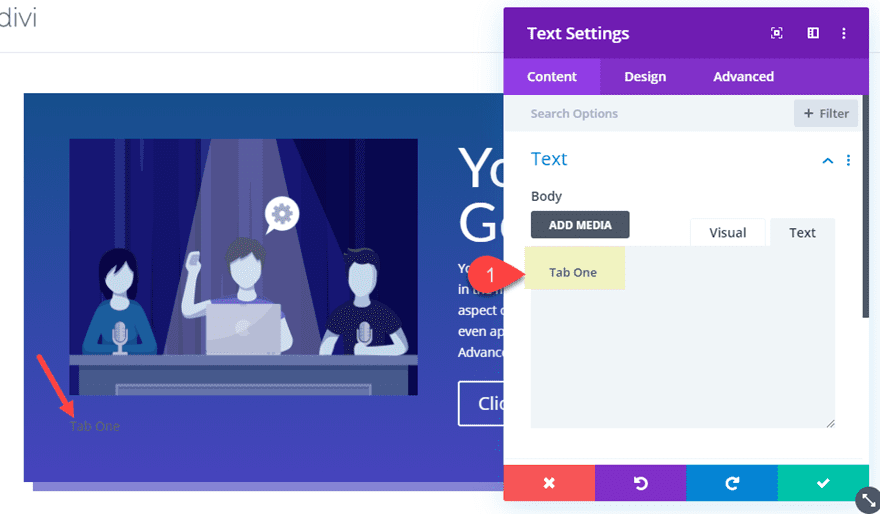
Background Colour: #284f91 (this will have to fit the left gradient coloration of the row)
Textual content Textual content Alignment: middle
Textual content Textual content Colour: #ffffff
Width: 100px
Peak: 50px
Margin: -100px peak, -50px left
Padding: 14px peak
After all, upload the next customized css to the primary component to provide it an absolute place on the peak of the row.
place: absolute !necessary;
peak: 0;
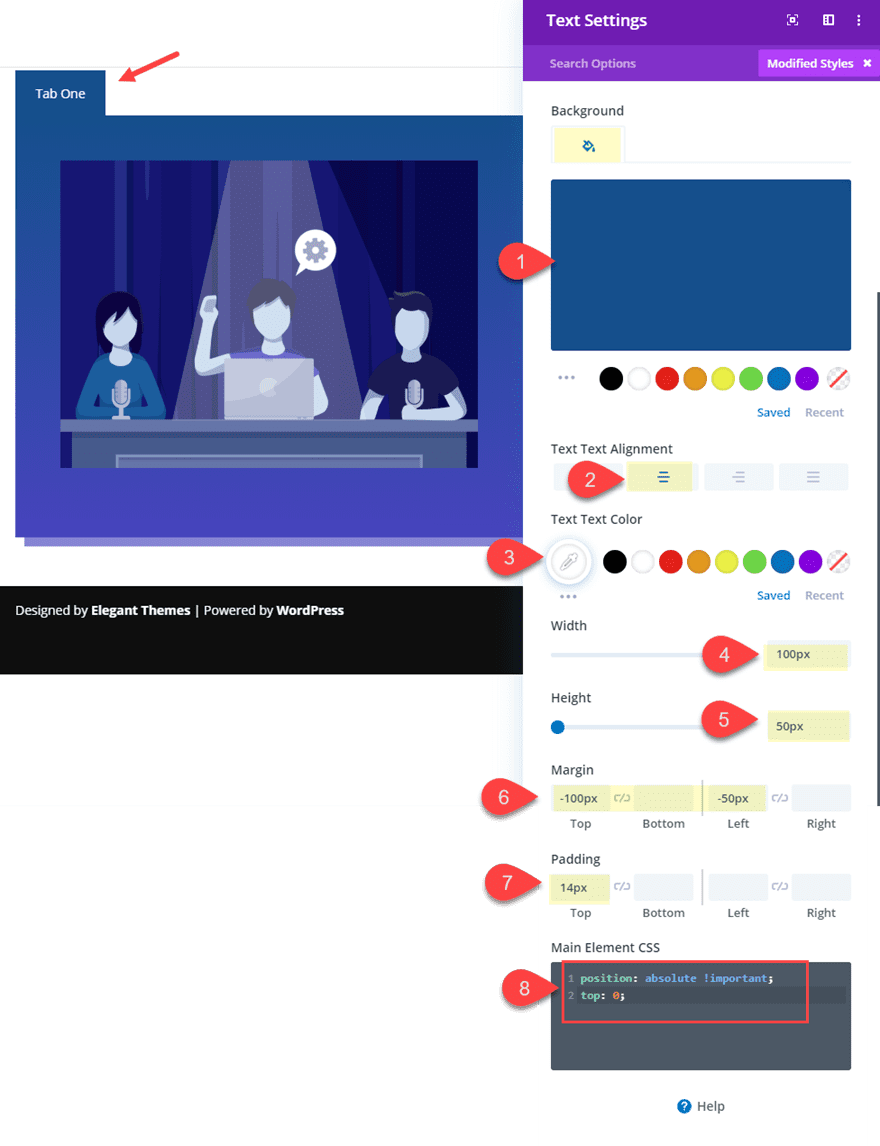
This css plus the customized margins we added will be certain the tab is situated precisely on the peak left of the row. It can be crucial that the tabs if truth be told take a seat above the row in order that the person can hover over it later.
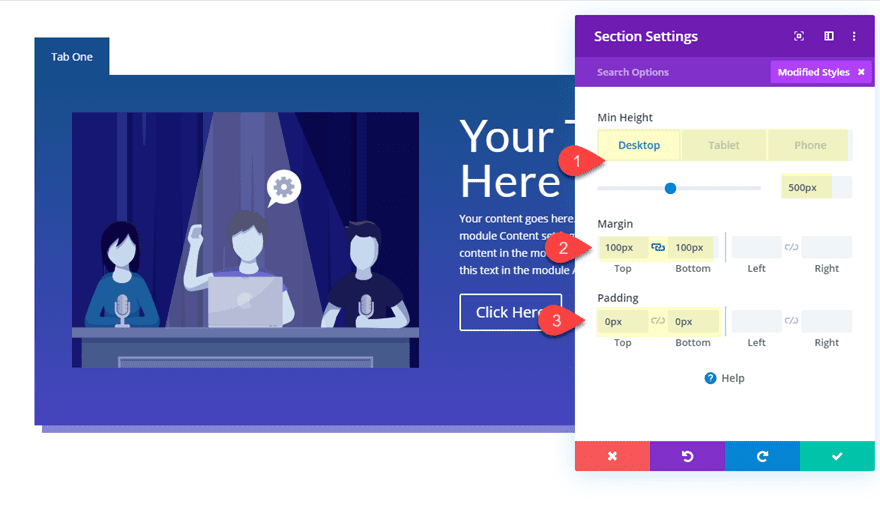
Segment Peak and Spacing
Now ahead of we proceed to create the rest rows and tabs, let’s give our rows a little bit respiring room by means of including some peak and backside margin to the phase. For this design, it can be crucial that we use margins to house out our phase as a result of we will be able to be giving our phase a collection peak as smartly. We want to give our phase a collection peak as a result of we wish our rows to span the entire peak of our phase. Which means that every of our rows (the tab content material) may have the similar peak of our phase. So it’s best that every of the rows have a equivalent quantity of content material or there can be undesirable adverse house in one of the crucial row tabs. This will have to make extra sense afterward.
For now, open the phase settings and replace the next:
Peak: 500px (desktop), 900px (pill), 750px (telephone)
Margin: 100px peak, 100px backside
Padding: 0px peak, 0px backside
Realize that the peak of the phase will want to be adjusted to account for the longer content material house when the row columns stack on cell. So there’ll want to be some tweaking to this peak to your personal wishes.
Now save your settings and let’s get again to including the ones extra rows.
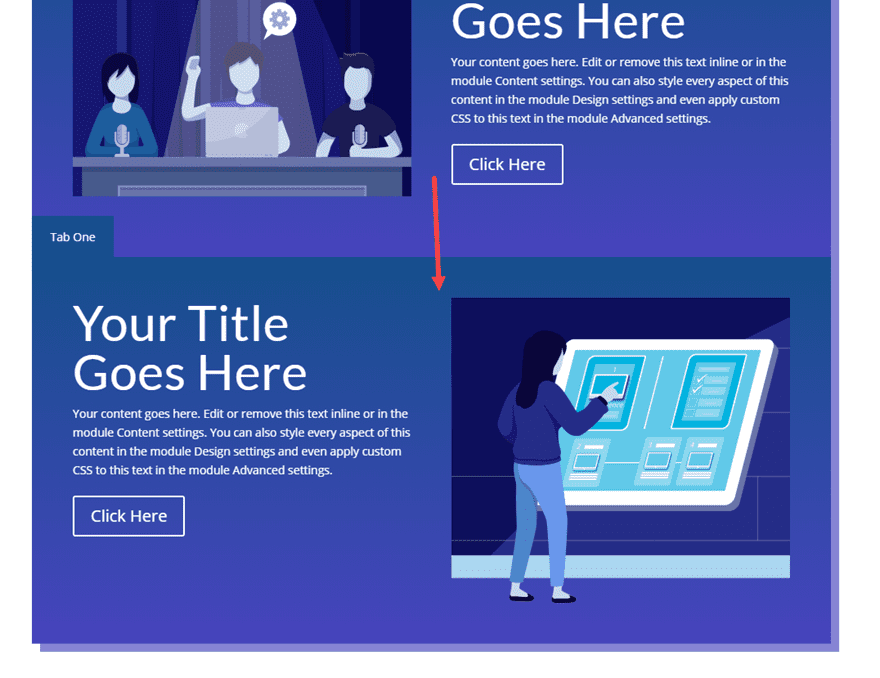
Growing the 2nd Row of Tab Content material
To create the second one row, replica the row you created previous. Transfer the textual content module to column 1 and the picture to column 2. Then replace the picture with a brand new one. This will likely permit you to get an concept of what other content material looks as if on every tab.
Open the settings of the second one row and turn the background gradient colours by means of soaring over the background preview space and click on the little “transfer” icon.
Then open the settings of the textual content module used to create the tab in column 1 and provides it a colour that fits the brand new peak gradient.
Background Colour: #4646c4

Then we want to transfer the tab over to the suitable in order that when this row overlaps the row above, you’ll be able to see the tab immediately to the suitable of the tab within the first row.
Margin: 50px Left
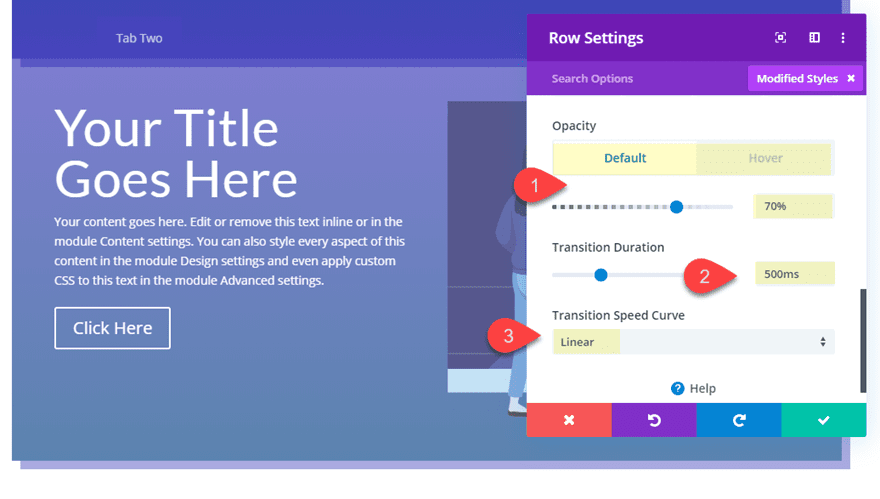
Including Opacity Clear out Hover Impact for the 2nd Row
For the row, we will upload an opacity clear out hover impact so that there’s a great hover transition when soaring over the tab and revealing the content material of the row.
Open the row settings and upload the next clear out:
Opacity: 70% (default), 100% (hover)
Then upload a transition length and velocity curve for the opacity clear out hover impact.
Transition Period: 500ms
Transition Pace Curve: Linear
Growing the 3rd Row of Tab Content material
Now we will upload our ultimate row of tab content material. To do that replica the second one row you simply created. Then transfer the textual content module to column 1 and the picture to column 2. And replace the picture module with a brand new symbol.
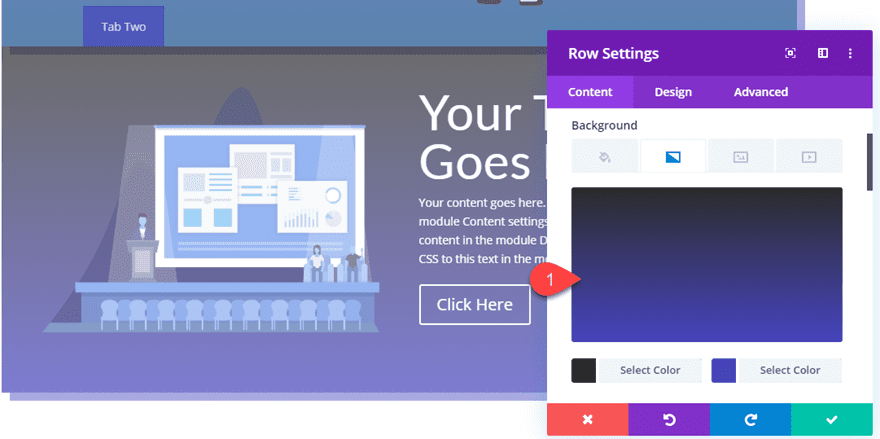
Replace the Row settings with a brand new background gradient.
Background Gradient Left Colour: #333333
Background Gradient Proper Colour: #4646c4
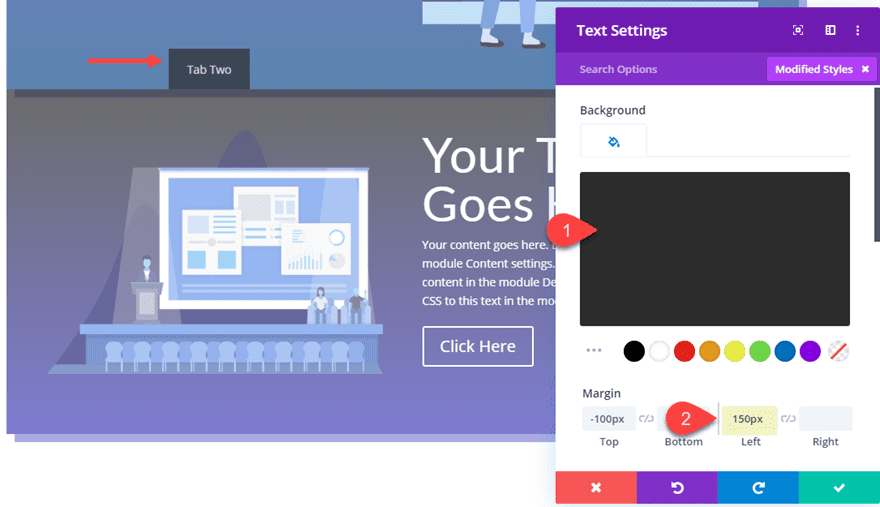
Subsequent open the atmosphere of the textual content module used to create the tab in column 1 and replace the colour and margin.
Background Colour: #333333
Margin: 150px left
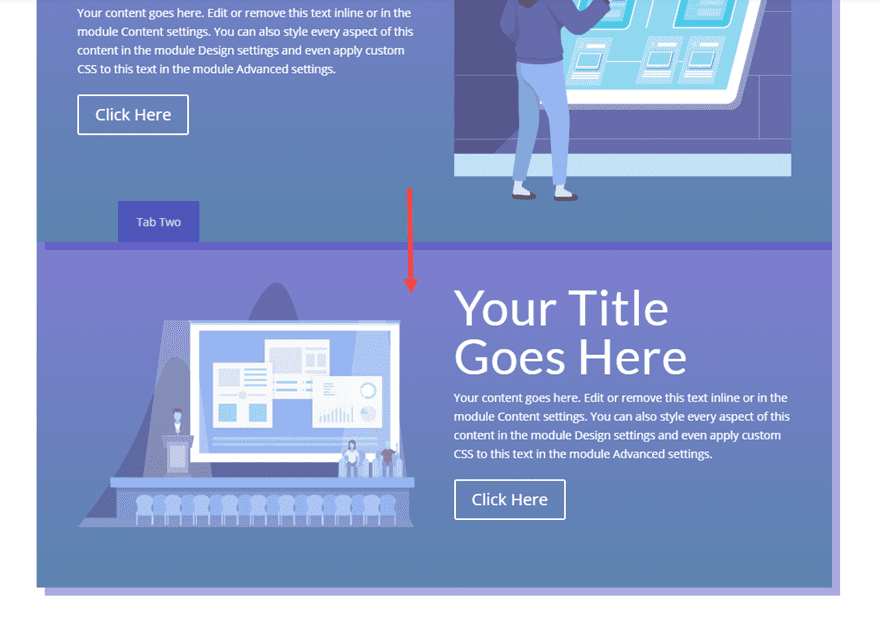
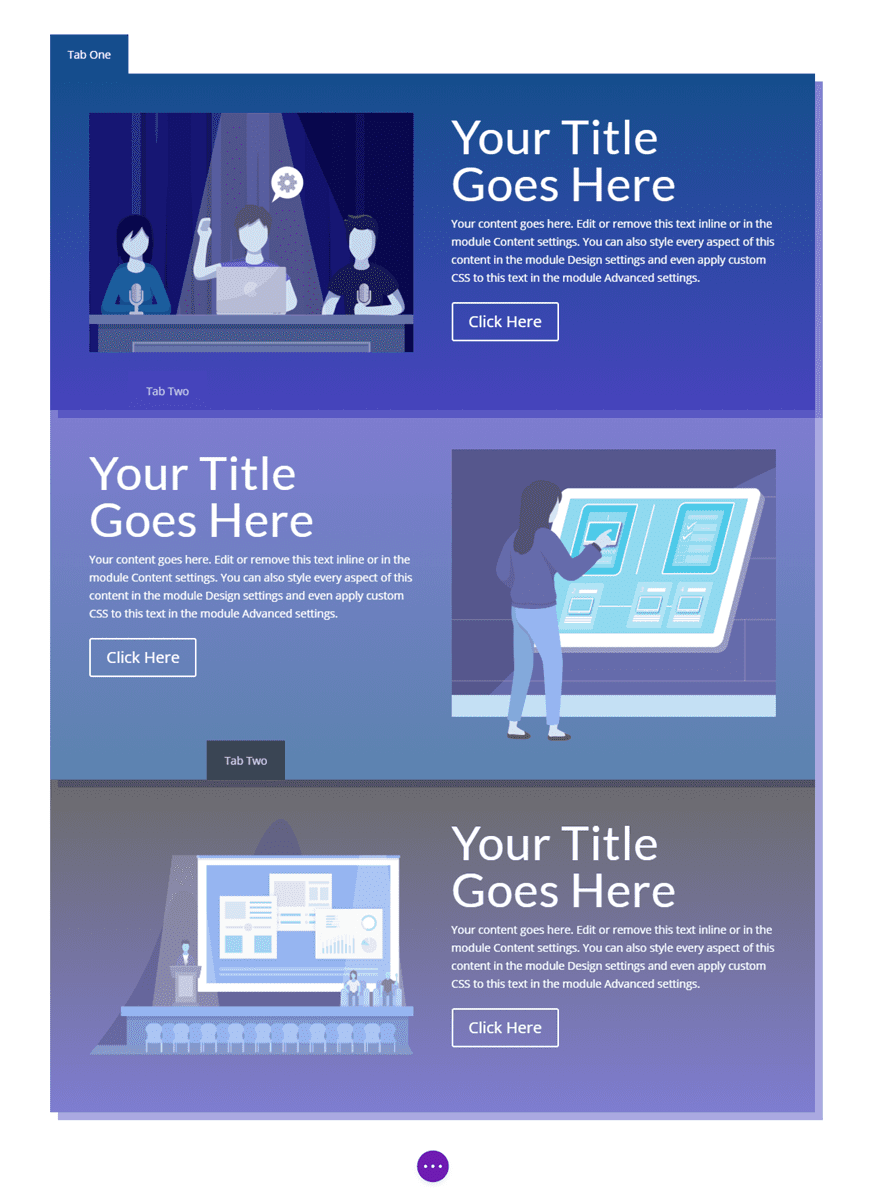
That is what your web page will have to appear to be ahead of we place our rows to overlap every different.
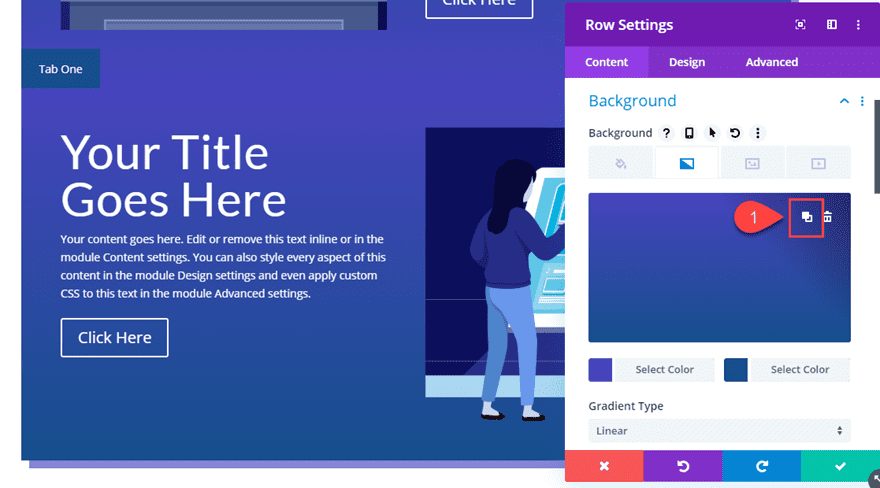
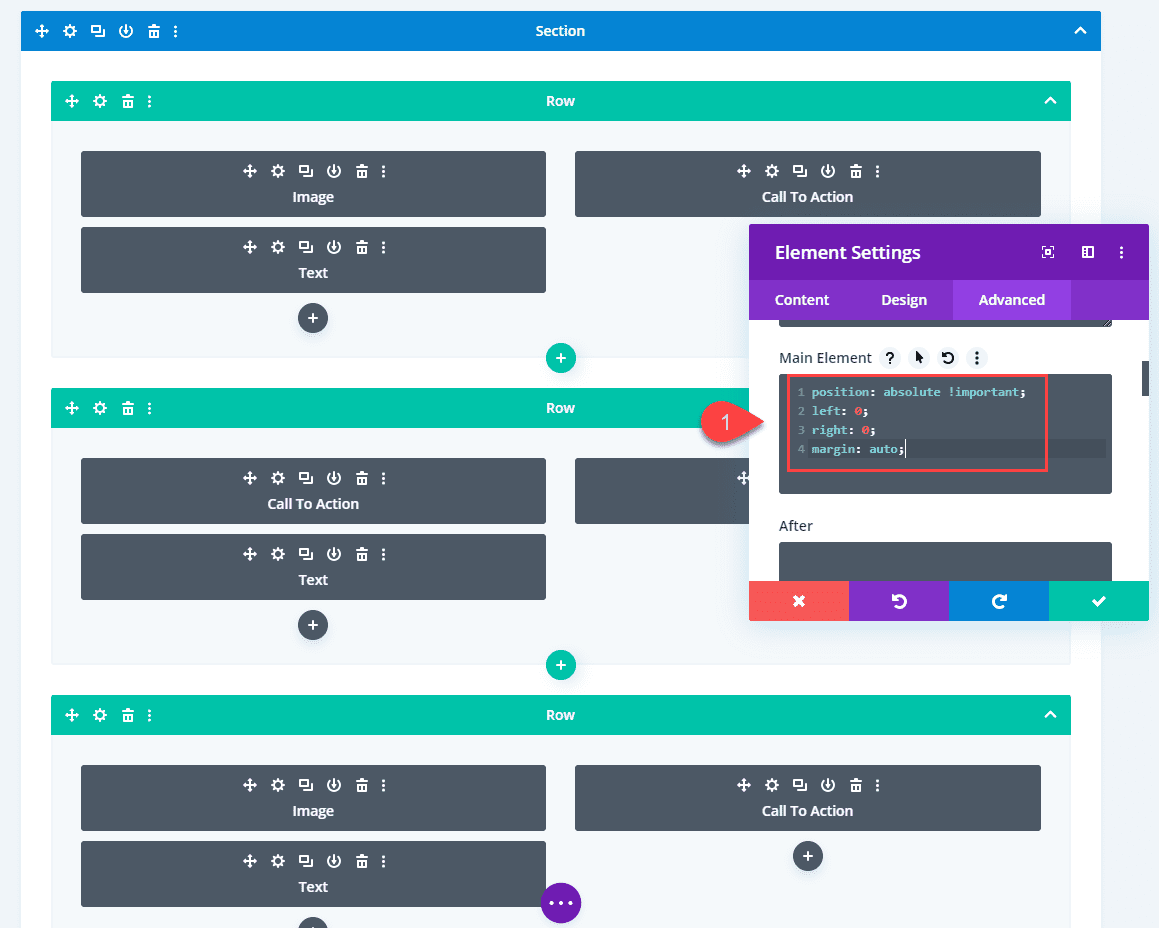
Overlapping the Rows with Absolute Positioning
To overlap our rows, we want to use absolute positioning. Then we will be able to use the Z index method to deliver every row to the leading edge when soaring over the tabs. However since we’re giving our rows an absolute place (and the mum or dad/phase has a collection peak), we will upload 100% peak to every of the rows in order that they span the entire peak of the phase.
Right here’s the best way to do it.
First, deploy wireframe mode. Then use multiselect to make a choice all 3 of the rows and open the settings of one among them to deploy the component settings modal. Then replace the peak to 100%.
Peak: 100%
This will likely set the peak for all 3 rows to 100%.
Then upload the next customized CSS to the Major Component:
place: absolute !necessary;
left: 0;
proper: 0;
margin: auto;
Now deploy desktop view mode to peer how the rows are overlapping properly to create our tabs.
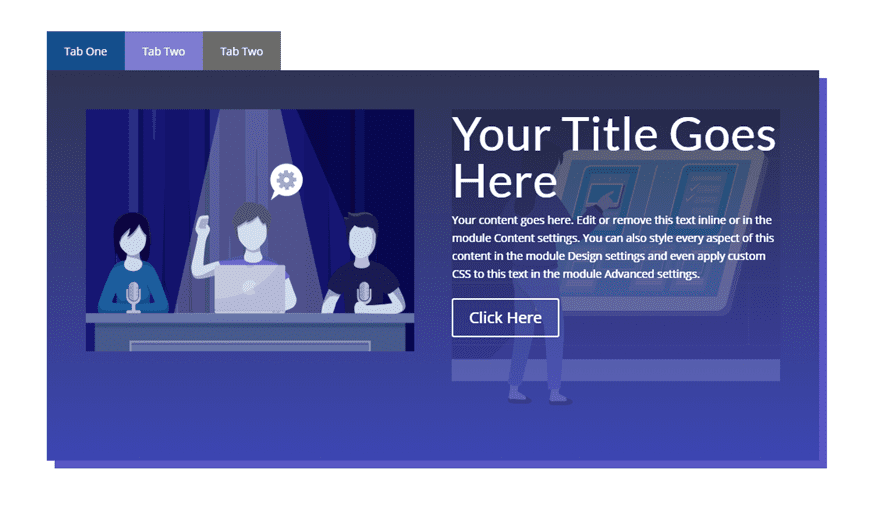
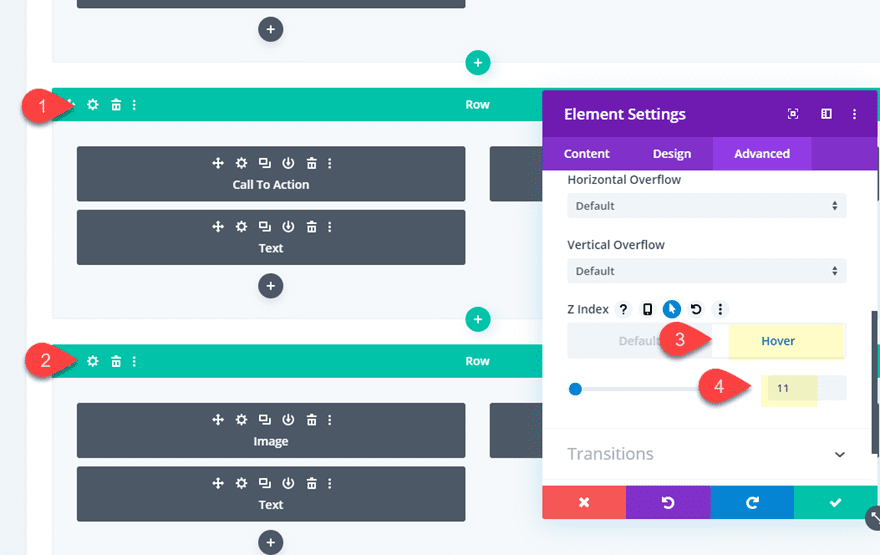
Converting the Order of the Rows on Hover with Z Index
Presently you’ll have spotted the 3rd row/tab is at the leading edge. So we want to reorder the rows the usage of Z Index in order that the primary tab presentations first till you hover over some other tab.
To do that, return to wireframe view mode and open the settings for the primary row you created (with tab one). Then replace the z index as follows:
Z Index: 10
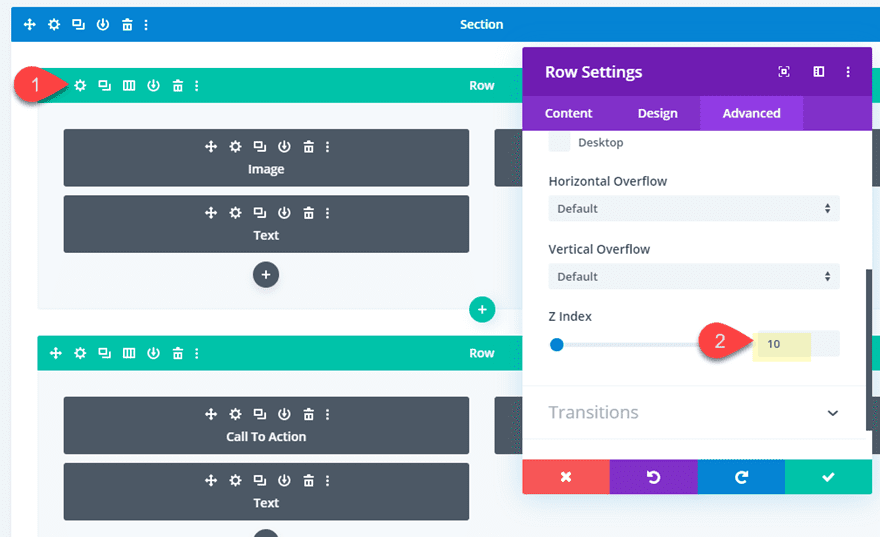
Subsequent use multiselect to make a choice the second one and 3rd row. Then open the component settings modal and upload the next z index on hover to each rows.
Z Index: 11 (hover)
That’s it. Let’s take a look at the general consequence.
Ultimate Outcome
The rationale this works is as a result of techniqually every tab (textual content module) is part of every row even supposing they’re situated above and out of doors of the row. This is why soaring over a tab will show the row it’s contained in.
And this is the way it appears on cell.

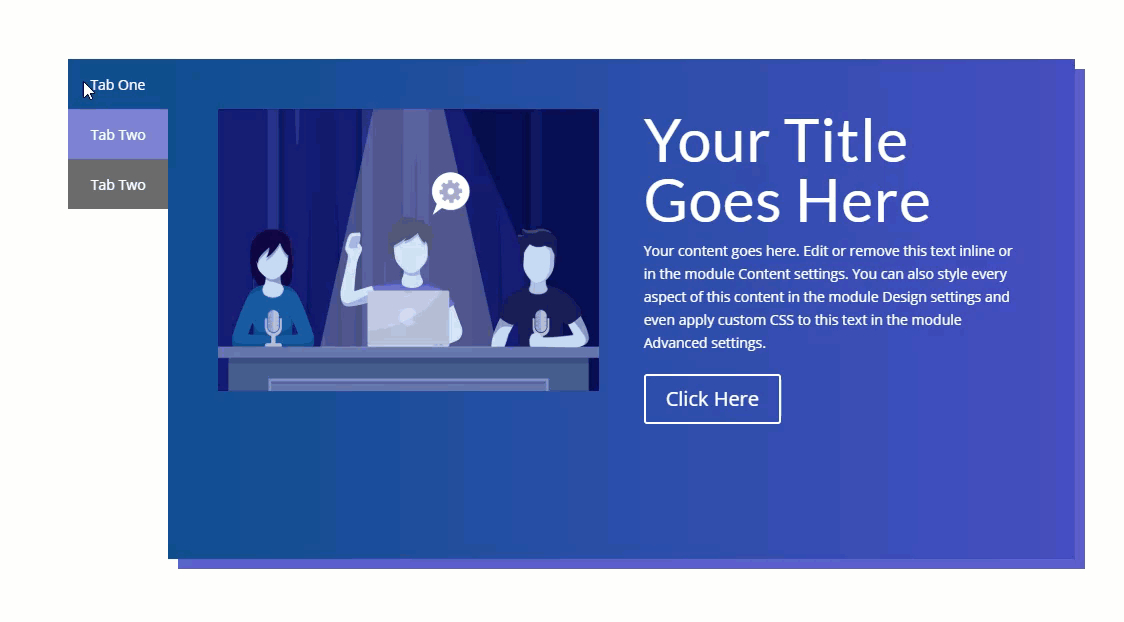
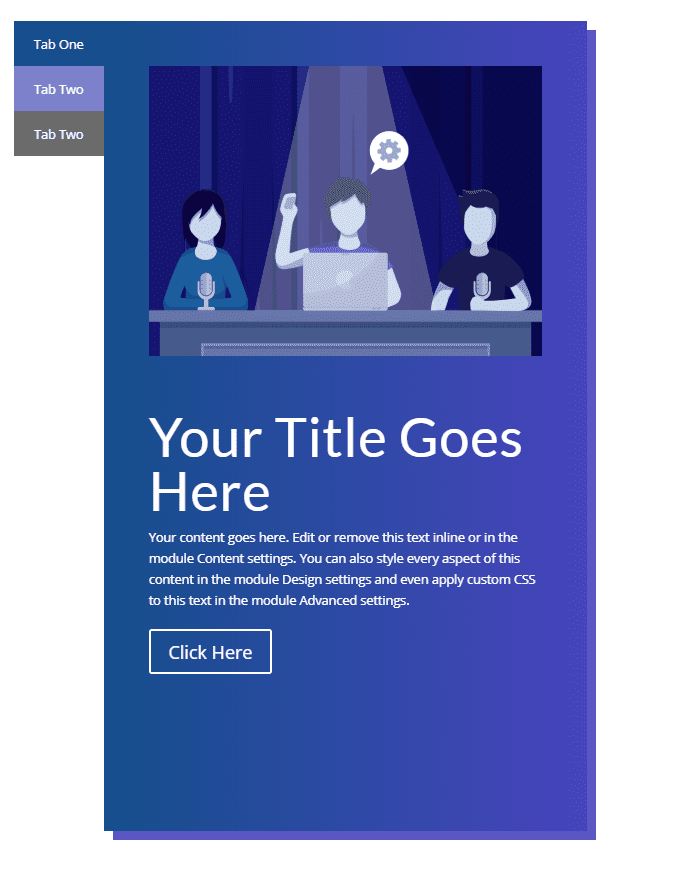
Growing Vertical Hover Tabs
If you wish to upload vertical tabs to the rows, all you in point of fact want to do is reposition the textual content modules used to create every tab. We will be able to additionally want to tweak the dimensions of our rows and phase spacing to make room for the tabs.
Right here’s what to do.
Pass forward and copy the phase containing the hover tabs we simply constructed so you’ve got a brand new design to paintings with.
Then open the phase settings and replace the next:
Padding: 10% left, 10% proper

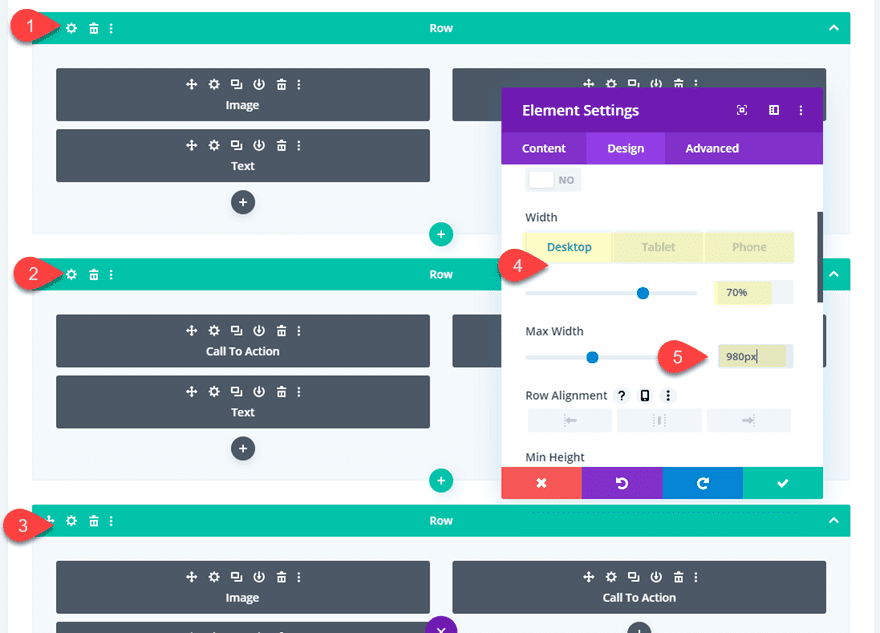
Then use multiselect to make a choice all 3 rows and replace the component settings with the next:
Width: 70% (desktop), 70% (pill), 80% (telephone)
Max-Width: 980px
Then replace the gradient Route to 90deg for all 3 blurbs in order that after we place the tabs at the left, the left gradient coloration will mix with the tab background coloration.
Gradient Route: 90deg

Now it’s time to place our textual content module tabs to the left of our rows to get the vertical tabs we wish.
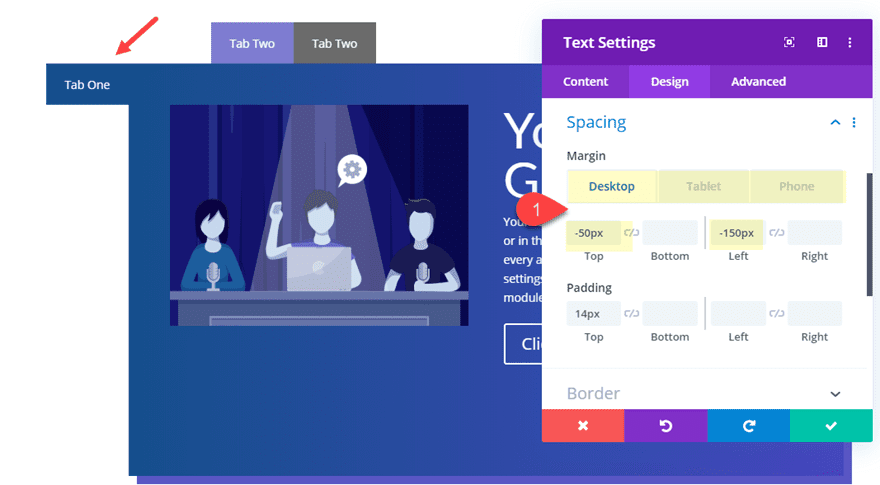
Open the textual content module tab atmosphere within the first row and replace the next:
Margin (desktop): -50px peak, -150px left
Margin (telephone): -100px peak, -50px left
The margin atmosphere for telephone is to deliver the tab again above the row for a horizontal tab show.
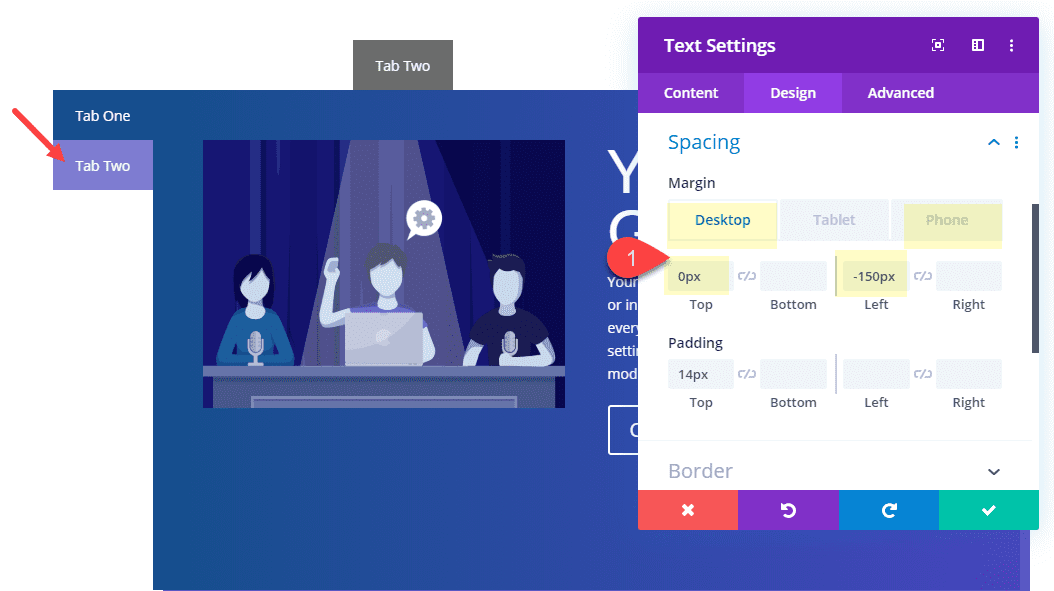
Subsequent, open the settings for the textual content module tab within the phase row and replace the next:
Margin (desktop): 0px peak, -150px left
Margin (telephone): -100px peak, 50px left
And for the general tab within the 3rd row, replace the next:
Margin (desktop): 50px peak, -150px left
Margin (telephone): -100px peak, 150px left

Ultimate Outcome
Now let’s take a look at the general consequence.
And right here it’s one pill and speak to.

Ultimate Ideas
With a little bit inventive pondering and the facility of Divi, you’ll be able to create some lovely cool customized hover tabs the usage of Divi rows. There are a couple of obstacles to what you’ll be able to show. For instance, with this setup all the rows should be the similar peak because the phase. However, for now not wanting to make use of a plugin, I feel it is a nice answer. And don’t put out of your mind, since you’ll be able to use Divi rows to your content material, there are a ton of the way you’ll be able to use those hover tabs to your subsequent venture.
I look ahead to listening to from you within the feedback.
Cheers!
The publish How to Convert Divi Rows into Horizontal and Vertical Hover Tabs seemed first on Elegant Themes Blog.
WordPress Web Design